Adobe Photoshop CS4 for Photographers phần 10 pot
Bạn đang xem bản rút gọn của tài liệu. Xem và tải ngay bản đầy đủ của tài liệu tại đây (4.63 MB, 66 trang )
613
Print output
Chapter 13
Photokit Sharpener
A demo version of Photokit Sharpener
is available on the DVD and there is also
a special discount coupon available at
the back of this book which entitles you
to a 10% discount. Photokit Sharpener
provides Photoshop sharpening routines
for capture sharpening, creative sharpening
and output sharpening (inkjet, continuous
tone, halftone and multimedia/Web). The
Camera Raw sharpening sliders are based
on the Photokit Sharpener methods of
capture sharpening, so if you have the
latest version of Photoshop or Lightroom,
you won’t need Photokit Sharpener for the
capture sharpening. If you have Lightroom
2, you will fi nd that the output sharpening
for inkjet printing is actually built-in to the
Lightroom print module. Therefore, if you
don’t have Lightroom 2, you’ll defi nitely
fi nd the Photokit Sharpener output
sharpening routines useful for applying
the exact amount of output sharpening that
is necessary for different types of print
outputs and at different pixel resolutions.
Try out the demo to see how the print
output compares to using no sharpening
or other print sharpening methods.
Judge the print, not the monitor
It is diffi cult, if not impossible, to judge how much you
should sharpen an image for print output by looking at the
monitor. Even if you reduce the viewing size to 50% or
25%, what you see on the screen will bear no resemblance
to the fi nal print output.
The ideal print output sharpening can be calculated
on the basis that at a normal viewing distance, the human
eye resolves detail to around 1/100th of an inch. So if the
image you are editing is going to be printed from a fi le with
a resolution of 300 pixels per inch, the edges in the image
will need a 3 pixel Radius if they are to register as sharp
in print. When an image is viewed on a monitor at 100%,
this kind of sharpening will look too sharp and quite ugly
(because you are viewing the image much closer up than
it will actually be seen in print), but the actual physical
print should appear nice and sharp. So, based on the above
formula, images printed at lower resolutions will require a
smaller pixel radius sharpening and those printed at higher
resolutions will require a higher pixel radius sharpening.
Now, different print processes and media types will require
slight modifi cations to the above rule, but essentially,
output sharpening can be distilled down to a set formula
for each print process/resolution/media type. This was the
basis for the research carried out by Bruce Fraser and Jeff
Schewe when they devised the sharpening routines used for
Photokit Sharpener (see sidebar).
High Pass fi lter edge sharpening technique
The technique described on pages 614–615 shows an
example of just one of the formulas used in the Photokit
Sharpener product for output sharpening. In this case I have
shown Bruce Fraser’s formula for sharpening a typical 300
pixel per inch glossy inkjet print output, so make sure you
have resized the image to the exact print output dimensions
and at a resolution of 300 pixels per inch beforehand. You
will notice that it mainly uses the High Pass fi lter combined
with the Unsharp Mask fi lter to apply the sharpening effect.
Martin Evening
Adobe Photoshop CS4 for Photographers
614
1
The sharpening method described here is designed for sharpening an inkjet print on
glossy paper at 300 ppi. To begin with, make a duplicate copy of the Background layer
and set the layer opacity to 66%, then double-click on the duplicate layer to open the
Layer Style options and get the Blend If sliders to match the settings shown here.
2
Next, apply the Unsharp Mask fi lter to the layer using an Amount of 320, Radius
of 0.6 and Threshold of 4. Then choose Edit
➯
Fade, change the blend mode to
‘Luminosity’ and reduce the opacity to 70%.
1
T
h
e
g
loss
a
nd s
La
y
e
r
615
Print output
Chapter 13
3
Now change the Layer blend mode from ‘Normal’ to ‘Overlay’, go to the Filter
menu and choose Other
➯
High Pass fi lter. Apply a Radius of 2 pixels. Note that the
sharpening layer can be increased or decreased in opacity or easily removed so that
the underlying Background layer remains unaffected by the sharpening steps.
4
Here is a close-up 1:1 view of the sharpened image. Remember, you can’t judge
the sharpening by looking at the monitor, but you should be able to judge the
effectiveness of the technique by how sharp the photograph appears here in print.
Martin Evening
Adobe Photoshop CS4 for Photographers
616
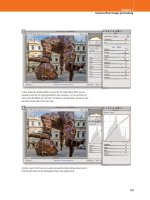
Soft proof before printing
Color management can do a fairly good job of translating
the colors from one space to another but, for all the
precision of measured targets and profi le conversions, it is
still essentially a dumb process. When it comes to printing,
color management can usually get you close, but it won’t
be able to interpret every single color or make aesthetic
judgements about which colors are important and which are
not, plus some colors you see on the screen simply can’t be
reproduced in print. This is where soft proofi ng can help.
If you use the Custom Proof Condition dialog as described
here, you can simulate pretty accurately on screen how
the print will look when printed. Soft proofi ng shows
you which colors are going to be clipped and also allows
you to see in advance the difference between selecting a
‘Perceptual’ or ‘Relative Colorimetric’ rendering intent. All
you have to do is to select the correct profi le for the printer/
paper combination that you are about to use, choose a
rendering intent and make sure ‘Black Point Compensation’
plus the ‘Simulate Paper Color’ (and by default simulate
black ink) are checked.
1
To begin with I opened the image shown here, went to the Image menu and chose
‘Duplicate ’ to create a duplicate copy image, which is shown here on the left next to
the original on the right. In this screen shot you can see a slight difference between
the color of the sky. This is because I had applied the Customize Proof Condition
shown in Step 2 to the original master image.
Gamut warning
The View menu contains a ‘Gamut Warning’
option that can be used to highlight colors
that are out of gamut. The thing is, you
never know if a highlighted color is just a
little or a lot out of gamut. Gamut warning
is therefore a fairly blunt instrument to work
with, which is why I suggest you use the
soft proofi ng method described here.
Print from the proof settings
The Customize Proof condition is also
important because when it is active and
used to preview an image, the Photoshop
Print dialog can be made to reference the
soft proofed view as the source space. This
means that you can use Customize Proof
Condition to select a CMYK output space
and the Photoshop print dialog will allow
you to make a simulated print using this
proof space.
OriOri
Ori
Ori
gin
gin
gin
gin
al
al
al
al
masmas
mas
mas
terter
ter
ter
upDup
up
up
lic
lic
lic
lic
ate
ate
a
ate
im
im
im
age
age
age
D
617
Print output
Chapter 13
3
I now had a soft proof prediction of how the master fi le would print that could be
viewed alongside a duplicate of the original image. The goal now was to add a Curves
adjustment layer to tweak the tones (using the Luminosity blend mode) and a Hue/
Saturation adjustment to tweak the colors (using the Color blend mode). A few minor
adjustments were enough to get the soft proofed master to match closer to the original.
2
To soft proof the master image I went to the View menu and chose Proof Setup
➯
Custom . Here I selected a profi le of the printer/paper combination that I wished to
simulate, using (in this case) the Relative Colorimetric rendering intent and with the
‘Simulate Paper Color’ option checked in the on-screen display options.
Ori
Ori
Ori
Ori
Or
Ori
Ori
gin
i
gin
gin
gin
gingin
al
l
al
al
al al
al
masmasmas
m
mas
ma
m
ter
ter
terter
er
ter
Dup
Dup
Dup
D
lic
lic
lic
lic
ate
ate
ate
ate
im
im
im
age
a
age
a
e would print that could be
D
Martin Evening
Adobe Photoshop CS4 for Photographers
618
Saving print presets
To help minimize print setup errors, it is
often worth creating print presets. Apply
all your page setup and print settings fi rst,
then pull down the Print Presets menu (see
page 627), choose ‘Save As…’ from the
bottom, and name it appropriately.
Making a print
The print menu items in Photoshop can be accessed via
the File menu and are all fairly straightforward. We
have a Page Setup menu (CSp LSp) for
setting up the printer and paper settings and a Photoshop
application Print menu item (Cp Lp) that takes
you directly to the Photoshop Print dialog.
The
Print One
Copy command (COSp LASp) is
there should you wish to mak
e a print using the current
confi
guration for a particular image, but wish to bypass
the print dialogs – but do heed later warnings about print
settings not always being sticky! Use this with caution.
4
In this fi nal version, you see the corrected, soft proofed master image. When this
corrected version is sent to the printer, the print output should match very closely to
what is seen here on the screen. I recommend the correction adjustment layers be
preserved by grouping them into a layer group. Turn the visibility off before saving
and only switch it back on again when you need to make further prints.
M
4
I
n t
h
c
orre
c
w
hat i
s
prese
r
a
nd o
n
619
Print output
Chapter 13
Page Setup
Let’s start with the Page Setup. The fi rst thing you need
to do is go to the Page Setup dialog (see Figures 13.1 and
13.2) and make sure the right printer is selected (you may
have to do this each time in Mac OS X). Choose a paper
size that matches the paper you are about to print with and
select the right orientation: either portrait or landscape.
Figure 13.2
If you are using Macintosh OS X, go to the File menu and choose
Page Setup . Where it says ‘Format For’ select the printer you want to print to and
then select the paper size and print orientation: Portrait or Landscape.
Figure 13.1
If you are using a PC computer, go to the File menu and choose Page
Setup . In the main Page Setup dialog you will want to click on the Printer button
to select which printer model you want to print to. Click ‘OK’ and this will return you
to the Page Setup dialog again where you can select the paper size, print feed method
and print orientation: Portrait or Landscape.
Scale setting in Page Setup
Although the Mac OS X Page Setup dialog
allows you to adjust the print scale size, I
don’t advise you to do this – either here or
in the Photoshop Print dialog – unless you
absolutely must. It is always much better
to resize the image in Photoshop fi rst and
print using a 100% scale size.
Martin Evening
Adobe Photoshop CS4 for Photographers
620
Ensuring your prints are centered
We would all love Photoshop printing to be simpler, but
unfortunately there are no easy solutions and this is not
necessarily all Adobe’s fault either. The problem is that you
have a multitude of different printer devices out there and,
in addition to this, you have two main types of operating
systems, each of which has their own protocols as to how
the system print dialogs should be organized.
Making sure a print is centered is just one of several
problems that require a little user intervention. If you
center a print in the Photoshop Print dialog, but it does not
print centered, this is probably due to the default margin
settings being uneven. The reason for this is that some
printers require a trailing edge margin that is wider than
all the other margins. But as I have shown below in Figure
13.3, you can overcome this by creating your own custom
paper sizes and margin settings.
Figure 13.3
On Mac OS X, go to the Page Setup menu and choose ‘Manage
Custom Sizes ’ from the Paper Size menu. In the Custom Page Sizes dialog check
the margin width for the bottom trailing edge margin for the selected printer. If you
want your prints to always be centered, all you have to do is to adjust the Top margin
width so that it matches this bottom measurement. Set a Width and Height for the
new paper size and save this as a new paper size setting and add ‘centered’ so you
can easily locate it when using the Page Setup dialog.
621
Print output
Chapter 13
Photoshop Print dialog
When you choose ‘Print ’ from the File menu, Photoshop
takes you to what I prefer to describe as the Photoshop
Print dialog (Figure 13.6), as opposed to the System
Print dialog. This dialog was once known as ‘Print with
Preview’ and since CS3 it has undergone a major overhaul
to provide better settings control and a larger color
managed print preview. We shall start by looking at the
Output settings.
Output settings
To adjust the Output settings, make sure that ‘Output’
is selected from the top menu. The Printer model you
selected in Page Setup should be visible in the Printer
menu and below that you will see a Page Setup button.
You could, if you like, bypass going to Page Setup
and access everything via this Photoshop Print dialog.
Although, if you are using a PC, the Page Setup button
takes you directly to the System Print dialog. This is
because you have already chosen a printer model and the
paper size, and orientation controls will also be available in
the System Print dialogs. Oh boy, see my comments on the
previous page about the operating systems forcing the print
pipelines to be so different and confusing.
When the Center Image box is deselected and the
Show Bounding box is enabled, you can position an image
anywhere you like, by dragging inside the preview area. Or,
you can position the image by entering in measurements for
the Top and Left margins. In the Scaled Print Size section,
if the image overfl ows the currently selected page size,
you can choose ‘Scale to Fit Media’, which automatically
resizes the pixel resolution to fi t the page (the Print
resolution PPI will adjust). You can also enter a specifi c
Scale percentage, or Height and Width for the image, but
as I pointed out on page 619, it is not really a good idea to
resize the image via the Print dialog if you can help it.
On the right, you can select any extra items you wish
to see printed outside the image area. The Calibration Bars
will print an 11-step grayscale wedge on the left and a
smooth gray ramp on the right. If you are printing CMYK
Output options
To apply some of the Output options
mentioned here, you must be using a
PostScript print driver and you should also
allow enough border space surrounding the
print area to print these extra items.
For example, when the ‘Include Vector
Data’ option is unchecked, it will rasterize
the vector layer information, such as type
at the image fi le resolution. However, if
it is checked, it will rasterize the vector
information such as type much crisper at
the full printer resolution, provided that
you are outputting from a PostScript RIP.
Freeform placement on the page
When the bounding box is made visible,
you can drag the box and box handles
to visually arrange the page position and
scale. If a selection is active before you
select Print Options, and Print Selected
Area is checked, the selected area only will
be printed.
16-bit printing
Image data is normally sent to the printer
in 8-bit, but some more recent inkjet
printers such as the Canon ipf5000 are
now enabled for 16-bit printing (providing
you are using the correct plug-in and the
16-Bit Output box is checked). There are
certain types of images that theoretically
may benefi t from 16-bit printing and where
it can avoid the possibility of banding
appearing in print, but I have yet to see
this demonstrated. Let’s just say, if your
printer is enabled for 16-bit printing,
Photoshop now allows you to send the
data in 16-bit.
Martin Evening
Adobe Photoshop CS4 for Photographers
622
Figure 13.5
The Border option will allow you
to add a black border and choose the size.
Figure 13.4
The Bleed option will work in
conjunction with the ‘Corner Crop Marks’ option
and determine how far to position the crop marks
from the edge of the printed image.
Figure 13.6
The Photoshop Print dialog, showing the Output settings mode options.
separations, tint bars can also be printed for each plate
color and the Registration Marks will help a printer align
the separate plates. The Corner and Center Crop Marks
indicate where to trim the image and the Bleed button
(Figure 13.4) determines how much the crop marks are
indented. Checking the Description box prints any text that
was entered in the File ➯ File Info box Description fi eld
and check the Labels box to have the fi le name printed
below the picture. Click on the Background button to
print with a background color other than paper white. For
example, when sending the output to a fi lm writer, you
would choose black as the background color. Click on
the Border button (Figure 13.5) to set the width for a
black border. But be aware that the border width can be
unpredictable. If you set too narrow a width, the border
may print unevenly on one or more sides of the image.
Open Print utility
Send data in
16-bit mode
Background
Border and
Bleed options
Output
settings
mode
Printing
marks
options
Select printerOpen Page Setup
Print size units Scaled print size options
B
B
623
Print output
Chapter 13
Color Management
Now let’s look at the Color Management settings for the
Photoshop Print dialog (Figure 13.8). The source space can
be the document profi le (which in this case was ProPhoto
RGB) and if you click on the Proof button it will default to
using the current CMYK workspace, or can use whatever
Custom Proof Condition you might have set (see page 616).
Next we come to the Color Handling section. If printing
from an RGB image, there are three options. ‘No Color
Management’ should only be used when printing out a
target print to build a print profi le. The ‘Printer Manages
Colors’ option can be used if you want to skip to the
system Print dialog and let the printer driver manage the
color output, but if you want the best print quality, you
should really select the ‘ Photoshop Manages Colors’
option (as shown in Figure 13.7). When this option is
selected you can use the Photoshop Print dialog to manage
the print color pipeline. First of all you will need to mouse
down on the Printer Profi le menu, where you’ll see a long
list of profi les. Here you need to select the printer profi le
that matches the printer/paper you are about to print with.
It used to be the case that canned profi les were frowned
upon as being inferior, but I would say that with the latest
Epson printers at least, the printers they make these days
are extremely consistent in print output and the canned
profi les they supply work very well, so you would be
advised to use their own brand profi les for the papers that
their printers support.
The rendering intent can be set to Perceptual,
Saturation, Relative Colorimetric or Absolute Colorimetric.
For normal RGB printing the choice boils down to the
choice of two settings. ‘Relative Colorimetric’ is the best
setting to use for general printing, as it will preserve most
of the original colors. ‘Perceptual’ is a good option to choose
when printing an image where it is important to preserve
the detail in saturated color areas, when printing an image
that has a lot of deep shadows, or when printing to a
smaller gamut output space, such as a fi ne-art matte paper.
Whichever option you choose, I advise you to leave Black
Accessing canned printer profi les
A set of canned printer profi les should be
installed in your System profi les folder at
the same time as you install the print driver
for your printer. If you can’t fi nd these, try
doing a reinstall, or do a search on the
manufacturer’s website.
Figure 13.7
This shows a close-up view of
the Color Management Photoshop Print dialog
options.
F
i
g
ure 13.7
This shows a close-u
p
view o
f
Martin Evening
Adobe Photoshop CS4 for Photographers
624
Point Compensation switched on, because this maps the
darkest colors from the source space to the destination print
space. Black Point Compensation preserves the darkest
black colors and maximizes the full tonal range of the print
output. The Print dialog preview can be color managed by
checking the ‘Match Print Colors’ option. Admittedly, the
preview could be made a bit bigger, but it does at least give
you some indication of how a photograph will print and
you will notice that as you pick a printer profi le or adjust
the rendering intents, you can preview on screen what the
printed colors will look like. When proofi ng an RGB output
in this way you can also check the ‘Show Paper White’
option to see an even more accurate simulation that takes
into account the paper color of the print media. There is
also a ‘Gamut Warning’ option, but as I pointed out on page
616, this isn’t as useful as using the soft proofi ng method
described earlier to gauge your print output.
Figure 13.8
The Photoshop Print dialog, showing the Color Management options.
Color proofi ng options
Color handling
options
Print using
Proof Setup
Print using
document space
Printer profi le
Rendering
intent options
Black Point
compensation
Proof Setup
options
Color Management mode
625
Print output
Chapter 13
Setting the Proof Setup in the Print dialog
Earlier, in the Soft proof before printing section (see page
616), I described using the soft proof setup to predict how
an RGB photograph might actually print via an inkjet or
when printed in CMYK. If the soft proofi ng is active for a
document window and you check the Proof button in the
Photoshop Print dialog (Figure 13.8), this can become the
new source space to print from (providing you also have
‘Current Custom Setup’ selected in the Proof Setup section
below). You can therefore use a custom CMYK setting in
the Customize Proof Condition dialog and then use this
as the source space when printing to any profi led printer
output. Alternatively, you can check the Proof button in the
Photoshop Print dialog and select ‘Working CMYK’ in the
Proof Setup menu. ‘Simulate Black Ink’ is always checked
by default, but you can also include ‘Simulate Paper Color’
when creating a proof print.
Proof print or aim print?
Using the proof setup, you should be able to produce very
nice targeted CMYK prints, providing you are printing to
a decent paper. You can use high quality photo paper, or
you could use papers that are specially designed for proof
printing. However, if you carry out what is referred to as
‘Photoshop cross-rendered proofi ng’ the prints you produce
can only really be described as ‘aim prints’. These are
not offi cial ‘contract proof’ prints, but even so, they are
accepted by many repro houses as a welcome guide to how
you anticipate the fi nal print image should look.
About the print dialogs
The following dialogs include the Mac and PC instructions
for the Epson 4800 inkjet printer settings. The Epson
interface and main controls will be fairly similar for other
makes of inkjet printers, but not identical. Figure 13.8
shows how I would go about making a print from an RGB
image in Photoshop using one of the Epson 4800 printer
profi les that were automatically loaded when I installed the
Epson 4800 printer driver on my computer.
Managing print expectations
When you use soft proofi ng to simulate
a print output your initial response can
be ‘eek, what happened to the contrast?’
This can be especially true when you also
include ‘Simulate Paper Color’ in a soft
proof setup. If we assume that you are
using a decent monitor and that it has
been properly calibrated, the soft proof
view should still represent an accurate
prediction of the contrast range of an
actual print, compared to the high contrast
range you have become accustomed to
seeing on an LCD monitor. One solution
is to look away as you apply the soft
proof preview so that you don’t notice the
sudden shift in the on-screen appearance
so much.
Overcoming dull whites
When ‘Simulate Paper Color’ is selected,
the whites may appear duller than expected.
This does not mean the proof is wrong,
rather it is the presence of a brighter white
border that leads to the viewer regarding
the result as looking inferior. To get around
this try adding a white border to the outside
image you are about to print. When the
print is done, trim away the outer paper
white border so that the eye does not get
a chance to compare the dull whites of the
print with the brighter white of the printing
paper used.
Martin Evening
Adobe Photoshop CS4 for Photographers
626
1 When you click the Print button in the Photoshop Print dialog, it will take you
to the Mac or PC System Print dialog shown here. How these appear will depend
on the printer and print driver you are using, but even though all the settings may
be arranged differently, you’ll fi nd the following steps show which specifi c settings
you need to confi gure. If using Mac OS X, mouse down on the main print driver
menu (circled, above left) and select ‘Print Settings’. If using a PC, click to select
the printer and then click on the Preferences button (circled) to proceed to the
next step.
he Print button in the Photoshop Print dialog it will take you
System Print dialog settings
Click ‘Print ’ in the Photoshop Print dialog and you will
be taken to either of the System Print dialogs shown here,
where you can confi gure the printer driver settings.
The ‘System Print dialog’ options will vary a lot from
printer to printer. As well as having Mac and PC variations,
you might have a lot of other options available to choose
from and your printer driver may look quite different. If
you are using the Photoshop Print dialog to manage the
colors, there are just two key things to watch out for. You
need to make sure you select the correct media setting
in the print settings and that you have the printer color
management turned off. This will mean selecting ‘No Color
Adjustment’ in the Print Settings or Color Management
sections (don’t pay any attention to any of the other options
you might see such as ‘EPSON Vivid’ or ‘Charts and
Graphs’).
Print quality settings
In the Print settings, a higher print
resolution will produce marginally better-
looking prints, but take longer to print. The
‘High Speed’ option enables the print head
to print in both directions. Some people
prefer to disable this option when making
fi ne quality prints, but with the latest inkjet
printers, the ‘High Speed’ option shouldn’t
give you inferior results.
627
Print output
Chapter 13
2 You will now need to select a media type that matches the paper you are going to
print with. If using Mac OS X, go to the Media Type menu and choose the correct
paper. Likewise, do the same if using the PC driver. Next, you will want to select
a print quality setting that might say ‘Super-duper Photo’ or ‘Max Quality’. Lastly,
look for the Color Settings menu and set this to ‘Off’ (No Color Adjustment). This
is because you do not need to make any further color adjustments. All you have to
do now is click on the Print button at the bottom of the Mac dialog, or click ‘OK’ in
the PC Advanced dialog and wait for your image to print.
3
Once you have established the print settings shown here for a particular printing
setup, it makes sense to save these settings as a preset that can easily be accessed every
time you want to make a print using the same printer and paper combination. It is also
the only way for the settings to remain ‘sticky’ when you wish to access them again.
3
Once you have established the print settings shown here for a particul
Martin Evening
Adobe Photoshop CS4 for Photographers
628
Custom print profi les
As I say, the profi les that are shipped with the latest
inkjet printers, and especially the Epson models, can be
considered reliable enough for professional print quality
work (providing you are using the manufacturer’s branded
papers). If you want to extend the range of papers you can
print with, then you will either have to rely on the profi les
supplied by these paper companies or consider having a
custom printer profi le built for each paper type.
One option is to purchase a complete calibration
kit package such as the X-Rite Eye-One Photo with
Profi leMaker software. The other alternative is to get an
independent color management expert to build a profi le
for you. There are quite a few individuals who are able to
offer these services, such as Andrew Rodney who is based
in the USA (go to: www.digitaldog.net). If you refer to
the back of this book, you’ll see that a compan
y called
colourmanagement.net are also offering a special coupon
to readers that entitles you to a discount on their remote
printer profi ling services.
Remote profi ling is a simple process. All you have to
do is to follow the link to the website, download a test
target similar to the one shown in Figure 13.9 (as well
as the instructions), and follow these instructions closely
when preparing a target print for output. Send the printed
target to the address you are given and you’ll be sent back
an ICC profi le via email. The important points to bear in
mind are that you must not color manage the target image
when printing. The idea is to produce a print in which
the pixel values are sent directly to the printer without
any color management being applied. The patch readings
are then used to build an ICC profi le that represents the
characteristics of a particular paper type on your individual
printer. The Print dialog settings used to produce the target
print should be saved so that the exact same print settings
are used when you then follow the steps outlined on pages
623–624 and pages 626–627.
Figure 13.9
Here is an example of an X-Rite
color target that can be used to build an ICC
color profi le. The target fi le must be opened
in Photoshop without any color conversion
and sent directly to the printer without any
color management; the print dimensions must
remain exact. If it is necessary to resize the ppi
resolution make sure that the Nearest Neighbor
interpolation mode is selected.
629
Output for the Web
Chapter 14
T
here is the well-known saying ‘a picture is
worth a thousand words’, a
nd it is so true –
pictures allow us to communicate visually
with clients, friends and family, in ways that
words alone cannot. T
he Internet is something most of us
use every day and having the means to transmit images
has become extremely important to us.
The most obvious
advantage of sending or displaying images via the Web
is its immediacy. Pictures can be sent around the world
almost instantly and it is quick and easy to prepare an
image to be distributed. The downsides are that, unlike
producing a fi nished print, you have little or no control over
the way the image is viewed, plus there are many other
pitfalls associated with the limitations of some Internet
software. This chapter aims to guide you with suggestions
on how best to output your work online.
Martin Evening
Adobe Photoshop CS4 for Photographers
630
Sending images over the Internet
Let’s look at the ways you can distribute images over the
Web. With the increasing popularity of Broadband, cable
and ADSL connections, you can effectively use any fast
connection to the Internet to transmit and receive large
fi les.
Email attachments
The easiest way to send image fi les is to send them as
attachments via email. Email programs may differ, but
most should let you simply drag a fi le from a folder on
your computer into the body text area of an email. Click
‘Send’ and you’re done – the attached document will
be distributed along with the text message in the email.
It’s relatively easy to do, but not completely fl awless.
For example, there is no reliable way of knowing if the
recipient’s email program can decode an attachment
that has been sent from your email program. If you
communicate using email this way, it is a good idea to
keep the attachments small. As a rule, I tend to keep all
attachments under 1 MB (assuming the recipient also has
a broadband type connection) and I do like to check fi rst
with the recipient, before sending anything bigger, to see
if they mind receiving an attachment bigger than this. The
Internet suffers quite enough already with bandwidth being
consumed by unwanted junk emails. So don’t add to the
problem by sending large, unsolicited attachments. But if it
is OK to send a big fi le, ask the recipient if there is a limit
in place for the size of fi les they can receive in a single
email, because if you exceed this your email will only
bounce back.
As long as you are aware of the parameters and
restrictions of email programs and the possible limitations
of the recipient’s server, email can be an effective way
to transfer smallish documents. Lots of people use email
this way to share photographs. And the advanced email
programs are also capable of displaying image fi le
attachments within the body text area. But remember, this
is by no means a foolproof way to send all images.
Sending multiple images by email
Email programs can accept single or
multiple attachments of any format, but not
as a folder, unless it has been compressed
as an archive fi rst. Aladdin™ Software
make the ubiquitous Stuffi t™ program
which is great for compressing fi les in his
way. It’s available for Mac or Windows and
handles ZIP compression as well as using
its own proprietary format, which uses
lossless compression. A Stuffi t archive
will have a .sit extension, which requires
expansion by Stuffi t (which is incorporated
into the Mac OS), but this can also be
saved as a self-extracting archive. In this
instance, the archive will bear the .sea
extension and either WinZip or Stuffi t can
expand such Mac created archives. If you
are using the latest Mac OS X system, you
can also use the contextual menu to select
the ‘Compress File’ option to quickly create
a ZIP archive on-the-fl y. If the pictures
in the source folder are JPEGs, then you
will probably not notice a big difference
in the fi nal fi le size. But don’t worry, this
compression will not compromise the
quality of the JPEG images any further.
631
Output for the Web
Chapter 14
Uploading to a server
With email you are sending a message that has the image
embedded in it. Another alternative is to upload the image
fi le to a server. You can then send an email that contains
a clickable link that launches the recipient’s web browser
and this will take them directly to a page from where they
can download the fi le, or simply download the fi le directly.
The advantage of this is that the email you send is small,
as it only contains a text link to the server. There is also
less risk of the email being rejected and if the person you
are sending the email to needs to share the image link with
someone else, they only have to forward the message –
they don’t have to forward the entire image attachment all
over again. But fi rst you need to know how to upload to a
server. If you connect to the Internet using a subscription
service, your Internet Service Provider (ISP) will most
likely have provided you with a limited amount of server
space that you can use to host your own website and upload
fi les to. If you don’t have a subscription service or your
ISP doesn’t provide enough adequate server space, then
you can always rent space from a company that maintains a
dedicated server and provides web hosting.
Once you have some server space you’ll most likely
need a dedicated FTP program to upload and manage
the fi les on the server. Figure 14.1 shows how I would
normally go about making an FTP connection to a server
using the Fetch™ program for Macintosh OS X. To avoid
having to re-enter the information each time you connect,
it should be possible to save this information (along with
the password if you wish) as a shortcut so that logging on
to the server becomes almost as easy as opening a folder on
your hard disk. Once the FTP connection window opens,
this is like any other hierarchically structured folder. The
main connection window displays the website documents
and subfolders. In Figure 14.1 you can see how I have
created new subfolders with names like ‘portraits’ and
‘Snaps’. I use these specifi c folders to upload web galleries
and images to so that they do not get mixed up with the
folder structure of the main website. I can then double-click
FTP software for Mac and PC
You will need File Transfer Protocol (FTP)
software to upload documents to the server
space. If using a Macintosh, I recommend
using Fetch™: www.fetchsoftworks.com
If
you are w
orking on a PC, try using
WS_FTP Pro www.ipswitch.com or Flash
FXP™ www.fl ashfxp.com All FTP software
is more or less the same. T
o estab
lish
a connection you need to provide a link
address to connect to the server. Next, you
need to enter your user ID and fi nally your
password. If you are familiar with the steps
required to confi gure your email account,
you should already have the username and
password information to hand. You may
need to enter a subdirectory folder as well,
but if you have trouble confi guring the
connection, speak to your ISP. They are the
best people to help you in these instances.
Macintosh iDisk
Another option available to Macintosh
users is iDisk which is part of the now
superseded Mac.com package, renamed
MobileMe. iDisk is an online server space
that you can use for off-site backup storage
or as a space to place publicly accessible
fi les and folders.
Yousendit.com
In the last year or so, yousendit.com™
has become extremely popular as an FTP
replacement fi le delivery service. All you
have to do is go to the above site address,
create a new user account and use the
website to upload fi les that can be sent to
recipients. The service is free for single fi le
transfers up to 100 MB.
Martin Evening
Adobe Photoshop CS4 for Photographers
632
on a folder such as ‘portraits’ to reveal the subfolder
contents and drag the Internet-ready fi les or folders
across into this window. And that’s it. The time this takes
to accomplish will depend on the size of your fi les and
Internet connection speed. All you have to do is to supply
people with a weblink such as the one in the accompanying
sidebar, so that they can access these fi les. When they click
on the link you give them, the fi le should start to download
automatically to their computer.
In the case of Bridge and Lightroom, you can now
upload Web Galleries directly to a server, without the need
for additional FTP software. When using the Create Gallery
panel in the Bridge Output workspace, you’ll need to enter
the same login information and password as you would to
establish an FTP connection, but you’ll still probably need
FTP software to manage and delete these fi les and folders.
Figure 14.1
The Fetch™ 5.3 FTP software interface, showing how a new server
connection can be made.
Download a sample image fi le
I have uploaded a photograph to my
server which you can access by typing in
the following URL address in your web
browser: www.martinevening.com/portraits/
evening.pdf This image document was
saved as a Photoshop PDF fi
le. Y
ou will
probably be asked if you want to save the
fi le to the desktop. Click ‘Save’ and the fi le
will start to download. The reason I saved
this image as a Photoshop PDF was to
demonstrate the security features that are
available when using this format. To open
the PDF fi le you will need to enter the
password ‘evening’ when prompted.
633
Output for the Web
Chapter 14
File formats for the Web
Now that we have covered the fundamentals of how to
access a server and administer your allocated server space,
let’s look at preparing images to be displayed on the Web,
some of the different fi le formats you can use, and which
are the best ones to choose in any given situation.
JPEG
The JPEG (Joint Photographic Experts Group) format
provides the most dramatic way to compress continuous
tone image fi les. The JPEG format uses what is known as a
lossy compression method. The heavier the compression,
the more the image becomes irreversibly degraded. If you
open a moderately compressed JPEG fi le and examine the
structure of the image at 200%, you will probably notice
that the picture contains a discernible pattern of 8 × 8 pixel
squares, and this mosaic pattern will easily be visible at
a 1:1 pixels view when using the heavier JPEG settings.
JPEG compression is usually more effective if the image
contains soft tonal gradations, as detailed images do not
compress quite so effi ciently and the JPEG artifacts will be
more apparent (see Figure 14.2). The JPEG format is mostly
used for web design work, because a medium to heavy
amount of JPEG compression can make most photographs
small enough to download quickly over the Internet. Image
quality is less of an issue here when the main object is
simply to reduce the download times. To be honest, do you
really want images that anyone and everyone can access on-
line to be of the highest technical quality anyway?
Photoshop compresses images on a scale of 0–12,
where a setting of ‘12’ applies the least amount of
compression and yields the highest image quality, while a
setting of ‘0’ applies the greatest amount of compression
and is therefore the most lossy. When you choose to save as
a JPEG and have the ‘Preview’ option checked in the JPEG
Options dialog (Figure 14.3), you’ll be able to preview the
effects of the JPEG compression in the image document
window as you adjust the ‘Quality’ in the Image Options
section. This shows how the image will look when it is
Figure 14.2
This shows a close-up
view of a JPEG image that was saved at the
‘0’ Quality setting in Photoshop. This clearly
reveals the underlying 8 x 8 pixel mosaic
structure, which is how the JPEG compression
method breaks down the continuous tone pixel
image into large compressed blocks. At the
higher quality settings you will have to look very
hard to even notice any change to the image.
Martin Evening
Adobe Photoshop CS4 for Photographers
634
reopened as a JPEG. The JPEG Options dialog box also
indicates the compressed fi le size in kilobytes.
If you save a master fi le as a JPEG and then decide the
fi le needs further compression, you can safely overwrite
the last saved JPEG using a lower JPEG setting. For as
long as the image is open in Photoshop, all data is held in
Photoshop’s memory and only the version saved on the
disk is degraded, so it is possible to repeat saving in the
JPEG format this way. However, once an image has been
compressed using the JPEG format and reopened, it is not a
good idea to repeatedly resave it as a JPEG again, because
this will only compound the compression that’s already
been applied to the image structure. Having said that, unlike
other programs, the JPEG compressor used in Photoshop
converges, so that after repeated opening and saving using
the same JPEG settings (and without modifying the pixels),
the data loss diminishes with every save, to the point where
there will be little or no further loss.
The JPEG format can primarily be used to send smaller-
sized email attachments and ensure that visitors to your
website don’t have to hang around while the images
download. You can also use the JPEG format to archive
images for faster electronic distribution, or when you
Keeping fi les small
Only one thing matters when you publish
images on the Web and that is to keep
the total fi le size of your pages as small
as possible. The JPEG format is the most
effective way to achieve fi le compression
for continuous tone images, but graphics
that contain fewer distinct blocks of color
should be saved using the GIF format.
Some web servers are case sensitive and
will not recognize capitalized fi le names,
so go to the Photoshop Preferences menu
➯ File Handling and make sure the Use
Lower Case Extensions box is checked.
Figure 14.3
This shows the JPEG Options save dialog box. ‘Baseline (“Standard”)’
is the most universally understood JPEG format option and one that most web
browsers will be able to recognize. ‘Baseline Optimized’ will often yield a slightly
more compressed sized fi le than the standard JPEG format and most (but not all) web
browsers are able to read this correctly. The ‘Progressive’ option creates a JPEG fi le
that will download in an interlaced fashion (the same way you can encode a GIF fi le).
635
Output for the Web
Chapter 14
are forced to save a large fi le to a restricted amount of
disk space. For example, a 10" × 8" RGB fi le at 300 ppi
resolution would normally be about 20 MB in size if saved
as a TIFF. By saving it as a high quality JPEG this same
fi le can be reduced in size to around 1 MB with hardly
any degradation to the image quality. Some purists argue
that JPEG compression should never be used under any
circumstances when saving a photographic image. It is true
that if a TIFF fi le is saved with JPEG fi le compression there
are some rare instances where this can cause problems
when sending the fi le to some older PostScript devices.
Otherwise, the image degradation is barely noticeable at
the higher quality compression settings, even when the
image is viewed on the screen in close-up at actual pixels
viewing, never mind how it will be seen when printed.
Figure 14.4
Here are two JPEG images: both
have the same pixel resolution and both have
been saved using the same JPEG quality setting.
Yet the Sahara desert image will compress to
just 21 kilobytes, while the gas works picture is
over three times bigger at 74 kilobytes. This is
because it contains lots of extra detail. The more
contrasting sharp lines there are in an image, the
larger the fi le size will be after compression. If
you are editing an image that is intended to go
on a web page, you can deliberately apply blur to
some of the less critical portions of an image to
remove distracting detail and thereby reduce the
JPEG size (this is an option in the Save for Web &
Devices dialog, see page 639).
Martin Evening
Adobe Photoshop CS4 for Photographers
636
Figure 14.5
Here we have one image saved six different ways and each method
producing a different fi le size. The opened image measures 500 x 600 pixels and the
uncompressed TIFF fi le size is: 1.8 MB. Below that are the JPEG versions which were
saved using different quality settings. Lastly, a GIF version was saved, which as you
can see, does not offer the most effi cient compression method, and is unsuitable
anyway for saving most kinds of images.
Choosing the right compression type
JPEG compression offers the most effective way to reduce
fi le size, but this is achieved at the expense of throwing
away some of the image data (as was demonstrated in
Figure 14.2). JPEG is therefore known as a lossy format, so
you need to be careful not to apply any more compression
than is necessary. If you refer to Figure 14.5 below, you
can compare the different fi le sizes that were obtained
when saving a 500 x 600 pixel image with different JPEG
settings. As an uncompressed, 8-bit RGB TIFF, this fi le was
1.8 MB in size. When saved using the highest JPEG quality
setting, there was barely any degradation to the image, yet
the JPEG fi le size was just 232 kilobytes, or 12% of its
original fi le size, which is quite a saving! When a medium
(8) JPEG quality setting was used, the fi le size was reduced
further to just 72 kilobytes. This is probably about the right
amount of compression to use when preparing photographs
to go on a website where you wish to strike the right
balance between maintaining decent image quality, yet still
keep the fi les compact in size. The lowest compression
setting squeezed the image down to just 34 kilobytes, but at
this level photographs will appear extremely ‘mushy’ and
the lower quality settings are therefore best avoided.
637
Output for the Web
Chapter 14
TIFF compression for FTP transfer
I mention the TIFF format again here because it is the
standard fi le format used for transferring fi les used for pre-
press work. If you save a layered image as a TIFF using no
image compression with Run Length Encoding (RLE) layer
compression, the uncompressed TIFF format doggedly
records every pixel value and will therefore be large in size.
If you need to speed up the time it takes to transfer TIFF
fi les via the Internet, such as when sending TIFF fi les via
the yousendit.com FTP service, you might want to employ
one of the compression methods described below in Figure
14.6. As you can see, LZW, ZIP or JPEG compression
combined with ZIP layer compression can cut the fi le size
down by half or more. The only downside is that the save
times will be noticeably slower and not all RIPs accept fi les
in a compressed TIFF format.
Lossless and lossy compression
The LZW and ZIP methods of compression
are lossless. They can reduce the fi le size,
but without degrading the image. The JPEG
compression is lossy and you can only use
it when saving TIFF images that have been
converted to 8-bits per channel (although
you can preserve the layers).
Figure 14.6
Here, I took an 8-bit, layered, RGB TIFF image saved with no
compression, which was 57.7 MB in size, and saved it using three different methods
of TIFF compression. The lossless LZW and ZIP compression methods effi ciently
reduced the fi le size to less than half the original size, while the lossy JPEG
compression method had the potential to reduce the TIFF fi le size even further