Adobe Photoshop CS4 for Photographers phần 2 pptx
Bạn đang xem bản rút gọn của tài liệu. Xem và tải ngay bản đầy đủ của tài liệu tại đây (4.54 MB, 71 trang )
45
Photoshop fundamentals
Chapter 1
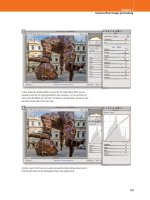
Figure 1.55
I mostly use the healing
brush and clone stamp tools to retouch small
blemishes or to remove sensor dust marks from
photographs. In this example I have shown how
the clone stamp tool can be used to paint detail
from one part of an image onto another. Note
how the retouching is applied to an empty new
layer and the Sample: ‘Current & Below’ layers
option was selected in the Options bar.
Martin Evening
Adobe Photoshop CS4 for Photographers
46
Blending modes
Photoshop image layers can be made to
blend with the layers below them using any
of the 25 different blending modes. Layer
effects/styles allow you to add effects such
as drop shadows, gradient/pattern fi lls or
glows to any layer. Custom styles can be
loaded from and saved to the Styles panel.
Figure 1.56
The above Layers panel shows
the layer contents of a multi-layered Photoshop
image. The diagram on the right shows the image
that this Layers panel view refers to, where the
layers have been pulled apart.
Working with Layers
Photoshop layers allow you to edit an image by building up
the retouching and added bits in multiple layered sections,
such as in the example shown in Figure 1.56. A layer can be
an image element, such as a duplicated background layer, a
copied selection made into a layer, or content that has been
copied from another image. Or, it can be text or a vector
shape layer. Or lastly, these are adjustment layers which are
like image adjustment instructions applied in a layered form.
Layers can be placed together in groups, which makes
the layer organization easier to manage, and you can apply
masking to the contents of a layer with either a pixel layer
mask or a vector mask. You will fi nd plenty of examples
throughout this book where I show you how to work with
layers and layer masks.
47
Photoshop fundamentals
Chapter 1
Figure 1.57
The Actions panel.
Figure 1.58
With Photoshop droplets you can apply a batch action operation by
simply dragging and dropping an image fi le or a folder of images onto a droplet.
Automating Photoshop
Why spend more time than you have to performing
repetitive tasks when Photoshop is able to automate many
of these processes for you? For example, the Actions panel
will let you load and save Photoshop actions, which are
basically recordable Photoshop scripts. In Figure 1.57 you
can see a screen shot of the Actions panel displaying an
expanded view of the Default Actions set. As you can see
from the action descriptions, these will perform automated
tasks such as adding a vignette or creating a wood frame
edge effect. OK, these are not exactly the sort of actions
you would use every day, but if you go to the panel fl y-out
menu and select Load Actions you will be taken to the
Photoshop CS4/Presets/Photoshop Actions folder. Here
you will fi nd lots of useful actions that are worth installing.
If someone sends you a Photoshop action, such as via
email, all you have to do is to double-click it and this will
automatically install the action in the Actions folder and, if
Photoshop is not running at the time, launch the program at
the same time.
To run an action, you will usually need to have a
document already open in Photoshop and then press the
Play button. It is also quite easy to record your own custom
actions and once you get the hang of how to do this you
can progress to using the File
➯ Automate ➯ Batch
function to apply a recorded action to a batch of images,
as well as converting actions into droplets, which are like
self-contained batch action operations (Figure 1.58). In
Chapter 15 I will explain in more detail how to automate
Photoshop using these methods.
Martin Evening
Adobe Photoshop CS4 for Photographers
48
Nudging layers and selections
The keyboard arrow keys can be used to
nudge a layer or selection in 1 pixel (10
pixels with the S key also held down)
increments. A series of
nudg
es count as
a single Photoshop step in history and is
undone with a single undo or step back in
history.
Figure 1.59
The move tool Options bar.
Move tool alignment options
The move tool Options panel now also
integrates the alignment options that were
previously only listed in the Layer menu.
To fi nd out more about layer alignment and
distribution refer to page 472.
Group or layer
There is a menu item in the move tool
Options panel that will allow you to choose
between Group or Layer auto-selection.
When Layer is selected, Photoshop only
auto-selects individual layers. But when
Group is selected, Photoshop will auto-
select whole layer groups.
Move tool
The move tool can perform many functions such as moving
layer contents, directly moving layers from one document
to another, copying layers, applying transforms, plus
selecting and aligning multiple layers. In this respect the
move tool might be more accurately described as a move/
transform/alignment tool. The move tool can also be
activated any time another tool is selected by holding down
the
C L key (except for the slice, slice select, hand, pen
tool or path selection tools).
Holding down the O A
key while the move tool is selected will then let you copy
a layer or selection contents. It is therefore useful to know
that using the
O A key plus C L (the move tool
shortcut) will let you make a copy of a layer or selection
contents when any other tool is selected (apart from those I
just listed). If the Show Transform Controls box is checked
a bounding box will appear around the bounds of the
selected layer and, when you mouse down on the bounding
box handles to transform the layer, the Options bar will
change to display the numeric transform controls
.
Layer selection using the move tool
When the move tool is selected, dragging with the move
tool will move a layer or image selection contents (the
cursor does not have to be centered on the object or
selection, it can be anywhere in the image window).
However, when the Auto-Select Layer option is switched
on, the move tool will auto-select the uppermost layer
containing the most opaque image data below the cursor;
this can be useful when you have a large numbers of image
layers stacked up. The move tool also makes multiple
layer selection possible, because when the move tool is
in the Auto-Select Layer mode you can marquee drag
with the move tool from outside the canvas area to select
multiple layers, the same way as you make a marquee
selection using the mouse cursor to select multiple folders
or documents in the Finder/Explorer (see Figure 1.60). It
49
Photoshop fundamentals
Chapter 1
Figure 1.60
When the move tool is selected and the Auto-Select Layer box
is checked, you can marquee drag with the move tool from outside of the canvas
area inwards to select specifi c multiple layers. If the ‘Auto-Select Layer’ option is
deselected, you can also hold down
C L
to temporarily switch the move tool to
the Auto-Select Layer mode.
Align/Distribute layers
When several layers are linked together,
you can click on the Align and Distribute
buttons in the Options bar as an alternative
to navigating via the Layer
➯ Align Linked
and Distribute Linked menus (see Chapter
9 for more about the Align and Distribute
commands).
Layer selection shortcuts
You can at any time use the COa
LOa shortcut to select all layers.
But note that the mo
ve tool layer selection
method will not select layers that are
locked. So if you use the Auto-Select layer
mode to marquee drag across the image
to make a layer selection, the background
layer will not be included in the selection.
is also worth noting that if you have the move tool selected
and the Auto-Select Layer option is currently unchecked,
holding down
C L will temporarily invert the state of
the move tool to Auto-Select Layer mode.
Where you have many layers that overlap, remember
there is a Contextual mode for the move tool that will
help you target specifi c layers (use
L right mouse-click
to access the Contextual layer menu). Any layer with
an opacity greater than 50% will then show up in the
contextual menu, allowing you to select a specifi c layer
beneath the cursor point with greater precision.
Client: ET Nail Art
Model: Susannah @ Storm
Makeup: Camilla Pascucci
Martin Evening
Adobe Photoshop CS4 for Photographers
50
Zoom tool
Eyedropper
Color sampler
Measure tool
Count tool
Notes tool
Rotate View tool
Hand tool
Figure 1.61
The Info panel showing an
eyedropper color reading, a measurement readout,
plus two color sampler readouts below.
Navigation and information tools
To zoom in on an image you can either click with
the zoom tool to magnify or drag with the zoom tool,
marqueeing the area you wish to inspect in close-up. This
combines a zoom and scroll function in one (in Normal
mode, a plus icon appears inside the magnifying glass
icon). To zoom out, hold down the O A key and click
(the plus sign is replaced with a minus sign).
Y
ou can also
zoom in by holding down the Spacebar + C key (Mac) or
Spacebar + L key (PC). This keyboard shortcut calls up
the zoom tool and you can then click to zoom in.
Y
ou can
also zoom out by holding down the Spacebar + O key
(Mac) or Spacebar + A key (PC). This keyboard shortcut
calls up the zoom tool in zoom out mode and you can then
click to zoom out. Note that these shortcuts cannot be used
if the type tool is selected.
When you are viewing an image in close-up, you can
select the hand tool from the Tools panel or Application
bar and drag to scroll the image on the screen, plus you
can also hold down the Spacebar at any time to temporarily
access the hand tool (except when the type tool is selected).
The hand and zoom tools also have another navigational
function. You can double-click the hand tool icon in the
Tools panel to make an image fi t to screen and double-click
the zoom tool icon to magnify an image to 100%.
The eyedropper tool can be used to measure pixel
values directly from a Photoshop document – these values
will be displayed in the Info panel, as shown in Figure
1.61. The color sampler tools can be used to place up
to four color samplers in an image to provide persistent
readouts of the pixel values. This is useful for those times
when you need to closely monitor the pixel values as you
make adjustments to an image. The measure tool can be
used to measure distance and angles in an image and, again,
this data is displayed in the Info panel. The count tool is
only available in the extended version and is perhaps more
useful to those working in areas like medical research,
where you can use the count tool to count the number of
cells in a microscope image.
Zoom resize shortcuts
As well as double-clicking the tools panel
icons (as described in the main text), you
will also fi nd some button options in the
hand and zoom tool Options bar. These
buttons will let you resize the image screen
display to: Actual Pixels, Fit Screen, Fill
Screen and Print Size.
Eyedropper sampling
The eyedropper tool options now allow
you to sample colors based on the ‘Current
Layer’ or ‘All Layers’.
51
Photoshop fundamentals
Chapter 1
Figure 1.62
If a window document is in OpenGL mode and in a close-up view,
you can hold down the
h
key and click with the mouse to access a bird’s-eye view
of the whole image. You can then drag the rectangle outline shown here to scroll the
image and release to return to a close-up of the image centered around this new view.
More zoom keyboard shortcuts
Traditionally, the CO0 LA0
shortcut can be used to zoom in to a 100%
pixels view and the C0
L0
shortcut is used to zoom out to pro
vide a
fi t to screen zoom view. Photoshop CS4
now also uses the C1 L1
shor
tcut to zoom to 100%. T
his has
been implemented in order to unify the
window document zoom controls across
all of the Creative Suite applications. As a
consequence of this, the channel selection
shortcuts have been shifted along two
numbers.
C2 L2 selects the
composite c
hannel and you now need
to use C3
L3 to select the red
c
hannel, C4
L4 to select the
green channel and so on. T
he Tilde key
has also changed use. Prior to CS4 C ~
L ~ was used to select the composite
color c
hannels (after selecting a red, green
or b
lue channel) but is now used to toggle
between open window documents.
Another handy zoom shortcut is
C+ L+ to zoom in and C-
L- to zoom out (note that the + key
is reall
y the = k
ey and the - key is the
one just to the left of the = k
ey). If your
mouse has a wheel, you can use it with the
O A key held down to zoom in or out.
If
you have OpenGL enab
led you can carry
out a continuous zoom by simply holding
down the zoom tool (and use the O A
k
ey + zoom tool to zoom out). Also
, if you
have a MacBook Air or later MacBook Pro
Laptop, CS4 supports two-fi ngered zoom
gestures such as drawing two fi ngers
together to zoom in and spreading two
fi ngers apart to zoom out.
Flick panning
With OpenGL enabled in the Photoshop Performance
preferences, you can also check the Enable Flick Panning
option in the General preferences (see page 95). When this
option is activated, Photoshop will respond to a fl ick of
the mouse pan gesture by continuing to scroll the image
in the direction you fi rst scrolled, taking into account the
acceleration of the fl ick movement. When you have located
the area of interest just click again with the mouse to stop
the image from scrolling any further.
Bird’s-eye view
Another OpenGL option is the Bird’s-eye view feature.
If you are viewing an image in a close-up view and hold
down the
h key as you click with the mouse and hold, the
image view will swiftly zoom out to fi t to the screen and at
the same time show an outline of the close-up view screen
area (a bit like the way the Navigator panel view works).
With the
h key and mouse key still held down, you can
then click and drag to reposition the close-up view outline,
release the mouse, and the close-up view will recenter to
the newly selected area in the image.
Martin Evening
Adobe Photoshop CS4 for Photographers
52
Figure 1.63
The rotate view tool shown here in action.
Rotate view shortcut
The rotate view tool uses the r keyboard
shortcut, which was previously assigned to
the blur/sharpen/sponge tool set. I reckon
this will be generally accepted as a positive
move, but you can, if desired, use the
Keyboard Shortcuts menu described on
page 24 to reassign the keyboard shortcuts
to whatever scheme you prefer.
Photograph: Eric Richmond
Rotate view tool
If OpenGL is enabled in the Photoshop preferences
(Performance section), you can use the new rotate view
tool to rotate the Photoshop image canvas (as shown below
in Figure 1.63). Having the ability to quickly rotate the
image view can sometimes make it easier to carry out
certain types of retouching work, rather than be forced to
draw or paint at an uncomfortable angle. To use the rotate
view tool, select it from the Tools panel and click and
drag in a window to rotate the image around the center
axis. As you do this, you will see a compass overlay that
indicates the image position relative to the default view
angle (indicated in red), which can be useful when you are
zoomed in close on an image. If you hit
‰ or click on
the Reset
V
iew button in the Options bar, this resets the
view angle to ‘Normal’ again.
53
Photoshop fundamentals
Chapter 1
Figure 1.65
This shows an example of the notes tool in action.
Figure 1.64
The new Notes panel.
g
ure
1
.
64
Th
e new
N
otes pane
l.
Notes tool
The notes tool is handy for adding sticky notes to an open
image in Photoshop. Photoshop CS4 has done away with
open note windows and uses instead a Notes panel (Figure
1.64) to store the recorded note messages. This new method
makes the notes display and management easier to control.
I use this tool quite a lot at work because when a client
calls me to discuss a retouching job, I can open the image,
click on the area that needs to be worked on and use the
Notes panel to type in the instructions for whatever further
retouching needs to be done (usually with the receiver in
one hand and typing with the other!) However, if the client
you are working with has Photoshop, they can use the
notes feature to mark up images, which when opened in
Photoshop can be inspected as shown in Figure 1.65 below.
Martin Evening
Adobe Photoshop CS4 for Photographers
54
Full screen view mode
The Full screen view mode is usually
the best view mode for concentrated
retouching work as it allows full movement
of the image, not limited by the edges of
the document bounds. In other words,
you can scroll the image to have a corner
centered in the screen and edit things
like path points outside the bounds of the
document. Also note that the
f key can
be used to cyc
le betw
een screen modes
and Sf to cycle backwards.
Screen view modes
In Figure 1.66 I have highlighted the screen view mode
options in the Application bar, where you can switch
between the three main screen view modes. The standard
screen view displays the application window the way it
has been shown in all the previous screen shots and allows
you to view the document windows as fl oating windows or
tabbed to the dock area. In Full screen mode, the frontmost
document fi lls the screen, while allowing you to see the
menus and panels. Lastly, the Absolute full screen view
mode displays a full screen view without showing the
menus and panels.
Figure 1.66
This illustration highlights the Screen mode options in the
Application bar and you can see an example here of the three screen view modes in
the Photoshop interface, showing the standard document window view (top), Full
screen view (middle) and the Absolute full screen view (bottom).
Standard screen view
Full screen view
Absolute full screen view
55
Photoshop fundamentals
Chapter 1
Loading presets
If you double-click any Photoshop setting
that is outside the Photoshop folder, it will
automatically load the Photoshop program
and append the preset to the relevant list in
the Preset Manager.
Saving presets as Sets
As you create and add your own custom
preset settings, you can manage these
via the Preset Manager. This means, for
example, that you can select a group of
presets and click on the Save Set button
to save these as a new group of presets.
These can then be recalled, offl oaded and
even swapped to avoid losing items that
have been appended to existing default
sets. The thing to be aware of here is that
tool preset settings can easily get deleted
when you update or reinstall Photoshop.
When you save brush or tool settings, it is
easy to reload these again later.
Figure 1.67
You can use the Photoshop Preset Manager to load custom settings
or replace them with one of the pre-supplied defaults. Presets include: Brushes,
Swatches, Gradients, Styles, Patterns, Contours, Custom Shapes and Tools.
Figure 1.68
Apart from being able to load and replace presets, you are able to
choose how the presets are displayed. In the case of Gradients, it is immensely useful
to be able to see a thumbnail preview alongside the name of the gradient.
Preset Manager
The Preset Manager lets you manage all your presets from
within the one dialog. It keeps track of brushes, swatches,
gradients, styles, patterns, layer effect contours and custom
shapes. For example, Figure 1.67 shows how you can use
the Preset Manager to edit a current set of Custom Shapes.
You can append or replace an existing set of presets via the
Preset Manager options and the Preset Manager can also
be customized to display the preset information in different
ways, such as in Figure 1.68 where I used a Large List to
display thumbnails of the Gradient presets.
Martin Evening
Adobe Photoshop CS4 for Photographers
56
Art history brush
History brush
Figure 1.69
A previous history state can be
selected by clicking on the history state name in
the History panel. When the History panel is set
to its default confi guration, you will notice how
when you go back in history like this, the history
states that appear after the one that is selected
will now appear dimmed. If you have moved
back in history, and then you make further edits
to the image, the history states after the selected
history state will become deleted. However, you
can change this behavior by selecting Allow Non-
linear History in the History panel options (see
history settings pages 57–58).
History
The History feature was introduced in Photoshop 5.0 and
back then it was considered a real breakthrough feature,
because for the fi rst time Photoshop was able to offer
multiple undos during a single Photoshop editing session.
History can play a really important role in the way you use
Photoshop. I thought here would be a good opportunity for
me to describe this feature in more detail and explain how
history can help you use Photoshop more effi ciently.
As you work on an individual image, Photoshop will
record a history of image states as steps which can be
viewed in the History panel (Figure 1.69). If you want
to reverse a step you can still use the conventional Edit
➯ Undo command (Cz Lz), but if you visit the
History panel you can go back as many stages in the edit
process as you have saved history steps. The history steps
can also be saved as Snapshots, which will temporarily
prevent them from ‘slipping off the radar’ and becoming
deleted as more history steps are created. One can therefore
look at the history as a multiple undo feature in which
you can reverse through up to 1000 image states. But it is
actually a far more sophisticated tool than just that. For
example, there is a non-linear history option for multiple
history path recording and a history source column that
allows you to select a history state to sample from when
working with the history brush. Painting from history can
save you from tedious workarounds like having to duplicate
a portion of the image to another layer, retouching this
layer and merging back down to the underlying layer again.
The History panel
The History panel displays the sequence of Photoshop
states recorded during a Photoshop session and its main
purpose is to let you manage and access the history states
recorded by Photoshop. To revert to a previous state, drag
the slider up the list of history states or, alternatively, you
can click directly on a specifi c history state. In Figure 1.69
I carried out a simple one-step undo by clicking on the one
but last history step.
57
Photoshop fundamentals
Chapter 1
Figure 1.70
The number of history states is set via the Performance section of the
Photoshop preferences dialog.
Figure 1.71
The History Options are accessed
via the History panel fl y-out menu. These will
allow you to decide the snapshot settings. I
usually prefer to check the Allow Non-Linear
History option because this enables me to use
the History feature to its full potential (see page
61).
History settings and memory usage
The number of recorded histories can be set in the
Photoshop Performance preferences (Figure 1.70). When
the maximum number of history states has been reached, the
earliest history state at the top of the list will be discarded.
Note that if you reduce the number of history states allowed,
via the preferences, any subsequent action will immediately
cause all earlier states beyond this new limit to be discarded.
To set the options for the History panel, mouse down on
the fl y-out menu and select History Options (Figure 1.71)
I’ll come on to the snapshot settings shortly, but at this
stage you may want to consider enabling non-linear history.
This will allow you to select a previous history state, but
instead of undoing those steps between the earlier state and
the latest, and deleting them, non-linear history will allow
you to shoot off in a new direction and still preserve all
the original history states. ‘ Make Layer Visibility Changes
Undoable’ makes switching layer visibility on or off a
recordable step in history, although this can be annoying
when you are mixing layer visibility on or off with an undo/
redo of the last Photoshop step.
History cleverly makes use of the image tiling to
limit any unnecessary drain on memory usage.
Conventional wisdom would suggest that any multiple
undo feature is bound to tie up vast amounts of scratch
Figure 1.72
This picture shows the
underlying tiled structure of a Photoshop image.
In this example we have a width and height of
fi ve tiles. This is the clue to how history works as
economically as possible. The history stores the
minimum amount of data necessary at each step
in Photoshop’s memory. So if only one or two tile
areas are altered by a Photoshop action, only the
data change for those tiles is recorded.
Martin Evening
Adobe Photoshop CS4 for Photographers
58
disk space to store all the previous image states. However,
proper testing of history indicates that this is not really the
case. It is true that a series of global Photoshop steps may
cause the scratch disk usage to rise, but localized changes
will not. (You can observe this for yourself by monitoring
the scratch disk usage over a number of Photoshop steps.)
This is because every Photoshop image is made up of tiled
sections. When a large image is in the process of redrawing
you may see these tiles rendering across the screen and
Photoshop’s history memorizes the changes that take place
in each tile only. If a brush stroke takes place across two
image tiles, only the changes taking place in those tiles
are updated (Figure 1.72). When a global change takes
place such as a fi lter effect, the whole of the image area is
updated and the scratch disk usage will rise accordingly.
A savvy Photoshop user will want to customize the
History feature to record a reasonable number of histories,
while at the same time being aware of the need to change
this setting if the history usage is likely to place too heavy
a burden on the scratch disk. Figure 1.73 demonstrates
that successive histories need not consume an escalating
amount of memory. After the fi rst adjustment layer,
successive adjustment layers have little impact on the
scratch disk usage (only the screen preview is being
changed). Clone stamp tool cloning and brush work affect
changes in small tiled sections. Only the Flatten Image and
Unsharp Mask fi lter, which are applied at the end, add a
noticeable amount to the scratch disk usage.
Even so, the Purge History command in the Edit
➯
Purge menu provides a useful way to keep the amount of
scratch disk memory used under control. If the picture
you are working with is exceptionally large, then having
more than one undo can be both wasteful and unnecessary,
so you should perhaps consider restricting the number of
recordable history states. On the other hand, if multiple
history undos are well within the scratch disk memory
limits of your system, then make the most of them. And
remember, history is not just there as a mistake correcting
tool – it has great potential for mixing composites from
previous image states.
Figure 1.73
The accompanying table shows
how the scratch disk usage will fl uctuate during
a typical Photoshop session. The opened
image was 95 MB in size and 3 GB of memory
was allocated to Photoshop. The scratch disk
overhead is always quite big at the beginning of
each Photoshop session, but notice how there is
little proportional increase in scratch disk size
with each added history state.
ure 1.73
The accom
p
an
y
in
g
table shows
p
c
c
w
t
T
y
P
i
i
p
u
H
History stages Scratch
disk
Open fi le 461 MB
Levels adjustment 721 MB
16 bit to 8 bit 945 MB
Healing brush 986 MB
Healing brush 998 MB
Healing brush 1010 MB
Marquee selection 982 MB
Feather selection 1011 MB
Inverse selection 1010 MB
Add adjustment layer 1140 MB
Flatten image 1110 MB
Unsharp Mask fi lter 1190 MB
59
Photoshop fundamentals
Chapter 1
Figure 1.74
A previous history state can be
selected as the source for the history brush by
going to the History panel and clicking in the
empty space to the left of the history state you
want to paint from using the history brush.
gure 1.7
4
A previous history state can b
e
Art history brush
The art history brush is something of an
oddity. It is a history brush that allows
you to paint from history but does so via
a brush which distorts the sampled data
and can be used to create impressionist
type painting effects. You can learn more
about this tool from the
Photoshop CS4
for Photographers Help Guide
that can be
installed from the DVD.
History brush
The history brush can be used to paint from a previous
history state. To do this you don’t change the current
history state, but instead you set a source history state for
the history brush by clicking a box in the column next to
the history state you wish to sample from. In Figure 1.74
you can see how I set the Levels history state as the history
source. The small history brush icon indicates which
history state (or snapshot) is currently being used as the
source and I was then able to paint with the history brush
from this previous history state. The history brush therefore
allows you to selectively restore the previously held image
information as desired. In Figure 1.74 I was using the
history brush to paint over the areas where I had applied
the healing brush, in order to restore those parts of the
picture to the Levels adjusted history state.
Use of history versus undo
As you will have seen so far, the History feature is capable
of being a lot more than a repeat Edit
➯ Undo command.
Although the History feature is sometimes described as
a multiple undo, it is important not to confuse Photoshop
History with the role of the Undo command. For example,
there are a number of Photoshop procedures that are
only undoable with the Edit
➯ Undo command – like
intermediate changes made when setting the shadows and
highlights in the Levels dialog. Plus there are things which
can be undone using Edit
➯ Undo that have nothing to
do with the history. For example, if you delete an action
or delete a history, these are also only recoverable using
Edit
➯ Undo. The Undo command is also a toggled action
and this is because the majority of Photoshop users like
to switch quickly back and forth to see a before and after
version of the image. The current combination of Undo
commands and history has been carefully planned to
provide the most fl exible and logical approach. History is
not just an ‘oh I messed up. Let’s go back a few stages’
feature, the way some other programs work; it is a tool
designed to ease the workfl ow and provide you with extra
creative options in Photoshop.
Martin Evening
Adobe Photoshop CS4 for Photographers
60
Figure 1.75
To record a new snapshot, click
on the New Snapshot button at the bottom of the
History panel. This will record a snapshot of
the history at this stage. If you O A-click
the button, there are three options: Full
Document, whic
h stores all layers intact; Merged
Layers, which stores a composite; and Current
Layer, which stores just the currently active layer.
Note that if you have the Show New Snapshot
dialog by Default turned on in the History panel
options the New Snapshot dialog will appear
directly, without you having to O A-click
the Ne
w Snapshot b
utton. The adjacent New
Document button will create a duplicate image of
the active image in its current history state.
Figure 1.76
Photographer Jeff Schewe has had a long standing connection with the Adobe Photoshop program and its development.
The origins of the History feature can perhaps be traced back to a seminar where he used the Globe Hands image shown here to demonstrate
his use of the Snapshot feature in Photoshop 1.5. Jeff was able to save multiple snapshots of different image states in Photoshop and then
selectively paint back from them. This was all way before layers and history were introduced in Photoshop. Chief Photoshop Engineer Mark
Hamburg was suitably impressed by Jeff’s technique, and the ability to paint from snapshots became an important part of the History feature.
Everyone had been crying out for a multiple undo in Photoshop, but when history was fi rst introduced in Photoshop 5.0 it came as quite a
surprise to discover just how much the History feature would allow you to do.
Snapshots
Snapshots are stored above the divider and used to record
the image in its current state so as to prevent this version
of the image from being overwritten (for as long as the
document is open and being edited in Photoshop). The
default settings for the History panel will store a snapshot
of the image in its opened state and you can create further
snapshots by clicking on the Snapshot button at the bottom
of the panel (Figure 1.75). This feature is particularly
useful if you have an image state that you wish to store
temporarily and don’t wish to lose it as you make further
adjustments to the image. There is no real constraint on
the number of snapshots that can be added, and in the
History panel options (Figure 1.71) you can choose to
automatically generate a new snapshot every time you save
the image (which will also be time-stamped). The Create
New Document button (next to the Snapshot button) can be
used to create a duplicate image state in a new document
window, which can then be saved as a separate image.
Create new
document
Create new
snapshot
61
Photoshop fundamentals
Chapter 1
Non-linear history
The non-linear history option lets you branch off in several
directions and experiment with different effects without
needing to add lots of new layers. Non-linear history is not
an easy concept to grasp, so the best way to approach it is
to imagine a series of history states as having more than
one ‘linear’ progression, allowing the user to branch off in
different directions instead of in a single chain of events in
Photoshop (Figure 1.77). You can therefore take an image
down several different routes, while you are working on it
in a Photoshop session, and a history step from one branch
can be blended with a history step from another branch
without having to save duplicate fi les.
Non-linear history requires a little more thinking on
your part in order to monitor and recall image states, but
ultimately makes for a more effi cient use of the available
scratch disk space. Overall, I fi nd it useful to have non-
linear history switched on all the time, regardless of
whether I need to push this feature to its limits or not.
Figure 1.77
The Non-linear history option
allows you to branch off in different directions
and simultaneously maintain a record of each
history path up to the maximum number of
history states that can be allowed. Shown here
are three history states selected from the History
panel: The initial opened image state (A); another
with a Curves adjustment layer (B); and thirdly,
an alternative version where I added a Black
and White adjustment layer followed by a
Curves adjustment layer to add a sepia tone
color effect.
Non-linear history in use
In Chapter 8 you can see a practical
example of how to use this and other
History features in a typical Photoshop
retouching session.
ure 1.77
The Non-linear histor
y
option
A
B
C
Martin Evening
Adobe Photoshop CS4 for Photographers
62
Figure 1.79
When fi les won’t open up
directly in Photoshop the way you expect them
to, then it may be because the header is telling
the computer to open them up in some other
program instead. To force open an image in
Photoshop, drag the fi le icon on top of the
Photoshop application icon or an alias or
shortcut thereof, such as an icon placed in the
dock or on the desktop.
Figure 1.78
The header information in some
fi les may contain information that tells the
operating system to open the image in a program
other than Photoshop. On a Macintosh go to
the File menu and choose File
➯
Get Info and
under the ‘Open with’ item, change the default
application to Photoshop. On a PC you can do
the same thing via the File Registry.
Corrupt fi les
There are various reasons why a fi le may
have become corrupted and refuses to
open. This will often happen to images that
have been sent as attachments and is most
likely due to a break during transmission
somewhere, resulting in missing data.
When fi les won’t open
You can open image fi les up using Bridge (which is
described on pages 72–75), or from anywhere on your
computer. As long as the fi le you are opening is in a
fi le format that Photoshop recognizes, it will open in
Photoshop when you double-click it and, if the program is
not running at the time, this action launches Photoshop too.
However, every document fi le on your computer will
contain a header section, which among other things tells
the computer which application should be used to open it.
For example, Microsoft Word documents will (naturally
enough) default to opening in Microsoft Word. Photoshop
can recognize nearly all types of image documents
regardless of the application they may have originated
from, but sometimes you will see an image fi le with an
icon for another specifi c program, like Macintosh Preview,
or Internet Explorer. If you simply double-click these fi les,
they will open in these respective programs. To get around
this, you can follow the instructions described in Figure
1.78. Alternatively, you can use the File
➯ Open command
from within Photoshop, or you can drag a selected fi le (or
fi les) to the Photoshop program icon or a shortcut/alias
of the program icon (Figure 1.79). In each of these cases
you can override the computer operating system which
normally reads the fi le header to determine which program
the fi le should be opened in. If you use Bridge as the main
interface for opening image fi les in Photoshop, then open
the File Type Association preferences (described in
Chapter 11) to check that the fi le formats for the fi les you
are opening are all set to open via Photoshop.
Yet there are times when even these methods will
fail too and this points to one of two things. Either you
have a corrupt fi le, in which case the damage is most
likely permanent. Or, the fi le extension has been wrongly
changed. It says .psd, but is it really a PSD? Is it possible
that someone has accidentally renamed the fi le with an
incorrect extension? In these situations, the only way to
open it will be to use the Photoshop File
➯ Open command
and navigate to locate the mis-saved image (which should
then be resaved to register it in the correct fi le format).
63
Photoshop fundamentals
Chapter 1
History saves
Alas, it is not possible to save a history of
everything you did to an image, but if you
go to the Photoshop preferences you can
choose to save the history log information
of everything that was done to the image.
This can record a log of everything that
was done during a Photoshop session and
be saved to a central log fi le or saved to
the fi le’s metadata.
The other thing you can do is go to the
Actions panel and click to record an action
of everything that is done to the image.
The major downfall here is that Actions
cannot record everything. For example,
you cannot record brush strokes within an
action.
Version Cue
Version Cue was fi rst introduced as a
component of the original Adobe Creative
Suite and is included when you buy a
complete Creative Suite set of applications.
Version Cue is not installed by default
when you select the easy install option and
must otherwise be installed separately.
Once you have done this you can enable it
by choosing Preferences ➯ File Handling
and select the checkbox next to Enable
Version Cue Workgroup Management. Do
this and you will have a choice between
using the OS Save or the Adobe Save
dialogs. The latter will allow you to make
use of the Version Cue features where
you can share fi les with other users over a
network and prevent others from over-
writing an image fi le that is already open
and in the process of being edited by
another user.
Save often
Do you remember the bit at the end of the movie Stand by
Me where the author shuts down the computer at the end
of writing his book? Every computer literate person in
the theater wanted to shout ‘No, don’t. Save fi rst!’ It goes
without saying that you must always remember to save,
often while working in Photoshop. Thankfully you won’t
come across many crashes when working with the latest
operating systems for Macintosh and PC. But that doesn’t
mean you should relax too much. Saving a fi le is easy to
do, but there are still some pitfalls to be aware of.
Choosing File
➯ Save will always create a safe backup
of your image but, as with everything else you do on a
computer, make sure you are not overwriting the original
with an inferior modifi ed version. There is always the
danger that you might make permanent changes, such as a
drastic reduction in the image size, by accidentally hitting
Save, and lose the original in the process. But before you
close a fi le you can always go back a step or two in the
History panel and resave the image in the state it was in
before it was modifi ed.
When you save an image in Photoshop, you are either
resaving the fi le (which will overwrite the original) or
forced to save a new version using the Photoshop fi le
format. The determining factor will be the type of fi le
format the image was in when you opened it and how it
has been modifi ed in Photoshop. Some of the different fi le
formats are discussed over the next few pages, but the main
thing to be aware of is that some fi le formats will restrict
you from being able to save things like layers, pen paths or
extra channels. If, for example, you open a JPEG format
fi le in Photoshop and modify it by adding a pen path, you
can choose File
➯ Save and overwrite the original without
any problem. But if you open the same fi le and add a layer
or an extra alpha channel, you won’t be able to save it as a
JPEG any more. This is because although a JPEG fi le can
contain pen paths it cannot contain layers or additional
channels, so it has to be saved using a fi le format that is
capable of containing these extra items.
Martin Evening
Adobe Photoshop CS4 for Photographers
64
The ‘save everything’ fi le formats
There are four main fi le formats that can
be used to save everything you might add
to an image such as image layers, type
layers, channels and also support 16-bits
per channel. These are: TIFF, Photoshop
PDF (the large document format) PSB and
lastly the native Photoshop fi le format,
PSD. I mostly favor using the PSD format
when saving master RGB images.
Quick saving
As with all other programs, the keyboard
shortcut for saving a fi le is: Cs
Ls. If you are editing an image that
has never been saved bef
ore or the imag
e
state has changed (so that what started
out as a fl attened JPEG now has layers
added), this action will pop the Save
dialog. Subsequent saves may not show
the save dialog. But if you do wish to
force the Save dialog to appear to save
a copy version, then use:
COs
LAs.
Figure 1.80
If the fi le format you choose to
save in won’t support all the components in the
image, such as layers, then a warning triangle
will alert you to this when you save this
document, and the layers will not be included.
Note that the Mac OS dialog shown here can
be collapsed or expanded by clicking on the
downward pointing disclosure triangle to toggle
the expanded folder view.
I won’t go into lengthy detail about what can and can’t
be saved using each format. But, basically, if you modify
a fi le and the modifi cations can be saved using the same
fi le format that the original started out in, then Photoshop
will have no problem saving and overwriting the original.
If the modifi cations applied to an image mean that it can’t
be saved using the original fi le format then it will default to
using the PSD (Photoshop document) format and save the
image as a new document via the dialog shown in Figure
1.80. You could choose to save such documents using TIFF
or PDF, but in my view PSD is a good format with which
to save any master image, since the PSD format is able to
contain anything that’s been added in Photoshop and also
offers good, lossless fi le compression, which can ultimately
help you save valuable disk space.
Using Save As to save images
Following on from that, if the image you are about to
save has started out as, say, a fl attened JPEG, but now has
layers, this will force the Save As dialog shown in Figure
1.80 to appear as you save. But you can also choose File
➯ Save As any time you wish to save an image using a
different fi le format or, if you want, you can save a layered
65
Photoshop fundamentals
Chapter 1
Smart PSD fi les
Adobe InDesign and Adobe Dreamweaver
will let you share Photoshop format fi les
between these separate applications so
that any changes made to a Photoshop fi le
will automatically be updated in the other
program. This modular approach means
that most Adobe graphics programs are
able to seamlessly integrate with each
other.
Maximum compatibility
Only the Photoshop, PDF, PSB and TIFF
formats are capable of supporting all
the Photoshop features such as vector
masks and image adjustment layers. But
for Photoshop format documents to be
completely compatible with other programs
(especially Photoshop Lightroom), you
must ensure you have ‘Maximize PSD
and PSB Compatibility’ checked in the
Photoshop File Handling preferences. The
reason for this is because Lightroom is
unable to read layered PSD fi les that don’t
include a saved composite saved within
the fi le. If PSD images fail to be imported
into Lightroom, it is most likely because
they were saved with this preference
switched off.
image as a fl attened duplicate. In the Save As dialog you
have access to various save options and in Figure 1.80
I was able to select the JPEG format when saving a
layered, edited image. But as you can see, a warning
triangle will appear to alert you if layers (or other non-
compatible items) can’t be stored when choosing JPEG.
In these circumstances, incompatible features like this are
automatically highlighted and grayed out in the Save As
dialog, and the image is saved as a fl attened version.
File formats
Photoshop supports nearly all the current, well-known
image fi le formats. And for those that are not supported,
you will fi nd that certain specialized fi le format plug-ins
are supplied as extras on the Photoshop application DVD,
which when installed in the Plug-ins folder will allow
you to extend the range of fi le formats that can be chosen
when saving. Your choice of format when saving images
should be mainly determined by what you want to do with
a particular fi le and how important it is to preserve all the
features (such as layers and channels) that may have been
added while editing the image in Photoshop. Some formats
such as PSD and PSB are best suited for archiving master
image fi les, while others, such as TIFF, are ideally suited
for prepress work.
Photoshop native fi le format
The Photoshop fi le format is a universal fi le format and
therefore a logical choice when saving and archiving
your master fi les, since the Photoshop (PSD) format will
recognize and contain all known Photoshop features. But
so too will the TIFF and PDF fi le formats. However, there
are several reasons why I fi nd it preferable to save the
master images using the PSD format. Firstly, it helps me
to distinguish the master, layered fi les from the fl attened
output fi les (which I usually save as TIFFs). But more
importantly, when saving layered images, I fi nd the PSD
format is faster and more effi cient compared to using TIFF.
PSD lossless compression
The native Photoshop format is usually the
most effi cient format to save in because
large areas of contiguous color such as a
white background are recorded using an
LZW type of compression that can make
the fi le size more compact, but without
degrading the image quality.
Martin Evening
Adobe Photoshop CS4 for Photographers
66
TIFF image compression options
An uncompressed TIFF is usually about
the same size as the fi gure you’ll see
displayed in the Image Size dialog box.
But the TIFF format in Photoshop offers
several compression options. LZW is a
lossless compression option, where data
is compacted and the fi le size reduced
without any image detail being lost. Saving
and opening will take longer when LZW
is utilized, so some clients request that
you do not use it. ZIP is another lossless
compression encoding that like LZW is
most effective where you have images
that contain large areas of a single color.
JPEG image compression offers a lossy
method, which can offer even greater levels
of fi le compression. But, again, be warned
that this option can cause problems
downstream with the printer RIP if it is
used when saving output fi les for print.
Save Image Pyramid
The ‘Save Image Pyramid’ option will save
a pyramid structure of scaled-down
versions of the full resolution image. TIFF
pyramid-savvy DTP applications (there
are none I know of yet) will then be able to
display a good quality TIFF preview, but
without having to load the whole fi le.
PSB (Large Document Format)
The PSB fi le format is provided as a special format that can
be used when saving master layered fi les that are in 32-bits
per channel mode and/or when you need to save fi les that
exceed the normal 30,000 × 30,000 pixel dimensions limit
in Photoshop. The PSB format has instead an upper limit of
300,000 × 300,000 pixels. This implies that you can create
huge-sized fi les. But the only photographic application I
can think of where you might need such a large fi le would
be if you were creating a long panoramic image. Even so,
a lot of applications and printer RIPs cannot handle fi les
greater than 2 GB anyway. But there are exceptions, such
as ColorByte’s ImagePrint and Onyx’s PosterShop. For
this reason the 30,000 × 30,000 limit has been retained
for all existing fi le formats in Photoshop, where the TIFF
specifi cation is limited to 4 GB and the native Photoshop
PSD format limit is 2 GB maximum size. You also have to
bear in mind that only Photoshop CS or later is capable of
reading the PSB format.
TIFF (Tagged Image File Format)
The main formats used for publishing work are TIFF
and EPS. Of these, TIFF is the most universally
recognized industry-standard image format, but this
does not necessarily imply that it is better, because
the PDF fi le format is also gaining popularity for DTP
(desktop publishing) work. TIFF fi les can readily be
placed in QuarkXpress, InDesign and any other DTP or
word processing document. The TIFF format is more
open though and, unlike the EPS format, you can make
adjustments within the DTP program as to the way a TIFF
image will appear in print.
Labs and output bureaux generally request that you
save your output images as TIFFs, as this fi le format can be
read by most other imaging computer systems. If you are
distributing a fi le for output as a print or transparency, or
for someone else to continue editing your master fi le, it will
usually be safer to supply the image using the TIFF format.
67
Photoshop fundamentals
Chapter 1
Figure 1.81
This dialog shows the save options that are available when you save
an image as a TIFF.
Pixel order
The Photoshop TIFF format has
traditionally saved the pixel values in an
interleaved order. So if you were saving
an RGB image, the pixel values would be
saved as clusters of RGB values using
the following sequence: RGBRGBRGB.
All TIFF readers are able to interpret this
pixel order. The Per channel pixel order
option will save the pixel values in channel
order, where all the red pixel values are
saved fi rst, followed by the green, then
the blue. So the sequence is more like:
RRRGGGBBB. Using the Per channel order
can provide faster read/write speeds and
better compression. Most third-party TIFF
readers should support Per channel pixel
ordering, but there is a very slim chance
that some TIFF readers won’t.
Byte order
The byte order can be made to match the
computer system platform the fi le is being
read on. But there is no need to worry about
this since I know of no examples where this
can cause compatibility problems.
Layer compression
If there are layers present in the image,
compression options can be applied
separately to the layers. RLE stands for
Run Length Encoding and provides the
same type of lossless compression as
LZW. The ZIP compression is another form
of lossless compression. Or alternatively
you can choose Discard Layers and Save a
Copy, which will save a copy version as a
fl attened TIFF.
TIFFs saved using Photoshop 7.0 or later will support
alpha channels, paths, image transparency and all the extras
that can normally be saved using the native PSD and PDF
formats. Labs or service bureaux that receive TIFF fi les
for direct output will normally request that a TIFF fi le is
fl attened and saved with the alpha channels, and other extra
items removed. For example, earlier versions of Quark
Xpress had a nasty habit of interpreting any path that was
present in the image fi le as a clipping path.
Flattened TIFFs
If an open image contains alpha channels or layers, the
Save dialog in Figure 1.80 will indicate this and you can
keep these items checked when saving as a TIFF. If you
have ‘Ask Before Saving Layered TIFF Files’ switched on
in the File Saving preferences, a further alert dialog will
warn you that Including Layers will increase the fi le size
after clicking OK, the fi rst time you save an image as a
layered TIFF.
Martin Evening
Adobe Photoshop CS4 for Photographers
68
PDF versatility
The PDF format in Photoshop is
particularly useful for sending Photoshop
images to people who don’t have
Photoshop, but do have Adobe Reader™
on their computer. If they have a full
version of Adobe Acrobat they will even
be able to conduct a limited amount of
editing, such as the ability to edit the
contents of a text layer. Photoshop is also
able to import or append annotations
added in Adobe Acrobat.
Photoshop PDF
The PDF (Portable Document Format) is a cross-platform
fi le format that was initially designed to provide an
electronic publishing medium for distributing documents
without requiring the recipient to have a copy of the
program that originated the document. Acrobat enables
others to view documents the way they are meant to be
seen, even though they may not have the exact same fonts
that were used to compile that document. All they need is
the free Adobe Reader program.
Adobe PDF has now gained far wider acceptance as
a reliable and compact method of supplying pages to
printers, due to its color management features and its
ability to embed fonts, and compress images. It is now
becoming the native format for Illustrator and other
desktop publishing programs. But it is also gaining
popularity for saving Photoshop fi les, because it can
preserve everything that a Photoshop (PSD) fi le can. Adobe
Reader™ and its predecessor Acrobat Reader™ are free,
and can easily be downloaded from the Adobe website. But
the full Adobe Acrobat™ program is required if you want
to distill page documents into the PDF format and edit
them on your computer.
But best of all, Acrobat documents are small in size and
can be printed at high resolution. I can create a document
in InDesign and export it as an Acrobat PDF using the
Export command. Anyone who has installed the Adobe
Reader program can open a PDF document I have created
and see the layout just as I intended it to be seen, with the
pictures in full color plus text displayed using the correct
fonts. The Photoshop PDF fi le format can be used to save
all Photoshop features such as Layers, with either JPEG
or lossless ZIP compression and is backwards compatible
in as much as it will save a fl attened composite for
viewing within programs that are unable to fully interpret
the Photoshop CS4 layer information. I have shown and
described all the PDF Save dialog options on pages 70–71.
69
Photoshop fundamentals
Chapter 1
Placing PDF fi les
The Photoshop Parser plug-in enables
Photoshop to import any Adobe Illustrator,
EPS or generic single/multi-page PDF
fi le. Using File ➯ Place, you can select
individual pages or ranges of pages from
a generic PDF fi le, rasterize them and
save to a destination folder. Use File ➯
Place to extract all or individual image/
vector graphic fi les contained within a PDF
document as separate image fi les (see
Figure 1.82 below).
Figure 1.82
If you try to open a generic Acrobat PDF from within Photoshop
by choosing File
➯
Open, or File
➯
Place, you will see the Import PDF or Place
PDF dialog shown here. This will allow you to select individual or multiple pages
or selected images only and open these in Photoshop or place them within a new
Photoshop document.
PDF security
The PDF security options allow you to restrict fi le access
to authorized users only. This means that a password will
have to be entered before an image can be opened in either
Adobe Reader, Acrobat or Photoshop. And you can also
introduce a secondary password for permission to print or
modify the PDF fi le in Acrobat. Note: this level of security
only applies when reading a fi le in a PDF reader program
and you can only password protect the opening of a PDF
fi le in a program like Photoshop. Once opened, it will
then be fully editable. Even so, this is still a useful feature
to have, since PDF security allows you to prevent some
unauthorized, fi rst level access to your images. There are
two security options: 40-bit RC4 for lower-level security
and compatibility with versions 3 and 4 of Acrobat and
128-bit RC4, for higher security using Acrobat versions
5–8. However, because the PDF specifi cation is an open-
source standard, some other PDF readers are able to by
pass these security features and can quite easily open a
password-protected image! So the security features are
not totally infallible, but marginally better than using no
security at all.