Flash CS5 THE MISSING MANUAL phần 2 pot
Bạn đang xem bản rút gọn của tài liệu. Xem và tải ngay bản đầy đủ của tài liệu tại đây (2.14 MB, 71 trang )
67
C : C S D
Creating Original
Artwork
As you drag, the anchor point you create sprouts two control lines, and your
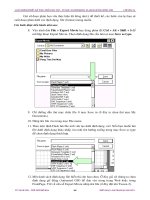
cursor turns into an arrow. As you can see in Figure 2-16, something different
is happening. Flash displays a preview curve and a control line that lets you
adjust the angle of the curve. Drag the end of the control line, and the shape of
the curve changes.
Figure 2-16:
To create a curve using the Pen, click
the stage to begin the curve. Then
move your cursor an inch or so, click
again, and then drag. While you’re
dragging, Flash displays a temporary
line with two small handles. These
control lines don’t show in your
document; you use them to shape
your curve. Drag the handles on
the ends of the control lines. As you
adjust the control lines, the curve
changes shape.
Mouse cursor over
curve control
Anchor point
Curve control line
Curved line preview
Anchor point
Straight line
4. Release the mouse button.
When you let go of the mouse button, Flash draws the curve on the stage. The
control lines disappear when you choose another tool. Using the Pen tool, you
can create both straight lines and curves, as shown in Figure 2-17.
5. Continue drawing connected lines by clicking other points on the stage.
Click, move, and click to draw straight lines. Click, move, and drag to create
curves. Adjust the curves using the handles on the end of the curve control
lines. If you’ve never used tools like these before, don’t worry; you’ll get better
with a little practice.
6. Create a closed loop shape by clicking the first point you created in step 2.
When the cursor is over a point that closes the loop, you see a small circle to the
right of the Pen tool cursor.
68
F CS: T M M
Creating Original
Artwork
Figure 2-17:
Here’s an example of
two finished shapes
drawn with the Pen
tool. The head shape
is made from curves
that create a closed
loop. The fill color
was created with the
Paint Bucket tool, as
described on page 84.
The hat is made of
connected straight lines
with the stroke thick-
ness set to 5 pixels.
Straight lines from pen tool
Pen tool
No fill color
Curved lines from
pen tool
Paint bucket
Fill color from paint
bucket
Tip: If you want to adjust a curve after the fact, choose the Subselection tool and then click an anchor
point adjacent to the curve. The control lines appear, and you can change the shape of the curve by
dragging the control points.
7. Once you feel comfortable drawing straight lines and curved lines, use curves
to create a cartoon head, similar to the one in Figure 2-17. Then use straight
lines to make a hat for your creation.
Drawing curves can be a bit tough until you get the hang of controlling the shape
of the curves as you draw. One of the great things about the Pen tool is that you can
make adjustments after the fact. Here are some tips for working with the Pen tool:
• You can change the path of a line or the shape of an object by moving anchor
points with the Subselection tool (A).
• To change the arc of a curve, click an adjacent anchor point with the Subselec-
tion tool. The anchor point sprouts control lines, and you can adjust the curve
by dragging the points on the end of the control lines.
• Use the Convert Anchor Point tool (C) to turn hard angles into curves and vice
versa.
69
C : C S D
Creating Original
Artwork
• Use the Add Anchor Point tool (=) to—you guessed it—add anchor points to
a line segment. The Delete Anchor Point tool (-) removes anchor points but
leaves a line segment between the remaining anchor points.
Once you get used to the Pen tool’s drawing system, you’ll find that you can draw
very precise shapes. (Plus, all your practice with the Pen tool will pay off if you ever
use Adobe Illustrator or similar programs that use the same Bezier curves to draw
complex shapes.)
Brush tool
You use the Brush tool to create free-form drawings, much like the Pencil tool
described on page 63. The differences between the two include the following:
• You can change the shape and size of the Brush tool. You can choose a brush tip
that’s fat, skinny, round, rectangular, or even slanted.
• The Brush tool creates fills, while the Pencil tool creates strokes. This distinc-
tion becomes important when it comes time to change the color of your
drawings (see page 79).
Note: The Brush tool really shows its stuff when you use it with a graphics tablet, as described in the box
on page 65. That’s because the Brush tool makes great use of the tablet’s ability to sense pressure. Press
hard for thick, bold lines. Lessen the pressure for thin, delicate lines. With practice, you can create great
calligraphic effects.
To use the Brush tool:
1. On the Tools panel, click the Brush tool (the little paintbrush icon).
Flash displays your Brush options—including Brush Mode, Brush Size, and
Brush Shape—in the Options section of the Tools panel. If you have a graphics
tablet, you also see Brush Pressure and Use Tilt buttons.
2. From the Brush Size drop-down menu (Figure 2-18), select the third- or
fourth-smallest brush size.
The larger brushes let you paint great, sweeping strokes on the stage. But in this
example, you’ll be drawing hairs on your fellow’s head, so a modest brush size is
more appropriate. Your cursor changes to reflect your choice (you can see this
change if you mouse over the stage).
Tip: Whenever you make a mistake, or simply want to wipe out the very last thing you did in Flash, Press
Ctrl+Z (c-Z) or select Edit➝Undo.
3. From the Brush Shape drop-down menu, choose the round brush shape.
Each brush shape gives you a dramatically different look. To draw hair, as in
this example, you may choose round because it most closely approximates the
70
F CS: T M M
Creating Original
Artwork
results you get with a real brush. Once again, your cursor changes to reflect your
choice.
Figure 2-18:
The options for controlling the brush size, shape, and mode appear at the bottom
of the Tools panel after you choose the Brush tool. To make a size adjustment,
click the Brush Size button and then select the size you want from the pop-up
menu.
Brush Mode
Brush Size
Brush Shape
Brush Size menu
4. Click the down arrow next to Brush Mode, and then, from the pop-up menu
that appears, choose Paint Normal.
Brush modes change the way the Brush tool paints over or under strokes and
fills already in your drawing. Figure 2-19 shows the different effects. Here you
choose Paint Normal to draw hair that shows over the head shape and the hat.
Later, you’ll see how to tuck that hair under the hat.
Figure 2-19:
Here you get an idea of
how the different brush
modes work. The hair
was brushed into this
picture using the five
different brush modes.
Brush tool
Brush mode button Brush size
Brush shape
71
C : C S D
Creating Original
Artwork
Here’s a rundown of all the brush modes you can choose from:
• Paint Normal. Flash uses this mode unless you tell it otherwise. If you
brush over an existing object on the stage using Paint Normal, your brush
stroke appears on top of the shape.
• Paint Fill. When you brush over an existing object on the stage using Paint
Fill, your brush stroke appears on top of the fill portion of the object, be-
hind the stroke, and on the stage.
• Paint Behind. When you brush over an existing object on the stage using
Paint Behind, your brush stroke always appears behind the object.
• Paint Selection. When you brush over an existing object on the stage using
Paint Selection, your brush stroke appears only on the parts of the shape
that are both fills and that you’ve previously selected.
• Paint Inside. If you brush over an existing object on the stage using Paint
Inside and begin inside the stroke outline, your brush stroke appears only
inside the lines of an object (even if you color outside the lines). If you be-
gin outside the lines, then your brush stroke appears only outside (even if
you try to color inside them).
5. Click the stage just about where your stick person’s hair should be and drag
your mouse upward; release the mouse button when the hair is the length you
want it.
Your paintbrush stroke appears on the stage.
6. Repeat to create additional locks of hair.
You should see a result similar to the one shown in Figure 2-19.
Arranging drawn objects forward and backward
When you draw in object mode, each part of your drawing (the head, the hat, the
hair) is an object, and you can place it in front of or behind the other objects. Imag-
ine that the head, hat, and hair are each cardboard cutouts that you’re placing on
your desktop. You set them down so that the head is at the bottom, the hair cutout
covers the top of the head, and the hat covers part of the hair. Perfect! Flash works
the same way. When you draw objects, Flash places each new object in front of the
last. But what if you don’t draw them in the proper order? Suppose, in the cartoon
face example, that you drew the hair on top of the hat? Flash can help. Follow these
steps to move the hat to the front.
Note: If you don’t have a drawing handy for this exercise, you can download 02-3_Arrange_Objects.fla
from the Missing CD page at www.missingmanual.com/cds.
1. With the Selection tool, click the hat’s outline.
Before you can rearrange the stacking order, you need to select an object to
move.
72
F CS: T M M
Creating Original
Artwork
2. Go to Modify➝Arrange➝Bring to Front or press Shift+Ctrl+up arrow
(Windows) or Option-Shift-up arrow (Mac) to move the hat to the front.
The hat moves in front of both the head shape and the hair, as shown in
Figure 2-20. You can still move the hat, hair, or head around the stage with the
Selection tool. They stay in the same stacking order (head on bottom, hair in
middle, hat on top) until you make another change using the Modify➝Arrange
commands.
Figure 2-20:
Use the Modify➝
Arrange commands to
position parts of your
drawing in front of or
behind other objects.
Here the hat is brought
to the front so that it
partially covers the
head and the hair. You
can find a copy of this
02-3_ Arrange_Objects.
fla on the Missing CD
page (www.missing-
manuals.com/cds).
Hat selected and brought to front
There are four commands that help you arrange the stacking order of the objects
you’ve drawn:
• Bring to Front. Moves the selected object to the very front of the stack.
• Bring Forward. Moves the selected object forward one level in the stack.
• Send to Back. Moves the selected object to the very back of the stack.
• Send Backward. Moves the selected object back one level in the stack.
As an alternative to using menu commands, you can select an object and then
use Ctrl+up arrow or Ctrl+down arrow (c-up arrow or c-down arrow) to move
the selected object forward or backward. Add the Shift key (Shift+Ctrl+up arrow
or Shift+Ctrl+down arrow for PCs; Shift-c-up arrow or Shift-c-down arrow for
Macs) to move all the way to the front or all the way to the back.
Tip: Remember, shapes drawn in merge drawing mode always appear behind objects drawn in object
drawing mode. If you want to rearrange mixed graphics, then you need to use the timeline layers, as
explained in Chapter 4.
73
C : C S D
Creating Original
Artwork
Shape tools: Oval, Rectangle, and PolyStar
Flash gives you a quick way to create basic shapes: the Oval tool, which lets you draw
everything from a narrow cigar shape to a perfect circle; the Rectangle tool, which lets
you draw rectangles, from long and skinny to perfectly square; and the PolyStar tool,
which you can use to create multisided polygons (the standard five-sided polygon,
angled correctly, creates a not-too-horrible side view of a house) and star shapes.
You can see the Oval, Rectangle, and PolyStar tools in Figure 2-21; Figure 2-22 shows
you how to configure the PolyStar tool.
Figure 2-21:
The Oval, Rectangle,
and PolyStar tools are
all tucked under the
same button on the
Tools panel. The icon
and related tooltip for
the last-used shape
appear on the button.
The small triangle in
the lower-right corner
of the button is your
clue that there are
more options. To
see the other shape
options, click and hold
down the button. A
small menu appears
showing all the options.
Shapes button Shapes menu
Figure 2-22:
One of the shape tools is called
PolyStar because it creates
polygons and stars. After choosing
PolyStar on the Tools panel, click
the Options button in the Properties
panel. Then, in the Tool Settings
box, choose either “polygon” or
“star” from the drop-down menu.
Choose star or polygon
Options button opens Tool Settings
74
F CS: T M M
Creating Original
Artwork
Tip: You can always create a circle, a square, or a star using one of the other drawing tools, like the Pencil
or the Line tool. But most people find the shape tools quicker and easier.
Up To Speed
Rectangle and Oval Primitives
Flash has two special shapes: the rectangle and oval primi-
tives. What makes these guys so primitive, and where and
how should you use them? When you draw a rectangle
or an oval using the standard tools, Flash just considers
them shapes. You see one as having corners and the other
curves, but to Flash they’re pretty much the same. When
you draw them in merge mode, you can chop standard
ovals and rectangles into little irregularly shaped pieces.
Primitives are different in that you can’t erase part of a
primitive or break it into parts. It’s all or nothing. Primi-
tives have some special features that you won’t find in their
counterparts. For example, using the Properties panel, you
can add rounded or beveled corners to your rectangle
primitives. With the Oval primitive, you can create pie slices
by defining the arc angles.
And as with the shapes drawn in object mode, you can
adjust the width and height of the objects by typing mea-
surements in the Properties panel. Last but not least, when
they’re in the hands of an ActionScript programmer, these
primitives can really jump through hoops.
Draw a rectangle, and then select it. Look in the Proper-
ties panel. If you drew it in object mode, then the
Properties panel lists it as a drawing object. Otherwise, it
describes it as a shape. Now draw a rectangle using the
Rectangle Primitive tool. Sure enough, the Properties panel
describes it as a rectangle primitive.
To create a shape:
1. Click the shape tool you want (choose from Oval, Rectangle, or PolyStar, as
shown in Figure 2-21).
Your cursor changes into a cross.
2. Click the stage where you want to start your shape, and then drag your cur-
sor to form the shape. When you’re satisfied with the way your shape looks,
release your mouse button.
Flash displays your shape on the stage.
Tip: To create a perfectly round circle or a perfectly square square, simply hold down the Shift key while
you drag to create your shape. If you want to create beveled or rounded corners, then before you release
the mouse button, press the up or down arrow keys.
Aligning Objects with the Align Tools
Sometimes dragging stuff around the stage and eyeballing the result works just fine.
Other times, you want to position your graphic elements with pinpoint precision.
Using the Align panel, you can align graphic elements based on their edges (top, bot-
tom, right, left) or by their centers. And you can base this alignment on the objects
75
C : C S D
Creating Original
Artwork
themselves (for example, you can line up the tops of all your objects) or relative
to the stage (useful if you want to position, say, several Freddy Flash heads precisely
at the bottom of the stage, as shown in Figure 2-23). You can even distribute indi-
vidual objects evenly with respect to one another.
To display the Align panel, select Window➝Align or press Ctrl+K (Windows) or
c-K (Mac).
Figure 2-23:
The Align panel gives you the
opportunity to align a single
object (or whole groups of se-
lected objects) along the left
side, right side, top, or bottom of
the stage, and more. First select
Modify➝Align➝To Stage. Select
the objects you want to align,
and then click the alignment icon
from the Align panel.
Erasing Mistakes with the Eraser Tool
Only in the digital realm does an eraser work so effectively. Try erasing a goof on
paper or canvas, and you not only have shredded eraser everywhere, but you’re also
left with ghostly streaks of paint, lead, or charcoal.
No so in Flash. Using the Eraser tool (Figure 2-24), you can effectively wipe anything
off the stage, from a little speck to your entire drawing.
Figure 2-24:
Here the Eraser tool is rubbing out the PolyStar shape. Erasing in Flash
isn’t useful just for fixing mistakes; you can create cool effects (like pat-
terns) by erasing, too. If you happen to start erasing the wrong thing, no
problem; just press Ctrl+Z (c-Z).
76
F CS: T M M
Creating Original
Artwork
Note: Using the Eraser tool is similar to selecting Edit➝Undo only in the sense that they both remove
objects from your drawing. The difference: Edit➝Undo tells Flash to work sequentially backward to undo
your last actions or changes, the most recent one first. The Eraser tool, on the other hand, lets you wipe
stuff off the stage regardless of the order in which you added it.
To use the Eraser tool:
1. In the Tools section of the Tools panel, click the Eraser tool to select it.
Your cursor changes to the size and shape of eraser Flash assumes you want. To
make your eraser larger or smaller, head to the Options section at the bottom of
the Tools panel and, from the Eraser Shape pop-up menu (Figure 2-25), select
the eraser size and shape you want. (You want a nice fat eraser if you have a lot
to erase, or a skinny one if you’re just touching up the edges of a drawing.)
Figure 2-25:
How your Eraser works
depends on which Eraser
mode you’ve selected.
Here, you see the effects
of each of the modes on
the fills and strokes of
the same shape.
Erase Mode
menu
Erase shape
Erase Mode
button
2. On the stage, click where you want to begin erasing, and drag your cursor
back and forth.
Flash erases everything your cursor touches (or not, depending on the Eraser
mode you’ve chosen—see the following section for details).
Tip: To erase a line or a fill in one fell swoop, click the Faucet option, and then click the line or fill you
want to erase. To erase everything on the stage and the Pasteboard (the area surrounding the stage)
double-click the Eraser icon on the Tools panel.
Configuring the Eraser
Flash has a ton of Eraser modes you can use to control how the Eraser tool works
(and what it erases). To see them, click the Erase Mode button in the Options
area (Figure 2-25), and then, from the fly-out menu that appears, select one of the
following modes.
77
C : C S D
Creating Original
Artwork
Note: The Eraser tool works only on editable objects. It doesn’t work on closed groups or symbols. To
remove grouped objects and symbols, click them with the Selection tool and then press Delete.
• Erase Normal. Flash uses this mode unless you tell it otherwise. When you
erase over an existing object on the stage using Erase Normal, Flash erases
everything, fill and stroke included.
• Erase Fill. When you erase over an existing object on the stage using Erase Fill,
only the fill portion of the object disappears.
• Erase Lines. When you erase over an existing object on the stage using Erase
Lines, only the stroke portion of the object disappears.
• Erase Selected Fills. When you erase over an existing object on the stage using
Erase Selected Fills, you erase only those parts of the object that are both fills
and that you’ve previously selected (using one of the selection tools described
on page 58).
Note: Oddly enough, if you configure your eraser to Erase Selected Fills and then rub your virtual eraser
over non-selected fills, Flash pretends to erase them—until you let up on your mouse, when they pop right
back onto the stage.
• Erase Inside. If you erase over an existing object on the stage using Erase Inside,
Flash erases the inside (fill) of the object as long as you begin erasing inside the
stroke outline; if you begin erasing outside the line, it erases only outside the line.
Cutting out an irregular shape from another object
You can cut an irregular shape out of the middle of an object using the Eraser tool. If
you’re going for precision, for example, then you can use an eraser with a small head
to outline the area you’re erasing and then use the Faucet tool to quickly erase the
rest. For example, say you want to draw a donut. Here’s how:
1. Select the Oval tool on the Tools panel.
If you don’t see the Oval tool, it’s probably hiding under the Rectangle tool or
the PolyStar tool. Notice the little triangle that indicates that there are more
options on the menu? Make sure you choose the Oval tool and not the Oval
Primitive tool. The Oval Primitive tool has a dot in the center.
2. Drag out a decent-sized oval on the stage.
You’re drawing a donut, so there’s no need to make a perfect circle, but do make
it large enough so that you can cut out a donut hole.
3. On the Tools panel, click the Eraser tool.
When you move the cursor over the stage, you see that it’s changed to a black
dot. That’s the Eraser, and the dot cursor shows how big the eraser head is.
78
F CS: T M M
Copying and Pasting
Drawn Objects
4. In the Options section at the bottom of the Tools panel, choose a small eraser
head.
At the bottom of the Tools panel is the drop-down menu that sets the size and
shape of the Eraser.
5. Using the Eraser, draw a circle within your oval to outline the donut hole.
As you drag, the fill color disappears, and you see the stage color beneath. (Make
sure you complete the circle, or the Faucet will erase the entire fill color in your
donut.)
6. On the Tools panel, click the Faucet, and then click the donut hole.
The rest of donut hole disappears as the Faucet tool erases all the fill color from
inside the cutout.
Copying and Pasting Drawn Objects
Copying graphic elements and pasting them—into the same frame, into another
frame, or even into another document—is much faster than drawing new objects
from scratch. It’s also the most familiar. If you’ve ever copied text in a word processing
or spreadsheet document and pasted it somewhere else, then you know the drill.
A simple copy-and-paste is the best way to go when you’re experimenting—for
example, when you want to see whether the blue-eyed wallaby you drew for one
animation looks good in another. But if you’re trying to keep your animation’s fin-
ished file size as small as possible, or if you plan to include more than one copy of
that wallaby, copying and pasting isn’t the best way to go. Instead, you’ll want to look
into symbols (page 240).
To copy and paste an image:
1. On the stage, select the image you want to copy.
Page 58 gives you an overview of the selection tools. In Figure 2-26, Freddy
Flash is selected.
2. Choose Edit➝Copy (or press Ctrl+C in Windows, c-C on the Mac). Then
select the keyframe into which you want to paste the image.
You can paste the image in the keyframe you’re in, or you can select another
one. Flash doesn’t restrict you to the document you currently have open; you
can open another document to paste the image into.
3. Choose one of the Paste commands. Here are your options:
• Edit➝Paste in Center. Tells Flash to paste the image in the center of the
viewing area.
• Edit➝Paste in Place. Tells Flash to paste the image in the same spot it was on
the original stage. (If you choose this option to paste an image to the same stage
as the original, then you need to drag the pasted copy off the original to see it.)
79
C : C S D
Adding Color
Figure 2-26:
Copying and pasting is the easiest way to
try out a look. If you’re copying a complex
image, as shown here, you may want to
group the selected image first by choos-
ing Modify➝Group. (There’s much more
detail on grouping objects on page 181.) For
additional copies, simply choose Edit➝Paste
in Center or Edit➝Paste in Place again.
• Edit➝Paste Special (Windows only). Displays a Paste Special dialog box
that lets you paste an image as a device-independent bitmap (an uneditable
version of your image with a fixed background the size and shape of the
selection box).
Flash pastes your image based on your selection, leaving your original copy intact.
Note: If all you want to do is make a quick copy of an image on the same stage as the original, then
Flash gives you an easier way than copying and pasting. Select Edit➝Duplicate (or press Ctrl+D in
Windows, c-D on the Mac). When you do, Flash pastes a copy of the image just a little below and to the
right of your original image, ready for you to reposition as you see fit. For the fastest duplication method
of all, with the Selection tool, just Alt-drag (Option-drag) the item you want to copy. The original stays put,
and you have a duplicate attached to your cursor. You can then drag the duplicate wherever you want on
the stage.
Adding Color
The Colors section of the Tools panel lets you choose the colors for your
strokes and fills. Before you click one of the drawing icons to begin drawing (or
afterward, to change existing colors), you can click either of the Stroke or Fill
icons in the Colors section to bring up a color palette, as shown in Figure 2-27.
Choose a color from the color palette, and Flash applies that color to the objects
you draw.
80
F CS: T M M
Adding Color
Figure 2-27:
Before you begin drawing with the Pen or Pencil
tools (both of which let you create strokes), you
can choose the color of the Pen or Pencil by
clicking the Stroke Color icon and then selecting
a color from the palette that appears. If you want
to change that color when you use the Brush tool
(which creates fills), then you need to click the Fill
Color icon (and select a color) before you click
the Brush tool and begin to draw.
Stroke color
Fill color
Changing the Color of a Stroke (Line)
One of the best things about drawing in Flash is how easy it is to change things
around. If you draw a bright orange line using the Pencil tool, for example, you can
change that line an instant later to spruce, chartreuse, or puce (and then back to
orange again) with just a few simple mouse clicks.
Note: In Flash, all lines are made up of strokes. The Flash drawing tools that produce strokes include the
Pencil, the Pen, the Line, and the shape tools (Oval, Rectangle, and PolyStar).
Flash gives you two different ways to change the color of a stroke: the Properties
panel and the Ink Bottle tool.
Coloring strokes with the Properties panel
Changing the color of a stroke using the Properties panel is best for situations when
you want to change the color of a single stroke or when you want to change more
than just the color of a stroke (for example, you want to change stroke thickness or
the color of the fill inside the stroke).
To change the color of a stroke using the Properties panel:
1. On the stage, select the stroke you want to change.
A highlight appears around or on the selected stroke.
81
C : C S D
Adding Color
2. If the Properties panel isn’t open, press Ctrl+F3 (c-F3).
The Properties panel shows settings related to the stroke, as shown in
Figure 2-28.
Figure 2-28:
Using the Properties panel
is a quick and easy way to
change the color of a single
stroke. First, select the stroke
you want to recolor; then, in
the Properties panel, click the
Stroke Color icon. When you
do, the color picker appears,
complete with any custom
color swatches you’ve added
to it (if any). The instant you
choose a color, the color
picker disappears and the
selected stroke changes to the
new color. Here, the Fill Color
icon has a slash through it,
meaning that no fill color is
currently selected.
Properties panel
Stroke selected Stroke color picker
3. In the Properties panel, click the Stroke Color icon.
The color picker appears.
4. Click a new color for your selected stroke.
The color picker disappears, and Flash displays your stroke using the new color
you chose.
Coloring strokes with the Ink Bottle tool
The Ink Bottle tool is great for situations when you want to apply the same color to
a bunch of different strokes in one fell swoop.
To change the color of a stroke (or several strokes) using the Ink Bottle tool:
1. In the Tools panel, click the Ink Bottle or press S.
The Ink Bottle and the Paint Bucket share the same Tools panel button. If the
Ink Bottle isn’t showing, then click and hold the Paint Bucket until you see
82
F CS: T M M
Adding Color
the fly-out menu, as shown in Figure 2-29, and then select the Ink Bottle tool.
Now, as you mouse over the stage, you notice that your cursor looks like a little
ink bottle.
Figure 2-29:
Use the Ink Bottle tool to
change the color strokes. To
change the color of strokes
one by one, you don’t need
to select them first; simply
click them with the Ink Bottle
tool. If you want to change
several strokes at once,
preselect the bunch, and
then click on any one with
the Ink Bottle.
Paint bucket and ink bottle
share same button
Ink bottle
menu
2. In the Properties panel, click the Stroke Color swatch (Figure 2-30).
The color picker appears, and as you mouse over the different colors, you notice
that your cursor looks like a tiny eyedropper.
Figure 2-30:
Clicking the Stroke Color icon displays the color
picker. All of Flash’s color pickers work the
same. Here, you can change not just the hue,
but also the transparency of the color. To do so,
click the number in the Alpha box and type in a
new percentage or drag right or left to “scrub”
in a new value. Numbers from 0%, (completely
transparent) to 100% (completely opaque) are
valid.
Selected color Alpha setting
Scrubber cursor
83
C : C S D
Adding Color
3. Click a color to choose it.
The color picker disappears, and Flash changes the Stroke Color swatch to
match your selection.
4. Click the strokes you want to recolor.
Flash changes the color of the strokes to match the stroke color in the Proper-
ties panel.
Changing the Color of a Fill
If you change your mind about the color of any of the fills you add to the stage, no
problem. Flash gives you several ways to change the color of a fill, including the
Properties panel and the Paint Bucket tool.
Note: The Flash drawing tools that produce fills include the Brush tool and all the shape tools (Oval, Oval
Primitive, Rectangle, Rectangle Primitive, and PolyStar).
Coloring fills with the Properties panel
Using the Properties panel to change the color of a fill is great for situations when
you want to change more than just fill color—for example, you want to change both
the fill color and the color of the stroke outline surrounding the fill.
To change the color of a fill using the Properties panel:
1. On the stage, select the object you want to change.
The selected object is highlighted.
2. If the Properties panel isn’t open, go to Window➝Properties to open it.
The Properties panel, similar to the one in Figure 2-31, appears.
3. In the Properties panel, click the Fill Color icon.
The color picker appears.
4. Click to choose a new color for your selected fill.
As soon as you let go of your mouse, the color picker disappears, and Flash dis-
plays your fill using the color you chose.
Note: To change the color of a bunch of fills quickly, select the fills you want to recolor; then select the Fill
Color icon and choose a new color. When you do, Flash automatically displays all your selected fills using
your new color.
84
F CS: T M M
Adding Color
Figure 2-31:
Select a fill-containing
object (here, the inside of
an oval). In the Properties
panel, click the Fill Color
icon to display the color
picker, and then click to
choose a new color for
your fill. If you don’t see
the exact color you want,
then you can click the
Custom Color icon to blend
your own custom shade.
And while you’re here in
the Properties panel, you
can also change the stroke
outline of the object, if
you like.
Properties panel Custom color picker
Selected
oval
Color picker
Coloring fills with the Paint Bucket tool
The Paint Bucket tool is great for situations when you want to apply the same color
to one or more fills on the stage, either one fill at a time or all at once.
To change the color of a fill using the Paint Bucket tool:
1. In the Tools panel, select the Fill Color icon (Figure 2-32).
The color picker appears, and as you mouse over the different colors, you notice
that your cursor looks like a tiny eyedropper.
2. Click a color to choose it.
The color picker disappears, and Flash redisplays the Fill Color icon using the
color you just selected.
3. On the stage, click the fill(s) you want to recolor.
Flash recolors each fill you click, as shown in Figure 2-33.
85
C : C S D
Adding Color
Figure 2-32:
Click the Fill Color icon to choose
a new color for your fills. As you
move your cursor around the
color picker, you notice that the
Preview window displays the
color your cursor happens to be
over at any given time.
Fill color
Selected fill color
Hexadecimal color number
Figure 2-33:
After you select a new fill color,
apply it to the fills on the stage by
clicking the Paint Bucket and clicking
each fill. If you’re adding a fill for
the first time and you find that Flash
doesn’t add your fill color, make
sure your fill is perfectly enclosed. If
it isn’t—if there’s a gap in the outline
surrounding it—Flash may not be
able to tell where your fill stops and
the stage begins. Fortunately, you
can tell Flash to ignore the gap and
change your fill color as best it can.
To do so, click the Gap Size option.
On the fly-out menu that appears,
turn on the checkbox next to Close
Small (or Medium, or Large) Gaps.
Gap no fill No gap Fill color Gap size menu
Gap size button
Note: If you don’t have a completely closed outline around your fill, Flash might not let you apply a fill color.
To tell Flash to ignore small gaps (or medium or even relatively large gaps) surrounding your fill, in the Options
section of the Tools panel (Figure 2-33), click Gap Size. Then, from the pop-up menu that appears, turn on the
checkbox next to Close Small Gaps, Close Medium Gaps, or Close Large Gaps. Then try to modify your fill
again. (You may also want to consider closing the gap yourself using one of Flash’s drawing tools.)
Animate Your Art
I
n the olden days of animation, artists had to create a drawing for each frame of a
movie by hand. Sure, they had their shortcuts, but since most movie frames click
by at 24 frames per second, that’s a labor-intensive endeavor. To keep costs down,
animation production companies had their best, highest-paid artists draw the most
important images, where major changes took place, and then had lesser talents and
beginners draw the in-between images. Those most important images are known as
keyframes. The in-betweeners are called tweens.
This chapter is your introduction to keyframes and tweens from Flash’s point of
view. In this case, you’re the high-paid artist who gets to create the keyframes, while
your computer does the grunt work of drawing all the tweens. You’ll learn about
two types of tweens—the motion tween and the shape tween. But first, you need to
understand the various types of frames you see in Flash’s timeline.
Note: “Tween” is one of those words that makes you smile—it just sounds funny. It’s even funnier when
you realize that it’s used as both a noun and a verb. Not only can you create a tween, but you can also
tween a drawn object, such as a car. (“I tweened the car to make it drive down the road.”)
Frame-by-Frame Animation
An animation is nothing more than a series of framed images displayed one after the
other to create the illusion of motion. If you want to, you can use Flash to make your
animation the old-fashioned way, by drawing each frame individually. Whether you an-
imate frame by frame or use computer-generated tweens, you need to be able to decode
88
F CS: T M M
Frame-by-Frame
Animation
the timeline symbols to understand how your animation works. Figure 3-1 shows
some of the hieroglyphics you’ll find on the timeline. Here are some more details:
Figure 3-1:
From left to right on this little strip of timeline you see several
frames. Frame 1 is a keyframe with a solid circle. Frame 4 is an
empty keyframe, shown as a hollow circle. The playhead is po-
sitioned at Frame 7, and the entire animation ends at Frame 10.
The rectangles from Frame 11 on are not part of this animation,
even though they’re visible in the timeline.
Keyframe Static frames
Playhead
Not in
animation
Blank keyframe
• Static frames represent a unit of time. If your animation runs at 24 frames per
second, then that unit is one twenty-fourth of a second. You control the timing
in your animation by adding or removing frames. For example, if you want an
image to remain on screen for a longer period of time, then you insert frames
into the timeline. Static frames appear to be empty in the timeline—that is, they
don’t display any special symbol, as keyframes do.
• Keyframes are the important frames—the frames you designate to hold distinct
images. Keyframes mark changes in your animation. For example, if you want
to add text to your animation at a certain point in time, you create a keyframe
in the timeline and then add the text to the stage at that point of the timeline.
On the timeline, keyframes are shown as a solid circle. If there’s no visible con-
tent on the stage, then you see a blank keyframe, as explained next.
• Blank keyframes are keyframes with no visible graphics or text in the frame.
As soon as you add text or graphics to a blank keyframe, it becomes a plain old
keyframe. On the timeline, a blank keyframe is shown as a hollow circle.
• Property keyframes come into play when you create a motion tween, as de-
scribed on page 98. Motion tweens change the appearance of a graphic or movie
clip symbol. Property keyframes are shaped like small diamonds, and they mark
a change to one of the symbol’s properties. On the timeline, the frames devoted
to a motion tween are tinted light blue.
• Frames not in animation. You can’t move the playhead beyond the last frame
in your animation. Beyond that point, you see rectangles that represent frames
not in your animation. If you want to make your animation run longer, you can
add or insert frames, as explained on page 92.
As you work with your animation, you use the playhead to manage time and build
your animation. Drag the playhead to Frame15, and you see the contents of the
stage at that moment in time.
Creating a Frame-by-Frame Animation
Flash lets you animate virtually any visible object you place on the stage. You can
animate cartoon-style drawings, photos, videos, or even text.
89
C : A Y A
Frame-by-Frame
Animation
Follow these steps to see how frame-by-frame animation works:
1. Open a blank Flash document by choosing File➝New and then selecting
ActionScript 3.0 and pressing OK.
You have a spanking new Flash document. As the timeline in Figure 3-2 shows,
Flash starts you out in Layer1, Frame1, because initially, a Flash document has
only one frame, a keyframe at Layer1, Frame1.
Tip: If you don’t see the timeline, then select Window➝Timeline or use the shortcut Ctrl+Alt+T
(Option-c-T).
The red rectangle over Frame1 is the playhead. It marks the current frame—the
one displayed on the stage. When you begin a new document, you can’t move
the playhead until you add more frames, as described in step3.
Figure 3-2:
When you create a new Flash docu-
ment, Flash automatically designates
Frame 1 as a blank keyframe. You
can tell that Frame 1 contains a
blank keyframe by the hollow circle
in Frame 1 and the fact that nothing
appears on the stage when the
playhead is at Frame 1.
Timeline tab Playhead
Frame 1
Up To Speed
To Tween or Not to Tween
The great thing about creating an animation frame by
frame is that it gives you the most control over the fin-
ished product. If you’re looking for a super-realistic effect,
for example, you may not be satisfied with the frames
Flash generates when you tell it to tween (page 98). In-
stead, you may prefer to lovingly handcraft every single
frame, making slight adjustments to lots of different
objects as you go.
Say, for instance, you’re creating an animation showing
an outdoor barbecue. Over the course of your animation,
the sun is going to move across the sky, which is going to
change the way your characters’ shadows appear. Bugs are
going to fly across the scene. When one character opens
his mouth to speak, the other characters aren’t going to
remain static: Their hair is going to ripple in the breeze,
they’re going to start conversations of their own, they’re
going to drop pieces of steak (which the host’s dog is going
to come streaking over to and wolf down). You can’t leave
realistic, director-level details like this to Flash; you’ve got
to create them yourself.
90
F CS: T M M
Frame-by-Frame
Animation
2. Using Flash’s paint and drawing tools, draw an image on the stage.
Figure 3-3 shows an example drawing of a frog with a tempting fly overhead,
but you can use any drawing or shape for this exercise. As soon as you add a
drawing or any visual content to a keyframe, the hollow circle fills in, becoming
a solid circle. The hollow circle marks an empty keyframe (no content). The
solid circle marks a keyframe with content—in other words, there are graphics
displayed on the stage.
Note: If you have an existing image stored on your computer, you can bring it onto the stage. Select
File➝Import➝Import to Stage, and then, in the Import window that appears, type in (or browse to) the
name of the file you want to pull in. When you finish, click Open (Import on a Mac). (Chapter 10 covers
importing files in more detail.)
Figure 3-3:
Flash associates the selected keyframe with all
the images you place on the stage—whether you
draw them directly on the stage using the drawing
and painting tools, drag them from the Library, or
import them from previously created files. Here,
Flash associates the frog-and-fly drawing with the
keyframe in Frame 1.
Keyframe with content Drawings in keyframe
3. In the timeline, click the rectangle under the number 20.
Flash highlights the rectangle, as shown in Figure 3-4. Notice that the playhead
doesn’t move, because at this point your animation contains only one frame.
4. Turn the selected frame into a blank keyframe by pressing F7.
Flash moves the playhead to the selected frame (Frame20 in Figure 3-4), inserts
a keyframe icon, and clears the stage.
Tip: In Flash, you often have several ways to do the same thing, and that’s true with inserting frames and
keyframes. You can use the menu: Select Insert➝Timeline and then choose Frame, Keyframe, or Blank
Keyframe. Or you can right-click (Control-click) a frame in the timeline and choose one of the options
from the pop-up menu.
91
C : A Y A
Frame-by-Frame
Animation
Figure 3-4:
When you click a frame in the timeline, Flash
highlights it, as shown in Frame 20. At this
point, the animation consists of a single
frame, and it’s not possible to move the play-
head beyond Frame 1.
Keyframe with content Selected frame
5. Draw a second image on the stage.
The second keyframe in Figure 3-5 shows the frog drawn again, with a thought
balloon instead of a fly. But if your two images are fairly similar, then you can
avoid having to completely redraw the image for your second keyframe, as
you’ll see in the next step.
Figure 3-5:
Here, the playhead is over the
second keyframe, which tells Flash
to place the content on the stage in
the second keyframe (Frame 20).
When it detects a new keyframe,
Flash displays only the new contents,
so Frames 2–19 carry forward the
content from Frame 1 (the first key-
frame). You can verify this behavior
by dragging the playhead from
Frame 20 back to Frame 1.