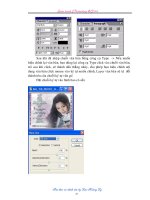
Wile Adobe Creative 5 suite Design Premium aio for dummies phần 3 potx
Bạn đang xem bản rút gọn của tài liệu. Xem và tải ngay bản đầy đủ của tài liệu tại đây (2.05 MB, 93 trang )
Book II
Chapter 5
Understanding
Page Layout
161
Merging Text and Graphics
Figure 5-6:
You can
wrap text
around
images in
InDesign
in several
ways.
(a) No text wrap
(b) Wrap around bounding box
(c) Wrap around object shape
(d) Jump object
(e) Jump to next column
✦ Top Offset: Enter a value for the top offset modifier to offset the text
wrapping around the object.
✦ Jump Object: Make the text wrapping around the image jump from
above the image to below it, with no text wrapping to the left or right of
the object in the column.
✦ Jump to Next Column: Make text end above the image and then jump to
the next column. No text is wrapped to the left or right of the image.
✦ Offset: Enter offset values for text wrapping on all sides of the object.
To add text wrapping to an object (a drawing or an image), follow these
steps:
1. Create a text frame on the page.
Add text to the text frame by typing text, pasting text from elsewhere, or
filling the frame with placeholder text. This text wraps around the image,
so make sure that the text frame is slightly larger than the graphic frame
you’ll use.
18_607466-bk02ch05.indd 16118_607466-bk02ch05.indd 161 5/24/10 11:47 PM5/24/10 11:47 PM
162
Merging Text and Graphics
2. Use the Selection tool to select a graphic frame on the page and move
it over the text frame.
Bounding box handles appear around the edges of the image or graphic.
3. Choose Window➪Text Wrap to open the Text Wrap panel.
The Text Wrap panel opens.
4. With the graphic frame still selected, click the Wrap around Object
Shape button.
The text wraps around the image instead of hiding behind it.
5. If you’re working with an image that has a transparent background,
choose Detect Edges or Alpha Channel from the Contour Options
drop-down list.
The text wraps around the edges of the image — refer to the (c) Wrap
around Object Shape example in Figure 5-6.
Modifying a text wrap
If you’ve applied a text wrap around an object (as we show you how to do in
the preceding section), you can then modify that text wrap. If you have an
image with a transparent background around which you’ve wrapped text,
InDesign created a path around the edge of the image; if you have a shape
you created with the drawing tools, InDesign automatically uses those paths
to wrap text around.
Before proceeding with the following steps, be sure that the object uses
the Wrap around Object Shape text wrap. (If not, open the Text Wrap panel
and click the Wrap around Object Shape button to apply text wrapping.)
Remember to choose Detect Edges if you’re using an image with a transpar-
ent background.
To modify the path around an image with text wrapping, using the Direct
Selection tool, follow these steps:
1. Select the object by using the Direct Selection tool.
The image is selected and you can see the path around the object.
2. Drag one of the anchor points on the path by using the Direct
Selection tool.
The path is modified according to how you move the point. (For more
about manipulating paths, take a look at Chapter 4 of this minibook.)
The text wrapping immediately changes, based on the modifications you
make to the path around the object.
18_607466-bk02ch05.indd 16218_607466-bk02ch05.indd 162 5/24/10 11:47 PM5/24/10 11:47 PM
Book II
Chapter 5
Understanding
Page Layout
163
Working with Pages and the Pages Panel
3. Select the Delete Anchor Point tool from the Tools panel and delete
an anchor point.
The path changes again, and the text wrapping modifies around the
object accordingly.
You can also use the Offset values in the Text Wrap panel to determine the
distance between the wrapping text and the edge of the object. Just increase
the values to move the text farther from the object’s edge.
Working with Pages and the Pages Panel
The page is the central part of any publication — it’s where the visible part
of your publication is created. Navigating and controlling pages is a large
part of what you do in InDesign. The Pages panel allows you to select, move,
and navigate pages in a publication. When you use default settings, pages
are created as facing pages, which means that they’re laid out as two-page
spreads. Otherwise, pages are laid out individually. This option is reflected
in, and can be changed in, the Pages panel.
The Pages panel, which you open by choosing Window➪Pages, also lets you
add new pages to the document, duplicate pages, delete a page, or change
the size of a page. The pages panel, shown in Figure 5-7, contains two main
areas: the master pages (upper) section and the (lower) section containing
the document’s pages.
To discover more about master pages and how they differ from regular
pages in your document, see the “Using Master Spreads in Page Layout” sec-
tion, later in this chapter.
Selecting and moving pages
Use the Pages panel to select a page or spread in your publication. Select a
page by clicking the page. If you Ctrl-click (Windows) or Ô-click (Mac) pages,
you can select more than one page at a time. The Pages panel also lets you
move pages to a new position in the document: Select a page in the docu-
ment pages area of the panel and then drag it wherever you want to move
the page. A small line and changed cursor indicate where the page will be
moved. You can move a page so that it’s between two pages in a spread; a
hollow line indicates where you’re moving the page. If you move a page after
a spread, a solid line appears. Release the mouse button to move the page to
the new location.
18_607466-bk02ch05.indd 16318_607466-bk02ch05.indd 163 5/24/10 11:47 PM5/24/10 11:47 PM
164
Working with Pages and the Pages Panel
Figure 5-7:
The Pages
panel
with page
previews.
Master pages
Edit Page Size
Create New Page
Delete Selected PagesDocument
pages
Adding and deleting pages
You can also add new pages to the publication by using the Pages panel. To
add a new page, follow these steps:
1. Choose Window➪Pages to open the Pages panel.
The Pages panel opens.
2. Click the Create New Page button.
A new page is added to the document.
Alt-click (Windows) or Options-click (Mac OS) the Create New Page
button and you can then specify the exact number of pages to add and
the location of these new pages.
3. Select a page in the Pages panel.
The selected page is highlighted in the Pages panel.
4. Click the Create New Page button again.
A new page is added following the selected page.
18_607466-bk02ch05.indd 16418_607466-bk02ch05.indd 164 5/24/10 11:47 PM5/24/10 11:47 PM
Book II
Chapter 5
Understanding
Page Layout
165
Using Master Spreads in Page Layout
To delete a page, select it in the Pages panel and click the Delete Selected
Pages button. The selected page is removed from the document.
You can also add, delete, and move pages and more without the Pages panel
by choosing Layout➪Pages.
Numbering your pages
When you’re working with longer documents, adding page numbers before
you print or export the publication is a good idea. You don’t have to add
them manually: A special InDesign tool lets you number pages automatically.
This tool is particularly useful when you move pages around the document.
You don’t have to keep track of updating the numbering when you make
these kinds of edits.
To number pages, follow these steps:
1. Using the Type tool, create a text frame on the page where you want
the page number to be added.
2. Choose Type➪Insert Special Character➪Markers➪Current Page
Number.
The current page number appears in the text frame you selected. If
you added the page number to a master page, the master pages’ letter
appears in the field instead.
If you want page numbers to appear on all pages in the document, add the
text frame to a master page. Remember that page numbers are added only
to the pages in your document that are associated with that master page. If
you want to add page numbers to the left and right sides of a book or maga-
zine, you need to repeat this process on the left and right sides of the master
pages. Remember that if you add the page only on a document page — and
not on a master — the page number is added to only that single page.
To modify automatic-numbering settings, choose Layout➪Numbering and
Section Options. You can choose to have numbering start from a specific
number or use a different style, such as Roman numerals.
Using Master Spreads in Page Layout
Master pages are a lot like templates you use to format page layouts. The
settings, such as margins and columns, are applied to each layout that the
master page is applied to. If you put a page number on a master page, the
number also appears on every page that uses the layout. You can have more
than one master page in a single publication, and you can choose which
pages use a particular master page.
18_607466-bk02ch05.indd 16518_607466-bk02ch05.indd 165 5/24/10 11:47 PM5/24/10 11:47 PM
166
Using Master Spreads in Page Layout
A master page or spread typically contains parts of a layout that are applied
to many pages. The master page has elements that are used on many pages,
such as page numbering, text frames to enter text into, background images,
or a heading that’s used on every page. You can’t edit the items you have on
a master page on the pages assigned to it — you can edit those items only
on the master page.
Master pages are lettered. The first master page is the A-Master by default.
If you create a second master page, it’s the B-Master by default. When you
create a new publication, the A-Master is applied to all pages you initially
open in the document. You can add pages at the end that don’t have a
master page applied to them.
Creating master pages and applying them to your publication enables you to
create a reusable format for it, which can dramatically speed your workflow
when you put together documents with InDesign.
Creating a master spread
You may need more than one master page or master spread for a document.
You may have another series of pages that need a unique format. In this
situation, you need to create a second master page. You can create a master
page or a master spread from any other page in the publication, or you can
create a new one with the Pages panel.
To create a master page using a page in the publication, do one of the following:
✦ Choose New Master from the Page panel’s menu and then click OK. A
blank master page is created.
✦ Drag a page from the pages section of the panel into the master page
section of the Pages panel. The document page turns into a master page.
If the page you’re trying to drag into the master pages section is part of a
spread, select both pages in the spread before you drag it into the master
pages section. You can drag individual pages into the master page section
only if they’re not part of a spread.
Applying, removing, and deleting master pages
After you create a master page, you can apply it to a page. You can also
remove a page from a master page layout and delete a master page altogether:
✦ To add master page formatting to a page or spread in a publication: In
the Pages panel, drag the master page you want to use from the master
page section on top of the page you want to format in the document
pages section. When you drag the master page on top of the page, it has
a thick outline around it. Release the mouse button when you see this
outline, and the formatting is applied to the page.
18_607466-bk02ch05.indd 16618_607466-bk02ch05.indd 166 5/24/10 11:47 PM5/24/10 11:47 PM
Book II
Chapter 5
Understanding
Page Layout
167
Using Master Spreads in Page Layout
✦ To remove any master page applied to a document page: In the Pages
panel, drag the None page from the master area in the Pages panel to
that document page. You may need to use the scroll bar in the master
pages area of the Pages panel to find the None page.
✦ To delete a master page: In the Pages panel, select the unwanted master
page and then choose Delete Master Spread from the panel menu.
This action permanently deletes the master page — you can’t get it
back — so think carefully before deleting a master page.
Changing individual page sizes
Using the Pages panel, you can change the size of individual pages in a docu-
ment, which is useful if you have one page that folds out and is larger than
others. Or, maybe you want to create a single document that includes a busi-
ness card, an envelope, and a letterhead.
To change the size of individual pages using the Pages panel, follow these
steps:
1. In the Pages panel, click to select the page you want to modify.
2. Click the Edit Page Size button at the bottom of the Pages panel and
select the new size.
3. Repeat the process to adjust the size for any pages you want to
modify.
When you’re done editing the size of the pages, continue to work on
their design and layout like you would work on any other pages. The
only difference is that some pages in your document may be a different
size.
18_607466-bk02ch05.indd 16718_607466-bk02ch05.indd 167 5/24/10 11:47 PM5/24/10 11:47 PM
168
Book II: InDesign CS5
18_607466-bk02ch05.indd 16818_607466-bk02ch05.indd 168 5/24/10 11:47 PM5/24/10 11:47 PM
Chapter 6: Clipping Paths,
Alignment, and Object
Transformation
In This Chapter
✓ Transforming objects with the Transform panel
✓ Transforming objects with the Free Transform tool
✓ Rotating and scaling objects
✓ Shearing and reflecting objects
✓ Adding a clipping path
✓ Aligning and distributing objects in a layout
I
n this chapter, you discover several different ways to manipulate and
arrange objects on a page. You find out how to use the Transform panel
and other tools in the Tools panel to transform objects on page layouts. You
can make the same transformation in many different ways in InDesign, so for
each way you can transform an object, we show you a couple different ways
to do the same job.
Aligning and distributing objects and images helps you organize elements
logically on a page. In this chapter, you find out how to align objects by
using the Align panel. In Chapter 5 of this minibook, we touch on vector
paths. This chapter provides more information about clipping paths. We
show you how to create a new path to use as a clipping path for an image in
your document.
Working with Transformations
Chapter 4 of this minibook shows you how to transform graphic objects by
skewing them. You can manipulate objects in InDesign in many other ways.
You can transform an object by selecting an individual object and choosing
Object➪Transform, by using the Transform panel (choose Window➪Object
& Layout➪Transform), or by using the Free Transform tool to visually
adjust objects.
19_607466-bk02ch06.indd 16919_607466-bk02ch06.indd 169 5/24/10 11:48 PM5/24/10 11:48 PM
170
Working with Transformations
Looking at the Transform panel
The Transform panel, shown in Figure 6-1, is extremely useful for changing
the way an image or graphic looks and also for changing the scale, rotation,
or skew of selected objects. You can choose from a range of values for some
of these modifiers or manually set your own by typing them.
Figure 6-1:
The
Transform
panel makes
it easy
to resize,
rotate, and
reposition
selected
objects.
Reference point indicator
Panel menu
Rotating angle
Constrain
proportions
Shear X angle
Scale Y Percentage
Scale X Percentage
The Transform panel offers the following information and functionality:
✦ Reference point: Indicates which handle is the reference for any trans-
formations you make. For example, if you reset the X and Y coordinates,
the reference point is set to this position. In Figure 6-1, the reference
point is in the center, as indicated by the solid square.
✦ Position: Change these values to reset the X and Y coordinate position
of the selected object.
✦ Size: The W and H text fields are used to change the current dimensions
of the object.
✦ Scale: Enter or choose a percentage from the Scale X Percentage and
Scale Y Percentage drop-down lists to scale (resize) the object on either
of these axes.
✦ Constraining proportions: Click the Constrain Proportions button to
maintain the current proportions of the object being scaled.
✦ Shearing: Enter or choose a negative or positive number to modify the
shearing angle (skew) of the selected object.
✦ Rotation angle: Set a negative value to rotate the object clockwise; a
positive value rotates the object counterclockwise.
19_607466-bk02ch06.indd 17019_607466-bk02ch06.indd 170 5/24/10 11:48 PM5/24/10 11:48 PM
Book II
Chapter 6
Clipping Paths,
Alignment, and
Object Transformation
171
Working with Transformations
When you’re scaling, shearing, or rotating an object in your layout, it trans-
forms based on the reference point in the Transform panel. For example,
when you rotate an object, InDesign considers the reference point to be the
center point of the rotation.
Click a new reference point square in the Transform panel to change the
reference point of the graphic to the equivalent bounding box handle of the
selected object.
You can open dialog boxes for each kind of transformation by choosing
Object➪Transform. These dialog boxes have similar functionality to the
Transform panel.
Using the Free Transform tool
The multipurpose Free Transform tool lets you transform objects in different
ways. Using the Free Transform tool, you can move, rotate, shear, reflect,
and scale objects.
The functions of the Free Transform Tool are represented in InDesign by dif-
ferent cursors, as shown in Figure 6-2.
Figure 6-2:
Different
cursors
indicate
options for
using the
Transform
tool.
Rotate Scale Scale Move
To move an object using the Free Transform tool, follow these steps:
1. Use the Selection tool to select an object on the page.
You can use an object that’s already on the page or create a new shape
by using the drawing tools. When the object is selected, you see handles
around its edges.
2. Select the Free Transform tool from the Tools panel.
The cursor changes to the Free Transform tool.
19_607466-bk02ch06.indd 17119_607466-bk02ch06.indd 171 5/24/10 11:48 PM5/24/10 11:48 PM
172
Working with Transformations
3. Move the cursor over the middle of the selected object.
The cursor changes its appearance to indicate that you can drag to
move the object (refer to Figure 6-2). If you move the cursor outside the
edges of the object, the cursor changes when other tools, such as rotate,
scale, and shear, become active.
4. Drag the object to a different location.
The object is moved to a new location on the page.
Rotating objects
You can rotate an object by using the Free Transform tool or the Transform
panel. Use the panel to enter a specific degree that you want the object to
rotate. The Free Transform tool lets you visually manipulate the object on
the page.
To rotate an image by using the Free Transform tool, follow these steps:
1. Select an object on the page with the Selection tool.
Handles appear around the edges of the object. You can rotate any
object on the page.
2. Select the Free Transform tool in the Tools panel and move it near the
handle of an object outside the bounding box.
The cursor changes when you move it close to the handle of an object.
For rotation, you must keep the cursor just outside the object.
3. When the cursor changes to the rotate cursor, drag to rotate the
object.
Drag the cursor until the object is rotated the correct amount.
Alternatively, you can use the Rotate tool to spin an object by following
these steps:
1. With the object selected, select the Rotate tool in the Tools panel and
move the cursor near the object.
The cursor looks similar to a cross hair.
2. Click the cursor anywhere on the page near the object.
The point that the object rotates around is set on the page.
3. Drag the cursor outside the object.
The object rotates around the reference point you set on the page. Hold
the Shift key if you want to rotate in 45-degree increments.
19_607466-bk02ch06.indd 17219_607466-bk02ch06.indd 172 5/24/10 11:48 PM5/24/10 11:48 PM
Book II
Chapter 6
Clipping Paths,
Alignment, and
Object Transformation
173
Working with Transformations
You can also rotate objects by using the Transform panel. Here’s how:
1. Select an object on the page with the Selection tool.
The bounding box with handles appears around the selected object.
2. If the Transform panel isn’t open, choose Window➪Object & Layout➪
Transform.
The Transform panel appears.
3. Select a value from the Rotation Angle drop-down list or click the text
field and enter a percentage.
The object rotates to the degree you set in the Transform panel.
Negative angles (in degrees) rotate the image clockwise, and positive
angles (in degrees) rotate the image counterclockwise.
Scaling objects
You can scale objects by using the Transform panel (refer to Figure 6-1), the
Scale tool, or the Free Transform tool. Use the Transform panel to set exact
width and height dimensions that you want to scale the object to, just as you
can set exact percentages for rotating.
To scale an object by using the Free Transform tool or the Scale tool, follow
these steps:
1. Select an object on the page.
A bounding box appears around the object.
2. Select the Free Transform tool or the Scale tool from the Tools panel.
3. Move the cursor directly over a corner handle.
The cursor changes into a double-ended arrow (refer to Figure 6-2).
4. Drag outward to increase the size of the object; drag inward to
decrease the size of the object.
If you want to scale the image proportionally, hold down the Shift key
while you drag.
5. Release the mouse button when the object is scaled to the correct size.
To resize an object using the Transform panel, select the object and enter
new values into the W and H text fields in the panel. The object then resizes
to those exact dimensions.
19_607466-bk02ch06.indd 17319_607466-bk02ch06.indd 173 5/24/10 11:48 PM5/24/10 11:48 PM
174
Working with Transformations
Shearing objects
Shearing an object means that you’re skewing it horizontally, slanting it to
the left or right. A sheared object may appear to have perspective or depth
because of this modification. You use the Shear tool to create a shearing
effect, as shown in Figure 6-3.
Figure 6-3:
The original
image is on
the left, and
the sheared
image is on
the right.
Follow these steps to shear an object:
1. Select an object on the page.
The bounding box appears around the object that’s selected.
2. Choose the Shear tool in the Tools panel by clicking and holding the
Free Transform tool.
The cursor changes so that it looks similar to a cross hair. Click the
corner of the object that you want to shear from, and a cross hair
appears, as shown in Figure 6-3.
3. Click anywhere above or below the object and drag.
The selected object shears depending on which direction you drag.
Press the Shift key while you drag to shear an object in 45-degree
increments.
To shear objects with the Free Transform tool, begin dragging a handle and
then hold down Ctrl+Alt (Windows) or Ô+Option (Mac) while dragging.
You can also enter an exact value into the Transform panel to shear an
object. Select the object and then enter a positive or negative value in the
panel representing the amount of slant you want to apply to the object.
You can apply shear by choosing Object➪Transform➪Shear to display the
Shear dialog box.
19_607466-bk02ch06.indd 17419_607466-bk02ch06.indd 174 5/24/10 11:48 PM5/24/10 11:48 PM
Book II
Chapter 6
Clipping Paths,
Alignment, and
Object Transformation
175
Understanding Clipping Paths
Reflecting objects
You can reflect objects to create mirror images by using the Transform
panel menu. The menu provides several additional options for manipulating
objects.
Follow these steps to reflect an object:
1. Select an object on the page and then press F9 to open the Transform
panel or open it from the Window menu.
The object’s bounding box and handles appear. The Transform panel
shows the current values of the selected object.
2. Click the panel menu in the Transform panel.
The menu opens, revealing many options available for manipulating the
object.
3. Select Flip Horizontal from the Transform panel menu.
The object on the page flips on its horizontal axis. You can repeat this
step with other reflection options in the menu, such as Flip Vertical.
You can also reflect objects with the Free Transform tool by dragging a
corner handle past the opposite end of the object. The object reflects on
its axis.
Understanding Clipping Paths
Clipping paths allow you to create a path that crops a part of an image
based on the path, such as removing the background area of an image. This
shape can be one you create using InDesign, or you can import an image that
already has a clipping path. InDesign can also use an existing alpha or mask
layer, such as one created using Photoshop or Fireworks, and treat it like a
clipping path. Clipping paths are useful when you want to block out areas of
an image and have text wrap around the leftover image.
You can create a clipping path directly in InDesign by using a drawing tool,
such as the Pen tool. You use the tool to create a shape and then paste an
image into this shape on the page. Here’s how:
1. Choose File➪Place and browse to locate an image.
2. With the Pen tool, create a path right on top of the image.
The path should be created so that it can contain the image.
19_607466-bk02ch06.indd 17519_607466-bk02ch06.indd 175 5/24/10 11:48 PM5/24/10 11:48 PM
176
Arranging Objects on the Page
3. With the Selection tool, click to select the image and then choose
File➪Cut.
4. Select the shape you created in Step 1 and choose Edit➪Paste Into.
The image is pasted into the selected shape you drew with the Pen tool.
Arranging Objects on the Page
In other chapters of this minibook, we show you how to arrange objects on
the page. However, you can arrange text or objects in a few other ways. This
section covers the additional ways you can arrange objects, which gives you
more control over the placement of elements in your document.
Aligning objects
In CS5, you can align visually without the need for any extra tools or panels.
If you keep Smart Guides activated (they’re on by default), when you use
the Selection tool to select and move objects around a page, guides appear
automatically. These guides appear when the selected object is aligned
with other objects on the page or with the page itself. If viewing these pesky
guides starts to bother you, choose Edit➪Preferences➪Guides & Pasteboard
(Windows) or InDesign➪Guides & Pasteboard (Mac) and turn off the four
options underneath the Smart Guide Options heading.
You can also align objects on a page by using the Align panel: Choose
Window➪Object & Layout➪Align. This panel gives you control over the way
elements align to one another or to the overall page. The Align panel has
many buttons to control selected objects. Mouse over a button to see its
tooltip describe how that button aligns elements.
If you’re not sure what each button does after reading the associated tooltip,
look at the icon on the button. The icon is sometimes helpful in depicting
what the Align button does to selected objects.
Here’s how to align elements on the page:
1. Select several objects on the page with the Selection tool.
Hold the Shift key while clicking each object to select several objects.
Each object is selected when you click it on the page. If you don’t have a
few objects on a page, quickly create a couple new objects by using the
drawing tools.
19_607466-bk02ch06.indd 17619_607466-bk02ch06.indd 176 5/24/10 11:48 PM5/24/10 11:48 PM
Book II
Chapter 6
Clipping Paths,
Alignment, and
Object Transformation
177
Arranging Objects on the Page
2. Choose Window➪Object & Layout➪Align.
The Align panel opens.
3. Select the kind of alignment you want to apply to the selected objects.
Try clicking the Align Vertical Centers button. Each selected object
aligns to the vertical center point on the page.
Distributing objects
In the preceding step list, we show you how to align a few objects on a page,
which is easy enough. However, what if the objects you’re aligning aren’t
distributed evenly? Maybe their centers are lined up but there’s a large gap
between two of the images and a narrow gap between the other ones. In that
case, you need to distribute objects and align them. Distribute objects on the
page to space them relative to the page or to each other in different ways.
Here’s how:
1. Select objects on a page that are neither aligned nor evenly distrib-
uted, by using the Selection tool while holding the Shift key.
The objects are selected when you click each one. All objects you select
will be aligned to each other on the page.
2. If the Align panel isn’t open, choose Window➪Object & Layout➪Align.
The Align panel opens.
3. Click the Distribute Horizontal Centers button and then click the
Align Vertical Centers button directly above it on the Align panel.
The selected objects are distributed evenly and aligned horizontally on
the page.
Don’t forget about the cool Multiple Place feature: It lets you distribute and
align on the fly! Try this handy option to place several images at one time:
1. Choose File➪Place.
2. Press Ctrl (Windows) or Ô (Mac), select multiple images, and then
click the Open button.
3. Before clicking to place the images, hold down Ctrl+Shift (Windows)
or Ô+Shift (Mac).
The cursor appears as a grid, as shown in Figure 6-4.
19_607466-bk02ch06.indd 17719_607466-bk02ch06.indd 177 5/24/10 11:48 PM5/24/10 11:48 PM
178
Arranging Objects on the Page
Figure 6-4:
Place
multiple
images by
holding
down
Ctrl+Shift
(Windows)
or Ô+Shift
(Mac) and
dragging.
4. Click and drag to create the rectangle that you want your images
aligned to and distributed within.
The images are aligned and distributed automatically, as shown in
Figure 6-5.
Figure 6-5:
Images are
aligned and
distributed
automa-
tically when
placed.
19_607466-bk02ch06.indd 17819_607466-bk02ch06.indd 178 5/24/10 11:48 PM5/24/10 11:48 PM
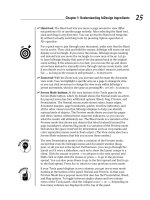
Chapter 7: Understanding
Color and Printing
In This Chapter
✓ Using color in page layout
✓ Looking at color controls and models
✓ Discovering swatches and swatch libraries
✓ Understanding bleeding and trapping
✓ Looking at printing and preferences
C
olor is an important part of your layouts. It impacts the design and
must be printed correctly. Advertisements often rely on color to relay
brands or effective messages — think of the package delivery company
based on brown or the purple-and-orange company known for overnight
shipments. Similarly, the success of a printed piece greatly depends on how
color is used in the layout. Color, used correctly, can enhance your message
and, used consistently, helps create a brand identity. In this chapter, you
find out some of the fundamental aspects of working with color and the
basic instructions on how to prepare documents for printing.
For more information on general subjects about color, see Book I, Chapters
7 and 8, which cover subjects such as color modes, inks, and printers, and
basic color correction across the programs in the Adobe Creative Suite.
Selecting Color with Color Controls
You have several different color modes and options to choose when work-
ing in InDesign. Because the use of color in print media can be quite a sci-
ence, you must have control over how your documents print on the page. In
Chapter 4 of this minibook, we show you how to add color to drawings with
the Color panel. In this section, we cover using the Color panel to choose
colors and apply them to the elements on your page.
You should use swatches whenever possible because they use named
colors that a service provider can match exactly. A swatch can have exactly
the same appearance as any color you choose that’s unnamed, but a swatch
20_607466-bk02ch07.indd 17920_607466-bk02ch07.indd 179 5/24/10 10:06 PM5/24/10 10:06 PM
180
Understanding Color Models
establishes a link between the color on the page and the name of a color,
such as a Pantone color number. Discover more about these kinds of color
in the later section “Using Color Swatches and Libraries.”
You can use these color controls for choosing colors for selections in a
document:
✦ Stroke color: Choose colors for strokes and paths in InDesign. A hollow
box represents the Stroke color control.
✦ Fill color: Choose colors for filling shapes. A solid square box repre-
sents the Fill color control.
You can toggle between the Fill and Stroke color controls by clicking
them. Alternatively, you can press X on the keyboard to toggle between
selected controls.
✦ Text color: When you’re working with text, a different color control
becomes active. The Text color control is visible and displays the
selected text color. Text can have both the stroke and fill colored.
To apply colors to selections, you can click the Apply color button below
the color controls in the Tools panel. Alternatively, you can select and click
a color swatch.
The default colors in InDesign are a black stroke and no fill color. Restore
the default colors at any time by pressing D. This shortcut works while using
any tool except the Type tool.
Understanding Color Models
You can use any of three kinds of color models in InDesign: CMYK (Cyan,
Magenta, Yellow, Black), RGB (Red, Green, Blue), and LAB colors (lightness
and A and B for the color-opponent dimensions of the color space). A color
model is a system used for representing each color as a set of numbers or
letters (or both). The best color model to use depends on how you plan to
print or display your document:
✦ If you’re creating a PDF that will be distributed electronically and prob-
ably not printed, use the RGB color model. RGB is how colors are dis-
played on a computer monitor.
✦ You must use the CMYK color model if you’re working with process
color: Instead of having inks that match specified colors, you have four
ink colors layered to simulate a particular color. Note that the colors on
the monitor may differ from the ones that are printed. Sample swatch
books and numbers can help you determine which colors you need to
use in a document to match colors printed in the end.
20_607466-bk02ch07.indd 18020_607466-bk02ch07.indd 180 5/24/10 10:06 PM5/24/10 10:06 PM
Book II
Chapter 7
Understanding
Color and Printing
181
Using Color Swatches and Libraries
✦ If you know that the document needs to be printed by professionals
who determine what each color is before it’s printed, it doesn’t matter
whether you use RGB, PMS (Pantone Matching System), or LAB colors.
Make sure to use named colors (predetermined swatches are a good
idea) so that the service provider knows which color should be printed.
In this case, you’re using spot colors, which are mixed inks that match
the colors you specify in InDesign.
For more information on color models, check out Book I, Chapter 7. This
chapter explains how colors are determined in the different color modes.
Using Color Swatches and Libraries
The Swatches panel and swatch libraries help you choose colors. Swatch
libraries help you use colors for specific publishing purposes. The colors
you use in a document can vary greatly depending on what you’re creating
the document for. For example, one publication you make with InDesign may
be for a catalog that has only two colors; another may be for the Web, where
many colors are available to you.
The Swatches panel
You can create, apply, and edit colors from the Swatches panel. In addition
to using this panel to create and edit tints and gradients and then apply
them to objects on a page, you can also create and save solid colors. Choose
Window➪Swatches to open or expand the Swatches panel.
To create a new color swatch to use in a document, follow these steps:
1. Click the arrow in the upper right corner to open the Swatches panel
menu; choose New Color Swatch.
The New Color Swatch dialog box opens.
2. Type a new name for the color swatch or leave the color named by
color values.
(The colors in the Swatches panel appear this way as a default.)
This name is displayed next to the color swatch when it’s entered into
the panel.
3. Choose the color type from the Color Type drop-down list.
Are you using a spot color (Pantone, for example) or CMYK (Cyan,
Magenta, Yellow, Black)?
4. Choose the color mode.
From the Color Mode drop-down list, select a color mode. For this exam-
ple, we use CMYK. Many of the other choices you see are prebuilt color
libraries for various systems.
20_607466-bk02ch07.indd 18120_607466-bk02ch07.indd 181 5/24/10 10:06 PM5/24/10 10:06 PM
182
Using Color Swatches and Libraries
5. Create the color by using the color sliders.
Note that if you start with Black, you have to adjust that slider to the left
to see the other colors.
6. Click OK or Add.
Click Add if you want to continue adding colors to the Swatches panel or
click OK if this color is the only one you’re adding. The color or colors
are added to the Swatches panel.
You can make changes to the swatch by selecting it in the Swatches panel
and then choosing Swatch Options from the panel menu.
Swatch libraries
Swatch libraries, also known as color libraries, are standardized sets of
named colors that help you because they’re the most commonly and fre-
quently used sets of color swatches. You can avoid trying to mix your own
colors, which can be a difficult or tedious process to get right. For example,
InDesign includes a swatch library for Pantone spot colors and a different
library for Pantone process colors. These libraries are quite useful if you’re
working with either color set. (See the earlier section “Understanding Color
Models,” where we explain the difference between spot and process colors.)
To choose a swatch from a swatch library, follow these steps:
1. Choose New Color Swatch from the Swatches panel menu.
The New Color Swatch dialog box opens.
2. Choose the color type you want to work with from the Color Type
drop-down list.
Choose from Process or Spot Color types.
3. Select a color library from the Color Mode drop-down list.
The drop-down list contains a list of color swatch libraries to choose
from, such as Pantone Process Coated or TRUMATCH. After choosing
a swatch set, the library opens and appears in the dialog box. For this
example, we chose standard, solid-coated Pantone. If you’re looking for
the standard numbered Pantone colors, this set is the easiest to choose
from. The Pantone solid-coated library of swatches loads.
4. Pick a swatch from the library.
Type a Pantone number, if you have one, in the Pantone text box. Most
companies have set Pantone colors that they use for consistency. You
can also scroll and click a swatch in the library’s list of colors, shown in
Figure 7-1.
20_607466-bk02ch07.indd 18220_607466-bk02ch07.indd 182 5/24/10 10:06 PM5/24/10 10:06 PM
Book II
Chapter 7
Understanding
Color and Printing
183
Printing Your Work
Figure 7-1:
Choose a
color from
the swatch
library to
add it to the
Swatches
panel.
Picking Pantone colors this way is rarely accurate. Spending money
on the Pantone Color Bridge Set is a wise investment. Get more details
about this guide at www.pantone.com and search for Color Bridge.
5. Click the Add button.
This step adds the swatch to your list of color swatches in the Swatches
panel. You can add as many color swatches as you like.
6. When you finish adding swatches, click the Done button.
After you add a new color, the swatch is added to the list of swatches
in the swatches panel and is ready to use in your project. Look in the
swatches panel to see the newly added colors.
Printing Your Work
You can print your work from an InDesign document in many different ways,
with many kinds of printers and processes. You can either use a printer at
home or in your office, which are of varying levels of quality and design, or
you can take your work into a professional establishment to print. Printing
establishments (or service providers) also vary in the quality of production
they can offer you.
The following subsections look at the different ways you can set up a docu-
ment for printing and the kinds of issues you may encounter during this
process.
20_607466-bk02ch07.indd 18320_607466-bk02ch07.indd 183 5/24/10 10:06 PM5/24/10 10:06 PM
184
Printing Your Work
What’s a bleed?
If you want an image or span of color to go to the edge of a page, without
any margins, you bleed it off the edge of the document. Bleeding extends the
print area slightly beyond the edge of the page into the area that will be cut
as usual during the printing process. When you print your work, you can
turn on crop and bleed marks to show where the page needs to be trimmed
and to make sure that the image bleeds properly. We cover this topic at the
end of this chapter, in “Doing it yourself: Printing at home or in the office.”
About trapping
When you print documents, the printer is seldom absolutely perfect when
creating a printed page with multiple inks. The registration (which deter-
mines the alignment of the separate colors when printed) will most surely
be off. This discrepancy can potentially cause a gap between two colors on
a page so that unprinted paper shows through between them. To solve this
problem, use trapping, which overlaps elements on the page slightly so that
the gap doesn’t appear between elements. The basic principle of trapping
is to spread the lighter of the colors into the other. See Figure 7-2 for an
example.
Figure 7-2:
Text as it
appears in
InDesign
(left). Text
(right) as
it appears
when
printed with
trapping
applied.
InDesign has built-in software for trapping. The settings you specify are
applied to the entire page. You choose settings in the Trap Presets panel.
You can use the default settings, customize the trapping settings, or decide
not to use trapping. To modify the default settings and then apply the cus-
tomized settings, follow these steps:
1. Choose Window➪Output➪Trap Presets.
The Trap Presets panel opens. The trapping presets in InDesign are
document-wide, but you can assign individual trappings by using the
Attributes panel (choose Window➪Attributes) to overprint strokes on
selected art only.
20_607466-bk02ch07.indd 18420_607466-bk02ch07.indd 184 5/24/10 10:06 PM5/24/10 10:06 PM
Book II
Chapter 7
Understanding
Color and Printing
185
Printing Your Work
2. Double-click [Default] in the panel’s list.
The Modify Trap Preset Options dialog box opens, as shown in Figure 7-3.
The default settings are perfectly adequate for many printing jobs.
Figure 7-3:
The Modify
Trap Preset
Options
dialog box.
3. Change the trap preset options, if you know what’s necessary, and
then click OK to close the dialog box.
If you don’t know what to change, investigate the options for a better
understanding of how they work. You can also request settings from
your print provider.
4. In the Trap Presets panel, choose New Preset from the panel menu.
The New Trap Preset dialog box opens.
5. Type an appropriate name for the new trap preset.
You see this name in the list of trap presets in the Trap Presets panel
when it’s opened. You might create a name for a printer that has differ-
ent settings from another.
6. Review and make any changes to the new preset in the dialog box.
You can change the presets by using these options:
• Trap Width: The default value specifies the width of the trap for any
ink, except black, that you use in the document. Enter the value for
black in the Black text field.
• Images: Control how InDesign handles trapping between elements
on the document page and any imported graphics on it. Use the
Trap Placement drop-down list to define how images trap to objects
on the page. When bitmap images are next to each other, select the
Trap Images to Images check box.
20_607466-bk02ch07.indd 18520_607466-bk02ch07.indd 185 5/24/10 10:06 PM5/24/10 10:06 PM