iPhone for Dummies PHẦN 7 pdf
Bạn đang xem bản rút gọn của tài liệu. Xem và tải ngay bản đầy đủ của tài liệu tại đây (1.77 MB, 24 trang )
3. Type a subject in the Subject field.
The subject is optional but it’s consid-
ered poor form to send an e-mail mes-
sage without one.
4. Type your message in the message
area.
The message area is immediately
below the Subject field.
5. Tap the Send button in the top-right
corner of the screen.
Your message will wing its way to its recipi-
ents almost immediately. If you are not in
range of a Wi-Fi network or the AT&T EDGE
data network when you tap Send, the mes-
sage is sent the next time you are in range
of either network.
Sending a photo with a text message
Sometimes a picture is worth a thousand
words. When that’s the case, here’s how
to send an e-mail message with a photo
enclosed.
Tap the Photos icon on the Home screen
and then find the photo you want to send.
Tap the button that looks like a little rectangle with a curved arrow springing
out of it in the bottom-left corner of the screen, and then tap the Email Photo
button.
An e-mail message appears on the screen with the photo already attached.
Just address the message and type whatever text you like, as you did for an
all-text message in the preceding section, and then tap the Send button.
Saving an e-mail message so you can send it later
Sometimes you start an e-mail message but don’t have time to finish it. When
that happens you can save it as a draft and finish it some other time.
125
Chapter 11: The E-Mail Must Get Through
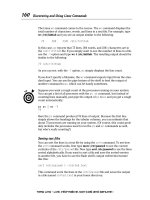
Figure 11-5: The new message
appears ready for you to start typing
the recipient’s name.
18_174692 ch11 8/21/07 6:42 PM Page 125
126
Part IV: The Internet iPhone
Here’s how: Start an e-mail message as described in one of the two previous
sections. When you’re ready to save it as a draft, tap the Cancel button in the
top-left corner of the screen. Now tap the Save button if you want to save this
message as a draft and complete it at another time. If you tap the Cancel
button, you’ll cancel the cancel command and go right back to the message
and can continue working on it now.
If you tap the Don’t Save button, the message disappears immediately with-
out a second chance. Don’t tap Don’t Save unless you mean it.
To work on the message again, tap the Drafts mailbox. A list of all the mes-
sages you’ve saved as drafts appears. Tap the one you want to work on and it
reappears on the screen. When you’re finished, you can tap Send to send it,
or tap Cancel to save it as a draft again.
The number of drafts appears on the right of the Drafts folder, the same way
that the number of unread messages appears on the right of other mail fold-
ers such as your Inbox.
Replying to or forwarding an e-mail message
When you receive a
message and want
to reply to it, open
the message and
then tap the
reply/reply all/for-
ward button, which
looks like a curved
arrow at the bottom
of the screen, as
shown in Figure
11-6. Then tap either
the Reply, Reply All,
or Forward button.
The Reply button
creates a blank e-mail
message addressed
to the sender of the
original message.
The Reply All button
creates a blank e-mail
message addressed to the sender and all other recipients of the original mes-
sage. In both cases the subject is retained with a Re: prefix added. So if the origi-
nal subject was iPhone Tips, the reply’s subject would be Re: iPhone Tips.
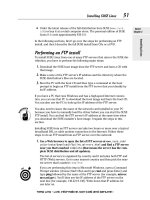
Previous
message
Next
message
New
message
File
message
Delete
message
Reply/reply all/
forward
Check for
new messages
Figure 11-6: Reading and managing an e-mail message.
18_174692 ch11 8/21/07 6:42 PM Page 126
Tapping the Forward button creates an unaddressed e-mail message that
contains the text of the original message. Add the e-mail address(es) of the
person or people you want to forward the message to, and then tap Send. In
this case, instead of a Re: prefix, the subject is preceded by Fwd:. So this time
the subject would be Fwd: iPhone Tips.
You can edit the subject line of a reply or a forwarded message or edit the
body text of a forwarded message the same way you would edit any other
text. It’s usually considered good form to leave the subject lines alone (with
the Re: or Fwd: prefix intact), but there may be times when you want to
change them. Now you know that you can.
To send your reply or forwarded message, tap the Send button as usual.
Settings for sending e-mail
Four settings involve sending e-mail. Here’s what they do and where to find
them:
ߜ To hear an alert when you successfully send a message: Tap the Sound
icon on the Home screen, and then turn on the Sent Mail setting. If you
want to change other settings, tap the Settings button in the top-left
corner of the screen. If you’re finished setting settings, tap the Home
button on the front of your iPhone.
The preceding paragraph is similar for all of the settings I discuss in this
section and later sections, so I won’t repeat them again. To summarize, if
you want to continue using settings, you tap whichever button appears
in the top-left corner of the screen — sometimes it’s called Settings, or
Mail, or Mailboxes, or something else. The point is that the top-left
button always returns you to the previous screen so you can change
other settings. And the same applies to pressing the Home button on the
front of your iPhone when you’re finished setting a setting. That always
saves the change you’ve just made and returns you to the Home screen.
ߜ To add a signature line, phrase, or block of text to every e-mail mes-
sage you send: Tap the Settings icon on the Home screen, tap Mail, and
then tap Signature. The default signature is Sent from my iPhone. You can
add text before or after it, or delete it and type something else. Your sig-
nature is now affixed to the end of all of your outgoing e-mail.
ߜ To have your iPhone send you a copy of every message you send: Tap
the Settings icon on the Home screen, tap Mail, and then turn on the
Always Cc Myself setting.
127
Chapter 11: The E-Mail Must Get Through
18_174692 ch11 8/21/07 6:42 PM Page 127
128
Part IV: The Internet iPhone
ߜ To set the default e-mail account for sending e-mail from the Photos or
Maps applications: Tap the Settings icon on the Home screen, tap Mail,
and then tap Default Account. Tap the account you want to use as the
default. Note that this setting applies only if you have more than one
e-mail account on your iPhone.
And that’s what you need to know about settings that apply to sending mail.
See Me, Read Me, File Me, Delete Me:
Working with Messages
The other half of the mail equation is receiving and reading the stuff.
Fortunately, you’ve already done most of the heavy lifting when you set up
your e-mail accounts. Getting and reading your mail is a piece of cake.
You can tell when you have unread mail by looking at the Mail icon, in the
bottom row of your Home screen. The number of unread messages appears
in a little red circle on the top-right of the icon.
Reading messages
To read your mail, tap the Mail icon on the Home screen. The mailboxes list
appears, and the Inbox in that list displays the number of unread messages in
a blue oval to the right of its name.
If you have more than one e-mail account, you may have to tap the Mailboxes
button in the upper-left corner and then choose the appropriate e-mail
account before you see the Inbox with the unread messages.
To see the list of unread messages, tap Inbox in the list of mailboxes and then
tap a message to read it. When a message is on the screen, buttons for man-
aging incoming messages appear below it (refer to Figure 11-6).
Managing messages
When a message is on your screen, you can do the following in addition to
reading it (all buttons are labeled in Figure 11-6):
ߜ View the next message by tapping the next message button.
ߜ View the previous message by tapping the previous message button.
18_174692 ch11 8/21/07 6:42 PM Page 128
ߜ Check for new messages by tapping the check for new messages button.
ߜ File this message in another folder by tapping the file message button.
When the list of folders appears, tap the folder where you want to file
the message.
ߜ Delete this message by tapping the delete message button.
ߜ Reply, reply to all, or forward this message (as discussed previously) by
tapping the reply/reply all/forward button.
ߜ Create a new e-mail message by tapping the new message button.
You can delete e-mail messages without opening them in two ways:
ߜ Swipe left or right across the message and then tap the red Delete
button that appears to the right of the message.
ߜ Tap the Edit button in the upper-left corner of the screen, tap the red
minus (–) button to the left of the message, and then tap the red Delete
button that appears to the right of the message.
Don’t grow too attached to attachments
Your iPhone can even receive e-mail messages with attachments in a wide
variety of file formats. What file formats does the iPhone support? Glad you
asked. It can read and display .c, .cpp, .diff, .doc, .docx, .h, .hpp, .htm, .html,
.m, .mm, .patch, .pdf, .txt, .xls, .and xlsx.
If the attachment is a file format not supported by the iPhone (for example, a
Photoshop .psd file), you’ll see the name of the file but you won’t be able to
open it on your iPhone.
Here’s how to read an attachment:
1. Open the mail message containing the attachment.
2. Tap the attachment (it appears at the bottom of the message so you’ll
probably need to scroll down to see it).
The attachment downloads to your iPhone and opens automatically, as
shown in Figure 11-7.
3. Read the attachment.
4. Tap the Message button in the upper-left corner of the screen to
return to the message text.
129
Chapter 11: The E-Mail Must Get Through
18_174692 ch11 8/21/07 6:42 PM Page 129
130
Part IV: The Internet iPhone
More things you can do with messages
But wait! You can do even more with your
incoming e-mail messages:
ߜ To see all the recipients of a message,
tap the word Details (displayed in
blue) to the right of the sender’s name.
If all recipients are displayed, the word
in blue will be Hide rather than Details.
Tap it to hide all names but the
sender’s.
ߜ To add an e-mail recipient or sender to
your contacts, tap the name or e-mail
address at the top of the message and
then tap either Create New Contact or
Add to Existing Contact.
ߜ To mark a message as unread, tap Mark
as Unread, which appears near the top
of each message in blue with a blue dot
to its left. When you do, the message
will again be included in the unread
message count on the Mail icon on
your Home screen and its mailbox and
will again have a blue dot next to it in
the message list for that mailbox.
ߜ To zoom in, double-tap the place you want to zoom in on. Double-tap
again to zoom out.
For more precise control over zooming, pinch and un-pinch instead of
double-tapping.
ߜ To follow a link in a message, tap the link. Links are typically displayed
in blue. If the link is a URL, Safari opens and displays the Web page. If the
link is a phone number, the Phone application opens and offers to dial
the number. If the link is a Map, Maps opens and displays the location.
And last but not least, if the link is an e-mail address, a new pre-
addressed blank e-mail message is created.
If the link opens Safari, Phone, or Maps and you want to return to your
e-mail, press the Home button on the front of your iPhone and then tap
the Mail icon.
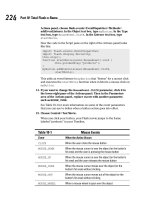
Figure 11-7: Text from a Microsoft
Word file that was attached to an
incoming e-mail message.
18_174692 ch11 8/21/07 6:42 PM Page 130
Setting your message and account settings
Our last lesson on Mail involves more settings, this time settings that affect
viewing and checking e-mail and messages that deal with your e-mail
accounts themselves.
Checking and viewing e-mail settings
Seven settings involve checking and viewing e-mail. You might want to modify
one or more, so here’s what they do and where to find them:
ߜ To set how often the iPhone checks for new messages: Tap the Settings
icon on the Home screen, tap Mail, and then tap Auto-Check. Your
choices are Manual, Every 15 Minutes, Every 30 Minutes, or Every Hour.
Tap the one you prefer.
If you have Yahoo! e-mail, this setting is irrelevant. Your messages are
sent to your iPhone automatically as soon as they hit the Yahoo! mail
server.
ߜ To hear an alert sound when you receive a new message: Tap the
Sound icon on the Home screen, and then turn on the New Mail setting.
ߜ To set the number of recent messages that appears in your Inbox: Tap
the Settings icon on the Home screen, tap Mail, and then tap Show. Your
choices are 25, 50, 75, 100, or 200. Tap the number you prefer.
You can always see more messages in your Inbox regardless of this set-
ting by scrolling all the way to the bottom and tapping Download More.
ߜ To set the number of lines of each message that are displayed in the
message list: Tap the Settings icon on the Home screen, tap Mail, tap
Preview, and then choose a number. Your choices are 0, 1, 2, 3, 4, or 5
lines of text. The more lines of text you display in the list, the fewer mes-
sages you can see at a time without scrolling. Think before you choose 4
or 5.
ߜ To set the font size for messages: Tap the Settings icon on the Home
screen, tap Mail, and then tap Minimum Font Size. Your options are
Small, Medium, Large, Extra Large, or Giant. Use trial and error to find
out which size you prefer. Choose one and then read a message. If it’s
not just right, choose a different size. Repeat until you’re happy.
ߜ To set whether or not the iPhone shows the To and Cc labels in mes-
sage lists: Tap the Settings icon on the Home screen, tap Mail, and then
turn the Show To/Cc Label setting on or off.
131
Chapter 11: The E-Mail Must Get Through
18_174692 ch11 8/21/07 6:42 PM Page 131
132
Part IV: The Internet iPhone
ߜ To turn the Ask Before Deleting warning on or off: Tap the Settings
icon on the Home screen, tap Mail, and then turn the Ask Before Deleting
setting on or off. If this setting is turned on, you need to tap the trash
can icon at the bottom of the screen and then tap the red Delete button
to confirm the deletion. When it’s turned off, tapping the trash can icon
deletes the message and you never see a red Delete button.
Altering account settings
The last set of settings we explore deals with your e-mail accounts. Most of
you will never need most of these settings, but we’d be remiss if we didn’t at
least mention them briefly. So here they are, whether you need ’em or not:
ߜ To stop using an e-mail account: Tap the Settings icon on the Home
screen, tap Mail, and then tap the account name. Tap the switch to turn
off the account.
This setting doesn’t delete the account; it only hides it from view and
stops it from sending or checking e-mail until you turn it on again.
ߜ To delete an e-mail account: Tap the Settings icon on the Home screen,
tap Mail, and then tap the account name. Scroll to the very bottom and
tap the red button that says Delete Account. You’ll be given a chance to
reconsider. Tap Delete Account if you’re sure you want this account
blown away or Cancel if you change your mind and want to keep it.
The last four settings are somewhat advanced and are all reached the same
way: Tap the Settings icon on the Home screen, tap Mail, and then tap the
name of the account you want to work with. Then:
ߜ To set how long until deleted messages are removed permanently
from your iPhone: Tap Advanced, and then tap Remove. Your choices
are Never, After One Day, After One Week, or After One Month. Tap the
choice you prefer.
ߜ To set whether drafts, sent messages, and deleted messages are stored
on your iPhone or on your mail server: Tap Advanced, and then
choose the setting (Stored on iPhone or Stored on Server) for Drafts,
Sent Messages, and Deleted Messages. If you choose to store any or all
of them on the server, you won’t be able to see them unless you have an
Internet connection (Wi-Fi or EDGE). If you choose to store them on your
iPhone, they’ll always be available whether or not you have Internet
access.
18_174692 ch11 8/21/07 6:42 PM Page 132
We strongly recommend that you not change these next two items
unless you know exactly what you’re doing and why. If you’re having
problems with sending or receiving mail, start by contacting your ISP
(Internet service provider), e-mail provider, or corporate IT person or
department. Then, only change these settings if they tell you to.
ߜ To reconfigure mail server settings: Tap Host Name, User Name, or
Password in the Incoming Mail Server or Outgoing Mail Server section of
the account settings screen and make your changes.
ߜ To adjust Incoming or Outgoing SSL, Authentication, or IMAP Path
settings: Tap Advanced, and then tap the appropriate item and make the
necessary changes.
And that, as they say in baseball, retires the side. You are now fully qualified
to set up e-mail accounts and send and receive e-mail on your iPhone.
133
Chapter 11: The E-Mail Must Get Through
18_174692 ch11 8/21/07 6:42 PM Page 133
134
Part IV: The Internet iPhone
18_174692 ch11 8/21/07 6:42 PM Page 134
12
Monitoring Maps, Scrutinizing
Stocks, and Watching Weather
In This Chapter
ᮣ Mapping your route with Maps
ᮣ Getting quotes with Stocks
ᮣ Watching the weather with Weather
I
n this chapter we look at three of the iPhone’s Internet-enabled applica-
tions: Maps, Stocks, and Weather. We call them Internet-enabled because
they display information collected over your Internet connection — whether
Wi-Fi or EDGE — in real (or in the case of Stocks, near-real) time.
Maps Are Where It’s At . . .
Maps has turned out to be the sleeper hit of our iPhone
experience and an application we both use more than
we expected. That’s because it’s so darn handy. With
Maps, you can quickly and easily find nearby restau-
rants and businesses, get turn-by-turn driving
instructions from any address to any other address,
and see real-time traffic information for any location.
Finding a person, place,
or thing with Maps
Tap the Maps icon on the Home screen, and then tap the
search field at the top of the screen to make the keyboard
appear. Now type what you’re looking for. You can search for
addresses, zip codes, intersections, towns, landmarks, businesses by
category and by name, and combinations, such as New York, NY 10022, pizza
60645 or Auditorium Shores Austin TX.
©
i
S
t
o
c
k
p
h
o
t
o
.
c
o
m
/
Y
u
r
i
H
n
i
l
a
z
u
b
19_174692 ch12_2.qxp 10/22/07 4:04 PM Page 135
136
Part IV: The Internet iPhone
If the letters you type match names in your
Contacts list, the matching contacts appear
in a list below the search field. Tap a name
to see a map of that contact’s location.
Maps is smart about it, too; it displays only
the names of contacts with a street address.
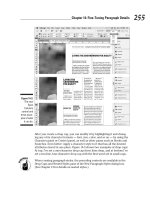
When you finish typing, tap Search. After a
few seconds, a map appears. If you
searched for a single location, it is marked
with a single pushpin. If you searched for a
category (pizza 60645, for example), you
see multiple pushpins, one for each match-
ing location, as shown in Figure 12-1.
So that’s how to find just about anything
with Maps. Now let’s look at some of the
ways you can use what you find.
Views, zooms, and pans
Let’s start by finding out how to work with
what you see on the screen. Three views are
available at any time: Map, Satellite, and
List. (Figure 12-1 shows the Map view.)
Select the one you want by tapping its
button at the bottom of the screen.
In Map or Satellite view, you can zoom to see more or less of the map, or
scroll (pan) to see what’s above, below, or to the left or right of what’s on the
screen:
ߜ To zoom out: Pinch the map or double-tap using two fingers. To zoom
out even more, pinch or double-tap using two fingers again.
This is a new concept. To double-tap with two fingers, merely tap twice
in rapid succession with two fingers rather than the usual one finger.
(That’s a total of four taps, two taps per finger.)
ߜ To zoom in: Un-pinch the map or double-tap (the usual way — with just
one finger) the spot you want to zoom in on. Un-pinch or double-tap
with one finger again to zoom in even more.
Figure 12-1: Search for pizza 60645
and you see pushpins for all nearby
pizza joints.
19_174692 ch12 8/21/07 6:43 PM Page 136
An un-pinch is the opposite of a pinch. Start with your thumb and a
finger together and then flick them apart.
You can also un-pinch with two fingers or two thumbs, one from each
hand, but you’ll probably find that a single-handed pinch and un-pinch is
handier.
ߜ To scroll: Flick or drag up, down, left, or right.
Maps and contacts
Maps and contacts go together like peanut butter and jelly. For example, if
you want to see a map of a contact’s street address, tap the little bookmark
icon in the search field, tap the Contacts button at the bottom of the screen,
and then tap the contact’s name.
Or type the first few letters of the contact’s name in the search field and then
tap the name in the list that automatically appears below the search field.
After you find a location by
typing an address into Maps, you
can add that location to one of
your contacts. Or you can create
a new contact with a location
you’ve found. To do either, tap
the location’s pushpin on the
map, and then tap the little > in a
blue circle to the right of the
location’s name or description,
as shown in Figure 12-2, to dis-
play its Info screen as shown in
Figure 12-3.
Now tap either the Create New Contact button or the Add to Existing Contact
button on the Info screen. You’ll probably have to scroll to the bottom of the
Info screen to see these buttons (shown on the right in Figure 12-3).
You work with your contacts by tapping the Phone icon on your Home
screen, and then tapping the Contacts icon at the bottom of the Phone
screen.
You can also get driving directions from any location including a contact’s
address to any other location including another contact’s address. You’ll see
how to do that in the “Smart map tricks” section.
137
Chapter 12: Monitoring Maps, Scrutinizing Stocks, and Watching Weather
Figure 12-2: Tap here to display info about a
location.
19_174692 ch12 8/21/07 6:43 PM Page 137
138
Part IV: The Internet iPhone
Figure 12-3: The unscrolled Info screen for Gulliver’s Pizza (left)
and the same screen when you scroll to the bottom (right).
Timesaving map tools
Maps offers three tools that can save you from having to type the same loca-
tions over and over again. All three appear in the Bookmarks screen, which is
displayed when you tap the little blue bookmark icon on the right side of any
search field.
At the bottom of the screen you’ll find three buttons: Bookmarks, Recents,
and Contacts. Here’s the lowdown.
Bookmarks
Bookmarks in the Maps application work like bookmarks in Safari. When you
have a location you want to save as a bookmark so you can reuse it later
without typing a single character, tap the little > in a blue circle to the right of
its name or description to display the Info screen for that location. Tap the
Add to Bookmarks button on the Info screen. (You’ll probably have to scroll
down the Info screen to see the Add to Bookmarks button.)
Once you add a location to your Bookmarks list, you can recall it at any time.
To do so, tap the bookmarks icon in any search field, tap the Bookmarks
button at the bottom of the screen, and then tap the bookmark name to see a
map of it.
19_174692 ch12 8/21/07 6:43 PM Page 138
The first things you should bookmark are your home and work address and
your zip codes. These are things you’ll be using all the time with Maps, so
you might as well bookmark them now to avoid typing them over and over.
Use zip code bookmarks to find nearby businesses. Choose the zip code
bookmark, and then type what you’re looking for, such as 78729 pizza,
60645 gas station, or 90201 Starbucks.
To manage your bookmarks, first tap the Edit button in the top-left corner of
the Bookmarks screen. Then:
ߜ To move a bookmark up or down in the Bookmarks list: Drag the little
icon with three gray bars that appears to the right of the bookmark
upward to move the bookmark higher in the list or downward to move
the bookmark lower in the list.
ߜ To delete a bookmark from the Bookmarks list: Tap the minus sign to
the left of the bookmark’s name.
When you’re finished using bookmarks, tap the Done button in the top-right
corner of the Bookmarks screen to return to the map.
Recents
Maps automatically keeps track of every location you’ve searched for in its
Recents list. To see this list, tap the bookmarks icon in any search field, and
then tap the Recents button at the bottom of the screen. To see a map of a
recent item, tap the item’s name.
To clear the Recents list, tap the Clear button in the top-left corner of the
screen, and then tap the Clear All Recents button.
When you’re finished using the Recents list, tap the Done button in the top-
right corner of the screen to return to the map.
Contacts
To see a map of a contact’s location, tap the bookmarks icon in any search
field, and then tap the Contacts button at the bottom of the screen. To see a
map of a contact’s location, tap the contact’s name in the list.
To limit the Contacts list to specific groups (assuming you have some groups
in your Contacts list), tap the Groups button in the top-left corner of the
screen and then tap the name of the group. Now only contacts in this group
are displayed in the list.
139
Chapter 12: Monitoring Maps, Scrutinizing Stocks, and Watching Weather
19_174692 ch12 8/21/07 6:43 PM Page 139
140
Part IV: The Internet iPhone
When you’re finished using the Contacts list, tap the Done button in the top-
right corner of the screen to return to the map.
Smart map tricks
The Maps application has more tricks up its sleeve. Here are a few nifty fea-
tures you may find useful.
Get route maps and driving directions
You can get route maps and driving directions to any location from any loca-
tion in a couple of ways.
One way is to tap a pushpin on a map, and
then tap the little > in a blue circle to the
right of the name or description to display
the item’s Info screen, as shown in Figures
12-2 and 12-3. Now tap the Directions to
Here or Directions from Here button to
get directions to or from that location,
respectively.
If you’re looking at a map screen, there’s
another way to get directions. Tap the little
up and down arrow icon at the bottom-left
corner of the map screen. The Start and End
fields appear at the top of the screen.
Type the starting and ending points, as
shown in Figure 12-4 (or choose them from
your bookmarks, recent maps, or contacts if
you prefer). If you want to swap the starting
and ending locations, tap the little swirly
arrow button to the left of the Start and End
fields.
When the start and end locations are cor-
rect, tap the Route button in the bottom-
right corner of the screen and the route
map appears, as shown in Figure 12-5.
Figure 12-4: Type a starting and
ending location.
19_174692 ch12 8/21/07 6:43 PM Page 140
If you need to change the start or end location, tap the Edit button in the top-
left corner. If everything looks right, tap the Start button in the top-right
corner to receive turn-by-turn driving directions, as shown in Figure 12-6.
When you’re finished with the step-by-step directions, tap the little up and
down arrows icon in the bottom-left corner to return to the regular map
screen.
Figure 12-5: The route map for the Figure 12-6: The first step in the step-
start and end locations shown in by-step driving directions for the
Figure 12-4. route shown in Figure 12-5.
Get traffic info in real time
You can find out the traffic conditions for whatever map you’re viewing by
tapping the little car icon in the bottom-right of the screen. When you do,
major roadways are color-coded to inform you of the current traffic speed.
Here’s the key:
141
Chapter 12: Monitoring Maps, Scrutinizing Stocks, and Watching Weather
19_174692 ch12 8/21/07 6:43 PM Page 141
142
Part IV: The Internet iPhone
ߜ Green: 50 or more miles per hour
ߜ Yellow: 25–50 miles per hour
ߜ Red: Under 25 miles per hour
ߜ Gray: No data available at this time
Traffic info doesn’t work in every location, but the only way to find out is to
give it a try. If no color codes appear, assume that it doesn’t work for that
particular location.
More about the Info screen
If a location has a little > in a blue circle to the right of its name or description
(refer to Figure 12-2), you can tap it to see the location’s Info screen.
You’ve already seen that you can get directions to or from that location, add
the location to your bookmarks or contacts, or create a new contact from it,
but there are still two more things you can do with a location from its Info
screen:
ߜ Tap its phone number to call it
ߜ Tap its URL to launch Safari and view its Web site
Taking Stock with Stocks
Stocks is another Internet-enabled application on your iPhone. It’s a one-trick
pony, but if you need its trick — information about specific stocks — it’s a
winner.
Every time you open the Stocks application by tapping its icon on the Home
screen, it displays the latest price for your stocks, with two provisos:
ߜ The quotes may be delayed by up to 20 minutes.
ߜ The quotes are updated only if your iPhone can connect to the Internet
via either Wi-Fi or the AT&T EDGE data network.
So tap that Stocks icon and let’s take a peek.
19_174692 ch12 8/21/07 6:43 PM Page 142
The first time you open Stocks you’ll see information for the Dow Jones
Industrial Average (^DJI), Apple (APPL), Google (GOOG), Yahoo (YHOO), and
AT&T (T). Because the chances of you owning that exact group of stocks are
slim, let’s look at how you can add your own stocks and delete any or all of
the default stocks.
Here’s how to add a stock:
1. Tap the i button in the bottom-right corner of the initial Stocks screen.
The i is for info.
2. Tap the + button in the top-
left corner of the Stocks
screen.
3. Type a stock symbol, or a
company, index, or fund
name.
4. Tap the Search button.
Stocks finds the company or
companies that match your
search request.
5. Tap the one you want to add.
Repeat Steps 4 and 5 until
you’re through adding stocks.
In Figure 12-7, we added John
Wiley & Sons (JW-A).
6. Tap the Done button in the
top-right corner.
And here’s how to delete a stock:
1. Tap the i button in the
bottom-right corner of the
initial Stocks screen.
2. Tap the – button to the left of the stock’s name.
3. Tap the Delete button that appears to the right of the stock’s name.
Repeat Steps 2 and 3 until all unwanted stocks have been deleted.
4. Tap the Done button.
143
Chapter 12: Monitoring Maps, Scrutinizing Stocks, and Watching Weather
Info
button
Figure 12-7: The Stocks screen.
19_174692 ch12 8/21/07 6:43 PM Page 143
144
Part IV: The Internet iPhone
That’s all there is to adding and deleting stocks.
Here are a few more things you can do with Stocks. By default, Stocks dis-
plays the change in a stock’s price in dollars. You can see the change
expressed as a percentage in two ways. The easy way is to tap the number
next to any stock (green numbers are positive; red numbers are negative).
That toggles the display for all stocks. So if they’re currently displayed as dol-
lars, tapping any one of them switches them to percent and vice versa.
The second way accomplishes the same
thing, but takes more steps. Tap the i
button in the bottom-right corner of the ini-
tial Stocks screen. Tap the % or Numbers
button at the bottom of the screen. The
numbers are displayed in the manner you
choose. Tap the Done button in the top-
right corner.
Now refer back to Figure 12-7 and note the
chart at the bottom of the window. At the
top of the chart, you see a bunch of num-
bers and letters, namely 1d, 1w, 1m, 3m,
6m, 1y, and 2y. They are buttons you can
tap to change the time period shown on the
chart. They stand for 1 day, 1 week, 1
month, 3 months, 6 months, 1 year, and 2
years, respectively. Tap one of them and
the chart reflects that period of time.
Finally, to look up additional information
about a stock at Yahoo.com, first tap the
stock’s name to select it, and then tap the
Y! button in the lower-left corner of the
screen. Safari launches and displays the
Yahoo.com finance page for that stock, as
shown in Figure 12-8.
Figure 12-8: The Yahoo.com finance
page for Apple (APPL).
19_174692 ch12 8/21/07 6:43 PM Page 144
Weather Watching
Weather is a simple application that provides you with the current weather
forecast for the city or cities of your choice. By default you see a six-day fore-
cast for the chosen city, as shown in Figure 12-9.
If the background for the forecast is blue, as
shown in Figure 12-9, it’s daytime (between
6 a.m. and 6 p.m.) in that city; if it’s a deep
purple, it’s nighttime (between 6 p.m. and
6 a.m.).
To add a city, first tap the i button in the
bottom-right corner. Tap the + button in the
upper-left corner and then type a city and
state or zip code. Tap the Search button in
the bottom-right corner of the screen. Tap
the name of the found city. Add as many
cities as you want this way.
To delete a city, tap the i button in the
bottom-right corner. Tap the red – button to
the left of its name, and then tap the Delete
button that appears to the right of its name.
You can also choose between Fahrenheit
and Celsius on this screen by tapping either
the °F or °C button near the bottom of the
screen.
When you’re finished, tap the Done button
in the top-right corner of the screen.
If you have added more than one city to Weather, you can switch between
them by flicking your finger across the screen to the left or the right.
See the seven little dots — one white and six gray — at the bottom of the
screen in Figure 12-9? They denote the number of stored cities (which is
seven in the figure).
145
Chapter 12: Monitoring Maps, Scrutinizing Stocks, and Watching Weather
Figure 12-9: The six-day forecast for
Indianapolis, IN.
19_174692 ch12 8/21/07 6:43 PM Page 145
146
Part IV: The Internet iPhone
Last but not least, to see detailed weather information about a city at
Yahoo.com, tap the Y! button in the lower-left corner of the screen. Safari
launches and displays the Yahoo.com weather page for the current city, as
shown in Figure 12-10.
Figure 12-10: Detailed weather on
Yahoo.com is just a tap away.
19_174692 ch12 8/21/07 6:43 PM Page 146
Part V
The Undiscovered
iPhone
20_174692 pt05 8/21/07 6:46 PM Page 147
T
his part is where we show you what’s under
the hood and how to configure your iPhone to
your liking. Then we look at the things to do if
your iPhone ever becomes recalcitrant.
In Chapter 13 we explore every single iPhone set-
ting that’s not discussed in depth elsewhere in the
book. iPhone offers dozens of different preferences
and settings you can customize to make your
iPhone your very own; by the time you finish with
Chapter 13, you’ll know how to customize every
part of your iPhone that can be customized.
iPhones are well-behaved little beasts for the most
part, except when they’re not. Like the little girl
with the little curl, when they’re good they’re very
very good, but when they’re bad they’re horrid.
So Chapter 14 is your comprehensive guide to
troubleshooting for the iPhone. It details what to
do when almost anything goes wrong, offering
step-by-step instructions for specific situations as
well as a plethora of tips and techniques you can
try if something else goes awry. You may never
need Chapter 14 (and we hope you won’t), but
you’ll be very glad we put it here if your iPhone
ever goes wonky on you.
Photo credits:
©iStockphoto.com/Kirill Roslyakov (Top)
©iStockphoto.com/kutay tanir (Middle)
©iStockphoto.com/Chad Anderson (Bottom)
20_174692 pt05 8/21/07 6:46 PM Page 148