Learning the vi Text Editor 6th phần 8 doc
Bạn đang xem bản rút gọn của tài liệu. Xem và tải ngay bản đầy đủ của tài liệu tại đây (444.91 KB, 30 trang )
current buffer has been modified but not saved. The file
may or may not be written out depending upon the
setting of the autowrite option.
[count]ta[g][!]
Jump to the countth newer entry in the tag stack.
[count]po[p][!]
Pops a cursor position off the stack, restoring the cursor
to its previous position. If supplied, go to the countth
older entry.
tags
Display the contents of the tag stack.
ts[elect][!]
[tagstring]
List the tags that match tagstring, using the information
in the tags file(s). If no tagstring is given, the last tag
name from the tag stack is used.
sts[elect][!]
[tagstring]
Like :tselect, but splits the window for the selected
tag.
[count]tn[ext][!]
Jump to the countth next matching tag (default 1).
[count]tp[revious][!]
[count]tN[ext][!]
Jump to the countth previous matching tag (default 1).
[count]tr[ewind][!]
Jump to the first matching tag. With count, jump to the
countth matching tag.
tl[ast][!]
Jump to the last matching tag.
Normally, vim shows you which matching tag, out of how many, has been jumped
to:
tag 1 of >3
It uses a greater-than sign (>) to indicate that it has not yet tried all the matches.
You can use :tnext or :tlast to try more matches. If this message is not
displayed because of some other message, use :0tn to see it.
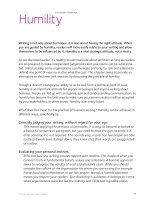
The output of the :tags command is shown below. The current location is marked
with a greater than sign (>):
# TO tag FROM line in file
1 1 main 1 harddisk2:text/vim/test
> 2 2 FuncA 58 -current-
3 1 FuncC 357 harddisk2:text/vim/src/amiga.c
The :tselect command lets you pick from more than one matching tag. The
"priority" (pri field) indicates the quality of the match (global versus static, exact
case versus case-independent, etc.); this is described more fully in the vim
documentation.
nr pri kind tag file ~
1 F f mch_delay os_amiga.c
mch_delay(msec, ignoreinput)
> 2 F f mch_delay os_msdos.c
mch_delay(msec, ignoreinput)
3 F f mch_delay os_unix.c
mch_delay(msec, ignoreinput)
Enter nr of choice (<CR> to abort):
The :tag and :tselect commands can be given an argument that starts with /.
In that case, this argument is treated as a regular expression. vim will find all the
tags that match the given regular expression.
[2]
For example, :tag /normal will
find the macro NORMAL, the function normal_cmd, and so on. Use :tselect
/normal and enter the number of the tag you want.
[2]
Prior to Version 5.1, vim keyed its treatment of the :tag or :tselect argument as a regular expression
based on the presence or absence of special characters. The use of / disambiguates the process.
The vi command mode commands are described in Table 11.6. Besides using the
keyboard, as in the other editors, you can also use the mouse, if mouse support
is enabled in your version of vim.
Table 11.6. vim Command Mode Tag Commands
Command Function
^]
g
<LeftMouse>
CTRL-
<LeftMouse>
Look up the location of the identifier under the cursor in the tags
file, and move to that location. The current location is
automatically pushed onto the tag stack.
^T
Return to the previous location in the tag stack, i.e., pop off one
element. A preceding count specifies how many elements to pop
off the stack.
The vim options that affect tag searching are described in Table 11.7.
Table 11.7. vim Options for Tag Management
Option Function
taglength,
tl
Controls the number of significant characters in a tag that is to be
looked up. The default value of zero indicates that all characters
are significant.
tags
The value is a list of filenames in which to look for tags. As a
special case, if a filename starts with ./, the dot is replaced with
the directory part of the current file's pathname, making it possible
to use tags files in a different directory. The default value is
"./tags,tags".
tagrelative
When set to true (the default), and using a tags file in another
directory, filenames in that tags file are considered to be relative to
the directory where the tags file is.
The vim 5.1 distribution comes with Version 2.0.3 of the Exuberant ctags
program. As of this writing, this is the current version of Exuberant ctags.
vim can use emacs style etags files, but this is only for backwards compatibility;
the format is not documented in the vim documentation, nor is the use of etags
files encouraged.
Finally, like elvis, vim also looks up the entire word containing the cursor, not just
the part of the word from the cursor location forward.
11.8.3 Infinite Undo
In vim, being able to undo and redo multiple levels of changes is controlled by
the undolevels option. This option is a number indicating how many levels of
"undo" that vim should allow. A negative value disallows any undoing (which is
not terribly useful).
When undolevels is set to a non-zero value, you enter text as normal. Then each
successive u command undoes one change. To redo (undo the undo), you use the
(rather mnemonic) CTRL-R command.
vim is different from elvis; it starts out with a default value for undolevels of
1,000, which should be close enough to infinite for any given editing session.
Also, the option is global, and not per buffer.
Once undolevels has been set, a count to either the u or ^R commands undoes
or redoes the given number of changes.
vim actually implements undoing and redoing in two different ways. When the
cpoptions (compatibility options) option contains the letter u, the u command
works like in vi, and ^R repeats the previous action (like . in nvi). When u is
absent from cpoptions, u undoes one step and ^R redoes one step. This is easier
to use, but not vi-compatible.
11.8.4 Arbitrary Length Lines and Binary Data
vim does not have a limit on the number or lengths of lines. When editing a
binary file, you should either use the -b command-line option or :set binary.
These set several other vim options that make it easier to edit binary files. To
enter 8-bit text, use ^V followed by three decimal digits.
11.8.5 Incremental Searching
As mentioned in Section 8.6.4, you enable incremental searching in vim using
:set incsearch.
The cursor moves through the file as you type. vim highlights the text that
matches what you've typed so far.
You may wish to use this with the hlsearch option, which highlights all matches
of the most recent search pattern. This option is particularly useful when looking
for all uses of a particular variable or function in program source code.
11.8.6 Left-Right Scrolling
As mentioned in Section 8.6.5, you enable left-right scrolling in vim using :set
nowrap. The value of sidescroll controls the number of characters by which vim
shifts the screen when scrolling left to right. With sidescroll set to zero, each
scroll puts the cursor in the middle of the screen. Otherwise, the screen scrolls by
the desired number of characters.
vim also has several commands that scroll the window sideways, shown in Table
11.8.
Table 11.8. vim Sideways Scrolling Commands
Command Function
zl
Scroll the window left.
zh
Scroll the window right.
zs
Scroll the window to put the cursor at the left (start) of the screen.
ze
Scroll the window to put the cursor at the right (end) of the screen.
11.8.7 Visual Mode
vim allows you to select regions one character at a time, one line at a time, or
rectangularly, using the commands shown in Table 11.9
.
Table 11.9. vim Block Mode Command Characters
Command Function
v
Start region selection, character at a time mode.
V
Start region selection, line at a time mode.
^V
Start region selection, rectangular mode.
vim highlights (using reverse video) the text as you are selecting. To make your
selection, simply use the normal motion keys. If showmode is set, vim will indicate
the mode as one of visual, visual line, or visual block. If vim is running inside an
xterm, you can also use the mouse to select text (see :help mouse-using for the
details). This also works in the GUI versions. The screen below shows a
rectangular region:
The 6th edition of <citetitle>Learning the vi Editor</citetitle>
brings the book into the late 1990’s.
In particular, besides the “original” version of
<command>vi</command> that comes as a standard part of every UNIX
system, there are now a number of freely available
“clones”
or work-alike editors.
After applying the ~ operator, the screen looks like this:
The 6th edition of <citetitle>Learning the vi Editor</citetitle>
brings the BOOK INTO THE LATE 1990’s.
In particulAR, BESIDES THE &LDQUo;original” version of
<command>vi</COMMAND> THAT COMES as a standard part of every UNIX
system,
there are nOW A NUMBER OF FREELY available “clones”
or work-alike editors.
vim permits many operations on the selected text. Some operations work only on
whole lines, even if you've selected a region that does not contain whole lines.
vim has special commands for increasing the "swept out" area, and it allows you
to apply almost any vi mode command to the highlighted text, as well as some
commands that are unique to visual mode.
When defining the area to be operated on, a number of commands make it easy
to treat words, sentences, or blocks of C/C++ code as single objects. These are
described in Table 11.10
. These commands can be used by themselves to extend
the region, or they can be used in conjunction with an operator. For example, daB
deletes a brace-enclosed block of text, including the braces.
Table 11.10. vim Block Mode Object Selectors
Command Selects
aw
A word (with whitespace)
iw
An inner word (without whitespace)
aW
A WORD (with whitespace)
iW
An inner WORD (without whitespace)
as
A sentence (with whitespace)
is
An inner sentence (without whitespace)
ap
A paragraph (with whitespace)
ip
An inner paragraph (without whitespace)
ab
A ( ) block (includes parentheses)
ib
An inner ( ) block (not including the parentheses)
aB
A { } block (includes braces)
iB
An inner { } block (not including the braces)
The terms "word" and "WORD" have the same meaning as for the w and W motion
commands.
vim allows you to use many operators on highlighted text. The available
operators are summarized in Table 11.11
.
Table 11.11. vim Block Mode Operations
Command Operation
~
Flip the case of the selected text.
o, O
Move to the other end of the highlighted text. o moves from the start of
the highlighted area to end, and vice versa. O in block mode moves to
the other end of the text on the current line. You can continue sweeping
out the area from the new position.
<, >, !
Shift text left or right, filter text. These operate on the whole lines
containing the marked region. In the future, for a block, only the block
will be shifted.
=
Filters text through the program named by the equalprg option.
(Typically a simple text formatter such as fmt.) This operates on the
whole lines containing the marked region.
gq
Formats the lines containing the marked region to be no longer that
what's set in textwidth. This operates on the whole lines containing
the marked region.
:
Start an ex command for the highlighted lines. This operates on the
whole lines containing the marked region.
c, d, y
Change, delete, or yank text. These work even on rectangular text,
although the c command only enters text on the first line in the block.
c, r, s
Change the highlighted text.
C, S, R
If using CTRL-V, the rectangle is deleted and insert mode is entered in
the first line. Otherwise, whole lines are replaced.
x
Delete the highlighted text.
X, Y
Delete or yank the whole lines containing the highlighted area.
D
Delete to the end of the line. When using CTRL-V, the highlighted block
and the rest of the text to end of each line is deleted. If not using CTRL-
V, the whole line is deleted.
J
Join the highlighted lines. This operates on the whole lines containing
the marked region.
U
Make uppercase. This command is unique to visual mode.
u
Make lowercase. This command is unique to visual mode.
^]
Use the highlighted text as the tag to find in a tag search.
11.9 Programming Assistance
vim has extensive facilities for both the edit-compile-debug cycle and syntax
highlighting.
11.9.1 Edit-Compile Speedup
The facilities in vim were inspired by the "quick fix" mode of the Manx Aztec C
compiler for the Amiga. In fact, the vim documentation refers to this feature as
"quick fix" mode. The features are quite flexible, allowing you to tailor them to
your programming environment (see Table 11.12
).
Table 11.12. vim Program Development Commands
Command Function
mak[e] [arguments]
Run make, based on the settings of several options as
described below, then go to the location of the first error.
cf[ile][!]
[errorfile]
Read the error file and jump to the first error. With an
errorfile, use that file for errors and set the errorfile
option to it. The ! forces vim to move to another buffer if
the current one has been modified but not saved.
cl[ist][!]
List the errors that include a filename. With !, list all
errors.
[count]cn[ext][!]
Display the countth next error that includes a filename. If
there are no filenames at all, go to the countth next
error.
[count]cN[ext][!]
[count]cp[revious][!]
Display the countth previous error that includes a
filename. If there are no filenames at all, go to the
countth previous error.
clast[!] [n]
Display error n if supplied. Otherwise, display the last
error.
crewind[!] [n]
Display error n if supplied. Otherwise, display the first
error.
cc[!] [n]
Displays error n if supplied, otherwise redisplays the
current error.
cq[uit]
Quit with an error code, so that the compiler will not
compile the same file again. This is intended primarily for
use with the Amiga compiler.
Like elvis, as you move through the errors vim also compensates for changes in
the file, so that when you go to the next error, you end up on the correct line.
The vim options that control the :make command are presented in Table 11.13
.
Table 11.13. vim Program Development Options
Option Value Function
shell /bin/sh
The shell to use to execute the command for
rebuilding your program.
makeprg make
The program that will actually handle all the
recompilation.
shellpipe 2>&1| tee
Whatever is needed to cause the shell to save
both standard output and standard error from the
compilation in the error file.
makeef /tmp/vim##.err
The name of a file which will contain the compiler
output. The ## causes vim to create unique
filenames.
errorformat %f:%l:\ %m
A description of what error messages from the
compiler look like. This example value is for GCC,
the GNU C compiler.
When you execute :make, vim constructs a command by concatenating the
various pieces described above. Any arguments you supply are passed to make in
the appropriate place. It then echoes this command to your screen. For example,
if you type :make -k, you might see something like this:
:!make -k 2>&1| tee /tmp/vim34215.err
By using the tee(1) program, the output from make and the compiler is saved in
the error file (/tmp/vim34215.err), and also sent to standard output, in this case
your screen.
When the make finishes, vim reads the error file, and goes to the location of the
first error. It uses the value of the errorformat option to parse the contents of
the error file, in order to find file names and line numbers. (The format of this
variable is described in full in :help errorformat.) You can then use the :cc
command to see the error messages, and the :cnext command to move to the
next error.
11.9.2 Syntax Highlighting
Highlighting in vim is based primarily on colors. To enable syntax highlighting, put
syntax on into your .vimrc file. This will cause vim to read the syntax.vim file,
which defines the default highlight coloring and then sets things up to use
highlighting appropriate to each language.
vim has a very powerful sub-language for defining syntax highlighting. The
syntax.txt help file in vim 5.1 that describes it is over 1,500 lines long. Therefore,
we won't attempt to give all the details here. Instead, the sample file below
should give you some taste for what vim can do. The example consists of portions
of the syntax file for Awk:
" Vim syntax file
" Language: awk, nawk, gawk, mawk
" Maintainer: Antonio Colombo <>
" Last change: 1997 November 29
" Remove any old syntax stuff hanging around
syn clear
" A bunch of useful Awk keywords
syn keyword awkStatement break continue delete exit
syn keyword awkFunction atan2 close cos exp int log rand sin
\
sqrt srand
syn keyword awkConditional if else
syn keyword awkRepeat while for do
syn keyword awkPatterns BEGIN END
syn keyword awkVariables ARGC ARGV FILENAME FNR FS NF NR
" Octal format character.
syn match awkSpecialCharacter contained "\\[0-7]\{1,3\}"
" Hex format character.
syn match awkSpecialCharacter contained "\\x[0-9A-Fa-f]\+"
syn match awkFieldVars "\$[0-9]\+"
syn match awkCharClass contained "\[:[^:\]]*:\]"
syn match awkRegExp contained "/\^"ms=s+1
syn match awkRegExp contained "\$/"me=e-1
syn match awkRegExp contained "[?.*{}|+]"
" Numbers, allowing signs (both -, and +)
" Integer number.
syn match awkNumber "[+-]\=\<[0-9]\+\>"
" Floating point number.
syn match awkFloat "[+-]\=\<[0-9]\+\.[0-9]+\>"
syn match awkComment "#.*" contains=awkTodo
if !exists("did_awk_syntax_inits")
let did_awk_syntax_inits = 1
" The default methods for highlighting. Can be overridden later
hi link awkConditional Conditional
hi link awkFunction Function
hi link awkRepeat Repeat
hi link awkStatement Statement
hi link awkNumber Number
hi link awkFloat Float
hi link awkComment Comment
endif
let b:current_syntax = "awk"
The file above uses syntax keyword to give names to certain classes of keywords
(such as real Awk keywords and built-in functions), and syntax match to give
names to regular expressions that match certain kinds of objects (such as
numbers). Then the hi link statements link the named classes of objects to the
predefined highlighting conventions.
The syntax.vim file predefines the standard conventions, with a number of lines
like these:
hi Comment term=bold ctermfg=Cyan guifg=#80a0ff
hi Constant term=underline ctermfg=Magenta guifg=#ffa0a0
hi Special term=bold ctermfg=LightRed guifg=Orange
hi Identifier term=underline ctermfg=DarkCyan guifg=#40ffff
The first argument defines the class, and the rest define what kind of highlighting
to do on what kind of terminal. term is for a normal terminal, cterm is for a color
terminal (in this case, the ForeGround color), and gui is for vim's GUI interface.
In vim, the syntax colors are global attributes. Changing the Comment color
changes the color for all comments in all windows, no matter what programming
language you're editing.
Since the syntax descriptions use attribute linking, you can make language-
specific changes. For example, to change the comment color for Awk, you can
define attributes for awkComment, like this:
hi awkComment guifg=Green
vim comes with a large number of syntax descriptions for different languages.
The coloring for Awk is slightly psychedelic (lots of red and pink), although the
coloring for context diffs is actually rather pleasant, as is the color scheme for
UNIX mailbox files. The HTML mode is also pretty interesting. Overall, it's quite a
lot of fun to use.
11.10 Interesting Features
vim is a very featureful editor. We cannot describe everything in full detail here.
Instead, we've chosen to discuss several of the most important and unique
features that it has.
Automatic file type detection
vim will notice how the lines of a text file end. It sets the fileformat
variable to one of dos (CR-LF), unix (LF), or mac (CR) to indicate the file's
current mode. By default, vim will write the file back out in the same
format, but if you change the value of fileformat, vim will use that
convention. This is an easy way to convert between Linux (or UNIX) and
MS-DOS files, and makes editing DOS files under UNIX or Linux very easy.
(In contrast, the other clones all display a ^M at the end of each line.)
vim is "charityware"
The licensing terms are described later in this chapter; they are fairly
liberal. However, the author encourages users who like vim to send a
donation to a children's center in Uganda.
Significant C programming extensions
vim has a large set of features for working with C and C++ programs.
The "auto command" facility
vim defines a large number of events, such as before or after reading a
file, entering or leaving a window, and so on. For each event, you can set
up an "auto command," i.e., a command to be executed when that event
occurs.
11.10.1 vim Is Charityware
With vim, Bram Moolenaar has taken a different approach from the usual
shareware or freeware author. If you use vim and you like it, Mr. Moolenaar
requests that you send a donation to help orphans in Uganda. We applaud his
efforts.
Mr. Moolenaar spent a year as a volunteer at Kibaale Children's Centre (KCC),
located in Kibaale, a small town in the south of Uganda, near Tanzania. The KCC
works to provide food, medical care, and education for children in this area, which
is suffering from AIDS more than in any other part of the world. Because of the
high incidence of AIDS, many of the children are orphans.
In order to continue supporting KCC, Mr. Moolenaar is trying to raise funds and
organize sponsorship. You can find a much longer explanation in the file
uganda.txt in the vim distribution. This includes directions for sending donations.
You can also look at /> .
11.10.2 C and C++ Programming Features
vim, in the grand tradition of vi, is first and foremost a programmer's editor. In
particular, it is a C programmer's editor, and happily, C++ programmers can take
advantage of it too. There are lots of features that make the C programmer's life
easier. We describe the most significant ones here.
11.10.2.1 Smart indenting
All versions of vi have the autoindent option, which, when set, automatically
indents the current line by the same amount as the one next to it. This is handy
for C programmers who indent their code, and for anyone else who may need to
indicate some kind of structure in their text via indentation.
vim carries this feature further, with two options, smartindent and cindent. The
cindent option is the more interesting of the two, and is the topic of this
subsection. See Table 11.14
for a list of vim indentation and formatting options.
Table 11.14. vim Indentation and Formatting Options
Option Function
autoindent
Simple-minded indentation, uses that of the previous line.
smartindent
Similar to autoindent, but knows a little about C syntax.
Deprecated in favor of cindent.
cindent
Enables automatic indenting for C programs, and is quite smart.
C formatting is affected by the rest of the options in this table.
cinkeys
Input keys that trigger indentation options.
cinoptions
Allows you to tailor your preferred indentation style.
cinwords
Keywords that start an extra indentation on the following line.
formatoptions
Made up of a number of single letter flags that control several
behaviors, notably how comments are formatted as you type
them.
comments
Describes different formatting options for different kinds of
comments, both those with starting and ending delimiters, as in
C, and those that start with a single symbol and go to the end of
the line, such as in a Makefile or shell program.
When set up appropriately, vim automatically rearranges the indentation of your
C program as you type. For instance, after an if, vim automatically indents the
next line. If the body of the if is enclosed in braces, when you type the right
brace, vim will automatically indent it back one tab stop, to line up underneath
the if. As another example, with the settings shown below, upon typing the
colon that goes with a case, vim will shift the line with the case left one tab stop
to line up under the switch.
The following .vimrc produces, in our opinion, very nicely formatted C code:
set nocp incsearch
set cinoptions=:0,p0,t0
set cinwords=if,else,while,do,for,switch,case
set formatoptions=tcqr
set cindent
syntax on
source ~/.exrc
The nocp option turns off strict vi compatibility. The incsearch option turns on
incremental searching. The settings for cinoptions, cinwords, and
formatoptions differ from the defaults; the result is to produce a fairly strict
"K&R" C formatting style. Finally, syntax coloring is turned on, and then the rest
of the vi options are read in from the user's .exrc file.
We recommend that you start up vim, set these options as shown, and then
spend some time working on a C or C++ program. Five minutes of playing with
this facility will give you a better feel for it than whatever static examples we
could present on the printed page. We think you'll find the facility really enjoyable
to use.
11.10.2.2 Include file searching
Often, when working with large C programs, it is helpful to be able to see where a
particular type name, function, variable or macro is defined. The tag facility can
help with this, but doing a tag lookup actually moves you to the found location,
which may be more than you need.
vim has a number of commands that search through the current file and through
included files to find other occurrences of a keyword. We summarize them here.
The vi and ex commands fall into four categories: those that display the first
occurrence of a particular object (in the status line), those that display all
occurrences of a particular object, those that jump to the location of the first
occurrence, and those that open a new window and jump to the first occurrence.
Commands that do all four exist to look for keywords, usually the identifier under
the cursor, and to look for macro definitions of the identifier under the cursor.
These commands use the smart syntax facilities (the comments variable described
earlier) to ignore occurrences of the searched-for identifier inside comments. With
a preceding count, they go to the countth occurrence. The search for the
identifier starts at the beginning of the file, unless otherwise noted.
See Table 11.15
for a list of the vim identifier searching commands.
Table 11.15. vim Identifier Search Commands
Command Function
[i
Display the first line that contains the keyword under the cursor.
]i
Display the first line that contains the keyword under the cursor, but
start the search at the current position in the file. This command is
most effective when given a count.
[I
Display all lines that contain the keyword under the cursor. Filenames
and line numbers are displayed.
]I
Display all lines that contain the keyword under the cursor, but start
from the current position in the file.
[ ^I
Jump to the first occurrence of the keyword under the cursor. (Note
that ^I is a TAB.)
] ^I
Jump to the first occurrence of the keyword under the cursor, but start
the search from the current position.
^W i
^W ^I
Open a new window showing the location of the first (or countth)
occurrence of the identifier under the cursor.
[d
Display the first macro definition for the identifier under the cursor.
]d
Display the first macro definition for the identifier under the cursor, but
start the search from the current position.
[D
Display all macro definitions for the identifier under the cursor.
Filenames and line numbers are displayed.
]D
Display all macro definitions for the identifier under the cursor, but start
the search from the current position.
[ ^D
Jump to the first macro definition for the identifier under the cursor.
] ^D
Jump to the first macro definition for the identifier under the cursor, but
start the search from the current position.
^W d
^W ^D
Open a new window showing the location of the first (or countth) macro
definition of the identifier under the cursor.
Two options, define and include, describe the source code lines that define
macros and include source files. They have default values appropriate for C, but
can be changed to suit your programming language (e.g., the value
^\(#\s*define\|[a-z]*\s*const\s*[a-z]*\) for define could be used to also
look for definitions of C++ named constants).
The same facilities are also available as ex commands, shown in Table 11.16
.
Table 11.16. vim Identifier Search Commands from ex Mode
Command Function
[range]is[earch][!]
[count] [/]pattern[/]
Like [i and ]i, but searches in range lines. The default
is the whole file. The !, if supplied, forces comments to
be searched also. Without the /'s, a word search is
done. With them, a regular expression search is done.
[range]il[ist][!]
[/]pattern[/]
Like [I and ]I, but searches in range lines. The default
is the whole file.
[range]ij[ump][!]
[count] [/]pattern[/]
Like [ ^I and ] ^I, but searches in range lines. The
default is the whole file.
[range]isp[lit][!]
[count] [/]pattern[/]
Like ^W i and ^W ^I, but searches in range lines. The
default is the whole file.
[range]ds[earch][!]
[count] [/]pattern[/]
Like [d and ]d, but searches in range lines. The default
is the whole file.
[range]dl[ist][!]
[/]pattern[/]
Like [D and ]D, but searches in range lines. The default
is the whole file.
[range]dj[ump][!]
[count] [/]pattern[/]
Like [ ^D and ] ^D, but searches in range lines. The
default is the whole file.
[range]dsp[lit][!]
[count] [/]pattern[/]
Like ^W d and ^W ^D, but searches in range lines. The
default is the whole file.
che[ckpath][!]
List all the included files that could not be found. With
the !, list all the included files.
The path option is used to search for included files that do not have an absolute
pathname. Its default value is .,/usr/include,,, which looks in the directory
where the edited file resides, in /usr/include, and in the current directory.
11.10.2.3 Cursor motion commands for programming
A number of enhanced and new cursor motion commands make it easier to find
the opposite ends of matching constructs, as well as to find unmatched constructs
that should be matched, for example, #if statements that do not have a
corresponding #endif. Most of these commands may be preceded by a count,
which defaults to one if not given.
See Table 11.17
for a list of the extending matching commands.
Table 11.17. vim Extended Matching Commands
Command Function
%
Extended to match the /* and */ of C comments, nd also the C
preprocessor conditionals, #if, #ifdef, #ifndef, #elif, #else, and
#endif.
[(
Move to the countth previous unmatched (.
[)
Move to the countth next unmatched ).
[{
Move to the countth previous unmatched {.
[}
Move to the countth next unmatched }.
[#
Move to the countth previous unmatched #if or #else.
]#
Move to the countth next unmatched #else or #endif.
[*, [/ Move to the countth previous unmatched start of a C comment, /*.
]*, ]/ Move to the countth next unmatched end of a C comment, */.
11.10.3 Autocommands
vim allows you to specify actions that should be executed when a particular event
occurs. This facility gives you a great deal of flexibility and control. As always
though, with power comes responsibility; the vim documentation warns that you
should be careful with the autocommand facility so that you don't accidentally
destroy your text!
The facility is complicated and detailed. In this section we outline its general
capabilities, and provide an example to give you a sense of its flavor.
The autocommand command is named :autocmd. The general syntax is:
:au event filepat command
The event is the kind of event to which this command applies, for example,
before and after reading a file (FileReadPre and FileReadPost), before and after
writing a file (FileWritePre and FileWritePost), and upon entering or leaving a
window (WinEnter and Winleave). There are more defined events, and case in
the event name does not matter.
The filepat is a shell-style wildcard pattern that vim applies to filenames. If they
match, then the autocommand will be applied for this file.
The command is any ex mode command. vim has a special syntax for retrieving
the different parts of filenames, such as the file's extension, or the name without
the extension. These can be used in any ex command, but are very useful with
autocommands.
Multiple autocommands for the same events and file patterns add commands
onto the list. Autocommands can be removed for a particular combination of
events and file patterns by appending ! to the :autocmd command.
A particularly elegant example allows you to edit files compressed with the gzip
program. The file is automatically decompressed when editing starts, and then
recompressed when the file is written out (the fourth line is broken for
readability):
:autocmd! BufReadPre,FileReadPre *.gz set bin
:autocmd! BufReadPost,FileReadPost *.gz '[,']!gunzip
:autocmd BufReadPost,FileReadPost *.gz set nobin
:autocmd BufReadPost,FileReadPost *.gz \
execute ":doautocmd BufReadPost " . expand("%:r")
:autocmd! BufWritePost,FileWritePost *.gz !mv <afile> <afile>:r
:autocmd BufWritePost,FileWritePost *.gz !gzip <afile>:r
:autocmd! FileAppendPre *.gz !gunzip <afile>
:autocmd FileAppendPre *.gz !mv <afile>:r <afile>
:autocmd! FileAppendPost *.gz !mv <afile> <afile>:r
:autocmd FileAppendPost *.gz !gzip <afile>:r
The first four commands are for reading compressed files. The first two in this set
use ! to remove any previously defined autocommands for compressed files
(*.gz). The compressed file is read into the buffer as a binary file, so the first
command turns on the bin (short for binary) option.
vim sets the marks '[ and '] to the first and last lines of the just read text. The
second command uses this to uncompress the just read file in the buffer.
The next two lines unset the binary option, and then apply any autocommands
that apply to the uncompressed version of the file (e.g., syntax highlighting). The
%:r is the current filename without the extension.
The next two lines are for writing the compressed file. The first one in this set
first removes any previously defined autocommands for compressed files (*.gz),
with these events. The commands invoke a shell to rename the file to not have
the .gz extension, and then run gzip to compress the file. The <afile>:r is the
filename without the extension. (The use of <afile>:r is restricted to
autocommands.) vim writes the uncompressed buffer to the file with the .gz
extension, thus the need for the renaming.
The second line in this set runs gzip to compress the file. gzip automatically
renames the file, adding the .gz extension.
The last four lines handle the case of appending to a compressed file. The first
two of these lines uncompress the file and rename it before appending the
contents to the file.
Finally, the last two lines recompress the file after writing to it, so that the
uncompressed file is not left laying around.
This section just touches the tip of the iceberg of autocommands. For example,
autocommands can be placed into groups, so that they can all be executed or
removed together. All of the syntax coloring commands described in Section
11.9.2 are placed into the highlight group. An autocommand then executes all
of them together when an appropriate file is read.
As an example, instead of having your .vimrc file always execute set cindent for
smart C indenting, you might use an autocommand to do it just for C source
code, like this:
autocmd BufReadPre,FileReadPre *.[chy] set cindent
11.11 Sources and Supported
Operating Systems
vim has its own Internet domain. The best thing to do is start from the home
page at /> . There is a FAQ (Frequently Asked Questions) for
vim, at /> . Of particular interest are several vim-related
mailing lists; start with /> .
Instead of just one or two distribution points, there are a number of ftp sites that
mirror the main vim distribution site. These are all available as
ftp.country.vim.org. Replace country with a two-letter code from Table 11.18
.
More details, including other mirror sites, are available via links on the web page,
and in the file /> . The other sites are all
mirrors of ftp.nl.vim.org
. When retrieving files via ftp, try to use the one that is
closest to you.
Table 11.18. vim Distribution Site Country Codes
Code Country
au
Australia
ca
Canada
gr
Greece
hu
Hungary
jp
Japan
kr
Korea
nl
The Netherlands
pl
Poland
us
United States
The source code for vim is freely distributable. Distribution is permitted in source
and binary form, but if you modify vim and distribute it, you must make your
changes available to the maintainer for possible inclusion in a subsequent release.
vim is also "charityware." This was discussed earlier in this chapter.
vim has been ported to the following systems:
• The Amiga. (This is where vim was born.)
• The Acorn Archimedes. The last working port was done with Version 2.0. A
new port is being done. It will be included in Version 5.2.
• BeOS. As of vim Version 5.1, both Intel and non-Intel CPUs are supported.
• MS-DOS.
• The Apple Macintosh. The original port to the Macintosh was for Version
3.0. The 5.x port is still marked as being in an Alpha state.
• MiNT on Atari microcomputers.
• OS/2.
• UNIX. Essentially any UNIX variant should work; vim uses GNU Autoconf
for configuration.
• VMS.
• Windows 95 and Windows NT. Both console and GUI versions are
available. Under Windows 3.1, use the 32-bit DOS version.
The online help documents the peculiarities of the vim port to each operating
system.
Compiling vim is straightforward. Retrieve the distribution via ftp. Uncompress
and untar it, run the configure program, and then run make:
$ gzip -d < vim-5.1.tar.gz | tar -xvpf -
$ cd vim-5.1; ./configure
$ make
vim should configure and build with no problems. Use make install to install it.
Should you need to report a bug or problem in vim, the person to contact is Bram
Moolenaar, at
.
Chapter 12. vile—vi Like Emacs
vile stands for "vi Like Emacs." It started out as a copy of Version
3.9 of MicroEMACS that was modified to have the "finger feel" of vi.
There are currently three maintainers: Paul Fox, Tom Dickey, and
Kevin Buettner. The current version is 8.0; it is essentially the same
as 7.4, but with bug fixes. This chapter was written using vile.
12.1 Authors and History
Paul Fox describes the early vile history this way:
vile's design goal has always been a little different than that of the other clones.
vile has never really attempted to be a "clone" at all, though most people find it
close enough. I started it because in 1990 I wanted to to be able to edit multiple
files in multiple windows, I had been using vi for 10 years already, and the
sources to Micro-EMACS came floating past my newsreader at a job where I had
too much time on my hands. I started by changing the existing keymaps in the
obvious way, and ran full-tilt into the "Hey! Where's `insert' mode?" problem. So
I hacked a little more, and hacked a little more, and eventually released in '91 or
'92. (Starting soon thereafter, major version numbers tracked the year of
release: 7.3 was the third release in '97.)
But my goal has always been to preserve finger-feel (as opposed to the display
visuals), and, selfishly, to preserve finger-feel most for the commands I use.
vile has quite an amazing ex mode, that works very well—it just looks really odd,
and a couple of commands which are beyond the scope of the current parser are
missing. For the same reasons, vile also won't fully parse existing .exrc files,
since I don't really think that's so important—it does simple ones, but more
sophisticated ones need some tweaking. But when you toss in vile's built-in
command/macro language, you quickly forget you ever cared about .exrc.
Tom Dickey started working on vile in December of 1992, initially just
contributing patches, and later doing more significant features and extensions,
such as line numbering, name completion, and animating the buffer list window.
Tom states that "Integrating features together is more important to my design
goals than implementing a large number of features."
In February of 1994, Kevin Buettner started working on vile. Initially, he supplied
bug fixes for the X11 version, xvile, and then improvements, such as scrollbars.
This evolved into support for the Motif, OpenLook, and Athena widget sets.
Because, surprisingly, the Athena widgets were not "universally available in a
bugfree form," he wrote a version that used the raw Xt toolkit. This version ended
up providing superior functionality to the Athena version. Kevin also contributed
the initial support in vile for GNU Autoconf.
Currently, vile maintenance is done "by committee," with Tom Dickey being the
primary maintainer. Paul manages the mailing lists.
For the near term, future work will focus on improving the Perl integration, and
enhancing the major mode concept (discussed below).
12.2 Important Command-Line Arguments
Although vile does not expect to be invoked as either vi or ex, it can be invoked
as view, in which case it will treat each file as read-only. Unlike the other clones,
it does not have a line-editor mode.
Here are the important vile command-line arguments:
-?
vile prints a short usage summary and then exits.
-g N
vile will begin editing on the first file at the specified line number. This can
also be given as +N.
-s pattern
In the first file, vile will execute an initial search for the given pattern. This
can also be given as +/pattern.
-t tag
Start editing at the specified tag. The -T option is equivalent, and can be
used when X11 option parsing eats the -t.
-h
Invokes vile on the help file.
-R
Invokes vile in "readonly" mode, no writes are permitted while in this
mode. (This will also be true if vile is invoked as view, or if readonly mode
is set in the startup file.)
-v
Invokes vile in "view" mode, no changes are permitted to any buffer while
in this mode.
@ cmdfile
vile will run the specified file as its startup file, and will bypass any normal
startup file (i.e., .vilerc) or environment variable (i.e., VILEINIT).
12.3 Online Help and Other Documentation
vile currently comes with a single (rather large) ASCII text file, vile.hlp. The
:help command (which can be abbreviated to :h) will open a new window on
that file. You can then search for information on a particular topic, using standard
vi search techniques. Because it is a flat ASCII file, it is also easy to print out and
read through.
In addition to the help file, vile has a number of built-in commands for displaying
information about the facilities and state of the editor. Some of the most useful
commands are:
:show-commands
Creates a new window that shows a complete list of all vile commands,
with a brief description of each one. The information is placed in its own
buffer that can be treated just like any other vile buffer. In particular, it is
easy to write it out to a file for later printing.
:apropos
Shows all commands whose names contain a given substring. This is
easier than just randomly searching through the help file to find
information on a particular topic.
:describe-key
Prompts you for a key or key sequence, and then shows the description of
that command. For instance, the x key will implement the delete-next-
character function.
:describe-function
Prompts you for a function name, and then shows the description of that
function. For instance, the delete-next-character function deletes a
given number of characters to the right of the current cursor position.
The :apropos, :describe-function, and :describe-key commands all give the
descriptive information, plus all other synonyms (since a function may have more
than one name, for convenience), all other keys that are bound to it (since many
key sequences may be bound to the same function), and whether the command
is a "motion" or an "operator." A good example of this is the output of
:describe-function next-line:
"next-line" ^J j #-B
or "down-arrow"
or "down-line"
or "forward-line"
(motion: move down CNT lines )
This shows all four of its names and its three key-bindings. (The sequence #-B is
vile's terminal-independent representation of the up-arrow—a complete list of
those names is in the help file.)
The VILE_STARTUP_PATH environment variable can be set to a colon-separated
search path for the help file.
[1]
The VILE_HELP_FILE environment variable can be
used to override the name of the help file (typically vile.hlp).
[1]
Although the help file says that this path is also used when searching for the startup file, the version 7.4
source code disagrees. It is actually the search path used for the :source command. In version 8.0, this is
fixed—the startup file and :source command use the same mechanism.
The combination of online searchable help, built-in command and key
descriptions, and command completion makes the help facility straightforward to
use.
12.4 Initialization
vile and xvile perform the following initializations:
1. (xvile only) Use the value of the XVILE_MENU environment variable for the
name of the menu description file, if provided. Otherwise, it uses
.vilemenu. The purpose of this file is to set the default menus for the X11
interface. You can then add to or override any of these menus in the other
startup files.
2. Execute the file named on the command line with @cmdfile, if any. Bypass
any other initialization steps that would otherwise be done.
3. If the VILEINIT environment variable exists, execute its value. Otherwise,
look for an initialization file.
4. If the VILE_STARTUP_FILE environment variable exists, use that as the
name of the startup file. If not, on UNIX use .vilerc, on other systems use
vile.rc.
5. Look for the startup file in the current directory, and then in the user's
home directory. Use whichever one is found first.
As for nvi and vim, you can place common initialization actions into your .exrc file
(i.e., options and commands for UNIX vi, and/or the other clones), and have your
.vilerc file execute :source .exrc before or after the vile-specific initializations.
12.5 Multiwindow Editing
vile is somewhat different from the other clones. It started life as a version of
Micro-Emacs, and then was modified into an editor with the "finger-feel" of vi.
One of the things that versions of emacs have always done is handle multiple
windows and multiple files; as such, vile was the first vi-like program to provide
multiple windows and editing buffers.
As in elvis and vim, the :split command
[2]
will create a new window, and then
you can use the ex command :e filename to edit a new file in the new window.
After that, things become different, in particular the vi command mode keys to
switch among windows are very different.
[2]
That this works is an artifact of the fact that vile allows you to abbreviate commands. The actual
command name is split-current-window.
<preface id="VI6-CH-0">
<title>Preface </title>
<para>
Text editing is one of the most common uses of any computer system,
and
<command>vi</command> is one of the most useful standard text
editors>
With <command>vi</command> you can create new files, or edit any
exist>
file.
</para>
ch00.sgm top
# Makefile for vi book
# Arnold Robbins
CHAPTERS = ch00_6.sgm ch00_5.sgm ch00.sgm ch01.sgm ch02.sgm ch03.sgm
\
ch04.sgm ch05.sgm ch06.sgm ch07.sgm ch08.sgm
APPENDICES = appa.sgm appb.sgm appc.sgm appd.sgm
POSTSCRIPT = ch00_6.ps ch00_5.ps ch00.ps ch01.ps ch02.ps ch03.ps \
ch04.ps ch05.ps ch06.ps ch07.ps ch08.ps \
=== Makefile =[modified]========================================= top
==
The split screen is the result of typing vile ch00.sgm followed by :split and :e
Makefile.
Like vim, all windows share the bottom line for execution of ex commands. Each
window has its own status line, with the current window indicated by having its
status line filled with equal signs. The status line also acquires an I in the second
column when in insert mode, and [modified] is appended after the filename
when the file has been changed but not yet written out.
vile is also like emacs in that commands are bound to key sequences. Table 12.1
presents the commands and their key sequences. In some cases, two sets of key
sequences do the same operation, for example, the delete-other-windows
command.
Table 12.1. vile Window Management Commands
Command
Key
Sequence(s)
Function
delete-other-
windows
^O, ^X 1
Eliminate all windows except the current one.
delete-window
^K, ^X 0
Destroy the current window, unless it is the last
one.
edit-file, E, e
find-file
^X e
Bring given (or under-cursor, for ^X e) file or
existing buffer into window.
grow-window V
Increase the size of the current window by count
lines.
move-next-
window-down
^A ^E
Move next window down (or buffer up) by count
lines.
move-next-
window-up
^A ^Y
Move next window up (or buffer down) by count
lines.
move-window-
left
^X ^L
Scroll window to left by count columns, half
screen if count unspecified.
move-window-
right
^X ^R
Scroll window to right by count columns, half
screen if count unspecified.
next-window ^X o
Move to the next window.
position-window z where
Reframe with cursor specified by where, as
follows: center (., M, m), top (RETURN, H, t), or
bottom (-, L, b).
previous-window ^X O
Move to the previous window.
resize-window
Change the current window to count lines. count
is supplied as a prefix argument.
restore-window
Return to window saved with save-window.
save-window
Mark a window for later return with restore-
window.
scroll-next-
window-down
^A ^D
Move next window down by count half screens.
count is supplied as a prefix argument.
scroll-next-
window-up
^A ^U
Move next window up by count half screens. count
is supplied as a prefix argument.
shrink-window v
Decrease the size of the current window by count
lines. count is supplied as a prefix argument.
split-current-
window
^X 2
Split the window in half; a count of 1 or 2 chooses
which becomes current. count is supplied as a
prefix argument.
view-file
Bring given file or existing buffer into window,
mark it "view-only."
historical-
buffer
_
Display a list of the first nine buffers. A digit
moves to the given buffer, __ moves to the most
recently edited file.
toggle-buffer-
list
*
Pop up/down a window showing all the vile
buffers.
12.6 GUI Interfaces
The screen shots and the explanation in this section were supplied by Kevin
Buettner, Tom Dickey, and Paul Fox. We thank them.
There are several X11 interfaces for vile, each utilizing a different toolkit based on
the Xt library. There is a plain "No Toolkit" version which does not use a toolkit,
but has custom scrollbars and a bulletin board widget for geometry management.
There are versions which use the Motif, Athena, or OpenLook toolkits. Of these,
the "No Toolkit" version is probably best supported since that is the version that
some of vile's authors most frequently use. But the Motif and Athena versions
have more features, such as menu support.
Fortunately, the basic interface is the same for each of these versions. There is a
single top level window which may be split into two or more panes. The panes, in
turn, may be used to display multiple views of a buffer or multiple buffers or
mixture of both. In vile parlance these panes are called "windows," but to avoid
confusion, we will continue to call them "panes" in the following discussion.
12.6.1 Building xvile
To build xvile, you have to choose which toolkit version to use. This is done when
you configure vile with the configure command. The relevant options are:
with -screen=value
Specify terminal driver. The default is tcap, for the termcap/terminfo
driver. Other values include ncurses (a special case of terminfo), X11,
OpenLook, Motif, Athena, Xaw, Xaw3d, neXtaw, and ansi.
with -scr=value
Same as with-screen.
with -x
Use the X Window System. This is the "No Toolkit" version.
with -Xaw3d
Link with Xaw 3-D library.
with -neXtaw
Link with neXt Athena library.
with -Xaw -scrollbars
Use Xaw scrollbars rather than the vile custom scrollbars.
12.6.2 Basic Appearance and Functionality
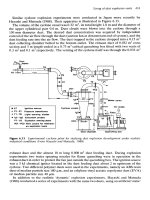
The figures show xvile's Motif interface. It is similar to the Athena interface.
Figure 12.1. The vile GUI window
Figure 12.1
shows three panes:
1. The man page for vile, which shows the use of underlining and boldface.
2. A buffer misc.c, from tin, which shows syntax highlighting (again,
underlining, this time for preprocessor statements, and boldface, for
quoted strings).
3. A three-line pane, which is active (noted by a darker status line), named
[Completions], for filename completions. The pane is coordinated with
the minibuffer (the colon command line): the first line reads Completions
prefixed by /tmp/m:, and the minibuffer reads Find file: m. The rest of the
pane contains the actual filenames which match. The first line of
[Completions] and the contents change as the user completes the
filename (and presses TAB to tell vile to show the reduced set of
choices).
Figure 12.2. Buffers and completions in vile