art and design in photoshop - phần 4 pps
Bạn đang xem bản rút gọn của tài liệu. Xem và tải ngay bản đầy đủ của tài liệu tại đây (5.76 MB, 256 trang )
.'
The huge explosion of
typographic design in
the 19th century gave
poster designers a vast
new range of fonts to
work with. Some were
bold some delicate, some
playful; the choice was
immense.
Printers would buy
in sets of typefaces at
set display sizes, and
frequently they wouldn’t
own more than one or
two sizes of a particular
font. This, in part,
explains the way the
reader is overwhelmed
with such a huge variety
of type styles: it’s almost
as if a different font
were used for each size.
Liberties were often
taken with the design, to
fit in with the available
space. In the example
above, the word ‘the’ in
the main headline has
been rotated 90° to fit.
Today, we’d reduce the
point size of the headline
slightly to make it occupy
the space, but the
Victorian printers had no
such luxury.
+
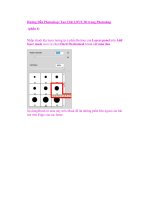
We need to load a lot of fonts to make this poster
work. Here I’ve used the fonts Headline One, Fette
Egyptienne, and Plastische Plakat-Antiqua for the main
headline. Set each line so that it takes up the full width
of the page.
0
The cast of characters is set in the font Slab Serif
HPLHS, a very condensed serif. We can’t set tab
stops in Photoshop – the program’s word processing
capabilities are very limited – so we’ll have to make the
text up by hand.
.
Photoshop doesn’t support ‘leader dots’ as there
are no tabs to be placed, so we have to type them
in by hand. A string of full stops would be too tight, so
type ‘dot space dot space’ in the gaps. Leaving a couple
of extra spaces helps the text to look more hand set, as if
the type were slightly damaged.
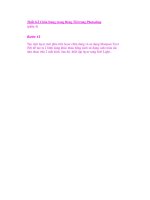
1
The rest of the poster is set in the same fonts we
used earlier, with the addition of Cairo for the
‘To be, or not to be’ line. Victorian posters tended to be
very wordy: you can’t get away with minimal information
here. Take the time to write extra lines to make the
effect more convincing.
Victorian playbill
.(
!
To create the names of the actors playing the
parts, we need to duplicate the character list.
With the Move tool, hold
- as you drag it to make
a copy, then add
1 to move it horizontally. Right align
the text using the button on the options bar.
,
The last two entries, Ophelia and Laertes, will
share a string of leader dots. The words ‘children
of above’ can be set on the ‘Laertes’ line, shifting the
baseline of the words up slightly. The curly brackets are
set in condensed Times Regular (see More Info).
/
Adding texture will help a lot here. We won’t use
the crumpled paper texture used elsewhere in
this book: this is a piece of stained paper, placed at the
top with its layer mode set to Hard Light so we can see
through it. The white background makes the effect far
too strong, however.
%
Changing the color of the background from
white to mid-gray solves the brightness problem
neatly. We could have set the mode of the paper layer to
Multiply instead, but this way it affects the type as well
as the background: the brownish, slightly mottled tint
makes the type look old and faded.
Poster design
FEK?<:;
DFI<@E=F
texture
font
There are two ways to O
make the text fit the width:
either make it larger and
smaller using
*1
!1 with the and
keys, or increase the
tracking (letter spacing)
by holding
- and
pressing the cursor keys
m
and
q to make the spacing
looser and tighter.
The curly O brackets added
in step 4 are in Times,
because most freeware
fonts don’t go to the extent
of including these little-used
typographic elements. The
bracket is made as a new
text box, placed above the
existing type; then Free
Transform is used to scale
it horizontally, making it
narrower so it looks more
in keeping with the narrow
serif font beneath:
This bracket can then
be copied and flipped
horizontally to make the one
on the other side.
The words ‘children of O
above’ in step 4 are shifted
vertically by selecing them
and using
1o
-1o to raise the
baseline.
J?FIK:LKJ
MAC WIN BOTH
.)
The Russian
Revolutionary style
of poster design is
unmistakeable: strong,
bold colors, generally in
combinations of black,
white and red. The
Cyrillic typeface is, of
course, a key element in
this poster; but what’s
even more distinctive is
the tendency towards
strong diagonals, as if
the entire poster design
has been rotated by
around 30°.
The intention of
the Constructivist
movement, of which
the posters were the
graphic expression,
was that art should
be used only for social
development, rather than
pure decoration. The
movement first appeared
in around 1914, and with
the October revolution of
1917 it gained impetus,
especially with the
backing of political
patron Leon Trotsky.
We’ll use this 1930
poster by Gustav Klutsis
as the inspiration for our
own version.
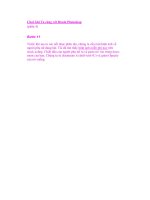
+
We’ll begin by copying that red diagonal shape in
the back of the original poster. Make a new layer,
trace the shape and fill it with red. We’ll also set the
background to a creamy color, rather than pure white,
which will help to give the poster an aged look.
0
Make a new layer, using the red shape layer as a
Clipping Mask (press
*D!-D)
and add some shading to the edge with a soft-edged
brush (left). When we change the mode of this layer to
Dissolve (right), we get this mezzotint effect.
.
The choice of background image depends on the
subject of the foreground, of course. Since we’re
designing an architectural poster here, we can use an
image of architecture as our background. The statue on
the right, which happened to be part of this image, gives
our architects something to look at.
1
The text here is set in the freeware font Kyrilla,
which conveys a suitable Soviet feel without
being truly Cyrillic. To make it stand out, add a Drop
Shadow using Layer Styles: setting the Size to 0 removes
the fuzziness, and setting the Opacity to 100% produces
the solid black we need.
Russian revolutionary
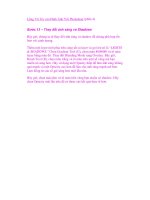
.*
!
Now for the figures. This pair of 1950s architects
is perfect for our purposes: the forthright pose,
the heavenward gaze, all give the impression of workers
who are both anticipating and, quite literally, building the
future. Duplicate the layer before proceeding.
,
Use Filter > Sketch > Photocopy to give the
duplicated image a distressed, screen printed
appearance, then change the mode to Multiply so we can
see the original through it. A second copy, filled with the
cream color (and set to Multiply) adds the color.
/
This text can now be copied and rotated to
make the other two text elements, enlarged
as necessary. Here, though, the drop shadow is cream,
rather than black; we need to change the mode of the
shadow, in the Layer Styles dialog, from Multiply to
Normal in order for it to show up.
%
The last step is to add some texture, making the
poster look more old and worn. I’ve provided
a photograph of a piece of crumpled paper for this
purpose: it’s largely gray, with creases and wrinkles. With
the mode of this texture layer set to Hard Light, we can
see through it to the poster design beneath.
Art & Design in Photoshop
Poster design
FEK?<:;
DFI<@E=F
image
texture
font
Changing the mode of the O
shading layer in step 2 from
Normal to Dissolve produces
this stippled appearance.
If this is too strong, lower
the opacity of the layer. We
can achieve a similar effect
by setting the mode of our
brush to Dissolve before
painting with it; the higher
the opacity of the brush, the
denser the stippled result
will be.
The choice of font here O
depends on whether you
want to be authentic, or to
give an overall impression.
The font we’ve used
contains characters such as
A, E and B that aren’t truly
part of the Cyrillic alphabet;
but they add to the effect,
and make the poster more
believable. Of course, the
only way to make it truly
authentic would be to set
the whole poster in Russian
from the beginning.
The key to working with a O
strong diagonal like this is to
use just the one angle, and
stick with it. The figures,
the background, and text,
if they’re rotated, should
conform to this angle. In
addition, though, we can
place further elements at
90° to the main angle, such
as the additional text on
this page. But be careful of
building in additional angles,
which can look messy.
J?FIK:LKJ
MAC WIN BOTH
.+
Founded by the German
architect Walter Gropius
in 1919, the Bauhaus –
literally, Building House –
was an art college based
in Weimar.
The Weimar Republic,
the democratic republic
that Germany became
after the end of the
monarchy and defeat
in the First World War,
was a liberal state that
abolished censorship.
This gave rise not only to
the decadence against
which the Nazis were
later to rail, but a fresh
and dynamic approach to
art and design.
The Bauhaus school
of design was a
development of German
modernism, bringing the
geometric shapes of art
deco to a new rigorous
aesthetic. Bauhaus
design informed art,
architecture, graphic
design and furniture
design; many of the
most famous pieces of
the period – such as the
famous Bauhaus chair
– are still reproduced
today.
+
Just like the Russian revolutionary posters, a
strong diagonal was the key to Bauhaus design.
This poster is based on a design created in Cologne in
1928, and uses the same colors and basic layout. To
begin, create a filled rectangle, and rotate it.
0
This rectangle will determine the angle for all
the rest of the components of the illustration.
Duplicating the rectangle and rotating it 90° produces
the right angle for the other elements, which can then be
modified and recolored as needed.
.
It’s easiest if the text is aligned left, so we
can get the starting point in the right place.
Once it’s here, adjust the type size using
*1
!1
and *1!1to make
the text larger and smaller, and
m-m to add
spacing between the characters.
1
For the large text, set it in the same font and then
rotate the whole text block to the same angle as
the original rectangle. When in Free Transform mode,
it’s easy to align the type: you just have to make the
bounding box line up with the base of the rectangle.
Bauhaus
.,
!
To create the curved text, first draw a Pen path
following the line (see More Info). Click the Type
tool near the path and it will snap the text to it. Type in
the text you want: the font used here is Geo Sans Light,
which suits the period perfectly.
,
The text will almost certainly appear in the wrong
location, and probably upside down. There will be
a marker on the left, right or center, depending on how
the type is aligned: drag this to change the type position.
You can also drag it across the line to flip it vertically.
/
The remainder of the type is made by copying the
existing text element, reducing it as necessary.
The rotated word ‘Photoshop’ here is at 90° to the other
text, and so is easy to place at the right angle.
%
The graphic elements – the brush, magnifying
glass and pencil – are best drawn on new layers
and then moved into position rising out of the colored
blocks. To stay true to the style they should not follow
the same angle but rise vertically from the blocks.
Art & Design in Photoshop
Poster design
FEK?<:;
DFI<@E=F
font
To rotate the elements by O
90° in step 2, and to rotate
the text in step 7, you can
choose Edit > Transform >
Rotate 90°, with either CW
(clockwise) or CCW (counter
clockwise) depending on
the direction you need
to go. A quicker method
is to use
*Q!Q
to enter Free Transform
mode, then hold the
1
key as you drag outside the
transformation box. This key
will make the rotation snap
to 15° increments (so that
we can easily rotate by 30°
and 45°), which means it
will click into place once we
near the 90° rotation we’re
looking for.
Drawing the Pen path in O
step 3 can be tricky: it isn’t
easy to follow the curve of
the circle it wraps around.
The most straightforward
method is to use the Shapes
tool to draw a circle first
(make sure the tool is set to
Path mode), and then rotate
this circular path. Delete all
but the lower left quadrant,
then use the Pen tool to
extend the path following
the angle of the initial
rectangle.
When adding text to O
a curve, the path will be
visible as long as the text is
selected. But once you click
on another layer, the path
will disappear of its own
accord.
J?FIK:LKJ
MAC WIN BOTH
Billboard posters of
the 1920s and 1930s
highlighted the golden
age of travel. In the days
before carbon footprints,
traveling by plane, train
or ship was glamorous
and sophisticated, and
the posters did their best
to convey the thrill of the
journey.
The one factor that
unites all the posters of
the period is the strong
perspective and low
point of view. These two
elements combine to
make the subject of the
poster appear huge and
powerful, looming over
us as they make their
unstoppable journey
between departure point
and destination.
Typographically, the
art deco period produced
an explosion of type:
some very angular and
graphic, some loose and
hand drawn. Art deco
took its angular design
from the Bauhaus, and
turned it into something
far more elegant.
+
It can be hard to find suitable starting images
taken from a low enough viewpoint. If you’re able
to photograph your own, that’s the best solution. Here,
we’ve used the 3D Layers feature of Photoshop CS3
Extended to pose this 3D model of a steam train. The
train model is taken from the Taschen 500 3D-Objects
collection.
0
To give the train a hand-drawn appearance, first
rasterize the 3D layer to make it a regular layer
(I’ve already done this in the version on the DVD). The
Poster Edges filter, found in the Artistic section of the
Filters menu, stylizes the image by reducing the number
of colors, while adding black outlines to it – perfect for
our purposes.
.
To make the headlight beams, first draw the
outline of the path using the Pen tool, and turn
it into a selection by pressing
#. On a new layer, fill
this selection with a pale yellow, then use the Gradient
tool with a white foreground color, dragged from left to
right, to create the lighter end of the beam near the light.
1
Change its mode from Normal to Hard Light,
using the pop-up menu at the top of the Layers
palette. This allows us to see the train through it.
Duplicate this layer and move it into place for the other
light. The steam is painted on a new layer, using a hard
edged brush: make it graphic, rather than realistic.
Art deco
FEK?<:;
J?FIK:LKJ
DFI<@E=F
image
font
The only tricky action in O
this illustration is drawing
the sleepers in perspective,
in step 4. These are created
by first drawing a single
sleeper near to us, with the
top and bottom horizontal
and the sides following
the angle of the rails. Then
Select All, and enter Free
Transform using
!Q
*Q. In the center
of the bounding box is a
center point marker: this
is the point about which
the transformation takes
place. Make the window
wider so you can see plenty
of gray outside the image
area, and drag the center
point marker out to the
horizon line, aiming for the
point where the rails would
meet. This is the vanishing
point. Now hold
-1
1 as you drag the
corner handle furthest from
this marker, and the sleeper
will move in perspective
towards the vanishing
point. Press E to apply the
transformation; then press
!1Q *1Q
to repeat the transformation
several times. A row of
sleepers will now appear in
perspective.
We could have added O
grass, hills and trees to this
poster to flesh it out; but
the stark graphic approach
we’ve taken here fits in
more neatly with the design
aesthetic of the period.
MAC WIN BOTH
!
The front rail is easily drawn as a straight object,
which can be distorted using Free Transform
to make it fit the angle of the train; duplicate it for the
other rail. A Layer Mask, added to the front rail, allows us
to paint it out around the wheels, so they appear to be on
top of it. See More Info, right, for details on how to draw
the sleepers.
,
Fill the background with black – these scenes are
always more impressive at night. Make a marquee
selection of the sky area, making sure the horizon lines up
with the vanishing point determined by the train angle;
use the Gradient tool, set to Foreground to Transparent,
to make a glow rising from the horizon. The stars are
easily painted with the Brush tool, one at a time.
/
Duplicate the gradient over the sky to make a
similar one at the base. The angular triangles in
the sky were typical of the period: make selections with
the Lasso tool, holding
-to set it to Polygonal
mode, and make a new layer from the background
gradation to create the extra effect.
%
The fonts are both by Ray Larabie: cursive
Deftone Stylus, and Guanine. The shadow on the
word ‘Steam’ has been added using Layer Styles dialog.
As a final step, I’ve added a slight shadow beneath the
rails to make them sit more firmly on the ground.
Poster design
Art & Design in Photoshop
./
When boxing matches
featured big names –
and there were none
bigger than Joe Frazier
and Mohammed Ali
– they could fill an
entire evening all by
themselves. Lesser
mortals had to make do
with their names alone.
Boxing posters
acquired a style of their
own, featuring large
surnames and much
smaller first names or
nicknames; the first and
last letter of the surname
was often enlarged so as
to frame the first name
within the gap created
by the process.
We’ll emulate the style
of the genre, including
reproducing the cheap
printing techniques they
used.
+
Rather than just
going for a pair
of standard boxers, let’s
try something a little
different: we can use the
format to make a social
comment, after all. So
here’s a businessman
in a suit up against a
decidedly less heavy
challenger. But who will
have the edge here?
!
The text here
is set in two
fonts – Headline One and
Boris Black Bloxx. When
creating the surname
text, use
*1
!1and
*1
!1to make
the first and last letters
larger and smaller – far
quicker than selecting
the size from the text
size field.
.
When we change
the mode of this
new texture layer from
Normal to Hard Light, we
can see through it to the
text beneath, and it gives
the impression of poorly
printed lettering on
cheap paper. Note how
the Clouds effect works
on the black lettering as
well as the red.
Boxing promotion
.0
0
Desaturate
both layers
using
*1R
!1R
to produce
a grayscale version.
If you’re designing a
poster to be used very
large, consider using
Filter > Pixellate > Color
Halftone, with all the
angles set to 45°, to
reproduce the kind of
coarse dot screen used
when printing onto cheap
paper.
,
Even though the
Headline One
font is based on an old
newspaper style, it’s far
too clean for this poster:
we need to make it look
more cheaply printed.
Load up each text layer
in turn as a selection (see
More Info) and make
a new layer above the
type; set the foreground
and background colors
to light and dark gray,
and run Filter > Render
> Clouds to get this
mottled effect.
1
This poster really
needs to look old
in order to work well. So
we’ll place our standard
piece of crumpled paper
on top, set to Hard Light
mode so the wrinkled
appearance shows
through on the poster
beneath. Here, I’ve tinted
the poster by adding
red using the Curves
adjustment, to make
it look older and more
yellowed.
Art & Design in Photoshop
Poster design
FEK?<:;
DFI<@E=F
image
texture
font
In step 4 we need to O
load up all the text area
on a single layer. Hold
*
! and click on the first
text layer’s thumbnail in
the Layers palette to load
it, then hold
1 as well
as you click on each text
block in turn to add it to the
selection. If you like, you
can fill the selection with a
color (on a new layer) so you
don’t lose it accidentally;
but if you’re going to apply
the Clouds filter right away
there’s no point, since
this will fill any selection
automatically.
The Clouds filter, used to O
create the texture in step 4,
creates a random mottling
effect each time it’s used.
After the first application,
pressing
*C!C
will repeat the operation
in a slightly different way,
so it’s worth having a few
goes until you get the effect
you want. For small text,
the filter will produce too
loose a result; try using
*C!-C
instead. This produces a
tighter version of the filter.
Again, it can be repeated
until you get a good version
of the texture.
The text may need O
tightening up, but don’t
overdo it. It’s supposed to
be set in block letters, so
no two letters can overlap
each other.
J?FIK:LKJ
MAC WIN BOTH
/'
From the early days of
John Wayne’s gung-ho
Red Indian slayers to the
reinterpretation of the
genre in such modern
classics as Brokeback
Mountain, the Western
has had a strong
hold on our collective
consciousness.
The poster style is
typified by the font –
one of many variations
on the elaborate 19th
century woodcut, with
fancy slab serifs and
those trademark pointed
bulges half way up the
characters. There are
many free versions of
this font style readily
available.
The other factor
common to these posters
is the color palette,
which predominantly
features shades of red,
gold and brown. This
is most often seen in
the doomy skies, but
is frequently reflected
in the coloring of the
headline style as well. A
big foreground face, of
course, sells the film’s
leading actor.
+
Our poster has just three basic elements: the
close-up of the man’s face; a rather dodgy cowboy
with poor dress sense tipping his hat; and that staple
of Western posters, the doomy dawn (or is it sunset?)
cloudy background.
0
We’ll start with the close-up. Use the Brightness/
Contrast adjustment to lower the Brightness
and increase the Contrast considerably, to boost those
skintones; then create a layer mask for this layer, and
paint out the side of the face with a soft edged brush.
.
Layer Styles complete the text. Here, we use
Stroke to make a black outline and Inner Glow
for the yellow inline. The Drop Shadow is set to a Spread
of 100%, which makes it solid rather than soft edged; at
100% opacity, it’s offset from the text to make a solid
grounding behind it.
1
The nonsense text at the bottom, simulating film
poster credits, is typed in a serif font narrowed to
around 40% of its original width to match the style. The
standout text is set in white to make it stand out against
the background, and a slight drop shadow added using
Layer Styles to lift it slightly.
Western movies
FEK?<:;
J?FIK:LKJ
DFI<@E=F
image
texture
font
When we make a layer O
mask in step 2, choose Layer
> Layer Mask > Reveal All.
This creates an empty mask
for the layer: painting on
it in black hides the layer,
painting in white reveals it
again. A large, soft brush
creates the smoothest
transitions.
The Brightness/Contrast O
adjustment in step 2 applies
to Photoshop CS3, which
has had an overhaul of the
adjustment tool. If you’re
using earlier versions of
Photoshop then less extreme
settings would be required.
To make the clipping layer O
in step 4, either choose
Layer > Create Clipping
Mask, or use
!-D
*D as a shortcut.
At first glance, the O
standing figure of the
cowboy is too posed and
artificial for our purposes.
But when seen as a
silhouette, it adds the sense
of a mysterious stranger to
the composition, as well as
adding a sense of depth and
perspective to the scene.
It also serves to draw the
eye back to the main figure,
the direction in which the
cowboy is facing.
This sky serves both as a O
sunset and as a suggestion
of flames – which could be
why they’re used so often.
MAC WIN BOTH
Poster design
!
The standing figure is simply filled with black to
make him an iconic silhouette. The text here is set
in the freeware font Saddlebag, and we’ve used the Warp
Text dialog to add a slight bend to it, using the Arc Upper
warp style.
,
Fill the text with red, then make a new layer
above it, using the text as a clipping layer (so
painting on the new layer only shows through where it
overlaps the text). The text highlights are now painted in,
using colors sampled from the poster background.
/
The ragged edge is made on a separate layer,
above all the rest. Draw this freehand, with the
Lasso tool, then inverse the selection using
!1F
*1F
and fill the inverted region with white. This
technique is far easier than making complex masks for
every layer in the document.
%
Finally, make another new, empty layer beneath
the mask. Use a soft-edged brush with either
a black or a dark brown foreground color, and paint in
around the edge of the jagged shape. This adds depth to
the poster, and gives it the impression of slightly burnt
edges appropriate to the style.
/(
Art & Design in Photoshop
/)
Science fiction posters
have intrigued, inspired
and occasionally
frightened us since the
earliest days of film.
There are as many
different types of science
fiction poster as there
are science fiction films,
of course; but they
do share a number of
common elements, and
certainly a common feel.
These films are always
publicized using posters
that have a strong black
element to them, in order
to express the emptiness
of space. Ever since the
first Alien poster, above,
there’s been a tendency
for widely-spaced
lettering.
We can’t attempt to
show how every kind
of sci-fi poster is put
together. But we can
look at some general
principles which may
help you in the design of
your own posters.
+
There are
three starting
elements to this poster:
the model of a satellite,
the photograph of the
Earth and the starry
background. Each is on
a separate layer, and so
may be moved around
and manipulated at will.
In this first example, we
can see each element
clearly.
!
We’re used to
thinking of the
Earth as lying beneath
us – the normal state
of affairs. But when we
move the planet to the
top of the screen, we
create a tension that
wasn’t there before: this
is no longer a satellite
hovering above the earth,
but a spaceship creeping
upon it surreptitiously.
.
We can make the
lettering more
eerie and atmospheric by
adding a glow treatment
to it. Here, we’ve used
the Outer Glow section
of Layer Styles to make
a white glow. In fact, the
glow alone is enough:
we don’t need the actual
letters at all. Set the text
color to black, and set
the layer mode to Screen
so it disappears.
Science fiction
/*
0
A simple question
of moving the
planet so it overlaps the
satellite makes a huge
difference to the unity
of the image. Rather
than being two separate
elements, they’re now
combined in a single
image: the satellite is
clearly a small object
in front of the planet,
whereas previously
it could have been an
enormous space station
behind it.
,
Every science
fiction movie
needs its own font –
and there are dozens
to choose from. We’ll
use the rather sedate
Ray Larabie font
Vipnagorgialla, which
works well. The text is
spaced out here, using
the Tracking control on
the Character palette.
1
We could just
stop at the end
of step 5, but let’s unify
our poster still further.
Here, we’ve created a
solid layer, filled with
pale blue, at the top of
the layer stack; set to
Multiply mode, it adds a
uniform tint to the whole
artwork. When the ‘In
space…’ line is added
in white above this, it
stands out from the rest
of the poster.
Art & Design in Photoshop
Poster design
FEK?<:;
DFI<@E=F
image
texture
font
The effect used on the O
text gives a space-like,
subtle glow around the
letters – be careful not to
make this glow too large, or
it will simply start to look
fuzzy. Because it’s a Layer
Style effect applied to live
text, we can change the
font, wording and tracking
as much as we like, and the
glow effect will be retained
whatever we do.
In step 6, we’ve added O
a new layer filled with
blue, and set to Multiply.
It’s now easy to change
this color with the Hue/
Saturation dialog: this
allows us to experiment
with different colors (by
dragging the Hue slider)
and different opacities (by
dragging the Lightness
slider). Alternatively, we
could create a Solid Color
adjustment layer at the top
of the layer stack, and set
that to Multiply instead.
Placing the planet at the O
top of the screen, rather
than at the bottom, is a
technique used frequently
in science fiction movies.
In almost every eposide of
Star Trek, for example, when
you see the USS Enterprise
approaching a planet it will
be from below, rather than
from above. It looks far
more space-like that way.
J?FIK:LKJ
MAC WIN BOTH
/+
The 1950s may have
been Hollywood’s Golden
Age, seeing the release
of 12 Angry Men, Rear
Window and Singin’
in the Rain – but it’s
also the decade that
produced some of the
corniest, cheesiest horror
movies ever created.
The posters of the
time reflected the mood
of the films: brash,
gaudy, ludicrous in scale
and conception.
You’ll notice an
anomaly in the poster
we’re creating here. The
title of our imaginary
movie is Day of the 20
Foot Hamster – but the
rodent in our illustration
is clearly many hundreds
of feet high. This, too,
was a feature of the
posters of the period:
scale was frequently
greatly exaggerated in
order to pull viewers into
the theaters. As, indeed,
were the comments that
adorned the posters
themselves.
+
The text for this
film is set in the
font Bullpen, designed by
Ray Larabie. To achieve
the distortion, we first
use the Warp Text dialog
to set an arc, using fairly
small numbers – just
a 19% distortion here.
The small amount of
horizontal distortion
adds the beginnings of a
sense of perspective to
the text.
!
The words ‘Day of
the’ are added in
a similar way to the main
headline. Both sets of
text are colored yellow,
and the pixels locked so
we don’t spill over the
edge (see More Info); the
red is painted on with a
large, soft-edged brush
(top). Then Layer Styles
are used (bottom) to
add a hard-edged drop
shadow, and an Inner
Glow to give the soft
stroke around the edge.
.
To integrate the
hamster into the
scene, it’s important to
place some foreground
elements in front of it.
The best way to do this
is to hide the hamster
layer, and select a group
of buildings from the
background layer; make
a new layer from these,
and bring them in front
of the hamster, then
reveal the hamster layer
again.
1950s B movies
/,
0
When we stretch
the text vertically
(top) we exaggerate the
arc added in the first
step – which is why
we used such a small
amount. To add the
perspective distortion
(bottom) we first need
to turn the text into a
regular, editable layer
(see More Info). Then,
using Free Transform,
hold
*! as you
drag the corner handles
to produce a more radial
view.
,
The text stands
out far more
clearly against a dark
background – could this
be the reason why key
scenes in these movies
are so often set at night?
The hamster is positioned
so that it’s clearly the
dominant figure in this
nocturnal landscape.
1
Finishing touches
include adding
more headlines, and
adding some color and
shading to the hamster
layer to make it blend in
better with the rest of
the scene. The dummy
credits at the bottom
are the same as those
we’ve used earlier in this
chapter. Finally, adding
the torn paper layer in
Hard Light mode adds a
creased, worn look; the
color helps to unify all
the picture elements.
Art & Design in Photoshop
Poster design
FEK?<:;
DFI<@E=F
image
texture
font
We’ve used the Arc O
distortion in step 1, as it
suits the style of this poster.
But it’s worth experimenting
with different warp
methods: remember, the
Warp Text effect is live, and
can be adjusted at any point.
When we distort the O
text in step 2, we need to
turn it into regular pixels
first – use Layer > Rasterize
> Type. Once this is done,
however, we lose access to
the editability of the text,
so be sure to check your
spelling first. An alternative
method would be to turn the
text into a Smart Object,
and to apply the perspective
distortion to that – but
this would entail creating
additional layers to hold the
painted color.
In step 3 we begin with O
yellow text, and paint the
red effect on using a large
soft-edged brush. But if we
were merely to paint on the
layer, the red would be seen
over the background as well.
The solution is to lock the
transparency of the layer,
using the icon at the top of
the Layers palette; or, as a
shortcut, use the
key.
Now, when we paint in red
on the layer, the red only
has an effect where it goes
over pixels already present
in the layer.
J?FIK:LKJ
MAC WIN BOTH
/-
The film The Silence of
the Lambs was a huge hit
for both Jodie Foster and
Anthony Hopkins – and
the public wanted more
of Hopkins’ character,
Hannibal Lecter. Red
Dragon was filmed in
2002 – but the film of
this prequel had already
been made as Manhunter
in 1986. The posters
for the two films are
remarkably similar, given
the 16-year gap between
them: it seems that the
horror of a psychotic
individual is nearly
timeless.
We’ll see if we can
emulate this style of
hard, moody lighting
with a horror movie of
our own.
+
We’ll start with an official publicity photograph of
Ronald Reagan, for no reason other than turning
this amiable grin into an image of menace will present us
with a particular challenge. Our personal political views
have no place in a book of this kind.
0
We can darken Reagan’s features using the
Curves adjustment: open the dialog and drag
down in the center of the RGB curve to produce this
deeper, stronger effect. At the same time, take out a
little green in order to boost the red appearance.
.
We can also use the Dodge tool to add sparkle to
the eyes and teeth, which makes them jump out
of the picture. Use the Burn tool, set to Midtones, to add
strategic darkness within the face: under the eyes, below
the mouth, around the cheek, and so on. This will help to
make the image look properly shaded.
1
The text here is set in Manfred Klein’s font
Optimus Princeps, which has precisely the sedate,
traditional, elegant look that counterbalances the menace
of the image perfectly. A little tracking spaces out the
letters: use the Character palette to add spacing.
Horror movies
/.
!
Since the image is going to appear on a black
background, the easiest way to mask it is to
paint in black on a new layer above it, using a soft-edged
brush. At present, we’re only concerned with painting
around the edge of the face.
,
We need to bring out those highlights on the
cheek and the brow, to make them shine a little
more menacingly. Duplicate the Reagan layer and use the
Dodge tool, set to Highlights, to brighten up these areas –
but be careful not to brighten it too much.
/
Add another new layer, and paint on here in black
to make the visible portion of the face narrower.
We want to hide those laugh lines around the mouth,
to make him look more sinister – and we can also cut
down the amount of light on the forehead and cheeks by
painting over them.
%
The remainder of the text is added in the same
font, with more spacing on the subtitle ‘The
Acting President’ so that it fills the full width of the
poster. The nonsense text at the bottom, once again, is
there purely to complete the effect. Note how the top
text frames the face neatly.
Art & Design in Photoshop
Poster design
FEK?<:;
DFI<@E=F
image
font
Although it’s not O
specifically mentioned in the
text each time, I’ve created
a duplicate layer for each
adjustment stage of this
workthrough. When creating
the initial black mask in
step 3, it’s easy enough to
switch between the Brush
tool and the Eraser tool
to paint the shadow in
and out; but when we’re
adding shading directly to
the image using the Dodge
and Burn tools, we need
to be able to maintain
editability. Creating new
layers at each stage allows
us to experiment without
ever damaging our artwork
irrevocably.
We can use the Character O
palette in step 6 to space
out the text. Alternatively,
select it all with the Type
tool and use
m-m
to increase spacing between
all the characters.
Despite adding deep O
shadows to the face, the
image of Ronald Reagan
remained smiling right up
to step 7, when we add the
second black mask. That’s
because until this stage, we
could still see laugh lines
around the mouth and eyes
– which suggest a far more
pleasant character than
we want to indicate. Hiding
these lines makes the smile
look more menacing.
J?FIK:LKJ
MAC WIN BOTH
//
Comedy posters have to
make the film look funny.
Often, this is achieved
mainly through the
expression on the face
of the main character:
and when the character
is big enough, like Rowan
Atkinson, his beaming
face is enough to sell the
movie on its own.
There are other
common factors that
typify the comedy
poster. Fonts are usually
playful, bold and sans
serif, and will frequently
have some or all of their
letters set at an angle.
This accentuates the
wackiness of the poster,
clearly signaling to the
viewer that laughs are
in store.
Some comedy movies
are parodies, such as
Airplane and Police
Squad, in which case
the poster will reflect
the genre the movie
is sending up. But
the predominant feel
is always bright and
airy, making full use
of primary colors and
plenty of white.
+
The main image is, as always, the key element in
this poster. Here’s our publicity shot: it shows the
lead character with a surprised expression. But he’s too
far away, and the detail of the chair stand is too fiddly
and distracting.
0
Zooming in on the shot helps a lot, and the shape
neatly frames the bottom of the poster. It’s not a
bad arrangement, but it somehow lacks immediacy. The
character still looks too detached and too distant for us
to engage with him.
.
It’s common practice to make a graphical pun
on one or more words in the title, if this is
appropriate. If the film were about learner drivers, for
example, we might place the letter ‘L’ in red on a white
square so it looked like an L-plate. Here, the word ‘Back’
is crying out to be reversed – and it is still legible.
1
Rotating the individual text blocks to wacky
angles helps to get across the idea of the film as
comedy. Again, this is a common procedure in comedy
films. In the poster for Mr Bean’s Holiday, above left, just
the letter ‘A’ has been rotated: this neatly gives a sense of
impending disaster.
Comedy movies
/0
!
Zooming in to a head shot gives the poster more
impact. We have to flip him horizontally so we
can fit the text on the left. Rotating the image counter-
clockwise makes him lean backwards into the frame,
which in itself is a comical pose.
,
The text we’ve chosen here is Ray Larabie’s font
Foo, which has a nicely casual, comic look. Set
each word in a different text block, so they can be moved
around and manipulated independently: for example, we
clearly need the ‘to’ smaller than the other two words.
/
To make the title stick together as a logo, it helps
to add a unifying element. In this case, this is
achieved by making a rotated blue square behind the
word ‘to’, and setting the word in white. Because the
square overlaps both words above and below, it links
them together visually.
%
The remainder of the text here is set in the
font Dream Orphans. It’s light and airy, and its
quirkiness of letter form has a potentially comic element
to it. As with many such posters, the quotes from
newspaper reviews help to reinforce the idea that this
movie really is funny.
Art & Design in Photoshop
Poster design
FEK?<:;
DFI<@E=F
image
font
The angle at which a O
figure is placed can have a
big impact on the comedic
value of the image. In step
3, for example, we could
have left the figure upright,
simply flipping the original
image horizontally:
It frames the side of the
page well enough, but
there’s no humor in the pose.
In the rotated version, the
overall impression is that the
man is walking out of shot,
and has leant back slightly
to look at us because we’ve
just caught his intention.
The pose also makes him
appear to be in motion –
and, without looking where
he’s going, we can be fairly
sure some disaster is about
to befall him.
The word ‘back’ works O
when reversed because it’s
a very short, recognizable
word. This wouldn’t work
with longer words, as they’d
be too hard to read.
J?FIK:LKJ
MAC WIN BOTH
0'
The French and
international versions
of the posters for the
1986 movie Betty Blue
are similar – except the
French version shows a
man and woman at the
bottom. Clearly, for the
French, the relationship
is more important than
the girl on her own.
The poster is typical
of the genre: a pouting,
unsmiling girl; the stark
treatment of the image,
turning it almost into
a graphic element; the
dark, moody background.
While we don’t have
Beatrice Dalle to model
for us, we do have an
image of a girl who fits
the bill well enough.
+
This girl is taken from the photos.com collection
of royalty-free images. She’s looking over her
shoulder at us in a scornful way that well befits the
French temperament: and her short haircut is well
matched to current French styling.
0
We need to remove that halter neck top from her
dress, of course. If there’s one thing the French
expect from their art movies it’s naked women, and to
suggest otherwise on the poster would be disastrous for
sales. Use the Clone tool to get rid of it.
.
The girl looked fine at the end of the last step,
and fitted the frame well: her eyes started a good
diagonal that ran down the arm to the corner of the
image. But by moving her over to the right, we create
additional tension: she’s now clearly turning her back on
us, the viewer.
1
By adding a second figure we get in a suggestion
of that all-important relationship issue. This man’s
in a suitable pose (left). Paint a glow on a new layer
behind him with a large, soft-edged brush (center); then
delete the man’s area from the glow, and hide the man
layer for a subtle silhouette effect (right).
French art house
0(
!
To make the stark version, first use *1R
!1Rto desaturate the image, taking all
the color out of it. Then use the Brightness and Contrast
adjustment to increase the contrast significantly (right):
see More Info for more on this.
,
Color the image using Color Balance to add a
little blue and cyan to it. Color the background
blue, and use the Gradient tool to darken the top; then
set the mode of the girl’s layer to Screen, so that her hair
disappears into the background.
/
In theory, we delete the area taken up by the
back of the woman’s hair from the glow layer,
since the scale indicates that it’s clearly behind her. But
leaving the glow visible, as we do in step 8, makes it
look more natural, as if it’s so bright that it’s dazzling us
enough to shine through her hair.
%
The text is added in the font Dream Orphans, in
a color that stands out well against the blue and
black that predominates here. It has a slight shadow,
created using Layer Styles: change the mode from
Multiply to Normal, and choose white for the color. To
avoid fuzziness, set the Size to 0 and the Spread to 100.
Art & Design in Photoshop
Poster design
FEK?<:;
DFI<@E=F
image
font
In step 3 we use the O
Brightness & Contrast
adjustment to produce this
almost black and white
version of the grayscale
image. In recent versions
of Photoshop, however,
this adjustment has been
changed so that it has a
more subtle effect on the
image – which means it
will no longer produce an
effect as strong as we
want. To make it behave as
it did before, check the Use
Legacy button at the bottom
right of the dialog. We can
now apply a large amount
of contrast to the picture,
modifying the brightness as
required.
In step 6 we delete the O
man’s outline from the
glow layer. The best way
to do this, of course, is to
use a layer mask. First,
hold
*!and click on
his thumbnail to load as a
selection; then make a layer
mask for the glow layer, and
fill the selection with black.
When we hide the man, just
his silhouette remains. If we
move the glow around, the
silhouette will move with it.
But if we click on the chain
icon between the layer and
its mask, we can move the
two independently. This
can make it easier for us to
adjust the position of the
silhouette within the glow,
as we can drag it while the
glow remains in place.
J?FIK:LKJ
MAC WIN BOTH
0)
‘Film noir’ is the French
for ‘black film’ – in the
sense of dark themes,
dark scenes and an
overriding air of gloom.
No happy endings to be
expected here.
Film noir posters
followed a definite
pattern, as the two
near-identical examples
here show. The man was
always smoking, and
smoking played a large
part in the films.
The posters convey
the shabbiness of
the men and their
surroundings, the
mock glamor of the
women, and the air
of desperation that
pervades the movies.
+
Our two characters are in costume and ready to
go. She has her billowing dress and her haughty
pose; he has his open-necked shirt, his fedora and, of
course, the prop he could never last a scene without – his
cigarette.
0
Applying Filter > Artistic > Poster Edges to
both layers makes them look more hand painted
than photographed. Boost their colors with the Hue/
Saturation dialog to make them larger than life, and
darken with Curves if required.
.
We need some sort of background for the top
left. Posters of the period often used a painted
texture here that didn’t represent anything; we can do
the job effectively with a photograph of clouds at sunset.
Darkening the image considerably makes it look more
moody and threatening.
1
To make a clear area in the bottom right, we need
to cover up some of that cloud texture. Make
a new layer, above the clouds, and sample a blue color
from the sky; paint on the new layer with a large soft
brush to obscure the sky from this region.
Film noir
0*
!
To make his shadow stronger, duplicate his layer
and desaturate using
*1R!1R.
Change the layer mode to Multiply so only the darkest
areas are visible, then use Image > Adjustments >
Threshold to turn it to pure black and white.
,
We need to make room for our titles, so make
a layer mask for the man’s layer and paint out
on here using a large, soft-edged brush. If we set the
Threshold layer to use this as a Clipping Mask, it will be
hidden by the layer mask as well.
/
The font we’ve used here is Dieter Steffmann’s
Marketing Script, which captures the hand
lettered style of the time. It was customary to include
quotation marks around the title, which is something
we’d never do today; make this very small, and raise
them so they line up with the letter tops (see More Info).
%
The tag line, top left, can be set in the same font.
It’s also fine for the first names of the actors –
but their surnames need to be bolder, for contractual
reasons. Here, the surnames are set in Headline One, a
condensed bold face that sits neatly with the script font
used for the first names.
Art & Design in Photoshop
Poster design
FEK?<:;
DFI<@E=F
image
font
In step 3, we change O
the mode of the layer to
Multiply before applying
the Threshold adjustment.
This is so we can see the end
result through it: as we drag
the Threshold slider, we can
see how much of the face is
being shaded. After applying
the adjustment, the effect
may well be too strong; I’ve
reduced it to 60% opacity
here.
To reduce the size of O
the quotation marks in
step 7, select one of them
and use
*1
!1 to make the
type size smaller. It will also
appear much lower down,
so with the character still
selected, use
1o
-1o to raise the
baseline to line up with
the tops of the letters. The
easiest way to make the
other quotation mark is to
copy and paste this one,
then replace it with the
correct symbol.
In step 8, we need to add O
three stars’ names in two
different fonts. The best
way to do this is to set one
name, using both fonts, and
adjust the leading to fit;
then duplicate the text block
twice to make the other two
names. With the Move tool,
hold
- as you drag a
name to make a copy, then
add
1 to move it only
horizontally.
J?FIK:LKJ
MAC WIN BOTH
0+
‘Pleasant, pretty and
predictable… one might
add piddling’ was how
the New York Times
described A Good Year
upon its release in 1996.
It was certainly a
departure for Russell
Crowe, fresh from his
successful roles as hard-
bitten action heroes in
Master and Commander
and Gladiator. The poster
for the movie had to
show the film’s star in a
different light altogether
– not so much to put off
the diehard action fans,
as to draw in female
viewers who might
have admired Crowe’s
physique but who have
previously been put off
by the amount of gore in
his movies.
And so the result was
a poster that shows a
warm, sunny movie that
we know from the start
is bound to have a happy
ending. As some wag
once said: ‘Men like films
in which lots of people
die quickly; women like
films in which one person
dies slowly.’
+
This photograph of actress Lisa Edelstein was
taken by Christopher Peterson, and is taken from
Wikipedia under the Creative Commons licence. Despite
the busy background, it’s an appealing pose that will do
as our starting point.
0
The first thing we need to do is to soften the
features. The best way to do this is to use the
Filter > Blur > Median, which works in a similar way to
Gaussian Blur but keeps hard edges crisp. This has taken
out the worst of the pores and wrinkles.
.
We could do a hard cutout of this image, but
sometimes it’s better just to paint out the
background. Make a new layer, and paint on here in
white with a soft-edged brush, leaving the head visible.
It’s worth keeping that faint horizontal behind her, as
this stretches the image neatly off the left of the page.
1
It’s looking good – but not yet good enough.
With the background largely hidden we can
concentrate on the face, and the blemishes are more
apparent – the bags under the eyes, the lines around the
mouth. Use the Clone tool to hide these: see More Info
for a neat way of doing this.
Romantic comedy