Microsoft Press transitioning your mcsa mcse to windows server 2008 2009 phần 9 ppt
Bạn đang xem bản rút gọn của tài liệu. Xem và tải ngay bản đầy đủ của tài liệu tại đây (1.99 MB, 97 trang )
7 4 8 CHAPTER 14 Confi guring FTP and SMTP Services
Each tool presents you with several options that perform actions similar to those avail -
able in the File Server Resource Manager MMC snap-in. To specify that a command
performs an action on a remote computer instead of on the local computer, use the
/remote: ComputerName parameter.
For example, dirquota.exe includes a template export parameter to write quota template
settings to an XML fi le and a template import parameter to import template settings from
the XML fi le. Adding the /remote:ComputerName parameter to the dirquota template import
command imports the templates from the XML fi le on the local computer to the remote
computer.
To manage remote resources with command-line tools, you must be logged on with a
domain account that is a member of the local Administrators group on both the local com-
puter and the remote computer.
DIRQUOTA
Use the dirquota command from an elevated command prompt to create and manage quo-
tas, auto-apply quotas, and quota templates. For example, use dirquota with the template
export option to export the settings for a custom quota template named 50 MB Limit to the
C:\test.xml fi le on the local computer, as follows.
dirquota template export /file:C:\test.xml /template:"50 MB Limit"
MORE INFO DIRQUOTA.EXE
For more information about the dirquota.exe utility, see
/en-us/library/cc731290.aspx. For more information about the use of the utility in template
import and export scenarios, see
FILESCRN
Use the fi lescrn command from an elevated command prompt. Filescrn includes subcom-
mands for creating and managing fi le groups, fi le screens, fi le screen exceptions, and fi le
screen templates and for confi guring general administrative options for screening fi les.
For example, to list all fi le groups currently confi gured on the local computer, enter the
following command:
filescrn filegroup list
To list the fi le name patterns included in and excluded from the Critical Files group, enter
the following command:
filescrn filegroup list /filegroup:"Critical Files"
MORE INFO FILESCRN.EXE
For more information about the fi lescrn.exe utility, see />/library/cc730977.aspx.
MORE INFO
DIRQUOTA.EXE
For more information about the dirquota.exe utility, see
/en-us/library/cc731290.aspx
. For more information about the use of the utility in template
/en-us/library/cc731290.aspx. For more information about the use of the utility in template /en-us/library/cc731290.aspx
import and export scenarios, see
/>.
/>MORE INFO
FILESCRN.EXE
For more information about the fi lescrn.exe utility, see
/>/library/cc730977.aspx
.
/library/cc730977.aspx./library/cc730977.aspx
Lesson 1: Confi guring FTP CHAPTER 14 749
STORREPT
You use the storrept command from an elevated command prompt to confi gure report
parameters and generate storage reports. You can also create report tasks and then use
schtasks.exe to schedule the tasks.
For example, to list all storage reports confi gured on the local computer, enter the follow-
ing command:
storrept reports list
To list storage reports that are currently running on the remote computer Boston, enter
the following command:
storrept reports list /running /remote:Boston
MORE INFO STORREPT.EXE
For more information about the storrept.exe utility, see />/library/cc753567.aspx and follow the links.
MORE INFO SCHTASKS.EXE
Schtasks.exe is not specifi cally related to the File Server Resource Manager commands but
is a general task scheduling utility. For more information about schtasks.exe, see http://
technet.microsoft.com/en-us/library/bb490996.aspx.
Installing and Using FTP7
The new FTP publishing service includes a wide range of new features and improvements, for
example:
n
Integration with IIS 7.0 The new FTP service is tightly integrated with the IIS7 admin-
istration interface and confi guration store.
n
Support for FTPS The service supports FTP over SSL, also known as FTP/SSL or FTPS,
and uses a public key SSL/TLS certifi cate.
n
Support for standards and protocols The service supports the UTF8 Unicode encod-
ing standard and the IPv6 protocol.
n
Shared hosting The service facilitates hosting FTP and Web content from the same
site by adding an FTP binding to an existing Web site. It also supports virtual host-
names, which facilitates hosting multiple FTP sites on the same IP address. Improved
user isolation facilitates isolating users through per-user virtual directories.
n
Extensibility The service supports developer (API) extensibility. This makes it easier
for software vendors to write custom providers for FTP authentication.
MORE INFO
STORREPT.EXE
For more information about the
storrept.exe
utility, see
/>/library/cc753567.aspx
and follow the links.
/library/cc753567.aspx and follow the links./library/cc753567.aspx
MORE INFO
SCHTASKS.EXE
Schtasks.exe
is not specifi cally related to the File Server Resource Manager commands but
is a general task scheduling utility. For more information about
schtasks.exe
, see
http://
technet.microsoft.com/en-us/library/bb490996.aspx
.
technet.microsoft.com/en-us/library/bb490996.aspx.technet.microsoft.com/en-us/library/bb490996.aspx
7 5 0 CHAPTER 14 Confi guring FTP and SMTP Services
n
Logging The service improves FTP logging, which is enhanced to include all FTP traf-
fi c in the log fi les.
n
Improved troubleshooting The service supports IIS7 troubleshooting features such
as Event Tracing for Windows (ETW) and provides detailed error responses and mes-
sages for local users.
EXAM TIP
The Windows Server 2008 FTP7 service does not use metadata, and the new confi guration
store in IIS7 uses NET XML-based fi les to store confi guration details.
MORE INFO DOWNLOADING THE FREE FTP PUBLISHING SERVICE
The new FTP publishing service is available as a free download at
/downloads/default.aspx?tabid=34&g=6&i=1619 (32-bit) or />/default.aspx?tabid=34&g=6&i=1620 (64-bit). An update for the 32-bit version is available
at />-934C-D5E9C3057661&displaylang=en&displaylang=en and for the 64-bit version at
/>-39EB148820DE&displaylang=en&displaylang=en.
The service requires the Windows Server 2008 operating system and IIS7. If you want to
manage the new FTP services by using the IIS7 interface, the Internet Information Services
(IIS) Manager must be installed. However, many administrators fi nd it more convenient to use
command-line administration. The appcmd.exe command-line utility is described later in this
chapter.
If you are using IIS7 shared confi guration, you must disable it on each node in a Web farm
scenario before you install the new FTP service. It can be re-enabled after the FTP service has
been installed. The FTP service that ships with the Windows Server 2008 must be uninstalled
before you install the new FTP service.
NOTE FTP7 INSTALLATION
You must uninstall FTP6 before installing FTP7.
When you download the appropriate fi le, you cannot specify that it should run auto-
matically on download because User Account Control blocks access to the applicationHost.
c o n fi g fi le. Instead, run it from an elevated command prompt or use one of the following
commands:
msiexec /i ftp7_x86_rtw.msi (for 32-bit)
msiexec /i ftp7_x64_rtw.msi (for 64-bit)
MORE INFO
DOWNLOADING THE FREE FTP PUBLISHING SERVICE
The new FTP publishing service is available as a free download at
/downloads/default.aspx?tabid=34&g=6&i=1619
(32-bit) or
/>/default.aspx?tabid=34&g=6&i=1620
(64-bit). An update for the 32-bit version is available
at
/>-934C-D5E9C3057661&displaylang=en&displaylang=en
and for the 64-bit version at
/>-39EB148820DE&displaylang=en&displaylang=en
.
NOTE
FTP7 INSTALLATION
NOTE FTP7 INSTALLATIONNOTE
You must uninstall FTP6 before installing FTP7.
Lesson 1: Confi guring FTP CHAPTER 14 751
During installation, you can include some or all the following features:
n
Common Files This provides common fi les for the Microsoft FTP Service for IIS, such
as the FTP confi guration schema fi le. Common fi les are required on all FTP servers
using shared confi guration mode.
n
FTP 7.0 Publishing Service This is the core component that FTP needs to work. It
requires the installation of the Process Model from the Windows Process Activation
Service feature.
n
Managed Code Support This is required when managed code features such as ASP.
NET or IIS Manager are used with FTP. This feature is optional and does not work in
Windows Server 2008 Server Core installations.
n
Administration Features This supports administration through IIS Manager. It
requires the installation of IIS Manager and Microsoft .NET 2.0 Framework.
You can confi rm that the FTP Service is installed by verifying that the Microsoft FTP Service
is running and (optionally) that the new IIS Manager FTP section displays management com-
ponents for the FTP Service.
By default, the FTP server is locked down and does not accept any FTP requests. You use
IIS Manager or the elevated command prompt to either publish a new FTP site or add FTP
Publishing to an existing Web site.
The FTP service supports anonymous authentication, but Microsoft recommends that you
not rely on this method. Recommended ways of authenticating your FTP users include the
following:
n
Windows Authentication In this method, users are located in the Active Directory
Domain Services (AD DS) or local user store on the dedicated FTP server.
n
IIS Manager Authentication This is a new feature. IIS Manager is used for user
administration; all users are added using IIS Manager, and authentication is handled by
the IISManagerAuth provider.
EXAM TIP
At this time of writing, the upgrade examinations are likely to test the version of FTP
(FTP6) that ships with Windows Server 2008 rather than FTP7, which must be downloaded
separately. You are likely to need to know only the signifi cant differences between the two
versions, such as that FTP7 supports Windows authentication, IIS Manager authentication,
and SSL encryption, whereas FTP6 does not. You use IIS 6.0 Manager to manage FTP6 and
IIS Manager to manage FTP7.
7 5 2 CHAPTER 14 Configuring FTP and SMTP Services
PracticE Installing the FTP Publishing Role Service and Creating a
Virtual Directory
In this practice, you install the FTP Publishing role service. You place content directly on
Default FTP Site. You then create a virtual directory that points to content elsewhere on the
hard disk.
ExErcisE 1 Install the FTP Publishing Service
In this exercise, you install the FTP Publishing Service role service that ships with Windows
Server 2008. This automatically installs the role service dependencies.
1. Log on to the domain controller Glasgow with the Kim_Akers account. If necessary,
open Server Manager.
2. In Server Manager, expand the Roles section, right-click the Web Server (IIS) server
role, and click Add Role Services.
3. On the Select Role Services page, select the FTP Publishing Service check box.
As shown in Figure 14-8, this automatically installs the FTP Server and FTP Manage-
ment Console role services.
4. Click Next.
FIGURE 14-8 Installing the FTP publishing service and its dependencies.
5. On the Confirm Installation Selections page, verify that you have made the correct
selections, and then click Install.
6. When the installation is complete, click Close.
Lesson 1: Configuring FTP CHAPTER 14 753
ExErcisE 2 View the Default Web Site Configuration and Add Content
In this exercise, you view configuration settings for Default FTP Site on the Glasgow FTP
server. You add and view site content.
1. If necessary, log on to the Glasgow domain controller with the Kim_Akers account.
2. Launch Internet Information Services (IIS) 6.0 Manager from the Administrative Tools
program group.
3. Expand Glasgow, and then expand the FTP Sites folder.
The Default FTP Site object exists but has not been started.
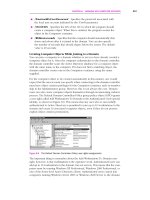
4. Right-click the Default FTP Site object and click Properties.
As shown in Figure 14-9, the default settings are for the FTP site to respond on all
unassigned IP addresses by using TCP port 21.
FIGURE 14-9 Default FTP Site settings.
5. Click the Home Directory tab to view the file system location for the FTP site’s root
directory.
The default file system location is %SystemDrive%\Inetpub\Ftproot. The default per-
missions are only Read, for access to the contents of this folder, and Log Visits.
6. Click OK to close the Default FTP Site Properties dialog box.
7. Using Windows Explorer, open the root directory for the FTP site and create a
new folder called MyFTPContents. Within this folder, create a new text file called
MyTestFile.txt.
8. In IIS 6.0 Manager, right-click the Default FTP Site object and click Start. If prompted,
click Yes to start the service and the site.
7 5 4 CHAPTER 14 Configuring FTP and SMTP Services
9. Open Internet Explorer. Navigate to ftp://Glasgow/MyFTPContents. View the contents
of Default FTP Site, as shown in Figure 14-10.
FIGURE 14-10 Accessing the MyFTPContents directory on Default FTP Site.
ExErcisE 3 Create a Virtual Directory
In this exercise, rather than put content directly on Default FTP Site, you create a virtual direc-
tory that points to a physical location on the hard disk.
1. If necessary, log on to the Glasgow domain controller with the Kim_Akers account and
open Windows Explorer.
2. Create a directory named C:\Virtual.
3. In C:\Virtual, create text files named Virtual1.txt and Virtual2.txt.
4. If necessary, launch Internet Information Services (IIS) 6.0 Manager from the Adminis-
trative Tools program group.
5. Navigate to Default FTP Site. Right-click Default FTP Site, click New, and then click
Virtual Directory.
6. Click Next.
7. In the Alias text box, type MyVirtualDir. Click Next.
8. In the Path text box, type C:\Virtual. Click Next.
9. Click Next to accept the default Directory Access permissions.
10. Click Finish.
11. If necessary, open Microsoft Internet Explorer. Browse to ftp://Glasgow/MyVirtualDir.
You should see the files you created, as shown in Figure 14-11.
Lesson 1: Confi guring FTP CHAPTER 14 755
FIGURE 14-11 Accessing files in a virtual directory.
Lesson Summary
n
You can confi gure general settings, security settings, home directory settings, mes-
sages settings, and directory security settings for FTP6 through the IIS 6.0 Server
Manager GUI. You can also add and manage virtual directories by using the GUI.
n
You can confi gure Anonymous or Basic authentication on an FTP6 site. You can use
NTFS permissions, IIS permissions, and IP address restrictions to help secure the site.
FTP6 offers no encryption facility; if you need encryption, confi gure IPsec. You can
manage resources on both a local and a remote server by using File Server Resource
Manager.
n
FTP7 offers a number of enhancements, including SSL encryption and additional
authentication methods.
Lesson Review
You can use the following questions to test your knowledge of the information in Lesson 1,
“Confi guring FTP.” The questions are also available on the companion DVD if you prefer to
review them in electronic form.
NOTE ANSWERS
Answers to these questions and explanations of why each answer choice is right or wrong
are located in the “Answers” section at the end of the book.
NOTE
ANSWERS
NOTE ANSWERSNOTE
Answers to these questions and explanations of why each answer choice is right or wrong
are located in the “Answers” section at the end of the book.
7 5 6 CHAPTER 14 Configuring FTP and SMTP Services
1. You are an administrator for Litware, Inc. According to the Litware’s written security
policy, all confidential company data must be transmitted over the network in the most
secure manner. However, a security check on the company’s Windows Server 2008
Web Server FTP server, Boston, reveals that confidential information, including name
and password information, is being transmitted to a partner organization in clear text.
Your system is using Basic authentication and the version of the FTP publishing service
that ships with Windows Server 2008. Your line manager has prohibited the down-
load and installation of FTP7 until it has been piloted on your internal test network.
How can you ensure that encryption is always used when the confidential files on the
Litware Boston server are transmitted over a network?
A. Use anonymous authentication on Boston and specify Use Only Anonymous
Authentication.
B. Configure the FTP sites on Boston to use SSL encryption. Publish the confidential
files on Boston, using IIS, and then activate SSL on the IIS server.
C. Use IPsec encryption between Boston and the partner network.
D. Upgrade the operating system of Boston to Windows Server 2008 Enterprise.
2. You install the FTP Publishing role service on the Windows Server 2008 server, Perth.
You configure Default FTP Site with Write IIS permission. Users complain that they
receive warning messages when they upload files to the site. What should you do to
allow authenticated users to access the FTP site and upload files without receiving
warnings?
A. Enter the cscript iisftpdr /access Perth “Default FTP Site” command at an elevated
command prompt.
B. Set NTFS permissions for the Authenticated Users security group to Allow Read/
Write Attributes.
C. Specifically allow the authenticated users’ client computers to access the site by
allowing access based on IPv4 address.
D. Configure Basic authentication.
3. You are configuring an FTP site on a Windows Server 2008 Web server in the trey-
research.internal domain. The server uses the FTP publishing service that ships with
Windows Server 2008.This facility enables researchers to submit a series of individual
independent reports on a new product. Researchers should not be influenced by their
colleagues’ reports and should not be able to access content in their colleagues’ direc-
tories. Directory location should be assigned through AD DS and only clients from a
single designated company network should be able to access the FTP service. Which of
the following settings should you configure on this FTP site? (Choose two. Each correct
answer presents part of a complete solution.)
Lesson 1: Configuring FTP CHAPTER 14 757
A. Configure access control to allow client computer access based on an IPv4 address
range.
B. Configure access control to allow client computer access based on an IPv6 address
range.
C. Configure SSL encryption.
D. Configure the site so that it does not isolate users.
E. Configure user isolation, using AD DS.
4. You are currently logged on interactively to the Glasgow Windows Server 2008 domain
controller. You want to list all the storage reports currently running on the Windows
Server 2008 member server, Boston, in the same domain. You open an elevated com-
mand prompt. Which command do you enter?
A. storrept reports list
B. storrept reports list /running
C. storrept reports list /running /Boston
D. storrept reports list /running /remote:Boston
7 5 8 CHAPTER 14 Confi guring FTP and SMTP Services
Lesson 2: Confi guring SMTP
You use Simple Mail Transfer Protocol (SMTP) in Windows Server 2008 to transport and
deliver e-mail messages. SMTP enables servers to send messages through internal e-mail or
across the Internet. Individuals and applications use SMTP to send notifi cations and other
information. In this lesson, you learn how to enable and confi gure the SMTP Server feature in
Windows Server 2008.
REAL WORLD
Ian McLean
I
think it’s all done to make me feel bad.
We have Simple Mail Transport Protocol, Simple Network Management Protocol,
Lightweight Directory Application Protocol, and Trivial File Transfer Protocol. Who
could possibly have problems with topics like that? I suppose my fi fteen-month old
granddaughter has it all worked out. She thinks “Silly-Grandpa” is all one word. So
does her grandmother.
I once spoke to a gentleman on the Internet Engineering Task Force (IETF), and he
told me that the simple standards were simpler than X509. That’s a bit like calling
the world’s second largest sumo wrestler a lightweight. Also, of course, Trivial File
Transfer handles only trivial fi les such as e-mail messages. I still have visions of my
wife attaching all the digital photographs on a full 4 GB USB fl ash memory drive to
an e-mail and sending the message to everyone she could think of. That was the day
the world ran out of electrons.
So what (if anything) am I saying? Basically, if you don’t understand something the
fi rst time, don’t worry, not even if someone tells you it’s simple or even trivial. Keep
plugging away. It will all come clear eventually, and you’ll wonder why you thought
it diffi cult in the fi rst place.
In the meantime, I’ll be programming my new Sat-Nav. I’m told it’s really simple—
provided you don’t mind going from Detroit to Windsor via Mexico City.
After this lesson you will be able to:
n
Install the SMTP Server feature and create and confi gure a virtual SMTP site.
n
Confi gure security, SMTP e-mail, and message delivery.
n
Confi gure smart hosts, size limitations, authentication, and SMTP relay settings.
Estimated lesson time: 35 minutes
Lesson 2: Confi guring SMTP CHAPTER 14 759
Installing the SMTP Server Feature
The Windows Server 2008 SMTP Server feature enables you to support applications and
network connections that send messages across a network. For example, a Web application
can use SMTP to send e-mail notifi cations to users. Messages can also be stored in a direc-
tory so they can be accessed by other applications. Users typically receive e-mail messages
by connecting to their mailbox on the messaging server, using a protocol such as Post Offi ce
Protocol version 3 (POP3).
For example, if you want to confi gure a Web site on a Windows Server 2008 Web server
to send e-mail to Internet users, confi gure the SMTP e-mail feature for the Web site on that
server. The SMTP Server feature allows the e-mails to be sent to specifi ed addresses.
EXAM TIP
SMTP sends messages. POP3 and IMAP4 retrieve them.
You can use Server Manager to install the SMTP Server feature on a Windows Server 2008
server. To do this, right-click Features and select Add Features. You can then add SMTP Server
and its dependencies. You do this in the practice later in this lesson. You can also use Server
Manager to remove the SMTP Server feature.
The SMTP server enables you to support applications and network connections that send
e-mail messages. Messages can be stored in a fi le system location so they can be accessed by
other applications. You can use IIS 6.0 Manager to confi gure SMTP settings by expanding the
server object. You also confi gure SMTP settings in the practice later in this lesson.
Installing the SMTP server confi gures a default site called SMTP Virtual Server #1. You can
also use the SMTP Virtual Server Wizard to create an SMTP virtual server. Each virtual server
has a set of confi guration settings and can be managed independently from other SMTP
servers.
To create an SMTP virtual server by using IIS 6.0 Manager, right-click the server object,
click New, and then click SMTP Virtual Server. Provide a name for the virtual server and select
the network connections on which the SMTP server is to be available. If the server has mul-
tiple physical network adapters or multiple IP addresses, you can specify these settings from a
drop-down list, which is useful when you want to limit access to the SMTP server for security
reasons (for example, when blocking networks that are accessible from the Internet). The
default IP address setting is All Unassigned, which specifi es that the SMTP virtual server will
respond on any IP address that is confi gured for the server.
Multiple SMTP virtual servers cannot run concurrently if they have the same IP address and
port assignment. The default port for SMTP connections is port 25. If you attempt to create a
new SMTP virtual server that has the same combination of IP address and port number, you
will receive an error message. You can continue to create the server, but you must reconfi gure
its settings later before you can start it.
7 6 0 CHAPTER 14 Configuring FTP and SMTP Services
After you specify the virtual server name and network connection, the New SMTP Virtual
Server Wizard Select Home Directory page enables you to specify the file system location for
the root for the SMTP virtual server. Message files and other data are stored in this location.
On the Default Domain page, specify the FQDN, for example, SalesServer.contoso.internal.
When you click Finish in the New SMTP Virtual Server Wizard, the new server appears in IIS
6.0 Manager, and you can access its properties to make additional configuration changes.
Configuring SMTP Server Settings
To configure settings for an SMTP virtual server, you access it in IIS 6.0 Manager, right-click it,
and then select Properties. On the General tab, you can specify the network connection set-
tings for the SMTP server. Select an IP address or All Unassigned from the drop-down list. You
can use the Advanced button to configure multiple bindings. The Advanced option, shown
in Figure 14-12, also enables you to change the port number on which the SMTP server is
accessed.
FIGURE 14-12 Configuring multiple identities on a virtual server.
Also on the General tab, you can limit the number of connections and set connection
timeouts. This helps manage performance on busy SMTP servers. You can also use the Enable
Logging option to store information about messages transmitted by the SMTP virtual server.
The Properties button offers options for determining the storage location of the log files.
On the Advanced tab, you can specify which types of information are included in the log
file. You can view Log files by using a standard text editor such as Windows Notepad. On busy
SMTP servers, enabling logging can decrease performance and increase disk space usage.
Configuring Access Security on an SMTP Virtual Server
You can configure access rules for sending messages by SMTP to prevent unauthorized use
of an SMTP virtual server. A large amount of spam is sent through unprotected SMTP relays,
and if you fail to protect an SMTP site, you could have problems with other organizations,
especially with ISPs identifying spam relayed through your site as being sent by you. You can
Lesson 2: Configuring SMTP CHAPTER 14 761
manage rules for using the SMTP virtual server through the properties on the Access tab,
shown in Figure 14-13.
FIGURE 14-13 An SMTP virtual server Properties Access tab.
You can use the Authentication settings to determine how potential users of an SMTP
virtual server pass their credentials to the service. The default setting is Anonymous Access,
which specifies that no credentials are required to connect to the SMTP virtual server. Choose
this option when you are using other methods (such as firewalls or trusted network connec-
tions) to prevent unauthorized access to the server.
The Basic Authentication option requires a username and password to be sent to the SMTP
virtual server. By default, these logon credentials are transmitted using clear text and are,
therefore, susceptible to interception. To prevent clear-text transmissions, you can config-
ure Transport Layer Security (TLS). This enables encryption for sent messages. TLS uses a
certificate-based approach to create the encrypted connection.
Integrated Windows Authentication relies on standard Windows accounts to verify cre-
dentials to access the system. This method is most appropriate for applications that use a
single Windows account or when all potential users of the SMTP server have Active Directory
domain accounts.
In addition to configuring authentication settings, you can also restrict access to an SMTP
virtual server based on IP addresses or domain names. This helps ensure that only authorized
network clients can use SMTP services. To add these restrictions, click the Connection button
on the Access tab of the Properties dialog box for the SMTP virtual server. You can choose the
default behavior for connection attempts, as shown in Figure 14-14.
7 6 2 CHAPTER 14 Configuring FTP and SMTP Services
FIGURE 14-14 Connection settings for an SMTP virtual server.
The Only The List Below option means that only computers that match the entry rules you
have configured will be able to use the server. This is most appropriate when all the expected
client computers are part of one or a few networks. The All Except The List Below option
means that the rules you add are for computers that are not allowed to use the SMTP virtual
server. Click the Add button to create new configuration rules.
For reasons discussed earlier in this section, it is important to configure relay restrictions.
SMTP relaying occurs when a message is sent with both to and from addresses that are not
part of the virtual server’s domain. Relaying is a common method by which spammers can use
unprotected SMTP virtual servers to send unsolicited mail. The Relay Restrictions dialog box is
shown in Figure 14-15.
FIGURE 14-15 The Relay Restrictions dialog box.
Lesson 2: Configuring SMTP CHAPTER 14 763
The Relay Restrictions dialog box enables you to specify which computers can relay mes-
sages through the SMTP server. Relay restrictions enable you to control the destination IP
addresses for which the SMTP server will accept mail. For example, if you want to ensure
that an SMTP server on the contoso.internal network can transfer mail only internally, and if
all internal e-mail addresses used the contoso.internal suffix, configure relay restrictions to
exclude all other suffixes.
The default settings are for all users and computers to be allowed to relay messages, pro-
vided they are able to authenticate. Click Add to define which IP addresses, domain names, or
both are allowed to relay messages. Click OK to save your changes.
When you want to ensure that sent messages are encrypted, you can enable TLS Encryp-
tion on the Access tab, but first you need to obtain and install the appropriate certificate.
Except in internal test networks, this will be a certificate obtained from a trusted third-party
certificate authority (CA). The process is the same as installing a certificate to create a secure
Web site with SSL encryption, which was discussed in Chapter 13.
Managing Security Permissions
You can define which Windows users may manage SMTP Virtual Server settings by using
the Security tab of your virtual SMTP server’s Properties dialog box, shown in Figure 14-16.
The list defines which users should be considered operators. Operators have permissions to
change the configuration of the SMTP virtual server. By default, this includes the Administra-
tors group and the Local Service and Network Service built-in accounts. You can click the Add
button to include additional users or groups on the list of operators.
FIGURE 14-16 The Security tab of a virtual SMTP server’s Properties dialog box.
7 6 4 CHAPTER 14 Configuring FTP and SMTP Services
Configuring SMTP E-Mail
You must configure SMTP e-mail when you want to deliver e-mail messages from your SMTP
site. Mail can be delivered immediately or it can be stored in a file location on disk, from
which it can be retrieved for delivery later.
You can configure SMTP e-mail for a Web application by using IIS Manager. You used IIS
6.0 Manager for virtual SMTP server configuration, but the more fully featured IIS Manager is
used to configure e-mail settings. You can also use the appcmd.exe command-line utility from
an elevated command prompt.
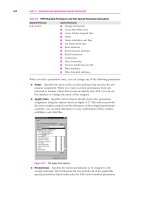
In IIS Manager, select the Server object and, in Features View, double-click SMTP E-mail.
Type the e-mail address of the sender in the E-mail address text box on the SMTP E-mail
page, as shown in Figure 14-17, and select one of the following delivery methods:
n
Deliver E-mail To SMTP Server This delivers e-mail messages immediately. An
operational SMTP server for which the user has credentials must be available. Type
the unique name of your SMTP server in the SMTP Server text box or select the Use
Localhost check box. Enter a TCP port in the Port text box. Port 25 is the SMTP stan-
dard TCP port. More than one virtual server can use the same TCP port if all servers are
configured by using different IP addresses. Under Authentication Settings, specify the
authentication mode and supply credentials if required.
n
Store E-mail In Pickup Directory This stores e-mails in a file location on disk for later
delivery by (for example) an ASP.NET application or by a user. Type the batch e-mail loca-
tion in the Store E-mail In Pickup Directory text box.
Finally, click Apply in the Actions pane.
FIGURE 14-17 SMTP e-mail configuration.
Lesson 2: Configuring SMTP CHAPTER 14 765
To configure SMTP e-mail from the command-line to deliver e-mail messages immediately,
enter a command with the following syntax:
%systemroot%\system32\inetsrv\appcmd set config /commit:WEBROOT
/section:smtp /from:string /deliveryMethod:network /network.port:int
/network.defaultCredentials:True|False /network.host:string
/network.userName:string /network.password:string
The variable string in the /from parameter is the e-mail address of the sender. The variable
network configures IIS to deliver e-mail messages immediately. The variable int specifies the
TCP port IIS uses to deliver e-mail messages. The variable string in the /network.host param-
eter specifies the host used for SMTP transactions. If defaultCredentials is set to True, Kerberos
or NTLM is used, if the server supports these protocols. The string variables in the /network.
userName and /network.password parameters specify a Basic authentication username and
password.
To configure SMTP e-mail from the command-line to store e-mails in a file location for
later delivery, enter a command with the following syntax:
%systemroot%\system32\inetsrv\appcmd set config /commit:WEBROOT /section:smtp
/from:string /deliveryMethod:PickupDirectoryFromIis|SpecifiedPickupDirectory
/SpecifiedPickupDirectory:string
The variable string in the /from parameter is the e-mail address of the sender. The string
variable in the /SpecifiedPickupDirectory parameter specifies the file location in which the
e-mail message is stored for later delivery.
The Message Delivery Process
Before SMTP delivers a message, that message is placed under the control of the SMTP
Service. You can use the following methods of presenting a message to the SMTP Service for
delivery:
n
Use an e-mail client You can use an e-mail client such as Outlook Express. In the
client application, specify the IIS server as the outgoing SMTP server for sending mes-
sages and then compose and send Internet e-mail in the normal way.
n
Place a properly formatted text file in the Mailroot\Pickup folder Requests for
Comment (RFCs) 821 and 822 define a properly formatted text file. Such a file, for
example, includes the sender’s and receiver’s e-mail addresses in the header. All files
copied to the Mailroot\Pickup folder are processed and delivered as regular mail.
You can move a single file or many files into the Mailroot\Pickup folder for delivery,
either manually or with a custom program or batch file. The file must also include your
default local domain name. When you have placed the file in the Mailroot\Pickup
folder, check the Mailroot\Drop folder for a new file with an .eml extension. If your
message is not destined for a local domain, it should instead be sent to the Mailroot\
7 6 6 CHAPTER 14 Confi guring FTP and SMTP Services
Queue folder. This option is useful if a user fi lls in a Web site form and the input infor-
mation is placed in a text fi le that is sent as an e-mail to a support address.
MORE INFO RFCS 821 AND 822
For more information about properly formatted e-mail fi les, see />/rfc821.txt and These are old RFCs but are still in
force. The upgrade examination, however, is unlikely to test you on the contents of
these documents.
n
Use a remote SMTP server The remote SMTP server connects to IIS, attaches to the
SMTP Service on port 25 (the default), and transmits any messages destined for e-mail
domains hosted on the IIS server. If the SMTP Service is confi gured to relay messages
to domains hosted on other SMTP servers, the remote server transmits messages for
routing to these other servers. In either case, the SMTP Service acquires the message
and places it in the Mailroot\Queue folder. IIS attempts to send any new messages
deposited in this folder immediately. If immediate delivery is not possible, IIS resends
queued messages. When the destination of the message is an e-mail domain hosted
on the IIS server itself, the message fi le is placed in the Mailroot\Drop folder.
Confi guring Messages Options
The Messages tab of an SMTP virtual server Properties dialog box accessed through IIS
6.0 Manager, and shown in Figure 14-18, enables you to confi gure size limitations on mes-
sages sent through the server. The fi rst two options specify the maximum size of a message
(including attachments) as well as the maximum amount of data that can be sent through one
connection to the server. You can also limit the number of messages sent per connection and
the number of recipients to whom they can be sent. These methods all help reduce unwanted
access to the server and preserve resources such as network bandwidth.
Incorrect addresses or domain names entered by the sending user frequently cause mes-
saging failures. The Send Copy Of Non-Delivery Report To option enables you to specify an
e-mail address to which undeliverable mail is forwarded. The Badmail Directory setting speci-
fi es the path to the folder into which these messages are sent. You can review these messages
to detect undeliverable mail.
MORE INFO
RFCS 821 AND 822
For more information about properly formatted e-mail fi les, see
/>/rfc821.txt
and
/rfc821.txt and /rfc821.txt
/>. These are old RFCs but are still in
force. The upgrade examination, however, is unlikely to test you on the contents of
these documents.
Lesson 2: Configuring SMTP CHAPTER 14 767
FIGURE 14-18 Enabling configuration of size limitations on messages that are sent through the server.
Defining Delivery Properties
Network routing issues and server failures on the Internet can cause service outages. SMTP
servers automatically store copies of messages they are trying to send. If the destination
server is unavailable, the SMTP server retries the operation. You can manage the details of this
behavior through the properties of the Delivery tab. The Outbound rules define the intervals
at which the server will attempt to retry the transmission of a message if a failure occurs.
You can also configure the Delay Notification and Expiration Timeout options for both the
Outbound and Local settings to determine when the server should stop resending a message.
Typically, SMTP servers send messages through other SMTP servers before they reach their
final destination. You can configure SMTP servers to require authentication before they relay
a message. The Outbound Security option on the Delivery tab, shown in Figure 14-19, enables
you to specify the authentication information to be used when connecting to another SMTP
server.
7 6 8 CHAPTER 14 Configuring FTP and SMTP Services
FIGURE 14-19 The authentication information to be used when connecting to another SMTP server.
The Outbound Connections settings specify limits on the number of connections to other
SMTP servers and how long they will remain active. Clicking Advanced accesses additional
options for managing how messages are processed by the SMTP virtual server. As shown in
Figure 14-20, the options include the following:
n
Maximum Hop Count When messages are forwarded to an SMTP server, the mes-
sage itself includes a hop count to record the number of times it has been forwarded.
When a message has exceeded the maximum hop count setting, it is considered
undeliverable.
n
Masquerade Domain A masquerade domain allows substitution of internal for exter-
nal domain names when forwarding mail to external SMTP servers. The Masquerade
Domain setting instructs the SMTP server automatically to rewrite the domain of the
From address used for outbound messages. You can use this setting when you want to
ensure that outgoing messages have a consistent domain name. For example, if you
have an organizational network with multiple domains, you can use a masquerade
domain so that all e-mail addresses use the same suffix.
n
Fully-Qualified Domain Name The Fully-Qualified Domain Name setting enables you
to specify the FQDN with which the SMTP server identifies itself when communicating
with remote SMTP servers. This setting specifies the DNS address of the SMTP virtual
server, based on Address (A) and Mail Exchanger (MX) records. In general, each SMTP
server for a domain should have a unique FQDN that includes the server name (for
example, boston.mail.contoso.internal).
Lesson 2: Configuring SMTP CHAPTER 14 769
n
Smart Host Smart hosts enable you to forward all outgoing mail to a specific remote
host. When a server name or IP address is defined for the Smart Host setting, all mes-
sages from this SMTP virtual server are routed through the specified server. This option
is commonly used when multiple internal servers route their messages through a spe-
cific SMTP server that has access to the Internet (for example, a Web server at an ISP).
Using a smart host configuration can save bandwidth and increase security because
only specific servers require access to external networks. The Attempt Direct Delivery
Before Sending To Smart Host option instructs the local SMTP server to attempt to
connect directly to the destination SMTP server. If this operation fails, the message is
forwarded to the designated smart host.
n
Perform Reverse DNS Lookup On Incoming Messages This setting instructs the
SMTP server to perform a DNS reverse lookup to verify that the user’s domain matches
the IP address in the message header. By enabling this option, you can reduce or pre-
vent unauthorized usage of the SMTP server by messages that use inconsistent header
information.
FIGURE 14-20 Advanced Delivery settings.
Enabling LDAP Routing
The Lightweight Directory Access Protocol (LDAP) is the primary standard by which directory
services communicate with each other. AD DS and Exchange Server are examples of LDAP-
compliant directory services. You can enable routing on the LDAP Routing tab of an SMTP
virtual server’s Properties dialog box to configure the server to use LDAP queries to resolve
to and from addresses in mail messages. The configuration options specify to which type of
LDAP system the SMTP server will be connecting and the address of the server. Other details
include authentication information for connecting to and querying the LDAP server.
7 7 0 CHAPTER 14 Confi guring FTP and SMTP Services
NOTE BACKING UP AND RESTORING SMTP CONFIGURATION
You back up and restore SMTP confi guration settings when you back up and restore IIS7
settings by using the appcmd.exe command-line utility. Chapter 13 discusses confi guration
backup and restore in detail.
PracticE Creating an SMTP Virtual Server
In this practice, you install the SMTP Server and Telnet Client features. You then create an
SMTP virtual server.
ExErcisE 1 Add the SMTP Server Feature
In this exercise, you add the SMTP Server feature. You also add the Telnet Client feature,
which you can use to test SMTP virtual servers. This is one of the suggested practices at the
end of this chapter.
1. Log on to the Glasgow domain controller with the Kim_Akers account. If necessary,
open Server Manager.
2. In Server Manager, right-click Features, and then select Add Features.
3. Select the SMTP Server and Telnet Client check boxes.
4. In the Add Features Wizard dialog box, shown in Figure 14-21, click Add Required
Features.
FIGURE 14-21 Installing dependent role services and features.
5. Click Next. Click Next again on the Web Server (IIS) page.
6. Click Next on the Select Role Services page.
7. On the Confi rm Installation Selections page, click Install.
8. When the installation is complete, click Close.
NOTE
BACKING UP AND RESTORING SMTP CONFIGURATION
NOTE BACKING UP AND RESTORING SMTP CONFIGURATIONNOTE
You back up and restore SMTP confi guration settings when you back up and restore IIS7
settings by using the
appcmd.exe
command-line utility. Chapter 13 discusses confi guration
backup and restore in detail.
Lesson 2: Configuring SMTP CHAPTER 14 771
ExErcisE 2 Create a New SMTP Virtual Server
In this exercise, you create a new SMTP virtual server by using IIS 6.0 Manager.
1. If necessary, log on to the Glasgow domain controller with the Kim_Akers account.
2. Open Windows Explorer and create a folder named C:\Mail.
3. Launch IIS 6.0 Manager from the Administrative Tools program group.
4. Expand the Glasgow (Local Computer) object and note that a default object, SMTP-
Virtual Server #1, has already been created.
5. Right-click the Glasgow object, select New, and then select Virtual Server.
6. In the Name text box, type MySMTPServer. Click Next.
7. In the Select IP Address text box, do not change the default setting. Click Next.
8. Read the warning message, and then click Yes to continue. You resolve this conflict
later by specifying a nondefault port number.
9. In the Home Directory text box, type C:\Mail. Click Next.
10. In the Domain step, type mail.contoso.internal.
11. Click Finish. Note that a new SMTP virtual server named MySMTPServer appears in the
left pane of IIS 6.0 Manager, as shown in Figure 14-22.
FIGURE 14-22 MySMTPServer has been created.
12. Right-click MySMTPServer and select Properties.
13. On the General tab, click Advanced to open the list of IP address and port number
settings.
14. Select the (All Unassigned) entry in the list and click Edit.
7 7 2 CHAPTER 14 Confi guring FTP and SMTP Services
15. Change the TCP Port setting to 2525 as shown in Figure 14-23. Click OK.
This resolves the confl ict with the default SMTP Virtual Server.
16. Click OK three times to close the dialog boxes and save the settings.
FIGURE 14-23 Specifying the SMTP port for an SMTP virtual server.
17. In IIS 6.0 Manager, right-click the MySMTPServer virtual server object, and then click
Start.
Lesson Summary
n
It is important to confi gure access security and, in particular, relay settings on an SMTP
virtual server. If you allow third parties to relay spam through your SMTP servers, your
site could be banned by ISPs and other organizations.
n
You can confi gure Message options such as how to handle undeliverable and unreturn-
able mail. Other message option settings include Maximum Hop Count, Masquerade
Domain, Fully-Qualifi ed Domain Name, Smart Host, and Perform Reverse DNS Lookup
On Incoming Messages.
Lesson Review
You can use the following questions to test your knowledge of the information in Lesson 2,
“Confi guring SMTP.” The questions are also available on the companion DVD if you prefer to
review them in electronic form.
NOTE ANSWERS
Answers to these questions and explanations of why each answer choice is right or wrong
are located in the “Answers” section at the end of the book.
1. You are a network administrator for a Web-hosting organization. Each client Web
site has a dedicated SMTP virtual server. You create a new SMTP virtual server on a
Windows Server 2008 Web server on your domain and install it for a new client Web
site. The Web server already hosts several SMTP virtual servers. The SMTP virtual server
NOTE
ANSWERS
NOTE ANSWERSNOTE
Answers to these questions and explanations of why each answer choice is right or wrong
are located in the “Answers” section at the end of the book.