Learning AutoCAD 2010, Volume 1 phần 7 potx
Bạn đang xem bản rút gọn của tài liệu. Xem và tải ngay bản đầy đủ của tài liệu tại đây (7.5 MB, 46 trang )
Lesson: Using Layers ■ 263
Option
Description
Linetype: A blank drawing will contain the Continuous
linetype. Select the Load button to load other
linetypes.
Lineweight: Various lineweights will not be displayed
in the drawing window unless the Show Lineweight
option is selected in the status bar. Note that the
default lineweight is 0.01 inches or 0.25 mm.
New Layer Properties
When you create a new layer, the properties of the currently selected layer are
duplicated for the new layer. If your new layer is going to have properties such as color or
linetype in common with another layer, select the similar layer before you click New.
Layer Status
The visibility and availability of objects on specific layers are determined by the layer's status. The
following table describes the potential status of a layer.
These icons appear in the Layer Properties Manager and the Layer list. Click the icon to change the
status of the layer.
Icon
Status
OR
On: Objects on the layer are visible.
Off: Objects on the layer are not visible but are still considered when the
drawing is regenerated.
264 ■ Chapter 4: Drawing Organization and Inquiry Commands
Icon
Status
OR
Thawed: Objects on the layer are visible.
Frozen: Objects on the layer are not visible and are not considered when
the drawing is regenerated.
OR
New VP Freeze: Freezes layer in newly created viewports.
VP Freeze (Layout only): The layer is not visible and will not print in the
selected or current viewport if frozen.
OR
Unlocked: You can select and edit objects on the layer.
Locked: You cannot select or edit objects on the layer.
Layer Control List
The Layer Control list is located on the Layers panel.
Select the down arrow to reveal the list of Layers in the drawing.
The Layer Control serves a dual purpose.
Lesson: Using Layers ■ 265
1.
In normal operations, the current layer is displayed. However, when an object is selected with the
Command line blank, the list displays the layer that the object is on. The following image shows that
when the door block is selected, the A-Doors layer is displayed.
It is helpful to know what layer the object is on. But you may also place the selected object or objects
on another layer by choosing the layer from the drop down list.
2.
After you create layers, you can use the Layer Control to select a layer to make it current, to change the
layer status to Freeze or Thaw, Lock or Unlock, or turn layer On or Off.
266 ■ Chapter 4: Drawing Organization and Inquiry Commands
Layer Tools Key Points
■ Creating and managing layers requires the use of some key commands, the Layer Properties
Manager, and the Layer Control list on the Layers panel.
■ Your primary tool for managing layers is the Layer Properties Manager. Use this dialog box to
create and manage layers.
■ Once a layer is created, you cannot delete it if it is current or if there are objects referenced on
that layer.
■ Layer 0 cannot be deleted or renamed.
■ Layer properties include color, linetype, lineweight, and whether the layer will plot or not.
■ A layer status can be On or Off, Frozen or Thawed, and Locked or Unlocked.
■ Layers that are turned off are not visible but are still considered when the drawing is regenerated.
■ Layers that are frozen are not visible and are not considered when the drawing is regenerated.
■ With the Command line blank, you can select an object and see what layer it is on from the Layers
Control list located on the Layers panel.
■ You can select an object and move it to another layer using the Layers Control list.
■ You can change a layers status from the Layers Control list.
■ The Layer Previous command returns you to the previous layer state, to the previous layer setting,
and to the previous status of all layers in the drawing.
Performance Tip
For better performance on large drawings, freeze layers instead of turning them
off. Objects on layers that are turned off are still considered when the drawing is
regenerated, while objects on layers that are frozen are not considered, and thus not
calculated when the drawing is regenerated.
Lesson: Using Layers ■ 267
Practice Exercise: Layer Tools
In this practice exercise, you create layers in the
Properties Manager dialog box and select the layer
from the Layer Control list to draw objects on the
appropriate layer.
1.
To create the layers:
■ On the ribbon, click Home tab > Layers
panel > Layer Properties.
■ In the dialog box, click New.
■ Create the following layers:
❏ Layer Name: Circle, Color: Red
❏ Layer Name: Line, Color: Blue
❏ Layer Name: Rectangle, Color: Green
Note: If you enter the layer name and then a
comma, a new layer name field appears. The
layers are automatically listed in alphabetical
order.
2.
Close the Layer Properties Manager dialog box.
3.
In the Layer Control list, select the Circle layer
to make it current and draw circles on that
layer.
4.
Repeat the previous step:
■ Click the Rectangle layer to make it current
and draw rectangles.
■ Click the Line layer to make it current and
draw lines.
268 ■ Chapter 4: Drawing Organization and Inquiry Commands
Exercise: Work with Layers
In this exercise, you freeze and thaw layers and lock
and unlock them. You create new layers, set the
current layer, andcreate new geometry on the current
layer.
The completed exercise
Completing the Exercise
To complete the exercise, follow the
steps in this book or in the onscreen
exercise. In the onscreen list of
chapters and exercises, click Chapter
4: Drawing Organization and Inquiry
Commands. Click Exercise: Work with
Layers.
1.
Open M_Create-Layers.dwg.
2.
Study the drawing, paying particular attention
to the color and linetype of the objects. Turn
the Dimensions layer off to make it easier to
view and make changes to the geometry in the
drawing:
■ On the Home tab, click Layers panel >
Layer Control list.
■ Click the Sun icon to freeze the Dimensions
layer. The icon changes from a sun to
a snowflake indicating that the layer is
frozen.
3.
To make the hidden layer current:
■ On the Home tab, click Layers panel >
Layer Control list.
■ Select Hidden to set it as the current layer.
4.
Zoom into the area shown and draw lines on
the Hidden layer:
■ Using the Line command, create a line
from point 1 to point 2 and another from
point 3 to point 4 as shown in the following
illustration.
■ Make sure you are snapping to the exact
endpoint or intersection on the existing
objects.
Lesson: Using Layers ■ 269
5.
Draw a line on the Center layer across the
center of the object as indicated below:
■ Zoom out so that the entire drawing is
displayed, then zoom into the area shown
below.
■ On the Home tab, click Layers panel >
Layer Control list. Select the Center layer.
■ Start the Line command.
■ Acquire the 180 degree quadrant point of
the large circle and drag your cursor to the
left along the extension path.
■ In the dynamic input field, enter 5. Press
ENTER.
■ Drag your cursor outside the large circle to
the right along the extension path.
■ In the Dynamic Input field, enter 85. Press
ENTER.
■ Press ENTER again to end the Line
command.
6.
To create another line across the center of the
object:
■ Press ENTER to repeat the Line command.
■ Acquire the 270 degree quadrant point
of the large circle and drag your cursor
downward along the extension path.
■ In the Dynamic Input field, enter 5. Press
ENTER.
■ Drag your cursor outside and above the
large circle along the extension path.
■ In the Dynamic Input field, enter 85. Press
ENTER.
■ Press ENTER again to end the Line
command.
270 ■ Chapter 4: Drawing Organization and Inquiry Commands
7.
Use the Rotate command to rotate both
centerlines 30 degrees. Use the center of the
large circle as the
base point for the rotation.
8.
Thaw the Dimension Layer:
■ On the Home tab, click Layers panel >
Layer Control list. Click the snowflake icon
to thaw the Dimensions layer.
■ Zoom out to the extents of your drawing.
9.
To observe object properties in the Layer
Control list:
■ With the command line blank, click any
dimension.
■ Notice that the Dimensions layer appears
in the Layer Control list.
■ Press ESC so that the command line is
blank.
■ Move your cursor over any object on the
Visible layer as shown below. Notice the
padlock symbol that is displayed. Objects
on the visible layer are locked and cannot
be modified, however, you may add more
geometry to any locked layer.
Lesson: Using Layers ■ 271
■ Select an object on the Visible layer and
notice how the layer name displays in the
Layer Control list.
■ Select any other object, such as a
dimension, and notice that now the Layer
Control field is blank. Because the list
cannot display multiple properties at once,
this indicates the objects that you selected
are on different layers.
■ Press ESC to deselect all objects.
10.
Try to move some of the objects including ones
which are on a locked layer:
■ Start the Move command.
■ Select all of the objects in the auxiliary
view. Press ENTER.
■ Click any point on the drawing. Enter 25.
Press TAB.
■ In the Angle field, enter 30. Press TAB.
■ Click anywhere in the drawing to complete
the Move command. Notice that some of
the objects did not move.
■ Undo the Move command.
11.
This time you will move the objects again, but
first you unlock the layer that some of these
objects are on:
■ On the Home tab, click Layers panel >
Layer Control list. Click the padlock icon
on the Visible layer. Note that the padlock
changes from a closed lock to an open lock
indicating that the layer is unlocked.
■ Repeat the Move command from the
previous step. Notice how all of the objects
are moved.
■ Relock the visible layer.
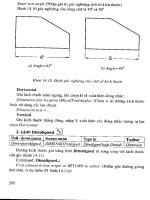
12.
To create a new layer:
■ On the Home tab, click Layers panel >
Layer Properties.
■ In the Layer Name field, click Visible. The
properties of layer Visible are used as the
default properties for the new layer.
■ In the Layer Properties Manager dialog
box, click New Layer (1).
■ In the Layer Name field (2), enter Title
Block.
■ Click the Color field (3) and select White.
13.
To add another layer:
■ Click New Layer again.
■ In the Layer Name field, enter Viewport.
■ Click the Color field and select Cyan. Click
OK.
■ Click in the Plot field. This sets the
Viewport layer to nonplotting.
■ Click the layer Title Block.
■ Right-click. Click Set Current.
■ Click the X to close the Layer Properties
Manager dialog box.
14.
Zoom out to the extents of your drawing.
272 ■ Chapter 4: Drawing Organization and Inquiry Commands
15.
To create a rectangular border:
■ Start the Rectangle command.
■ Enter 0,0. Press ENTER.
■ Right-click. Click Dimensions.
■ Enter 400 for the length. Press ENTER.
■ Enter 277 for the width. Press ENTER.
■ Click anywhere near the Auxiliary view to
complete the command.
16.
Close all files. Do not save.
Lesson: Changing Object Properties ■ 273
Lesson: Changing Object Properties
This lesson describes what object properties are and how to change the properties of objects in a
drawing. Every object that you create in a drawing has associated properties. For example, a line has
an associated color, layer, linetype, and length as shown in the following Quick Properties panel.
It is very common practice to change the properties of objects as you work on a drawing. One way
to access and change some object properties is to select the object and use the Layers and Property
panels in the Ribbon to change the Layer or override the color, linetype or lineweight. Another
method to change object properties is with the Properties palette which provides a number of options
depending on the items selected.
The following illustration shows the object properties of a selected circle as displayed in the Properties
palette.
After completing this lesson, you will be able to describe the various properties of objects, identify the
current settings, and assign and change object properties for existing objects in the drawing.
Objectives
After completing this lesson, you will be able to:
274 ■ Chapter 4: Drawing Organization and Inquiry Commands
■ Describe what object properties are and explain how they are used.
■ Describe the use and effect of the ByLayer property.
■ Change object properties.
About Object Properties
The most common object properties include Layer, Color, Linetype, and Lineweight. In most instances,
an object's color, linetype, and lineweight are determined by the layer on which it was drawn. When
you create new objects, you should make sure that the object properties settings in the layers that
you create produce the desired results.
However, you may view, override, or change some object properties from the settings in the Layers
and Properties panels. These options are limited to Layer, Color, Linetype, and Lineweight.
In the Properties palette, shown below, you can access a more complete list of object properties that
you may view or change. The list of properties that is displayed depends on the type of object or
variety of objects that you select.
Lesson: Changing Object Properties ■ 275
Object Properties - Line
Warning!
The 3D Visualization group show in the previous image is not available in AutoCAD LT.
Definition of Object Properties
Object properties control how an object looks, both on screen and in print. The following image shows
objectswith specific Linetype, Lineweight, and Color properties.
276 ■ Chapter 4: Drawing Organization and Inquiry Commands
Example of Object Properties
It is common practice in 2D drafting to represent a feature or surface that is obscured by another with
a hidden linetype. The hidden line indicates that the feature exists behind the current visible surface.
Another common practice is to use colors to distinguish between objects in complex drawings and
assigning different colors to different object types.
In the following image, the object lines are shown with the Continuous linetype and a unique color.
The section line is shown with the Phantom linetype and unique color. The hole centerlines are shown
with the Centerline linetype and a unique color. The hidden edge lines are shown with the Hidden
linetype and a unique color. More than likely, the information in this drawing is organized into layers
which determine the color and linetype of these objects. However, at a glance, it would be impossible
to know precisely how the object properties have been assigned without further investigation.
Object lines shown as Continuous linetype.
Hole centerlines shown as Center linetype.
Hidden edge lines shown as Hidden linetype.
Section line shown as Phantom linetype.
Lesson: Changing Object Properties ■ 277
ByLayer Property
The Properties panel in the Home tab of the ribbon displays the current property settings for objects
that you create in a drawing. The default settings are ByLayer which means that the object properties
are determined by the layer. By default, all objects use the ByLayer setting for color, linetype, and
lineweight.
The following image shows the default ByLayer settings on the object Properties panel.
Definition of the ByLayer Property Setting
The ByLayer property setting is assigned to objects and specifies its color, linetype, lineweight, and plot
style. This special property setting is the equivalent to using a specific color such as red or a specific
linetype such as Hidden. When property types are set to ByLayer, the object assumes the property
setting that is defined in the object's layer. If you change the property in the layer, all objects with the
ByLayer setting update accordingly.
The ByLayer setting not only enables consistency across objects on the same layer, it also ensures that
all objects update accordingly if you change the layer's color, linetype, or lineweight properties.
You should only override an object's color, linetype, or lineweight property to something
other than ByLayer when absolutely necessary. When you look at a drawing that contains
objects of the same colors and linetypes, the natural inclination is to assume those
objects are on the same layers.
Example of Changing Object Properties from the ByLayer Default
It is common drafting practice to place certain object types on their own layers. For example, all
centerlines would be on the same layer, all object lines on their own layer, and so forth. By following
this structure, you can readily control the display of all your objects both on screen and in print.
278 ■ Chapter 4: Drawing Organization and Inquiry Commands
In the following image, the object lines, centerlines, and hidden lines all have their properties set to
ByLayer.
If you change the lineweight of the layer of the object lines, all of the objects on that layer change to
reflect the layer setting. This change is shown in the following image.
Lesson: Changing Object Properties ■ 279
Changing Object Properties
One way to change the properties of objects is to use the controls in the Layers and Properties on
the ribbon. By selecting the object or objects, you can view properties and make changes simply by
selecting the desired options from the lists.
To turn the Layers or Properties panels on, right-click on the Home tab and click Panels. Then select
Layers and Properties from the list.
280 ■ Chapter 4: Drawing Organization and Inquiry Commands
Layers Panel - Layer Control List
The following image shows the Layers panel. With an object selected, you can view and modify the
layer associated with that object.
Properties Panel - Select a Linetype
The following image shows the Properties panel with the linetype list selected. Using this panel, you
can view and modify an object's color, linetype, and lineweight.
Show/Hide Lineweight
The Show/Hide Lineweight option on the status bar controls the visibility of lineweights in the
drawing.
Click to turn this feature on or off. Right-click and select Settings to adjust the display scale.
Lesson: Changing Object Properties ■ 281
Procedure: Changing an Object's Layer Property
The following steps give an overview of how to change an object's layer property using theLayer
Control list in the Layers panel.
1.
Select one or more objects in your drawing that need to be moved to a different layer.
282 ■ Chapter 4: Drawing Organization and Inquiry Commands
2.
On the Home tab, click Layers panel > Layer Control list. Select the layer where you want to move the
objects.
3.
Press ESC to clear your selection.
Procedure: Changing an Object's Color Property
The following steps describe how to change an object's color by selecting a color from thelist on the
Properties panel.
1.
Select one or more objects in your drawing that need to have their color changed.
Lesson: Changing Object Properties ■ 283
2.
On the ribbon, click Home tab > Properties panel > Object Color. Select the desired color from the list.
3.
Press ESC to deselect the objects.
Procedure: Changing an Object's Linetype Property
The following steps describe how to change an object's linetype by selecting the list of linetypes from
the Properties panel. You can load desired linetypes that are not in the list by selecting Other.
1.
Select one or more objects in your drawing that need to have their linetype changed.
284 ■ Chapter 4: Drawing Organization and Inquiry Commands
2.
On the ribbon, click Home tab > Properties panel > Linetype. Select the desired linetype from the list.
3.
Press ESC to deselect the object.
Procedure: Changing an Object's Lineweight Property
The following steps describe how to change an object's lineweight by using the lineweight list on
theProperties panel.
1.
Select one or more objects in your drawing that need to have their lineweight changed.
Lesson: Changing Object Properties ■ 285
2.
On the ribbon, click Home tab > Properties panel > Lineweight. Select the desired lineweight from the
list.
3.
Press ESC to deselect the object.
Change Properties Guidelines
■ Make sure that you display the Layers and Properties panels. If they are not visible, right-click in
the Home tab of the ribbon to turn them on.
■ Be sure the Command line is blank, then use the window or crossing selection to quickly select one
or more objects to view or change their properties.
■ If you select the wrong object, just press SHIFT and select it again to remove it from the selection
set.
■ When you select more than one object with different properties, the field in the property option
will be blank. This is because only one property can be listed at a time.
■ You can select more than one object and choose a property that you want to assign to all of the
objects selected.
■ Object properties should be determined by the layer (ByLayer) whenever possible.
■ Linetypes not shown in the list can be loaded into the drawing.
■ Be sure the Lineweight display option is on in the status bar and adjust the lineweight display in
the Settings dialog box.
Object Selection
Remember to press the ESC key after you complete each change and before you select
more objects. This prevents accidental changes to the properties of previously selected
objects.
286 ■ Chapter 4: Drawing Organization and Inquiry Commands
Practice Exercise: Changing Object Properties
In this practice exercise, you draw simple objects on
the default layer 0. Then you create additional layers
with object properties as specified. Finally, you select
the objects and change the properties using the lists
from the Layers and Properties panels.
1.
Begin a new drawing from the acad.dwg
template and draw some lines, circles, and
rectangles on the default layer 0.
2.
On the Home tab, click Layers panel > Layer
Properties. In the Layer Properties Manager,
create several layers with the following names
and colors:
■ Circles - red
■ Lines - blue
■ Rectangles - cyan
3.
To assign a hidden linetype to the Lines layer:
■ In the Layer Properties Manager, on the
Lines layer, click Continuous.
■ In the Select Linetype dialog box, click
Load.
■ In the Load or Reload Linetypes dialog box,
scroll to and click HIDDEN.
■ Click OK to exit the dialog boxes.
4.
To assign a Lineweight of 0.35 to the layer
named Rectangles:
■ In the Layer Properties Manager dialog
box, click the Default lineweight of the
Rectangles layer.
■ In the Lineweight dialog box, click 0.35 mm
lineweight.
Lesson: Changing Object Properties ■ 287
■ Click OK to exit the dialog box.
■ Close the Layer Properties Manager.
5.
To change the object properties:
■ With the command line blank, select all of
the circles. On the Home tab, click Layers
panel > Layer. Select the Circle layer. Press
ESC to deselect the objects.
■ Repeat this step for the lines and
rectangles and place them on their
designated layers.
■ Press ESC to deselect all objects.
■ Your drawing should look similar to what is
shown in the following illustration.
6.
On the status bar, be sure the Show Lineweight
setting is on.
7.
To change the object properties again:
■ With the command line blank, select all of
the object you have drawn.
■ On the Home tab, click Properties panel >
Linetype(1) > Hidden.
■ In the Lineweight list (2), click 0.40.
■ From the Color list (3), select White.
■ Now all of the objects in your drawing
should have the same color, linetype, and
lineweight as in the following image.
It is difficult to tell at a glance which objects
are on the layers.
8.
Change the object properties back to ByLayer:
■ With the command line blank, select all of
the objects that you have drawn.
■ On the Home tab, click Properties panel >
ByLayer for (1) Color, (2) Linetype, and (3)
Lineweight.
■ Press ESC to deselect all of the objects.
■ Your objects should display the properties
that you assigned to each object in step 5.