Learning AutoCAD 2010, Volume 2 phần 6 pptx
Bạn đang xem bản rút gọn của tài liệu. Xem và tải ngay bản đầy đủ của tài liệu tại đây (9.3 MB, 37 trang )
178 ■ Chapter 8: Dimensioning
Chapter Summary
Dimensions are vital annotations used on most drawings to convey important design size and position
specifications. You can create a variety of dimension types. You control dimension placement and
appearance using dimension styles. Once placed, you can edit dimensions by using grips to move
the dimensions or text to new locations or by double-clicking the dimensions and modifying their
properties in the Properties palette. You can also use the Dimedit, Dimtedit, and Ddedit commands to
modify dimensions and dimension text.
Having completed this chapter, you can:
■ Create dimensions.
■ Use dimension styles to manage dimensions.
■ Create and edit multileader styles and multileaders.
■ Use different commands and methods to edit dimensions.
Chapter Overview ■ 179
Chapter
9
Hatching Objects
You can use hatch patterns and gradient fills on the drawing to bring focus or call attention to certain
areas. Once you have created hatch patterns and fills, you can edit them using similar methods.
Objectives
After completing this chapter, you will be able to:
■ Create hatch and gradient fill patterns on objects in the drawing.
■ Edit hatch and gradient fills that have been placed in the drawing.
180 ■ Chapter 9: Hatching Objects
Lesson: Hatching Objects
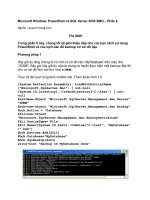
This lesson describes how to hatch and fill objects in your drawing using the Hatch and Gradient
commands. In the following illustration, the roof has a roof tile hatch pattern and the walls a brick
pattern. The background is composed of two gradient fills.
Hatching is used across all design disciplines to enhance drawing views, to clarify design features, and
to show areas that were modified in drawings when you communicate with your clients. For example,
you can add hatching when you draft roof or floor tiles or create section views of manufactured parts.
You can also use hatching in construction, steelwork, or road design.
Warning!
Gradient Fills cannot be created with AutoCAD LT®.
Objectives
After completing this lesson, you will be able to:
■ Describe the characteristics of hatch and fill patterns.
■ Describe the characteristics of associative hatch patterns.
■ Create hatch patterns and fills.
Lesson: Hatching Objects ■ 181
Introduction to Hatch Patterns and Gradient Fills
You may want to add patterns that represent materials, special regions, or textures to your drawing to
help communicate your ideas. Applying hatch patterns to areas of your drawing can quickly augment
their appearance and help to convey design intent. You can use the provided solids, gradients, and
predefined hatch patterns or define your own.
Definition of Hatch and Fill Boundaries
Hatch patterns are graphical elements that are often used to represent materials, special regions, or
textures in a drawing. In addition to using a pattern to define an area, you can use gradient or solid fill.
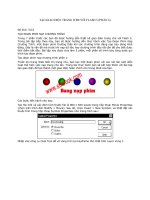
In the following image, the Hatch command was used to create hatch patterns and gradients on
several areas of the elevation. The highlighted edges around the bricks illustrate the boundaries that
were used to create the pattern. A boundary for a hatch or fill is any combination of selected objects,
such as lines, polylines, circles, and arcs, that create an enclosed area.
182 ■ Chapter 9: Hatching Objects
Hatch Boundaries
When you click an area within a drawing to hatch, the boundaries in the drawing are automatically
evaluated to determine how to place the hatch based on the specifications you set in the Hatch and
Gradient dialog box.
When a hatch boundary cannot be determined, it may be because the specified internal point is not
within a fully enclosed area. Red circles are displayed around unconnected endpoints of the boundary
to identify any gaps in the hatch boundary.
The red circles remain displayed even after you exit the Hatch command. They are removed when
you select another internal point for the hatch or when you use the Redraw, Regen, or Regenall
commands.
Example of Hatch and Fill Patterns
Using hatch patterns and fills is like coloring in an area, but with more sophistication. For instance, you
might select blue to color an ocean. This color alone represents water, but with hatch and fill, you can
go beyond color and add patterns and textures, such as waves or ripples.
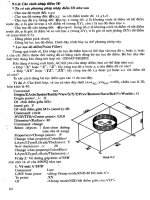
The following illustration shows that in addition to a brick color on the building front, a hatch has also
been applied to better represent how brick would appear in real life.
Lesson: Hatching Objects ■ 183
Key Points for Hatch and Gradient Fill
Consider the following when using hatch and gradient fills:
■ Hatch patterns are graphic elements that are often used to represent materials, special regions, or
textures in a drawing.
■ You can use the provided solids, gradients, and predefined hatch patterns, or define your own.
■ Boundaries define which area of your drawing can be hatched or filled.
■ A boundary for a hatch or fill is any combination of selected objects, such as lines, polylines, circles,
and arcs, that create an enclosed area.
Associative Hatch Patterns
By default, hatch patterns are associated with the space they fill, which means that when the hatched
object is edited, the hatch adjusts to the new shape. This feature eliminates the rework of recreating
the hatch every time you edit a hatched object or area within your drawing.
Removing Associativity
You can elect not to associate a hatch with the object or area. To do this, clear the Associative option
under Options in the Hatch and Gradient dialog box.
Nonassociative Hatch Patterns
Hatches made using the Gap Tolerance feature are nonassociative. This means that after you modify
the unclosed area containing the hatch, you will need to rehatch it.
When you use the Gap Tolerance feature, all subsequent hatches are also nonassociative. To make
hatches associative again, select Associative in the Hatch and Gradient dialog box under Options.
184 ■ Chapter 9: Hatching Objects
Example of an Associative Hatch Pattern
Suppose you need to alter the opening in a brick fireplace. If your hatch is associative, the brick
pattern adjusts to the new space. If your hatch is not associative, it does not adjust and you need to
delete it and rehatch the area.
Associative Hatch Key Points
Consider the following points when using hatches:
■ By default, hatch patterns are associated with the space they fill, which means that when the
hatched object is edited, the hatch adjusts to the new shape.
■ Hatches made using the Gap Tolerance feature are nonassociative. This means that after you
modify the unclosed area containing the hatch, you will need to rehatch it.
■ When you use the Gap Tolerance feature, all subsequent hatches are also nonassociative. To make
hatches associative again, select Associative in the Hatch and Gradient dialog box under Options.
Creating Hatched Objects
With the Hatch command, you can fill selected areas of your drawing with patterns, colors, or
gradients. You fill these areas by defining boundaries based on points or objects in the drawing.
When you start the Hatch command, the Hatch and Gradient dialog box is displayed. Using this dialog
box, you select the type and pattern for the hatch, adjust the angle, scale, and hatch origin, and then
define the boundaries that will contain your hatch.
After adjusting the hatch properties and defining the hatch boundaries, you can use the Preview
button to preview the hatch pattern before you create it.
Note: Gradient fills are not supported by AutoCAD LT, so the Hatch and Gradient dialog box is just
called the Hatch dialog box in AutoCAD LT.
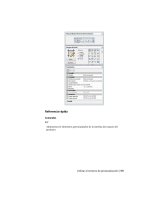
In the following image, hatch and gradient objects are used to create a quarter-section view of the
part. The hatch patterns indicate the area sectioned while the gradient patterns are used to add color
to the drawing view.
Lesson: Hatching Objects ■ 185
Command Access
Hatch
Command Line: HATCH, H
Ribbon: Home tab > Draw panel > Hatch
Hatch and Gradient Dialog Box: Hatch Tab
Click the arrow at the bottom-right of the Hatch and Gradient dialog boxes to access the advanced
hatching options.
186 ■ Chapter 9: Hatching Objects
Type and Pattern
You use the Type and Pattern area of the Hatch and Gradient dialog box to select the hatch pattern.
You can select patterns from the Pattern list or click the browse button or Swatch area to open the
Hatch Pattern Palette dialog box. Using this dialog box, you can select patterns based on a visual
swatch.
Hatch Pattern Palette Dialog Box
Lesson: Hatching Objects ■ 187
Angle and Scale
You use the Angle and Scale area to adjust the angle and scale of the pattern. When you enter an
angle, it is relative to the default angle of the hatch. For example, the ANSI 31 hatch pattern has a
default angle of 45 degrees built into the hatch definition. If you enter 45 degrees in the angle field, it
is added to the default angle and the pattern lines are drawn vertically at 90 degrees.
Hatch Origin
Some hatching situations may require that you adjust the hatch origin for better placement of the
hatch pattern. Using the Hatch Origin options, you can create a more realistic pattern by controlling
where the pattern begins.
188 ■ Chapter 9: Hatching Objects
Command Access
Gradient
Command Line: GRADIENT
Ribbon: Home tab > extended Draw panel > Gradient
Hatch and Gradient Dialog Box: Gradient Tab
In the Hatch and Gradient dialog box, click the Gradient tab to create gradients in your drawing. You
can choose between a one color gradient with adjustments to mimic shading or tint and a two color
option in which you specify two colors for the gradient.
Select the gradient pattern from nine predefined choices.
In the Orientation area, you can choose to have the gradient centered within the boundary and adjust
the angle of the gradient.
Lesson: Hatching Objects ■ 189
Hatch and Gradient - Boundaries and Advanced Options
The following interface options and descriptions apply to both hatches and gradients.
Boundaries
Every hatch or gradient you create is based on a boundary you define. Use the options in this area
of the dialog box to create boundaries by selecting points inside a boundary or objects that define a
boundary.
190 ■ Chapter 9: Hatching Objects
Options
When the Associative option is selected, the resulting hatch is associative with the boundary. When
you are creating hatch patterns in multiple boundaries at once, you can use the Create Separate
Hatches option to create a separate hatch for each boundary defined. Using this option, you can
change any of the resulting hatch patterns independently of the others.
Use the Draw Order list to adjust the draw order of the hatch pattern. The draw order determines the
pattern or gradient's position behind or in front of other objects. Use this option to create multiple
pattern fills that include both a hatch and a solid fill or a hatch and a gradient.
Inherit Properties
When you edit drawings that already contain hatch patterns, use this option to retrieve the properties
of an existing hatch pattern. Using this feature, you can easily match the properties of other hatch
patterns or gradients.
Islands
Select Island Detection to detect boundaries that are inside the boundary you define. Choose
between Normal, Outer, or Ignore. This is extremely useful when hatching areas that contain text. The
text is treated as a boundary and, unless you choose the Ignore option, the pattern or gradient does
not overrun the text.
Lesson: Hatching Objects ■ 191
Boundary Retention
If you select the Retain Boundaries option, a new object is created representing the defined boundary.
You can choose between a Region or Polyline object.
Boundary Set
Use this option to determine how the drawing is analyzed for boundaries. On large drawings, this can
speed up boundary analysis by limiting the objects that are considered.
Gap Tolerance
If the boundary has gaps, you can set the gap tolerance to allow any gap that is equal to or smaller
than the tolerance to be ignored.
Note: If a gap exists in the boundary, the hatch pattern will not be associative.
Inherit Options
If you use the Inherit Properties option to create the hatch, you can use the Inherit options to control
the location of the hatch origin.
192 ■ Chapter 9: Hatching Objects
Procedure: Creating a Hatch Pattern
The following steps give an overview of creating a hatch or gradient in the drawing.
1.
On the ribbon, click Home tab > Draw panel > Hatch.
2.
Select the hatch pattern type and define its properties.
3.
Click Add: Pick Points or Add: Select Objects and select points internal to a boundary or objects that
define a boundary.
4.
Adjust other options as required in the Hatch and Gradient dialog box.
5.
Click Preview to preview the hatch.
6.
When the hatch is previewed, click anywhere in the drawing to return to the Hatch and Gradient dialog
box or right-click to accept the hatch pattern as it is previewed.
Layers for Hatch and Gradient
It is good practice to create all of your hatches on one layer and all gradients on another.
Lesson: Hatching Objects ■ 193
Hatch Guidelines
Consider the following guidelines when creating hatched objects:
■ All hatch and gradient patterns must fill a boundary. A boundary is an enclosed area that can
consist of lines, polylines, circles, and arcs.
■ The easiest way to specify a boundary is to zoom into the area you want to hatch and select a point
inside that area using the Add: Pick points Boundaries option.
■ You can delete the boundary without deleting the hatch or gradient fill.
■ Do not use a densely hatched pattern to create the effect of a solid fill. Instead use the Solid hatch
pattern provided by the software. The Solid hatch pattern is located at the top of the Pattern list.
■ Click the Expand button in the lower-right corner of the Hatch and Gradient dialog box to access
advanced options.
■ Most of the time you will want the Associative Option checked when creating a hatched object.
■ If you are placing the hatch or gradient fill within more than one boundary area, it will be treated
as a single hatch unless you choose Create separate Hatches located in the advanced options.
■ Scaling a hatch pattern is similar to scaling Text and Dimensions. It should be scaled proportionate
to the display scale of the object it is filling. For instance if the object will be displayed to plot at a
scale of & #188;” = 1”, then the hatch scale should be 48 (4 x 12).
■ Select the Annotative Option when there will be multiple views of the object at multiple scales in
the drawing layout. This will keep the hatch scale consistent in all the viewports.
■ If you enter an angle for the hatch, it is added to the angle already defined in the pattern.
■ Use the Hatch Origin options to fine tune hatch placement.
■ Use draw order to create multiple pattern fills containing both hatch patterns and gradients or
solid colors.
■ Create separate layers for hatch patterns in your drawing.
■ An exploded hatch pattern will result in thousands of separate objects and increase the size of your
drawing.
■ You can set the hatch pattern scale factor to a desired default scale that will appear in the dialog
box by typing HPSCALE at the command line and entering a new value.
194 ■ Chapter 9: Hatching Objects
Practice Exercise: Create Hatched Objects
In this practice exercise you create a drawing similar
to the one below and use the Hatch and Gradient
commands.
1.
Begin a blank drawing and create the
objects to hatch and gradient fill. Make two
overlapping rectangles and place a circle in
one of them.
2.
To create a solid hatch pattern in a selected
object:
■ On the Home tab, click Draw panel >
Hatch.
■ In the Hatch and Gradient dialog box,
select ANSI31 from the Pattern list.
■ Select 0 from the Angle list.
■ Select 1.000 from the Scale list.
■ Under Boundaries, click Add: Select
Objects.
■ Click the overlapping rectangle as
indicated.
■ Right-click the selected object. Click
Preview.
■ Right-click to accept the hatch.
3.
To create a gradient fill using two colors:
■ On the Home tab, click Draw panel >
Hatch.
■ In the Hatch and Gradient dialog box, click
the Gradient tab.
■ Under Color, click Two color.
■ Choose any of the gradient patterns.
■ Under Boundaries, click Add: Pick points.
■ Click inside the part of the other
overlapping rectangle as indicated below.
The boundary is detected and highlighted.
Lesson: Hatching Objects ■ 195
■ Right-click the selected object. Click
Preview.
■ Click inside the drawing window to return
to the dialog box.
■ Select another gradient pattern.
■ Click Preview.
■ Right-click to accept the gradient.
4.
To create a Solid fill hatch pattern:
■ On the Home tab, click Draw panel >
Hatch.
■ In the Hatch and Gradient dialog box,
Pattern list, select Solid.
■ From the Swatch list, select Select Color.
■ In the Select Color dialog box, click the
Color Books tab.
■ Select a color from one of the Color book
guides. Click OK to return to the Hatch and
Gradient dialog box.
■ Under Boundaries, click Add: Pick points.
■ Click inside the circle. Notice the boundary
is highlighted.
■ Right-click to Preview.
■ Press ENTER to accept the hatch.
5.
To modify an associative hatched object:
■ With the command line blank, select the
hatched objects.
■ Select the grips to adjust the shape of the
objects.
196 ■ Chapter 9: Hatching Objects
■ Press ESC to deselect the objects.
The hatch and gradient fills adjusted to the
modified shapes of the objects because the
Associative option in the Hatch and Gradient
dialog box was selected.
Lesson: Hatching Objects ■ 197
Exercise: Create Hatches
In this exercise, you use the Hatch command to create
hatch patterns on the elevation drawing. You use the
Create Separate Hatch option to see how it affects a
multiple boundary pattern.
The completed exercise
Completing the Exercise
To complete the exercise, follow the
steps in this book or in the onscreen
exercise. In the onscreen list of
chapters and exercises, click Chapter 9:
Hatching Objects. Click Exercise: Create
Hatches.
1.
Open M_Hatch-Objects.dwg.
2.
Zoom into the left area of the elevation as
shown.
3.
Use the Hatch command to place separate
hatches on the front of the building:
■ On the Home tab, click Draw panel > Hatch.
■ In the Hatch and Gradient dialog box, select
AR-B816C from the Pattern list.
■ In the Scale field, enter 1.
■ Place a check mark in the box next to the
Create Separate Hatches option.
■ Click Add: Pick Points.
■ Click two points (1) and (2) define the
boundary as shown.
4.
To complete the hatch:
■ Press ENTER.
■ In the Hatch and Gradient dialog box, click
Preview to preview the hatch.
■ If the hatch pattern appears correct, press
ENTER to accept the hatch.
5.
Pan to the right side of the elevation.
198 ■ Chapter 9: Hatching Objects
6.
To place a single hatch on the three areas on
the right side of the elevation:
■ On the Home tab, click Draw panel > Hatch.
■ Clear the Create Separate Hatches option.
■ Click Add: Pick Points.
■ Click three points (1), (2), and (3) to define
the boundaries as shown.
7.
To complete the hatch:
■ Press ENTER to return to the Hatch and
Gradient dialog box.
■ Click Specified Origin.
■ Click the Click to Set New Origin button.
■ Select the endpoint as shown.
■ In the Hatch and Gradient dialog box, click
OK.
8.
Select the previously created hatch. Notice all
boundaries are treated as a single hatch object.
9.
Zoom to display the entire drawing.
10.
On the View tab, click Navigate panel > Extents
drop-down > Window. Window zoom into
the area shown in the following image. Make
certain only part of the roof area is visible.
11.
On the command line, enter Regen.
12.
To expand the Hatch dialog box:
■ On the Home tab, click Draw panel > Hatch.
■ Expand the Hatch and Gradient dialog box.
13.
To specify the island detection type, under
Islands, click Outer.
Lesson: Hatching Objects ■ 199
14.
To apply a hatch pattern to the roof even
though the entire area is not displayed:
■ In the Pattern list, select AR-B88.
■ Click Add: Pick Points.
■ Select a point on the roof.
■ Press ENTER.
■ Click Preview.
■ Press ENTER to accept the hatch pattern.
15.
Zoom to display your entire drawing.
16.
Close all files. Do not save.
200 ■ Chapter 9: Hatching Objects
Exercise: Create Fills and Gradients
In this exercise, you create solid fills and gradients.
You use draw order to place the gradients and fills
behind existing patterns, and you use the Inherit
Properties options to copy gradient and fill patterns.
Warning!
Gradient fills are not supported by
AutoCAD LT. If you attempt this exercise
in AutoCAD LT, you will need to use
solid fills instead of gradient fills.
The Hatch and Gradient dialog box
is named the Hatch dialog box in
AutoCAD LT.
The completed exercise
Completing the Exercise
To complete the exercise, follow the
steps in this book or in the onscreen
exercise. In the onscreen list of
chapters and exercises, click Chapter
9: Hatching Objects. Click Exercise:
Create Fills and Gradients.
1.
Open M_Create-Fills-Gradients.dwg.
2.
Apply a gradient to the elevation roof:
■ On the Home tab, click Draw panel >
Gradient.
■ Click Inherit Properties.
■ Select the gradient pattern in the top
block.
3.
Select a point on the roof as shown.
4.
Right-click anywhere in the drawing. Click
Preview. Notice how the gradient pattern hides
the roof hatch pattern.
5.
To move the gradient fill behind the roof
hatch:
■ Press ESC to return to the Hatch and
Gradient dialog box.
■ Under Options, select Send to Back in the
Draw Order list.
■ Under Islands, make certain Outer is
selected.
■ Under Options, select Send to Back from
the Draw Order list.
■ Click Preview. The gradient should appear
behind the roof hatch pattern.
■ Right-click anywhere in the drawing to
accept the gradient fill.
Lesson: Hatching Objects ■ 201
6.
To add a gradient fill to the fascia and columns
area of the elevation:
■ On the Home tab, click Draw panel >
Gradient.
■ Click Inherit Properties. Select the second
swatch.
7.
Press ESC to return to the Hatch and Gradient
dialog box.
The fill is detected as a solid color, and the
Hatch tab of the dialog box is displayed again.
8.
Under Options, select Send to Back in the
Draw Order list:
■ Click Add: Pick Points.
■ Select points inside the fascia area,
columns, and outer areas of the upper
floor windows.
Note: The following image reflects the
selections only on the right side of the
drawing.
■ Press ENTER.
■ Click Preview.
9.
If the fills look correct, right-click anywhere in
the drawing to accept the hatch.
10.
Repeat the Gradient command. Use the Inherit
Properties option to assign the gradient on
the lower swatch to the bricks on the front
elevation.
202 ■ Chapter 9: Hatching Objects
Once applied, the elevation should appear as
shown.
11.
To add a solid hatch to the foundation area or
the elevation:
■ On the Home tab, click Draw panel >
Hatch.
■ In the Pattern list, make sure SOLID is
selected.
■ In the Swatch list, choose Select Color.
■ In the Select Color dialog box, Index Color
tab, under Color, enter 254.
■ Click OK.
12.
Click Add: Pick Points. Select the foundation
area of the elevation.
■ Preview the hatch.
■ Right-click anywhere in the drawing to
accept the hatch.
Note: Make sure you select the foundation
area on both sides of the door.
13.
On the Layers panel, freeze the Hatch_Swatch
layer.
14.
On the Layers panel, thaw the Background-
Frame layer.
15.
Zoom to display the entire drawing.
Note: To save time, lines were drawn to
use as a boundary for the background and
foreground fills.
16.
Add a gradient fill to the upper background
representing the sky:
■ On the Home tab, click Draw panel >
Gradient.
■ Under Color, click One Color.
■ Click the Color button and select Blue on
the Index Color tab of the Select Color
dialog box.
■ Click OK.
■ Adjust the Shade - Tint slider as shown.
Click the middle right gradient swatch.