Manga Studio For Dummies phần 3 doc
Bạn đang xem bản rút gọn của tài liệu. Xem và tải ngay bản đầy đủ của tài liệu tại đây (871.73 KB, 39 trang )
5. In the Output Color Depth area, select the RGB Color radio button.
When you’re exporting to such a small file, using a monochrome setting
results in poor quality line work, and a moiré effect on your screentones
(for those unfamiliar with the moiré effect, I discuss that in Chapter 11).
Setting the image to RGB adds enough anti-aliasing to keep the integrity
and general feel of the line art intact.
6. In the Output Data Settings area, make sure that the Output Finished
Image, Output Text, and Output Tone check boxes are the only ones
selected.
Any layers you designated as Sketch layers (check out the “Roughing
Your Page” section earlier in this chapter to set up your Sketch layers)
are ignored when the file is exported, which is exactly what you want —
because the only part you’re interested in showing off is the final line
work, tones, and text.
The rest of the check boxes you see in the dialog box are irrelevant for
exporting a Web-ready image, so they can remain unselected. But if you
want to find more information on what exactly those other boxes do, you
can check out Chapter 13, where I go over each and every one of them.
7. Click OK.
What you see now is the Save As dialog box corresponding to your par-
ticular operating system.
8. Enter the name of the file in the File Name text box.
9. Select JPEG from the Save As Type drop-down list.
JPEG files are probably the most well-known and often-used file format
on the Web, as they produce a fine combination of image quality and file
size. Odds are, every single graphical browser created can read a JPEG
file, so you may as well stick with what works.
You’re done! You now have a page that is all set for you to upload to your
Web site of choice.
Printing a Hard Copy
“You mean it’s not just File➪Print?”
It can be. But what if you want to print only the line art, without any screen-
tones? Setting up your page for printing gives you the chance to be as specific
as you want regarding what is printed and what is ignored. Then, when you’re
ready to print, you’ll know that you’re going to get exactly what you want.
For this example, you can set up the page to include the final artwork, the
bleed area, and the print guide, should you decide to put together your book
yourself or send off to a professional printer.
60
Part I: Welcome to Manga Studio!
07_129869 ch03.qxp 11/29/07 11:35 AM Page 60
Follow these steps to set up your page for printing:
1. From the main menu, select File➪Print Setup.
The first thing that appears, at least the first time, is the Printer Setup
dialog box. You can go through and change those settings however you
want, depending on your printer type and your operating system.
2. Click OK in the Printer Setup dialog box.
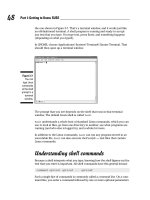
The Print Setup dialog box appears, as shown in Figure 3-21. This is
where you can get as specific as you want, regarding what is printed and
what is left behind.
3. In the Print Size area, select Actual Size radio button.
This is going to depend on dimensions of the page file, but if you want to
avoid any potential moiré effect in your screentones (see Chapter 11),
it’s best to print your work at actual size.
If you’re not able to print at the actual size, then you can choose to
shrink the image down to fit the page by selecting the Adapt to the Page
Format radio button.
4. In the Print area, select the Entire Page radio button.
This makes sure that all the art you’ve drawn is printed, including the
parts that you’ll trim off later.
Figure 3-21:
The Print
Setup dialog
box.
61
Chapter 3: Creating Your First Manga Page: A Quick-Start Guide
07_129869 ch03.qxp 11/29/07 11:35 AM Page 61
5. In the Color Depth of Printed Image area, select the Monochrome
radio button.
Unlike in the “Exporting to an Image File” section of this chapter, where
you switch to RGB to maintain quality during image shrinking, keeping
the image in monochrome when printing it works just fine. This helps
maintain the sharpness of the line art and tones, without any chance of
potential anti-aliasing happening.
6. In the Output Data Settings area, select the check boxes that refer to
the parts of your artwork that you want to print.
I go over this in much more detail in Chapter 13, but basically this section
helps you pick and choose what parts of the image you want printed out.
For example, if you wanted to print out only the line art and text, you
would check the Output Finished Image and Output Text check boxes,
and deselect all of the other ones in this section.
For layers that you have as sketches and finished art, whatever gets
printed will depend on how you’ve designated the layers. Check out the
“Roughing Your Page Out” section of this chapter to find out how you
can set the layer as Sketch or Finish.
7. In the Page Settings area, select the Output Print Guide check boxes.
Printing the guide can help you later when you trim the bleed off the
paper. All the other check boxes are irrelevant for this exercise
(although I go over them all in Chapter 13).
8. Click Print.
This brings you back to the Printer dialog box.
9. Click OK in the Printer dialog box.
You’re done! Check out your printer, and you should see your page, hot
off the press.
62
Part I: Welcome to Manga Studio!
07_129869 ch03.qxp 11/29/07 11:35 AM Page 62
Part II
Roughing It
08_129869 pt02.qxp 11/29/07 11:36 AM Page 63
In this part . . .
B
efore you dive headfirst into Manga Studio, it’s a
good idea to get a basic understanding of the pro-
gram. You’ll find it pretty difficult to start creating the next
Great American Manga if you don’t know how to set up
your pages properly, or scan in your artwork, or get the
drawing tools set up if you’re planning on going the all-
digital route.
This part of the book covers all the basics you need to get
your page ready, from concept to finished pencils. Chapter
4 is all about properly setting up your page and story files
so that they’re at the proper dimensions you want to work
in. Chapter 5 covers how to scan in your work and get it
adjusted properly on the page. If you’re looking to use a
drawing tablet to clean up the scanned-in artwork — or
possibly even create all your work digitally — the chapter
also covers how to use the Pencil and Eraser tools, as well
as how to work with the page as though it’s a real piece of
paper.
Chapter 6 helps you take advantage of the digital realm,
with discussion of the various layers you can add to your
page and how you can quickly adjust the layers’ settings
on-the-fly, if need be. Chapter 7 goes over how you can
divide your page into panel layers that you can work on
separate from the rest of the page, as well as how to
quickly create nice, clean panel borders using the panel
ruler layer.
Chapter 8 talks about how you can use Manga Studio’s
exclusive virtual ruler feature to create all kinds of rulers
and guides to assist you in your technical drawing. Finally,
Chapter 9 explains how you can use selections to make
tweaks to your roughs without having to erase and start
over, as well as using selection layers to save your selec-
tions for future use.
08_129869 pt02.qxp 11/29/07 11:36 AM Page 64
Chapter 4
Your New Page Awaits
In This Chapter
ᮣ Creating a custom page
ᮣ Using an existing page template
ᮣ Creating a custom page template
ᮣ Creating and customizing a story file
ᮣ Saving your work
W
hen I first started drawing comics, I was pretty sure I understood how
the system worked: I would draw all my art and word balloons within
the borders of my 11-x-17-inch piece of bristol board and then send my stack
of pages away to be printed. No problem! It wasn’t until I first saw my work in
a book that I realized I did something drastically wrong. Panels were cut off!
Important pieces of art were nowhere to be seen! What happened?
It was then that I discovered terminology that would be vital if I ever wanted to
see my artwork in print — terms such as
bleed, trim, and safe area. Confusing?
Totally! I had no idea that printing comics would be so . . . technical!
Fortunately for you, Manga Studio helps with this very important step as
soon as you open a new document. In this chapter, I show you how to set up
your pages so that you don’t have to learn the hard way where your pages
will be trimmed at the printer, and so on . . . like I did.
Creating a New Page
Before you can draw the first line in Manga Studio, you need to open a new
page. Admittedly, not a big surprise. To do this, choose File
➪New➪Page on
the main menu or press Ctrl+N (
Ô+N on the Mac).
Instead of a blank canvas suddenly appearing, you see a New Page dialog
Box with two tabs: Custom Page and Page Templates. If you’re interested in
09_129869 ch04.qxp 11/29/07 11:36 AM Page 65
setting up your own page, read on. If, however, you’re impatiently saying,
“But I want to start drawing
now,” skip ahead to the “Selecting page tem-
plates a la carte” section.
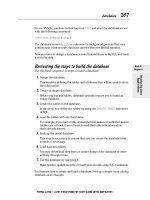
Setting up a custom page: As you like it
The Custom Page tab of the New Page dialog box, shown in Figure 4-1, is
where you’ll select the size of the paper you wish to work with, as well as its
resolution, finish frame, basic frame, and bleed width.
Open a new, custom page by following these steps:
1. Choose File➪New➪Page. Alternatively, click the New Page icon on the
toolbar (it’s the leftmost icon) or press Ctrl+N (
Ô+N on the Mac).
A New Page dialog box appears. Notice the settings area on the left side
of the dialog box and a preview area on the right. Changes you make on
the left side are reflected in the right side preview.
Figure 4-1:
The Custom
Page tab
allows you
to create
your own
page
however
you’d like.
66
Part II: Roughing It
09_129869 ch04.qxp 11/29/07 11:36 AM Page 66
2. To set up a customized page, make sure the Custom Page tab is active
and then select the options you want.
The options on the Custom Page tab are as follows:
•
Standard Resolution (dpi): The technical definition of dpi (dots per
inch) is the number of dots that a printer can print within a one-inch
line. What this means for you is simple: The higher the resolution
chosen for your page, the crisper the line art and tone work will be
when it’s printed.
The drawback to working at a higher resolution is that it results in
a bigger page, and therefore a large file size. Larger pages (like, say,
an 11-x-16-inch piece of paper at 1200 dpi) can be more taxing on
your computer, especially if the computer is more than a few years
old or you have a small amount of memory available. So, if Manga
Studio seems to be running sluggishly, try the same size paper at a
lower resolution and see if that improves things.
•
Page Size: This refers to the physical dimensions of your page.
From here, you can select your units of measurement (inches, cen-
timeters, millimeters, or pixels) and adjust the width and height as
small or as large as you’d like. If you prefer a preset size, the drop-
down list on the right provides a list of page dimensions to choose
from. (I break down what each of the sizes are in Table 4-1.)
The size of the page has limits. You can’t create a page larger than
42 x 42 centimeters (approximately 16.5 x 16.5 inches) or smaller
than 3 x 3 centimeters (approximately 1.1 x 1.1 inches).
3. Select the Inside Dimensions check box to display a collection of blue
lines in the preview pane.
The blue lines are printing guides that assist you if you’re planning on
having your work printed and bound. You can adjust the settings of each
frame to what you need. These guides are:
•
Finish Frame: Also known as the trim. This is the absolute bound-
ary for your page. Anything drawn beyond these borders won’t be
visible when printed.
•
Basic Frame: Also known as the safe or live area. This is where all
the important pieces of art and dialogue go. Anything within this
frame won’t be cut off by the printer. You can offset this frame by
however far to the left or right you would like it.
•
Bleed Width: Sometimes an artist wants to extend the art to the
absolute edge of the page. To prevent any possible white edges
showing in the final print, a bleed extending past the finish frame
is set. Make sure there is nothing important you want shown in the
bleed area, or it will be lost!
67
Chapter 4: Your New Page Awaits
09_129869 ch04.qxp 11/29/07 11:36 AM Page 67
It’s always better to err on the side of caution when it comes to the
bleed width of your page. If you’re planning on having your manga pro-
fessionally printed, it’s much better to have too much bleed than not
enough. This is because the settings on copiers and paper cutters can
vary from printing service to printing service. If you aren’t careful, your
full-bleed artwork may have white streaks along the edge!
4. When you’ve finished adjusting your settings, click OK.
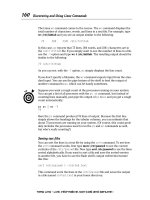
Selecting page templates a la carte
If you don’t feel like setting up your own page, just switch to the Page
Templates tab, as shown in Figure 4-2, and you have a large variety of prede-
fined templates at your disposal. All of the necessary page dimensions have
been planned out for you, so all you need to do is choose your resolution and
start working!
Looking at the list of templates can be a bit daunting, especially if you aren’t
familiar with the terminology of paper sizes or what the difference between
Submission paper and Dojinshi paper. (Don’t feel bad. I didn’t really know
when I first started making comics either!) Table 4-1 breaks down the various
page sizes into centimeters and inches.
Figure 4-2:
The Page
Templates
tab gives
you
plenty of
predefined
pages to
choose
from.
68
Part II: Roughing It
09_129869 ch04.qxp 11/29/07 11:36 AM Page 68
Table 4-1 Common Paper Sizes for Manga
Paper Size in cm Size in Inches
A3 29.7 x 42.0 cm 11.7 x 16.5 inches
A4 21 x 29.7 cm 8.3 x 11.7 inches
A5 14.8 x 21 cm 5.8 x 8.3 inches
A6 10.5 x 14.8 cm 4.1 x 5.8 inches
B4 25.7 x 36.4 cm 10.1 x 14.3 inches
B5 18.2 x 25.7 cm 7.2 x 10.1 inches
B6 12.8 x 18.2 cm 5 x 7.2 inches
B7 9.1 x 12.8 cm 3.6 x 5 inches
Japanese postcard 10.0 cm x 14.8 cm 3.9 x 5.8 inches
So, when you see a template with the title Basic Page A6 Finish B7 5mm, it’s
telling you that you’ll be working on a 10.5-x-14.8-centimeter piece of paper
with a finish frame of 9.1 x 12.8 centimeters and a bleed width of 5 millimeters.
The page templates are shown in centimeters. So keep that in mind when you
select your template. If you aren’t careful, that piece of paper you think is 10
x 15 inches will turn out to be 4 x 6 inches! I’ve made that mistake on more
than one occasion, so I speak from experience.
Now that I’ve covered the sizes, you can tackle the various template types
that are available to you:
ߜ Basic Paper: As its name implies, these are basic templates with various
sizes for the canvas as well as its bleed, finish, and basic frames. These
templates are available in both 600 and 1200 dpi.
ߜ Dojinshi Paper: Dojinshi is a Japanese term used for independently pro-
duced/distributed manga. These are fan comics that are made outside
the system and are sold through mail order or other means, instead of in
book and comic stores.
ߜ Fixed Page: This is the same as the basic paper types, with a larger
variety of sizes and resolutions.
ߜ Fixed Size: These are templates that are formatted in inches or pixels.
They don’t have any printing frames associated with them; they’re just
blank pages. The pages formatted by pixels are at a much lower resolution
than any of the other templates (72 and 150 dpi).
ߜ Submission Paper: These are templates typically used for various
Japanese magazines.
69
Chapter 4: Your New Page Awaits
09_129869 ch04.qxp 11/29/07 11:36 AM Page 69
Just like on the Custom Page tab, you can select a single page or a two-page
spread.
Now for the moment you’ve been waiting for: selecting your template!
1. From the main menu, choose File➪New➪Page.
2. Select the Page Templates tab on the New Page dialog box.
3. Choose your template from the Default folder on the left side of the
window.
Click the folder of the paper type you’d like to work from.
4. If there are a group of folders organized by resolution, choose the
folder of the resolution you’d like to work in.
5. Choose the template size you’d like to work on from the list on the
center window.
6. In the Page Settings section (located above the page preview on the
right side of the window), select the Single option button if you’d like
only one page, or you can select the Double option button if you’d like
to work on a two-page spread.
7. When you’re set, click the OK button.
You’re now ready to start drawing!
Creating your own page templates
Say you’ve looked through the list of page templates but don’t see what you
need to work with. Or perhaps you’ve created a custom page but you don’t
want to change the settings every time you want to create a new page (or
worse, forget what your settings originally were!). Fortunately, Manga Studio
allows you to design your own template. Now, you can create and come back
to your custom page whenever you want, and not worry about having to
change any settings!
If you skipped the “Setting up a custom page: As you like it” section earlier,
now is your chance to go back and review how that section works, because
the New Template dialog box works exactly the same way.
To create your own template, follow these steps:
1. Choose File➪New➪Page.
Alternatively, you can click the New Page icon or press Ctrl+N (Ô+N
on a Mac).
2. In the New Page dialog box that appears, click the Page Templates tab.
70
Part II: Roughing It
09_129869 ch04.qxp 11/29/07 11:36 AM Page 70
3. Click the New Template button on the Page Templates menu.
The Page Template Settings dialog box appears, which is almost identi-
cal to the Custom Page tab you see when creating a new page. (Refer to
Figure 4-1.)
4. Make sure the User folder is highlighted in the left pane of the Page
Templates tab.
You can create a custom template only in that folder.
5. Like the Custom Page tab, you select your resolution, finish frame
size, basic frame size, and bleed width.
(See the earlier section, “Setting up a custom page: As you like it,” for
details on these settings.)
6. Enter a name for your template in the Template Name text box.
7. (Optional) Type any notes or reminders you may wish to include in
the Memo text box.
8. Save your template by clicking the OK button.
When you save the template, the resolution and page size become fixed.
You can’t go back and change them. So, be sure that this is the size you
wish to work with!
That’s not to say that everything is locked up on your new template! You can
still edit the size of the basic frame, finish frame, and bleed area at any time.
Follow these steps to view your new template’s properties and make any
adjustments (or view the properties of the preinstalled templates):
1. When in the New Page Window, double-click the user-created
template you want to adjust.
The New Template dialog box pops up.
2. Now you can adjust the template’s frames, bleed area, title, and memo.
(With the preinstalled templates, you can select only the units of mea-
surement. It doesn’t change any dimensions but at least helps you if
you’re used to metric or imperial units.)
If you’ve made a mistake in your template creation, no problem! On the page
template menu, there’s a Trash Can icon. Just highlight the page you wish to
remove and click the Trash Can, as shown in the margin. That’s all!
You can adjust the properties of the page you’re currently working on at any
time by double-clicking the Print Guide and Basic Frame Layer on the Layers
palette. You’ll see a properties tab appear similar to the page template proper-
ties. From here, you can adjust the Finish Frame, Basic Frame, and Bleed
width. You won’t be able to adjust the page’s resolution or physical size.
71
Chapter 4: Your New Page Awaits
09_129869 ch04.qxp 11/29/07 11:36 AM Page 71
Save As Template: On-the-fly
template creation
As you work on your page, you may find that the template settings you cre-
ated (or opened from one of the default templates) aren’t quite working like
you originally expected. So, you make your adjustments to the print guide,
add and adjust a few layers (I cover how to do this in Chapter 6), and you’re
all set to go. If you’re planning on using these settings for future pages or sto-
ries, however, you don’t want to have to readjust the settings all over again,
do you? (Especially because the New Template dialog box doesn’t give you
the option to add and adjust layer settings.)
Manga Studio provides the option to save a new template at this stage.
1. Choose File➪Save As Template from the main menu.
A window pops up, just like the one used for creating new templates.
2. Enter a descriptive name for your template in the Template Name text
box.
3. Make any final adjustments to the print guide dimensions.
4. (Optional) Add a memo in the Memo text box.
(Or remove them altogether, if you’d like.)
5. Click the OK button, and your template is now saved in the User
folder of your page templates, ready to be reused again and again!
Just like when you use an existing template, you can’t adjust the physical size
of the page. So, if you’re working on an 8-x-10-inch page, it will remain that
size when you save your new template.
Creating a New Story
Manga Studio provides a great organizational tool for those who may be
working on a book (or a chapter of a book). Creating a new story allows you
to have as many pages as you need in one convenient place. Now, instead of
opening an individual page to work on, you can open a story, select your
page from a list, add and delete pages as needed, create two-page spreads,
and preview how consecutive pages may look when placed together.
To create a new story, follow these steps:
1. From the main menu, choose File➪New➪Story.
72
Part II: Roughing It
09_129869 ch04.qxp 11/29/07 11:36 AM Page 72
Alternatively, click the New Story Icon on the toolbar (second from the
left), or you can press Ctrl+Alt+N (
Ô+Option+N on the Mac) on your
keyboard.
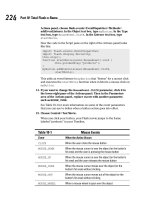
The New Story dialog box pops up, as shown in Figure 4-3. It’s just like
the one used for creating a new page (custom pages or page templates),
except that there is a new group of settings available called Page Settings:
•
Pages: This is where you enter the number of pages you want for
your story or chapter. The drop-down list provides a selection of
choices, or you can enter your own number.
•
Closing Position: This setting depends on how you would like the
book to be read. If you’re going for an authentic manga style,
where the reader reads from right to left, choose Right. If you’d like
the reader to read from left to right, choose Left.
•
Starting Page: This determines what the starting position for the
first page of your book will be. If you’d like the first page to start on
the right side, choose Right; for the left side, choose Left.
•
Page Structure: This gives you the option of either keeping each
page in the story separate (Single) or joining them together by
twos, so you can spread your art over two pages (Double).
Figure 4-3:
The New
Story dialog
box helps
you set up
your multi-
page story
file.
73
Chapter 4: Your New Page Awaits
09_129869 ch04.qxp 11/29/07 11:36 AM Page 73
2. After you’ve adjusted your page settings, create or select your page
size and print guides.
(Check out the “Setting up a custom page: As you like it” and “Selecting
page templates a la carte” sections in this chapter.)
3. Enter the name of your story in the Name text box, located in the Save
section at the bottom of the dialog box.
4. Click the Location button to select the place on your computer you’d
like the files saved.
5. When that’s all set, click the OK button.
A new window appears, containing thumbnails of all the pages you’ve created
for your story. All you need to do now is double-click your mouse on the page
(or pages, if it’s a two-page spread) you’d like to work on, and it opens in a
new window!
What happens if you’re working on your story and you realize that you have
too many pages (or not enough)? Manga Studio has that covered as well!
1. Choose Story➪Insert Page.
Alternatively, right-click (Control+click on the Mac) a story page and
select Insert Page. Or click the Show Menu button on the toolbar
and select Insert Page.
The Insert Page window pops up. You can’t choose a page size different
from what you already selected for your story, but you can choose the
number of pages you wish to add.
a. Enter the number of pages you wish to add in the Insert Page
combo box (or select a number from the list provided).
b. Select whether you want to add these pages before or after the
current page.
2. If you want to delete a page, select Delete Page.
3. When you’re done, click the OK button.
From the Story Window, you can adjust the single/double page settings on a
page-by-page basis. To do this, click the page you wish to combine or sepa-
rate and choose either Story
➪Match Pages to combine them or
Story
➪Unmatch Pages to split them up.
Adding author and page information
Having your pages centrally located in one story file is certainly a convenient
means of keeping your story together. But what if you want to include
74
Part II: Roughing It
09_129869 ch04.qxp 11/29/07 11:36 AM Page 74
some additional clerical information to the file, such as story file or
author name?
Manga Studio gives you that ability with the Change Story Settings dialog
box. This dialog box gives you the option to add items like the author or
story name, page number placement and format, and so on. Even more, you
can choose to add that info to only one page, or to all the pages in the story
file at once.
For this example, you can use the included story file (labeled, simply enough,
Story File), located in the Author/Chapter 4 folder of the CD-ROM.
To use the Change Story Settings function, follow these steps:
1. Open the story file, and make sure that you are in the Story window.
2. Choose Story
➪Change Story Settings from the Main menu.
With the Change Story Settings dialog box open (see Figure 4-4), you can
now insert the following information onto the story file.
•
Story Info: Inserts the story’s title, episode number, and subtitle to
the page. Additionally, you can choose the placement of the infor-
mation (lower left, center, or right) on the page.
•
Author Info: Inserts the author’s name to the page. Additionally,
you can choose to place the author’s name on the bottom left,
bottom center, or bottom right of the page.
•
Page Number: Sets the placement of the page number on the page.
You can choose to place it on the bottom left, bottom center, or
bottom right of the page.
•
Pagination Settings: When selected, the page number is placed and
formatted within the print guide of the page.
You can add a prefix or suffix to the page number, set the starting
page number, and set its placement on the page (bottom left,
bottom center, or bottom right of the basic frame).
•
Apply Settings to All Pages: When selected, all the information (and
placement of that info on the page) you added to this dialog box
will be saved to all the pages in the file. You can choose to save
both the content and placement together, just the content, or just
the content placement.
Left unchecked, the info and positioning you entered will be saved
to the currently selected page.
3. Click OK to add your selected elements to the page.
75
Chapter 4: Your New Page Awaits
09_129869 ch04.qxp 11/29/07 11:36 AM Page 75
The Save Button: A Vital Tool
After you create/open your new page or story, you see a new blank page
ready for you to draw away to your heart’s content. Before you get too
far along, though, it would probably be wise to know how to save your
newly-created work.
You can save your work in three ways:
ߜ Click the Save button on the main toolbar.
ߜ Choose File➪Save.
ߜ Press Ctrl+S (Ô+S on the Mac).
By default, saving a new document immediately brings you to a Save As
dialog box. Here, you can name the page (or story), choose where on your
computer you’d like to save it, and choose to save a separate copy of
your work (if you want to save different versions of your art, for example).
Saving frequently is the most important thing you can do in Manga Studio.
Your computer or program can crash unexpectedly, taking your art along
with it. It can be very frustrating to work on an intricate piece of art, forget
to save, and then watch it vanish because of a system crash or power outage.
So save frequently! You’ll thank yourself in the long run.
Figure 4-4:
The Change
Story
Settings
dialog box
helps you
add the title
and author
name.
76
Part II: Roughing It
09_129869 ch04.qxp 11/29/07 11:36 AM Page 76
Chapter 5
Importing and Penciling Your
Rough Draft
In This Chapter
ᮣ Importing art from a scanner or an image file
ᮣ Adjusting the imported art for the page
ᮣ Drawing digitally with the Pencil tool
ᮣ Choosing the size of your Pencil and Eraser tools
ᮣ Moving around the canvas as you work
I
t’s funny; when I sat down to write this chapter, I couldn’t think what to
write for the introduction. Then it hit me . . . that’s probably the fundamen-
tal thing you need before you can start working on a project — a place to start.
When you don’t have a starting point, you’ve got
nothing.
For the purposes of Manga Studio, the starting point is your rough draft. It can
be a quick sketch done on a sticky note, or it can be a blank canvas waiting for
you to apply your first strokes on your tablet with the Pencil tool.
In this chapter, I explain how to import art into Manga Studio using your scan-
ner, as well as how to import art files you may already have on your computer.
If you plan on penciling digitally or you just want to touch up your imported
roughs, I explain the ins and outs of your two new Manga Studio friends, the
Pencil and Eraser tools. Finally, I explain how you can easily treat this digital
canvas like it’s a physical piece of paper with the Hand, Rotate, and Zoom tools.
Time to Import Some Art!
Maybe you’re like me, and you’re raring to use your mouse or drawing tablet
and start sketching away with the different tools Manga Studio offers. However,
you may prefer to get your hands dirty with graphite and/or ink, and you’d
simply like to know how to import your scanned work into Manga Studio. The
following sections show you how to import your work from a scanner or from
an electronic art file.
10_129869 ch05.qxp 11/29/07 11:36 AM Page 77
Using your scanner
Manga Studio offers several options for importing your work into the program.
The most direct method is to scan in your artwork.
Before you can scan anything, you need to let Manga Studio know where your
scanner is. To do so, follow these steps:
1. From the main menu, choose File➪Import➪Select TWAIN Device.
The Select Source dialog box opens with a selection of peripheral
devices it believes could be your scanner. (See Figure 5-1.)
2. Select the device from the list and click the Select button.
Now you can scan in your art! Follow these steps to scan and import your
artwork:
Figure 5-1:
The Select
Source
dialog box.
78
Part II: Roughing It
Scanning tips and tricks
If you’re new to the world of scanning, it can be a
bit tricky to import your image into Manga Studio
properly. Here are a few tips to help make sure
you get the best-quality scan possible. Doing so
will certainly help you when it comes time to ink
and/or screentone your page.
ߜ Make sure that the scanner glass is free from
dust and smudges.
ߜ Check your paper to make sure it’s properly
aligned with the glass. (Unless you sketched
your drawing crooked. In that case, you can
align the paper however you’d like.)
ߜ Use the Brightness and Contrast to adjust
the image optimally. You have the option of
using your scanner’s settings, or using
Manga Studio’s Brightness and Contrast fil-
ters. Try each of these out to see which will
produce the best result. (Heck, you may
find that using both will help!)
ߜ If your computer can handle it, try to scan
your drawing at 300 dpi or greater resolution.
It’s a lot easier to ink your work from crisp
pencils than blurry ones. Scanning at a higher
resolution and scaling it down to fit the page
helps. I go over scaling in the “Adjusting the
image size” section, later in this chapter.
10_129869 ch05.qxp 11/29/07 11:36 AM Page 78
1. From the main menu, choose File➪Import➪TWAIN.
The scanning dialog box for your scanner appears.
2. Follow the directions for your particular scanner.
Each scanner has a different window for scanning and adjusting your
image. As such, it’s nearly impossible for me to possibly cover all of
them. So, I simply suggest that you follow along with whatever your
scanning program would like you to do.
3. Click the OK (or Scan) button when you’re happy with the scan preview.
Importing an image file
Perhaps you’ve already scanned your work into your computer through
a different program. Or maybe you’ve used a digital sketching program to
create your roughs. In that case, the Import Image File function best suits
your needs.
Follow these steps to import an existing art file into Manga Studio:
1. From the main menu, choose File➪Import➪Image File.
2. When the Open File dialog box opens, navigate to wherever you’ve
stored your image file, select it, and click OK.
You see the Import Images dialog box. If the imported image is set how
you want it to be on the page, click OK. If not, the next section helps you
tweak the image’s settings until it’s exactly the way you want it displayed
on the page.
With Manga Studio Debut, you have the option of importing a JPEG (
.JPG)
or bitmap (
.BMP) image. If you have Manga Studio EX, you can also import
PNG (
.PNG) and Targa (.TGA) files. If your artwork is not in one of those
formats, Manga Studio won’t be able to find it!
What Happened?! (The Image
Looks All Wonky)
So you imported your image into Manga Studio, but things don’t seem right
when you view it on the page? The image size is completely wrong! And why
is the color all gone? (That is, if your drawing was in color.) Or worse, why
can’t you see (or only barely see) the pencil work you just scanned in?! Check
out Figure 5-2 — which is what I think would be a worst-case scenario.
79
Chapter 5: Importing and Penciling Your Rough Draft
10_129869 ch05.qxp 11/29/07 11:36 AM Page 79
It’s okay. Your image is really there, and it’s a cinch to tweak the settings so
you can see your art, as well as resize, rotate, and position it so that you can
get right to work.
I’ve included a sample image on the CD (look in the Author/Chapter 5 folder)
so you can see what happens when you import an image larger than the
page you’re working on. It’s a good way to practice and experiment with the
various image properties and transformations.
Adjusting the image layer settings
The first order of business is to adjust the settings so you can see your
roughs. Here’s how to do that:
1. If you haven’t done this already, import the image.
See the earlier section, “Importing an image file,” for instructions.
The Import Images window opens.
2. If it isn’t already active, click the Layer Settings tab (shown in
Figure 5-3).
3. Enter or change the name of the image in the Layer Name text box.
Figure 5-2:
Ack! What’s
wrong with
this
picture?!
80
Part II: Roughing It
10_129869 ch05.qxp 11/29/07 11:36 AM Page 80
4. Choose an option from the Layer Type drop-down list:
• If you’re using the image as a reference for inking and you aren’t
planning on making any changes to it, select Sketch Layer from the
Layer Type drop-down list.
This creates a layer on the page that you can’t modify. The rest
of the layer settings are grayed out at this stage, so you’re now
done changing your layer settings. If you need to fix the imported
image’s size, skip ahead to the next section, “Adjusting the
image size.”
• If you’re planning on making additional tweaks to the image
after importing it, select Raster Layer from the Layer Type
drop-down list.
5. Select the image resolution you’d like the image to be from the
Resolution drop-down list.
The higher the resolution you choose, the smoother your lines are
when working on this image. This choice is a matter of preference, so
feel free to experiment.
6. The Expression Mode drop-down list sets the amount of grayscale
you want in your image. You can choose among Black (1bit), Black
and White (2bit), or Gray (8bit).
If you’re trying to import pencils, I suggest choosing the 8Bit (256
Shades of Gray) option because it produces a better-quality image.
However, you can always experiment and see what works best for
you. You can see the differences among the various resolutions in
Figure 5-4.
Figure 5-3:
Change
your
imported
image’s
layer
settings.
81
Chapter 5: Importing and Penciling Your Rough Draft
10_129869 ch05.qxp 11/29/07 11:36 AM Page 81
7. Choose whether your image is a sketch or finished layer from the
Output Attribute radio buttons.
This is useful later on when you’re exporting or printing your image.
I go into further detail about the output attributes in Chapter 13.
8. If you select either 1Bit (Black Only) or 2Bit (Black and White) from
the Expression Mode drop-down list, select how you want the
interme-
diate colors
(the shades of gray between black and white) displayed
in the Subtractive Method drop-down list. The following options are
available:
• Threshold: Depending on the shade, any grays become either black
or transparent (or black and white, if you selected the 2Bit (Black
and White option). (Refer to Figure 5-4.) How the colors are divided
depend on the threshold level you enter in the Threshold text box.
•
Dither: This option converts the grays into a collection of one-pixel
black dots of various densities (depending on the shade of gray).
(Refer to Figure 5-4.)
•
Diffusion: Much like dithering, the Diffusion option converts the
grays into a series of one-pixel black dots of varying densities.
Diffusion goes into a greater level of detail than dithering. (Refer
to Figure 5-4.)
8Bit Does Not Convert to Gray
2Bit Threshold (27)
2Bit Dither 2Bit Diffusion
Figure 5-4:
The same
image
shown in
various
resolutions.
82
Part II: Roughing It
10_129869 ch05.qxp 11/29/07 11:36 AM Page 82
9. If you’ve chosen the Threshold subtractive method, enter the threshold
level in the Threshold text box.
This helps Manga Studio decide how to split up the shades of gray
between black and transparent/white. Each shade of gray has a value
between 0 and 255. If you chose a threshold value of 100, any shade of
gray with a value below 100 will become black, while anything above 100
will become transparent or white. Check out Figure 5-5 for some examples
of various threshold levels.
10. If you don’t need to adjust the image’s size or position, click OK. If you
do need to adjust the image’s size or position, skip ahead to the next
section, “Adjusting the image size.”
Dither and Diffusion do not preview properly in Manga Studio. You will see
only the changes made to the imported image when you click OK.
Now that you can see your image properly, you can focus on getting the darn
thing to fit on the page!
Threshold: 27
Threshold: 50
Threshold: 100
Figure 5-5:
Examples of
threshold
levels.
83
Chapter 5: Importing and Penciling Your Rough Draft
10_129869 ch05.qxp 11/29/07 11:36 AM Page 83
Adjusting the image size
When you import an image, it sometimes appears much larger or smaller
than you expected. (Refer to Figure 5-2.) If your imported image is too large
or too small, you can correct the problem by following these steps:
1. Import your image (see the “Importing an image file” section), and
when you arrive at the Import Images dialog box, click the Move and
Transform tab, shown in Figure 5-6.
2. Make sure the Keep Aspect Ratio check box is selected.
This helps maintain the original aspect ratio (the ratio of the width and
height) of your image. In other words, it ensures that your image isn’t
squashed, stretched, or distorted when you resize it.
3. Click the Auto Adjust button.
A new dialog box, shown in Figure 5-7, opens with these options:
•
Position: This drop-down list enables you to adjust the image rela-
tive to the page, print guide, or basic frame by selecting among the
Page, Outside Print Guide, Inside Print Guide, or Basic Frame. (The
latter three options are applicable only if you’re using the print
guide and basic frame.)
•
Page: If you’re using a double page, you use this drop-down list to
select whether to position the image on the left or right page by
selecting the Left Page or the Right Page option.
•
Direction: Selecting the Up, Left, Right, or Down option button posi-
tions and sizes the page relative to either the top, left, right, or
bottom of the page.
Figure 5-6:
The Move
and
Transform
tab.
84
Part II: Roughing It
10_129869 ch05.qxp 11/29/07 11:36 AM Page 84