mcts training kit 70 - 652 70-622 Configuring Microsoft Exchange Server 2010 phần 6 ppsx
Bạn đang xem bản rút gọn của tài liệu. Xem và tải ngay bản đầy đủ của tài liệu tại đây (2.02 MB, 92 trang )
Lesson 2: Monitoring Mail Flow Chapter 9 433
Retry, which would indicate that connectivity problems may be preventing next-hop delivery.
You can resume a message or a message queue or manually retry a queue as appropriate.
If this does not result in message delivery, further investigation of the message properties
(described earlier in this lesson) may be required.
The following command, entered by Kim Akers on a server in the Adatum Exchange
organization, gets the message tracking reports for all email messages Jeff Hay has sent to
Don Hall and displays a detailed message tracking report for each email message, without
resolving display names:
Search-MessageTrackingReport -Identity "Don Hall" -Sender "JeffHay@fabrikam
.com" -ByPassDelegateChecking -DoNotResolve | ForEach-Object { Get-MessageTrackingReport
-Identity $_.MessageTrackingReportID -DetailLevel Verbose -BypassDelegateChecking
-DoNotResolve -RecipientPathFilter "" -ReportTemplate RecipientPath }
MORE INFO GET-MESSAGETRACKINGREPORT AND SEARCH-
MESSAGETRACKINGREPORT
For more information about the Get-MessageTrackingReport cmdlet, see http://technet
.microsoft.com/en-us/library/dd351082.aspx. For more information about the Search-
MessageTrackingReport cmdlet, see />Testing Mail Flow
Exchange Server 2010 provides you with tools to test mail ow and resolve situations where
email messages are not delivered. The EMC provides the Microsoft Exchange Mail Flow
Troubleshooter as part of the Microsoft Exchange Troubleshooting Assistant, but the primary
tool for resolving mail ow and resolving nondelivery situations is the EMS Test-Mailow
cmdlet.
You can use this cmdlet to diagnose whether mail can be successfully sent from and
delivered to the system mailbox on a Mailbox server. You can also use it to verify that
email is sent between Mailbox servers within a specied time (sometimes termed the
latency threshold). The Test-Mailow cmdlet tests mail submission, transport, and delivery.
It veries that each Mailbox server can successfully send itself a message. You can also use
this cmdlet to verify that the system mailbox on one Mailbox server can successfully send
a message to the system mailbox on another Mailbox server.
The Test-Mailow cmdlet supports the AutoDiscoverTargetMailboxServer parameter.
This species whether a command will automatically populate a list of target Mailbox
servers to which a test message is sent. The task queries Active Directory Directory Services
(AD DS) to discover all Mailbox servers and then sends each server a test message.
You can use the TargetDatabase parameter to specify a target mailbox database to
which messages are sent. You can also use the TargetEmailAddress parameter to specify
a target email address when you want to send test messages to a Mailbox server in a remote
forest. The TargetMailboxServer parameter species one or more Mailbox servers in the
434 Chapter 9 Monitoring Exchange Server 2010
local Exchange organization to which test messages are sent. If more than one of these
parameters is specied, the AutoDiscoverTargetMailboxServer parameter takes precedence
over the TargetEmailAddress and TargetMailboxServer parameters. The TargetMailboxServer
parameter takes precedence over the TargetEmailAddress parameter. A system mailbox must
be present on all servers involved in the test.
Quick Check
1. You want to copy an email message into a text le so that you can view it, but
you do not want to remove the message from its queue. You have suspended
the message. What EMS cmdlet do you use to copy the message to a le?
2. What le extension should you use for a le into which you are copying an
email message?
Quick Check Answers
1. Export-Message
2. The .eml le extension.
Several parameters specify time-outs. The ActiveDirectoryTimeout parameter species the
number of seconds that elapse before the task provides an informational message about the
delay. The default value is 15 seconds. The ErrorLatency parameter species the number of
seconds that elapse before an error event is logged in Microsoft System Center Operations
Manager 2007. The default value when a test message is sent to the local Mailbox server
is 15 seconds. When a test message is sent to a remote Mailbox server, the default value is
180 seconds.
The ExecutionTimeout parameter species the maximum time that the task can run before
the test is determined to be a failure. If no test message or delivery report arrives before the
execution time expires, the task ends, and an error is reported. When the task is run in the
EMS, the default setting is 240 seconds. When you include the MonitoringContext parameter,
which species that System Center Operations Manager 2007 is being used for server
monitoring, the default setting is 15 seconds.
MORE INFO SYSTEM CENTER OPERATIONS MANAGER 2007
For more information about System Center Operations Manager 2007, see http://technet
.microsoft.com/en-us/library/bb687791.aspx#scop07.
The Identity parameter species the source Mailbox server name or source mailbox SMTP
address from which a test message is sent. The default value is the local Mailbox server.
If you include the Conrm switch, this causes the command to pause and requires you to
acknowledge that you want the task to proceed before processing continues. You do not
specify a value with the Conrm switch.
Lesson 2: Monitoring Mail Flow Chapter 9 435
The following command tests message ow from the Mailbox server VAN-EX1 to the
Mailbox server VAN-EX2:
Test-Mailflow VAN-EX1 -TargetMailboxServer VAN-EX2
The following command tests message ow from the server VAN-EX1 to the email address
:
Test-Mailflow VAN-EX1 -TargetEmailAddress
Figure 9-22 shows that this test was successful.
FIGURE 9-22 A successful mail flow test
MORE INFO TEST-MAILFLOW
For more information about the Test-Mailow cmdlet, see />en-us/library/aa995894.aspx.
Back Pressure
B
ack pressure is a system resource monitoring feature of the Microsoft Exchange
Transport service that exists on Hub Transport and Edge Transport servers.
System resources such as available hard disk drive space and available memory
are monitored. If utilization of a system resource exceeds its specied limit, the
Exchange server stops accepting new connections and messages. This prevents the
system resources from being completely overwhelmed and enables the server to
deliver the existing messages. When utilization of the system resource returns to
a normal level, the Exchange server accepts new connections and messages.
The following system resources are monitored as part of the back-pressure feature:
n
Free space on the hard disk drive that stores the message queue database
n
Free space on the hard disk drive that stores the message queue database
transaction logs
n
The number of uncommitted message queue database transactions that exist in
memory
n
The memory that is used by the EdgeTransport.exe process
n
The memory that is used by all processes
436 Chapter 9 Monitoring Exchange Server 2010
For each monitored system resource on a Hub Transport server or Edge Transport
server, the following three levels of resource utilization are applied:
n
Normal The resource is not overused. The server accepts new connections and
messages.
n
Medium The resource is slightly overused. Back pressure is applied to the server
in a limited manner. Mail from senders in the authoritative domain can ow. However,
the server rejects new connections and messages from other sources.
n
High The resource is severely overused. Full back pressure is applied. All
message ow stops, and the server rejects all new connections and messages.
Conguration options for back pressure are available in the EdgeTransport.exe
.cong application conguration le that is located in the C:\Program Files\
Microsoft\Exchange Server\V14\Bin directory. The EdgeTransport.exe.cong le is
an XML application conguration le that is associated with the EdgeTransport.exe
le. EdgeTransport.exe and MSExchangeTransport.exe are executable les located
in the same directory that are used by the Microsoft Exchange Transport service.
This service runs on every Hub Transport or Edge Transport server. Changes that are
saved to the EdgeTransport.exe.cong le are applied after the Microsoft Exchange
Transport service is restarted.
However, Microsoft strongly discourages modifying the back-pressure settings
in the EdgeTransport.exe.cong le because such modication may result in
poor performance or data loss. You should instead investigate and correct the
root causes of any back-pressure events. In other words, nd out what resource
is under pressure and why and take the appropriate action such as upgrading
server hardware or moving tasks to another server. In general, events with event
source MSExchangeTransport and event category Resource Manager that indicate
problems due to excessive resource usage are regarded as back-pressure events.
Scanning for Disconnected Mailboxes
A connected mailbox requires that a mailbox object exists in the Exchange store and the
corresponding user object exists and has Exchange properties in AD DS. A disconnected
mailbox is a mailbox object in the Exchange store that is not connected to a user object in
Active Directory. You can use the Disable-Mailbox EMS cmdlet to disconnect a mailbox and the
Connect-Mailbox cmdlet to reconnect a disconnected mailbox to an AD DS user account. You can
use the Remove-Mailbox cmdlet to disconnect a mailbox and remove the user object from AD DS.
Using the Remove-Mailbox cmdlet permanently removes the mailbox object from the Exchange
store.
Under normal circumstances, a mailbox is marked as disconnected immediately after
the Disable-Mailbox or Remove-Mailbox command completes. However, if you use the
Disable-Mailbox cmdlet or the Remove-Mailbox cmdlet while the Microsoft Exchange
Lesson 2: Monitoring Mail Flow Chapter 9 437
Information Store service is stopped or if a mailbox is disabled by external means other
than the Disable-Mailbox cmdlet or the Remove-Mailbox cmdlet, it is possible that the
disconnected mailbox is not marked as disconnected in AD DS, and this can lead to problems
if email messages are sent to the user.
In this situation, you can use the Clean-MailboxDatabase EMS cmdlet to scan a mailbox
database for disconnected mailboxes that have not been marked as disconnected within AD
DS. Commands based on this cmdlet also update the status of those mailboxes so that they
are correctly marked as disconnected.
For example, the following command scans the database Mailbox Database 1363123687
for disconnected mailboxes that are not marked as disconnected within AD DS and updates
their status so that they are correctly marked as disconnected:
Clean-MailboxDatabase –Identity "Mailbox Database 1363123687"
MORE INFO CONNECTING, DISCONNECTING, AND REMOVING A MAILBOX
For more information about the Connect-Mailbox cmdlet, see rosoft
.com/en-us/library/aa997878.aspx. For more information about the Disable-Mailbox
cmdlet, see For more
information about the Remove-Mailbox cmdlet, see />library/aa995948.aspx.
MORE INFO CLEAN-MAILBOXDATABASE
For more information about the Clean-MailboxDatabase cmdlet, see http://technet
.microsoft.com/en-us/library/bb124076.aspx.
Lesson Summary
n
The EMS is the primary tool for conguring message tracking and tracking logs.
You can use the EMC to perform some tasks, but its functionality is limited.
n
You can use Queue Viewer in the EMC to monitor or EMS commands to monitor, lter,
and manage transport queues on a Hub Transport or Edge Transport server.
n
You can use Queue Viewer in the EMC to lter messages but the primary tool for
managing messages and testing mail ow is the EMS.
Lesson Review
You can use the following questions to test your knowledge of the information in Lesson 2,
“Monitoring Mail Flow.” The questions are also available on the companion CD if you prefer to
review them in electronic form.
NOTE ANSWERS
Answers to these questions and explanations of why each answer choice is correct or
incorrect are located in the “Answers” section at the end of the book.
438 Chapter 9 Monitoring Exchange Server 2010
1. You want to enable message tracking on the Mailbox server AdatumMail02. What EMS
command do you use?
A. Set-TransportServer –Identity AdatumMail02 -MessageTrackingLogEnabled:$false
B. Set-MailboxServer –Identity AdatumMail02 -MessageTrackingLogEnabled:$false
C. Set-TransportServer –Identity AdatumMail02 -MessageTrackingLogEnabled:$true
D. Set-MailboxServer –Identity AdatumMail02 -MessageTrackingLogEnabled:$true
2. You want to change the maximum size of each message tracking log le on the Edge
Transport server NY-Edge01 to 15 MB. What command do you enter in the EMS?
A. Set-TransportServer –Identity NY-Edge01 -MessageTrackingLogMaxDirectorySize
15MB
B. Set-TransportServer –Identity NY-Edge01 -MessageTrackingLogMaxFileSize 15MB
C. Set-MailboxServer –Identity NY-Edge01 -MessageTrackingLogMaxDirectorySize
15MB
D. Set-MailboxServer –Identity NY-Edge01 -MessageTrackingLogMaxFileSize 15MB
3. You want to display the number of messages in queues on an Edge Transport server
in the Contoso.com domain that are bound for the BlueSkyAirlines.com domain. What
command do you enter in the EMS?
A. Get-Queue –Filter {NextHopDomain –eq “blueskyairlines.com”}
B. Get-Queue -Filter {MessageCount -gt 50}
C. Get-Queue –Filter {NextHopDomain –eq “adatum.com”}
D. Get-Queue -Filter {MessageCount -ge 50}
4. You want to suspend all queues on a Hub Transport server that have a message count
equal to or greater than 450 and have a status of Retry. The command should work
immediately without requiring conrmation. What EMS command do you enter on the
server?
A. Suspend-Queue -Filter {MessageCount -ge 450 -and Status -eq “Retry”}
B. Suspend-Queue -Filter {MessageCount -gt 450 -and Status -eq “Retry”}
-Conrm:$False
C. Suspend-Queue -Filter {MessageCount -ge 450 -and Status -eq “Active”}
-Conrm:$False
D. Suspend-Queue -Filter {MessageCount -ge 450 -and Status -eq “Retry”}
-Conrm:$False
5. You want to test the message ow from the Mailbox server NY-EX1 to the Mailbox
server NY-EX2. What command do you enter in the EMS?
A. Test-Mailow NY-EX1 -TargetMailboxServer NY-EX2
B. Test-Mailow NY-EX2 -TargetMailboxServer NY-EX1
C. Test-Mailow NY-EX1 -TargetDatabase NY-EX2
D. Test-Mailow NY-EX1 -TargetEmailAddress NY-EX2
Lesson 3: Monitoring Exchange Connectivity Chapter 9 439
Lesson 3: Monitoring Exchange Connectivity
This lesson looks at communication between the various server and client computers that
make up an Exchange Server organization. Computers need to be correctly congured so that
they can communicate with each other over IP networks and (unless your email requirements
are fully internal) with external networks such as extranets or the Internet. Clients need to be
able to connect to servers using the appropriate client protocols, and servers need to be able
to communicate with each other.
After this lesson, you will be able to:
n
Test and debug network connectivity.
n
Use the Telnet tool to test protocol connectivity over various ports and
particularly SMTP and Extended Simple Mail Transfer Protocol (ESMTP)
connectivity over port 25.
n
Test connectivity using the various client-to-server and server-to-server
protocols that enable users to access and read email messages.
n
Test Microsoft Exchange Web Services (EWS), Microsoft Outlook Anywhere,
and Microsoft Exchange ActiveSync operation.
Estimated lesson time: 40 minutes
Debugging Network Connectivity
The standard tools for troubleshooting network connectivity, such as Ping, Tracert, Nslookup,
and Ipcong, are well known but sometimes do not provide the answers you are looking for,
particularly on servers such as Windows Server 2008 and Windows Server 2008 R2, whose
internal rewalls by default block the Internet Control Message Protocol Echo command.
However, the main thrust of this lesson is the use of the Telnet tool and EMS
cmdlets to obtain network connection information and to test connectivity over the
various client-to-server and server-to-server protocols used to implement an Exchange
Server 2010 organization.
Using Telnet to Test SMTP Communication
On client computers that have a Telnet client installed, you can use the Telnet tool to test
connectivity for protocols dened by their port numbers. For example, opening a Telnet
session and entering open VAN-EX1.contoso.com 25 tests connectivity to server VAN-EX1
.contoso.com on port 25, and if this connection can be made, the Telnet command ELHO tests
that ESMTP connections can be made to that server.
You can use the Telnet utility to connect to and verify the functionality of the SMTP service
on an Edge Transport server and to test whether this server is able to receive email sent from
other SMTP servers on the Internet. By default, SMTP listens on port 25. If you use Telnet on
440 Chapter 9 Monitoring Exchange Server 2010
port 25, you can enter the SMTP commands that are used to connect to an SMTP server and
send a message exactly as if your Telnet session were an SMTP messaging server.
However, before you use Telnet to test SMTP communication, you need to consider
a number of factors. For example, message transfers that occur between Hub Transport
servers are encrypted and authenticated by default. You can use Telnet on port 25 to submit
messages only to an internal Hub Transport server that has a Receive connector congured
to allow anonymous access or basic authentication. Anonymous access is required for
Internet-facing servers. When you send a message to a Receive connector that accepts
basic authentication, you must have a utility to convert the text strings that are used for the
user name and password into the Base64 format. Chapter 7, “Routing and Transport Rules,”
discusses Receive connectors.
CAUTION BASIC AUTHENTICATION CAN BE A SECURITY RISK
Because the user name and password are easily discernible when basic authentication is
used, Microsoft recommends that you do not use basic authentication without encryption.
Typically, Internet-facing SMTP messaging servers are congured to validate the
source IP address, the corresponding Domain Name System (DNS) domain name, and the
reverse-lookup IP address of any Internet host that tries to send a message to the server. If
you connect a client computer to the Internet and try to send a test message to a remote
messaging server by using Telnet on port 25, your message is likely to be rejected. In this
case, you should connect to the remote messaging server from your Edge Transport server.
The accepted domains that are congured on the Edge Transport server have the appropriate
DNS mail exchanger (MX) records, address (A) records, and reverse-lookup records that
identify the Edge Transport server as a legitimate and traceable email message source.
You can use Telnet to connect to your organization’s Edge Transport server from a host
that is located outside your perimeter network and send a test message. You can also use
Telnet to connect to a remote messaging server from your organization’s Edge Transport
server and send a test message. Note that the syntax of Telnet commands may differ
depending on the third-party Telnet client you use. Remember that you cannot use the
backspace key after you have connected to a destination SMTP server within the Telnet
session. If you make a mistake as you type an SMTP command, you must press Enter and then
type the command again.
To use Telnet on port 25 to connect to a destination SMTP server, you must rst discover
the fully qualied domain name (FQDN) or the IP address of the SMTP server. You can use the
Nslookup command-line tool to nd the MX record for the destination domain and hence the
address of the SMTP server by carrying out the following procedure:
1. On the computer you are using to run the Telnet session and to connect to a remote
SMTP server on the Internet, right-click Command Prompt on the Accessories menu
and click Run As Administrator. If you are not logged on with an Administrator-level
account, you need to supply credentials.
Lesson 3: Monitoring Exchange Connectivity Chapter 9 441
2. Enter the following command:
nslookup
3. Enter the following command:
set type=mx
4. Enter the following command:
set timeout=20
NOTE DNS QUERY TIME-OUT
By default, Windows DNS servers have a 15-second recursive DNS query time-out limit.
5. Enter the name of the domain for which you want to nd the MX record, followed by a
trailing period. For example, to nd the MX record for the contoso.com domain, enter
the following command:
contoso.com.
NOTE USING A TRAILING PERIOD
The trailing period indicates a FQDN. The use of the trailing period prevents any default
DNS sufxes congured for your network from being unintentionally added to the
domain name. Note also that the domain must be reachable on the Internet and must
contain at least one messaging server.
6. Obtain the FQDN and IP address for the server to which you want to connect. The
portion of the command’s output that is of signicance to you should look similar to
the following (note that the IP addresses will be public Internet addresses and not the
private addresses shown here as an illustration):
contoso.com mx preference=10, mail exchanger = mail1.contoso.com
contoso.com mx preference=20, mail exchanger = mail2.contoso.com
mail1.contoso.com internet address = 10.0.10.20
mail2 contoso.com internet address = 10.0.10.30
7. To end the Nslookup session, enter the following command:
exit
The above procedure discovers the FQDNs and IP addresses of messaging servers in
an external Exchange organization reachable over the Internet. To nd the FQDNs of Hub
Transport and Edge Transport servers within your internal Exchange Server 2010 organization,
enter the following command in the EMS:
Get-ExchangeServer | where {$_.isHubTransportServer -eq $true -or $_.isEdgeServer -eq
$true} | FL Fqdn,ServerRole
442 Chapter 9 Monitoring Exchange Server 2010
Figure 9-23 shows the output from this command.
FIGURE 9-23 Messaging servers in the adatum.com internal organization
MORE INFO GET-EXCHANGESERVER
For more information about the Get-ExchangeServer cmdlet, see rosoft
.com/en-us/library/bb123873.aspx.
When you have obtained the FQDN of the target messaging server, you can use Telnet
on port 25 to test SMTP communication (assuming that a Telnet client is installed in your
source computer—remember that Microsoft Windows Vista and Microsoft Windows 7 client
computers do not have a Telnet client installed by default). The procedure described below
uses the following values:
n
Destination SMTP server mail01.contoso.com
n
Source domain adatum.com
n
Sender’s email address
n
Recipient’s email address
n
Message subject Test from Adatum
n
Message body Test message
To use Telnet on port 25 to test SMTP communication, carry out the following procedure:
1. On an Edge Transport server in the Adatum.com domain, open a command prompt by
specifying Run As Administrator and enter the following command to open the Telnet
session:
telnet
2. Optionally, to view the characters as you type them, enter the following command:
set localecho
3. Optionally, to enable logging of the Telnet session to the log le telnet.log, enter the
following command:
set logfile C:\Logfiles\telnet.log
4. To access the server mail01.contoso.com on port 25, enter the following command:
open mail01.contoso.com 25
If access is successful, you receive a response similar to the following:
220 mail01.contoso.com Microsoft ESMTP MAIL Service ready at <day-date-time>
Lesson 3: Monitoring Exchange Connectivity Chapter 9 443
5. To test that ESMTP is operating in the Contoso.com domain, enter the following
command:
EHLO contoso.com
If ESMTP is working correctly, you receive a response similar to the following:
250 mail01.contoso.com Hello [<sourceIPaddress>]
6. To specify the sender’s email address, enter the following command:
MAIL FROM:
If the sender’s email address is recognized as valid, you receive a response similar
to the following:
250 2.1.0 Sender OK
7. To specify the recipient’s email address and to dene the particular delivery status
notication (DSN) messages that the destination SMTP server must provide to the
sender, enter the following command:
RCPT TO: NOTIFY=success,failure
If the recipient’s email address is recognized as valid, you receive a response similar
to the following:
250 2.1.5 Recipient OK
MORE INFO DSN MESSAGES
DSN messages are dened in RFC 1891. For more information, see />rfcs/rfc1891.html.
8. To start mail input, enter the following command:
DATA
You receive a response similar to the following:
354 start mail input; end with <CLRF>.<CLRF>
9. Enter Subject: Test from Adatum.
10. Press Enter. You need a blank line between the Subject: header eld and the message
body.
11. Enter Test message.
12. Press Enter, type a period, and then press Enter again. You receive a response similar to
the following:
250 2.6.0 <GUID> Queued mail for delivery
444 Chapter 9 Monitoring Exchange Server 2010
13. To disconnect from the destination SMTP server, enter the following command:
QUIT
You receive a response similar to the following:
221 2.0.0 Service closing transmission channel
14. To close the Telnet session, enter the following command:
QUIT
Using Nslookup to Test MX Record Conguration
You can use the Nslookup tool to verify MX record conguration on an external or Internet
DNS server. In order to receive incoming email, an MX record for each of your mail servers
that you use as bridgehead servers or Internet mail servers must exist on your external DNS
server or servers. For external DNS servers to resolve a mail server’s MX record and contact
that mail server, the mail server must be accessible from the Internet and must be congured
to contact a correctly congured DNS server to resolve DNS names.
In order to send outgoing mail, you can congure Exchange Server 2010 to use internal
DNS servers that resolve external names locally or use a forwarder to an external DNS server.
Typically, you congure computers running Exchange Server 2010 as DNS clients of your
internal DNS server. On your internal DNS server, you can congure an external forwarder to
point to trusted external DNS servers. Alternatively, to send outgoing mail, you can congure
computers running Exchange Server 2010 to use a dedicated external DNS server.
To use Nslookup to verify that your MX records are congured correctly for ingoing and
outgoing email, you can perform the following procedure on your Mailbox server:
1. Open the Command Prompt console and enter the following command:
nslookup
2. Where <IP address> is the IP address of the external DNS server, enter the following
command:
server <IP address>
3. Enter the following command:
set q=MX
4. Type the name of your domain (for example, contoso.com) and then press Enter. If DNS
is congured correctly, the MX record for the domain you entered is displayed.
Viewing Network Adapter Conguration
If you are experiencing network connectivity problems on a particular Exchange Server 2010
server, you can use a command based on the Get-NetworkConnectionInfo EMS cmdlet to view
the network conguration information for all network adapters congured on that server.
Typically, you run this cmdlet locally, and it returns information about the network adapters
Lesson 3: Monitoring Exchange Connectivity Chapter 9 445
on the server on which it runs. You can optionally specify another server on the network and
the FQDN of the domain controller that retrieves data from AD DS. Note that you cannot
use the DomainController parameter when obtaining conguration information on an Edge
Transport server.
Commands based on the Get-NetworkConnectionInfo cmdlet can display the following elds:
n
RunspaceID This displays a GUID that uniquely identies the session in which an
event occurs.
n
Name This displays the name of the network adapter. This can indicate the
manufacturer and model of the network adapter or an administrator-specied
network adapter name.
n
DnsServers This displays the DNS servers the network adapter uses. If more than
one DNS server exists, the server names are separated by commas.
n
IPAddresses This displays the IP addresses used by the network adapter.
n
AdapterGuid This displays the GUID that Microsoft Windows assigns to the network
adapter.
n
MacAddress This displays the media access control address of the network adapter.
The following command returns network connection information for the local server:
Get-NetworkConnectionInfo
Figure 9-24 shows the output from this command. Some of the elds on the Exchange
Server 2010 server on your test network will return different information.
FIGURE 9-24 Connection information
MORE INFO GET-NETWORKCONNECTIONINFO
For more information about the Get-NetworkConnectionInfo cmdlet, see http://technet
.microsoft.com/en-us/library/aa998845.aspx.
Testing Post Ofce Protocol Version 3 (POP3) Connectivity
The POP3 service provides email access to clients on port 110. Secure Socket Layer
(SSL)-protected POP3 uses port 995. POP3 is a client-to-server protocol in which email is
received and held for the user on the Client Access server. Periodically, users check their
mailboxes and download mail using the POP3 service. POP3 is built into, for example,
Microsoft Outlook Express. It is also built into the Microsoft Internet Explorer browser.
446 Chapter 9 Monitoring Exchange Server 2010
You can use commands based on the Test-PopConnectivity EMS cmdlet to verify that the
POP3 service is running correctly. The Test-PopConnectivity cmdlet can be used to test the
POP3 functionality on a specied Client Access server for all mailboxes on servers running
Exchange Server 2010 in the same AD DS site. You can also specify a single Mailbox server in
the site by using the MailboxServer parameter. You can identify a single mailbox by using the
MailboxCredential parameter, but to do this, you need to rst get the credential information
for a specic mailbox by using the Get-Credential PowerShell cmdlet.
For example, the following command prompts for the credentials for the Kim Akers
mailbox user and tests POP3 connectivity to the Kim Akers mailbox on the VAN-EX1 Mailbox
server:
Test-PopConnectivity -MailboxServer:VAN-EX1 -MailboxCredential:(Get-Credential "adatum\
Kim Akers") | FL
Note that this command prompts for credentials even when you are logged on with
the Kim Akers user. Figure 9-25 shows that connectivity failed in this instance because the
MSExchangePOP3 service is not running.
FIGURE 9-25 POP3 connectivity failure message
Commands based on the Test-PopConnectivity cmdlet are typically run against the Client
Access server on which they are entered. However, you can specify a remote Client Access
server in the same Exchange Server 2010 organization by using the ClientAccessServer
parameter. You can also use the ConnectionType parameter to specify whether the
connection type is Plaintext, SSL, or Transport Layer Security (TLS). For example, the following
command tests POP3 connectivity between the Client Access server CAS01 and all mailboxes
on all Mailbox servers in the same organization and species the connection type as SSL:
Test-PopConnectivity –ClientAccessServer:CAS01 –ConnectionType:SSL
NOTE CREATING A USER TO TEST CLIENT ACCESS SERVER CONNECTIVITY
You need to create a test user account to test connectivity to Client Access servers. To do
this, enter the following command in the EMS and follow the prompts:
New-TestCasConnectivityUser.ps1
Lesson 3: Monitoring Exchange Connectivity Chapter 9 447
You can use the TrustAnySSLCerticate parameter to instruct the command to check the
POP3 service without generating an error when the SSL certicate does not match the URL
of the Client Access server. You can use the MonitoringContext parameter to specify whether
the command is run by System Center Operations Manager 2007. Take care, however, that if
System Center Operations Manager 2007 is not running, including this parameter causes the
command to fail.
If you want to perform only a test logon to a Mailbox server using the POP3 protocol and
do not require the command to test the sending and receiving of a message, you can specify
the LightMode parameter. If you are using a port other than port 110 to connect to the Client
Access server, you need to use the PortClientAccessServer parameter to specify the port used.
MORE INFO TEST-POPCONNECTIVITY AND GET-CREDENTIAL
For more information about the Test-PopConnectivity cmdlet, see rosoft
.com/en-us/library/bb738143.aspx. For more information about the Get-Credential cmdlet,
see />Quick Check
n
What elds can EMS commands based on the Get-NetworkConnectionInfo cmdlet
display?
Quick Check Answer
n
RunspaceID, Name, DnsServers, IPAddresses, AdapterGuid, and MacAddress.
Testing Internet Message Access Protocol Version 4
(IMAP4) Connectivity
IMAP4 is a standard client-to-server protocol for accessing email from an Exchange Server
2010 server local to the email client. Email messages are received and held by the server.
A mailbox user can view the heading and the sender of the message and then decide whether
to download it. A user can create and manipulate multiple folders or mailboxes on the server,
delete messages, or search for messages. IMAP4 requires continual access to the server
during the time that a user is working with his or her email messages.
The default port for IMAP4 is 143. SSL-protected IMAP4 uses TCP port 993 to retrieve email
through a Client Access server. Note that both POP3 and IMAP4 enable users to receive email
messages. SMTP or ESMTP enables users to send email messages.
You can use commands based on the Test-ImapConnectivity EMS cmdlet to verify that
the IMAP4 service is working as expected. You can test IMAP4 functionality on a specied
Client Access server for all mailboxes on Exchange Server 2010 Mailbox servers in the same
Active Directory site, for a specic Mailbox server, or for a specic mailbox identied by its
credentials.
448 Chapter 9 Monitoring Exchange Server 2010
The Test-ImapConnectivity cmdlet supports the MailboxServer, -MailboxCredential,
ClientAccessServer, ConnectionType, TrustAnySSLCerticate, MonitoringContext, LightMode,
and PortClientAccessServer parameters in the same way as previously described for the
Test-PopConnectivity cmdlet. For example, the following command tests IMAP4 connectivity
from the Client Access server on which it is entered to all mailboxes on the Mailbox server
VAN-EX1:
Test-ImapConnectivity -MailboxServer:VAN-EX1 | FL
The following example tests IMAP4 connectivity from the Client Access server CAS01 to
all mailboxes on all Mailbox servers on the local site:
Test-ImapConnectivity -ClientAccessServer:CAS01 | FL
The following example tests IMAP4 SSL-protected connectivity from the Client Access
server CAS01 to all mailboxes on all Mailbox servers on the local site:
Test-ImapConnectivity -ClientAccessServer:CAS01 –ConnectionType:SSL
–PortClientAccessServer:993 | FL
MORE INFO TEST-IMAPCONNECTIVITY
For more information about the Test-ImapConnectivity cmdlet, see http://technet
.microsoft.com/en-us/library/bb738126.aspx.
Testing Messaging Application Programming Interface
(MAPI) Connectivity
MAPI is a messaging architecture and Component Object Model designed by Microsoft and
based on the Application Programming Interface for Microsoft Windows. It allows client
programs to become email messaging enabled or aware by calling MAPI subsystem routines
that interface with messaging servers. While MAPI is designed to be protocol independent,
it is usually used with the RPC protocol. MAPI/RPC is the proprietary protocol that Microsoft
Outlook uses to communicate with Microsoft Exchange and is usually termed the MAPI
protocol. MAPI uses a negotiated dynamic port (above 1024). RPC uses port 135.
The MAPI version that ships with Exchange Server 2010 and Microsoft Ofce Outlook is
sometimes known as Extended MAPI. It allows complete control over the messaging system
on the client computer, creation and management of messages, management of the client
mailbox, and so on. Extended MAPI includes facilities to access message transports, message
stores, and directories.
You can use commands based on the Test-MapiConnectivity EMS cmdlet to test MAPI
connectivity and verify server functionality. You use the Identity parameter to specify a logon
mailbox. The SystemMailbox is used if you do not include the Identity parameter. The cmdlet
retrieves a list of items in the Inbox. Logging on to the mailbox tests two protocols used when
a client connects to a Mailbox server: MAPI and Lightweight Directory Application Protocol.
During authentication, the Test-MapiConnectivity cmdlet veries that the MAPI server,
Exchange store, and Directory Service Access (DSAccess) service are working.
Lesson 3: Monitoring Exchange Connectivity Chapter 9 449
Commands based on the Test-MapiConnectivity cmdlet log on to the specied mailbox
using the credentials of the account with which you are logged on to the local computer.
After successful authentication, the command accesses the mailbox to verify that the
database is working. Note that you do not run the Test-MapiConnectivity cmdlet against
the Client Access server. This cmdlet must be run against the Mailbox server.
The Test-MapiConnectivity cmdlet supports the Database parameter. This parameter
species a mailbox database identity so that the command can test whether it is possible to
log on to the system mailbox on the specied database. The cmdlet also supports the Identity
parameter, which species a mailbox identity so that the command can test whether it is
possible to log on to a specic mailbox. The Server parameter species a server identity and
tests whether it is possible to log on to each system mailbox on the specied server.
For example, the following command tests MAPI connectivity to the system mailboxes in
each mailbox database on the Mailbox server VAN-EX1 and returns detailed results:
Test-MapiConnectivity -Server VAN-EX1 | FL
Figure 9-26 shows the output of this command.
FIGURE 9-26 Testing MAPI connectivity
The following command tests MAPI connectivity to the system mailbox in the mailbox
database Research and returns detailed results:
Test-MapiConnectivity –Database Research | FL
The following command tests MAPI connectivity to the Don Hall mailbox in the Adatum.
com domain and returns detailed results:
Test-MapiConnectivity –Identity "adatum\Don Hall" | FL
MORE INFO TEST-MAPICONNECTIVITY
For more information about the Test-MapiConnectivity cmdlet, see http://technet
.microsoft.com/en-us/library/bb123681.aspx.
450 Chapter 9 Monitoring Exchange Server 2010
Quick Check
n
What parameter enables you to specify that EMS commands based on the
Test-PopConnectivity cmdlet are run by System Center Operations Manager 2007?
Quick Check Answer
n
MonitoringContext.
Testing EWS and Outlook Anywhere
The EWS-managed API provides a managed interface for developing client applications that
use EWS. This API communicates with the Exchange Client Access server by means of EWS
Simple Object Access Protocol (SOAP) messages.
EWS uses standard industry protocols that provide interoperability between servers and
client applications. SOAP XML messages provide the communication between the computer
that is running Exchange Server 2010 and web services client applications. The following
changes and enhancements are included in Exchange Server 2010 EWS:
n
Distribution Lists are renamed Contact Groups.
n
The FindItems interface is redesigned.
n
The Autodiscover implementation supports DNS SRV record lookup.
n
The notications interface is redesigned.
n
New methods have been added for getting and setting free or busy information.
EXAM TIP
EWS is a developer tool. As such, it is unlikely to be tested in the 70-662 examination. You
should, however, know how to verify EWS functionality as described in this section.
Outlook Anywhere enables Microsoft Ofce Outlook clients to connect to their Exchange
servers over the Internet by using the RPC-over-HTTP networking component. It integrates
RPCs with an HTTP layer and allows email trafc to traverse network rewalls without
requiring RPC ports to be opened. To deploy Outlook Anywhere in your Exchange messaging
environment, you need to enable at least one Client Access server by using the Enable
Outlook Anywhere Wizard.
You can use the Enable Outlook Anywhere Wizard on an Exchange Server 2010 Client
Access server to allow a user to connect to his or her Exchange mailbox from the Internet.
Outlook Anywhere eliminates the need for mobile users or users in remote ofces or to use
a virtual private network to connect to Exchange servers.
Outlook Anywhere is enabled on your Client Access server after a conguration period of
approximately 15 minutes. To verify that Outlook Anywhere has been enabled, you can check
Lesson 3: Monitoring Exchange Connectivity Chapter 9 451
the application event log on the Client Access server. Before you can use Outlook Anywhere,
you need to do the following:
n
Install a valid SSL certicate from a certication authority trusted by the client.
n
Install the Microsoft Windows RPC-over-HTTP Proxy component (if this not installed
by default). Note that if you use the XML les included with Exchange Server 2010
and the install and setup instructions in the Appendix, you should not need to install
RPC-over-HTTP Proxy.
n
Enable Outlook Anywhere on the Client Access server.
MORE INFO INSTALLING THE WINDOWS RPC OVER HTTP PROXY COMPONENT
If you require more information about how to install the Windows RPC-over-HTTP proxy
component, see />NOTE THE DEFAULT SSL CERTIFICATE IS NOT SUFFICIENT FOR OUTLOOK ANYWHERE
When you install Exchange Server 2010, you can install a default SSL certicate created
by Exchange Setup. However, this certicate is not trusted by the client. To use Outlook
Anywhere, you must install an SSL certicate that is trusted by the client.
If you use Outlook Anywhere, you must allow port 443 through your rewall because
Outlook Anywhere requests use HTTP-over-SSL. If you already use Outlook Web App (OWA)
with SSL or Exchange ActiveSync with SSL, you do not need to open any additional ports from
the Internet. By default, when you enable Outlook Anywhere on a Client Access server, all
users who have mailboxes on Mailbox servers are enabled for Outlook Anywhere.
MORE INFO OUTLOOK ANYWHERE
For more information about Outlook Anywhere, access />library/bb123513.aspx and follow the links.
You can test the connectivity needed for EWS and Outlook Anywhere to work by entering
commands based on the Test-WebServicesConnectivity EMS cmdlet. You can use such
commands to verify the functionality of EWS on an Exchange Server 2010 Client Access
server. The Test-WebServicesConnectivity cmdlet tests the functionality of EWS and performs
basic operations to verify the functionality of Outlook Anywhere. By default, the following
operations are tested:
n
GetFolder
n
CreateItem
n
DeleteItem
n
SyncFolderItems
452 Chapter 9 Monitoring Exchange Server 2010
However, if you specify the LightMode parameter in the command, only the GetFolder
operation is tested.
By default, the test runs on the Client Access server on which the command is entered.
However, you can use the ClientAccessServer parameter to specify a remote Client Access
server in the same Exchange organization. As with other test cmdlets described earlier in this
lesson, you can use the MailboxServer and MailboxCredential parameters to test connectivity
to a specic Mailbox server or to a specic user mailbox. The MonitoringContext parameter
species whether the test result is passed to System Center Operations Manager 2007. If this
parameter is set to a value of $false, the test result appears only on the command line.
The Timeout parameter species the amount of time, in seconds, allowed for the test
operation to nish. The default value for the Timeout parameter is 300 seconds. The time-out
value you specify must be greater than 0 seconds. Microsoft recommends conguring this
parameter with a value of 5 seconds or greater.
The ResetTestAccountCredentials parameter resets the password for the test account used
to run Test-WebServicesConnectivity commands. This is typically reset every seven days. When
the ResetTestAccountCredential parameter is used, a password reset is forced any time it is
required for security reasons. You can specify whether a secure SSL channel is required or
whether the test can run over an unsecured channel by using the AllowUnsecureAccess switch
parameter. If the test runs over a secure channel, the TrustAnySSLCerticate parameter allows
it to use any SSL certicate available.
The UseAutodiscoverForClientAccessServer parameter species whether the test uses the
Autodiscover service to locate the Client Access server. The Autodiscover service congures
client computers that are running Outlook 2007 or Outlook 2010. The service can also congure
supported mobile devices. It provides access to Exchange Server 2010 features for Outlook
clients that are connected to the Exchange Server 2010 messaging environment. The service
enables clients to automatically connect to features, such as the Outlook Address Book (OAB),
the Availability service, and Unied Messaging (UM). The service uses the user’s email address
and password to provide prole settings to Outlook clients and supported mobile devices. If the
Outlook client is joined to the domain, the user’s domain account credentials are used.
The following command tests Web services continuity for the Getfolder operation
between the Client Access server on which it is entered and all mailboxes in the same
Exchange organization. The test operates over a secure channel authenticated by any
available SSL certicate; if a secure channel cannot be established, the command attempts
to test connectivity over an insecure channel:
Test-WebServicesConnectivity –LightMode:$true –TrustAnySSLCertificate:$true
–AllowUnsecureAccess:$true | FL
Figure 9-27 shows the output from this command.
MORE INFO TEST-WEBSERVICESCONNECTIVITY
For more information about the Test-WebServicesConnectivity cmdlet, see http://technet
.microsoft.com/en-us/library/aa998328.aspx.
Lesson 3: Monitoring Exchange Connectivity Chapter 9 453
FIGURE 9-27 Testing web services connectivity
You can use commands based on the Test-OutlookWebServices EMS cmdlet to verify
that the Autodiscover settings for Microsoft Outlook are congured correctly. This cmdlet
supports an Identity parameter that can specify any valid email address in the forest, and
this address is used to test the Outlook provider. It is typically an SMTP address, but you can
specify the domain and user name or an Active Directory GUID, and the command resolves
this information to an SMTP address. The TargetAddress parameter species the recipient
used to test whether Availability service data can be retrieved.
Typically, commands based on this cmdlet run against the Client Access server on
which they are entered, but, as with previously described cmdlets, you can use the
ClientAccessServer parameter to specify the Client Access server that the client accesses.
The MonitoringContext parameter species whether the results of the command include
monitoring events and performance counters. If you specify this parameter with the value
$true, the test results include monitoring events and performance counters in addition to
information about the MAPI transaction.
The following command veries the service information returned to the Outlook client
from the Autodiscover service for the user :
Test-OutlookWebServices -Identity: -MonitoringContext:$true | FL
The above command tests the following:
n
The Availability service
n
Outlook Anywhere
n
The OAB
n
UM
Figure 9-28 shows the output from this command.
MORE INFO THE AUTODISCOVER SERVICE
For more information about the Autodiscover service, access />en-us/library/aa995956.aspx and follow the links.
454 Chapter 9 Monitoring Exchange Server 2010
FIGURE 9-28 Verifying Autodiscover settings
MORE INFO TEST-OUTLOOKWEBSERVICES
For more information about the Test-OutlookWebServices cmdlet, see http://technet
.microsoft.com/en-us/library/bb124509.aspx.
Using Exchange Server ActiveSync
Exchange Server ActiveSync is the messaging component of Exchange Server 2010 that
relays messages to mobile devices. Windows Server 2008 and Windows Server 2008 R2 use
Windows Mobile Device Center version 6.1, which is a version of ActiveSync.
You can use the EMS to create a Microsoft Exchange ActiveSync virtual directory in
Microsoft Exchange Server 2010. When Exchange server 2010 is installed, a new ActiveSync
virtual directory named Microsoft-Server-ActiveSync is created in the default Internet
Information Services (IIS) website. You can optionally create additional Exchange Server 2010
ActiveSync virtual directories in websites other than the default website. All the ActiveSync
virtual directories you create have the name Microsoft-Server-ActiveSync.
For example, the following EMS command creates a new ActiveSync virtual directory in the
adatum.com website:
New-ActiveSyncVirtualDirectory -WebSiteName "Adatum.com"
MORE INFO NEW-ACTIVESYNCVIRTUALDIRECTORY
For more information about the New-ActiveSyncVirtualDirectory cmdlet, see http://
technet.microsoft.com/en-us/library/aa997160.aspx.
When you install the Client Access server role on Exchange Server 2010, ActiveSync is
enabled by default, and an ActiveSync virtual directory is created on the Client Access server.
You can then congure the virtual directory using either the EMC or the EMS.
Lesson 3: Monitoring Exchange Connectivity Chapter 9 455
To use the EMC to congure ActiveSync virtual directory properties, open the EMC,
expand the Console tree, and carry out the following procedure:
1. In the console tree under Server Conguration, click Client Access.
2. In the Work pane, click the Exchange ActiveSync tab. Right-click Microsoft-Server-
ActiveSync and click Properties.
3. In the General tab, you can view display-only information about the ActiveSync virtual
directory and set internal and external URLs.
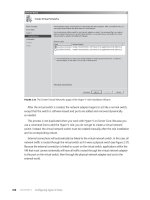
4. On the Authentication tab, shown in Figure 9-29, you can control the authentication
methods for the Exchange ActiveSync virtual directory.
FIGURE 9-29 Authentication methods for the Exchange ActiveSync virtual directory
5. On the Remote File Servers tab, you specify allowed and blocked host names for
ActiveSync clients. This tab also allows you to congure which domains are treated as
internal. You can use the Block List to congure a list of host names of servers to which
clients are denied access and the Allow List to congure a list of host names of servers
on which clients are allowed to access les. The Block list takes precedence over the
Allow list. You can use the Unknown Servers list to specify how to access les from host
names not listed in either the Block list or the Allow list. The default value is Allow. Use
the Enter The Domain Sufxes That Should Be Treated As Internal control to congure
specic host names as internal host names.
You can also use the EMS to congure the Exchange ActiveSync virtual directory
properties. For example, the following command congures the Exchange ActiveSync virtual
456 Chapter 9 Monitoring Exchange Server 2010
directory with Basic authentication and an External URL of
Microsoft-Server-ActiveSync:
Set-ActiveSyncVirtualDirectory -Identity "http://adatum/microsoft-server-activesync"
-BasicAuthEnabled:$true -ExternalURL />The following example congures the Exchange ActiveSync virtual directory with Basic
authentication:
Set-ActiveSyncVirtualDirectory -Identity "adatum\microsoft-server-activesync"
-BasicAuthEnabled:$true
MORE INFO SET-ACTIVESYNCVIRTUALDIRECTORY
For more information about the Set-ActiveSyncVirtualDirectory cmdlet, see http://technet
.microsoft.com/en-us/library/bb123679.aspx.
By default, users are enabled for ActiveSync in Exchange Server 2010. You can disable
Exchange ActiveSync for a user by using the EMC or the EMS.
To use the EMC to disable Exchange ActiveSync for a user, open the EMC and expand
the Console tree, then carry out the following procedure:
1. Click Mailbox under Recipient Conguration in the Console tree.
2. Right-click the user’s mailbox and then click Properties.
3. Click the Mailbox Features tab.
4. Click Exchange ActiveSync and then click Disable.
5. Click OK.
To enable Exchange ActiveSync for a user for whom it has previously been disabled, you
carry out the same procedure except that you click Enable after you have clicked Exchange
ActiveSync.
You can also use the EMS to disable Exchange ActiveSync for a user. The following
command disables Exchange ActiveSync for the mailbox user Don Hall in the Adatum.com
domain:
Set-CASMailbox –Identity -ActiveSyncEnabled $false
To use the EMS to enable Exchange ActiveSync for a user for whom it has previously been
disabled, you would enter a command similar to the following:
Set-CASMailbox –Identity -ActiveSyncEnabled $true
You can restrict access to ActiveSync by using the device ID. This feature prevents users
from synchronizing, for example, unauthorized mobile phones with Exchange Server 2010.
By default, if ActiveSync is enabled for a user, that user can synchronize the Exchange
mailbox with any mobile phone. To restrict a user to a specic mobile phone, you use the
ActiveSyncAllowedDeviceIDs parameter of the Set-CASMailbox cmdlet. For example, the
Lesson 3: Monitoring Exchange Connectivity Chapter 9 457
following command permits Don Hall to synchronize two mobile phones identied by their
device IDs, where these IDs are specied by the variables <DeviceID_01> and <DeviceID_02>”:
Set-CASMailbox -Identity: –Identity -ActiveSyncAllowedDeviceIDs:
"<DeviceID_01>","<DeviceID_02>"
MORE INFO MANAGING EXCHANGE SERVER ACTIVESYNC
For more information about managing Exchange Server ActiveSync, access http://technet
.microsoft.com/en-us/library/bb124396.aspx and follow the links.
MORE INFO SET-CASMAILBOX
For more information about the Set-CASMailbox cmdlet, see />en-us/library/bb125264.aspx.
Quick Check
n
What port do you need to allow through your rewall if you use Outlook
Anywhere?
Quick Check Answer
n
You must allow port 443 because Outlook Anywhere requests use HTTP-over-SSL.
This port may already be opened if you also use, for example, OWA.
Lesson Summary
n
You can use the Telnet tool from a computer that has a Telnet client installed to test
SMTP and ESMTP connectivity on Port 25.
n
EMS commands are available to enable you to display network adapter settings and
test POP3, IMAP4, and MAPI connectivity.
n
You can also use EMS commands to test EWS connectivity and Outlook Anywhere
operability. You can use either the EMC or the EMS to congure Exchange Server
ActiveSync.
Lesson Review
You can use the following questions to test your knowledge of the information in Lesson 2,
“Monitoring Exchange Connectivity.” The questions are also available on the companion CD if
you prefer to review them in electronic form.
NOTE ANSWERS
Answers to these questions and explanations of why each answer choice is correct or
incorrect are located in the “Answers” section at the end of the book.