mcts training kit 70 - 652 70-622 Configuring Microsoft Exchange Server 2010 phần 8 pptx
Bạn đang xem bản rút gọn của tài liệu. Xem và tải ngay bản đầy đủ của tài liệu tại đây (1.69 MB, 92 trang )
Lesson 1: Ensuring Message Integrity Chapter 12 617
S/MIME is a standard for public key encryption and signing of MIME data. S/MIME
provides authentication, message integrity and nonrepudiation of origin (using digital
signatures), and privacy and data security (using encryption).
Before you can use S/MIME for public key cryptography, you need to obtain and install
a certicate either from your organization’s internal certicate authority (CA) or from a
trusted third-party CA. An internal certicate can be used in-house only, as it is not trusted by
external organizations. Typically, S/MIME clients require the installation of a certicate before
permitting users to send encrypted messages.
OWA and S/MIME
A public key infrastructure (PKI) uses digital certicates to verify and authenticate the validity
of each participant in an electronic transaction. You need to install Certicate Services
on a member server in your organization to deploy a Windows PKI. A PKI enables your
organization to publish its own certicates. Clients can request and receive certicates
from a PKI on the internal network, and the PKI can renew or revoke certicates. Chapter 5,
“ Conguring Client Access”; Chapter 6 “Federated Sharing and Role-Based Access Control”;
and Chapter 7, “Routing and Transport Rules” discuss the use of certicates.
OWA users can use S/MIME to encrypt outgoing messages and attachments so that only
intended recipients who have a digital identication (a certicate) can read them. Users
digitally sign a message, which enables its recipients to verify the identity of the sender
and that the message has not been tampered with.
Users must have a digital ID and must install the S/MIME control for OWA before they can
send encrypted and digitally signed messages or read encrypted messages using the OWA
client. The S/MIME control is necessary to verify the signature on a digitally signed message.
It is installed on a client computer by using the SMIME tab in Options. When they use
S/MIME, users have access to features that are not otherwise available in OWA. They can,
for example, do the following:
n
Attach messages to other messages
n
Paste images into messages
n
Attach multiple les in a single operation
However, if the S/MIME control is installed in OWA, WebReady document viewing works
in only clear-signed messages, not in encrypted messages or opaque-signed messages. When
certain content types are sent from Outlook as S/MIME messages, they are not displayed in
OWA. In such cases, OWA displays a banner in the message header. When a user opens a
folder in another mailbox or uses explicit sign-in to open another user’s mailbox, most
S/MIME features are not available. In such cases, the only S/MIME feature that is available is
verication of digital signatures.
MORE INFO WEBREADY DOCUMENT VIEWING
For more information about WebReady document viewing, see rosoft
.com/en-us/library/aa995967.aspx.
618 Chapter 12 Message Integrity, Antivirus, and Anti-Spam
Enabling and Disabling S/MIME in OWA
You can use the Exchange Management Console (EMC) or the Exchange Management
Shell (EMS) to enable or disable S/MIME in OWA. To use the EMC, carry out the following
procedure:
1. Open the EMC and expand the tree in the Console pane.
2. In the console tree, click Client Access under Server Conguration.
3. At the top of the Result pane, click the server that hosts the OWA virtual directory.
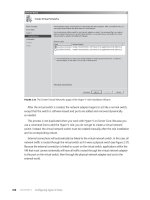
4. On the Outlook Web App tab under the server name, click Owa (Default Web Site).
5. In the Actions pane under Owa (Default Web Site), click Properties.
6. On the Owa (Default Web Site) Properties dialog box, click the Segmentation tab.
7. In the Segmentation window, click the SMime, as shown in Figure 12-1.
FIGURE 12-1 Selecting the SMime feature on the Segmentation tab
8. Click Enable or Disable as appropriate.
9. Click OK to save your changes and close the Properties dialog box.
By default, S/MIME is enabled. To use the EMS to disable S/MIME on the OWA virtual
directory in the default Internet Information Services (IIS) website on the local server, enter
the following command:
Set-OWAVirtualDirectory -Identity "owa (Default Web Site)" -SMimeEnabled $false
Lesson 1: Ensuring Message Integrity Chapter 12 619
To enable S/MIME when it has previously been disabled, enter the following command:
Set-OWAVirtualDirectory -Identity "owa (Default Web Site)" -SMimeEnabled $true
Neither of the previously listed EMS commands generates an output. If the command
completes without error, the change has been made.
MORE INFO SET-OWAVIRTUALDIRECTORY
For more information about the Set-OwaVirtualDirectory EMS cmdlet, see http://technet
.microsoft.com/en-us/library/bb123515.aspx.
Managing S/MIME for OWA
You manage S/MIME for OWA by using the Regedit utility to edit the registry on an
Exchange Server 2010 Client Access server. Changes are made on a per-server basis, and if
you have more than one Client Access server and you need the same S/MIME behavior on
all such servers, you need to make the same changes on each server. Changes to the S/MIME
settings in the registry take effect immediately. Users do not need to sign out or to restart
any services.
The registry settings that control S/MIME behavior on a Client Access server can be found
by accessing the following registry key:
HKLM\System\CurrentControlSet\Services\MSExchange OWA\SMIME
As shown in Figure 12-2, the settings that control S/MIME are not in the registry by
default, and you need to add them. Table 12-1 shows some of the settings you can use.
This list is not exclusive.
FIGURE 12-2 The registry key that holds settings that control S/MIME behavior
620
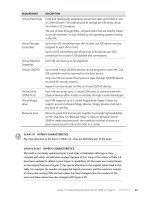
TABLE 12-1 Settings that control S/MIME behavior
NAME AND TYPE VALUES EXPLANATION
CheckCRLOnSend (DWORD) 1=True, 0=False
(default).
If a certicate revocation list (CRL) distribution point in a
sender’s certicate chain cannot be accessed during revocation
verication when sending signed or encrypted email, OWA will
indicate a failure and prevent the email message from being
sent when CheckCRLonSend is set to true.
DLExpansionTimeout (DWORD) A value in
milliseconds. The
default is 60000
(60 seconds); the
range is 0 through
2147483647.
This attribute controls how long OWA waits for a distribution
list in Active Directory to expand when sending encrypted
email before the operation fails. A zero setting disables the
ability to send encrypted email to distribution lists. When this
parameter is set to its maximum value, OWA waits until the
distribution list is expanded regardless of how long expansion
takes.
UseSecondaryProxiesWhenFindingCerticates
(DWORD)
1=True (default),
0=False.
OWA matches a certicate in Active Directory for a recipient
when sending encrypted email. The certicate subject or
subject alternative name can contain a Simple Mail Transfer
Protocol (SMTP) address as one of its values. If the value of
this parameter is set to true, OWA accepts certicates that do
not match the primary SMTP address of the recipient as valid.
If the value is set to false, OWA accepts only certicates that
match the primary SMTP address of the recipient as valid.
CRLConnectionTimeout (DWORD) A value in
milliseconds. The
default is 60000
(60 seconds);
the range is
5000 through
2147483647.
This setting species the time that OWA waits while
connecting to retrieve a single CRL as part of a certicate
validation operation. If the CRL is not retrieved before the
time expires, the operation fails. If the setting is less than
5000, the default value (60000) is used. If the maximum
value is specied, the connection does not time-out.
621
CRLRetrievalTimeout (DWORD) A value in
milliseconds. The
default is 10000
(10 seconds); the
range is 0 through
2147483647.
This setting species the time that OWA waits to retrieve all
CRLs when validating a certicate. If all CRLs are not retrieved
before the specied time expires, the operation fails.
Disable CRL Check (DWORD) 1=True, 0=False
(default).
If true this setting prevents CRLs from being checked while
certicates are being validated. Disabling CRL checking can
decrease the time it takes to validate signatures. However,
it shows revoked email messages signed with revoked
certicates as valid instead of not valid.
AlwaysSign (DWORD) 1=True, 0=False
(default).
If true this setting requires users to digitally sign email
messages when they use OWA with the S/MIME control.
The OWA Options page and the Message Options dialog
box show the “Send signed e-mail” option as selected.
AlwaysEncrypt (DWORD) 1=True, 0=False
(default).
If true this setting requires users to encrypt email when
they use OWA with the S/MIME control. The OWA Options
page and the Message Options dialog box show the “Send
encrypted e-mail” option as selected.
ClearSign (DWORD) 1=True (default),
0=False.
If true this setting requires any digitally signed email
message that is sent from OWA to be clear-signed. If false
this setting causes OWA to use an opaque signature.
IncludeCerticateChainWithoutRootCerticate
(DWORD)
1=True, 0=False
(default).
If this setting is true, signed or encrypted email will include
the full certicate chain, except for the root certicate.
By default, OWA includes only the signing and encrypting
certicates and not their corresponding certicate chains
when sending signed or encrypted email.
622 Chapter 12 Message Integrity, Antivirus, and Anti-Spam
MORE INFO MANAGING S/MIME FOR OWA
For more information about managing S/MIME for OWA, including additional registry
settings you can add to the registry on Client Access servers, see rosoft
.com/en-us/library/bb738151.aspx.
NOTE CLEAR AND OPAQUE-SIGNED EMAIL MESSAGES
Clear-signed email messages are larger than opaque-signed (encrypted) messages,
but they can be opened and read using most email clients, including clients that do not
support S/MIME.
CAUTION
Edits to the registry take effect immediately without requiring conrmation. Take care
when editing the registry.
MORE INFO OWA SECURITY
For more information about OWA security, including other methods of authentication,
see />MORE INFO UNDERSTANDING S/MIME
For general information about S/MIME, see />aa995740(EXCHG.65).aspx.
Using TLS and MTLS
The TLS and MTLS protocols, introduced in Chapter 7, provide encrypted communications
and end-point authentication over network connections such as Internet connections. Server-
to-server connections (for example, connections between SMTP servers on an organizational
internetwork or the Internet) rely on MTLS for mutual authentication. On an MTLS connection,
the server originating a message and the server receiving it exchange certicates from a
mutually trusted CA. The certicates prove the identity of each server to the other.
The TLS protocol provides secure web communications on the Internet or intranets.
It enables clients to authenticate servers and (optionally) servers to authenticate clients. It
provides a secure channel by encrypting communications. However, when TLS is deployed, it
typically provides only condentiality in the form of encryption. Sometimes no authentication
occurs between the sender and the receiver, and sometimes only the receiving server is
authenticated. For example, the Secure Sockets Layer (SSL) protocol, which is the Hypertext
Transfer Protocol (HTTP) implementation of TLS, authenticates only the receiving server.
Lesson 1: Ensuring Message Integrity Chapter 12 623
When using MTLS authentication, on the other hand, each server veries the identity
of the other server by validating a certicate provided by that server. When messages
are received from external domains over veried connections in an Exchange Server 2010
environment, Microsoft Outlook displays a Domain Secured icon. MTLS is a manageable
technology for implementing the various features required for domain security, such
as certicate management, connector functionality, and Outlook client behavior.
In Exchange 2010, Setup creates a self-signed certicate, and TLS is enabled by
default. This enables any sending system to encrypt the inbound SMTP session.
Exchange Server 2010 also attempts to use TLS for all remote connections by default.
All trafc between Edge Transport servers and Hub Transport servers is authenticated
and encrypted using MTLS.
Exchange Server 2010 uses direct trust to authenticate the certicates. Active Directory
is considered a trusted storage mechanism, and the certicate is validated because it is
present in Active Directory or Active Directory Lightweight Directory Services (AD LDS). When
direct trust is used, it does not matter whether the certicate is self-signed or signed by a
CA. When you subscribe an Edge Transport server to the Exchange organization, the Edge
subscription publishes the Edge Transport server certicate in Active Directory for the Hub
Transport servers to validate. The Microsoft Exchange EdgeSync service updates AD LDS with
the set of Hub Transport server certicates for the Edge Transport server to validate.
MORE INFO EDGE SUBSCRIPTIONS AND THE EDGESYNC SYNCHRONIZATION PROCESS
For more information about Edge subscriptions and the EdgeSync synchronization process,
see />Chapter 5 introduced certicates and the Active Directory Certicate Services role. TLS
and MTLS require a certicate for authentication of inbound connections to a front-end
server (for example, an Edge Transport server) and for outbound connections from the Front
End Server. The certicate is provided by the server in response to authentication challenges
from clients or servers that send messages to this server. Each Edge Transport server must
have a certicate for MTLS communication with other servers on the network, in particular
Hub Transport servers.
Inbound Anonymous TLS Certicates
Inbound anonymous TLS certicates can authenticate SMTP sessions between Edge
Transport servers and Hub Transport servers. They can also be used to encrypt SMTP
sessions between Hub Transport servers. In the latter case, where anonymous TLS and the
public keys from certicates are used to encrypt the session between Hub Transport servers,
the Kerberos protocol is used for authentication. When an SMTP session is established, the
receiving server initiates a certicate selection process to determine which certicate to
use in the TLS negotiation. The sending server also performs a certicate selection
process.
624 Chapter 12 Message Integrity, Antivirus, and Anti-Spam
MORE INFO THE SELECTION PROCESS FOR INBOUND ANONYMOUS TLS CERTIFICATES
The selection process for inbound anonymous TLS certicates occurs automatically without
user intervention, and the details are beyond the scope of this lesson. For detailed information
about this process, see
Inbound STARTTLS Certicates
An inbound STARTTLS certicate is selected whenever SMTP hosts request TLS security
when communicating with Edge Transport servers. The requesting host may be any SMTP
host other than the Edge Transport server. Note that SMTP hosts other than Edge Transport
servers requesting TLS security is a feature of the domain security scenario. Domain security
is discussed later in this lesson.
An inbound STARTTLS certicate is also used when SMTP clients, such as Microsoft
Outlook Express, request TLS security when communicating with Hub Transport servers
and when Internet-facing Hub Transport servers request TLS security with Edge Transport
servers. When an SMTP session is established, the receiving server initiates a certicate
selection process to determine which certicate to use in the TLS negotiation.
MORE INFO SELECTING AN INBOUND STARTTLS CERTIFICATE
The selection of an inbound STARTTLS certicate occurs without user intervention and is
beyond the scope of this lesson. For more information, see />en-us/library/bb430748.aspx.
NOTE OUTBOUND CERTIFICATES
When the receiving server requests an inbound STARTTLS certicate, the sending server
also performs a certicate selection process and selects an outbound anonymous TLS
certicate. The selection of outbound anonymous TLS certicates is discussed next.
Outbound Anonymous TLS Certicates
An outbound anonymous TLS certicate is selected for authentication during an SMTP
session between an Edge Transport server and a Hub Transport server. This type of certicate
is also used to encrypt SMTP sessions between Hub Transport servers by using public keys.
When an SMTP session is established, the receiving server initiates a certicate selection
process to determine the outbound anonymous TLS certicate to use in the TLS negotiation.
The receiving server also performs a certicate selection process, as described in the
previous sections of this lesson.
MORE INFO SELECTING AN OUTBOUND ANONYMOUS TLS CERTIFICATE
The selection of an outbound anonymous TLS certicate occurs without user intervention
and is beyond the scope of this lesson. For more information, see rosoft
.com/en-us/library/bb430773.aspx.
Lesson 1: Ensuring Message Integrity Chapter 12 625
Implementing Domain Security
Domain security provides a lower-cost alternative to S/MIME or other message-level
security
solutions. The domain security feature provides a method of managing secured message
paths between business partners over the Internet. After secured message paths are
congured, messages that have successfully traveled over these paths from authenticated
senders are displayed to users as domain secured in the Outlook and OWA interfaces.
Domain security uses MTLS authentication to provide session-based authentication
and encryption. MTLS authentication differs from a typical TLS implementation. When TLS is
implemented, the client veries that the connection securely connects to the intended server
by validating the server’s certicate. The client authenticates the server before transmitting
data. However, the server does not authenticate the session with the client. When MTLS
authentication is used, each server veries the connection with the other server by validating
a certicate provided by that other server—in other words, both the message sender and the
message recipient are validated.
Exchange Server 2010 provides a set of cmdlets that create, request, and manage TLS
certicates. By default, TLS certicates are self-signed. That is, they are signed by their
own creator. In Exchange Server 2010, self-signed certicates are created on the Exchange
server by using the Microsoft Windows Cryptography Application Programming Interface.
Self-signed certicates are considered less trustworthy than certicates generated by PKI or
a trusted third-party CA and are typically used for internal mail only. However, you can use
self-signed certicates to secure email messages from your organization to another Exchange
Server 2010 organization if the receiving organization agrees to install your self-signed
certicates in the trusted root certicate store in each of its inbound Edge Transport servers.
In this case, the self-signed certicates are trusted explicitly.
MORE INFO TRUSTED CERTIFICATES AND DOMAIN SECURITY
For more information about trusted certicates and domain security, see http://technet
.microsoft.com/en-us/library/bb124817.aspx.
Conguring Domain Security
To secure email messages that traverse the Internet, you would typically generate TLS
certicates with a PKI or obtain them from a third-party CA. Suppose, for example, that
you are an Exchange administrator at the Adatum Corporation and you want to congure
Adatum’s Exchange Server 2010 organization to exchange domain-secured email with
its partner organization, NorthWind Traders. You want to ensure that all email messages
sent to and received from NorthWind Traders are protected with MTLS, and you want to
congure domain security functionality so that all mail between the Adatum Corporation
and NorthWind Traders is rejected if mutual TLS cannot be used.
Adatum has an internal PKI that generates certicates. The PKI’s root certicate has
been signed by a trusted third-party CA. NorthWind Traders uses the same third-party
626 Chapter 12 Message Integrity, Antivirus, and Anti-Spam
CA to generate its certicates. Therefore, both organizations trust the other’s root CA. By
default, the public third-party CA is one of the trusted root certicates in the Microsoft
Windows certicate store in the adatum.com domain. Therefore, any client that includes
the same third-party CA in its trusted root store and that connects to Adatum can
authenticate to the certicate presented by Adatum.
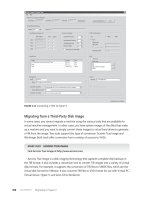
The Edge Transport server VAN-EX2.adatum.com requires a certicate. You therefore
generate a base64-encoded PKCS#10 certicate request on that server by entering the
following commands:
$Data1 = New-ExchangeCertificate -GenerateRequest -FriendlyName "Internet certificate
for VAN-EX2" -SubjectName "DC=com,DC=Adatum,CN=VAN-EX2.adatum.com" -DomainName mail
.adatum.com
Set-Content -Path "C:\Certificates\VAN-EX2-request.req" -Value $Data1
Figure 12-3 shows these commands. Note that the folder C:\Certicates must exist on
VAN-EX2; otherwise, the second command returns an error.
FIGURE 12-3 Generating a certificate request
MORE INFO NEW-EXCHANGECERTIFICATE
For more information about the New-ExchangeCerticate EMS cmdlet, see http://technet
.microsoft.com/en-us/library/aa998327.aspx.
MORE INFO GENERATING A CERTIFICATE REQUEST
For more information about how to create a certicate request, see http://technet
.microsoft.com/en-us/library/ee861120.aspx.
Your next step is to import the certicate and enable it in the trusted certicate store on
the Edge Transport server. Note that you should not use the Certicate Manager snap-in in
the Microsoft Management Console (MMC) to import the certicates for TLS on an Exchange
server because this does not bind the request created in this procedure to the issued certicate.
You can use the Import-ExchangeCerticate EMS cmdlet to import an existing certicate and
private key from a Personal Information Exchange Syntax Standard (PKCS) #12 (.pfx or .p12)
le to the certicate store on the local Edge Transport server. PKCS #12 is a le format used
to store certicates with corresponding private keys protected with a password. The following
command imports and enables the certicate by piping the certicate into the Enable-
ExchangeCerticate EMS cmdlet and starts the SMTP service on the Edge Transport server:
Import-ExchangeCertificate -FileData ([Byte[]]$(Get-Content -Path C:\Certificates\
VAN-EX2-certificate.pfx -Encoding Byte -ReadCount 0)) | Enable-ExchangeCertificate
-Services SMTP
Lesson 1: Ensuring Message Integrity Chapter 12 627
Note that the VAN-EX2-certicate.pfx le must exist in the path specied; otherwise,
the command returns an error.
MORE INFO IMPORT-EXCHANGECERTIFICATE AND ENABLE-EXCHANGECERTIFICATE
For more information about the Import-ExchangeCerticate EMS cmdlet, see http://
technet.microsoft.com/en-us/library/bb124424.aspx. For more information about the
Enable-ExchangeCerticate EMS cmdlet, see />aa997231.aspx.
You next need to congure outbound domain security and verify your settings. Note that
because the changes that you make in outbound domain security are global, you must make
these changes on an internal Exchange Server 2010 server (for example, a Hub Transport
server). The conguration changes you make are replicated to Edge Transport servers by
using the Microsoft Exchange EdgeSync service. The following command species the domain
to which you want to send domain-secured email (in this case northwindtraders.com):
Set-TransportConfig -TLSSendDomainSecureList northwindtraders.com
You then use the Set-SendConnector EMS cmdlet to set the DomainSecureEnabled
property on the Send connector that sends email to this domain. For a Send connector
named Internet and congured for Internet connection, you enter the following command:
Set-SendConnector Internet -DomainSecureEnabled:$true
Neither of these two commands generates an output. If they complete without error, you
have specied a target domain and enabled domain security on the Send connector. Note
that an appropriately congured Send connector named Internet must exist for the second
command to be successful.
The nal step in conguring outbound domain security is to check that the Send connector
you are using to send domain-secured email routes mail using the Domain Name System
(DNS) and that the fully qualied domain name (FQDN) of the Send connector matches
either the Subject Name or the Subject Alternative Name of certicates that you are using for
domain security. To verify the Send connector settings, enter the following command:
Get-SendConnector Internet | FL Name,DNSRoutingEnabled,FQDN,DomainSecureEnabled
Figure 12-4 shows the output of this command. Note that the Fqdn value is shown as
blank. The default value of the Fqdn parameter is $null, which indicates that the actual default
FQDN value is the FQDN of the Edge Transport server that contains the Send connector.
FIGURE 12-4 Verifying the Send connector settings
628 Chapter 12 Message Integrity, Antivirus, and Anti-Spam
MORE INFO SET-TRANSPORTCONFIG, SET-SENDCONNECTOR,
AND GET-SENDCONNECTOR
For more information about the Set-TransportCong EMS cmdlet, see http://technet
.microsoft.com/en-us/library/bb124151.aspx. For more information about the Set-
SendConnector EMS cmdlet, see
For more information about the Get-SendConnector EMS cmdlet, see http://technet
.microsoft.com/en-us/library/bb124553.aspx.
Quick Check
1. Which EMS cmdlet enables you to import an existing certicate and private key
from a PKCS #12 le to the certicate store on the local Edge Transport server?
2. Which EMS cmdlet enables the imported certicate?
Quick Check Answers
1. Import-ExchangeCerticate
2. Enable-ExchangeCerticate
When you have congured and veried outbound domain security, you next need to
congure inbound domain security. To do this, you use the Set-TransportCong EMS cmdlet
to specify the domain from which you want to receive domain-secured email and, on the
Edge Transport server, enable domain security on the Receive connector from which you want
to receive domain-secured email. Because domain security requires MTLS authentication, you
must also enable TLS on the Receive connector. To specify the domain from which you want
to receive domain-secured email, you run the following command on an internal Exchange
Server 2010 server (for example, a Hub Transport server):
Set-TransportConfig -TLSReceiveDomainSecureList northwindtraders.com
Figure 12-5 shows this command entered on the VAN-EX1 Hub Transport server.
FIGURE 12-5 Specifying the domain from which your organization receives domain-secured email
You need to congure the Receive connector on each Edge Transport server that accepts
mail from the domain from which you want to receive domain-secured email—in the
example given, the VAN-EX2.adatum.com Edge Transport server. Assuming that the Adatum
environment is congured to have a single Internet Receive connector, with an Identity
parameter value of Internet on this Edge Transport server, you enable domain security
and TLS by running the following command on the Edge Transport server:
Set-ReceiveConnector Internet -DomainSecureEnabled $true -AuthMechanism TLS
Lesson 1: Ensuring Message Integrity Chapter 12 629
This command generates no output. If it completes without error, you have enabled
domain security on the specied Receive connector.
MORE INFO SET-RECEIVECONNECTOR
For more information about the Set-ReceiveConnector EMS cmdlet, see http://technet
.microsoft.com/en-us/library/bb125140.aspx.
MORE INFO DOMAIN SECURITY
For more information about using MTLS to send secure email between domains,
see
EXAM TIP
The Enable-ServiceEmailChannel cmdlet allows you to enable the .NET service channel for
a specic user. It does not enable domain security or use TLS or MTLS to send secure email
between domains.
Testing Domain-Secured Mail Flow
After you congure domain-secured email, you can test the connection by reviewing
performance counters and protocol logs. Protocol logs were discussed in Chapter 10,
“ Logging and Reports,” and the Exchange Server Performance Monitor and the Performance
Logs and Alerts tool were discussed in Chapter 9, “Monitoring Exchange Server 2010.”
Messages that have successfully authenticated over the domain-secured mail ow path are
displayed in Outlook as domain-secured messages.
You can review the send and receive protocol logs to determine whether TLS negotiation
has been successful. You should set the protocol logging level to Verbose on the connectors
that your organization uses to send and receive domain-secured email. You need to enter the
following command on all Edge Transport servers involved in domain security:
Set-ReceiveConnector Internet -ProtocolLoggingLevel Verbose
To enable protocol logging on the Send connector, you need to enter the following
command on an internal Exchange server, such as a Hub Transport server:
Set-SendConnector Internet -ProtocolLoggingLevel Verbose
Neither of these two commands generates an output. If they complete without error, you
have successfully enabled protocol logging on the specied Receive and Send connectors.
MORE INFO SET-RECEIVECONNECTOR AND SET-SENDCONNECTOR
For more information about the Set-ReceiveConnector EMS cmdlet, see http://technet
.microsoft.com/en-us/library/bb125140.aspx. For more information about the Set-
SendConnector EMS cmdlet, see /> 630 Chapter 12 Message Integrity, Antivirus, and Anti-Spam
MORE INFO PROTOCOL LOGS
For more information about protocol logs, see />bb124531.aspx.
You can use the following performance counters under the MSExchange Secure Mail
Transport object in Exchange Server Performance Monitor to monitor domain security:
n
Domain-Secured Messages Received
n
Domain-Secured Messages Sent
n
Domain-Secured Outbound Session Failures
Figure 12-6 shows these counters.
FIGURE 12-6 Counters associated with the MSExchange Secure Mail Transport object
A counter log le for domain-secured mail ow that logs the values of these counters
using the Performance Logs and Alerts MMC snap-in helps you monitor the number of
messages sent and received and also to monitor failed MTLS sessions.
Quick Check
n
Which EMS command enables domain security and TLS on an Edge Transport
server that has a single Internet Receive connector with an Identity parameter
value of Internet?
Quick Check Answer
n
Set-ReceiveConnector Internet -DomainSecureEnabled $true -AuthMechanism TLS
Lesson 1: Ensuring Message Integrity Chapter 12 631
Conguring Permissions on Active Directory Objects
You can perform functions (for example, allowing one user to send on behalf of another)
and alter Exchange Server 2010 behavior by conguring the permissions on Active
Directory objects, such as user mailboxes, distribution groups, Send connectors, and Receive
connectors. In Chapter 11, “Managing Records and Compliance,” you saw how you could
control read access for message classications by denying Read permission to a message
classication instance for a user mailbox or distribution group.
Adding and Denying Active Directory Permissions
You can use the Add-ADPermission EMS cmdlet to add an Active Directory permission and the
Remove-ADPermission EMS cmdlet to remove such a permission. For example, the
following
command grants Kim Akers the Send As permission to the Don Hall mailbox, allowing Kim
to send mail as Don:
Add-ADPermission -Identity "Don Hall" -User "Kim Akers" -AccessRights ExtendedRight
-ExtendedRights "send as" | FL
The command is piped into the PowerShell Format-List function so that its output can be
seen in more detail. Figure 12-7 shows this output.
FIGURE 12-7 Granting Kim Akers permission to send as Don Hall
The identity parameter species the Active Directory object to which permissions
are being granted (or from which they are being removed). It could, for example, identify
a mailbox, a Receive connector, or a Send connector. If the Active Directory object has
an owner, you can use the Owner parameter to identify this. The User parameter species
the user or group to which the permissions are granted. The AccessRights parameter species
the rights needed to perform the operation. Valid values include the following:
n
CreateChild
n
DeleteChild
n
ListChildren
n
Self
n
ReadProperty
n
WriteProperty
n
DeleteTree
n
ListObject
632 Chapter 12 Message Integrity, Antivirus, and Anti-Spam
n
ExtendedRight
n
Delete
n
ReadControl
n
GenericExecute
n
GenericWrite
n
GenericRead
n
WriteDacl
n
WriteOwner
n
GenericAll
n
Synchronize
n
AccessSystemSecurity
The AccessRights parameter can take the argument ExtendedRight as specied in the above
list. You can specify the extended rights, such as Send As, ms-Exch-SMTP-Submit, ms-Exch-
SMTP-Accept-Any-Recipient, and ms-Exch-Bypass-Anti-Spam, by using the ExtendedRights
parameter. For example, the following command congures the Receive connector
MyReceiveConnector to accept anonymous SMTP messages and bypass the spam lter:
Add-ADPermission "MyReceiveConnector" -User "NT AUTHORITY\ANONYMOUS LOGON" -AccessRights
ExtendedRight -ExtendedRights ms-Exch-SMTP-Submit,ms-Exch-SMTP-Accept-Any-Recipient,
ms-Exch-Bypass-Anti-Spam
Note that the Receive connector MyReceiveConnector must exist on the server on which
the command runs; otherwise, the command returns an error. Note also that you would not
congure a Receive connector in this way unless you had another mechanism in place for
blocking unsolicited email.
You can use the Deny switch to deny a permission to an Active Directory object. For
example, the following command denies the Send As permission on the Don Hall mailbox
to the user Kim Akers:
Add-ADPermission -Identity "Don Hall" -User "Kim Akers" –Deny -AccessRights
ExtendedRight -ExtendedRights "send as"
EXAM TIP
Bear in mind that denying a permission is not the same as removing it. If an Active
Directory permission is removed, the user no longer has the permission granted through
this mechanism but may have the permission because of, for example, membership of
a distribution group that has been allocated that permission. If a permission is denied to
a user, the user cannot be allocated this permission through a group membership. The
Deny setting overrides any allocation of the denied permission by any other means.
MORE INFO ADD-ADPERMISSION
For more information about the Add-ADPermission EMS cmdlet, see http://technet
.microsoft.com/en-us/library/bb124403.aspx.
Lesson 1: Ensuring Message Integrity Chapter 12 633
Removing a Permission and Obtaining Permission Details
You can remove a permission by using a command based on the Remove-ADPermission EMS
cmdlet. For example, the following command removes the permissions that enable the Receive
connector MyReceiveConnector to accept anonymous SMTP messages and bypass the spam lter:
Remove-ADPermission "MyReceiveConnector" -User "NT AUTHORITY\ANONYMOUS LOGON"
-AccessRights ExtendedRight -ExtendedRights ms-Exch-SMTP-Submit,ms-Exch-SMTP-Accept-Any
-Recipient,ms-Exch-Bypass-Anti-Spam
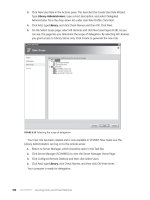
Figure 12-8 shows the output from this command. You need to conrm your action unless
you set the Conrm parameter to false in the command by using the syntax –Conrm:$false.
FIGURE 12-8 Removing Active Directory permissions
You can discover the Active Directory permissions that have been set on an object by
using a command based on the Get-ADPermission EMS cmdlet. For example, the following
command lists the permissions set on the Don Hall mailbox:
Get-ADPermission –Identity "Don Hall" | FL > C:\"Don Hall Permissions"
This command generates a large volume of information, and its output has therefore been
redirected into a text le named “Don Hall Permissions.” Figure 12-9 shows a portion of this
text le.
FIGURE 12-9 Some of the permissions set on the Don Hall mailbox object
634 Chapter 12 Message Integrity, Antivirus, and Anti-Spam
MORE INFO REMOVE-ADPERMISSION AND GET-ADPERMISSION
For more information about the Remove-ADPermission EMS cmdlet, see http://technet
.microsoft.com/en-us/library/aa996048.aspx. For more information about the Get-
ADPermission EMS cmdlet, see />Quick Check
n
Which EMS command congures the Receive connector MyReceiveConnector
to accept anonymous SMTP messages and bypass the spam lter?
Quick Check Answer
n
Add-ADPermission “MyReceiveConnector” -User “NT AUTHORITY\ANONYMOUS
LOGON” -AccessRights ExtendedRight -ExtendedRights ms-Exch-SMTP-Submit,
ms-Exch-SMTP-Accept-Any-Recipient,ms-Exch-Bypass-Anti-Spam
Rights Management Services Federation
In Chapter 7, you looked at Active Directory Rights Management Services (AD RMS), and saw
how Information Rights Management (IRM) makes use of AD RMS. AD RMS can be used in a
federated environment, where a user from an organization that is part of the federation can
access and decrypt messages sent by a user in another organization that are protected using
an RMS template either through IRM or through a transport protection rule, where the other
organization is also a member of the federation. The user in the rst organization does not
need to log on to the second organization’s domain or provide additional credentials in order
to gain access to this protected trafc. The technology that provides this facility is AD FS.
AD FS is a single sign-on (SSO) technology that is often described as a limited trust
relationship. The AD FS service provides external support for the internal identity and access
services that Active Directory Directory Services (AD DS) requires and extends the authority of
your internal network to external networks. In other words, AD FS lets you use the credentials
required to log on to your own organization to access information (both protected les
and protected email) held in another organization that is part of the same federation. In this
section, you learn how AD FS authenticates a user, how you install and congure the service,
and how you manage the trusts and certicates it requires.
Understanding AD FS
AD FS allows users of external web-based applications (for example, OWA) to access and
authenticate through a browser. It relies on the internal authentication store of the user’s
own domain to authenticate a client and does not have a store of its own. It also relies
on the original authentication that clients perform in their own networks and passes this
authentication to web applications that are AD FS enabled. AD FS federates a user’s internal
AD DS identity and submits it to external networks. Users need to authenticate only once.
Lesson 1: Ensuring Message Integrity Chapter 12 635
For example, David Hamilton, Nancy Anderson, and Jeff Hay buy supplies for Wingtip Toys
from World Wide Importers, an organization with which their company has a long-standing
relationship. David, Nancy, and Jeff need to log on to web applications at World Wide
Importers. Employees at World Wide Importers need to be able to add David, Nancy, and Jeff
to distribution lists that otherwise contain only World Wide Importers employees and send
David, Nancy, and Jeff email messages that have their content protected by an RMS template.
World Wide Importers have user name and password policies that are different from those
at Wingtip Toys. If no federation mechanism were in place, David, Nancy, and Jeff would need
to log on to the World Wide Importers domain as if they were employees and remember
two sets of login names and passwords, which regularly change. AD FS allows Wingtip Toys
and World Wide Importers to set up a partnership so that David, Nancy, and Jeff can log
on to these web applications and decrypt protected World Wide Importers internal email
messages using their Wingtip Toys credentials. They are not required to log in twice and
remember two user names and two passwords in order to do their job.
Unlike forest trusts, AD FS does not use Lightweight Directory Application Protocol
(LDAP) ports but rather the common HTTP ports, specically port 443, so that all AD FS trust
communications can be secured and encrypted. AD FS relies on Active Directory Certicate
Services (AD CS) to manage certicates for each server in the AD FS implementation. AD FS
can extend AD RMS deployment and provide federation services for intellectual property
management between partners.
AD FS provides extensions to internal forests and enables your organization to create
partnerships without needing to open any additional ports on its rewall. It relies on each
partner’s internal AD DS directory to provide authentication for extranet or perimeter
services. When a user attempts to authenticate to an application integrated to AD FS, the
AD FS engine polls the internal directory for authentication data. Users who have access
provided through the internal directory are granted access to the external application. This
means that each partner needs to manage authentication data only in its internal network.
The federation services of AD FS do all the rest.
Forming Business-to-Business Partnerships
You can use AD FS and RMS Federation to form business-to-business (B2B) partnerships.
In this arrangement, partners can be account or resource organizations (or both). These
can be described as follows:
n
Account organizations Manage the accounts used to access shared resources
and decrypt protected email messages in SSO scenarios. Account organizations join
partnerships created by resource organizations and access resources (including email)
in these organizations.
n
Resource organizations Form the partnerships in SSO scenarios. An organization
that has resources (such as a collaboration website) can use AD FS to simplify the
authentication process to these resources by forming partnerships that account
organizations then join. The organization that initially forms the partnership is deemed
the resource organization because it hosts the shared resources in its perimeter network.
636 Chapter 12 Message Integrity, Antivirus, and Anti-Spam
In the example given earlier, David, Nancy, and Jeff are logged on to the Wingtip Toys
forest and can access web applications and protected email messages at World Wide
Importers without needing to supply additional credentials. In this case, Wingtip Toys is
the account organization (or account partner), and World Wide Importers is the resource
organization (or resource partner).
AD FS uses claims, cookies, and certicates to implement a federated B2B partnership.
Using Claims in AD FS
A claim is a statement that the federation server makes about a user or client. Claims are
stored as AD DS attributes that each partner in an AD FS relationship attaches to its user
accounts. They can be based on several different values, such as user names, certicate keys,
membership of security groups, and so on. Claims are included in the signed security token
that AD FS sends to the web application and are used for authorization. They can be based
on user identity (the identity claim type) or on security group membership (the group claim
type). Claims can also be based on custom information (the custom claim type), such as a
custom identication number (for example, employee number or bank account number).
MORE INFO AD FS CLAIMS
For more information on AD FS claims, see />cc730612.aspx.
Using Cookies in AD FS
User browsers hold cookies that are generated during web sessions authenticated through
AD FS. AD FS uses authentication cookies, account partner cookies, and sign-out cookies.
When a user is authenticated through AD FS, an authentication cookie is placed within the
user’s browser to support SSO for additional authentications. This cookie includes all the
claims for the user. It is a session cookie and is erased after the session is closed.
The AD FS process writes an account partner cookie when a client announces its account
partner membership during authentication, so it does not need to perform partner discovery
again the next time the client authenticates. An account partner cookie is long-lived
and persistent.
Each time the federation service assigns a token, it adds the resource partner or target
server linked to the token to a sign-out cookie. The authentication process uses sign-out
cookies for various purposes, such as for cleanup operations at the end of a user session.
A sign-out cookie is a session cookie and is erased after the session is closed.
MORE INFO AD FS COOKIES
For more information on AD FS cookies, see />cc770382.aspx.
Lesson 1: Ensuring Message Integrity Chapter 12 637
Using Certicates in AD FS
AD FS communications must be encrypted at all times, and this requires several certicate
types. The type of certicate required by the role depends on its purpose.
A federation server requires both a server authentication certicate and a token-signing
certicate. In addition, the trust policy requires a verication certicate. The server
authentication certicate is an SSL authentication certicate that is typically requested
and installed through IIS Manager.
A token-signing certicate is made up of a private key and a public key pair. When a
federation server generates a security token, it digitally signs the token with its token-signing
certicate. A verication certicate is used during the verication process that takes place
between servers when there is more than one federation server in a deployment. It contains
only the public key of the token-signing certicate.
A federation service proxy requires a server authentication certicate to support
SSL-encrypted communications with web clients. It also needs a client authentication
certicate (known as a federation service proxy certicate) to authenticate the federation
server during communications. Both private and public keys for this certicate are stored on
the proxy. The public key is also stored on the federation server and in the trust policy. A web
server hosting the AD FS web agent also requires a server authentication certicate to secure
its communications with web clients, typically federation servers.
NOTE CERTIFICATES AND OUTWARD-FACING ROLES
Many AD FS roles are outward facing. Therefore, your certicates should be from a trusted
CA. If you use Active Directory–generated certicates, you need to modify the Trusted CA
store on each web client. AD FS relies on AD CS to manage these certicates.
MORE INFO AD FS CERTIFICATES
For more information on AD FS certicates, see />cc730660.aspx.
Quick Check
n
Which claim types does AD FS support?
Quick Check Answer
n
AD FS supports three claim types:
•
Identity claims. These can be user principal name, email address,
or common name.
•
Group claims. These consist of membership in specic distribution
or security groups in AD DS.
•
Custom claims. These can include custom information, such as a user’s bank
account number.
638 Chapter 12 Message Integrity, Antivirus, and Anti-Spam
AD FS Role Services
Federated identity is the process of authenticating a user’s credentials across multiple
information technology systems and organizations. Identity federation enables users in one
domain to securely access data or systems of another domain by using SSO. AD FS relies on
the following role services to support identity federation:
n
Federation Service A server running the federation service (a federation server)
routes authentication requests to the appropriate source directory to generate security
tokens for the user requesting access. Servers that share a trust policy use this service.
n
Federation Service Proxy A federation server relies on a proxy server located in the
perimeter network to obtain authentication requests from a user. The proxy collects
authentication information from the user’s browser through the WS-Federation Passive
Requestor Prole and passes it on to the federation service.
n
Windows Token-Based Agent A Windows token-based agent converts an AD FS
security token into an impersonation-level Windows NT access token that is recognized
by applications that rely on Windows authentication rather than web-based
authentication.
n
Claims-Aware Agent A claims-aware agent on a web server initiates queries of
security token claims to the federation service. Each claim is used to grant or deny
access to a given application. For example, ASP.NET applications that examine
the various claims contained in the user’s AD FS security token are claims-aware
applications, as is AD RMS.
MORE INFO AD FS
For more information about AD FS and the enhancements introduced by Windows Server
2008, access and follow the links.
AD FS Congurations
AD FS supports three congurations (or architectural designs) depending on the type of B2B
partnership you need to establish. Each supports a particular partnership scenario. These
architectural designs are as follows:
n
Federated Web SSO This deployment scenario typically spans several rewalls. It links
applications contained within an extranet in a resource organization to the internal
directory stores of account organizations. The federation trust is the only trust used in
this model. A federation trust is a one-way trust from the resource organization to the
account organization(s).
MORE INFO Federation trusts
For more information about federation trusts, see />library/cc770993.aspx.
Lesson 1: Ensuring Message Integrity Chapter 12 639
n
Web SSO This is deployed when all users of an extranet application are external.
It allows users to authenticate using SSO to multiple web applications. It relies on
multihomed web servers that are connected to both the internal and the external
network and that are part of the AS DS domain. The Federation Service Proxy is
also multihomed to provide access to both the external and the internal network.
n
Federated Web SSO with Forest Trust In this model, a forest trust is established
between an external forest in the perimeter network and an internal forest.
A federation trust is also established between the resource federation server located
within the perimeter and the account federation server located in the internal network.
Internal users have access to the applications from both the internal network and the
Internet, whereas external users have access to the applications only from the Internet.
The most common scenarios are Web SSO and Federated Web SSO. Ideally, all members
of an identity federation deployment have their own AD DS directory and act as account
organizations to simplify the deployment strategy.
AD FS Authentication
When an AD FS partnership is in place, users can log on transparently to external web
applications included in the partnership. In a typical AD FS email scenario, a user receives
and attempts to open a protected email message across an extranet. AD FS automatically
provisions the user’s credentials and outlines the claims included in the user’s AD DS account
attributes. Figure 12-10 illustrates the process.
FIGURE 12-10 AD FS authentication
640 Chapter 12 Message Integrity, Antivirus, and Anti-Spam
A more detailed high-level description of the process is as follows:
1. A user attempts to open a protected email message in an extranet.
2. The claims-aware agent on the Exchange server contacts a resource federation server
(RFS) in the resource organization through a federation service proxy (FSP).
3. The RFS accesses an account federation server (AFS) in the account organization’s
internal network, again through a proxy, to identify the user’s access rights.
4. The AFS obtains access rights from AD DS through an LDAP query. These access rights
are listed in the form of claims linked to the user’s account object in AD DS.
5. The AFS generates the user’s AD FS security token. This includes the claims linked in
the user’s AD DS account. Security tokens also identify the user and include the AFS
digital certicate.
6. The AFS contacts the RFS through the proxy server and sends the
security token.
7. The RFS decrypts the token and extracts the user’s claims. It lters them depending
on the access requirements of the protected message and generates a signed security
token. The signature for the token is based either on the RFS digital certicate or
on a Kerberos session key.
8. The signed security token is sent to the Exchange server in the resource organization’s
extranet. The claims-aware agent decrypts the token and grants access to the
protected message based on the claims in the token. A local authentication cookie is
generated in the user’s browser so that the process is not repeated if the user needs
to authenticate again during this session.
MORE INFO FEDERATING RMS
For more information about RMS Federation, see />library/ee256071(WS.10).aspx.
Quick Check
1. What are the four role services and features that make up the AD FS server role?
2. What are the three AD FS architectural designs?
Quick Check Answers
1. AD FS includes the following role services:
n
The federation service provides the core AD FS functionality. It manages
resource access, claims ltering, and security token generation.
n
The federation service proxy is an Internet relay that passes requests on
to internal federation service servers.
Lesson 1: Ensuring Message Integrity Chapter 12 641
n
The Windows token-based agent supports the integration of
Windows applications to AD FS processes.
n
The claims-aware agent supports the integration of web applications with
AD FS processes.
2. AD FS supports three architectural designs: Federated Web Single-Sign-On,
Web SSO, and Federated Web SSO with Forest Trust.
Conguring AD FS
Servers in an AD FS relationship rely on certicates to create a chain of trust and ensure
that all trafc transported over the relationship is encrypted at all times. To ensure that the
chain of trust is valid and trusted in all locations, you can obtain certicates from a trusted
third-party CA or through the creation of a linked implementation of AD CS that uses
a trusted third-party CA as its root.
When you deploy AD FS, you need to congure AD FS–aware applications, trust policies
between partner organizations, and claims for your users and groups. After you install
and deploy AD FS, you need to carry out the following conguration tasks:
n
Congure the web service on each AD FS server to use SSL/TLS encryption
on the website that hosts the AD FS service.
n
Congure IIS on servers that host claims-aware applications.
n
Export certicates from each server and import them on the other servers
in the relationship.
n
Create and congure the claims-aware applications you are hosting.
n
On the federation servers in both account and resource organizations, congure the
trust policy, create claims for users, and congure the AD DS account store for identity
federation. In a resource organization, you also then enable the claims-aware applications.
n
Create the federation trust to enable identity federation by exporting the trust policy
from the account organization and importing it into the resource organization,
creating and conguring a claim mapping in the resource organization, and exporting
the partner policy from the resource organization so that you can import it into the
account organization.
Much of the conguration process involves certicate mapping from one server to
another. You need to be able to access the certicate revocation lists (CRLs) for each
certicate. CRLs indicate to a member of a trust chain whether a certicate is valid.
In AD FS, CRL checking is enabled by default. Typically, CRL checking is performed
for security token signatures, but it is good practice to rely on it for all digital
signatures.