Photoshop CS4 for Dummies phần 10 pps
Bạn đang xem bản rút gọn của tài liệu. Xem và tải ngay bản đầy đủ của tài liệu tại đây (2.54 MB, 40 trang )
Source panel and select the Show Overlay option. The source frame appears
as an overlay on the destination frame (see Figure 17-7).
Figure 17-7: Show Overlay is very handy when cloning from frame to frame.
If the Layer➪Video Layers menu is grayed out, open the Animation panel’s
menu and select Convert to Timeline or click the button in the lower-right
corner of the Animation panel to toggle from the panel’s Frame Animation
mode. Keep in mind, however, that converting the panel also converts any
active video clips. Converting a video clip to frame-based animation uses only
the keyframes, not all frames. If you want to generate a frame-based animation
using all frames, choose File➪Import➪Video Frames to Layers (see Figure 17-8).
Figure 17-8: You can import video as a frame-based animation.
363
Chapter 17: Introducing Photoshop CS4 Extended
24 327258-ch17.qxp 8/20/08 7:05 PM Page 363
364
Part IV: Power Photoshop
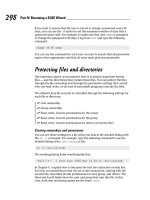
Measuring, Counting, and Analyzing Pixels
Designed for researchers and scientists, the measuring capabilities in
Photoshop CS4 Extended are quite powerful. You can measure just about any-
thing and count the number of whatevers in a technical image, perhaps from a
microscope or telescope.
Measuring length, area, and more
If you know the exact size of any element in an image, you can then discover
just about anything you want to know about anything else in that image. The
key is to set the measurement scale, as shown in Figure 17-9.
Figure 17-9: Drag a known distance; set the measurement scale.
In this example, we know the knee is 2.5 inches wide, and we can see in the
Options bar that the Ruler tool (nested in the Toolbox with the Eyedropper)
was Shift+dragged over 138 pixels. We can, therefore, set the scale to 138
pixels = 2.5 inches. Now, using any selection tool or the Ruler tool, we can
24 327258-ch17.qxp 8/20/08 7:05 PM Page 364
isolate any part of the image, click the Record Measurements button in the
Measurement Log panel (which you open, like any panel, through the
Window menu), and we find out more than we ever wanted to know about
that particular selection.
In addition to various sizes, the Measurement Log also records information
about the color or gray values in the image (see Figure 17-10). You can also
add the measurement scale to the image (as an editable layer group) with the
Analysis➪Scale Marker command.
Figure 17-10: The Measurement Log panel records so much info, it’s shown here in two
sections.
After you have made and recorded all the various measurements you need,
you can select all the lines in the Measurement Log (or only a few) and click
the third button in the upper-right corner of the panel to export the data for
use in a spreadsheet program.
Photoshop CS4 Extended also offers measurement in perspective through
Vanishing Point. Suppose, for example, that for some reason or other you need
to calculate how much wallpaper to order for the room shown in Figure 17-11.
You know the height of the window (70 inches) and, using that as your known
measurement, you can have Photoshop calculate the height and length of
each wall.
365
Chapter 17: Introducing Photoshop CS4 Extended
24 327258-ch17.qxp 8/20/08 7:05 PM Page 365
366
Part IV: Power Photoshop
Figure 17-11: Measurements can also be made in perspective with Vanishing Point.
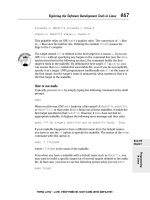
Counting crows or maybe avian flu
Nested with the Ruler tool and the Eyedroppers in the Toolbox is the Count
tool. Zoom in and start clicking on whatever it is that you need to count,
whether it’s birds in the sky or viruses on a slide. Each item you click is labeled
with a number. If you want to record the count (shown in the Options bar and
on-screen as the most recent number), click the Record Measurements button
in the Measurement Log (shown in Figure 17-12).
New in Photoshop CS4 are Count Groups. You can now record and work with
multiple counts. To the right of the Count Groups menu in the Options bar
(see Figure 17-12) are buttons to show/hide the currently-selected count
group, to start a new count group, and to delete the current count group.
Click the color swatch in the Options bar to select a new color for the count
group, and you can customize both the size of the circle that marks the count
and the marker number — individually for each count group.
(Don’t you love the way that Warning symbol in the margin catches your eye?)
Adjust the marker and label sizes before you start clicking around in your
image with the Count tool — changing the size after placing your count mark-
ers can shift them in the image window, destroying your meticulous placement.
24 327258-ch17.qxp 8/20/08 7:05 PM Page 366
Figure 17-12: Click on each item and Photoshop keeps a running tally for you.
Ignoring MATLAB, DICOM, and Other Initials
Photoshop CS4 Extended offers all of these interesting features for scientists,
researchers, and technicians, so it only makes sense that it should work with
some of the file formats they actually use and integrate with their software.
When you come across the term MATLAB in Photoshop CS4 Extended, recog-
nize it as a software environment (sort of like a programming language) that
speeds calculations and helps coordinate work in various technical pro-
grams. Unless you actually work with MATLAB, say in a research lab, there’s
nothing else you really need to know. (If you’re intrigued by the idea, visit
www.mathworks.com.)
Another set of initials in Photoshop CS4 Extended might be of interest: DICOM
(Digital Imaging and COmmunication in Medicine). If your doctor’s office, hos-
pital, or lab has sent you home with a CD that contains the results of your CAT
scan, MRI, ultrasound, or X-rays, you can open the files and take a look right in
Photoshop. Copy the files to your hard drive. (Don’t open files into Photoshop
directly from CD or DVD.) Choose File➪Open, and in the Open dialog box,
select the frames in which you’re interested, and click Open. In the dialog box
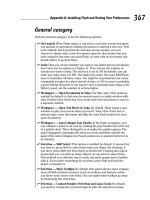
that opens (shown in Figure 17-13), select the frames, elect to open as layers in
an image or in a grid pattern (N-Up), and open. (You can also use Photoshop’s
File➪Place command to add a DICOM image to an existing image.)
367
Chapter 17: Introducing Photoshop CS4 Extended
24 327258-ch17.qxp 8/20/08 7:05 PM Page 367
368
Part IV: Power Photoshop
Figure 17-13: Review medical imagery right in Photoshop CS4 Extended.
24 327258-ch17.qxp 8/20/08 7:05 PM Page 368
Part V
The Part of Tens
25 327258-pp05.qxp 8/20/08 7:06 PM Page 369
In this part . . .
D
on’t get nervous — this is The Part of Tens
and not The Part of Tense!
In Chapter 18, I present you with ten of my favorite
Photoshop tricks and techniques. Chapter 19
contains a list of a mere ten of the hundreds of
reasons why working with a Wacom Cintiq display
or Intuos drawing tablet can make your work in
Photoshop more efficient — and even help you
avoid at least one common computer-related
disability.
Chapter 20 provides you with ten reasons to shoot
digitally. If you already own and use a digital
camera, read it anyway for some tips. And then
loan it to an analog colleague.
25 327258-pp05.qxp 8/20/08 7:06 PM Page 370
18
Pete’s Top Ten Favorite Photoshop
Tips and Tricks
In This Chapter
ᮣ Playing with artistic and creative tricks
ᮣ Exploring a few useful tips
I
have literally thousands of Photoshop tips and tricks to share with you,
but space here allows for only ten. Actually, just about anything you do
that doesn’t use Photoshop’s default values or presets could be considered a
tip or a trick. However, you’re likely interested in creative and productive
shortcuts rather than something like this: Save copies of your custom brushes,
styles, and other such bits and pieces somewhere other than the Photoshop
folder so you don’t lose them should you ever need to reinstall the
program. (Oops! I snuck in an extra tip, didn’t I?)
In this chapter, I present ten of my favorite creative and
useful techniques. Some of these tricks I developed
while helping solve problems in my role as Help Desk
Director for the National Association of Photoshop
Professionals (NAPP), and others are tried-and-true
helpers that have been around for years.
Adding Artistic and Creative Effects
Surely you’d prefer to read Fill a layer with brown, use
the Add Noise filter (Gaussian Distribution, Monochrome),
and then apply a Motion Blur filter to create a wood grain effect
rather than If you need to apply a grayed-out filter to a CMYK image,
apply it to one channel, and then the other three individually using Ô+F/Ctrl+F.
(Now, don’t consider those to be tips or tricks — remember that the chapter
title says “Ten”!) Here are some of my favorite and most useful creative tips.
26 327258-ch18.qxp 8/20/08 7:07 PM Page 371
372
Part V: The Part of Tens
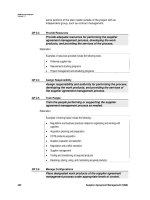
Smoothing skin perfectly
When you see glamour shots — you know, photos of The Beautiful People
who look so absolutely perfect — one of the things you’re not seeing is the
texture of the skin. No wrinkles. No creases. No pores? Indeed, the skin
appears to be perfectly smooth (see Figure 18-1).
© 2003PhotoSpin, PhotoSpin image #1150039
Figure 18-1: Use the Healing Brush and a plain-color source area to smooth skin.
Here’s how you can achieve that effect without blurring:
1. Open a copy of your image.
Whenever you use a technique that makes permanent changes to the
pixels in your image, you should work on a copy. That preserves the orig-
inal image, which not only protects you from any errors that you (or
Photoshop) might make but also keeps that original for different tech-
niques and tricks in the future. (Does that count as a tip?)
2. Add a new layer by clicking the New Layer button in the Layers panel.
3. Make a selection.
The selection should be away from the face area, and sized at least one-
half the width and height of the face.
4. Fill the selection with color; then deselect.
Press Option+Delete (Mac)/Alt+Backspace (Windows) to fill it with the
foreground color (it doesn’t matter what color).
26 327258-ch18.qxp 8/20/08 7:07 PM Page 372
5. Select the Healing Brush and set the source point.
Make sure that the Sample: All Layers option is selected in the Options
bar and that Aligned is deselected. Option/Alt+click in the center of the
filled selection.
6. Paint over the skin.
In the Layers panel, click on the lower layer, the original image layer, to
make it active. Click and drag with the Healing Brush to smooth areas of
skin. The Healing Brush replaces the texture of the skin (pores and all)
with the texture of the source area (smooth). Use short strokes that
follow the contour of the face. Make sure that you don’t paint over eye-
brows, nostrils, lips, and other areas of critical detail.
From a photo to a painting
You have dozens of ways to create a “painterly” effect in Photoshop. Here’s
one of my favorites, as illustrated by Figure 18-2.
Figure 18-2: Blur shadows, sharpen highlights, and add texture for a “painterly” effect.
373
Chapter 18: Pete’s Top Ten Favorite Photoshop Tips and Tricks
26 327258-ch18.qxp 8/20/08 7:07 PM Page 373
374
Part V: The Part of Tens
1. Open a copy of your image as a Smart Object.
Choose File➪Open as Smart Object or, if the image is already open,
choose Layer➪Smart Objects➪Convert to Smart Object. When working
with Smart Filters, you can later — if necessary — re-open the filter and
change the settings.
2. Select the shadows and blur.
Open the Channels panel and Ô/Ctrl+click the RGB channel at the top to
make a selection according to the brightness of each pixel. Use the
shortcut Ô+Shift+I/Ctrl+Shift+I to invert the selection (select shadows
rather than highlights). Apply a slight Gaussian Blur, perhaps 1 or 2
pixels, to blur detail in the darker areas. (Remember that you can use
the shortcut Ô+H/Ctrl+H to hide the “marching ants” and make the
selection border disappear — and that’s not yet another tip!)
3. Select the highlights and sharpen.
You need to reselect the highlights, so again Ô/Ctrl+click the RGB chan-
nel at the top. Apply the Sharpen➪Smart Sharpen filter with initial set-
tings of Amount: 200% and Radius: 2 pixels. (Adjust the values to match
the content of your image and your artistic vision.)
4. Add a canvas texture to the image.
Don’t deselect (so that the texture will be applied a bit more promi-
nently to the image’s highlights than to the shadows). Use the
Texture➪Texturizer filter to add a slight canvas texture, enhancing the
painterly effect.
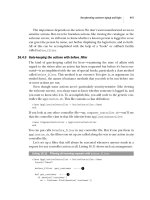
Creating a sketch from a photo
Simulating a painting in Photoshop is great, but sometimes you might need
line art or a sketch. Photoshop has a couple of filters that do a nice job of cre-
ating pencil sketches, but none of them really do a great job with outlines.
Here’s an easy way to create line art from a photo (see Figure 18-3).
1. Open a copy of your image and create a Smart Object.
Again, open your image as a Smart Object or convert with the command
Layer➪Smart Objects➪Convert to Smart Object before. When working
with Smart Filters, you can later — if necessary — re-open the filter and
change the settings.
2. Apply the Smart Blur filter.
Set the filter to Quality: High and Mode: Normal. Use settings that
remove all the tiny detail in your image (such as pores and individual
hairs or blades of grass) but maintain edges and major detail (such as
eyes, noses, golf balls, and trees).
26 327258-ch18.qxp 8/20/08 7:07 PM Page 374
3. Define edges with Smart Blur.
Reopen the Smart Blur dialog box and set the Mode pop-up menu to
Edge Only. Adjust the sliders until the white-on-black preview shows
approximately the amount of detail you want in the final image; then
click OK.
4. Invert the colors.
Using the button at the bottom of the Layers panel or the Layer➪New
Adjustment Layer menu, add an Invert adjustment layer. (Not only is it a
good idea to use adjustment layers rather than adjustment commands,
but you’ll find that you can’t use most adjustment commands with Smart
Objects.)
5. Blur the lines.
Click the Smart Object layer again in the Layers panel to make it active
and apply a 1- or 2-pixel Gaussian Blur to soften the edges of the lines.
6. Adjust the thickness of the lines with a Levels adjustment layer.
In the Levels dialog box, drag the middle slider control left and right
until you’re satisfied with the image’s appearance. If desired, you can
further refine the sketch with the Sharpen➪Unsharp Mask filter.
© 2003PhotoSpin, PhotoSpin image #0990140
Figure 18-3: You can use the versatile Smart Blur filter to produce
line art from a photo.
375
Chapter 18: Pete’s Top Ten Favorite Photoshop Tips and Tricks
26 327258-ch18.qxp 8/20/08 7:07 PM Page 375
376
Part V: The Part of Tens
Creating snow or rain
Here’s a multi-use technique that you
can use to create falling snow or rain
(as shown in Figure 18-4):
1. Add a new layer to your image
by clicking the New Layer
button in the Layers panel.
2. Still in the Layers panel, change
the layer’s blending mode from
Normal to Screen.
Because this technique uses a
separate layer, you can consider
it to be nondestructive (you can
always delete the layer later), so
you don’t have to work on a copy
of your image. But it’s always a
good idea to work on a copy, just in case.
3. Choose Edit➪Fill to fill the layer with black.
Because the layer’s blending mode is Screen, you won’t see the black fill.
4. Add Noise to the layer.
Use the Noise➪Add Noise filter to add some variation to the layer. Use
Amount: 20%, Distribution: Gaussian, and mark the Monochromatic
check box.
5. Enlarge the noise with the Crystallize filter.
Use the Pixelate➪Crystallize filter to turn the little noise into larger
chunks. Use Cell Size: 3 for small snow or rain; try 7 or 10 for larger
flakes. You can also apply a slight Gaussian Blur to increase the size.
6. Sharpen the edges.
Using the Unsharp Mask filter, sharpen until the snowflakes have distinct
edges. Use Amount: 100%, Radius: 2, Threshold: 0. When you create rain,
use Amount: 40%.
7. Apply a Levels adjustment.
In the Levels dialog box, drag the middle slider about halfway to the left;
then drag the left slider slowly to the right until you see the amount of
snow or rain that you want. Afterward, if desired, you can apply the
Motion Blur filter to the falling snow/rain. And, of course, you can add a
layer mask to control visibility.
Figure 18-4: Use the Noise and Crystallize
filters to produce snow or rain.
26 327258-ch18.qxp 8/20/08 7:07 PM Page 376
The Glass Text effect
Perfect for adding a large copyright notice right across the center of your
image (while allowing the image’s beauty to still show through), this tech-
nique is so easy it doesn’t even need a step-by-step explanation. Simply type
your copyright info or any other text and add a Bevel and Emboss layer style
(perhaps with a slight Inner Shadow and maybe a 1-pixel black Stroke effect).
Then, at the top of the Layers panel, reduce the Fill slider (not the Opacity
slider) to 0 (zero). The pixels on the layer become transparent, but the layer
style remains visible.
Useful Tricks to Make Life Easier
Here are five techniques that make life easier and your work look snappier
and more professional.
Changing product colors in a snap
Use the Replace Color feature (in the
Image➪Adjustments menu) to
quickly and easily make variations
of a single image by changing color.
Replace Color is especially handy in
production environments, letting
you shoot one shot and produce
numerous color variations. (See
Figure 18-5.)
Open Replace Color and Shift+drag
the Eyedropper tool through the
color you want to change. Adjust the
Fuzziness slider to fine-tune the selection; then adjust the Hue/Saturation and
Lightness sliders to change the color.
If the target color appears in more than one part of the image, perhaps a red
blouse and red lipstick, make a loose selection around the area you want to
change (excluding the other areas) before opening Replace Color.
Deleting a plain white background
Lots of stock photographs come as a subject shot against a plain white back-
ground. Clip art also generally comes on a plain white background. Most of
these images have clipping paths or alpha channels that you can use to
377
Chapter 18: Pete’s Top Ten Favorite Photoshop Tips and Tricks
© 1998 PhotoSpin, PhotoSpin image #0070004
Figure 18-5: The Replace Color adjustment
makes quick work of color changes.
26 327258-ch18.qxp 8/20/08 7:07 PM Page 377
378
Part V: The Part of Tens
extract the subject from the background to add it to another image. And
when there is no path or channel? Open both images in Photoshop and drag
the stock photo’s Background layer from the Layers panel to the window of
the destination image. Make sure that the upper layer is active in the Layers
panel and then open the Blending Options panel of the Layer Style dialog
box. In the Blend If area at the bottom, drag the upper-right slider handle to
the left until the upper layer’s white background is completely gone. (See
Figure 18-6.)
Both images © 1998 PhotoSpin, PhotoSpin image #0010032 (background) and image #0120013 (foreground)
Figure 18-6: Use the Blend If sliders to hide a white background.
Quick and easy edge effects
Need some way to make your images stand out? Try this:
1. Add a new layer to your image by clicking the New Layer button in
the Layers panel.
To avoid making any permanent change to your image (primarily so you
can change your mind about the border later), work on a new layer.
2. Select a border area around the image.
Choose Select➪All and then choose Select➪Modify➪Border. Enter a
value twice the width that you want for your edge effect.
3. Fill the selection with black, gray, or white.
• Black: Makes your image look brighter and more saturated
• Gray: Minimizes any perceived color shift
• White: Mutes the image somewhat but allows it to stand on its own
Alternatively, use any color from the image (or its inverse).
26 327258-ch18.qxp 8/20/08 7:07 PM Page 378
4. Apply filters to the layer.
Open the Filter Gallery and apply one or more filters to the border to
create an interesting edge effect (such as the samples in Figure 18-7).
Remember, too, that you can convert this layer to a Smart Object before
applying filters so that you can later change your settings.
Not that this counts as an additional tip in this chapter, but remember that
you can open this image, open another image of the same size, and drag the
frame layer from the Layers panel of the first image to the window of the
second image to duplicate it. Reusable frames!
Figure 18-7: Filtering a border area creates interesting edge effects for your images.
Making dashed and dotted lines
Changing a couple of settings in the Brushes panel enables you to create
dashed and dotted lines with ease. In the Brush Tip Shape pane, increase
Spacing to a value higher than 100% to separate the individual imprints of the
brush tip (the brush tip instances). Switch to the Shape Dynamics pane and
select Direction from the Angle Jitter pop-up menu. For best results, make a
selection and choose Edit➪Stroke to apply your dotted or dashed brush
along the selection border.
379
Chapter 18: Pete’s Top Ten Favorite Photoshop Tips and Tricks
26 327258-ch18.qxp 8/20/08 7:07 PM Page 379
380
Part V: The Part of Tens
Printing multiple documents at the same time
You have a bunch of images to print from your latest job, but you also have a
bazillion other things to do — you don’t want to sit at your computer and
open one image, print, close, open the next image, print, close, open the next
image, print, close, and so on, all afternoon long. Instead, use the Output
panel in Bridge to create a multipage PDF document (see Chapter 16) and
print all of the pages — all of your images — from Acrobat or Adobe Reader,
without sitting around to babysit the computer!
26 327258-ch18.qxp 8/20/08 7:07 PM Page 380
19
Ten Reasons to Love
Your Wacom Tablet
In This Chapter
ᮣ Considering reasons to use a tablet
ᮣ Setting up your tablet for efficient Photoshop work
D
rawing tablets from Wacom enable you to use a special stylus, which
you hold like a pen or pencil or brush, to move the cursor (rather than
using a mouse, track pad, or trackball). There are several reasons why using
a stylus is a huge improvement over a mouse, and I give you five to start off
the chapter. Another five reasons you’ll love your Wacom tablet involve maxi-
mizing your efficiency; those reasons conclude the chapter.
More Natural Movement
Whether you use a pen only to sign your name or
you’re a traditionally trained artist, the movement of
a stylus is far more natural than pushing a mouse
around a desk.
Health and Safety
Use of a drawing tablet instead of a mouse can help
avoid repetitive stress injuries and carpal tunnel syn-
drome, and can be vastly more comfortable for those of us
who suffer from arthritis and tendonitis.
27 327258-ch19.qxp 8/20/08 7:08 PM Page 381
382
Part V: The Part of Tens
Artistic Control
With up to 1,024 levels of sensitivity,
a “click” or a “drag” using a drawing
tablet is far more versatile than
working with a mouse. Open the
Photoshop Brushes palette and take
a look at the eight different options
that you can control through Pen
Pressure, Pen Tilt, or (with the
Wacom Airbrush) Stylus Wheel
(see Figure 19-1). And don’t forget
about tools that can be directly
controlled with pen pressure, such
as the Quick Selection tool, which
can use pen pressure to adjust the
brush diameter.
Extended Comfort
You can lean back and relax or sit up
straight: With fingers poised over
the keyboard or hand grasping
mouse, you’re pretty much locked into a single position, often for hours at a
time. With the long cord of a Wacom tablet plugged into a handy USB port,
you have the flexibility to change positions, move back from the monitor,
even slouch in a way that would make Mom turn pale — all while still sending
input to the computer. (Or how about a Bluetooth cordless model?) Whether
you work with the tablet on the desk or on your lap, it doesn’t matter; do
whatever is most comfortable and efficient for you.
Programmable ExpressKeys and Touch Strips
How about convenient controls, right on the tablet, that let you access modi-
fier keys, keyboard shortcuts, and even brush sizes and tool selection? No
need to lean back in toward the desk to press a key or two; just program your
most-needed keystrokes to the tablet.
Figure 19-1: Scattering, Color Dynamics, and
Other Dynamics also have pen-controlled
options.
27 327258-ch19.qxp 8/20/08 7:08 PM Page 382
The Optimal Tablet
The inexpensive Bamboo and Bamboo Fun come in two sizes (just under
4 x 6 and 5.3 x 8.5 inches for the working areas) and have 512 levels of
pressure sensitivity. The moderately-priced and very convenient Graphire
Wireless has an active area of 6 x 8 inches and 512 levels of pressure sensitiv-
ity. The professional Intuos line includes six different sizes, from 4 x 6 to
a whopping 12 x 19 inches. The 12 x 19–inch and 6 x 11–inch sizes are
specifically designed for widescreen and dual-monitor systems. If you have a
fine-arts background, you might want a larger tablet. If you are not a
traditionally-trained artist, you might be more comfortable with a smaller
tablet, on which you can make smaller strokes. Regardless of what size tablet
you have, don’t forget that you can zoom in on a specific area of your image
while you work. (And keep in mind that you might also want to have a
smaller tablet to slide right into your laptop case, too.)
The Pen’s Switch
Most (but not all) Wacom pens have a switch, called the DuoSwitch, right on
the side that (by default) lets you right-click or double-click simply by rock-
ing the switch. Rather than tapping the pen twice on the tablet to double-
click (which could leave two spots of color if the Brush tool is active), simply
press the DuoSwitch’s upper rocker. And, of course, you can program the
DuoSwitch to other functions as well, such as a specific keystroke, a modifier
key, even panning and scrolling.
Setting Preferences
After downloading and installing the
latest version of the Wacom driver for
your tablet, open the Control Panel
and customize your tablet. (On a
Mac, choose System Preferences➪
Wacom Tablet. In Windows, choose
Start➪All Programs➪Wacom
Tablet➪Wacom Tablet Properties.)
The Control Panel (see Figure 19-2)
enables you to assign a specific func-
tion or keystroke to each of the
ExpressKeys and Touch Strips, as
well as program your various pens
and mouse.
383
Chapter 19: Ten Reasons to Love Your Wacom Tablet
Figure 19-2: Think about what keys and
keystrokes are best assigned to the easy-to-
reach ExpressKeys.
27 327258-ch19.qxp 8/20/08 7:08 PM Page 383
384
Part V: The Part of Tens
Don’t forget the accessories
Wacom offers a variety of pens, several different mouse versions (including a
five-button model), and even an airbrush to help you get the very most out of
your tablet. Choose the input device that’s best for you — or switch among
several, using the one that’s most appropriate for the specific job at hand.
Cintiq for the Ultimate Control
The ultimate tablets are, of course, the Cintiq tablets, which integrate a
monitor into the tablet, enabling you to paint or draw directly on your image.
Wacom offers three sizes of Cintiq
displays, ranging from 12" to 21"
measured diagonally. And although
$999 to $1,999 may seem like a lot
of money for a tablet, it’s not too
extreme when you consider the
money you may save by not purchas-
ing a monitor. Whether you use the
integrated stand and paint on your
Cintiq on your desk (see Figure 19-3)
or take advantage of the long
cable and work with the display in
your lap, you’re bound to find
increased accuracy and productivity
at your fingertips — literally!
Until you’re perfectly comfortable using a stylus and tablet, the Cintiq line
might be a bit of a stretch. But after you’ve worked with the more affordable
lines of tablets (Intuos, Graphire, and the entry-level Bamboo), you may
develop a craving for a Cintiq!
Figure 19-3: Consider using a Cintiq in place of
a standard monitor.
27 327258-ch19.qxp 8/20/08 7:08 PM Page 384
20
Ten Reasons to Own
a Digital Camera
In This Chapter
ᮣ Five professional-life reasons to go digital
ᮣ Four personal-life reasons to go digital
ᮣ One good-for-the-future-of-the-planet reason to go digital
P
icking just ten reasons to own and use a digital camera is hard. In an
effort to play to heartstrings everywhere, I’ve included ideas about
job-related shooting, uses in the home, travel considerations . . . the list goes
on and on, but this list only goes up to ten. After that, you have to use your
imagination.
The gap in capability between 35mm film and high-end
digital cameras disappeared some time ago. The technol-
ogy that allows digital cameras to match 35mm quality
is now found in quite reasonably priced equipment.
(Admittedly, only the most expensive digital camera
backs for very expensive high-quality cameras can
even think about competing with medium or large
format film.) If you haven’t yet gone over to the
digital side, here are some convincing arguments
to make the jump. If you already are digital in mind,
body, and lens, read the list anyway — it might
give you a few points for future discussions with
traditionalists.
28 327258-ch20.qxp 8/20/08 7:09 PM Page 385
386
Part V: The Part of Tens
Shooting Digital for Your Work
In the field, in the studio, and even in the home and on the road, digital offers
a number of advantages over film:
ߜ No processing time (or cost): You don’t have to wait to start editing
your images. Instead, you download to your computer and open the
images in Photoshop. No longer do you have those pesky delays for
processing/printing/scanning, nor those bothersome bills for film
processing.
ߜ Instant feedback: You can evaluate the shot immediately on the
camera’s LCD screen, which allows you to quickly delete any boo-boos
before anyone else sees them. Oh, and that frees up storage space, too,
of course! And don’t forget about LCD previews available on many cam-
eras, which let you makes decisions even before you shoot.
ߜ Create libraries of textures and patterns: Shoot digital images of clouds
and bark and grass and fabric and concrete and bricks and whatever to
create libraries of textures to use in Photoshop. Use blending mode and
the Texture➪Texturizer filter with your library images to create wonder-
ful backgrounds and artistic effects, such as the visually interesting
background in Figure 20-1.
Figure 20-1: The Texturizer filter uses grayscale .psd files, such as tree
branches and clouds, to add detail to an image.
28 327258-ch20.qxp 8/20/08 7:09 PM Page 386
ߜ Remote control: Use your computer’s monitor (if your camera/software
allows) to adjust and perfect the shot before shooting. The screen is a
lot larger and more accurate than the camera’s LCD. This is often
referred to as tethered shooting.
ߜ Multiple exposures for one image: Bracket the exposure and then com-
bine the images automatically in Photoshop with Merge to HDR, shown
in Figure 20-2. (See Chapter 10 for specific instructions on shooting for
Merge to HDR.)
Figure 20-2: Combine multiple exposures to capture a greater tonal range.
Shooting Digital for Yourself
Owning a digital camera comes in handy for your personal life, too:
ߜ Travel convenience: With a digital camera, you eliminate worries about
X-ray machines, baggage scanning, and film storage. And don’t forget
how much easier it is to carry a half-dozen flash cards than dozens of
rolls of film!
ߜ Home inventory: Do it. Really. Do it. Go around the house and take
photos of the important stuff. (Don’t forget the jewelry!) If your camera
has a date/time stamp, use it. You don’t even need to print these shots.
387
Chapter 20: Ten Reasons to Own a Digital Camera
28 327258-ch20.qxp 8/20/08 7:09 PM Page 387