DIGITAL FILMMAKING HANDBOOK phần 5 pot
Bạn đang xem bản rút gọn của tài liệu. Xem và tải ngay bản đầy đủ của tài liệu tại đây (2.15 MB, 52 trang )
CHAPTER 9SHOOTING DIGITAL VIDEO
Focusing a Canon XL1
Some DV camera lenses, notably the zoom lens that comes with the Canon XL1,
do not hold focus if you use the manual zoom ring on the lens to recompose your
shot. Instead, use the mechanical zoom button on the lens. You can also focus by
composing your shot first and then adjusting the focus ring on the lens, the same
way you would with a prime lens. The only problem with this method is that the
wider your shot, the harder it will be to tell if your subject is truly in focus. You
can also center your subject, press the autofocus button until it finds the right
focus, then turn off the autofocus feature to lock the focus in place. Then recom-
pose your shot as desired. The XL1 has a Find Focus button that allows you to set
the focus without using the auto-focus features.
Measuring Focus
If your camera lens has a focus ring with distance measurements marked on it,
like the lens in Figure 9.5, you can measure the distance between your subject
and the lens to ensure perfect focus. (Of course, you can’t be sure of the focus
markings on your lens unless you’ve tested them and found the marks to be
accurate.)
If you plan to eventually transfer your video image to film, proper focus is
critical. When the image is projected and blown up to 25+ times its normal
size, what looked in focus on a small video monitor may appear out of focus.
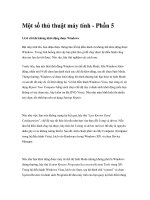
Luckily, most images have a
depth of field that exceeds the depth of focus. In
Figure 9.9, the depth of focus is eight feet from the camera, but the depth of
field—the part of the image that
appears in focus—starts a couple feet in front
of the subject and extends to infinity. The woman seated behind the subject
will appear in focus, even though she’s not on the plane of focus.
If you’re having trouble focusing, use your manual iris control to iris down
(go to a higher f-stop number). This will increase your depth of field and im-
prove your chances of shooting focused. If you’re shooting in a low light situ-
ation with the lens aperture wide open, don’t count on a lot of depth of field.
Compose your shot with the knowledge that only your subject may be in
focus.
If you’re transferring to film for projection, the only way to be certain about
depth of field is to calculate it mathematically. Unfortunately, depth of field
calculations for DV cameras are complicated by the fact that DV cameras
often lack f-stop or distance markings on their lenses, digital lenses use differ-
ent optics than 35mm lenses, and DV lens sizes in millimeters do not corre-
199
spond to 35mm lens sizes. Standard depth of field charts, such as those found
in the American Cinematographer’s Manual, do not apply to your DV camera.
Pulling Focus
Film camera operators compensate for shallow depth of field by having the
camera assistant
pull focus. As the camera moves on a dolly, for example, the
camera assistant manually moves the focus using the focus ring on the lens.
Some lenses have a place to attach a knob that makes pulling focus easier, but
either way, it requires a steady hand. You need to be able to pull focus in order
to do a
rack focus shot. Unless you have a camera with high-end features like
the one in Figure 9.12, pulling focus on a DV camera is almost impossible.
TIP
Faking Focus Pulls
Puffin Designs’ Image Lounge includes a Rack Focus filter that you can use to
fake some rack focus shots in post-production. Obviously, you’ll need to do some
experimentation and planning before you rely on such post-production effects.
DIGITAL FILMMAKING HANDBOOK
200
In this illustration, the plane of focus is eight feet from the lens, but the depth
of field, represented by the white area, is much bigger. Everything in this area
appears in focus, including the woman and the background.
FIGURE
9.9
CHAPTER 9SHOOTING DIGITAL VIDEO
LENS FILTERS
If your camera has threads on the end of its lens, you can attach special filters
that will help you better control color and composition, as well as create spe-
cial effects. Filters are simply specially prepared pieces of glass housed in a
screw-on attachment. Most filters are threaded so that you can screw filters
onto filters to stack up effects. Filters come in different sizes, so the selection
of filters available for your lens size may vary. Many filters come in different
“strengths” whose values are usually measured with a simple number scheme.
The higher the number, the more the filter will affect your image.
UV Filters
As we mentioned earlier, you should get at least one UV filter to protect your
lens. In addition, UV filters will filter out ultraviolet light and help reduce
haze. There are a number of variations of UV filters, including stronger haze
filters and warm UV filters, that will add warmth to your image.
Polarizing Filters
Polarizers are used to deepen saturation and are must-haves for shooting out-
doors. A circular polarizer attaches like any other filter, but can be rotated to
achieve different polarizing effects, such as making an image more or less sat-
urated, or to shift an image more toward warm or red. Shooting with a polar-
izer is just about the only way to get decent images of cloudy skies.
Polarizers can also be used to eliminate reflections when shooting through
glass or windows (see Figure 9.10) and to eliminate hot spots on a reflective
surface created by a light source.
Neutral Density Filters
Used for controlling the amount of light coming through your lens, the most
common light balancing filter is the neutral density filter. ND filters reduce the
amount of light entering the lens in 1 f-stop increments. So, if you’re shooting
in bright sunlight (which normally requires a small aperture), but you want to
shoot with a very shallow depth of field (which requires a large aperture), you
can use ND filters to cut out enough light to facilitate a smaller f-stop value.
Your camera may have a built-in electronic ND filter. Check your manual
to see how many stops this feature provides.
201
DIGITAL FILMMAKING HANDBOOK
202
The window reflections in the first image can be easily eliminated with a po-
larizing filter.
FIGURE
9.10
CHAPTER 9SHOOTING DIGITAL VIDEO
Color Correction and Light Balancing Filters
There are a number of filters that can correct for tungsten or daylight. In ad-
dition, special colored filters can be used to tint your image, or strengthen par-
ticular colors.
Contrast Adjustment
High-Contrast filters can be used to improve the contrast ratio (and therefore,
apparent sharpness) in an image, while filters such as Tiffen’s ProMist and
Black ProMist can be used to reduce contrast to achieve more of a film look
(Figure 9.11).
Gradiated Filters
Gradiated filters feature a grade from dark to light that can be useful if you
need to take down a bright sky but want to keep the area below the horizon
line unfiltered.
Special Effects Filters
Special effects filters can be used to make lights flare in starburst patterns, to
tone an image sepia, to create extreme fog effects, and much, much more. Be-
fore you commit to any of these filters, though, see if you can achieve the same
look in your post-production software. Shooting clean, unfiltered video and
processing it digitally later will give you more flexibility.
In addition to filters, a
sun shade attached to the end of your lens will pre-
vent the sun from shining directly on the lens and creating lens flares.
Film Look
There’s a lot of advice floating around about how to create a “film look” using
diffusion filters. The only way to decide if they work is to do some experi-
menting with them. If you’re planning to eventually transfer to film, this may
be unnecessary since the film process itself will result in a “film look.” One of
the challenges of a successful video-to-film transfer is delivering an image that
looks sharp on film. Consult with your film recordist before using lots of fil-
tration or diffusion. We recommend that you avoid using diffusion materials,
like softening effects filters or stockings and other fabrics over or behind the
lens itself. Use diffusion spray, fog machines, and diffusion on the lights to
soften the image, but avoid overusing these items as well.
203
DIGITAL FILMMAKING HANDBOOK
204
Tiffen’s ProMist and Black ProMist can be used to reduce the contrast in an
image and make light flares bloom, creating a more film-like image.
FIGURE
9.11
CHAPTER 9SHOOTING DIGITAL VIDEO
Film typically has a shallower depth of field than does video. One way to get
more of a film-like image, then, is to shoot with less depth of field.
We’ll discuss film look more in Chapter 18.
OTHER CAMERA FEATURES
If your camera allows it, you should opt for a slow shutter speed when shooting
for a film look. Usually the slowest speed available on a DV camera is 1/60th
of a second, which corresponds with the fastest shutter speed available on most
film cameras. In Figure 6.8a and b, you can see the difference between a fast
shutter speed and a slower shutter speed. The resulting motion blur of the slow
shutter speed will help make your video look more like film. (Refer to your
camera manual for instructions on manually adjusting the shutter speed.)
Most DV cameras will allow you to choose between
progressive and inter-
laced scanning
. (See Chapter 4 for an explanation of progressive and interlaced
scanning.) Progressive scanning will also make your video look more film-like,
as—depending on your camera—the slower shutter speed might be closer to
film. However, when shooting with progressive scan, you’ll need to be very
careful to avoid fast camera moves and fast action on-screen. Unless you are
205
Mechanical
zoom control
Lens
Zoom ring
Optical viewfinder
Viewfinder
focus ring
Digital display
Audio level
controls
Slide mount for
on-camera light
Focus ring
Aperture ring
Zebra on/off
White balance
Battery
Shutter controls
Filter ring w/ 3200K,
5600K and ND filters
Auto iris settings
White balance settings
Gain boost
Power on/off
º
The JVC GY-D500 miniDV camera has manual override for everything and
lots of high-end features.
FIGURE
9.12
going for a special effect, or plan on pulling lots of stills from your video, in-
terlaced scanning is a better choice.
All newer video cameras come with a
gain boost feature for low light situa-
tions. Gain boost makes everything in your image brighter, including the black
areas of your image. A good video image should aim for dark, solid blacks, and
bright, clear whites. If the gain is boosted, the blacks tend toward gray. In ad-
dition, video
noise is introduced. Noise is the video equivalent of film grain, ex-
cept it is a lot more noticeable and distracting. If you are planning to go to film
later, you should avoid any gain boosting. Instead, use proper lighting to get a
good exposure on your videotape and turn off the gain boost feature.
ASPECT RATIOS
Choosing an aspect ratio is an artistic choice. Needless to say, composing a shot
for 1.33 video (or 4:3) is very different from projected film at 1.85 or high-de-
finition television at 1.77 (or 16:9). (See the aspect ratio table in Chapter 4.)
Be sure to keep this in mind when you shoot. The DV format’s 1.33 aspect
ratio is perfectly suited to the current broadcast standard, although the num-
ber of TV productions shot in the HDTV 1.77 format will continue to grow.
If you’re planning to transfer to film, 16mm film shares the same 1.33 aspect
ratio as DV, but to get the 1.85 aspect ratio of North American theatrical re-
lease format for 35mm film, the top and bottom of the 1.33 image will be
cropped out (refer back to Figure 4.6).
If you want to take advantage of the 35mm film format, you’ll need to
shoot in the 1.77 high-definition widescreen aspect ratio. 1.77 is still slightly
smaller than projected film, but the difference is negligible. Most 35mm film
cameras have lenses that can be fit with removeable ground glass attachments
for viewing crop marks that indicate various aspect ratios through the
viewfinder. This helps camera operators compose the shot for the aspect ratio
desired (even if it doesn’t match the native aspect ratio of the format they’re
shooting with). Unfortunately, the concept of removeable ground glass at-
tachments hasn’t quite trickled down to the DV camera world yet.
TIP
Buyer Beware
Just because a camera is 16:9/4:3 switchable, doesn’t mean that the camera
records a true native 16:9 image. The change in aspect ratio may simply mean
that the image is being re-shaped to fit that ratio (Figure 6.12). If your camera
doesn’t shoot native 16:9, you can add an anamorphic lens attachment to it that
will squeeze the image (Figure 6.13).
DIGITAL FILMMAKING HANDBOOK
206
CHAPTER 9SHOOTING DIGITAL VIDEO
TV Title Safe and Action Safe
The portion of the video image that is visible varies from one TV set to an-
other. To ensure that all viewers can see the action and read the titles, SMPTE
came up with guidelines for the
action safe and title safe areas of the image. Pro-
fessional lenses have visual guides visible in the viewfinder that show where the
title safe and action safe boundaries lie, much like the guides shown in Figure
16.1. Unfortunately, not all DV camera manufacturers have included these
guides in their viewfinders. If your viewfinder doesn’t have action safe and title
safe guides, be sure to remember that the outer edges of the image may not be
visible, and compose your shots accordingly.
CONTROLLING THE CAMERA
There are a mind-boggling number of gadgets available today for controlling
the movement of a camera. You can buy anything from giant cranes to special
remote control helicopters to heavy-duty underwater gear. In Chapter 6, we
discussed tripods, steadicams, and on-board image stabilizing systems. Here
are a few more ways to control the camera:
•
Dollies. There are a number of cheap options for getting that fancy
dolly shot. You can make your own skateboard dollies with four rotat-
ing skateboard wheels attached to a piece of plywood. Wheelchairs also
work well, allowing the operator to sit in the chair and hold the camera
while someone else pushes, and you can always try using your car.
Shooting out of a convertible or the back of a pick-up truck works best,
but take care not to endanger yourself and others.
•
Handholding. Handholding a lightweight video camera can be a chal-
lenge. Some prefer to hold the camera at waist level, balanced against
their torso, others at eye level. Using the shoulder strap sometimes stead-
ies the camera, and standing with your legs shoulder-width apart can
help steady your stance. As with most camera-operating skills, practice
makes perfect.
•
Car camera mounts. To get good footage inside a moving car, car cam-
era mounts—special vacuum suction devices that attach the camera to
the body of the car—are essential.
207
Hopefully, you’ve come to the shoot fully prepared with a shot list, story-
boards, and careful blocking of your scenes. Here’s a list of odds and ends to
remember with during the shoot:
•
Prevent Timecode breaks. Your post-production will go much easier if
you avoid breaks in timecode when shooting. A break in timecode oc-
curs any time there is a blank spot on the tape. Such breaks might pre-
vent your NLE from being able to capture or digitize your footage. Most
DV cameras include special controls (usually in the form of buttons on
the camera) that will search forward or backward for the last piece of sta-
ble timecode. The camera will then cue the tape to the last frame of sta-
ble timecode and begin recording from there.
If your camera doesn’t have such a feature, you can protect your tape
from timecode breaks by always letting the tape run for a few seconds
after the end of your shot. Then, before you begin taping again, back the
tape up so that recording begins on top of your extra footage.
•
Calling “Action!” Believe it or not, there is a very specific protocol to
follow when calling “Action” on a film shoot. The assistant director yells
“Roll sound” and the sound recordist replies “Speed” once his equip-
ment is running at full speed. Next, the assistant director calls “Roll
camera” and the camera person answers “Speed” once the camera is run-
ning at full speed. Finally, the director calls “Action!” Even if you’re not
using a sound recordist, assistant director, or a camera operator, it’s still
good practice to warn everyone on the set vocally that you’re about to
start shooting, and give your camera and audio equipment a few seconds
to run before you call “Action.”
•
Heads and tails. Allowing a few seconds to roll before the action starts
and a few seconds to roll after the director calls “cut” can be crucial dur-
ing the editing process later on.
•
Crossing the stage line. Crossing the 180° axis, also known as the stage
line,
is jarring. If you think of your set as a theatrical stage, the 180° axis
falls along the proscenium (the front of the stage). Once you’ve set up
your camera on one side of the axis, avoid moving it to the other side
(see Figure 9.13). Be aware that this primarily concerns action and dia-
logue shots. Cut-aways and establishing shots can often get away with
crossing the stage line.
•
Eye lines. If you’re shooting a conversation between two or more actors,
you need to make sure the eyelines in each close-up match the others, so
During the Shoot
DIGITAL FILMMAKING HANDBOOK
208
CHAPTER 9SHOOTING DIGITAL VIDEO
that when the shots are edited together, they look like they’re looking at
each other (see Figure 9.14). It’s also usually a good idea to shoot dia-
logue within a scene with the same focal length lens and from the same
distance.
209
Stage line
D
J
A
C
B
This camera diagram corresponds to the images in Figure 9.14. Camera angle
B is on the wrong side of the stage line, which results in the mismatched eye-
lines in Figure 9.14.
FIGURE
9.13
A
C
AB
Incorrect eye lines
Correct eye lines
A and B have eyelines that are shot incorrectly, while A and C have eyelines
that match.
FIGURE
9.14
• Using a field monitor. Feature film directors use “video assist” monitors
that connect to 35mm film cameras so that they can see what is being
seen by the camera operator. A field monitor lets you do the same thing
with a video camera. Even if you’ll be operating the camera yourself, a
field monitor can be an asset, making it much easier to focus and frame
your shots, and, of course, it lets others see what the operator is seeing.
•
Camera logs. Have someone on the camera crew keep camera logs: a list
of shots, lens focal lengths, and technical notes with timecode refer-
ences. If you have trouble later, camera logs can help you decipher the
problem.
•
Logging your shots on the set. You can log shots on paper or using spe-
cial logging software like Avid’s Media Log on a laptop computer or
Production Magic’s Shot Logger on an Apple Message Pad. Shot Logger
comes at a hefty $2250 price tag, but allows for wireless transmission of
timecode information directly from the camera into the handheld com-
puter.
TIP
12 bit or 16 bit? 32 or 48 KHz?
As we stated earlier, when editing it’s important to be sure you use the same fre-
quency for all of your audio. So, if you’ve decided to use 48 KHz audio in one
part of your project, you need to use 48 KHz audio in all of it. Most cameras,
however, don’t let you select 32 or 48 KHz audio. Instead they measure audio by
its bit-depth, either 12 or 16-bit. In simplest terms, 12-bit audio is simply an-
other way of saying 32 KHz audio, while 16-bit audio is synonymous with 48
KHz audio.
• Avoid over-coverage of a scene. You may think you’re just burning
videotape as you call for Take 23, but you’re also burning the energy of
your cast and crew and expensive editing time later on.
•
Make-up. Video isn’t known for flattering the human face, and bright
lights can make even the most minor skin flaws stand out. We’re not ad-
vocating the “news anchorwoman” look, but you should always use sub-
tle makeup on all your subjects to cover blemishes, even out skin tones,
enhance facial features, and, most importantly, take the shine off hot
spots.
•
Room Tone. At some point during your shoot, your sound recordist
will need to record 30 seconds to a minute of
room tone. Room tone is
DIGITAL FILMMAKING HANDBOOK
210
CHAPTER 9SHOOTING DIGITAL VIDEO
nothing more than the sound of the room when no one is talking or
making sound. This “empty” sound will be used by the sound editor to
patch gaps in the soundtrack and to cover rough sound edits.
Because you are trying to record the natural ambient sound of your
location, be sure to record your room tone after your set has been fully
dressed. Recording it before may produce a different quality tone as
there will be fewer sound-absorbing set pieces and props. The end of
your shooting day is usually the best time to record room tone. Simply
ask everyone on the set to be quiet, and start your recorder.
COMPOSING THE SHOT
Though we don’t really have space for an in-depth discussion of the aesthetics
and theory behind composition and framing, we can point out some techni-
cal concerns to keep an eye on, as well as remind you of some simple compo-
sitional guidelines.
Composition
When looking through a camera, it’s very easy to pay attention to what you
know rather than what you see. While you may think it’s obvious that the focus
of the shot is on the tiny figure in the back of the scene, the audience might
focus on the big empty room in the foreground. One way to “short-circuit”
your brain and pay attention to your eyes, is to methodically check the
following:
•
Headroom. Don’t leave a lot of headroom at the top of the shot (unless
it’s for some stylistic reason). In other words, pay attention to the
entire
frame, not just the area of the frame where your subject is.
•
Cropping. There are no rules to how you should crop a shot. While you
might be tempted to have a subject’s entire head in a shot, you can often
get more dramatic power by moving in closer and cropping them. The
same holds true for scenes or actions. A close-up shot of a hand flexing
and tensing as it wields an ax can be more dramatic than a long shot of
an entire lumberjack.
•
Leading. In dialog scenes, if a character is speaking to someone off-
frame, you’ll want to
lead the speaker by putting some empty space in
front of him or her. Leading is also a good way to create tension. Con-
211
sider the last scene in 0 when the little girl has fallen down a ventilator
shaft into a water-filled room on an alien-infested planet. When the di-
rector cuts to the first shot of the girl standing waist deep in water, he
leaves a tremendous amount of headroom. The audience knows that this
is just enough space to fit a big, slavering alien, thus heightening the sus-
pense of the scene.
Focal Length
In addition to the framing of your shot, it’s very important to pay attention to
your choice of focal length. As we discussed earlier, the longer the focal length,
the more compressed the sense of depth will be in the shot.
Consider the two images shown in Figure 9.15.
In the top image, we wanted a shallow depth of field, so we stood back, and
zoomed in. In the bottom image, we wanted to see more of the background
(not just a focused background, but a wider angle) so we zoomed out and
moved the camera closer to the actress.
Notice how different her face looks in the two shots. In particular, note the
relationship of the size of her nose to her ear in each shot. In the right image,
her ear has shrunk while her nose has stayed about the same size. Also, her face
looks taller and skinnier in the second image. In general, the second image is
distorted.
When a telephoto lens magnifies an image, it magnifies everything in the
image by an equal amount. So, when we stood back and zoomed in on the ac-
tress, everything in the image was enlarged (including the background, which
is how telephoto images compress depth). When we zoomed out to a wider
angle, the parts of her face that were closer to the camera were magnified more
than the parts that were farther away.
Usually, a slightly telephoto lens will be the most flattering focal length you
can choose for shooting people. In addition, their compression of depth cre-
ates a more intimate sense of space.
When shooting landscapes or sets, consider what kind of sense of scale you
want to create. If you’re going for a huge space and sense of immensity, go with
a shorter focal length to separate the background from the foreground. For in-
timate shots, a longer focal length will bring everything closer.
DIGITAL FILMMAKING HANDBOOK
212
CHAPTER 9SHOOTING DIGITAL VIDEO
213
You can use your aperture controls to create different depths of field when
composing an image.
FIGURE
9.15
Almost every project involves some special shooting circumstances, but if
you’re shooting for a highly compressed delivery format, such as the Web,
you’ll have a special set of issues to tackle.
SHOOTING FOR THE WEB
Delivering video on the Web requires a huge amount of compression. If you
plan your shoot with this in mind, the outcome will be much more successful.
Here are some things that compress poorly:
•
Motion. This means both motion of the subject and motion of the
camera. Use a tripod to lock down your shots, and keep the movement
of the actors to a minimum.
•
Visually complex images. Keep the images simple and iconic—close-
ups work best.
Special Shooting
Situations
DIGITAL FILMMAKING HANDBOOK
214
Respect for Acting
In the sea of technical details, you may forget the most important thing on
your set: your talent. Here are a few quick tips on how to help them give a
great performance:
• Try to maintain some sort of story continuity as you shoot. It’s often
necessary to shoot out of sequence, but at least try to stay continu-
ous within each scene.
• Have a closed set if you’re doing a scene that involves highly emo-
tional performances or nudity.
• Respect your actors’ opinions about the characters they’re playing.
Even if you wrote the script yourself, you may find that they have new
ideas that make your script even better. Remember, they’ve proba-
bly spent the last week or two thinking a lot about that character, and
they may have come to a deeper understanding than you have.
• Try to remain sensitive to the mood and material of the scene. If the
actor must play a sad scene when everyone is joking around on the
set, he or she may have a hard time concentrating or getting in the
right mood.
CHAPTER 9SHOOTING DIGITAL VIDEO
• High contrast lighting. Compression algorithms for the Web don’t
seem to handle high contrast lighting very well, resulting in clipping of
darks and lights. Try for a brightly and evenly lit look.
•
Fine lines, stripes, and other patterns. Again, simplicity is the key.
Recording the image is only part of the battle—you can’t overestimate the im-
portance of good sound. The next chapter covers how to record production
audio.
Quiet on the
Set, Please
215
10
Production
Sound
217
IN THIS CHAPTER
• What You Want to Record
• Microphones
• Setting Up
• Recording Your Sound
• A Good Approach
W
ith all this talk about storyboarding, cameras, and image quality,
it’s pretty easy to become something of a “video chauvinist” and
end up scrimping on your project’s sound. So, at this point, it’s im-
portant to be reminded that
sound is one of the most powerful tools in your cre-
ative palette
. With the right music and sound effects, you can do everything
from evoking locations to defining moods and building tension. In fact, in
many ways, good sound is more important than good video.
As an example, there are plenty of movies that adopt a grungy, low-quality
image as a stylistic choice. The makers of
Three Kings and p went to great
lengths to create a very rough-looking, grainy, noisy, image style. But did they
choose an equivalent low-fidelity for their audio? No way! Audiences are very
forgiving of low-quality video—they even find it visually appealing, but if
they can’t understand the audio, they won’t be engaged in the story. Just close
your eyes in the theater some time and you’ll find that you have no trouble fol-
lowing the story with your ears. Closing off your ears and trying to follow with
just your eyes will probably prove more difficult.
Editing, mixing, adding music, and creating sound effects are each a crucial
part of your post-production process, but to be successful in those tasks, you
have to have clean, high-quality audio recordings. In this chapter, we’ll cover
the basics of good production sound recording, including how to choose and
use microphones, as well as what the best recording options are for different
types of projects. Finally, at the end of this chapter we’ll detail simple record-
ing set-ups for common shooting situations.
Though it is possible to edit the quality of your audio in post-production,
don’t expect to be able to make the kind of content changes that you can make
when editing video or still images. If you’ve got extra sound, or low recording
What You Want
to Record
DIGITAL FILMMAKING HANDBOOK
218
CHAPTER 10 PRODUCTION SOUND
levels, correcting your audio will be extremely difficult. Your goal when
recording audio is to get high-quality recordings of just the sounds you want.
Though you will usually record voices, there are times when you’ll want to
record other things, such as actions that are critical to your story. A hand turn-
ing the clicking dial of a safe, for example. Or the philandering husband try-
ing, unsuccessfully, to quietly creep into his house late at night.
It’s difficult or impossible to correct a sound, or remove an unwanted sound
from a recording, but it’s easy to mix sounds
in. So, if you’ve recorded high-
quality, isolated sound from your primary
foreground elements, you can always
add
background sound later.
For example, say you’re recording two people talking in a crowded restau-
rant, but one character is difficult to hear because she has laryngitis. You can
spend a long time shooting multiple takes, trying to get a version where you
can hear every word over the din of other diners. Or, you can ask everyone else
in the restaurant to be silent—but continue to pantomime talking—while
you record your actors. Then, let your restaurant patrons go back to speaking
and record a few minutes of their sound (in the business, crowd noise is re-
ferred to as
walla). In post-production, you can mix together the sounds of
your characters with your separately recorded background walla, and have full
control over the loudness of the background, letting you mix the background
to more easily hear your foreground characters.
Recording good audio requires a lot of preparation, and begins with select-
ing the right microphone.
Though your video camera has a built-in microphone, you won’t be able to use
it for most feature and documentary work. On-camera mics are typically low
quality, and produce tinny sound recorded from all directions. In addition, be-
cause of their location on the camera, they frequently pick up camera noise
such as motors and hand movements (Figures 10.1 and 10.2). Consequently,
to record good audio, you’ll want to buy or rent one or more high-quality mi-
crophones, which you will connect to your camera or to a separate audio
recorder such as a DAT or MiniDisc recorder.
Different types of microphones are designed for different recording situa-
tions, so your choice of microphone will be based on matching microphone
characteristics to your shooting needs.
Microphones
219
DIGITAL FILMMAKING HANDBOOK
220
On-camera mics are frequently housed inside the camera’s body, where they
are susceptible to picking up camera noise.
FIGURE
10.1
Even if your camera has an external, shotgun mic, you’ll still want to get a
higher-quality, better-sounding mic for your shoot.
FIGURE
10.2
CHAPTER 10 PRODUCTION SOUND
WHAT A MIC HEARS
Just as different lenses have different angles of view—some wider, some nar-
rower—that define what they will see, microphones have different “direc-
tional” characteristics that define what they will hear. The directional
“coverage” of the mic that you choose will have a lot to do with both the con-
tent and quality of your recorded sound.
Omnidirectional Mics
As their name implies, onnidirectional mics pick up sounds from all directions.
While this may seem like a good idea for recording the sound of an entire
room, omnidirectional mics are often not practical for many situations. With
their wide coverage, omni mics can pick up far more sound than you may
want, including camera noise (and camera operator noise!), as well as ambient
sounds like passing cars or people.
Omnidirectional mics work well if they are held close to the subject of the
sound—within 12 inches or so—because the subject tends to overpower any
background sound. But keeping a mic in this position can be very difficult,
particularly if you want it hidden, and especially if your subject is moving.
On the positive side, omnidirectional mics have a low sensitivity to wind
and breath sounds, and many provide a “shaped” response that boosts higher-
frequency sounds while dampening lower, rumbling sounds. Shaped-response
mics are good for preserving the sound of a voice that is being recorded against
loud sounds such as traffic or construction.
Unidirectional Mics
Unidirectional (or just “directional”) mics, as you might expect, pick up sound
from one direction. Because you can point a unidirectional mic at a particular
subject, they are well-suited to feature and documentary production, as they
allow you to selectively record a particular person or event. Also, because a di-
rectional mic can be farther from the recording subject than an omnidirec-
tional mic, they are better-suited to some feature production sets, where
keeping a mic close to the subject is difficult. Some directional mics are more
directional than others, and which type to choose depends on your shooting
task.
Most directional mics are sensitive to sound in a
cardioid pattern (so named
because it looks vaguely heart shaped, see Figure 10.3). A cardioid micro-
phone is more sensitive to sound coming from the front of the mic, and typi-
221
cally attenuates, or drops off, sounds around the sides of the mic. Typically, a
cardioid pattern is wide enough that a cardioid mic placed more then seven or
eight feet from its subject will pick up unwanted sounds.
A
supercardioid mic has a tighter pickup pattern than a cardioid and is sim-
ilar to the pickup pattern of the human ear. Supercardioid mics provide good
results when used at a distance of 6–15 feet from the subject.
Finally,
hypercardioid mics have an even narrower pickup pattern that rejects
most sounds that are “off-axis” from the direction the mic is pointed. Hyper-
cardioids are, in fact, so directional that they can be somewhat difficult to use.
If they stray even a little from their subject, they will not pick up the desired
sound. You’ll need a diligent mic operator to use a hypercardioid mic.
Contrary to common sense, it’s the holes on a microphone that make it
more or less directional. Take a look at a typical handheld or clip-on omnidi-
rectional mic. You’ll see that most of the holes in the microphone’s case are in
the very top of the mic, with just a few holes around the sides. Now take a look
at a typical hypercardioid mic and you’ll see a very long tube riddled with holes
along its entire length. What’s the deal?
The holes in a directional mic cause the sounds coming in from the sides of
the mic to cancel each other out, leaving only the sounds from the front (and
sometimes, back). In fact, you can turn a hypercardioid mic into an omnidi-
rectional mic simply by covering up the holes along the sides.
If you can’t afford multiple mics or arrange for a
boom operator (more on
this later) on your shoot and you need to shoot dialog scenes, then an omni-
DIGITAL FILMMAKING HANDBOOK
222
The cardioid patterns for an omnidirectional and a supercardioid mic.
FIGURE
10.3
CHAPTER 10 PRODUCTION SOUND
directional mic will be the best choice. Ideally, though, you’ll want a mic with
a supercardioid pattern and the personnel and equipment to use it right. Later
in this chapter, we’ll discuss how to mic your scene.
Most microphones come with a coverage chart that indicates the directional
pattern of the microphone, and how different parts of the field of coverage re-
spond to different frequencies (Figure 10.4). Though interesting, don’t lose any
sleep over trying to understand these charts. Most mics are clearly rated as car-
dioid, supercardioid, or hypercardioid.
223
dB
25
20
15
10
5
0
0°
30°
60°
90°
120°
150°
180°
150°
120°
90°
60°
30°
250 Hz
500 Hz
1000 Hz
2000 Hz
4000 Hz
8000 Hz
Most microphones include a polar chart that diagrams their directionality and
sensitivity. The polar chart shows a cross-section of the mic’s pickup-pattern,
with the mic laying in the middle of the chart, pointed toward the top. This
chart diagrams a supercardioid mic.
FIGURE
10.4
TIP
Hands Off That Mic!
Because a mic’s directional characteristics can be affected by the way you handle
the mic, be very careful when attaching a mic to a stand or pole with a clamp or
tape (or when holding a mic in your hand). Be certain you don’t cover up any of
the holes in the mic’s case. Similarly, don’t think that you can make a mic more
directional by cupping your hands around the front of the mic.
Finally, parabolic mics are extremely directional mics that use a large para-
bolic dish to gather and focus sound onto the head of a unidirectional mi-
crophone. Parabolic mics are sensitive to sounds over 200 feet away and are