The Essential Guide to Flash CS4 friends of ED ADOBE LEARNING LIBRARY PHẦN 8 docx
Bạn đang xem bản rút gọn của tài liệu. Xem và tải ngay bản đầy đủ của tài liệu tại đây (1.23 MB, 43 trang )
USING 3D SPACE IN FLASH CS4
279
9
Figure 9-38. Setting mouseChildren to false ensures protection against errant mouse clicks.
The next step involves ensuring the registration point of the ei]caDkh`an is centered, by
positioning the image loader along the x-and the y-axes. The registration point is the point
to which Flash attaches the symbol when it’s in motion. In Chapter 7 we changed the reg-
istration point of the multiarmed monster so that when its arms moved around they stayed
attached to the body. The following code will ensure that the images in your carousel stay
in position when the carousel moves them around.
19. Add the following two lines to the end of your current ActionScript code:
ei]caHk]`an*t9)$EI=CA[SE@PD+.%7
ei]caHk]`an*u9)$EI=CA[DAECDP+.%7
The following five lines will ensure that the ei]caDkh`an has been added to the ei]caDkh`an
array and that the images load correctly.
20. Add the following five lines under the previous code entered, as shown in Figure 9-39:
ei]caDkh`ano*lqod$ei]caDkh`an%7
ei]caHk]`an*hk]`$jasQNHNamqaop$ei]ca*qnh%%7
ei]caHk]`an*_kjpajpHk]`anEjbk*]``ArajpHeopajan$Arajp*?KILHAPA(
ei]caHk]`a`%7
y
y
Figure 9-39. Ensuring the images load correctly into the carousel
The final three lines that need to be added for this section of the exercise create a function
that is called when an image is loaded and update the number of images defined by the XML
file, which will then flag when the last image has been uploaded and set up the genosel.
THE ESSENTIAL GUIDE TO FLASH CS4
280
21. Add the following code to the ActionScript panel, as shown in Figure 9-40:
bqj_pekjei]caHk]`a`$a6Arajp%6rke`w
jqi^anKbHk]`a`Ei]cao''7
eb$jqi^anKbHk]`a`Ei]cao99jqi^anKbEi]cao%w
Figure 9-40. The final code for this exercise
22. Save your Flash file.
We have accomplished what we set out to do—to create the variables that enable the
Flash file to call the information in the XML file. Though we haven’t finished creating the
3D carousel yet, we are going to finish this exercise here and continue with this saved file
in the next exercise. If you tried to test your movie now, it would throw an output error,
and naught would display on the screen. In the next exercise we will remedy that with the
creation of the genosel.
Displaying the information on stage
This second part of the genosel-creation process continues the build of the carousel com-
ponent of the genosel.
USING 3D SPACE IN FLASH CS4
281
9
1. Add the following code to the end of your saved Flash document from the previ-
ous exercise, as shown in Figure 9-41:
ejepe]heva?]nkqoah$%7
y
y
Figure 9-41. Setting up the genosel
The next step in this exercise is to create the function that will be used when all of the
images have loaded into the genosel.
2. Add the following line of code to line 42 of the ActionScript panel, as shown in
Figure 9-42:
bqj_pekjejepe]heva?]nkqoah$%6rke`w
Figure 9-42. Creating the InitializeCarousel function
The next lines of code that you add will determine the angle of the distance between each
of the images in radians (the standard unit of a plane angular measure). A radian is the
standard international unit of plane angle.
3. The following code is tacked onto the first available line below the rest of the code
you have already entered to determine the distance between the images in the
carousel:
r]n]jcha@ebbanaj_a6Jqi^an9I]pd*LE&$/2,+jqi^anKbEi]cao%+-4,7
To assign the ei]caDkh`an that we created in the previous exercise to a local variable, we
must ensure that we space the images evenly and that we loop through them all.
4. The following code is to be inserted below the code from the prior exercise, as
shown in Figure 9-43:
bkn$r]ne6qejp9,7e8ei]caDkh`ano*hajcpd7e''%w
r]nei]caDkh`an6Ikrea?hel9$Ikrea?hel%$ei]caDkh`anoWeY%7
r]nop]npejc=jcha6Jqi^an9]jcha@ebbanaj_a&e7
THE ESSENTIAL GUIDE TO FLASH CS4
282
Figure 9-43. Assigning imageHolders to the local variable, looping through them all, and
spacing them evenly via ActionScript 3.0
5. Add the following code to lines 47 through 50 in your ActionScript panel to ensure
that the ei]caDkh`ans are positioned correctly on stage:
ei]caDkh`an*tlko/@9n]`eqo&I]pd*_ko$op]npejc=jcha%7
ei]caDkh`an*vlko/@9n]`eqo&I]pd*oej$op]npejc=jcha%7
ei]caDkh`an*ulko/@9bhkkn7
ei]caDkh`an*_qnnajp=jcha9op]npejc=jcha7
The next line of code that we are going to enter into the ActionScript panel will calculate the
ratio of scale for the ei]caDkh`an; that is, the farther away the image appears, the smaller the
scale is going to be. Likewise, as the image appears closer to you, the scale becomes larger.
6. Add the following code below the rest of the code in your ActionScript panel:
r]no_]haN]pek9bk_]hHajcpd+$bk_]hHajcpd'ei]caDkh`an*vlko/@%
The following code then uses the scale ratio to scale the ei]caDkh`an.
7. Immediately below the code in the preceding step, add the following, as shown in
Figure 9-44:
ei]caDkh`an*o_]haT9ei]caDkh`an*o_]haU9o_]haN]pek7
Figure 9-44. Calculating the scaleRatio on the x- and y-axes in your genosel
The final four lines of code for this exercise will add the ei]caDkh`an to the stage, and
position it on 2D coordinates.
ei]caDkh`an*t9r]jeodejcLkejpT'ei]caDkh`an*tlko/@&o_]haN]pek7
ei]caDkh`an*u9r]jeodejcLkejpU'ei]caDkh`an*ulko/@&
o_]haN]pek7
]``?deh`$ei]caDkh`an%7
y
USING 3D SPACE IN FLASH CS4
283
9
Figure 9-45. The entire exercise code in the ActionScript panel
8. Save your Flash CS4 document.
The entire code for this exercise is available to download from the Downloads section of
the friends of ED website, dppl6++bneaj`okba`*_ki+.
We’re at a junction where we could theoretically see the elements appear on stage, as
shown in Figure 9-46, by adding a second y to the bottom of the code to close it. Should
you choose to do this, you will need to remember to delete the bracket prior to continu-
ing the next exercise.
Figure 9-46. The static carousel
The final exercise to complete your 3D genosel will show you how to bring your animation
to life by rotating it.
Rotating your carousel
The first exercise in this section set up our XML file, which specified how many images we
were going to use in our genosel and the URLs where they were located. The second exer-
cise defined variables in ActionScript 3.0 to call the information in the XML file, and the
third exercise enabled you to display the information on the stage. This final exercise is
going to animate the genosel!
THE ESSENTIAL GUIDE TO FLASH CS4
284
The first thing we are going to do is add an AJPAN[BN=IA for the rotation. The AJPAN[BN=IA
is a class that enables the creation of animations. Let’s add this now, and we can begin to
build the animation!
Remember: if you added the } at the end of the last exercise to view the static
movie, you must remove it before commencing this exercise!
1. Add the following code to the first free line under the code from the previous
exercise, as shown in Figure 9-47:
]``ArajpHeopajan$Arajp*AJPAN[BN=IA(nkp]pa?]nkqoah%7
y
bqj_pekjnkp]pa?]nkqoah$a6Arajp%6rke`w
Figure 9-47. Adding the ENTER_FRAME class to your ActionScript 3.0
The next line of code we add is going to enable the user to adjust the speed of the carou-
sel mousing over the images as the carousel turns. The second line will ensure that this is
looped throughout the images.
2. Add the following code to lines 60 and 61 of your ActionScript pane, directly under
the preceding code:
]jchaOlaa`9$ikqoaT)r]jeodejcLkejpT%+1,,,7
Once again we are going to assign the ei]caDkh`an to a local variable and update its angle
as the genosel rotates.
3. Add the following code to the ActionScript panel, as shown in Figure 9-48:
bkn$r]ne6qejp9,7e8ei]caDkh`ano*hajcpd7e''%w
r]nei]caDkh`an6Ikrea?hel9$Ikrea?hel%$ei]caDkh`anoWeY%7
ei]caDkh`an*_qnnajp=jcha'9]jchaOlaa`7
Figure 9-48. The code for this exercise, up to step 3
USING 3D SPACE IN FLASH CS4
285
9
4. The following code will set a new position for the ei]caDkh`an as the genosel
rotates:
ei]caDkh`an*tlko/@9n]`eqo&I]pd*_ko$ei]caDkh`an*_qnnajp=jcha%7
ei]caDkh`an*vlko/@9n]`eqo&I]pd*oej$ei]caDkh`an*_qnnajp=jcha%7
5. Add the following code to calculate the ratio of scaling required as the carousel
moves along the 3D axis. We’ll use this information to scale the ei]caDkh`an and
then to refresh the ei]caDkh`an’s coordinates as it moves around the carousel:
r]no_]haN]pek9bk_]hHajcpd+$bk_]hHajcpd'ei]caDkh`an*vlko/@%7
ei]caDkh`an*o_]haT9ei]caDkh`an*o_]haU9o_]haN]pek7
ei]caDkh`an*t9r]jeodejcLkejpT'ei]caDkh`an*tlko/@&o_]haN]pek7
ei]caDkh`an*u9r]jeodejcLkejpU'ei]caDkh`an*ulko/@&o_]haN]pek7
y
6. The following lines of code will call the function that sorts the images in the geno-
sel and ensures they overlap each other correctly, as shown in Figure 9-49:
oknpV$%7
y
bqj_pekjoknpV$%6rke`w
Your ActionScript panel should be displaying as shown in Figure 9-49.
Figure 9-49. Ensuring your images overlap each other correctly in your animation
7. The final lines of code ensure that the image that has the highest Z position is dis-
played first in the array and defines a new set of child indexes for the images that
are called from the XML file.
ei]caDkh`ano*oknpKj$vlko/@(=nn]u*JQIANE?x=nn]u*@AO?AJ@EJC%7
bkn$r]ne6qejp9,7e8ei]caDkh`ano*hajcpd7e''%w
oap?deh`Ej`at$ei]caDkh`anoWeY(e%7
y
y
8. Save your movie.
THE ESSENTIAL GUIDE TO FLASH CS4
286
It is now time to test your genosel by selecting Control ¢ Test Movie.
What do you see? Familiar creatures from previous chapters in this book rotate serenely
around a carousel. Where, though, would you use an application like this?
When you are considering planning your website or animation, at all times you must con-
sider usability. If your website is commercial, your goal is probably to drive your customer
to buy your product, either online or in a store. If your carousel moves too quickly or is
confusing for the user to get all of the information that you wish to give them, you may
want to reconsider using it, or adjust the settings to slow it down to a usable speed. See
Chapter 11 for more usability hints.
Flash CS4 and 3D engines
A 3D engine provides an easy and efficient way to create 3D interactivity with real-time
animation and lighting, material changes, and rendering. Traditionally 3D was faked in
Flash by either prerendering from dedicated 3D-modeling software or by using clever
mathematical algorithms. 3D engines let you use your imagination without having to
worry about how things work. Typically, 3D engines are delivered as part of a download-
able library—a collection of ActionScript functions and routines for creating 3D in Flash.
Most of the common 3D engines are hosted at _k`a*ckkcha*_ki and are downloaded
using a version-control system, such as the Subversion (SVN) tool available from dppl6++
oq^ranoekj*pecneo*knc. Once the libraries are downloaded to your system you can
either place the library folders into the same project directory that you are working on,
or you can place the library folders on a given local spot on your computer. You then use
the
Preferences panel in Flash to point to the specific class-path location. For full instruc-
tions on downloading and setting up 3D engines and SVN, for both Windows and OSX,
please refer to Appendix A.
As an alternative you can download the class libraries to the same directory as your proj-
ect. The advantage of using the libraries in this way is that you will not need to set up an
external path library. The disadvantage is that for every project you will need to copy the
same folders to every 3D project you create. Also, 3D engines do get updated regularly,
and it is much easier to update one folder rather than a plethora scattered through your
work directories.
Papervison3D, Sandy 3D, and Away3D
There are a heap of 3D engines out there, some free to use, and some that you must buy.
Papervision3D is without a doubt the best known—and best of all, it’s free. The other two
engines worth a mention are Sandy 3D and Away3D. All engines have advantages and dis-
advantages. In this book will discuss Away3D because of its ease of use, great interactive
features, and friendly community. If you venture to dppl6++]s]u/`*_ki+ you will see some
examples built using the engine that you can interact with to get an idea of the engine’s
power. Away3D also has a welcoming user group at dppl6++cnkqlo*ckkcha*_ki+cnkql+
]s]u/`)`ar. Go there to find an answer to a question, to get feedback, or to speak with
like minds.
USING 3D SPACE IN FLASH CS4
287
9
Summary
In our largest coding exercise so far, we have created carousel in ActionScript 3 and Flash
CS4. You have learned about external 3D engines such as Papervision3D, Sandy 3D, and
Away3D. Using 3D graphics is a wonderful way to bring your Flash CS4 animations to life.
In the next chapter we add sound to Flash animations and you’ll learn about ways to use
video.
SEEING AND HEARING ARE
BELIEVING!
THE ESSENTIAL GUIDE TO FLASH CS4
290
Flash CS4 allows Flash designers to build animations that as little as ten years ago could
only be dreamed about. Sound and video are no longer just the realm of film and music
makers. Flash CS4 allows you to create compelling and interactive documents using both
sound and video imported right onto the stage.
Until recent years, video and sound in Flash CS4 animations has been looked upon with
trepidation because the speed of Internet was slower and it would take a long time to
download a video. Now fast Internet is the order of the day, and you can use video and
sound knowing that they will be delivered to the user in the best possible format.
Ad-serving technologies such as Eyeblaster offer developers rich media advertising banner
formats that are ready to have video and sound inserted into them. Yet just because you
can use it doesn’t necessarily mean that you always should. Sound and video should be
used to enhance your movie, not to dominate your Flash CS4 application.
Over the course of this chapter, you will learn how to apply sound to an animation you
previously created, and to create videos in Flash CS4.
Sweet, sweet sounds in Flash
Flash CS4 allows you to incorporate sounds in many ways in your Flash movie clips and
animations. You can add sounds to your animation that will play repeatedly and continu-
ously, separate from your timeline, or you can harness the timeline to synchronize anima-
tion and sound to create some really cool effects. You can also control sounds via
ActionScript. Flash CS4 might offer great 3D stuff, but sound and video take your Flash
applications to a whole new level, which enables you as a commercial web developer/
designer to give your clients the vehicle with which to sell their product.
There are two ways that you can control sound in Flash CS4. One is inserting it into a time-
line by importing it directly to the stage or from the library. The other way is by imple-
menting a
Sound object in ActionScript. For fine control of your animations and sounds, it
is preferable to use the
Sound object, as timeline sounds are largely dependent upon the
speed of the user’s computer. This makes syncing animation and sounds a largely hit-or-
miss effort for timeline animations. Luckily, the
Sound object will save the day. We will
examine the
Sound object later on in this chapter when we apply a sound to a banner.
You can use Flash CS4 in a variety of ways to manipulate sounds:
Adding sound to buttons
Fading sound in and out to enhance your Flash CS4 movie clips
Streaming sound to an animation
SEEING AND HEARING ARE BELIEVING!
291
10
Flash CS4 allows you to work with two kinds of sounds: event sounds and streaming
sounds, which are sounds that need to be downloaded completely before they play, and
streaming sounds are sounds that play as soon the first couple of frames have down-
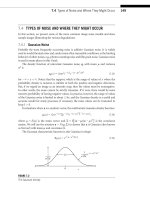
loaded. Streaming sounds are synchronized on a timeline. Table 10-1 displays the sound
formats that you can import into Flash CS4 if you have QuickTime 4 or later installed on
your computer.
The latest version of QuickTime can be downloaded for free from sss*]llha*
_ki+`ksjhk]`o.
Table 10-1. Supported sounds in Flash CS4
Sound Descriptor
AIFF Macintosh native sound format
ASND Adobe Soundbooth native sound format
WAV Waveform audio format (Windows and Mac OS compatible)
MP3 MPEG-1, Audio Layer 3 cross-platform (Windows and Mac
OS) sound file
Sound Designer II Mac-only sound
Audio-only Windows and Mac compatible
QuickTime movies
Sun AU Cross-platform (Windows and Mac) sound
System 7 Cross-platform (Windows and Mac) sound
Importing sounds
Importing sounds into Flash CS4 is as simple as importing images. The following exercise
will show you how to import the sound of a wasp. Be sure to have downloaded the source
files for this chapter from the friends of ED website (sss*bneaj`okba`*_ki).
1. Open a new document in Flash CS4.
2. Select File ¢ Import ¢ Import to Library, as shown in Figure 10-1.
THE ESSENTIAL GUIDE TO FLASH CS4
292
Figure 10-1. Importing a sound to the library
3. Navigate to where the s]ol*s]r file is saved
on your system, in the
Import dialog box, and
ensure that the selected file type to view is
WAV Sound (*wav).
4. Select wasp.wav and click Open to import
the sound into the Library, as shown in
Figure 10-2.
As you can see, sounds are saved into the Flash
CS4 document’s Library along with any images,
movie clips, and symbols that make up the Flash
CS4 animation. Just as you can use an image multiple ways in an animation with just one
copy in the Library, you can use one sound in the Library multiple ways.
You can also preview the sound in the Sound Library by clicking the play con-
trols at the top right of the preview panel.
Figure 10-2. The file wasp.wav
imported into the Library
SEEING AND HEARING ARE BELIEVING!
293
10
Let’s hear how the sound file that we have just imported plays:
1. Double-click the s]ol*s]r file in the Library. The Sound Properties dialog box will
appear, as shown in Figure 10-3.
Figure 10-3. The Sound Properties dialog box displaying the
wasp.wav file
You need to click the speaker icon rather than the file name in the Library to
get the
Sound Properties dialog box to display. Clicking the file name merely
allows you to rename the file in the Library.
2. Click the Test button in the Sound Properties dialog
box. You will hear the wasp buzzing for about 15
seconds.
3. Save this Flash CS4 document as s]ol*bh], as we
will be using it in the next exercise.
Though it hasn’t been seen since Flash 8, Flash CS4 also
contains a comprehensive Sound Library. To access the
Sound Library, as shown in Figure 10-4, select
Window ¢
Common Libraries ¢ Sounds.
The Sound Library is completely royalty free and may be
used on commercial and personal websites. It contains a
variety of sounds to help bring your Flash CS4 movies to
life, such as ambient background noises, animal noises,
explosions, screams, and general household sounds.
Figure 10-4. The Sound
Library installed with Flash CS4
THE ESSENTIAL GUIDE TO FLASH CS4
294
Exporting sounds
Sound and video files can be large and slow to download, so Flash can compress them so
that they’re smaller and quicker. Flash CS4 offers you the ability to select compression
options for individual event and stream sounds, and also for videos, which we will be using
later on in this chapter. For now, let’s check out how to export sounds and use the
Sound
section of the Properties Inspector.
When you need to be careful about file size, it’s a good idea to compress sounds, though
the quality of the sound deteriorates the more you compress it. As you will discover in
Chapter 11, there are international standards for file size in online advertising collateral.
Likewise, when visiting your website, users can be fickle. If you keep them waiting to see
your content, there is no guarantee that they will stick around to see your offering.
Therefore, as a Flash developer, when it comes to sounds and video, you are constantly
walking a fine line between optimal performance and preserving the integrity of your
files.
Sound file compression in Flash CS4
In the Sound Properties dialog box, you can choose from different types of compression, as
shown in Figure 10-5. We’ll momentarily deviate from our exercise to investigate what
each of these are.
Figure 10-5. Types of sound compression available in Flash CS4
ADPCM compression
ADPCM (Adaptive Differential Pulse Code Modulation) compression enables you to com-
press 8- and 16-bit sound data. This is the best kind of compression to use when you have
very short and light sound files, such as a button click or page transition click, as ADPCM
SEEING AND HEARING ARE BELIEVING!
295
10
compression does not compress the sound file very much. As shown in Figure 10-6, when
you select ADPCM, a number of options become available for exporting the file.
Figure 10-6. The
ADPCM compression
options
Preprocessing enables you to convert stereo sound to monaural (better known as mono)
sound, which is a single-channel sound that can be channeled to two or more speakers.
Changing the sample rate enables you to control the file size and the sound quality
(defined in kilohertz [kHz]). Generally, the lower the sample rate, the smaller the file size,
but this decrease in file size is often at the expense of sound quality. As a Flash developer,
you are constantly walking the line between high-quality sounds, videos, and graphics, and
acceptable files size for users. You cannot increase the kHz of a sound file beyond that of
the original imported file—that means that you cannot improve the sound quality of the
original file.
Changing the
ADPCM Bits setting enables you to manipulate the bit rate of the sound
compression. The lower the bit rate, the lower the sound quality; and the higher the bit
rate, the better. If file size is not an issue, choose the higher-quality sound. If you have file
weight restrictions, you will be required to compromise on sound quality.
MP3 compression
MP3 compression allows you to export sound files employing MP3 compression. This is the
option to use when you are exporting longer-playing sounds, such as movie clip sound-
tracks and songs. Again, the MP3 compression option, as shown in Figure 10-7, offers a
number of different choices when exporting your movie.
Figure 10-7. The MP3
compression options
The Preprocessing option is exactly as per other compressions—that is, it enables you to
change stereo sound to mono. The difference with MP3 compression is that you are only
able to make this conversion if the file that you are converting has a bit rate of 20kbps
(kilobits per second) or higher.
THE ESSENTIAL GUIDE TO FLASH CS4
296
Once again, changing the bit rate determines the exported sound file’s bits per second, at
a range between 8 and 160kbps. If you are exporting music soundtracks, for best sound
results, ensure that the bit rate is set to 16kbps or higher.
The options in the
Quality drop-down box in the MP3 compression option are as follows:
Fast, which offers most compression for the fastest possible download per bit rate; Best,
which offers the best quality sound at the expense of download times; and
Medium, which
is a midpoint between the two settings.
Raw compression
Raw compression exports your sound with no sound compression—that is, it does not
change the file size, regardless of the kHz quality. As shown in Figure 10-8, you are able to
use the
Preprocessing option to convert stereo sound files to mono, and to change the
sample rate.
Figure 10-8. Raw
compression preserves
the original file size.
Raw compression exports the sound file without applying any compression to it at all.
Speech compression
Speech compression exports sounds using a compression that is especially created for
human speech. As shown in Figure 10-9, it does not offer preprocessing conversion from
mono to stereo sound, and the sample rate gives you control over file size and sound qual-
ity. While 5kHz is acceptable for speech, a sample rate of 11kHz or over is recommended.
44kHz is standard audio CD quality but a longer download time.
Figure 10-9. Speech
compression options
Compressing a sound file
You will learn about the importance of optimizing your Flash CS4 movies in Chapter 11,
but for now, let’s learn how to compress a sound file.
1. Open the file s]ol*bh] that you created in the previous exercise in Flash CS4.
2. Double-click the speaker icon next to wasp.wav in the Library. The Sound Properties
dialog box will appear, as shown in Figure 10-10.
SEEING AND HEARING ARE BELIEVING!
297
10
Figure 10-10. The Sound Properties dialog box
Notice that the details for the original file appear as shown in Figure 10-11. The unedited
s]ol*s]r file is 6.3KB. In the next step, we’ll see what happens when we change the
compression rate.
3. Select MP3 from the Compression drop-down list.
Notice how the file size has changed from 6.3KB to 2.3KB—approximately 60 percent
smaller. These conversions will prove invaluable in creating complicated Flash CS4 anima-
tions of small file size.
We’re now going to test the sound.
4. Click Test to hear the sound.
You will hear the angry sound of a wasp! You can continue to play with the settings until
you are happy with the sound.
5. Click OK to accept the sound.
Simple compression is not the only way that you can optimize sound files in your Flash CS4
animations. There are many ways that you can be clever with sound to prevent your files
becoming too large, while still preserving their sound integrity. For example, you can set
short sounds and music riffs to loop to provide background music for your animation. This
will ensure that you have music throughout the animation, but will enable you to minimize
the added weight to your file size from sound, as you are employing one small sound over
and over again. It’s important to note that you shouldn’t ever loop streaming sound.
Similarly, if you have only certain points where different sounds need to be heard, set
them to play from separate small sound files at the appropriate spot, instead of including
a large sound file that has moments of silence, which would add weight to your Flash file.
Figure 10-11. The
original file is 6.3KB.
THE ESSENTIAL GUIDE TO FLASH CS4
298
Get more out of the same sounds by applying different effects for sounds (such as volume
envelopes, looping, and in/out points) at different keyframes. You can get a number of
sound effects by using only one sound file.
We will now demonstrate how to apply sounds to the timeline using an animation used
previously in this book, and in the process explore the sound settings in the Properties
Inspector.
Adding sounds to the timeline and using the sound
settings in the Properties Inspector
We’ve seen how to compress sounds for optimum playback for both file loading times and
sound quality, and now we’ll start the first of the exercises in applying the sound to the
timeline. For this exercise, we will continue to use the s]ol*s]r file before we move into
completing another step on the banner that we created in Chapter 6.
1. With the previous exercise completed to the final step (step 4), click frame 1 of
Layer 1.
2. Drag the s]ol*s]r file onto the stage.
Notice that while you can’t see anything on the stage, there is a
small wavy line in the first frame of the timeline, as shown in
Figure 10-12.
Now that you have placed a sound on the timeline, you can take
advantage of the preset sound effects that come with Flash CS4.
3. Click frame 1 of Layer 1 to select it. The Properties Inspector will appear, as shown in
Figure 10-13. It is here that you can apply different settings that will affect your sound.
Figure 10-13. The Sound section of
the Properties Inspector
Figure 10-12. The sound populates
frame 1 of the movie.
SEEING AND HEARING ARE BELIEVING!
299
10
4. Choose an effect from the Effect drop-down menu, as shown in Figure 10-14.
Table 10-2 details what happens with each effect.
Table 10-2. Default sound effects in the Effect drop-down
Effect Details
Left channel The sound is played through the left speaker only.
Right channel The sound is played through the right speaker only.
Fade to right The sound plays normally but fades out to the right
speaker.
Fade to left The sound plays normally but fades out to the left
speaker.
Fade in The sound fades in from silence.
Fade out The sound fades out from silence.
Custom The
Custom setting brings up the sound
envelope, as shown in Figure 10-15, which allows
you to customize the fading in and out of your
sound.
Figure 10-15. The Edit Envelope dialolg allows you to customize your sound on
the stage.
Figure 10-14. The preset sound
effects in the Effects drop-down
THE ESSENTIAL GUIDE TO FLASH CS4
300
The Stream option of the Sync drop-down box tells Flash CS4 to begin playing the sound
before it is completely loaded into memory. The downside to it is that every time the
sound is replayed, it needs to be reloaded. Setting
Sync to stream also tells flash to line the
sound up with the timeline—if you add frames to the layer with a streaming synced sound
and scrub the playhead back and forth, you will hear a preview of the sound event at that
frame.
Applying sounds to a button using
ActionScript 3.0
Now that you’ve seen how to import a sound into the Library, we’re going to revisit a famil-
iar Flash CS4 movie. In Chapter 6, you learned how to animate a banner on motion paths.
We’re now going to give it some sound. Ensure that you have either completed the final
exercise in Chapter 6, or that you have downloaded the source files for this chapter from
the friends of ED website. When you have downloaded the file, take a moment to listen to
it. You will find that we have built onto the original insect buzzing sound, adding some
background noise and a sudden crunch—as if our fly is being consumed by a monster! If
you have not completed the Chapter 6 exercise, you can download it from the Chapter 10
files for this book from the friends of ED website, along with the sound source file.
1. Open the final exercise from Chapter 6 or the downloaded source file from this
chapter in Flash CS4. Your stage will display as shown in Figure 10-16.
Figure 10-16. The open file
2. Save the sound file and the Flash source file in the same directory. Do not change
their names; this is important to ensure that the ActionScript that we are about to
code can reference the sound file and therefore works.
The first thing we are going to do is to create a button that will enable people to click to
hear and mute sound after we have applied
ActionScript to it.
3. Import the ^aa*il/ file into the anima-
tion by selecting
File ¢ Import to Library.
4. Create a new layer at the very top of the
timeline, above all of the other layers.
5. Call it sound, as shown in Figure 10-17.
Figure 10-17. Creating the sound layer
in Flash CS4
SEEING AND HEARING ARE BELIEVING!
301
10
The next thing we need to do is create a button to which to attach the sound. We will do
this on the
sound layer of the timeline.
6. Select Insert ¢ New Symbol.
7. Give it the name of sound_btn and the type of Button, as shown in Figure 10-18.
Figure 10-18. Naming your button symbol
8. The button should open immediately on the stage, ready for you to edit. If it
doesn’t, double-click the
sound_btn button in the Library.
The button symbol will open for editing. We’re going to create a button that users click to
hear or mute the sound. Ensuring that sound is user initiated is very important when creat-
ing banner ads for a client who is planning to distribute the ads through common publish-
ers, as there are guidelines that must be adhered to for those ads to be published. See
more about international publishing standards in Chapter 11.
9. Draw a small black rectangle on the stage within the sound_btn symbol.
10. Insert the text shown in Figure 10-19 in white on top of the black rectangle.
Remember that the button needs to fit on the banner, so don’t make it too big.
Figure 10-19.
Creating a button to
attach your sound to
11. Click Scene 1 at the top-left corner of the stage to exit the button editing screen.
12. Drag the sound_btn symbol from the Library to the right side of the stage, as shown
in Figure 10-20.
13. In the Properties Inspector, give the button an instance name of sound_btn.
Figure 10-20. Placing the sound button on the stage
THE ESSENTIAL GUIDE TO FLASH CS4
302
We have now prepared the movie, and it’s time to move on to the ActionScript side of
adding the sound.
14. With the first frame of the sound layer on the timeline, open the Actions panel by
selecting
Window ¢ Actions.
The first step in adding sound to your animation is to create a Okqj` object. This is a three-
step process. First of all, we will declare a new sound and call it ^aa. This sound is named
as it is because we are referencing the ^aa*il/ file that is saved in the same directory as
your Flash CS4 document. As discussed previously, the Okqj` object in ActionScript is the
ideal way to finely control sounds in your animation, as it keeps the size of the animation
smaller and enables you to specify exactly where you want sounds to occur, regardless of
the size of the animation or the ability of the user’s computer to display large-scale anima-
tions smoothly.
The second step is to tell Flash that ^aa is a new Okqj` object, and then you tell Flash
exactly where the sound is located. This needn’t always be a relative path; you could point
it at an absolute URL such as sss*bneaj`okba`*_ki+okqj`o+^aa*il/ if you so wished.
All three steps are contained in one line of code!
15. Type the following code into line 1 of the Actions panel, as shown in Figure 10-21:
r]n^aa6Okqj`9jasOkqj`$jasQNHNamqaop$^aa*il/%%7
Figure 10-21. The first step in creating a Sound object is to declare the sound in ActionScript.
Now we’ll create a Okqj`Pn]jobkni object. Okqj`Pn]jobkni objects control volume and
stereo panning—that is, which stereo channel the sounds are directed to come out of. In
this situation, we are allowing the users to decide if they want to hear the sound or not at
the click of a button.
SEEING AND HEARING ARE BELIEVING!
303
10
16. Add the following code at line 2 of the Actions panel, as shown in Figure 10-22:
r]nrkh6Okqj`Pn]jobkni9jasOkqj`Pn]jobkni$-(,%7
Figure 10-22. Adding the SoundTransform object
Once again, a single line of code encompasses multiple steps. The first is setting the
Okqj`Pn]jobkni volume. Volume (in this case the number - in the code) is always repre-
sented by a value between 0 and 1.
The second step is to give the code a value for left and right stereo panning. Stereo pan-
ning in code is represented with values between –1 and 1, with –1 being the extreme left,
1 being the extreme right, and 0 being directly in the middle of left and right stereo—in
which the sound is basically transmitted through two or more designated channels, creat-
ing a fuller sound experience.
The Okqj`?d]jjah object controls the sound in your Flash CS4 movie. Every sound in your
Flash CS4 ActionScript 3.0 document is assigned to a Okqj`?d]jjah object, which acts like a
speaker system for your sound file. Your Flash CS4 application can have many Okqj`?d]jjahs
that can be mixed together to produce different kinds of sound effects, thus making it easier
for the Flash designer to produce unique and compelling animations. So now we’ll give our
animation a Okqj`?d]jjah object.
17. Add the following code to line 3 of the ActionScript, as shown in Figure 10-23:
r]nokqj`Abba_po6Okqj`?d]jjah9^aa*lh]u$,(-(rkh%7
This new line of code gives the Okqj`?d]jjah object the name okqj`Abba_po.
Figure 10-23. Naming the SoundChannel object
The code in step 17 tells the Flash file where to start playing the ^aa*il/ file. The first
number, 0, tells the file to start playing from 0 seconds, or the absolute start. The second
number, 1, tells the file to play the sound once only. The reference to rkh is referring to
the Okqj`Pn]jobkni you created in step 16, which contains the values for the volume and
stereo panning.
If we pause for a moment here and test the movie by selecting
Control ¢ Test Movie, we
can see the wonderful effects that sound has upon an animation. Your bug now buzzes!
Birds sing in the background and the caterpillar-like creature closes its mouth with a
resounding lip smack. Now that we have the sound playing, we are going to give the user