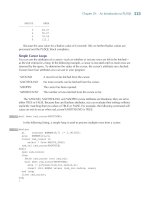
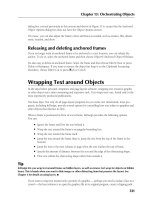
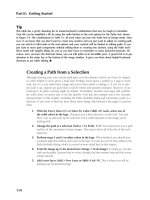
THE GIMP Bible PHẦN 5 pps
Bạn đang xem bản rút gọn của tài liệu. Xem và tải ngay bản đầy đủ của tài liệu tại đây (1.46 MB, 76 trang )
Part III: Manipulating Images
Analyzing Your Colors with Info Tools
Before doing color correction on an image, it’s a good idea to understand the nature of
that image in an analytical sense. The functions available in the Colors
Info submenu are
well-suited to providing you with the raw data about your image that can facilitate that analysis.
Histogram
Probably the most useful of the informational tools is the histogram. As you may have noticed,
the histogram is an integral part of many of GIMP’s color tools, including the Levels, Curves,
and Threshold tools. It’s also the easiest way to see how the automated tools have modified the
tonal qualities of your image. Because the histogram is so valuable, it’s actually one of GIMP’s
dockable dialogs, briefly covered in Chapter 1. The Colors
Info Histogram menu item is
just a convenient shortcut that brings up the same dockable dialog you get by going to Windows
Dockable Dialogs Histogram. As explained earlier in this chapter, a histogram is a chart that
shows how many pixels in your image share a specific value for a given channel in your image.
Figure 9-40 shows the Histogram for each of its available channels.
FIGURE 9-40
The Histogram dialog can show statistical data for each of the channels in your image, including a
combined view of all channels.
Like in the Levels and Curves tools, you can switch which channel the histogram displays by
clicking the Channel drop-down menu. You also still retain the ability to display the histogram
266
Chapter 9: Adjusting Colors
on either a linear or logarithmic scale with the two buttons on the right side of the dialog. The
Histogram dialog also features a set of triangle sliders beneath the actual histogram graph, but
this does not modify anything in the image. It merely defines a range for giving you statistical
information at the bottom of the dialog.
The Histogram dialog displays information only for the active layer or the current selection of
pixels within that layer. If you want to have the histogram show an analysis of all visible pixels,
you first need to merge layers.
Border Average
Like the other color operations in the Info submenu, the Border Average operation (Colors
Info Border Average) does not modify your image. However, it does change the foreground
color used by your paint tools. Basically this tool traverses either the border of the active layer
or your current selection and calculates the dominant color used for that perimeter. That color is
assigned to your foreground color. To do this, the Border Average operation brings up a dialog,
such as the one shown in Figure 9-41.
FIGURE 9-41
The dialog for the Border Average operation
This dialog features two primary controls:
Border Size — When the Border Average function runs, it creates a border around your
active layer or selection and samples the pixels within that border. The Thickness value set
here in the dialog determines how wide that border is. Larger Thickness values increase
the number of sampled pixels that Border Average uses to pick your new foreground color.
Number of Colors — As the Border Average operation traverses the border it has created,
it takes the colors it samples and organizes them into a series of buckets that it later uses to
determine the dominant color along the border. The drop-down menu here dictates how
many colors get included in each bucket. If you have a smaller Bucket Size, the Border
Average operation yields more precise results about the nature of the colors in the selected
border area.
Colorcube Analysis
As Figure 9-42 shows, the Colorcube Analysis function (Colors Info Colorcube Analysis)
produces a histogram that looks remarkably similar to the Histogram dialog when set to the
RGB pseudochannel. For the most part this is true; it just shows the information at a somewhat
267
Part III: Manipulating Images
finer grain, using each of the six common hues in digital color (red, yellow, green, cyan, blue,
magenta) and showing the results in an additive format where each color overlaps with the
others to generate a new color. Where all of the colors overlap, you see white.
FIGURE 9-42
The results of running Colors Info Colorcube Analysis on a color image
Smooth Palette
Unlike the other operations in the Info submenu, the Smooth Palette operation (Colors Info
Smooth Palette) actually creates an image as output. Specifically speaking, it creates an image that
looks very similar in appearance to the gradients in the Gradients dialog. Basically, it takes all of
the colors in your image and generates a linear palette from them. The main purpose of this filter
is to create custom input for the Flame filter (Filters
Render Nature Flame). However, it’s
also a pretty convenient way to generate a map of the colors used in an image. Then you can
use the strip that’s generated as your painting palette if you want to create an image with similar
tonal qualities. Figure 9-43 shows the Smooth Palette operation’s dialog and an example palette
that it created.
FIGURE 9-43
On the left, the Smooth Palette dialog; on the right, a palette that this operation generated
The Width and Height values in this dialog dictate the final size of the generated palette
image. The Search Depth field stipulates the number of shades included in the palette. It has a
range from 1 to 1024. If you choose to generate a palette with a Search Depth that’s greater than
the default value of 50, it’s definitely a good idea to at least increase the width of the generated
palette image.
268
Chapter 9: Adjusting Colors
Color Filter Plug-ins
The last set of items in the Colors menu is actual filter plug-ins that ship with GIMP and explic-
itly work with color. For convenience and organization, they’ve been included with the Colors
menu rather than cause undo clutter in the already lengthy Filters menu.
Color to Alpha
This filter performs the exact same function as can be found in Layer Transparency Color
to Alpha. This feature is discussed more in depth in Chapter 6, but the thrust of it is that you
use the dialog that appears (shown in Figure 9-44) to choose a color to be mapped to the alpha
channel. The cool thing about this filter is that rather than do a binary transparency opera-
tion where one specific color is transparent and all others are opaque, this filter measures the
influence of the chosen color in each color channel and uses that to produce varying levels of
transparency on the active layer or selection.
FIGURE 9-44
The Color to Alpha dialog
Colorify
The Colorify filter is like a quick-and-dirty version of the Colorize tool. Rather than present you
with a handful of sliders to adjust the hue, saturation, and luminosity of the overlay color for
your active layer or selection, the Colorify filter presents you with a dialog (Figure 9-45) that has
a preview window and seven preset colors to apply to your image: the six core component colors
and white. If none of those colors are to your liking, you can click the Custom Color swatch and
choose the color you want with the color picker that appears. Ultimately the effect is about the
same as Colorize. You get an image that appears like you’re viewing it through colored glass.
Filter Pack
The Filter Pack filter is pretty interesting. It doesn’t really provide any facilities that you can’t
get with any of GIMP’s standard color correction tools, but it does offer a cleaner interface to
269
Part III: Manipulating Images
perform color-correction activities. When you call Filter Pack from Colors Filter Pack, you get
a dialog like the one in Figure 9-46.
FIGURE 9-45
The Colorify filter’s dialog
FIGURE 9-46
The Filter Pack dialog (left) and its various sub-windows for adjusting (in columns from left to right)
Hue, Saturation, Value, and for performing advanced curves techniques
The best way to approach the Filter Pack plug-in is to work down the left column of the dialog
and then work down the right. So the first thing you want to set is what gets shown in the pre-
view images at the top of the dialog. Just like the Rotate Colors operation, you have the choice
of showing the Entire Image, your Selection Only (if you have a selection), or the Selection in
Context. Both the Original and Current preview images at the top are updated to reflect your
changes.
270
Chapter 9: Adjusting Colors
After determining what you want to see in the previews, you can then decide which pixels you
want to tweak first. The radio buttons under the Affected Range heading have the same effect as
the Shadows, Midtones, and Highlights radio buttons in the Color Balance tool.
Unlike a lot of other filters and tools that can work in RGB space or HSV space, the Filter Pack
filter works exclusively in HSV. Therefore, the next set of radio buttons under the heading Select
Pixels By is how you tell Filter Pack which channel you want to work on: Hue, Saturation, or
Value (Luminosity).
With all of the controls on the left side of the dialog set, you have your work environment for
color correction established. Now you can really get into some color correcting. The way it works
is pretty intuitive. On the right side of the dialog under the Windows heading, click the check
box that corresponds with the channel that you want to modify. The first three options pop up
sub-windows, each with an array of thumbnail previews of your image with various color adjust-
ments applied to them. Click the image that most closely matches the final look you want. You
can continue with this process until you’re satisfied with the final look presented. If you’re com-
pletely satisfied, you can click OK and Filter Pack processes your color corrections to give you
your final results. Figure 9-47 shows the secondary dialogs that appear when you enable the
check boxes for each of the Hue, Saturation, and Value channels.
FIGURE 9-47
From left to right, channel dialogs for Hue, Saturation, and Value
If you’re not completely satisfied, you have two further options. For one, you may want to have
more fine-grained control over the differences between the thumbnail choices that Filter Pack
presents you with. You can compensate for that by adjusting the Roughness slider at the bottom
of the Filter Pack dialog. Lower Roughness values reduce the amount of change between preview
images.
Your other option for fine-grained control is in the Filter Pack’s Advanced window. This window
gives you even more control over the difference between the preview images presented to you
271
Part III: Manipulating Images
in each of the filter’s sub-windows. This window is dominated by a Curves tool–like control for
tweaking intermediate levels between the previews. You can also use the Preview Size slider on
the right of this sub-window to increase or decrease the size of the previews so you can better
see what Filter Pack is doing. Figure 9-48 shows the Advanced sub-window for the Filter Pack
feature.
FIGURE 9-48
The Advanced window for the Filter Pack gives you controls similar to the Curves tool.
Hot
The Hot filter is most valuable when you’re working on images that are destined for display
on television in older standard definition (SD) formats like PAL or NTSC. The issue with older
SD televisions is that historically they’re not particularly good at displaying colors or values at
full saturation or luminosity. So to compensate for that television editors and graphic artists
have to work in ‘‘television-safe’’ colors, kind of like the Web-safe color palette. However, GIMP
doesn’t natively limit you to working only in the NTSC or PAL color spaces. This is where
the Hot filter comes in. Launch this filter from Colors
Hot and you get the dialog shown in
Figure 9-49.
The options in this dialog allow you to adjust your image’s histogram to fit within either the
NTSC or PAL color spaces. Furthermore, it also gives you the chance to create a new layer in
your image with the modified version of your image. This way you can compare it with the orig-
inal and see if there are any glaring problems with the automated color conversion that this filter
implements.
Maximum RGB
The Maximum RGB filter (Colors Maximum RGB) has the relatively simple dialog box shown
in Figure 9-50.
This filter works by analyzing each pixel in your image and determining which of the three chan-
nels (red, green, or blue) is the most dominant or least dominant for that pixel. Which one it
chooses to display is determined by the radio buttons in the dialog:
272
Chapter 9: Adjusting Colors
Hold the Maximal Channels — The dominant channel is retained. The other two chan-
nels are discarded.
Hold the Minimal Channels — The least dominant channel is retained and the other,
more dominant channels are discarded.
FIGURE 9-49
The Hot filter’s dialog
FIGURE 9-50
The Maximum RGB filter dialog
Regardless of which channels are retained and which are discarded per pixel, the end result is an
image that consists entirely of the primary colors red, green, and blue.
Retinex
Typically speaking, the human eye is much better at seeing in low light conditions than the
electric sensor of a camera. Therefore, cameras don’t always pick up the detail in low light
that humans would find critical for correctly understanding what’s going on in the image. The
Retinex filter is an attempt to enhance dark images in a way that’s more akin to the way the
human eye works. The core of the filter is in the MultiScale Retinex with Color Restoration
(MSRCR) algorithm. The term Retinex is a combined abbreviation of retina and cortex. It works
well on underexposed photographs and is often used to show more detail in astronomical
photographs and medical images like x-rays and MRIs. When you activate this filter by going to
Colors
Retinex, you get a dialog like the one in Figure 9-51.
273
Part III: Manipulating Images
FIGURE 9-51
The Retinex filter’s dialog
The key to the MSRCR algorithm is that it attempts to replicate the behavior of the human
eye. That being the case, many of the settings in this filter’s dialog are a bit obtuse and lean
toward the technical side of things. Explanations of the inner workings of this algorithm are
beyond the scope of this book, but if you’re interested, there’s a good reference paper online at
www.dti.unimi.it/rizzi/papers/josa.pdf. Fortunately there aren’t too many controls, so
this filter is pretty conducive to a healthy amount of fiddling and playing with the controls to
get a good feeling for how they behave. The default values tend to yield acceptable results, but
the following descriptions of each control setting should help you attain better results:
Level — The Level drop-down gives you three options that deal with the light intensity in
the image.
Uniform — This is the default value. It treats both high and low intensity areas evenly
and tends to yield the most natural results.
Low — The results of this option tend to look a bit like simple edge detection. The
emphasis here is on the low-intensity details of the image at the expense of washing out
the rest of it.
High — This option tends to emphasize the clearest part of the image, accentuat-
ing contrast and enhancing the colors. If the results from the Uniform option appear
muddy, this option should appear cleaner.
Scale — The lower this value is, the more rudimentary the filtering is in the results. At
low values, you may still see details in the image, but there’s often a glow or color shift
around features that reduces the clarity of the image overall. Typically, the optimal setting
for this option is a value of 240 and therefore that’s also the default value.
274
Chapter 9: Adjusting Colors
Scale Division — The Retinex filter is an iterative filter, meaning it runs its core
algorithm multiple times when you click OK. This value controls how many iterations
are used. The default value of three gives good results. Setting the Scale Division too
high not only increases processing time, but it also tends to make your final image a bit
noisy.
Dynamic — Of the controls for this filter, this one is the most image-dependent. Higher
values reduce the saturation and overall contrast of the results and lower values tend to
blow out the details in the image.
The biggest thing to know about the Retinex filter is that it can sometimes take a while to
finish processing. This is particularly true on larger images. That’s something to keep in
mind as you monkey around with the settings. Be careful when adjusting them (especially
the Scale Division slider), or you may be waiting a while for GIMP to finish processing after
you click OK. Figure 9-52 shows the results of the Retinex filter for each of the three Level
options.
FIGURE 9-52
From left to right, the original photograph and that same photograph with the Retinex filter applied
using Uniform, Low, and High levels (Photo credit: cgtextures.com)
Exporting Color Separations with the
Separate+ Plug-in
Earlier in this chapter you saw how the Decompose operation could be used to take images from
GIMP’s native RGB color space and spit out color plates for channels in a variety of other for-
mats, including HSL, LAB, and CMYK (pronounced in the GIMP community as ‘‘schmuck’’). As
part of that discussion, I recommended against using Decompose to produce your CMYK plates.
The reason for that is because you typically want to go to CMYK only when you want to take
an image to a printer using a traditional four-color process. That being the case, straight CMYK
likely won’t cut it. The reason for that is because GIMP’s Decompose feature doesn’t take any
color management profiles into account. When it comes to getting computer graphics off of a
computer monitor and on to some other media, color management becomes very important. It’s
through the color profiles used by color management systems (CMS) that hardware printers and
275
Part III: Manipulating Images
software applications can agree on a display standard. Without color management, it’s incredibly
difficult to work with a digital color image and be guaranteed its colors on screen will be accu-
rate to the printed result.
This is where the Separate+ plug-in comes in. If you don’t already have Separate+ installed for
GIMP, have a look through Chapter 21 and follow the installation instructions there for your
operating system. Once you get Separate+ installed and working on your computer, come back
here and have some fun.
At its core, the Separate+ plug-in does the exact same thing that the Decompose operation does.
The only difference is that Separate+ uses industry-standard color profiles to dictate the color
spaces that it decomposes to. Because Separate+ operates on an entire image and not just the
active layer, the Separate+ functions are not found in the Colors menu. Instead, go to Image
Separate to see the Separate+ submenu, shown in Figure 9-53.
FIGURE 9-53
See the items in the Separate+ submenu by going to Image Separate, as shown on the
left here. On the right is the Separate+ dialog called when you go to Image Separate
Separate+.
The real functionality you want to work with is at Image Separate Separate+.Thetwomost
important controls in this dialog are dictated by the buttons next to the Source and Destination
Color Space labels. These define the color space that you’re working with in GIMP and the color
space that you want to print in, respectively. Assuming you’ve set up your color space prop-
erly through GIMP’s Preferences window (as described in Chapter 1), everything here should be
ready to go. However, if you’ve got a special situation and are either working in a different color
space or you want to create color separations for a different destination color space, just click the
button next to the color space you want to change, and choose your desired color space from
the dialog that appears. It should look something like the one in Figure 9-54.
Beneath the Source Color Space button is a check box labeled Give Priority to Embedded Pro-
file. Most photographs and other images intended for print typically come with their own color
276
Chapter 9: Adjusting Colors
profile embedded in the file. To ensure the most color accuracy, it’s usually a good idea to stick
with the embedded profile. The only exception to this would be if GIMP can’t handle the embed-
ded color profile and you have to convert to something GIMP can handle before continuing to
edit the image. If that’s the case, you’ll want to leave this check box disabled.
FIGURE 9-54
The dialogs that allow you to pick your desired Source (top) and Destination (bottom) color spaces
The next control in the Separate+ dialog is the drop-down menu labeled Rendering Intent. Your
options in this menu match the same menu in the Color Management section of GIMP’s Pref-
erences. For a review of these Rendering Intent options, refer back to Chapter 1. Typically, you
should use the same Rendering Intent here that you defined in those Preferences.
Beneath the Rendering Intent drop-down are four more check boxes:
Use BPC Algorithm — BPC is an abbreviation for black point compensation. Typically
it’s okay to leave this check box enabled. If you’re taking your image to a professional
print shop, ask them whether they would prefer to have BPC enabled in your files or
disabled.
Preserve Pure Black — Enable this option to ensure that the blacks in your image are
truly black rather than a concentrated mixture of the cyan, magenta, and yellow inks.
277
Part III: Manipulating Images
Overprint Pure Black — Overprinting is when one color is printed over another. This is
either done to get a third color or, in the case of overprinting black, compensate for possi-
ble registration and alignment errors when printing. The main situation where you want to
enable this option is when you have pure black overlapping another color. For instance, if
you have black text on a blue background, you’ll want to overprint the black. However,
if you have black text straight on the white paper, there’s no need to overprint. This option
is available only if you enable the Preserve Pure Black check box.
Make CMYK Pseudo-Composite — When you run the Separate+ plug-in, it works like
the Decompose operation and generates a new image with four grayscale layers; one for
each color channel in the CMYK color space. Separate+, however, offers another pos-
sibility if you enable this check box. Rather than create the grayscale channels as layers,
Separate+ creates a layer for each color and then uses the grayscale channel as a mask for
that color. By doing that and compositing the layers on the same image, you get a rough
composite of what the final color image looks like.
Figure 9-55 shows the color separations that Separate+ creates as well as the layer structure
when you have Make CMYK Pseudo-Composite enabled.
FIGURE 9-55
The CMYK color separations for a photograph and the layer structure GIMP creates when doing a
pseudo-composite (Photo credit: cgtextures.com)
Original
Cyan Magenta
Yellow Black Pseudo-Composite
Once you’ve created your separations, you have a few options that you can play with. Proba-
bly the most useful thing you can do is save your color separations to an image format that a
print shop can handle. Fortunately, you can do this easily by going to your separated image and
choosing Image
Separate Save. This brings up a File Chooser where you can export a sepa-
rated TIFF image with the proper CMYK color profile embedded with it. Once the file is saved,
278
Chapter 9: Adjusting Colors
you can verify that it works by trying to re-open it with File Create Separated TIFF. This
should open your separated image with the proper color profile and color masks assigned to
each layer.
The other useful operation you can do with the Separate+ plug-in is create a print proof based
on your separated color channels. To do this, go to Image
Separate Proof. This brings up a
dialog like the one in Figure 9-56.
FIGURE 9-56
Separate+’s Proof dialog for testing to see how your separated image may look when printed
This dialog is kind of like the inverse of the Separate+ dialog. Use the buttons next to Moni-
tor/Working Color Space and Separated Image’s Color Space to choose the correct color spaces
for your image and your working environment. Assuming you’ve properly configured everything
in GIMP’s Preferences, these buttons should default to the correct color spaces. You can also
lend priority to the embedded color profile in your image. That shouldn’t be necessary if you’ve
just created the separated image on the same machine, but if you’re dealing with a file created
elsewhere, this option is incredibly helpful.
The only other options for creating a proof are in the drop-down menu labeled Mode. For most
circumstances, Normal should yield the results that you want. However, if you need to simulate
black ink or the white color of the paper you’re printing on, this menu provides you with those
options as well. Once you’ve made your settings, click OK and the Separate+ plug-in creates a
new image with a reproduction of what should be produced by the printer.
Summary
This chapter was huge. Not only did you go through a comprehensive explanation of all the color
correction tools and operations available in GIMP’s Color menu, but you also got to see where
some of them are more useful than others. In particular, you discovered that in the right hands,
the Levels and Curves tools can be used to create almost any other color correction effect. You
also saw the value that histograms have in correcting and analyzing the colors in your image.
And at the end of the chapter, you were introduced to the Separate+ plug-in and discovered
why it’s superior to using the Decompose operation if you’re taking your image to a printing
professional. All in all, this chapter covered a ton of stuff. Next up, working with text. It’s fun.
Ipromise.
279
Working with Text
IN THIS CHAPTER
Knowing the benefits of text
Using the Text tool
Understanding how text
layers work
A
picture may be worth a thousand words, but that doesn’t necessarily
dictate that they’ll be the best or most appropriate words for com-
municating any given subject matter. Sometimes you don’t need
a thousand words; you just need one or two properly chosen ones. Enter
GIMP’s text editing features. If you’re working with digital images, some-
where along the line you’re probably going to need to mix text with those
images. This chapter gives you the rundown on exactly how you do that in
GIMP. GIMP isn’t necessarily a typesetting or layout tool, but its text features
are extensive enough for you to do everything from labeling photos to using
that text as a design element.
Another thing to note is that, along with paths, GIMP handles text as vector
image data. This gives you the ability to edit, move, resize, and drastically
modify your text over and over again, non-destructively.Ifyousaveyour
image in GIMP’s native XCF format or the Photoshop PSD format, the text
vector information is retained so you can continue to edit in future sessions.
However, if you save in a pure raster format like JPEG or PNG, the text lay-
ers are rasterized and merged with the other layers in the image.
Uses for Text in Images
You can find countless uses for text in your images. Perhaps you’ve taken a
photograph of an engine and you need to label its parts. Or maybe you’re
producing a flier for a local music venue. Possibly you’re producing a web
comic and your characters have dialogue. Or maybe you need to mock up a
layout for an entire web site and you need to see how text will look on the
page. You could even want to be a bit designerly and use the text itself as
your primary design element for a banner or magazine ad.
281
Part III: Manipulating Images
Adding and Editing Text
Nearly all of GIMP’s text editing features can be accessed, unsurprisingly, using the Text tool. To
use this tool click the icon in the Toolbox that looks like the letter ‘‘A’’ (shown in Figure 10-1)
or press the keyboard shortcut, T. Doing so changes your mouse cursor in the image window to
a crosshair with the text insertion ‘‘i-beam’’ to the lower right.
FIGURE 10-1
The Text tool activated in GIMP’s Toolbox
Once you have the Text tool activated, you have two options:
Click and drag to create an area where you would like your text to live — Doing
this creates an explicit place that your text is allowed to be. In layout programs, this
is referred to as a text frame. Think of the frame as a window to the text you’ve typed.
Any text you add to this frame wraps when you get to its maximum width. If you type
more text than the frame allows space for, that additional text is simply not seen unless
you resize the frame. Like the boxes created with the Rectangle Select tool and the Crop
tool, you can resize this text frame by clicking and dragging any of its edges or corners.
And you can move it by Alt+clicking and dragging in the middle of the frame. This text
frame also establishes the dimensions of your text layer, discussed in more detail in the
next section.
Click in the image window where you would like your text to be — This is the eas-
iest way to add text to an image in GIMP. If you use this method, the text frame will be
dynamically resized to fit whatever text you type. This guarantees not only that no text
will be hidden, but also that the frame is exactly the dimensions of your available text. Of
course, choosing this method doesn’t lock you into it. You’re free to resize your text area
whenever you please with the same methods mentioned earlier.
282
Chapter 10: Working with Text
Note
If you manually resize a text frame created by the second method, there’s no way to revert its behavior
to dynamic resizing.
Figure 10-2 shows an image window with a text frame created and filled with some text.
FIGURE 10-2
Text frames can dynamically resize or you can explicitly define their size by clicking
and dragging an edge or corner.
In earlier versions of GIMP, regardless of whether you explicitly create your text frame or have it
dynamically resize, GIMP would automatically pop up a Text Editor window. This is where you
would actually type in the text that you want to have appear in the text frame. While there are
certainly advantages to having a simple text editor built into GIMP, this is not the ideal behavior
that most artists want from their Text tool. It’s usually much nicer to be able to add the text
directly in the image window and interactively see how that text appears in your image with
your desired font. Fortunately the GIMP developers understood this need and added this feature
early on in the development for GIMP 2.8. This means that now, once you add your text frame,
you can begin typing immediately and edit your text directly from the image window. Hooray!
If you’ve used the Text tool in previous versions of GIMP and enjoyed some of the additional
features that the Text Editor window provided, you should be glad to know that the bulk of
that functionality is still accessible when editing text from the image window. To access these
features, simply right-click in the text frame that you’re editing and you should see the context
menu that’s shown in Figure 10-3.
As the figure shows, you can perform standard Cut, Copy, Paste, and Delete operations on your
text as well as a handful of other helpful functions. One of the most useful features is the ability
283
Part III: Manipulating Images
to load text from an external file. Say you’ve already typed all of your text and you just want to
lay it out. Or perhaps you’re creating a magazine ad and you receive the textual content of that
ad, called the copy, from someone else who was hired to write it. Well, rather than retyping all
of that text or trying to copy and paste all of it, you can simply load the text from a file. To do
this, right-click your text frame and choose Open Text File from the context menu. This brings
up a File Chooser where you can select the text file you want to use.
FIGURE 10-3
Additional functionality from the Text tool can be accessed from a context window invoked by
right-clicking in an active text frame.
Besides being able to load text from an external file, you also have the ability to remove all text
from the text frame by right-clicking and choosing Clear from the menu. This function is partic-
ularly useful when you have more text than can fit in the text frame. Rather than trying to select
all of the text and then deleting it, this menu item does it all for you in a single step.
The Path from Text and Text along Path items in this menu will be covered later on in this
chapter, but the last two menu items deserve immediate attention. They’re actually a toggle;
that is, you can only choose one or the other. Either you choose From Left to Right or you
choose From Right to Left. These options control which direction text flows in the text editor.
The default behavior should match the language you’ve set your machine to work at. So if you’re
using a Western language, it should be set to use From Left to Right. Of course, you can use
these menu items to change the direction the text flows whenever you need.
Note
When you’re adding text in the image window, be aware that keyboard shortcuts are specific to editing text.
For instance, pressing Ctrl+A selects all of your text in the active text frame rather than creating a marching
ants selection around your image canvas. Likewise, keyboard shortcuts like P for the Paintbrush tool won’t
work. To activate those tools, you need to go to the Toolbox or the Tools menu in the image window.
Despite the enormous convenience of being able to edit text directly within the image window,
there are still advantages to using a Text Editor window instead. The biggest advantage is that
you can see all of your text. This is particularly helpful if you’ve written or loaded more text
than your text frame has space for. You can type and edit your text in the editor first and then
get it to fit in the frame once you’re done. To enable the Text Editor window, go to the Text
284
Chapter 10: Working with Text
tool’s Tool Options in the Toolbox and enable the Use Editor check box. Upon doing so, you
get a window like the one shown in Figure 10-4.
FIGURE 10-4
GIMP’s Text Editor window is another place where you enter the text that appears in the text frame.
Through the Text Editor, you have all of the functionality available when editing text in the
image window, plus a few additional features. You can load external text by clicking the Open
button or remove it all by clicking Clear. The LTR and RTL buttons control whether your text
flows from left to right or from right to left, respectively.
The text entry area is a very simple text editor, allowing you to type whatever text you would
like to appear in your image and do some basic formatting of that text. You can access a context
menu for this area by right-clicking within it. Like the menu available in the image window, this
one provides your basic cut/copy/paste/delete options, but a few additional options are here, but
not available in the image window:
Select All — Pretty straightforward, this option selects all of the text that you’ve entered
into the text area.
Input Methods — This allows you to choose how text is interpreted from your hardware.
For instance, if you have a Cyrillic mapping for your keyboard, you can choose that from
the menu as your input method.
Insert Unicode Control Character — This menu offers you the ability to enter some
special characters to help you explicitly control your text flow, such as a right-to-left over-
ride character.
Figure 10-5 shows these two submenus of the right-click context menu in the Text Editor
window.
Tip
Right-clicking the Text Editor window isn’t the only way to access the Input Methods and Insert Unicode
Control Character menus. These menus are specifically related to the language that you’re writing in and
285
Part III: Manipulating Images
they’re accessible at the very bottom of the Tool Options panel for the Text tool, under the label of Lan-
guage. Simply right-click in this text field and you get the exact same context menu that appears when
right-clicking in the Text Editor.
FIGURE 10-5
On the left, the Input Methods submenu; on the right, the Insert Unicode Control Character
submenu
Below the text entry area for the text editor is a Use Selected Font check box. When you enable
this option, whatever font you’ve chosen in the Text tool’s options appears in the text area. The
size of the font doesn’t change in the text area, but being able to see the font here certainly helps
get your basic text layout visible from within the text editor. This is a holdover feature from
when you couldn’t edit text in the image window, but it’s still useful on occasion.
Note
Although you can do a lot with GIMP’s text editor, it’s still pretty basic. In its current form, it doesn’t allow
you to mix fonts or font attributes such as bold or italics. To do that with the current version of GIMP, you
need to use multiple text layers. This can be a bit of a headache, but it should be addressed in future
versions.
Customizing Text from the Text Panel
By default, GIMP uses a standard Sans font when you first start using the Text tool. Sans is nice,
but you’re using an image editor; part of the fun is making things look interesting and awe-
some! Control of that is handled from the options of the Text tool, which appears by default
at the bottom of the Toolbox window when you have the Text tool selected. Figure 10-6 shows
the options available to you in the Text panel.
Font and Size
The two most useful — and most used — options in this panel are at the top, Font and
Size. The Font option shows you the current font that you’re using. The easiest way to change
your font is to click the square font icon immediately to the right of the font name. This brings
up a drop-down menu with a full listing of all the fonts you have installed on your computer.
286
Chapter 10: Working with Text
Next to each font name is an icon that gives you a quick preview of what the font looks like
with an uppercase and lowercase letter ‘‘a.’’ Select the font you want to use from this list and it
will immediately change in the image window. Alternatively, if you know the name of the font
you want to use, you can click in the text field where the font name is and start typing the name
of that font. When you do this, GIMP brings up a list of the fonts that match what you’ve typed
and you can select your font from there or finish typing. Figure 10-7 shows this in action.
Note
The way GIMP handles fonts appears a bit strange. This is because GIMP reads each individual font file
you have installed on your system. This is strange because different styles of a font, like bold or underlined
versions, are often stored as separate files. Whereas most programs load the main font and offer buttons
to access the bold or italic versions, GIMP loads each of these files individually and lists them in the Font
drop-down. This is why your font list may appear to be much longer than you expect. The benefit of doing
it this way, though, is that you’re guaranteed to get an italic version of a font only if it actually exists, rather
than having a standard font skewed to the right. (Typeface designers hate it when you do this.)
FIGURE 10-6
The Text panel allows you to control a variety of attributes on the text you enter in the image
window.
The next option is the text’s Size. By default, this is defined in pixels and you can adjust the
value by typing it in or using the up/down tumbler buttons on the right of that number value. If
you want to describe the text size in different units, such as points, picas, inches, or any of the
other units that GIMP recognizes, you can choose those units from the Units drop-down at
the far right.
Below the Size entry field is the Use Editor check box. As described earlier in this chapter, this
option toggles the visibility of the Text Editor window. By default it’s disabled.
Font Edging
Below the Use Editor option is another check box, labeled Antialiasing, which, as you may
expect, toggles whether or not the font is rendered with antialiasing. As discussed elsewhere in
287
Part III: Manipulating Images
this book, aliasing is the pixelated, jagged-edge effect that often happens at the edges of objects
in digital images. Antialiasing is a method to reduce those jagged edges. Enabling this op-
tion will antialias your text. If you’re working with really small text, however, using this option
might make your fonts look blurry and unreadable. In those cases, it’s better to accept a bit of
jagginess (it’s a word, I swear) in exchange for readability.
FIGURE 10-7
Typing the name of the font you want brings up a list of installed fonts that match that name.
Below the Antialiasing option is a drop-down menu that controls how GIMP handles hinting.
Specifically, hinting pertains to the font’s edging. Many fonts offer modified outlines so they may
render more clearly at smaller sizes and appear more readable. To make the font system aware
of this ability, fonts that can do this are embedded with hints that let the system know what to
do for each character if the font size is small. This drop-down allows you to control how much
GIMP takes advantage of these hints if the font has them. You have four options: None, Slight,
Medium, and Full. The default setting of Medium suits most cases, but if you’re using smaller
fonts, it may look better if you use Full hinting.
Changing Text Color
Below the Hinting drop-down is the option that allows you to change the color of your
text. By default, the color is set to whatever you have chosen for your foreground color in the
Colors dockable dialog. However, if you want to use a different color, click the color swatch
in the Text options panel. This brings up the Text Color dialog. This window, shown in
Figure 10-8, gives you all of the color picking options that you’d recognize from the Colors
dockable dialog, with an additional feature: saved color history.
The way the saved color history works is pretty simple. If you choose a new color with this win-
dow and click OK, that color is added to the history swatches at the bottom of the dialog. The
next time you choose a text color, that color will be available at the bottom of the dialog for you
288
Chapter 10: Working with Text
to choose. This is particularly useful if you’re designing a flier or brochure and you need to
use consistent colors throughout the design. You can also explicitly add colors to the history
by clicking the arrow button to the left of the history swatches. And because this is a persistent
history within GIMP, these swatches are available to you each time you run GIMP, regardless of
whether you’re re-opening the same image file.
FIGURE 10-8
The Text Color dialog gives you
just
a little bit more than the Colors dockable dialog.
Justification, Indentation, and Spacing
The next control available in the Text tool’s options is your text’s justification, or alignment. This
control has four available options:
Left Justified — Click this icon to align the text to the left of the text frame.
Right Justified — Clicking here aligns text to the right of the frame.
Centered — When you click this icon, your text is centered within the text frame. If your
text frame is automatically sizing to fit your content, you may not notice this unless you
have more than one line of text.
Filled — Choose this option to create filled justification. This means that GIMP increases
the spacing between words so your text frame has text aligned to both the left and the right
edges, like you might expect in a newspaper or magazine article.
Note
Using the Left Justified and Right Justified buttons is not the same as toggling between From Left to Right
and From Right to Left when you’re editing text. While text that’s added using the From Right to Left option
is right justified, that’s not the only change that occurs. Unfortunately, it’s difficult to see other changes
without writing in a non-Western language that actually flows from right to left.
The next three options in the Text tool’s options panel deal with spacing. The first option con-
trols indentation on the first line of a paragraph. Positive values in this field indent the first line
to the right. If you use a negative value in this field, GIMP gives you a hanging indent.Thatis,
the first line of text aligns with the left of the frame while the rest of the paragraph is indented.
Figure 10-9 shows an example of what changing the values in this field does.
289
Part III: Manipulating Images
FIGURE 10-9
If you set the indentation value to 50 pixels, you get a normal indent like the one on the left. If you
set the value to –50 pixels, you get a hanging indent like the one on the right.
The next numeric field controls line spacing. In typography, this is often referred to as lead-
ing (pronounced like ‘‘sledding’’). Quite simply, this is the amount of space that GIMP places
between each line of text in your text frame. If you use the default value of zero, GIMP relies
on the spacing hints indicated by the font itself. However, you can adjust this value if you want
more control. Use positive values to increase the spacing between lines and negative values to
cram the lines closer to one another.
The last value in this last numeric field is letter spacing, called tracking by typographers. Adjust
this value to increase or decrease the amount of space between each letter in your text field. Note
that this setting is different from kerning, though the differentiation between the two settings is
subtle. Letter spacing controls the total amount of space between each letter in a word. Kerning,
on the other hand, is intended to account for how characters in a non-fixed-width, or propor-
tional, font relate to one another. Because letters in a proportional font don’t all have the same
width and some letters hang into the space of adjacent ones, kerning is used to make the spac-
ing look even. Kerning hints are typically embedded in font files and GIMP recognizes them.
Currently, though, GIMP allows you to control only letter spacing and not kerning.
Note
You might notice that none of the spacing values have any units associated with them. This is because they
use the units that you stipulate at the top of the Text tool’s options panel for your font size. Pay close atten-
tion to this, because GIMP doesn’t automatically convert units for you on these values. If, for example, you
change from pixel-sized fonts to inch-sized fonts, your indentation setting of 10 pixels will suddenly become
an indentation of 10 inches. Unless you’re doing something weird and working at 1ppi, this is quite a dra-
matic change!
Making Text Go Along a Path
One of the cool things about text in GIMP is that you’re not limited to keeping your text locked
to the hard rectangular shape of the text frame. You can actually have your text flow along the
length of a path. Following is an outline of the process you have to use to achieve this effect:
1. Create your text. Enable the Text tool (T) and enter text as described earlier in this
chapter.
290