A Guide to MATLAB Object-Oriented Programming phần 8 pdf
Bạn đang xem bản rút gọn của tài liệu. Xem và tải ngay bản đầy đủ của tài liệu tại đây (2.25 MB, 38 trang )
Class Wizard 241
Output Argument List: holds a comma-separated list of output arguments for the
function. If a copy of the object is passed, this must be included in the argument list.
By convention, when it exists, this should usually be the first argument in the argument
list. As with variables in the input argument list, output variable names are added to the
data dictionary.
Comment: holds a text description of the function. The text description will be added to
the header comments when the function is generated.
Clicking the Save Change button commits the changes and displays the function prototype in
WYSIWYG format. During file generation, Class Wizard writes the same function prototype into
the private function and follows the prototype with header comments. Of course, Class Wizard
doesn’t know how to write the real function body, but it can write a body that runs without error.
The body of the private function must be manually modified to include the desired class-specific
functionality.
The three buttons, Save Change, Delete, and Done, are the same three buttons used in
the parent-class dialog. Refer to §17.2.1.2 for a description of their behavior. When you finish
modifying the object’s private-function data, click the Done button. This will save your changes
and return you to the more dialog. Private-function names are shown in the list box adjacent to the
Private Functions … button. The names provide a quick summary, and in the more dialog
view they are not active. You have to open the private-function dialog to make changes or see more
detail.
FIGURE 17.12 Class Wizard, Private Function … dialog.
C911X_C017.fm Page 241 Friday, March 2, 2007 8:50 AM
242 A Guide to MATLAB Object-Oriented Programming
17.2.1.10 Public Functions … Dialog
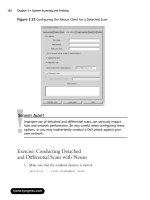
Clicking the Public Functions … button brings up the dialog shown in Figure 17.13. The
dialog shown in the figure contains an entry for one function. Like most of the tool’s dialogs, the
public-function dialog is organized into three sections: input fields, action buttons, and a display.
In Figure 17.13, the input fields contain values because a function name in the display is selected.
Selecting a blank line will empty all values in the input fields. Even the name field will be empty
because there is no suggested naming convention. Any legal function name can be entered in the
name field.
In reality, standard group-of-eight functions are public functions; however, group-of-eight
functions are managed separately from class-specific public functions. Only class-specific public
functions show up in this list.
Public functions, like most functions, can be described by a function name, a list of input
arguments, a list of output arguments, and a comment. The data-entry fields for these four function
elements are described by the following:
Function Name: holds the desired name for the function. Any valid function name can
be used.
Input Argument List: holds a comma-separated list of input arguments for the
function. If a copy of the object must be passed, this must be included in the argument
FIGURE 17.13 Class Wizard, Public Function … dialog.
C911X_C017.fm Page 242 Friday, March 2, 2007 8:50 AM
Class Wizard 243
list. By convention, when it exists, this should usually be the first argument in the list.
In addition, notice there is no way to enter comments for individual arguments. Instead,
variable names are added to the data dictionary using the Data menu on the main screen.
Output Argument List: holds a comma-separated list of output arguments for the
function. If a copy of the object is passed, this must be included in the argument list.
By convention, when it exists, this should usually be the first argument in the argument
list. As with variables in the input argument list, output variable names are added to the
data dictionary.
Comment: holds a text description of the function. The text description will be added to
the header comments when the function is generated.
Clicking the Save Change button commits the changes and displays the function prototype in
WYSIWYG format. During file generation, Class Wizard writes the same function prototype into
the private function and follows the prototype with header comments. Of course, Class Wizard
doesn’t know how to write the real function body, but it can write a body that runs without error.
The body of the private function must be manually modified to include the desired class-specific
functionality.
The three buttons, Save Change, Delete, and Done, are the same three buttons used in
the parent-class dialog. Refer to §17.2.1.2 for a description of their behavior. When you finish
modifying the object’s public-function data, click the Done button. This will save your changes
and return you to the more dialog. Public-function names are shown in the list box adjacent to the
Public Functions … button. The names provide a quick summary, and in the more dialog
view they are not active. You have to open the public-function dialog to make changes or see more
detail.
17.2.1.11 File Menu
The main Class Wizard dialog has two menu items: File and Data. The File menu allows you
to create a New class definition, Open … an existing definition, Save the current definition, or
Save as … to save the current definition using a different file name. These menu items behave
the same as any application that opens and saves files. Their behaviors are described as follows:
File::New: Select this item to begin a new class definition. The hot-key sequence is
ctrl-N. All fields are reset to default initial values, usually empty. Currently, using
File::New does not check for changes to the currently loaded values before loading a
new file. You will not be warned to save your changes.
File::Open : Selecting this item allows you to open an existing file using the
standard fi
le-open dialog box. The hot-key combination is ctrl-O. This familiar dialog
is shown in Figure 17.14. The file format for definition files is .mat. This format is
convenient because it allows you to load the definition file directly in MATLAB and tweak
the data in ways not available through Class Wizard.
File::Save: Selecting this item saves the current class definition file to the current file
name. The hot-key sequence is ctrl-S. If there is no current filename, you will be
prompted to enter one.
File::Save As : Selecting this item opens a standard dialog box for specifying
the file name during a save. The hot-key sequence is ctrl-A. The familiar dialog is shown
in Figure 17.15. The definition file can be stored anywhere; however, the best location is
in the class directory. When class functions are generated, the definition file is automatically
saved in the same directory as the functions.
C911X_C017.fm Page 243 Friday, March 2, 2007 8:50 AM
244 A Guide to MATLAB Object-Oriented Programming
17.2.1.12 Data Menu
In most class definitions, the same variable names are used in several functions. Rather than commenting
these variables in several places, a data dictionary approach collects the variables into a central location.
That way, comments only need to be entered once; and from there, Class Wizard can perform the
tedious task of repeating the comments into each header. The Data menu is used to enter type and
comment information for the function arguments defined for constructor helper functions, public
functions, and private functions. The information entered through Data::Dictionary are
written into header comments when the file is generated. The Data::Dictionary dialog is
shown in Figure 17.16.
Like most of the tool’s dialogs, the data dictionary dialog is organized into three sections: input
fields, action buttons, and a display. In Figure 17.16, the input fields contain values because a
variable name in the display is selected. The Variable Name field is grayed out because the
name of the variable cannot be changed. This also means that new names can’t be added to the
definition via the dictionary. Names can only be added by defining a new name in a function call.
Data in the other fields can be modified to reflect the appropriate descriptions. The three data fields
in the data dictionary variable dialog are described by the following:
FIGURE 17.14 Class Wizard, standard File::Open … dialog.
FIGURE 17.15 Class Wizard, standard File::Save As … dialog.
C911X_C017.fm Page 244 Friday, March 2, 2007 8:50 AM
Class Wizard 245
Variable Name: displays the name of the variable. This name can’t be changed because
it is linked to the definition of one or more member functions.
Variable Type(s): holds a comma-separated list of types expected. Any descriptive
text can be entered in this field. The text is not used to generate code, but rather it is used
to comment on the variable in the header of every function where it is used. The field is
intended to be a description of the allowed types.
Comment: holds a string description pertaining to the variable. This comment is copied
into the header comments for each function that uses the variable in its input argument list.
The three buttons, Save Change, Delete, and Done, are the same three buttons used in
the parent-class dialog. Refer to §17.2.1.2 for a description of their behavior. When you finish
modifying the object’s parent data, click the Done button. This will save your changes and return
you to the main dialog.
17.2.1.13 Build Class Files Button
After entering class data, class files are generated by clicking the Build Class Files button.
This button first displays the standard dialog that allows you to select the directory where the files
should be written. The dialog includes a button that allows you to create a new class directory.
Don’t forget to include @ in the directory name. An example view of the dialog is shown in Figure
17.17.
Selecting a directory and clicking OK allows Class Wizard to generate the collection of
class files. In addition to generating class functions, the class definition file is also saved in the
selected directory in mat-file format. The group-of-eight files are completely functional, and
FIGURE 17.16 Class Wizard, Data File::Dictionary … dialog.
C911X_C017.fm Page 245 Friday, March 2, 2007 8:50 AM
246 A Guide to MATLAB Object-Oriented Programming
class-specific member functions exist as simple function stubs. If new public or private member
variables need to be added, it is a simple process to reload the definition file, add the new variables,
and rebuild the files. The class organization and default wizard settings make this possible.
17.3 SUMMARY
For building a robust MATLAB class, Class Wizard has no equal. The various dialog screens are
organized along the same divisions used to describe an object-oriented design. This makes data
entry much less of a chore. Once the design data are entered, Class Wizard builds a full imple-
mentation of the group of eight and takes care of some of the more mundane details. In short, Class
Wizard allows you to focus on the design and on the application-specific aspects of the class.
There are several ways that Class Wizard can be used in a development environment. The least
effective way is to use Class Wizard to generate an initial set of class functions and then never use
it again. I don’t recommend this approach because it is very difficult to keep all of the various files
in synch. The file dependency graph in Figure 17.2 is too complicated. Some changes seem easy,
but eventually, something will be omitted or updated incorrectly. It is easy and much safer to let
Class Wizard manage changes to the group of eight.
One viable approach is to enter only parent, constructor, and variable information into Class
Wizard. This allows Class Wizard to manage changes to group-of-eight functions while you manage
private and public member functions outside of the group of eight. You lose the advantage of
uniform headers and variable descriptions, but that might be an acceptable trade-off in some
development environments. For a well-documented class, these data will still need to be entered;
however, they do not have to be entered through Class Wizard fields. Keeping default check box
and radio button selections and never entering data for private and public member variables enable
this approach.
The third approach extends definition data to include names and arguments for public and
private functions. Comments associated with arguments should also be documented in the data
dictionary. The first time a class-specific function is generated, the header will include a complete
set of comments. After that, selecting new will prevent the file from being overwritten. It would
be nice to be able to regenerate header comments yet leave the files code intact. That way the
definition would always be consistent with the Class Wizard–generated section of each file. That
FIGURE 17.17 Class Wizard, Build Class Files dialog.
C911X_C017.fm Page 246 Friday, March 2, 2007 8:50 AM
Class Wizard 247
capability does not currently exist, but there are plans for future upgrades that will fill this and
other known deficiencies.
In this chapter, we focused on the mechanics of entering data into Class Wizard. There are
some idiosyncrasies due to Guide, but overall the GUI interface makes it much easier to enter data
and keep the design organized. Data contained in individual dialogs mirror the implementation
model discussed throughout the first two sections of this book. The functions generated from data
entered through these dialogs also mirror the code developed in the first two sections. In the next
chapter, we will redevelop the complete cShape example using Class Wizard. Differences in
development time and coding accuracy will be very apparent.
17.4 INDEPENDENT INVESTIGATIONS
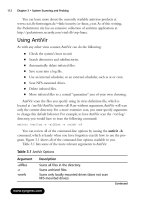
1. Open Class Wizard (the command is class_wizard) and enter a few variables and
functions.
2. Practice saving and loading definition files. You can use the .mat files for Chapter 18
and get a preview of the next chapter.
3. Navigate into the Header Info dialog box and enter your pertinent information. Use the
Default Header Info menu to save the data for future reference.
4. After entering some data, select Build Class Files and follow the process. After
building the files, inspect a few of them and note their close similarity to the standard
idioms.
C911X_C017.fm Page 247 Friday, March 2, 2007 8:50 AM
C911X_C017.fm Page 248 Friday, March 2, 2007 8:50 AM
249
18
Class Wizard Versions of the
Shape Hierarchy
In Chapter 17, we covered Class Wizard’s various input dialogs along with their general operation.
In this chapter, we demonstrate the complete Class Wizard process of developing a collection of
classes. To do this, we will recreate our now familiar collection of classes that includes
cLine-
Style
,
cShape
,
cStar
, and
cDiamond
. Creating a collection of familiar classes is important
because it allows us to spot logical errors. It also allows us to compare automatically generated
files with the handcrafted versions. The collection also includes a rich hierarchy with both par-
ent–child inheritance and composition. This is important because the hierarchy exercises most of
the available options.
The primary activity in this chapter involves entering data into the various Class Wizard dialog
screens. As data are entered, the lower-list box in each dialog shows a line-by-line summary of the
data. To assist you in data entry, a screen shot of each completed dialog is included. That way, all
variables and functions are provided as you will see them displayed on your screen. The syntax of
each line in the lower-list box is easy, and converting from the display to individual fields quickly
becomes obvious. If the translation isn’t clear, you can always refer back to Chapter 17. In addition,
a shorthand table description of the data in each field is provided.
The first step is of course entering data. The second step allows Class Wizard to generate class
files. At this point, group-of-eight functions are fully functional. Objects can be created and
displayed, and direct-link public variables can be accessed and mutated. Even so, this is not the
final step. Some files will require postgeneration tailoring. The list of files includes most of the
public and private functions that give each class their unique behavior. Enter the names and
arguments for these functions, and Class Wizard will give you a head start by generating the initial
version. The initial version contains full header comments but not much more. For example, a
description for
draw
can be included in the
Public Functions
dialog, but until it is tailored,
calling
draw
will not do anything. The implementation isn’t complete until code for the application-
specific member functions has been added. The example code for this chapter includes a copy of
the as-generated files in a directory separate from the full solution.
18.1 CLINESTYLE CLASS WIZARD DEFINITION DATA
Begin by running the graphical interface for Class Wizard. To do this, the directory
/utils/wizard_gui
must be on or added to the MATLAB path. You can add the path in one
of three ways:
cd
into the directory, use an
addpath
command, or use MATLAB’s
File::Set
Path
menu item. After adding the directory, the command to run Class Wizard is simply
>> class_wizard
The current version accepts no input arguments. The
class_wizard
command opens the main
Class Wizard dialog with empty fields and default options. You must now fill in fields that describe
your particular class definition. After doing this for
cLineStyle
, the main dialog will look like
Figure 18.1. The full definition file can be found in
chapter_17/@cLineStyle/cLine-
Style.mat
. You can follow along and enter data, but if data entry becomes too tedious, you can
load the full
.mat
file at any time. Similarly, the definition files for the other classes are located
in their respective class directories. As with the other chapters, the class directories under chapter_17
C911X_C018.fm Page 249 Friday, March 2, 2007 9:06 AM
250
A Guide to MATLAB Object-Oriented Programming
are fully functional. Since these directories become fully functional only after tailoring, a copy of
the fi les prior to tailoring can be found in the class directories under
chapter_17/as_generated
.
Open a new session of Class Wizard and type in
cLineStyle
as the class name. Leave the
other fields on the main dialog blank or filled with their default values. This gives Class Wizard
control over the group of eight (
Overwrite
) and allows Class Wizard to generate other files only
when the definition data are new (
New
). The remaining definition data are entered into each
corresponding dialog. Dialog order doesn’t matter, and each dialog can be opened and changed
any number of times. In the text that follows, a separate subsection is devoted to each dialog.
18.1.1
C
L
INE
S
TYLE
H
EADER
I
NFO
A good place to begin is the header info dialog. Click the
Header Info …
button and enter
the data shown in the various fields of Figure 18.2. Of course, you can replace the example text
with your own name, company information, and so on. After entering all header information, save
the fields for future use. Before clicking
Okay
, select the menu item Default Header Info::Save.
There are no prompts; however, the fields contained in the dialog are now stored in the file
default_header.mat
located in the same directory as
class_wizard.m
. For a new class,
you can recall the fields by opening the
header info
dialog and selecting
Default Header
Info::Load
.
Dialog names associated with each field are merely a suggestion because Class Wizard doesn’t
inspect the values. All fields use a free format, and you can commandeer any field to write other
FIGURE 18.1
Class Wizard, main dialog for cLineStyle.
C911X_C018.fm Page 250 Friday, March 2, 2007 9:06 AM
Class Wizard Versions of the Shape Hierarchy
251
information into the files. In the header, each string gets a comment delimiter and the order of appearance
is fixed. Once you figure out where each string is written, you will be able to bend the header information
to your specific needs. A little later when we look at specific code examples, we can observe the header
output. For now, simply click
Okay
to commit the data and return to the main dialog. If you click
Cancel
, you will return to the main dialog but changes will not be committed.
18.1.2
C
L
INE
S
TYLE
P
RIVATE
V
ARIABLES
The next dialog we will visit defines the private variables. Click the
Private Variables …
button
and enter the data shown in Figure 18.3. Initially, the lower display will be empty. If the first blank
line in the lower display block is not highlighted, select the first empty line by clicking on it. The data
fields are active, and you can start entering private variable data. After entering
mColorHsv
data,
click the
Save Change
button to commit the changes. The data are displayed in WYSIWYG format
in the display box, and the selection moves to an empty line. Follow the same procedure to enter data
for the other private variables. The field data are summarized in Table 18.1.
As you enter data, the contents of the lower display are almost identical to the code included
in
ctor_ini.m
. Even the default-value assignment is correctly formatted. The
Initial Value
string is copied verbatim into the display and into
ctor_ini.m
. Virtually any value that can be
written on the right-hand side of an assignment can be used as an initial value. For example, a
function call generates the initial value for
mColorHsv
. Click
Done
to commit the changes and
return to the main dialog.
When Class Wizard generates
/@cLineStyle/private/ctor_ini
, the private variable
names and their default values are included in the code. The names and comments are included in
the header. If you return to the main screen and click
Build Class Files
, Class Wizard will
generate the file
@cLineStyle/private/ctor_ini.m
shown in Code Listing 105. Other
files will also be generated, but
ctor_ini
is the current focus.
FIGURE 18.2
Class Wizard, cLineStyle header information dialog.
C911X_C018.fm Page 251 Friday, March 2, 2007 9:06 AM
252
A Guide to MATLAB Object-Oriented Programming
FIGURE 18.3
Class Wizard, cLineStyle private variable dialog.
TABLE 18.1
cLineStyle Private Variable Dialog Fields
Private Variable Name Initial Value Comment
mColorHsv rgb2hsv
([0 0 1])’
[H; S; V] color of border; default
is blue
mLineWidth 1 handle graphic LineWidth attribute
mLineHandle [] graphics handle of the line plot
Code Listing 105, Constructor Helper from Class Wizard, @cLineStyle/private/ctor_ini.m
1 function [this, superior, inferior] = ctor_ini
2 %CTOR_INI for class cLineStyle, Replace with a short note
3 % Replace with something like UNCLASSIFIED
4%
5 % function [this, superior, inferior] = ctor_ini
6%
7 % Replace with text that you would like to have copied into
the header of
8 % every file in this class
9%
10 % Private Member Variables
11 % mColorHsv: HSV Line Color Value
12 % mLineWidth: handle-graphic LineWidth attribute
13 % mLineHandle: graphics handle of the line plot
C911X_C018.fm Page 252 Friday, March 2, 2007 9:06 AM
Class Wizard Versions of the Shape Hierarchy
253
Line 1 contains the function definition and lines 2–24 contain the header comments. Line 2
identifies the class and function along with a truncated one-line description. For this line to be
meaningful, the header-info defined
H1 Line
field needs to be short and the first few words of
the function comment should be concise. Line 3 and line 32 contain the
classification
string.
Line 5 repeats the function definition because
help
does not automatically display it. Lines 7–8
contain the contents of the
Common Header Comments
field from header info. Lines 10–13
list the private variables and their comments. The remaining header comments are generated from
various fields in header info. Lines 26–38 are code; here the private structure is created and private
variables are added and initialized. Notice the private variable
mDisplayFunc
in line 31. This
variable was not in the private variable list, but it shows up in the default constructor because
cLineStyle
has no parents. If you compare Code Listing 105 with
ctor_ini
from Chapter
16, the code lines are identical.
18.1.3
C
L
INE
S
TYLE PUBLIC VARIABLES
Moving down the collection of dialog buttons brings us to the public variables. Click the
Public Variables … button and enter the data shown in Figure 18.4. Fresh from the previous
14 %
15 % Author Info
16 % Replace with your company's name
17 % Replace with your name
18 % Replace with your email address
19 % Replace with your phone number
20 % Replace with the author notes that you would like to
appear just after
21 % the author info for every file in this class
22 % Replace with your standard copyright notice
23 % Replace with a string recognized by your revision control
software
24 % A Class Wizard v.3 assembled file, generated: 20-Dec-2005
13:23:23
25
26 % piece-meal create to avoid object and cell problems
27 this = struct([]);
28 this(1).mColorHsv = rgb2hsv([0 0 1])';
29 this(1).mLineWidth = 1;
30 this(1).mLineHandle = [];
31 this(1).mDisplayFunc = []; % class-wizard reserved field
32 % Construct the parent classes, if any
33 parents = cell(0, 1);
34 % Initialize parent_list
35 parent_list(parents{:});
36 % Return desired superior and inferior arguments
37 superior = {};
38 inferior = {};
39 % Replace with something like UNCLASSIFIED
C911X_C018.fm Page 253 Friday, March 2, 2007 9:06 AM
254 A Guide to MATLAB Object-Oriented Programming
exercise of entering private variables in §18.1.2, the fields Name and Comment are familiar. The
type, accessor, and mutator fields are new.
The type field serves two purposes. First, with the exception of display, the public name
and its type string are copied into all group-of-eight headers. Second, the type string is displayed
as a hint when set is called with one argument. That also means the type string is copied into the
–possible case inside fieldnames.
Accessor Expression and Mutator Expression fields guide the generation of public
cases inside get.m and set.m. If the Expression field contains the name of a private variable,
direct-access code syntax will be inserted into get or set. If the Expression field contains
the string %helper, helper-function syntax will be inserted into get or set, and a stub for the
helper will be generated. Finally, if the Expression field is empty, a public case for the variable
is not included. The Accessor Expression value and Mutator Expression value are
independent. Accessor Expression influences the code in get and Mutator Expression
influences the code in set. In addition, public variables with an empty Accessor Expression
value are not included in fieldnames or struct.
All public variables in cLineStyle have accessors. The accessor for Color uses a helper,
but accessors for LineWidth and LineHandle are directly linked to mLineWidth and
mLineHandle. All public variables also have mutators. In this case, the mutator for LineWidth
is not a direct link but rather uses a helper. The table of entries for the public variables is given in
Table 18.2.
The procedure for data entry follows the same procedure used for private variables. Select the
first empty line in the lower display block, and enter data in the fields. After all field values have
been specified, click Save Change to commit the data and move to the next line. In this dialog,
the lower display can’t be easily formatted using standard MATLAB syntax. Instead, the lower
display delimits each field by putting two colons between each value. The display order is name,
type, accessor, mutator, and comment. When you have finished all additions or modifications, click
Done to commit the changes and return to the main dialog.
FIGURE 18.4 Class Wizard, cLineStyle public variable dialog.
C911X_C018.fm Page 254 Friday, March 2, 2007 9:06 AM
Class Wizard Versions of the Shape Hierarchy 255
If you compare the generated group-of-eight files with files from Chapter 16, the code lines
are identical. Because of this, you will have no trouble relating the code to discussions in the
previous chapters. Ideally, you will never need to hand tailor any function in the group of eight,
but if do, you should have no trouble finding your way.
Accessor and mutator helper functions are another matter. These private functions require
tailoring because the dialog data do not include any information that could be used to generate
class-specific code. The functions include header information and they include code stubs that allow
them to work without error. This allows group-of-eight mechanics to be tested prior to tailoring,
but the class is not fully functional until afterward. We revisit the topic of helper file tailoring in
§18.1.7.
18.1.4 CLINESTYLE CONSTRUCTOR FUNCTIONS
The final data-entry button on the main dialog defines constructors. The cLineStyle class uses
a two-argument constructor to assign values for Color and LineWidth. Click the Construc-
tors button to display the dialog shown in Figure 18.5. To define a new constructor, the
TABLE 18.2
cLineStyle Public Member Variable Field Values
Public Variable
Name Type
Accessor
Expression
Mutator
Expression Comment
Color (3x1) array %helper %helper RGB line color
LineWidth integer > 0 mLineWidth %helper
LineHandle graphics handle mLineHandle mLineHandle Public
graphics
handle to the
line plot
FIGURE 18.5 Class Wizard, cLineStyle constructor function dialog.
C911X_C018.fm Page 255 Friday, March 2, 2007 9:06 AM
256 A Guide to MATLAB Object-Oriented Programming
only data required are a comma-separated list of input variable names. The function name is created
based on the number of variables. The comma-separated variable list is entered in the Input
Argument List field. Any valid variable name except this can be used in the list.
For this example, we don’t need a table of dialog values. Select the first empty line in the lower
display. Then type color, width into the Input Argument List field. When you are
done, click Save Change to commit the data. Finally, click Done to return to the main dialog.
During file generation, Class Wizard will use this data to generate a function stub named
private/ctor_2.m. The stub contents are shown in Code Listing 106. The comma-separated
list from the definition data shows up in the input argument list of the function definition. These
variable names also show up in the header on lines 12 and 14. The comments list them as having
no type info and no description because data dictionary data for these variables do not yet exist.
The generated code is found in lines 27–31. The function will run; however, until it is tailored,
line 29 will display a warning. The helper can be tailored by copying code from the Chapter 16
version.
Code Listing 106, Two-Input Class Wizard Constructor, @cLineStyle/private/ctor_2.m
function this = ctor_2(this, color, width)
1 function this = ctor_2(this, color, width)
2 %CTOR_2 for class cLineStyle, Replace with a short note
3 % Replace with something like UNCLASSIFIED
4%
5 % function this = ctor_2(this, color, width)
6%
7 % Replace with text that you would like to have copied into
the header of
8 % every file in this class
9%
10 % Input Arguments::
11 %
12 % color: no type info: no description provided
13 %
14 % width: no type info: no description provided
15 %
16 % Author Info
17 % Replace with your company's name
18 % Replace with your name
19 % Replace with your email address
20 % Replace with your phone number
21 % Replace with the author notes that you would like to appear
just after
22 % the author info for every file in this class
23 % Replace with your standard copyright notice
24 % Replace with a string recognized by your revision control
software
25 % A Class Wizard v.3 assembled file, generated: 20-Dec-2005
13:23:23
26
C911X_C018.fm Page 256 Friday, March 2, 2007 9:06 AM
Class Wizard Versions of the Shape Hierarchy 257
18.1.5 CLINESTYLE DATA DICTIONARY
At this point in the definition, public and private variables are defined and an additional constructor
is available. From the main screen, you could generate all required files for a fully functioning
cLineStyle class. But don’t click Build Class Files because there is one more dialog
that needs attention. We need to add comments so the header inside ctor_2 will contain mean-
ingful comments for its input arguments.
On the menu bar of the main dialog, select Data::Dictionary …. This selection will
display the dialog shown in Figure 18.6. These fields are similar to the same fields in the public
variable dialog. Initially the lower display should include the variable names color and width
but there will be no type or comments. The variable names in the lower display were collected
from the argument definitions used to define constructors, public functions, and private functions.
Since cLineStyle uses the standard set of public and private functions, the list only includes
constructor arguments. The data dictionary dialog can’t be used to add variables. Variables are
added automatically based on function definitions.
The type and comment data you need are provided in Table 18.3. Select each variable by
pointing to its line in the lower display and clicking. The field values are now active and can be
modified. Click Save Change to commit the changes before selecting the next name. After
entering all the data, click Done to return to the main dialog. Now if you generate the files, the
header in ctor_2 will contain meaningful comments. The affected lines now look like the
following:
27 % \/ \/ \/ \/
28 % replace with your specific constructor code
29 warning('OOP:incompleteFunction',
30 'The function definition is incomplete');
31 % /\ /\ /\ /\
32 % Replace with something like UNCLASSIFIED
FIGURE 18.6 Class Wizard, cLineStyle data dictionary dialog.
C911X_C018.fm Page 257 Friday, March 2, 2007 9:06 AM
258 A Guide to MATLAB Object-Oriented Programming
% Input Arguments::
%
% color: 3x1 RGB values 0-1: The initial RGB line color. The
% array is a 3x1 column vector of values and the values
% range from zero to one.
%
% width: integer > 0: The initial line width as an integer
% greater than 0
18.1.6 CLINESTYLE BUILD CLASS FILES
The definition for cLineStyle is now complete. Click Build Class Files to begin class
file generation. You always need to specify a destination class directory. MATLAB’s standard
directory-selection dialog is used. An example of the dialog is shown in Figure 18.7. Simply
highlight the desired directory and click OK. If a suitable directory does not exist, the Make New
Folder button on the lower left will allow you to create one. When you click OK, Class Wizard
TABLE 18.3
cLineStyle Data Dictionary Field Values
Variable
Name Type Comment
color 3x1 RGB values
0-1
The initial RGB line color. The array is
a 3x1 column vector of values and the
values range from zero to one.
width integer > 0 The initial line width as an integer
greater than 0
FIGURE 18.7 Class Wizard, cLineStyle directory-selection dialog.
C911X_C018.fm Page 258 Friday, March 2, 2007 9:06 AM
Class Wizard Versions of the Shape Hierarchy 259
generates class files. File generation is very fast. Click Okay on the confirmation dialog to return
to the main Class Wizard dialog. The newly generated class should work without error; however,
a couple of helper functions need to be tailored before the class will achieve full functionality.
These functions are discussed next.
18.1.7 CLINESTYLE ACCESSOR AND MUTATOR HELPER FUNCTIONS
In cLineStyle three private helper functions need to be tailored. The first is ctor_2, a private
constructor helper. The as-generated file was shown in Code Listing 106. Modifying the as-
generated file is easy because we can copy the code body from the working version in Chapter 16.
Refer to Code Listing 89 to see the complete function body.
Code bodies for the other two helpers, Color_helper and LineWidth_helper, can
also be copied from Chapter 16. After copying the code bodies, cLineStyle is complete. The
tailored versions of Color_helper and LineWidth_helper are also included in this
chapter’s source files. Before moving to the other classes, let’s look at the initial helper-file stub.
The as-generated version of Color_helper is shown in Code Listing 107. The listing consists
mostly of comments, but there are some important lines of code in each case.
Code Listing 107, Public Variable Helper, as Generated by Class Wizard,
cLineStyle::Color_helper
1 function [do_sub_indexing, do_assignin, this, varargout] =
2 Color_helper(which, this, index, varargin)
3 %COLOR_HELPER for class cLineStyle, Replace with a short
note
4 % Replace with something like UNCLASSIFIED
5%
6 % function [do_sub_indexing, do_assignin, this, varargout]
=
7 % Color_helper(which, this, index, varargin)
8%
9 % Replace with text that you would like to have copied into
the header
10 % of every file in this class
11 %
12 % Author Info
13 % Replace with your company's name
14 % Replace with your name
15 % Replace with your email address
16 % Replace with your phone number
17 % Replace with the author notes that you would like to appear
just
18 % after the author info for every file in this class
19 % Replace with your standard copyright notice
20 % Replace this line with a string for your revision control
software
21 % A Class Wizard v.3 assembled file, generated: 18-Jan-2006
13:18:46
C911X_C018.fm Page 259 Friday, March 2, 2007 9:06 AM
260 A Guide to MATLAB Object-Oriented Programming
22 %
23
24 switch which
25 case 'get' % ACCESSOR
26 % input: index contains any additional indexing as a
substruct
27 % input: varargin empty for accessor
28 do_sub_indexing = true; % tells get.m whether to index
deeper
29 do_assignin = false; % leave false until you read book
section 3
30 varargout = cell(1, nargout-3); % -3, 3 known vars plus
varargout
31 % \/ \/ \/ \/
32 % YOUR 'GET/ACCESSOR' HELPER CODE GOES HERE
33 % e.g., [varargout{:}] = {function of public and private
vars};
34 warning('OOP:incompleteFunction',
35 'The function definition is incomplete');
36 % /\ /\ /\ /\
37 case 'set' % MUTATOR
38 % input: index contains any additional indexing as a
substruct
39 % input: varargin contains values to be assigned into
the object
40 do_sub_indexing = false; % always false, mutator _must_
index
41 do_assignin = false; % leave false until you read book
section 3
42 varargout = {}; % 'set' returns nothing in varargout
43 % \/ \/ \/ \/
44 % YOUR 'SET/MUTATOR' HELPER CODE GOES HERE
45 warning('OOP:incompleteFunction',
46 'The function definition is incomplete');
47 % below is a code template as a convenient starting point
48 % if isempty(index) % No more indexing requested, assign
input
49 % [this.Color] = deal(varargin{:});
50 % else % deeper indexing requested, use subsasgn to do it
51 % Color = [this.Color]; % Modify the assignment
52 % Color = subsasgn(Color, index, varargin{:});
53 % [this.Color] = Color;
54 % end
55 % /\ /\ /\ /\
56 otherwise
57 error('OOP:unsupportedOption', ['Unknown helper option: '
which]);
C911X_C018.fm Page 260 Friday, March 2, 2007 9:06 AM
Class Wizard Versions of the Shape Hierarchy 261
Lines 25–36 contain the placeholder for tailored accessor code. Lines 28–29 assign typical flag
values, and line 30 preallocates varargout based on the size of nargout. These three lines
are usually necessary so they are automatically included. Lines 31–36 should be replaced by helper-
specific accessor code. Otherwise, lines 34–35 will generate a warning and return empty values.
If accessor syntax is direct-link, there are two options depending on how much control is desired.
Either leave the warning in place or replace the warning with direct-link code.
Lines 37–55 contain the placeholder for tailored mutator code. Lines 40–41 assign typical flag
values, and line 42 preallocates varargout. Note that the mutator code must either use all the
index values or throw an error. Here varargout is empty because the object is returned in the
output variable this. These three lines are usually necessary so they are automatically included.
Lines 43–55 should be replaced by helper-specific mutator code. Otherwise, lines 45–46 will
generate a warning and an unmodified this will be returned. The comments in lines 48–54
represent typical direct-link syntax and are included as an aid to development.
18.2 CSHAPE CLASS WIZARD DEFINITION DATA
Data entry for every class follows the same procedure used to define cLineStyle. During the
definition of cShape, we will build on that procedure by spending more time discussing new
areas. Open a new session of Class Wizard or select File::New from the menu and type in
cShape as the class name. From an earlier chapter, we know that cShape needs to be superior
to double. In the Superior To: field on the main dialog, add the string double. If cShape
needed to be superior to more than one type, a comma-separated list would be used. Keep the
default values for all other main dialog data. The remaining definition data are entered using the
various data-entry dialogs.
18.2.1 CSHAPE HEADER INFO
Click the Header Info … button and select Default Header Info::Load from the menu. This
selection loads the collection of default values previously saved during the definition of cLine-
Style. You can change the field values or leave them as is. Click Okay to return to the main dialog.
18.2.2 CSHAPE PRIVATE VARIABLES
The next dialog for data entry defines the class’ private variables. Click the
Private Variables … button and enter the data shown in Figure 18.8. The data are also
summarized in Table 18.4. Data entry is the same as before. First, select an empty line in the lower
display block and start entering private variable data. Click Save Change to commit the changes
and move to the next line. Finally, when data for all variables have been saved, click Done to
return to the main dialog.
The only noteworthy aspects of the private variables are the initial values. The initial mPoints
array is now defined to be empty. Previous versions of cShape used the corner points of a star
to populate mPoints. If you prefer star corner points, modify the initial value field for mPoints
and rebuild the class. The initial value for mLineStyle calls the cLineStyle constructor using
two arguments. This is an example of composition and demonstrates how easy it is to define a
class that uses composition. Except for comments, the version of /@cShape/pri-
vate/ctor_ini resulting from the private variable definitions is identical to the Chapter 16
version. This fi le and all the class files for this chapter can be found in
/oop_guide/chapter_18.
58 end
59 % Replace with something like UNCLASSIFIED
C911X_C018.fm Page 261 Friday, March 2, 2007 9:06 AM
262 A Guide to MATLAB Object-Oriented Programming
18.2.3 CSHAPE CONCEALED VARIABLES
Moving down the collection of dialog buttons brings us to the concealed variables button. Click
the Concealed Variables … button and enter the data shown in Figure 18.9. The concealed
variable data are also provided in Table 18.5. Fields for concealed variables are the same as the
fields for public variables because there is very little difference between the two. In the generated
functions, concealed variables are written into the concealed variable sections of get and set. If
you examine these files, you will notice that the mFigureHandle shares the concealed section
with another concealed variable, mDisplayFunc. Managed exclusively by Class Wizard, mDis-
playFunc should never be included in the concealed variable dialog. When you are finished,
click Done to return to the main dialog.
FIGURE 18.8 Class Wizard, cShape private variable dialog.
TABLE 18.4
cShape Private Variable Dialog Fields
Private Variable Name Initial Value Comment
mSize ones(2,1) Scaled [width; height] of bounding
box
mScale ones(2,1) [width; height] scale factor
mPoints zeros(2,0) Columns of [x; y] shape corner
values
mFigureHandle [] Handle for the shape’s figure
window
mLineStyle cLineStyle
([0;0;1], 1)
Secondary cLineStyle object
C911X_C018.fm Page 262 Friday, March 2, 2007 9:06 AM
Class Wizard Versions of the Shape Hierarchy 263
18.2.4 CSHAPE PUBLIC VARIABLES
The next move down the collection of dialog buttons brings us to the public variables button. Click
the Public Variables … button and enter the data shown in Figure 18.10. The public variable
data are also provided in Table 18.6. When you are finished, click Done to return to the main dialog.
All public variables defined for cShape have accessors. Accessors for Size and Points
use simple, direct-link syntax, and accessors for ColorRgb and LineWeight use a helper
function. Internally, cShape manages color and line width through a secondary object stored in
mLineStyle. Access to the color value is simple, but it does not conform to direct-link require-
ments. Consequently, ColorRgb must specify helper-function syntax. Access to the line width is
more complicated because the interface converts between strings ‘normal’ and ‘bold’ and
integer width values.
All public variables defined for cShape also have mutators. In this case, the desire for a robust
interface complete with input value checking means that all public variables use helper function
syntax for mutation. Helper-function stubs all look similar to the Color_helper stub in Code
Listing 107. The appropriate helper-function code for cShape’s private variables was developed
in Chapter 16.
FIGURE 18.9 Class Wizard, cShape concealed variable dialog.
TABLE 18.5
cShape Concealed Variable Dialog Fields
Concealed Variable
Name Type Accessor Expression
Mutator
Expression Comment
mFigureHandle graphics
handle
mFigureHandle The shape’s handle-
graphics handle
C911X_C018.fm Page 263 Friday, March 2, 2007 9:06 AM
264 A Guide to MATLAB Object-Oriented Programming
18.2.5 CSHAPE CONSTRUCTOR FUNCTIONS
The final data-entry button on the main dialog defines constructors. The cShape class uses a one-
argument constructor to assign initial Point values. The one-argument constructor is a little odd
because Class Wizard always generates a copy constructor. When a one-argument constructor is
defined, the generated version of ctor_1 uses the specified variable name and still includes a
FIGURE 18.10 Class Wizard, cShape public variable dialog.
TABLE 18.6
Public Member Variable Field Values
Public Variable
Name Type
Accessor
Expression
Mutator
Expression Comment
Size double array
(2x1)
mSize %helper The horiz (1,1) and
vert (2,1) size of
the shape’s
bounding box
ColorRgb double array
(3x1)
%helper %helper [R; G; B] color
values of the shape
Points double array
(2xN)
%helper %helper Corner points: x in
row (1,:), y in row
(2,:)
LineWeight normal, bold %helper %helper Weight of the line
used to draw the
shape; either
‘normal’ or ‘bold’
C911X_C018.fm Page 264 Friday, March 2, 2007 9:06 AM
Class Wizard Versions of the Shape Hierarchy 265
case for copy. Clicking the Constructors button brings up the dialog shown in Figure
18.11. Select an empty line and enter InitialPoints as the input argument list. Now click
Save Change to commit the list and Done to return to the main dialog. The function ctor_1.m
will again be tailored using code from Chapter 16.
18.2.6 CSHAPE PUBLIC FUNCTIONS
We are done with the buttons on the main dialog, but we are not yet done entering all definition
data for the class. The public interface includes three public functions, mtimes, reset, and
draw. We are going to let Class Wizard generate the initial versions of these three files. To do that,
we need to enter public-function data.
At the bottom of the main screen, click More …. This will open a dialog box with a button
for public functions. Click the Public Functions … button and enter the data shown in Figure
18.12. The public-function data are also provided in Table 18.7. When you are finished, click Done
to return to the more dialog. In the upper right-hand corner of the more dialog, click Done to
return to the main dialog.
The initial version of the public function will run without error, but it doesn’t do anything. The
code body includes a warning message, and any output variables that are not also passed into the
function are assigned an empty value. To tailor these files, we will again copy code from Chapter 16.
18.2.7 CSHAPE DATA DICTIONARY
At this point, all the elements of cShape have been defined but we still need to add some comments
for the function arguments. On the main dialog menu bar, select Data::Dictionary … and
the dialog shown in Figure 18.13 will be displayed. Enter type information and comments for each
variable. The variable data are also provided in Table 18.8. When you are finished, click Done to
return to the main dialog.
FIGURE 18.11 Class Wizard, cShape constructor function dialog.
C911X_C018.fm Page 265 Friday, March 2, 2007 9:06 AM