Beginning ASP.NET 2.0 E-Commerce in C# 2005 From Novice to Professional PHẦN 8 pptx
Bạn đang xem bản rút gọn của tài liệu. Xem và tải ngay bản đầy đủ của tài liệu tại đây (2.24 MB, 70 trang )
CHAPTER 12 ■ ADDING CUSTOMER ACCOUNTS
469
Figure 12-11. Blank user details page
26. Click Edit and enter some details, as shown in Figure 12-12.
Darie-Watson_4681C12.fm Page 469 Monday, September 12, 2005 6:50 AM
470
CHAPTER 12
■ ADDING CUSTOMER ACCOUNTS
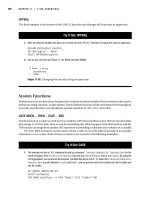
Figure 12-12. User details page in edit mode
27. Click Update and note how the credit card number is displayed as XXXX-XXXX-XXXX-1234.
28. Log out (you should be redirected to the log in page), and then log back in again as a different user.
When you look at the user details for this user, you should see that the details are blank—they are
unique to users.
How It Works: Implementing User Profiles for BalloonShop
That was a long exercise! Still, at no point have you seen any particularly complicated code. In fact, most of it was
to make the user details edit form look good. Still, there’s plenty to analyze, starting with the way that user profile
data is exposed to the FormView control via an ObjectDataSource control.
Sadly, there is no direct way to bind user profile data to controls. Many methods are available for doing this (for
example, a fellow author and friend, Dave Sussman, created a generic way to do this, see http://blogs.
ipona.com/davids/archive/2004/10/29/414.aspx). You could even take the simple option—ignore data
binding and build a form yourself, setting Text properties of TextBox or Label controls to appropriate values in
the code behind. Because you have encrypted credit card details available, you needed to take a slightly oblique
approach to keep the data in the database secure; going with the data-bound approach is also a good test for your
ASP.NET development muscles.
To start with, let’s look at ProfileWrapper. The code for this class starts with a reference to the SecurityLib
library and a bunch of private fields. These fields cover all the fields defined in web.config, along with credit card
fields obtained from the SecureCard class in the SecurityLib namespace:
Darie-Watson_4681C12.fm Page 470 Monday, September 12, 2005 6:50 AM
CHAPTER 12 ■ ADDING CUSTOMER ACCOUNTS
471
using System;
using System.Web;
using System.Web.Security;
using SecurityLib;
/// <summary>
/// A wrapper around profile information, including
/// credit card encryption functionality.
/// </summary>
public class ProfileWrapper
{
private string address1;
private string address2;
private string city;
private string region;
private string postalCode;
private string country;
private string shippingRegion;
private string dayPhone;
private string evePhone;
private string mobPhone;
private string email;
private string creditCard;
private string creditCardHolder;
private string creditCardNumber;
private string creditCardIssueDate;
private string creditCardIssueNumber;
private string creditCardExpiryDate;
private string creditCardType;
These fields all have associated public properties, which weren’t all listed to save space.
Next, the constructor for the ProfileWrapper class obtains the profile information for the currently logged-in user
and populates the preceding fields. Because this class isn’t the code behind for a Web Form, you can’t use the
Page.Profile property to access this information, so instead you used the static HttpContext.Current
property to obtain the current context. From this, you get the ProfileCommon instance that you’re interested in:
public ProfileWrapper()
{
ProfileCommon profile =
HttpContext.Current.Profile as ProfileCommon;
From this object, you extract all the data you want. Most of this is simply a case of examining properties of the
ProfileCommon instance, but in some cases more code is required. For instance, for shippingRegion, we
wanted to use a drop-down list rather than a text box (because limited options are available), so we initialized the
field accordingly—if profile.ShippingRegion is empty, you instead use the text "1", which matches the
ShippingRegionID for “Please Select” in the ShippingRegion table. You could do this for some of the
other properties, notably Country, but for simplicity (and brevity) we’ve kept things simple.
Darie-Watson_4681C12.fm Page 471 Monday, September 12, 2005 6:50 AM
472
CHAPTER 12
■ ADDING CUSTOMER ACCOUNTS
You also extracted the email address of the user by obtaining a MembershipUser object via Membership.
GetUser() and passing the username obtained from the profile as a parameter. You then used the Email property
of this object to obtain the email address. Strictly speaking, the user’s email address isn’t part of the user’s profile,
but it makes sense to expose it here for easy editing.
creditCard also needs more work. You needed to decrypt any information stored and use the decrypted data to
fill the appropriate fields: creditCardHolder, creditCardNumber, and so on. Because a decryption failure
results in an exception, this decryption is performed in a try catch block.
address1 = profile.Address1;
address2 = profile.Address2;
city = profile.City;
region = profile.Region;
postalCode = profile.PostalCode;
country = profile.Country;
shippingRegion =
(profile.ShippingRegion == null
|| profile.ShippingRegion == ""
? "1"
: profile.ShippingRegion);
dayPhone = profile.DayPhone;
evePhone = profile.EvePhone;
mobPhone = profile.MobPhone;
email = Membership.GetUser(profile.UserName).Email;
try
{
SecureCard secureCard = new SecureCard(profile.CreditCard);
creditCard = secureCard.CardNumberX;
creditCardHolder = secureCard.CardHolder;
creditCardNumber = secureCard.CardNumber;
creditCardIssueDate = secureCard.IssueDate;
creditCardIssueNumber = secureCard.IssueNumber;
creditCardExpiryDate = secureCard.ExpiryDate;
creditCardType = secureCard.CardType;
}
catch
{
creditCard = "Not entered.";
}
}
Next the UpdateProfile method sets profile data, email data, and credit card details from the data contained in
the object instance from which it is called. Again, the code here is simple, with only some minor trickery required
to obtain the encrypted form of the credit card data. There’s nothing here you haven’t seen elsewhere, so there’s no
need to repeat the code here.
To use object data with the ObjectDataSource control, you needed to pass an object supporting IEnumerable
as the return result of a SELECT method. This is because ObjectDataSource is designed to work with data lists
as well as single data items. ProfileDataSource acts as an interface between ObjectDataSource and
Darie-Watson_4681C12.fm Page 472 Monday, September 12, 2005 6:50 AM
CHAPTER 12 ■ ADDING CUSTOMER ACCOUNTS
473
ProfileWrapper, simply using the IEnumerable that is supporting generic list class List<T> to pass data to
ObjectDataSource. The code instantiates an instance of List<ProfileWrapper> and adds a single item, the
user’s profile data, to this list and then returns it.
public List<ProfileWrapper> GetData()
{
List<ProfileWrapper> data = new List<ProfileWrapper>();
data.Add(new ProfileWrapper());
return data;
}
Because List<T> actually supports IEnumerable<T>, this is a strongly typed binding, meaning that the UPDATE
method is passed an argument of type T when ObjectDataSource calls it. In this case, T is ProfileWrapper,
so to update the profile information, you just called the UpdateProfile() method:
public void UpdateData(ProfileWrapper newData)
{
newData.UpdateProfile();
}
Next, you used these classes to populate a FormView control via the aforementioned ObjectDataSource control.
The templates created needed a bit of modification, because we didn’t want to display all the credit card fields on
the initial item view. We also wanted to use a drop-down list for the shippingRegion property, and bound that
drop-down list to the ShippingRegion table using simple data-binding syntax.
This customization required a lot of code, but most of this was for general display purposes, so there’s no real need
to go through it in any depth here. Suffice to say that the credit card details get fully displayed for the editing template.
■Note We haven’t done it here, but it would be relatively easy to modify this code to enable customers to
store multiple credit cards, with one selected as a default to use for purchases. You could, for example, store
an array of strings for credit card details, each containing one encrypted card, along with a default card prop-
erty. Alternatively, you could extend SecureCard to provide a single encrypted string for multiple cards. The
only reason this hasn’t been done here is to keep things moving—there’s no reason to get bogged down in
lengthy, uninteresting code at this point. Another feature that’s lacking here is the inclusion of validation
controls to ensure that required fields are filled in. Again, this is easy to add, but would have filled up another
page or so if included here.
You used a user control to store the customer details editing form, CustomerDetailsEdit.ascx. There’s a good
reason for this—later you’ll want to display the same information to customers when they place their orders, giving
them a last chance to modify details. To facilitate this reuse, CustomerDetails.ascx.cs includes two public
properties, Editable and Title, which can be used to hide the EditButton button and set the title for the
FormView control, respectively. This customization happens in the OnPreRender event handler for the control, to
cater for the fact that these properties may be set late on in the life cycle of the control, and we still want them to
work if this happens. For the Edit Details page, you use the default values for these properties; later you’ll supply
nondefault values for them.
Darie-Watson_4681C12.fm Page 473 Monday, September 12, 2005 6:50 AM
474
CHAPTER 12
■ ADDING CUSTOMER ACCOUNTS
The page displaying the CustomerDetailsEdit.ascx user control (CustomerDetails.aspx) needed to have
its access limited to users in the Customers role, so you added the required security code to web.config. Note
that the code in web.config prevents users in the Administrators role from editing profiles. This isn’t a problem,
however, because administrators don’t need to store this information.
Finally, you tested things out by entering some details for a customer and verified that the information added applied
only to that customer.
Now that you have this information available, you can move on to the next step—providing a new checkout page.
The Checkout Page
The new checkout page will display an order summary and customer details, which can be
reviewed before the customer places an order. This page appears when a customer clicks the
Proceed to Checkout button after viewing his shopping cart.
In the next exercise, you’ll implement and secure this page.
Exercise: Implementing a new Checkout Page
1. Add a new page to the BalloonShop application called Checkout.aspx and modify the code as follows:
<%@ Page Language="C#" MasterPageFile="~/BalloonShop.master"
AutoEventWireup="true" CodeFile="Checkout.aspx.cs"
Inherits="Checkout" %>
<%@ Register TagPrefix="uc1" TagName="CustomerDetailsEdit"
Src="UserControls/CustomerDetailsEdit.ascx" %>
<asp:Content ID="Content1"
ContentPlaceHolderID="contentPlaceHolder" runat="Server">
<asp:Label ID="titleLabel" runat="server"
CssClass="ShoppingCartTitle"
Text="Your Shopping Cart" /> <br />
<br />
<asp:GridView ID="grid" runat="server"
AutoGenerateColumns="False" DataKeyNames="ProductID"
BorderWidth="1px" Width="100%">
<Columns>
<asp:BoundField DataField="Name" HeaderText="Product Name"
ReadOnly="True" SortExpression="Name" />
<asp:BoundField DataField="Price" DataFormatString="{0:c}"
HeaderText="Price" ReadOnly="True"
SortExpression="Price" />
<asp:BoundField DataField="Quantity" HeaderText="Quantity"
ReadOnly="True" SortExpression="Quantity" />
Darie-Watson_4681C12.fm Page 474 Monday, September 12, 2005 6:50 AM
CHAPTER 12 ■ ADDING CUSTOMER ACCOUNTS
475
<asp:BoundField DataField="Subtotal" DataFormatString="{0:c}"
HeaderText="Subtotal" ReadOnly="True"
SortExpression="Subtotal" />
</Columns>
</asp:GridView>
<asp:Label ID="Label2" runat="server" Text="Total amount: "
CssClass="ProductDescription" />
<asp:Label ID="totalAmountLabel" runat="server" Text="Label"
CssClass="ProductPrice" />
<br />
<br />
<uc1:CustomerDetailsEdit ID="CustomerDetailsEdit1" runat="server"
Editable="false" Title="User Details" />
<br />
<asp:Label ID="InfoLabel" runat="server" CssClass="InfoText" />
<br />
<br />
<asp:Button ID="placeOrderButton" runat="server"
CssClass="ButtonText" Text="Place order"
OnClick="placeOrderButton_Click" />
</asp:Content>
2. Modify Checkout.aspx.cs as follows:
public partial class Checkout : System.Web.UI.Page
{
protected void Page_Load(object sender, EventArgs e)
{
// Set the title of the page
this.Title = BalloonShopConfiguration.SiteName +
" : Checkout";
if (!IsPostBack)
PopulateControls();
}
// fill controls with data
private void PopulateControls()
{
// get the items in the shopping cart
DataTable dt = ShoppingCartAccess.GetItems();
// populate the list with the shopping cart contents
grid.DataSource = dt;
grid.DataBind();
// setup controls
titleLabel.Text =
"These are the products in your shopping cart:";
grid.Visible = true;
Darie-Watson_4681C12.fm Page 475 Monday, September 12, 2005 6:50 AM
8213592a117456a340854d18cee57603
476
CHAPTER 12
■ ADDING CUSTOMER ACCOUNTS
// display the total amount
decimal amount = ShoppingCartAccess.GetTotalAmount();
totalAmountLabel.Text = String.Format("{0:c}", amount);
// check customer details
bool addressOK = true;
bool cardOK = true;
if (Profile.Address1 + Profile.Address2 == ""
|| Profile.ShippingRegion == ""
|| Profile.ShippingRegion == "Please Select"
|| Profile.Country == "")
{
addressOK = false;
}
if (Profile.CreditCard == "")
{
cardOK = false;
}
// report / hide place order button
if (!addressOK)
{
if (!cardOK)
{
InfoLabel.Text =
"You must provide a valid address and credit card "
+ "before placing your order.";
}
else
{
InfoLabel.Text =
"You must provide a valid address before placing your "
+ "order.";
}
}
else if (!cardOK)
{
InfoLabel.Text = "You must provide a credit card before "
+ "placing your order.";
}
else
{
InfoLabel.Text = "Please confirm that the above details are "
+ "correct before proceeding.";
}
placeOrderButton.Visible = addressOK && cardOK;
}
Darie-Watson_4681C12.fm Page 476 Monday, September 12, 2005 6:50 AM
CHAPTER 12 ■ ADDING CUSTOMER ACCOUNTS
477
protected void placeOrderButton_Click(object sender, EventArgs e)
{
// Store the total amount because the cart
// is emptied when creating the order
decimal amount = ShoppingCartAccess.GetTotalAmount();
// Create the order and store the order ID
string orderId = ShoppingCartAccess.CreateOrder();
// Create the PayPal redirect location
string redirect = "";
redirect +=
" /> redirect += "&item_name=BalloonShopOrder " + orderId;
redirect += "&item_number=" + orderId;
redirect += "&amount=" + String.Format("{0:c} ", amount);
redirect += "&return=";
redirect += "&cancel_return=";
// Redirect to the payment page
Response.Redirect(redirect);
}
}
3. Add the following class definition to BalloonShop.css:
.InfoText
{
font-family: Verdana, Helvetica, sans-serif;
font-size: 12px;
}
4. Modify web.config as follows:
<! Only existing customers can access Checkout.aspx >
<location path="Checkout.aspx">
<system.web>
<authorization>
<allow roles="Customers" />
<deny users="*" />
</authorization>
</system.web>
</location>
5. Modify ShoppingCart.aspx.cs as follows:
// redirect to the checkout page
protected void checkoutButton_Click(object sender, EventArgs e)
{
string redirect = "Checkout.aspx";
// Redirect to the checkout page
Response.Redirect("Checkout.aspx");
}
Darie-Watson_4681C12.fm Page 477 Monday, September 12, 2005 6:50 AM
478
CHAPTER 12
■ ADDING CUSTOMER ACCOUNTS
6. Log in, edit your customer details, and place an order via the shopping cart page. If your details are
correct, you should be able to click Proceed to Checkout; otherwise, you’ll have to add valid customer
details before proceeding.
How It Works: Implementing a New Checkout Page
We haven’t really done much that is particularly difficult here—most of the work was already done. All we’ve really
done is reorganize existing code to prepare for a new order backend.
The new checkout page, Checkout.aspx, now appears when customers click Proceed to Checkout from the
shopping cart view. It displays the current shopping cart using code very similar to—but not identical to—code in
ShoppingCart.aspx. The code is different in that editing is no longer possible—quantities and order items are
fixed. Checkout.aspx also includes a noneditable version of the CustomerUserDetails.ascx control, customized
using the Editable and Title properties you added earlier.
As with ShoppingCart.aspx, you use a code-behind method called PopulateControls() to get and bind to
data. The major differences here are that you don’t need to check for existing shopping cart items (we know there
will be some at this stage), and that you also check for valid address and credit card details before allowing the user
to proceed:
// check customer details
bool addressOK = true;
bool cardOK = true;
if (Profile.Address1 + Profile.Address2 == ""
|| Profile.ShippingRegion == ""
|| Profile.ShippingRegion == "1"
|| Profile.Country == "")
{
addressOK = false;
}
if (Profile.CreditCard == "")
{
cardOK = false;
}
This code, which checks the validity of the address and credit card, merits a little extra discussion. First, notice
the validation of the address. The address is validated by checking a few of the fields for data (Address1 and
Address2 combined must contain data for a valid order, and a country and shipping region must be set). This may
look overly simple, but it’s fine here—if address problems occur further down the line, you can deal with problems
as they arise. The shipping region is also interesting because you check for a value of “1”, which corresponds to
“Please Select” in the database—hence the importance of this record having an ID field value of 1, as noted
earlier. As far as credit card details go, you just check that some data is stored, not what that data is. Again, problems here
can be dealt with later.
Assuming that the data is okay, the placeOrder button allows users to actually place an order. Notice that the code
here is the same code you used in the earlier incarnation of the ShoppingCart.aspx page. In fact, none of the
extra details are used. This isn’t a problem because you now have everything you need to hook into a proper,
fleshed-out order pipeline, as you’ll see in subsequent chapters.
Darie-Watson_4681C12.fm Page 478 Monday, September 12, 2005 6:50 AM
CHAPTER 12 ■ ADDING CUSTOMER ACCOUNTS
479
A final note—the web.config file has again been modified so that users must log in before the checkout page is
visible. Using this setting, clicking on Proceed to Checkout takes users straight to the login page if they aren’t logged
in. This is a nice feature, but really there ought to be more feedback. Some simple text on Login.aspx ought to do it:
</table>
<span class="InfoText">You must be logged in to place an
order. If you aren't yet
registered with the site, click
<asp:HyperLink runat="server" ID="registerLink"
NavigateUrl="~/Register.aspx" Text="here"
ToolTip="Go to the registration page"
CssClass="UserInfoLink" />. </span>
</LayoutTemplate>
</asp:Login>
</asp:Content>
Now users will know that they must be registered to place on order and are automatically presented with the tool
they need.
Setting Up Secure Connections
Customers can now register on your site, log in, and change details. However, the current system
involves sending potentially sensitive information over HTTP. This protocol isn’t secure, and
the information could be intercepted and stolen. To avoid this, you need to set up the applica-
tion to work with SSL (Secure Socket Layer) connections using HTTPS (HyperText Transport
Protocol [Secure]).
To do this, you have a bit of groundwork to get through first. Unless you’ve already been
using an SSL connection on your web server, you are unlikely to have the correct configuration to
do so. This configuration involves obtaining a security certificate for your server and installing it
via IIS management.
Security certificates are basically public-private key pairs similar to those discussed earlier
in the chapter relating to asymmetric encryption. You can generate these yourself if your domain
controller is configured as a certification authority, but this method has its problems. Digital
signing of SSL certificates is such that browsers using the certificate will not be able to verify the
identity of your certification authority, and may therefore doubt your security. This isn’t disastrous,
but may affect consumer confidence, because users are presented with a warning message when
they attempt to establish a secure connection.
The alternative is to obtain SSL certificates from a known and respected organization that
specializes in web security, such as VeriSign. Web browsers such as Internet Explorer have
built-in root certificates from organizations such as this and are able to authenticate the digital
signature of SSL certificates supplied by them. This means that no warning message will appear
and an SSL secured connection will be available with a minimum of fuss.
This section assumes that you take this latter option, although if you want to create your
own certificates, that won’t affect the end result.
Darie-Watson_4681C12.fm Page 479 Monday, September 12, 2005 6:50 AM
480
CHAPTER 12
■ ADDING CUSTOMER ACCOUNTS
Obtaining an SSL Certificate from VeriSign
Obtaining a certificate from VeriSign is a relatively painless experience, and full instructions
are available on the VeriSign web site, ( You also can get test certif-
icates from VeriSign, which are free to use for a trial period. The basic steps are as follows:
1. Sign up for a trial certificate on the VeriSign web site.
2. Generate a Certificate Signing Request (CSR) via IIS management on your web server.
This involves filling out various personal information, including the name of your web
site, and so on.
3. Copy the contents of the generated CSR into the VeriSign request system.
4. Shortly afterward, you’ll receive a certificate from VeriSign that you copy into IIS
management to install the certificate.
There is a little more to it than that, but as noted, detailed instructions are available on the
VeriSign web site, and you shouldn’t run into any difficulties.
Enforcing SSL Connections
After the certificate is installed, you can access any web pages on your web server using an SSL
connection by replacing the http:// part of the URL used to access the page with https://
(assuming that your firewall is set up to allow an SSL connection, which by default uses port 443,
if you use a firewall—this doesn’t apply to local connections). Obviously, you don’t need SSL
connections for all areas of the site, and shouldn’t enforce it in all places because it can reduce
performance. However, you do want to make sure that the checkout, login, and customer
detail modification pages are accessible only via SSL. While you’re at it, you can also secure the
admin pages. This isn’t so important at this stage, but later, when you have full order and user
admin controls, it doesn’t hurt to make things secure here.
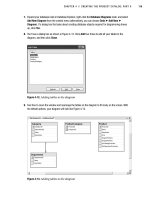
There are several ways to achieve this restriction. One way is to configure individual pages
via IIS management. Looking at the properties for Login.aspx in IIS management, for example,
shows the File Security tab, as shown in Figure 12-13.
■Note To access this dialog box, open IIS manager from the Administrative Tools section of Control Panel,
navigate through the tree view through IIS/Local Computer/Web Sites/Default Web Site/
BalloonShop, and get the properties for Login.aspx.
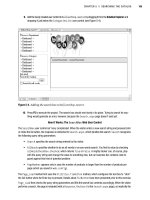
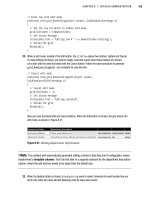
From here, you can click the Edit button in the Secure Communications section and tick
the Require Secure Channel (SSL)box in the dialog box that appears (don’t worry about the
other options), as shown in Figure 12-14.
Darie-Watson_4681C12.fm Page 480 Monday, September 12, 2005 6:50 AM
CHAPTER 12 ■ ADDING CUSTOMER ACCOUNTS
481
Figure 12-13. File Security property page
Figure 12-14. Setting the HTTPS requirement
After clicking OK, attempts to access the Login.aspx page using HTTP will be rejected.
However, this isn’t quite the route you want to go down for BalloonShop, because it makes
certain things—namely redirections between URLs that start with http:// and URLs that start
with https://—slightly difficult to manage. Rather than giving an error message when users
Darie-Watson_4681C12.fm Page 481 Monday, September 12, 2005 6:50 AM
482
CHAPTER 12
■ ADDING CUSTOMER ACCOUNTS
attempt to access Login.aspx without SSL, it’s better to detect unsecure connections in code
and redirect accordingly. This means that users trying to access Login.aspx without SSL are
automatically redirected to the same page, but with SSL. Similarly, we want users attempting
to use SSL to access a page such as Default.aspx—which doesn’t need to be secured—to be
redirected to a non-SSL connection to the same page. This results in a seamless experience
for users.
We’ll look at this in more detail in a moment. First, however, it’s worth mentioning an
attribute that ASP.NET supplies for use with the <forms> definition in web.config. You can set
the attribute requireSSL to true for this element, which will prevent user login cookies from
being exchanged over a non-SSL connection. However, this enforces the requirement that,
once logged in, users can only be authenticated for pages viewed over SSL. This setting does not
prevent users from looking at pages such as Default.aspx over a standard HTTP connection.
However, user-aware controls (such as UserInfo.ascx in BalloonShop) will not have access to
user information unless SSL is used. This attribute is for use only when you are happy to enforce
SSL connections site-wide. Because SSL connections introduce a performance hit due to the
encryption and decryption required, this isn’t recommended for most web sites.
Including Redirections to Enforce Required SSL Connections
One way to enforce SSL connections is to use absolute URLs everywhere a link is used on the
site, using for example https://<server>/CustomerDetails.aspx for the Edit Details link in
UserInfo.ascx and the http:// protocol for most other links. If you did this in combination
with SSL enforcement in IIS, you could prevent users from accessing secured pages quite effec-
tively. If they tried rewriting the URL by hand, they would likely end up with an error message
because IIS prevents secured pages from being transmitted via HTTP. However, this involves a
lot of work to modify and maintain links, and we have a far more elegant technique at our disposal.
The core concept behind the technique presented here is that every page—bar none—
uses a Master Page. This Master Page is either BalloonShop.master or Admin.master. We want to
force pages using Admin.master to always use SSL, and force pages using BalloonShop.master to
sometimes use SSL, where the “sometimes” translates as “where specified by the page.”
The simplest of these, Admin.master, requires the following code in Admin.master.cs:
protected override void OnInit(EventArgs e)
{
if (!Request.IsSecureConnection)
{
Response.Redirect(Request.Url.AbsoluteUri.ToLower().Replace(
"http://", "https://"), true);
}
base.OnInit(e);
}
Here you detect whether an SSL connection is in use with Request.IsSecureConnection,
and if it isn’t, redirect to a page with the same URL as the current page, but starting with https
rather than http. You do this at the OnInit stage of the page life cycle; that is, before the page
has had a chance to do much processing that would be wasted.
Similarly, in BalloonShop.master.cs, you redirect to an SSL connection if required or to a
standard HTTP connection if SSL isn’t required. This prevents other, nonsecured pages in the
Darie-Watson_4681C12.fm Page 482 Monday, September 12, 2005 6:50 AM
8213592a117456a340854d18cee57603
CHAPTER 12 ■ ADDING CUSTOMER ACCOUNTS
483
site from being accessed via SSL when not required. To control this redirection, you include a
property that pages using BalloonShop.master can set, saying whether they require SSL or not.
This property, EnforceSSL, is defined as follows:
public bool EnforceSSL
{
get
{
if (ViewState["enforceSSL"] != null)
{
return (bool)ViewState["enforceSSL"];
}
else
{
return false;
}
}
set
{
ViewState["enforceSSL"] = value;
}
}
We use view state here to streamline things, but other than that, this is a simple Boolean
property.
Now, because this property may be set fairly late in the life cycle of the Master Page, you
can’t act on it in OnInit. Instead, you check the value of this property in OnPreRender and redirect
then (if necessary):
protected override void OnPreRender(EventArgs e)
{
if (EnforceSSL)
{
if (!Request.IsSecureConnection)
{
Response.Redirect(
Request.Url.AbsoluteUri.ToLower().Replace(
"http://", "https://"), true);
}
}
else if (Request.IsSecureConnection)
{
Response.Redirect(Request.Url.AbsoluteUri.ToLower().Replace(
"https://", "http://"), true);
}
}
With this scheme, the user is only aware that something is going on when logging in. At
this point the user is redirected from a secure to a nonsecure connection. From that point on,
Darie-Watson_4681C12.fm Page 483 Monday, September 12, 2005 6:50 AM
484
CHAPTER 12
■ ADDING CUSTOMER ACCOUNTS
the user is redirected from secure to nonsecure connections transparently—secure when needed,
nonsecure when not. Users will, of course, always be able to tell what type of connection they
have, because the standard “padlock” symbol is displayed as per usual. The URL will also be
there to reassure them.
The code behind required for SSL secured pages is
protected override void OnInit(EventArgs e)
{
(Master as BalloonShop).EnforceSSL = true;
base.OnInit(e);
}
This code needs to be added to Login.aspx.cs, Register.aspx.cs, CustomerDetails.
aspx.cs, and Checkout.aspx.cs. Note that the call to base.OnInit(e) is required for proper
themes functionality. Without this call, the ASP.NET theme doesn’t get applied, and the CSS
styles, and so on won’t be loaded.
Summary
In this chapter, you’ve implemented a customer account system that customers can use
to store their details for use during order processing. You’ve looked at many aspects of the
customer account system, including encrypting sensitive data, and securing web connections
for obtaining it.
You started by creating a set of classes in a new namespace called SecurityLib for hashing
and encrypting strings, and a secure credit card representation that makes it easy to exchange
credit card details between the encrypted and decrypted format.
After this, you implemented a customer login scheme using a new user role called Customers.
This required some, but not many modifications to the existing Forms Authentication scheme,
as well as the addition of a registration page. You also added customer details functionality
using the ASP.NET Membership controls and the SecurityLib namespace and classes. After all
this was implemented, you prepared the way for a new order process with a new checkout page.
Finally, we looked at how to secure data passing over the Internet using secure SSL connec-
tions. This involved obtaining and installing a certificate from a known certification authority
(VeriSign, for example), restricting access to SSL where appropriate, and modifying the redirection
code slightly to use SSL connections.
In the next chapter, we’ll look at how to create the framework for the order-processing
pipeline, enabling you to automate even more of the supply process.
Darie-Watson_4681C12.fm Page 484 Monday, September 12, 2005 6:50 AM
485
■ ■ ■
CHAPTER 13
Advanced Customer Orders
The BalloonShop e-commerce application is shaping up nicely. You’ve added customer
account functionality, and you’re keeping track of customer addresses and credit card infor-
mation, which is stored in a secure way. However, you’re not currently using this information—
you’re delegating responsibility for this to PayPal.
In this chapter, you’ll make the modifications required for customers to place orders that
are associated with their user profile. The main modification here is that the customer associated
with an order will be identified by a new piece of information in the Orders table, and much of
the rest of the modifications will be made to use this information.
In the next chapter, you’ll start to implement a more sophisticated order system, and the
code you’ll write in this chapter will facilitate this. You’ll be adding various new data structures
and data access classes to get ready for this. Because of this, you’ll be making some modifica-
tions that won’t seem necessary at this stage, but they’ll make your life easier later on.
Also in this chapter, you’ll take a look at dealing with another common feature of e-commerce
sites: tax and shipping charges. Many options are available for implementing this functionality,
but we’ll just examine a simple way of doing things and lay the groundwork for your own
further development.
Implementing Customer Order Functionality
This section is divided into two parts as follows:
• Placing customer orders: In this section, you’ll enable customers to place orders.
• Accessing customer orders: In this section, you’ll enable the order-processing system in
later chapters to access customer orders.
Placing Customer Orders
To enable customers to place orders using ASP.NET membership, you need to make several
modifications. You’ll modify the database and business tier to enable customer orders to be
placed and provide new code in the presentation tier to expose this functionality.
Database Modifications
As mentioned previously, the first thing to do is modify the database to make it ready to hold
information about customer orders.
Darie-Watson_4681C13.fm Page 485 Wednesday, September 14, 2005 9:27 AM
486
CHAPTER 13
■ ADVANCED CUSTOMER ORDERS
The Orders Table
Currently the Orders table doesn’t allow for as much information as you’ll need to implement
customer orders. There are also some modifications that you’ll need in later chapters, so you
need to add the new columns shown in Table 13-1 to the Orders table.
All except the first of these columns are related to advanced order processing, including
credit card transactions, and you’ll look at these columns in more detail later. You might also
wonder why the CustomerID column is of type uniqueidentifier, which is quite reasonable.
The reason is simply because this is how users are identified in the ASP.NET membership
system. Effectively, this column provides a link to the aspnet_Users membership table, in the
ASPNETDB database.
Note that you won’t be using some of the columns that already exist in the Orders table,
such as Verified and Completed. This is because this information is now encapsulated in the
Status column. You also won’t need the old fields relating to customer identification, such as
CustomerName, because now this information is stored elsewhere. Don’t delete these deprecated
columns, however, or you’ll lose backward compatibility with code earlier in this book.
■Note To enable this database to be used with both the code in this section of the book and the code in the
earlier part of this book, it’s necessary to make the new columns nullable, because earlier data won’t supply
values for them.
The CreateCustomerOrder Stored Procedure
Currently, the CreateOrder stored procedure is used to add orders to the database:
CREATE PROCEDURE CreateOrder
(@CartID char(36))
AS
/* Insert a new record into Orders */
DECLARE @OrderID int
INSERT INTO Orders DEFAULT VALUES
Table 13-1. The Orders Table
Column Name Column Type Description
CustomerID uniqueidentifier The ID of the customer that placed the order
Status int The current status of the order, which you’ll use in
later chapters to determine what stage of order
processing has been reached; default value 0
AuthCode varchar(50) The authentication code used to complete the
customer credit card transaction
Reference varchar(50) The unique reference code of the customer credit
card transaction
Darie-Watson_4681C13.fm Page 486 Wednesday, September 14, 2005 9:27 AM
CHAPTER 13 ■ ADVANCED CUSTOMER ORDERS
487
/* Save the new Order ID */
SET @OrderID = @@IDENTITY
/* Add the order details to OrderDetail */
INSERT INTO OrderDetail
(OrderID, ProductID, ProductName, Quantity, UnitCost)
SELECT
@OrderID, Product.ProductID, Product.Name,
ShoppingCart.Quantity, Product.Price
FROM Product JOIN ShoppingCart
ON Product.ProductID = ShoppingCart.ProductID
WHERE ShoppingCart.CartID = @CartID
/* Clear the shopping cart */
DELETE FROM ShoppingCart
WHERE CartID = @CartID
/* Return the Order ID */
SELECT @OrderID
When an order is created in this new system, more data is added to the database, so you
need to use a different (although very similar) stored procedure, CreateCustomerOrder (the
differences are shown in bold):
CREATE PROCEDURE CreateCustomerOrder
(@CartID char(36),
@CustomerID uniqueidentifier)
AS
/* Insert a new record into Orders */
DECLARE @OrderID int
INSERT INTO Orders (CustomerID) VALUES (@CustomerID)
/* Save the new Order ID */
SET @OrderID = @@IDENTITY
/* Add the order details to OrderDetail */
INSERT INTO OrderDetail
(OrderID, ProductID, ProductName, Quantity, UnitCost)
SELECT
@OrderID, Product.ProductID, Product.Name,
ShoppingCart.Quantity, Product.Price
FROM Product JOIN ShoppingCart
ON Product.ProductID = ShoppingCart.ProductID
WHERE ShoppingCart.CartID = @CartID
/* Clear the shopping cart */
DELETE FROM ShoppingCart
WHERE CartID = @CartID
/* Return the Order ID */
SELECT @OrderID
The new data here is the inclusion of a CustomerID value with the order.
Darie-Watson_4681C13.fm Page 487 Wednesday, September 14, 2005 9:27 AM
488
CHAPTER 13
■ ADVANCED CUSTOMER ORDERS
Business Tier Modifications
To use your new stored procedure, you need to modify the ShoppingCartAccess class. Rather
than removing the old CreateOrder method, however, add the following method:
// Create a new order with customer ID
public static string CreateCommerceLibOrder()
{
// get a configured DbCommand object
DbCommand comm = GenericDataAccess.CreateCommand();
// set the stored procedure name
comm.CommandText = "CreateCustomerOrder";
// create parameters
DbParameter param = comm.CreateParameter();
param.ParameterName = "@CartID";
param.Value = shoppingCartId;
param.DbType = DbType.String;
param.Size = 36;
comm.Parameters.Add(param);
// create a new parameter
param = comm.CreateParameter();
param.ParameterName = "@CustomerId";
param.Value =
Membership.GetUser(
HttpContext.Current.User.Identity.Name)
.ProviderUserKey;
param.DbType = DbType.Guid;
param.Size = 16;
comm.Parameters.Add(param);
// return the result table
return GenericDataAccess.ExecuteScalar(comm);
}
This new method, CreateCommerceLibOrder, is more or less the same as the old order-placing
code, but there is a new parameter to use: @CustomerID. The GUID to use for this customer iden-
tification is obtained using the ASP.NET membership classes. You obtain a MembershipUser class
using Membership.GetUser by passing the name of the current user obtained from the current
context. Next, you use the ProviderUserKey property of the MembershipUser object you receive
to obtain the unique GUID that identifies the current user.
Note the naming of this new method, which includes the name CommerceLib. In later chapters,
this name helps identify the new code that is associated with the new, advanced order-processing
scheme.
Presentation Tier Modifications
You’ll use the preceding method in the checkout page you added in the last chapter. You’ll do
this in the following exercise, as well as add an order confirmation page that users will be redi-
rected to after placing an order.
Darie-Watson_4681C13.fm Page 488 Wednesday, September 14, 2005 9:27 AM
CHAPTER 13 ■ ADVANCED CUSTOMER ORDERS
489
Exercise: Adding Customer Orders to BalloonShop
1. Modify the placeOrderButton_Click method in Checkout.aspx.cs as follows:
protected void placeOrderButton_Click(object sender,
EventArgs e)
{
// Store the total amount because the cart
// is emptied when creating the order
decimal amount = ShoppingCartAccess.GetTotalAmount();
// Create the order and store the order ID
string orderId = ShoppingCartAccess.CreateCommerceLibOrder();
// Redirect to the confirmation page
Response.Redirect("OrderPlaced.aspx");
}
2. Add a new Web Form to the project called OrderPlaced.aspx by using the BalloonShop.master
Master Page:
<%@ Page Language="C#" MasterPageFile="~/BalloonShop.master"
AutoEventWireup="true" CodeFile="OrderPlaced.aspx.cs"
Inherits="OrderPlaced" %>
<asp:Content ID="Content1"
ContentPlaceHolderID="contentPlaceHolder" runat="Server">
<span class="InfoText">
Thank you for your order, please come again!
</span>
</asp:Content>
3. Add the following title-setting code and method override to the code-behind file for this form,
OrderPlaced.aspx.cs:
protected override void OnInit(EventArgs e)
{
(Master as BalloonShop).EnforceSSL = true;
base.OnInit(e);
}
protected void Page_Load(object sender, EventArgs e)
{
// Set the title of the page
this.Title = BalloonShopConfiguration.SiteName +
" : Order Placed";
}
Darie-Watson_4681C13.fm Page 489 Wednesday, September 14, 2005 9:27 AM
8213592a117456a340854d18cee57603
490
CHAPTER 13
■ ADVANCED CUSTOMER ORDERS
4. Modify web.config as follows:
<! Only existing customers can access OrderPlaced.aspx >
<location path="OrderPlaced.aspx">
<system.web>
<authorization>
<allow roles="Customers" />
<deny users="*" />
</authorization>
</system.web>
</location>
5. Place an order or two using the new system to check that the code works. You’ll need to log on to do
this and supply enough details to get past the validation on the checkout page.
How It Works: Adding Customer Orders to BalloonShop
The code added in this exercise is very simple and hardly merits much discussion. Still, you may want to modify the
text displayed on OrderPlaced.aspx to include additional information that customers might require after placing
an order. Also, note that this new page is secured via SSL and the Customer role. Customers who aren’t logged in
won’t need to see this page.
After you’ve implemented more of the new ordering code, you’ll be able to provide more information to customers,
such as sending them confirmation emails and enabling them to check on order statuses, past and present. For
now, however, this is as far as we can take things.
Accessing Customer Orders
After orders have been placed, you’ll need to access them. This involves various modifications
to the database business tier to provide new data structures and access code. Although essential
in the next chapter and beyond, for now, you’ll implement a simple (admin only) test form to
access customer order data.
Database Modifications
You only need to make one modification here: Add a stored procedure to get access to the new
information in the modified Orders table. Add the following stored procedure to the BalloonShop
database:
CREATE PROCEDURE CommerceLibOrderGetInfo
(@OrderID int)
AS
SELECT OrderID,
DateCreated,
DateShipped,
Comments,
Status,
CustomerID,
AuthCode,
Darie-Watson_4681C13.fm Page 490 Wednesday, September 14, 2005 9:27 AM
CHAPTER 13 ■ ADVANCED CUSTOMER ORDERS
491
Reference
FROM Orders
WHERE OrderID = @OrderID
This is very similar to the existing OrderGetInfo stored procedure, but rewritten to take
into account the new columns.
Business Layer Modifications
The current order access code—stored in App_Code/OrdersAccess.cs—and the data for an
order can be wrapped in a struct called OrderInfo. This struct is then used by various methods
to manipulate order details.
The OrderInfo struct doesn’t give you access to the new data stored in the Orders table,
and it doesn’t allow you to access order details or customer and credit card information. In
short, you need something a little more advanced.
To achieve this, add a new class called CommerceLibAccess to the App_Code directory. You’ll
actually store two other classes in the same file, as per code in previous chapters (excepting the
fact that in previous chapters only structs have shared files with a main class). Having a single
file makes it easy to group classes that are functionally linked. All the classes in this file will
facilitate data access, and you’ll start by looking with a class to wrap rows in the OrderDetail
table. Before doing this, however, add the following namespace references to the
CommerceLibAccess.cs file:
using System.Data.Common;
using System.Text;
using System.Collections.Generic;
using System.Web.Profile;
using SecurityLib;
These namespaces provide the class required for us to access and process order and
customer information.
The CommerceLibOrderDetailInfo Class
Add the following class to CommerceLibAccess.cs:
/// <summary>
/// Wraps order detail data
/// </summary>
public class CommerceLibOrderDetailInfo
{
public int OrderID;
public int ProductID;
public string ProductName;
public int Quantity;
public double UnitCost;
public string ItemAsString;
Darie-Watson_4681C13.fm Page 491 Wednesday, September 14, 2005 9:27 AM
492
CHAPTER 13
■ ADVANCED CUSTOMER ORDERS
public double Subtotal
{
get
{
return Quantity * UnitCost;
}
}
public CommerceLibOrderDetailInfo(DataRow orderDetailRow)
{
OrderID = Int32.Parse(orderDetailRow["OrderID"].ToString());
ProductID = Int32.Parse(orderDetailRow["ProductId"].ToString());
ProductName = orderDetailRow["ProductName"].ToString();
Quantity = Int32.Parse(orderDetailRow["Quantity"].ToString());
UnitCost = Double.Parse(orderDetailRow["UnitCost"].ToString());
// set info property
Refresh();
}
public void Refresh()
{
StringBuilder sb = new StringBuilder();
sb.Append(Quantity.ToString());
sb.Append(" ");
sb.Append(ProductName);
sb.Append(", $");
sb.Append(UnitCost.ToString());
sb.Append(" each, total cost $");
sb.Append(Subtotal.ToString());
ItemAsString = sb.ToString();
}
}
This class wraps a row from the OrderDetail table. Note that we aren’t using a struct for
this functionality. This is because structs can’t have constructors, and to make initialization
easier, this class uses a constructor that takes a DataRow object to initialize itself. This constructor
simply parses the OrderID, ProductID, ProductName, Quantity, and UnitCost columns and associates
them with public fields. We could hide these fields by making them private, and expose them
via properties, but for our purposes this access scheme is fine—and is a lot quicker to type in!
The constructor finishes with a call to a publicly accessible Refresh method, which sets a
utility field called ItemAsString. This field, as you will see later, makes it easier for us to quickly
extract a descriptive piece of text concerning the data contained in a CommerceLib➥
OrderDetailInfo instance.
Subtotal is another piece of information exposed by this class. Like ItemAsString, this is
really just for convenience and simply returns the number of items multiplied by the cost of a
single item.
Darie-Watson_4681C13.fm Page 492 Wednesday, September 14, 2005 9:27 AM
CHAPTER 13 ■ ADVANCED CUSTOMER ORDERS
493
The GetOrderDetails Method
The first method to add to the CommerceLibAccess class is one that obtains the OrderDetail rows
associated with an order. Add the following method to the class:
public static List<CommerceLibOrderDetailInfo>
GetOrderDetails(string orderId)
{
// use existing method for DataTable
DataTable orderDetailsData = OrdersAccess.GetDetails(orderId);
// create List<>
List<CommerceLibOrderDetailInfo> orderDetails =
new List<CommerceLibOrderDetailInfo>(
orderDetailsData.Rows.Count);
foreach (DataRow orderDetail in orderDetailsData.Rows)
{
orderDetails.Add(
new CommerceLibOrderDetailInfo(orderDetail));
}
return orderDetails;
}
There are several things to note here. First, this class returns a generic list of
CommerceLibOrderDetailInfo objects. The (in my view, quite fabulous) generic list classes make
it easy to perform complex list operations on data without writing any of the code, and they are
great timesavers.
We already have a similar method to this one in the OrdersAccess class, so we start by using
that method to get a DataTable containing the data we are interested in. Next we take each row
in that table, create an instance of the CommerceLibOrderDetailInfo class from it, and add it to
the generic list of objects.
The CommerceLibOrderInfo Class
Add the following class to CommerceLibAccess.cs:
/// <summary>
/// Wraps order data
/// </summary>
public class CommerceLibOrderInfo
{
public int OrderID;
public string DateCreated;
public string DateShipped;
public string Comments;
public int Status;
public string AuthCode;
public string Reference;
Darie-Watson_4681C13.fm Page 493 Wednesday, September 14, 2005 9:27 AM