Beginning C# 2008 Databases From Novice to Professional phần 8 potx
Bạn đang xem bản rút gọn của tài liệu. Xem và tải ngay bản đầy đủ của tài liệu tại đây (1.11 MB, 52 trang )
How It Works
Visual Studio comes with a lot of features to help developers while writing code. One
of these features is that you can just double-click the GUI element for which you want
to add the code, and you will be taken to the code associated with the GUI element in
Code view. For example, when you double-click the Submit button in Design view, you
are taken to the Code view, and the
btnSubmit_Click event template automatically gets
generated.
To achieve the functionality for this control, you add the following code:
MessageBox.Show("Hello" + ' ' + txtFname.Text + ' ' + txtLname.Text + ' ' +
"Welcome to the Windows Application");
MessageBox.Show
is a C# method that pops up a message box. To display a “Welcome”
message with the first name and last name specified by the user in the message box, you
apply a string concatenation approach while writing the code.
In the code segment, you hard code the message “Hello Welcome to the Windows
Application”, but with the first name and last name of the user appearing after the word
“Hello” and concatenated with the rest of the message, “Welcome to the Windows Appli-
cation”.
For readability, you also add single space characters (
' ') concatenated by instances
of the
+ operator in between the words and values you are reading from the Text property
of the
txtFnam and txtLname. If you do not include the single space character (' ') during
string concatenation, the words will be run into each other, and the message displayed in
the message box will be difficult to read.
Setting Dock and Anchor Properties
Prior to Visual Studio 2005, resizing Windows Forms would require you to reposition
and/or resize controls on those forms. For instance, if you had some controls on the left
side of a form, and you tried to resize the form by stretching it toward the right side or
bring it back toward the left, the controls wouldn’t readjust themselves according to the
width of the resized form. Developers were bound to write code to shift controls accord-
ingly to account for the user resizing the form. This technique was very code heavy and
not so easy to implement.
W
ith
V
isual S
tudio 2005 came two new properties, Anchor and Dock, which are so
easy to set at design time itself.
The same Dock and Anchor pr
oper
ties ar
e available with
V
isual S
tudio 2008, and they solv
e the pr
oblem with the behavior of controls that users
face while r
esizing
for
ms
.
CHAPTER 14 ■ BUILDING WINDOWS FORMS APPLICATIONS 335
9004ch14final.qxd 12/13/07 4:02 PM Page 335
Dock Property
The Dock property allows you to attach a control to one of the edges of its parent. The
term “parent” applies to Windows Forms, because Windows Forms contain the controls
that you drag and drop on them. By default, the Dock property of any control is set to
None.
For example, a control docked to the top edge of a form will always be connected to
the top edge of the form, and it will automatically resize in the left and right directions
when its parent is resized.
The Dock property for a control can be set by using the provided graphical interface
in the Properties window as shown in Figure 14-11.
Figure 14-11. Setting the Dock property
Anchor Property
When a user resizes a form, the controls maintain a constant distance from the edges
of its parent form with the help of the Anchor property. The default value for the
Anchor pr
oper
ty for any contr
ol is set to
T
op
, Left, which means that this control will
maintain a constant distance fr
om the top and left edges of the for
m.
The Anchor pr
op
-
er
ty can be set b
y using the pr
ovided graphical interface in the Properties window, as
sho
wn in F
igur
e 14-12.
D
ue to the default setting of Anchor pr
oper
ty to Top, Left, if you try to resize a form
b
y str
etching it toward the right side, you will see that its controls are still positioned on
the left r
ather than shifting to the center of the for
m to adjust to the size of the form after
r
esizing is done
.
I
f opposite edges
, for example, Left and Right, are both set in the Anchor property,
the contr
ol will str
etch when the form is resized. However, if neither of the opposite edges
is set in the Anchor pr
oper
ty, the control will float when the parent is resized.
CHAPTER 14 ■ BUILDING WINDOWS FORMS APPLICATIONS336
9004ch14final.qxd 12/13/07 4:02 PM Page 336
Figure 14-12. Setting the Anchor property
Try It Out: Working with the Dock and Anchor Properties
In this exercise, you will use the existing Windows Forms Application named WinApp,
which you created previously in the chapter. You will see how to modify this application
in such a way that when you resize the form, its controls behave accordingly and keep
the application presentable for the user.
1. Go to Solution Explorer and open the WinApp project. Open the WinApp form in
Design mode.
2. Select the form by clicking its title bar; you will see handles around form’s border,
which allow you to resize the form’s height and width.
3. Place the cursor on the handle of the right-hand border, and when mouse pointer
becomes double-headed, click and stretch the form toward the right-hand side.
You will see that form’s width increases, but the controls are still attached to the
left corner of the form.
4. Similarly, grab the handle located on the bottom of the form and try to increase
the height of the form. You will notice that the controls are still attached to the top
side of the form.
Have a look at Figure 14-13, which shows a resized (height and width) form and
the position of the controls. The controls appear in the top-left corner because
their Dock property values are None and Anchor property values are Top, Left.
CHAPTER 14 ■ BUILDING WINDOWS FORMS APPLICATIONS 337
9004ch14final.qxd 12/13/07 4:02 PM Page 337
Figure 14-13. Resized form and position of controls
Now you will try to set the Dock and Anchor properties for the controls and then
retest the application.
5. Select the Label control having a Text value of Welcome, and go to the Properties
window. Select the AutoSize property and set its value to False (default value is
True).
6. Resize the width of the Label control to the width of the form, and adjust the Label
control to the top border of the form. Set this control’s TextAlign property to Top,
Center.
7. Set the Dock property for the Label control from None to Top, which means you
want the label to always be affixed with the top border of the form.
8. Now select all the remaining controls (two Labels, two TextBoxes, and one
Button) either by scrolling over all of them while holding down the left mouse
button or selecting each with a click while pressing down either the Shift or
Ctrl key.
9. Once you have selected all the controls, go to the Properties window. You will see
listed all the properties common to the controls you have selected on the form.
10. S
elect the Anchor property; modify its value from the default Top, Left to Top, Left,
and Right.
This will allow you to adjust the controls accordingly as soon as you
r
esize the form. The controls will also grow in size accordingly to adjust to the
width of the form, as you can see in Figure 14-14.
CHAPTER 14 ■ BUILDING WINDOWS FORMS APPLICATIONS338
9004ch14final.qxd 12/13/07 4:02 PM Page 338
Figure 14-14. The effect of the Anchor property setting Top
, Left, Right on a
resized form
■Note The Anchor property has very interesting behaviors; you can try setting this property in various
combinations and see their effects when you resize your form.
11. Return the form to its previous size so you can see the effects of setting another
Anchor property.
12. Select all the controls again as you did in Step 8. Set the Anchor property to Top
only and try resizing the form now. You will notice that the controls are floating in
the middle of the form when you resize it, as you can see in Figure 14-15.
Figure 14-15. The effect of the Anchor property setting Top on a resized form
13. Save the changes in your project by clicking File ➤ Save All.
CHAPTER 14 ■ BUILDING WINDOWS FORMS APPLICATIONS 339
9004ch14final.qxd 12/13/07 4:02 PM Page 339
How It Works
When you resize the form, it will behave according to the settings of the Dock and Anchor
properties.
In the first instance, you set the Dock property of the Label control to Top, which
allows this Label control to be affixed to the top border of the form and span the entire
width of the form. Setting the Anchor property of the remaining controls to Top, Left,
and Right shifts the controls in such a manner that they will maintain a constant dis-
tance from the left and right borders of the form.
Adding a New Form to the Project
You’ll obviously need multiple Windows Forms in any given project. By default, every
project opens with only one Windows Form, but you are free to add more.
Try It Out: Adding a New Form to the Windows Project
In this exercise, you will add another Windows Form to your project. You will also work
with a ListBox control and see how to add items to that control.
1. Navigate to Solution Explorer and select the WinApp project, right-click, and click
Add
➤ Windows Form. This will add a new Windows Form in your project.
2. In the Add New Item dialog box displayed, change the form’s name from Form1.cs
to AddName.cs. Click Add. The new form with the name AddName will be added to
your project.
3. Ensure that the newly added form AddN
ame is open in Design view. Drag a Label
control onto the form and change its Text property to Enter Name.
4. D
r
ag a TextBox control onto the AddName form, and modify its Name property
to txtName.
5. Drag a ListBox control onto the AddName form, and modify its Name property
to lstName.
6. A
dd a B
utton contr
ol to the A
ddN
ame form and modify its Name property to
btnA
dd and its
T
ext pr
oper
ty to Add.
Now you are done with the design part of the AddName form; your form should
look like the one shown in Figure 14-16.
CHAPTER 14 ■ BUILDING WINDOWS FORMS APPLICATIONS340
9004ch14final.qxd 12/13/07 4:02 PM Page 340
Figure 14-16. GUI design of the AddNames form
You want the user to add a name into the TextBox and click the Add button, after
which that name will be added to the ListBox. To do so, you need to write the code
functionality behind the click event of the Add button.
7. Double-click the Add button and write the following code, which will read the
name entered into the TextBox and add it to the ListBox, inside the
btnAdd_Click
event.
lstName.Items.Add(txtName.Text);
txtName.Clear();
8. Go to the Build menu and select Build Solution. You should see a message indicat
-
ing a successful build.
Keep your current project open, as you’ll need it immediately for the next exercise.
(Don’t worry, we’ll explain how this and the next exercise work afterward.)
Try It Out: Setting the Startup Form
Setting the startup form in a Visual C# project is a little tricky, so we wanted to break it
out into its own exercise. To set a startup form, you need to follow these steps:
1. In the project you modified in the previous exercise, navigate to Solution Explorer,
open the
Program.cs file, and look for the following code line:
Application.Run(new WinApp());
This code line ensures the WinApp form will be the first form to run all the time; in
order to set the AddNames form as the startup form, you need to modify this
statement a little, as follows:
Application.Run(new AddNames());
CHAPTER 14 ■ BUILDING WINDOWS FORMS APPLICATIONS 341
9004ch14final.qxd 12/13/07 4:02 PM Page 341
2. Build the solution, and run and test the application by pressing Ctrl+F5. The
AddNames application form will be loaded.
3. Enter a name in the TextBox and click the Add button; you will see that the name
you entered has been added to the ListBox, as shown in Figure 14-17.
Figure 14-17. Running the AddNames Windows Forms Application
How It Works
Let’s have a look at the “Adding a New Form to the Windows Project” task first. You use the
following code:
lstName.Items.Add(txtName.Text);
txtName.Clear();
The ListBox control has a collection named Items, and this collection can contain a
list of items, which is why you use it here. Next you call up the
Add method of the Items
collection, and finally you pass the value entered in the TextBox to the ListBox’s Items col-
lection’s
Add method.
As users may want to add another name after entering one, you have to clear the
TextBox once the name has been added to the list so that the TextBox will be empty, ready
for another name to be entered.
In the “Setting the Startup Form” task, you create an instance of the AddName form
in the
Program.cs, as shown in the following code:
Application.Run(new AddNames());
Implementing an MDI Form
The term Multiple Document Interface (MDI) means to have a GUI interface that allows
multiple documents or forms under one parent form or window.
CHAPTER 14 ■ BUILDING WINDOWS FORMS APPLICATIONS342
9004ch14final.qxd 12/13/07 4:02 PM Page 342
Visualize the working style of Microsoft Word: you are allowed to open multiple doc-
uments in one parent window, and all the documents will get listed in the Window menu,
from which you can choose whichever you want to read, instead of having the individual
documents open in their own windows, which makes it difficult to handle all of the docu-
ments and covers your screen with a lot of open windows.
Having an individual window for each instance of the same application is termed
Single Document Interface (SDI); applications such as Notepad, MS Paint, Calculator, and
so on are SDI applications. SDI applications only get opened in their own windows and
can become difficult to manage, unlike when you have multiple documents or forms open
inside one MDI interface.
Hence, MDI applications follow a parent form and child form relationship model.
MDI applications allow you to open, organize, and work with multiple documents at the
same time
.
The parent (MDI) form organiz
es and arranges all the child forms or documents that
are currently open.
Try It Out: Creating an MDI Parent Form with a Menu Bar
In this exercise, you will create an MDI form in the WinApp project. You will also see how
to create a menu bar for the parent form, which will allow you to navigate to all the child
forms. To do so, follow these steps:
1. Navigate to Solution Explorer, select the WinApp project, right-click, and select
Add
➤ Windows Form. Change the Name value from Form1.cs to ParentForm.cs,
and click A
dd.
2. Select the newly added ParentForm in Design mode, and navigate to the Proper-
ties window. Set the IsMdiContainer property value to True (the default value is
False). Notice that the background color of the form has changed to dark gray.
3. Modify the size of the ParentForm so that it can accommodate the two forms you
cr
eated earlier
, WinApp and AddNames, inside it.
4. Add a menu to the ParentForm by dragging a MenuStrip (a control that serves the
purpose of a menu bar) onto the ParentForm. In the top-left corner, you should
now see a drop-down sporting the text Type Here. Enter
Open Forms in the drop-
down. This will be your main top-level menu.
5. Now under the Open Forms menu, add a submenu by entering the text Win App.
6. U
nder the
W
in A
pp submenu, enter
A
dd N
ames
.
7. N
o
w click the top menu, Open Forms, and on the right side of it, type
H
elp
.
CHAPTER 14 ■ BUILDING WINDOWS FORMS APPLICATIONS 343
9004ch14final.qxd 12/13/07 4:02 PM Page 343
8. Under the Help menu, enter Exit.
9. Now it’s time to attach code to the submenus you have added under the main
menu Open Forms. First, you’ll add code for the submenu Win App, which basi-
cally will open the WinApp form. In Design mode, double-click the Win App
submenu, which will take you to the code editor. Under the
click event, add the
following code:
WinApp wa = new WinApp();
wa.Show();
10. Now to associate functionality with the Add Names submenu: double-click this
submenu, and under the
click event add the following code:
AddNames an = new AddNames();
an.Show();
11. To associate functionality with the Exit submenu located under the Help main
menu, double-click Exit, and under the
click event add the following code:
Application.Exit();
Again, keep your current project open, as you’ll need it immediately for the next
exercise. (Don’t worry, we’ll explain how this and the next exercise work afterward.)
Try It Out: Creating an MDI Child Form and Running an
MDI Application
In this exercise, you will associate all the forms you created earlier as MDI child forms to
the main MDI parent form you created in the previous task.
1. I
n the pr
oject y
ou modified in the previous exercise, you’ll first make the WinApp
for
m an MDI child for
m.
T
o do so
, y
ou need to set the
MdiParent pr
oper
ty to the
name of the MDI par
ent for
m, but in the code editor
.
Y
ou have already added
functionality in the pr
evious task (opening the
W
inA
pp for
m); just before the line
wher
e y
ou ar
e calling the
Show() method, add the follo
wing code:
wa.MdiParent=this;
After adding this line, the code will appear as follows:
WinApp wa = new WinApp();
wa.MdiParent = this;
wa.Show();
CHAPTER 14 ■ BUILDING WINDOWS FORMS APPLICATIONS344
9004ch14final.qxd 12/13/07 4:02 PM Page 344
■Note this is a C# language keyword that represents the current instance of the class. In this case, it
refers to the ParentForm. Because you are writing this code inside ParentForm, you can use the
this key-
word for the same.
2. Now you will make the AddNames form an MDI child form. To do so, you need to
set the
MdiParent property to the name of the MDI parent form, but in the code
editor. Add the following code as you have done in the previous step:
an.MdiParent=this;
After adding this line, the code will appear as follows:
AddNames an = new AddNames();
an.MdiParent=this;
an.Show();
3. Now you hav
e all the code functionality in place, and you are almost set to run the
application. But first, you have to bring all the controls to the MDI form, Parent-
Form in this case, and so you need to set ParentForm as the startup object. To do
so, open
Program.cs and modify the Application.Run(new AddNames()); statement
to the following:
Application.Run(new ParentForm());
4. Now build the solution, and run the application by pressing F5; the MDI applica-
tion will open and should appear as shown in Figure 14-18.
Figure 14-18. Running an MDI form application
CHAPTER 14 ■ BUILDING WINDOWS FORMS APPLICATIONS 345
9004ch14final.qxd 12/13/07 4:02 PM Page 345
5. Click Open Form ➤ Win App; the WinApp form should open. Again, open the
main menu and click Add Names. Both the forms should now be open inside your
main MDI parent form application, as shown in Figure 14-19.
Figure 14-19. Opening child forms inside an MDI form application
6. Because both the forms are open inside one MDI parent, it becomes easier to
work with them. Switch back and forth between these forms by clicking their
title bars.
7. Once you are done with the forms, close the application by selecting Help ➤ Exit.
How It Works
Let
’
s talk about the “Creating an MDI Parent Form with a Menu Bar” task first. You use the
follo
wing code:
WinApp wa = new WinApp();
wa.Show();
This creates an instance of the WinApp form and opens it for you.
The following code creates an instance of the AddNames form and opens it for you:
AddNames an = new AddNames();
an.Show();
CHAPTER 14 ■ BUILDING WINDOWS FORMS APPLICATIONS346
9004ch14final.qxd 12/13/07 4:02 PM Page 346
You close the application with the following code:
Application.Exit();
In the “Creating an MDI Child Form and Running an MDI Application” task, you add
the lines shown in bold:
WinApp wa = new WinApp();
wa.MdiParent = this;
wa.Show();
AddNames an = new AddNames();
an.MdiParent=this;
an.Show();
The wa.MdiParent=this; line tells the child form which form is its parent. As you
want all the child forms to appear inside ParentForm, and you write the code inside
the MDI parent form, you can use the
this keyword to represent the current object.
Finally, you modify the code inside
Program.cs by supplying the MDI form’s name
as follo
ws:
Application.Run(new ParentForm());
This sets ParentForm as the startup form.
Summary
In this chapter, you learned about Windows Forms and the design principles associated
with graphical user interface design. You also learned the importance of commonly
ignored features, such as font styles and colors, and their impact on applications and
effect on large numbers of users. You also worked with properties that solve the resizing
problem of Windows Forms. You looked at the importance of MDI applications, and then
you created an MDI application with menu controls.
In the next chapter, you will see how to build an ASP.NET application.
CHAPTER 14 ■ BUILDING WINDOWS FORMS APPLICATIONS 347
9004ch14final.qxd 12/13/07 4:02 PM Page 347
9004ch14final.qxd 12/13/07 4:02 PM Page 348
Building ASP.NET Applications
This chapter focuses on the concepts behind web application development and the
key components that play a very important role in the web environment, and shows
you how to work with some new features of ASP.NET during the development of a web
application.
In this chapter, we’ll cover the following:
• Understanding web functionality
• Introduction to ASP.NET and web pages
• Understanding the Visual Studio 2008 w
eb site types
• Layout of an ASP.NET web site
• Using Master Pages
Understanding Web Functionality
A web application, also often referred to as a web site, is one that you want to run over the
Internet or an intranet. The technique .NET came up with to build web applications is by
using web forms, which work in the ASP.NET environment and accept code functionality
from the C# language.
Before you dive into web forms and learn how to develop a web application, you
need to understand what components drive this entire web world and how these compo-
nents serve various applications running over it.
Basically, there are three key players that make all web applications functional: the
web server, the web browser, and Hypertext Transfer Protocol (HTTP). Let’s have a look at
their communication process:
1. The web browser initiates a request to the web server for a resource.
2. HT
TP sends a GET r
equest to the web server, and the web server processes that
r
equest.
349
CHAPTER 15
9004ch15final.qxd 12/13/07 4:00 PM Page 349
3. The web server initiates a response; HTTP sends the response to the web browser.
4. The web browser processes the response and displays the result on the web page.
5. The user inputs data or performs some action that forces data to be sent again to
the web server.
6. HTTP will POST the data back to the web server, and the web server processes that
data.
7. HTTP sends the response to the web browser.
8. The web browser processes the response and displays the result on the web page.
Now that you have a general understanding of the communication process, let’s have
a closer look at each of the key components.
The Web Server
The web server is responsible for receiving and handling all requests coming from
browsers through HTTP. After receiving a request, the web server will process that
request and send the response back to the browser. Right after this, usually the web
server will close its connection with the database and release all resources, opened
files, network connections, and so forth, which become part of the request to be
processed on the web server.
The web server does all this cleaning of data, resources, and so on in order to be
stateless. The term
state refers to the data that gets stored between the request sent to
the server and the response delivered to the browser.
Today’s web sites run as applications and consist of many web pages, and data on
one web page is often responsible for the output that will be displayed on the next web
page; in this situation, being stateless defeats the whole purpose of such w
eb sites
, and
so maintaining state becomes impor
tant.
T
o be stateful, the w
eb ser
v
er will keep connections and r
esour
ces alive for a period
of time b
y anticipating that ther
e will be an additional r
equest fr
om the
web browser.
The Web Browser and HTTP
The w
eb br
o
wser
is the client-side application that displays w
eb pages. The web browser
wor
ks with HT
TP to send a r
equest to the w
eb ser
ver, and then the web server responds
to the w
eb br
o
wser or w
eb client
’s request with the data the user wants to see or work
with.
HT
TP is a communication pr
otocol that is used to r
equest w
eb pages from the web
server and then
to send the r
esponse back to the web browser.
CHAPTER 15 ■ BUILDING ASP.NET APPLICATIONS350
9004ch15final.qxd 12/13/07 4:00 PM Page 350
Introduction to ASP.NET and Web Pages
ASP.NET is available to all .NET developers, as it comes with Microsoft .NET Framework.
ASP.NET provides a web development model to build web applications by using any
.NET-compliant language. ASP.NET code is compiled rather than interpreted, and it sup-
ports the basic features of .NET Framework such as strong typing, performance opti-
mizations, and so on. After the code has been compiled, the .NET CLR will further
compile the ASP.NET code to native code, which provides improved performance.
Web pages serve the purpose of a user interface for your web application. ASP.NET
adds programmability to the web page. ASP.NET implements application logic using
code, which will be sent for execution on the server side. ASP.NET web pages have the
following traits:
• They are based on Microsoft ASP.NET technology, in which code that runs on the
server dynamically generates web page output to the browser or client device.
• They are compatible with any language supported by the .NET common language
runtime, including Microsoft Visual Basic, Microsoft Visual C#, Microsoft J#, and
Microsoft JScript .NET.
• They are built on the Microsoft .NET Framework. This provides all the benefits of
the framework, including a managed environment, type safety, and inheritance.
The web page consists of application code that serves requests by users; to do so,
ASP.NET compiles the code into the assemblies.
Assemblies are files that contain meta-
data about the application and have the file extension
.dll. After the code is compiled, it
is translated into a language-independent and CPU-independent format called
Microsoft
Intermediate Language
(MSIL), also known as Intermediate Language (IL). While running
the w
eb site, MSIL runs in the context of the .NET Framework and gets translated into
CPU-specific instructions for the processor on the PC running the web application.
Understanding the Visual Studio 2008
Web Site Types
V
isual S
tudio 2008
offers v
arious ways of creating a web project or web site. Though
w
eb sites ar
e only meant for the I
nternet or intranets, Visual Studio 2008 has three
types
, based on location, that can ser
v
e as a foundation for any web site web develop-
ers ar
e wor
king on.
The purpose of having these options is that they really simplify the
system r
equir
ements on the dev
eloper’s machine.
If y
ou hav
e ever worked with classic ASP applications (not ASP.NET), recall the days
of Visual S
tudio 6.0, when developers were required to use Internet Information Services
CHAPTER 15 ■ BUILDING ASP.NET APPLICATIONS 351
9004ch15final.qxd 12/13/07 4:00 PM Page 351
(IIS) to work with and test an ASP web application. This issue has been resolved with the
evolution of Visual Studio; now you can develop a web site without having IIS installed
on your machine.
■Note Internet Information Services (formerly called Internet Information Server) is a set of Internet-based
services where all web applications can reside and run. IIS provides complete web administration facility to
the web applications hosted inside it.
A new Web Site project can be built in the Visual Studio 2008 IDE by accessing File ➤
New ➤ Web Site.
Let’s have look at the types of web sites offered by Visual Studio 2008.
File S
ystem Web Site
A file system–based web site is stored on the computer like any other folder structure.
The main feature of this type of web site is that it uses a v
ery lightweight ASP.NET devel-
opment server that is part of Visual Studio 2008, and so it does not necessarily require
IIS to be available on the developer’s local machine.
Figure 15-1 shows the New Web Site dialog box with the web site Location option set
to File System; notice also the path of the folder where this web site will be stored.
Figure 15-1. S
pecifying a file system web site
CHAPTER 15 ■ BUILDING ASP.NET APPLICATIONS352
9004ch15final.qxd 12/13/07 4:00 PM Page 352
FTP Web Site
A web site based on the File Transfer Protocol (FTP) helps you to manage and transfer
files between a local machine and a remote web site. The FTP web site offers a Windows
Explorer–like interface and exposes the folder structure where files, documents, and so
on are kept for sharing purposes.
You can access the FTP site to share, transfer, or download files from a remote FTP
site to your local computer, or you can upload files to the remote FTP site.
Figure 15-2 shows the New Web Site dialog box with the web site Location option set
to FTP.
Figure 15-2. Specifying an FTP web site
■Note Building FTP sites requires a user’s credentials to be passed. Usually there is no anonymous
FTP site; you should specify the FTP address using the ftp://user:pwd@ftpaddress:port syntax.
HTTP Web Site
A w
eb site based on the Hypertext Transfer Protocol (HTTP) is preferable for building
entir
ely commercial web-based products. The HTTP web site requires IIS on the local
machine of the dev
eloper, as it is configured as an application in the virtual directory
of IIS. The IIS server brings a lot of administrative power to web applications sitting
inside IIS.
CHAPTER 15 ■ BUILDING ASP.NET APPLICATIONS 353
9004ch15final.qxd 12/13/07 4:00 PM Page 353
Figure 15-3 shows the New Web Site dialog box with the web site Location option set
to HTTP.
Figure 15-3. Specifying an HTTP web site
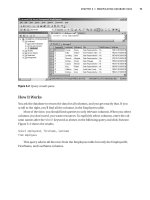
Layout of an ASP.NET Web Site
Let’s open a new web site and explore its layout. Open the Visual Studio 2008 IDE, and
select File
➤ New ➤ Web Site. In the New Web Site dialog box, select ASP.NET Web Site as
the project template, and then choose HTTP as the location and Visual C# as the lan-
guage. In the text box adjacent to the Location drop-down list box, modify the path from
http:// to http://localhost/Chapter15, which indicates that you are going to create a web
site under IIS with the name Chapter15. Click OK.
Now navigate to Solution Explorer so you can see what components make up a Web
Site pr
oject. After y
ou create the project, it will open as shown in Figure 15-4.
So that you understand the function of the components for a Web Site project, we’ll
discuss each component shown under Solution Explorer in the Chapter15 Web Site proj-
ect next.
CHAPTER 15 ■ BUILDING ASP.NET APPLICATIONS354
9004ch15final.qxd 12/13/07 4:00 PM Page 354
Figure 15-4. Layout of an ASP.NET web site
Web Pages
Web pages, also known as web forms, provide an interface for user interaction. By
default, each Web Site project comes with one
Default.aspx page, or form, and can have
as many other web pages with different names as you like to achieve the functionality
you desire. The name
Default.aspx has special meaning for IIS; the Default.aspx page will
be loaded automatically when someone accesses the web site URL.
The
Default.aspx page can be used as the home page for y
our w
eb site
, or y
ou can
inser
t some hyperlinks on this page and wr
ite code behind those hyperlinks to r
edir
ect
users to other pages
. By default,
Default.aspx is added to the list of default content pages
under IIS. B
esides those pages that are already listed, you can add any other pages to be
tr
eated as default pages for your web site. You can even remove the default setting of IIS,
which allo
ws a user’s web browser to recognize
Default.aspx as the default page to be
loaded while that user is accessing the w
eb site, so it becomes unnecessary to pass the
name of the page while the w
eb site is being accessed.
F
or this example, you need to provide the URL as
http://localhost/Chapter15, which
will load the
Default.aspx page. However, if there is any other page available with a name
other than
Default.aspx, you need to pass that name along with the URL: for example,
http://localhost/Chapter15/MyPage.aspx. Also note that the URLs are not case sensitive.
CHAPTER 15 ■ BUILDING ASP.NET APPLICATIONS 355
9004ch15final.qxd 12/13/07 4:00 PM Page 355
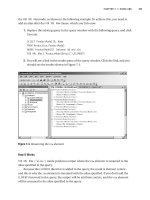
You can access IIS by either of the following methods:
• Click Start
➤ Run and then type InetMgr (short for Internet manager).
• Click Start
➤ Settings ➤ Control Panel. Select Administrative Tools and then click
the Internet Information Services (IIS) Manager option. You should see the Inter-
net Information Services (IIS) Manager window as shown in Figure 15-5.
Figure 15-5. Internet Information Services (IIS) Manager window
■Note Under Internet Informa
tion Ser
vices,
the default pa
ges are established as properties of your web
site.
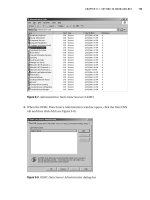
Now right-click your Chapter15 Web Site project and select the Properties option.
In the Chapter15 Properties window, shown in Figure 15-6, switch to the Documents tab
page, and you will see that the
Default.aspx page is available in the list of default content
pages. IIS works as a web server, which is why you see listed other page types that work as
default pages for other types of web sites that could have been built using other technol-
ogies (for example, ASP could be used and for that purpose
Default.asp is also listed). If
required, you can click the Add button to add another page of your web site to be recog-
nized as a default page. You can also remove a page listed as a default page by selecting
CHAPTER 15 ■ BUILDING ASP.NET APPLICATIONS356
9004ch15final.qxd 12/13/07 4:00 PM Page 356
the particular page and clicking the Remove button. By default, you will see that the
option Enable default content page is active; you can disable this functionality by remov-
ing the check mark.
Figure 15-6. Chapter15 Properties window
Application Folders
ASP.NET comes with some predefined folders into which you can inser
t data files, style
sheets, resource files (used in a global scope in the application), and so on and achieve
functionality throughout the project.
The
App_Data folder is the default folder, which is added automatically when you cre-
ate an ASP.NET Web Site project.
To add other available folders, right-click the project, select the Add ASP.NET Folder
option, and then choose the folder that is appropriate for the type of web application you
are building.
The web.config File
The web.config file is a very important file of a web project. This file helps the developer
by providing a central location where all the settings required for various actions like
database connections, debugging mode, and so on can be set, and these settings will be
applied and accessible throughout the project.
CHAPTER 15 ■ BUILDING ASP.NET APPLICATIONS 357
9004ch15final.qxd 12/13/07 4:00 PM Page 357
■Note The web.config file is not automatically added to the ASP.NET Web Site project if you select
File System as the storage location. The
web.config file is also not added if you choose the location of a
folder with the File System option selected while saving the project.
Another feature of the web.config file is that it is simple to read and write to, just like
a Notepad file, because it comes in XML format.
The
web.config file has a lot of predefined tags that help you to organize the configu-
ration settings for your web application. The most important thing to remember is that
all tags need to be embedded inside the parent tags
<Configuration></Configuration>.
Try It Out: Working with a Web Form
In this exercise, you will add a web form with basic controls, and then you will attach the
required functionality to the controls.
1. Navigate to Solution Explorer, select the Chapter15 project, right-click it, and
select Add New Item.
2. In the Add New Item dialog box, modify the form name to appear as Input.aspx
and ensure that the Language drop-down list shows Visual C# as the language to
be used. Click Add to add the
Input.aspx form to your project.
3. Right-click the Input.aspx web form and select the View Designer option; this will
open the
Input.aspx page in Design view, where you can drag and drop controls
onto the web page.
4. Drag a Label contr
ol (named Label1) onto the form, and modify its Text property
to E
nter N
ame.
5. Drag a TextBox control (named TextBox1) onto the form. Drag a Button control
(named B
utton1) onto the for
m and modify its Text property to Submit. All three
contr
ols should appear in one line
.
6. Now add another Label control (named Label2) below the three controls you
added previously, and set its Text property to blank (i.e., no text is assigned).
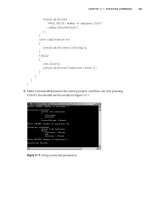
7. To attach the code behind the Button control, double-click the Button control.
CHAPTER 15 ■ BUILDING ASP.NET APPLICATIONS358
9004ch15final.qxd 12/13/07 4:00 PM Page 358
8. Source view opens, taking you inside the Input.aspx.cs tab page, where you will
see the blank template for the
Button1_Click event. Add the following code to the
click event of the button:
L
abel1.Text = "Hello" + " " + TextBox1.Text + " " +
"You are Welcome !";
9. Begin testing the application by selecting Input.aspx, right-clicking, and choosing
the View in Browser option.
10. The Input.aspx form will appear in the browser. Enter a name in the provided text
box and click the Submit button. You should receive output similar to that shown
in Figure 15-7.
Figure 15-7. Testing the web form application
Try It Out: Working with Split View
I
n this
exer
cise, you will see how to modify the properties of ASP control elements such
as asp:Label, asp:T
extB
o
x, and so on. You will also see how Split view, a brand-new fea-
tur
e of
V
isual Studio 2008, works.
CHAPTER 15 ■ BUILDING ASP.NET APPLICATIONS 359
9004ch15final.qxd 12/13/07 4:00 PM Page 359