Beginning Linux Programming Third Edition phần 10 docx
Bạn đang xem bản rút gọn của tài liệu. Xem và tải ngay bản đầy đủ của tài liệu tại đây (1.37 MB, 90 trang )
Virtual Memory Areas
Above the page table reside the virtual memory areas. These constitute a map of contiguous virtual
memory addresses as handed out to an application.
struct vm_area_struct {
unsigned long vm_start;
unsigned long vm_end;
pgprot_t vm_page_prot;
struct vm_operations_struct *vm_ops;
unsigned long vm_pgoff;
struct file *vm_file;
};
This is a highly snipped version of the structure; you can find it in linux/mm.h. We will cover the
members that we will actually need later on.
vm_start and vm_end represent the beginning and end
of the virtual memory area, and
vm_page_prot is the protection attributes assigned to it—whether it is
shared, private, executable, and so forth.
vm_ops is similar to the file_operations structure used
with character and block devices and forms an analogous abstraction to operation on virtual memory
areas. Finally,
vm_offset is the offset into the area, and vm_file is used in correlation with memory
mapping of files. We’ll take a much closer look at this structure when we dissect the
mmap functions of
schar.
The mappings made by a specific process can be seen in
/proc/<PID>/maps. Each one corresponds to a
separate
vm_area_struct, and the size, span, and protection associated with the mapping can be read
from the
proc entry, among other things.
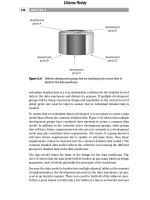
Address Space
The entire addressable area of memory (4 GB on 32-bit platforms) is split into two major areas—kernel
space and user (or application) space.
PAGE_OFFSET defines this split and is actually configurable in
asm/page.h. The kernel space is located above the offset, and user space is kept below. The default for
PAGE_OFFSET on the Intel platform is 0xc0000000 and thus provides the kernel with approximately 1 GB
of memory, leaving 3 GB for user space consumption. On the Intel platform, the virtual addresses seen
from the kernel are therefore a direct offset from the physical address. This isn’t always the case, and
primitives to convert between the two must thus be used. See Figure 18-4 for a visual representation of
the address space.
759
Device Drivers
b544977 Ch18.qxd 12/1/03 8:57 AM Page 759
Figure 18-4
Types of Memory Locations
There are three kinds of addresses you need to be aware of as a device-driver writer:
❑ Physical: This is the “real” address, the one that is used to index the memory bus on the
motherboard.
❑ Virtual: Only the CPU and the kernel (via its page tables and TLB) know about virtual
addresses.
❑ Bus: All devices outside the CPU. On some platforms, this is identical to the physical
addresses.
Now, if you want to talk to an add-on card, you can’t hand it a virtual memory address and tell it to
transfer X number of bytes to you. The card knows absolutely nothing about what addressing scheme
the kernel and CPU have agreed upon since it does not have access to the page tables and thus can’t
make any sense of the memory address. Similarly, the kernel uses virtual addresses for everything, and
accessing bus memory varies from platform to platform. Linux therefore provides convenient macros
and functions to convert the three types of addresses back and forth.
unsigned long virt_to_phys(void *address)
void *phys_to_virt(unsigned long address)
unsigned long virt_to_bus(void *address)
void *bus_to_virt(unsigned long address)
Talking to a peripheral device requires the translation back and forth between virtual addresses (that the
kernel knows about) and bus addresses (what the devices know about). This is regardless of the type of
bus the peripheral is installed in, be it PCI, ISA, or any other. Note that jumping through the extra hoops
of converting addresses is only necessary when you explicitly need to pass a pointer to a memory area
directly to the device. This is the case with DMA transfers, for example. In other situations, you normally
read the data from device I/O memory or I/O ports.
Application
Space
Kernel
Space
4GB
PAGE_OFFSET, 0xC000000
16MB
0
760
Chapter 18
b544977 Ch18.qxd 12/1/03 8:57 AM Page 760
Getting Memory in Device Drivers
Memory is allocated in chunks of the PAGE_SIZE on the target machine. The Intel platform has a page
size of 4 Kb, whereas the Alpha architecture uses 8-Kb-sized pages, and it is not a user-configurable
option. Keep in mind that the page size varies depending on the platform. There are many ways of
allocating memory for driver usage, the lowest-level one being a variant of
unsigned long __get_free_page Allocate exactly one page of memory.
(int gfp_mask)
gfp_mask describes priority and attributes of the page we would like to get a hold of. The most com-
monly used ones in drivers are the following:
GFP_ATOMIC Memory should be returned, if any is available, without blocking or
bringing in pages from swap.
GFP_KERNEL Memory should be returned, if any is available, but the call may
block if pages need to be swapped out.
GFP_DMA The memory returned should be below the 16MB mark and thus suit-
able as a DMA buffer. This flag is only needed on ISA peripherals, as
these cannot address more memory than 16MB.
GFP_ATOMIC must always be specified if you wish to allocate memory at interrupt time since it is guar-
anteed not to schedule out the current process if a suitable page is not available. ISA boards can only see
up to 16MB of memory, and hence you must specify
GFP_DMA if you are allocating a buffer for DMA
transfers on an ISA peripheral. Depending on how much memory is installed and the level of internal
fragmentation, memory allocated with
GFP_DMA may not succeed. PCI devices do not suffer under this
constraint and can use any memory returned by
__get_free_page for DMA transfers.
__get_free_page is actually just a special case of __get_free_pages.
unsigned long __get_free_pages(int gfp_mask, unsigned long order)
gfp_mask has the same meaning, but order is a new concept. Pages can only be allocated in orders of
2, so the number of pages returned is 2
order
. The PAGE_SHIFT define determines the software page size
and is 12 on the x86 platform (2
12
bytes is 4 Kb). An order of 0 returns one page of PAGE_SIZE bytes,
and so forth. The kernel keeps internal lists of the different orders up to 5, which limits the maximum
order to that amount, giving you a maximum of 2
5
times 4 Kb—which is equal to 128 Kb—on the x86
platform.
You may have wondered why the functions are prefixed with
__; there is a perfectly good explanation
for this. They are actually faster variants of
get_free_page and get_free_pages, respectively, and the
only difference lies in the fact that the
__ versions don’t clear the page before returning it. If you copy
memory back to user space applications, it may be beneficial to clear the page of previous contents that
could inadvertently contain sensitive information that should not be passed to another process.
__get_free_page and friends are quicker and, if the memory allocated is only to be used internally,
clearing the pages may not be needed.
761
Device Drivers
b544977 Ch18.qxd 12/1/03 8:57 AM Page 761
void free_page(unsigned long addr) Free the page(s) at memory location addr.
void free_pages(unsigned long addr, You are expected to keep track of the size of
unsigned long order) allocated pages, since free_pages expects
you to the supply it with the order you used
when allocating the memory.
kmalloc
Allocation of memory with get_free_page and the like is a bit troublesome and places a lot of the
memory management work in the hands of the device driver. Depending on what you are aiming at
using the memory for, a page-oriented scheme might not be the most appropriate. Besides, it is not that
often that the size requirement fits perfectly into the scheme of allocating pages in orders of two of the
page size. This can lead to a lot of wasted memory. Linux provides
kmalloc as an alternative, which lets
you allocate memory any size you want.
void *kmalloc(size_t size, int flags)
size is the requested amount of memory and is rounded up to the nearest multiple of the page size. The
flags parameter consists of a mask of priorities, just like with the get_free_page variants. The same
size restrictions apply: You can only get up to 128 kB at a time. Trying to allocate more will result in an
error in the log, saying “
kmalloc: Size (135168) too large,” for example.
void kfree(const void *addr)
kfree will free the memory previously allocated by kmalloc. If you are used to dynamically allocating
memory in applications with
malloc, you will feel right at home with kmalloc.
vmalloc
The third and final way to acquire memory is with vmalloc. While get_free_page and kmalloc both
return memory that is physically contiguous,
vmalloc provides memory that is contiguous in the vir-
tual address space and thus serves a different purpose. It does so by allocating pages separately and
manipulating the page tables.
void *vmalloc(unsigned long size)
void vfree(void *addr)
vmalloc allows you to allocate much larger arrays than kmalloc, but the returned memory can only be
used from within the kernel. Regions passed to peripheral devices cannot be allocated with
vmalloc
because they are not contiguous in the physical address space. Virtual memory is only usable within the
kernel/CPU context where it can be looked up in the page tables.
It is extremely important to free memory once you are done using it. The kernel does
not reap allocated pages when the module is unloaded, and this makes it the mod-
ule’s complete responsibility to do its own memory management.
762
Chapter 18
b544977 Ch18.qxd 12/1/03 8:57 AM Page 762
vmalloc cannot be used at interrupt time either as it may sleep, since internally kmalloc is called with-
out
GFP_ATOMIC set. This should not pose a serious problem, as it would be abnormal to need more
memory than
__get_free_pages can provide inside an interrupt handler.
All things considered,
vmalloc is most useful for internal storage. The RAM disk module, radimo,
shown in the “Block Devices” section later in this chapter will provide an example of
vmalloc usage.
Transferring Data between User and Kernel Space
Applications running on the system can only access memory below the PAGE_OFFSET mark. This ensures
that no process is allowed to overwrite memory areas managed by the kernel, which would seriously
compromise system integrity, but at the same time poses problems regarding getting data back to user
space. Processes running in the context of the kernel are allowed to access both regions of memory, but at
the same time it must be verified that the location given by the process is within its virtual memory area.
int access_ok(int type, const void *addr,
unsigned long size)
The above macro returns 1 if it is okay to access the desired memory range. The type of access (VERIFY_
READ
or VERIFY_WRITE) is specified by type, the starting address by addr, and the size of the memory
region by
size. Every transfer taking place to or from user space must make sure that the location given
is a valid one. The code to do so is architecture-dependent and located in
asm/uaccess.h.
The actual transfer of data is done by various functions, depending on the size of the transfer.
get_user(void *x, const Copy sizeof(addr) bytes from user space address
void *addr) addr to x.
put_user(void *x, const Copy sizeof(addr) bytes to user space to variable
void *addr) x from addr.
The type of the pointer given in
addr must be known and cast if necessary, which is why there is no
need for a size argument. The implementation is quite intricate and can be found in the aforementioned
include file. Frequently they are used in implementing
ioctl calls since those often copy single-value
variables back and forth.
You may have wondered why the appropriate
access_ok call was not included in schar, for example.
Often the check is omitted by mistake, and the
x_user functions therefore include the check. The return
value is 0 if the copy was completed and
-EFAULT in case of access violation.
get_user(x, addr)
The versions prefixed with __ perform no checking. They are typically used when performing multiple
single-value copies, where performing the access check several times is redundant.
char foo[2];
if (access_ok(VERIFY_WRITE, arg, 2*sizeof(*arg)) {
__put_user(foo[0], arg);
__put_user(foo[1], arg+1);
763
Device Drivers
b544977 Ch18.qxd 12/1/03 8:57 AM Page 763
} else {
return -EFAULT;
}
This is a trivial case, but the idea behind it should be clear. A third version of the x_user family also
exists. Typically, the return value is checked and
-EFAULT is returned in the case of access violation; this
leads to the introduction of the last variant.
void get_user_ret(x, addr, ret)
void put_user_ret(x, addr, ret)
The _ret versions return the value in ret for you in case of error; they don’t return any error code back
to you. This simplifies the programming of
ioctls and leads to such simple code as
get_user_ret(tmp, (long *)arg, -EFAULT);
Moving More Data
Often more data needs to be copied than just single variables, and it would be very inefficient and awk-
ward to base the code on the primitives in the preceding section. Linux provides the functions needed to
transfer larger amounts of data in one go. These functions are used in
schar’s read and write functions:
copy_to_user(void *to, void *from, unsigned long size)
copy_from_user(void *to, void *from, unsigned long size)
They copy size amount of bytes to and from the pointers specified. The return value is 0 in case of suc-
cess and nonzero (the amount not transferred) if access is not permitted, as
copy_xx_user also calls
access_ok internally. An example of the usage can be found in schar.
if (copy_to_user(buf, schar_buffer, count))
return -EFAULT;
As with get_user, nonchecking versions also exist and are prefixed in the same manner with __.
copy_to_user(void *to, void *from, unsigned long size)
copy_from_user(void *to, void *from, unsigned long size)
Finally, _ret variants are also available that return ret in case of access violations.
copy_to_user_ret(void *to, void *from, unsigned long size, int ret)
copy_from_user_ret(void *to, void *from, unsigned long size, int ret)
All of the preceding examples rely on being run in the context of a process. This means that using them
from interrupt handlers and timer functions, for example, is strictly prohibited. In these situations the ker-
nel functions are not working on behalf of a specific process, and there is no way to know if
current is
related to you in any way. In these situations it is far more advisable to copy data to a buffer maintained
by the driver and later move the data to user space. Alternatively, as will be seen in the next section, mem-
ory mapping of device driver buffers can be implemented and solve the problems without resorting to an
extra copy.
764
Chapter 18
b544977 Ch18.qxd 12/1/03 8:57 AM Page 764
Simple Memory Mapping
Instead of copying data back and forth between user and kernel space incessantly, at times it is more
advantageous to simply provide the applications a way to continuously view in-device memory. The
concept is called memory mapping, and you may already have used it in applications to map entire files
and read or write to them through pointers instead of using the ordinary file-oriented read or write. If
not, Chapter 3 contains an explanation of what
mmap is and how it is used in user space. In particular,
many of the arguments are explained there, and they map directly to what we are going to do here.
It is not always safe or possible to copy data directly to user space. The scheduler might schedule out the
process in question, which would be fatal from an interrupt handler, for example. One possible solution
is to maintain an internal buffer and have such functions write and read there and later copy the data to
the appropriate place. That causes additional overhead because two copies of the same data have to be
made, one to the internal buffer and an extra one to the application’s memory area. However, if the
driver implements the
mmap driver entry point, a given application can directly obtain a viewpoint into
the driver buffer, and there is thus no need for a second copy.
schar_mmap is added to the file_operations structure to declare that we support this operation. Let’s
look at the
schar implementation:
static int schar_mmap(struct file *file,
struct vm_area_struct *vma)
{
unsigned long size;
/* mmap flags - could be read and write, also */
MSG(“mmap: %s\n”, vma->vm_flags & VM_WRITE ? “write” :
“read”);
/* we will not accept an offset into the page */
if(vma->vm_offset != 0) {
MSG(“mmap: offset must be 0\n”);
return -EINVAL;
}
/* schar_buffer is only one page */
size = vma->vm_end - vma->vm_start;
if (size != PAGE_SIZE) {
MSG(“mmap: wanted %lu, but PAGE_SIZE is %lu\n”,
size, PAGE_SIZE);
return -EINVAL;
}
/* remap user buffer */
if (remap_page_range(vma->vm_start,
virt_to_phys(schar_buffer),
size, vma->vm_page_prot))
return -EAGAIN;
return 0;
}
765
Device Drivers
b544977 Ch18.qxd 12/1/03 8:57 AM Page 765
We receive two arguments in the function—a file structure and the virtual memory area that will be
associated with the mapping. As mentioned earlier,
vm_start and vm_end signify the beginning and
end of the mapping, and the total size wanted can be deduced from the difference between the two.
schar’s buffer is only one page long, which is why mappings bigger than that are rejected. vm_offset
would be the offset into the buffer. In this case, it wouldn’t make much sense to allow an offset into a
single page, and
schar_mmap rejects the mapping if one was specified.
The final step is the most important one.
remap_page_range updates the page tables from the
vma->vm_start memory location with size being the total length in bytes. The physical address
is effectively mapped into the virtual address space.
remap_page_range(unsigned long from, unsigned long phys_addr,
unsigned long size, pgprot_t prot)
The return value is 0 in case of success and -ENOMEM if it failed. The prot argument specifies the protec-
tion associated with the area (
MAP_SHARED for a shared area, MAP_PRIVATE for a private, etc.). schar
passes it directly from the one given to mmap in the application.
The page or pages being mapped must be locked so they won’t be considered for other use by the kernel.
Every page present in the system has an entry in the kernel tables, and we can find which page we’re using
based on the address and set the necessary attributes.
struct page *virt_to_page(void *addr) Return the page for address.
schar allocates a page of memory and calls mem_map_reserve for the page returned by the virt_to_
page
function. The page is unlocked by mem_map_unreserve and freed in cleanup_module when
the driver is unloaded. This order of operation is important, as
free_page will not free a page that is
reserved. The entire page structure, along with all the different flag attributes, can be found in
linux/mm.h.
This was an example of how to access the kernel’s virtual memory from user space by making
remap_page_range do the work for us. In many cases, however, memory mapping from drivers
allows access to the buffers on peripheral devices. The next section will introduce I/O memory and,
among other things, will briefly touch upon how to do just that.
I/O Memory
The last kind of address space we are going to look at is I/O memory. This can be both ISA memory
below the 1MB boundary or high PCI memory, but we conceptually use the same access method for
both. I/O memory is not memory in the ordinary sense, but rather ports or buffers mapped into that
area. A peripheral may have a status port or onboard buffers that we would like to gain access to. The
sample module
Iomap gives a demonstration of these principles and can be used to read and write or
memory-map a region of I/O memory.
Where I/O memory is mapped to depends highly on the platform in question. On the x86 platform, sim-
ple pointer dereferencing can be used to access low memory, but it is not always in the physical address
space and therefore must be remapped before we can get a hold of it.
void *ioremap(unsigned long offset, unsigned long size)
766
Chapter 18
b544977 Ch18.qxd 12/1/03 8:57 AM Page 766
ioremap maps a physical memory location to a kernel pointer of the wanted size. Iomap uses it to
remap the frame buffer of a graphics adapter (the main intended use for the module) to a virtual address
we can access from within the driver. An
Iomap device consists of the following:
struct Iomap {
unsigned long base;
unsigned long size;
char *ptr;
}
Where base is the starting location of the frame buffer, size is the length of the buffer, and ptr is what
ioremap returns. The base address can be determined from /proc/pci, provided you have a PCI or
AGP adapter; it is the prefetchable location listed there:
$ cat /proc/pci
PCI devices found:
Bus 1, device 0, function 0:
VGA compatible controller: NVidia Unknown device (rev 17).
Vendor id=10de. Device id=29.
Medium devsel. Fast back-to-back capable. IRQ 16. Master Capable.
Latency=64. Min Gnt=5.Max Lat=1.
Non-prefetchable 32 bit memory at 0xdf000000 [0xdf000000].
Prefetchable 32 bit memory at 0xe2000000 [0xe2000008].
Find your graphics adapter among the different PCI devices in your system and locate the memory
listed as prefetchable; as you can see, that would be 0xe2000000 on this system.
Iomap can manage up to
16 different mappings all set up through
ioctl commands. We’ll need this value when trying out Iomap
a little later.
Once the region has been remapped, data can be read and written to.
Iomap using byte-size functions.
unsigned char *readb(void *addr)
unsigned char *writeb(unsigned char data, void *addr)
readb returns the byte read from addr, and writeb writes data to specified location. The latter also
returns what it wrote, if you need that functionality. In addition, doubleword and long versions exist.
unsigned short *readw(void *addr)
unsigned short *writew(unsigned short data, void *addr)
unsigned long *readl(void *addr)
unsigned long *writel(unsigned long data, void *addr)
If IOMAP_BYTE_WISE is defined, this is how Iomap reads and writes data. As one would expect, they are
not that fast when doing copies of the megabyte size since that is not their intended use. When
IOMAP_BYTE_WISE is not defined, Iomap utilizes other functions to copy data back and forth.
void *memcpy_fromio(void *to, const void *from, unsigned long size)
void *memcpy_toio(void *to, const void *from, unsigned long size)
They work exactly like memcpy but operate on I/O memory instead. A memset version also exists that
sets the entire region to a specific value.
767
Device Drivers
b544977 Ch18.qxd 12/1/03 8:57 AM Page 767
void *memset_io(void *addr, int value, unsigned long size)
Iomap’s read and write functions work basically just like schar’s, for example, so we are not going to
list them here. Data is moved between user space and the remapped I/O memory through a kernel
buffer, and the file position is incremented.
At module cleanup time, the remapped regions must be undone. The pointer returned from
ioremap is
passed to
iounmap to delete the mapping.
void iounmap(void *addr)
Assignment of Devices in Iomap
Iomap keeps a global array of the possible devices created, indexed by minor numbers. This is a widely
used approach to managing multiple devices and is easy to work with. The global array,
iomap_dev,
holds pointers to all the potential accessed devices. In all the device entry points, the device being acted
upon is extracted from the array.
Iomap *idev = iomap_dev[MINOR(inode->i_rdev)];
In the cases where an inode is not directly passed to the function, it can be extracted from the file struc-
ture. It contains a pointer to the dentry (directory entry) associated with the file, and the inode can be
found in that structure.
Iomap *idev = iomap_dev[MINOR(file->f_dentry->d_inode->i_rdev)];
I/O Memory mmap
In addition to being read and written ordinarily, Iomap supports memory mapping of the remapped I/O
memory. The actual remapping of pages is very similar to
schar, with the deviation that because actual
physical pages are not being mapped no locking needs to be done. Remember that I/O memory is not
real RAM, and thus no entries exist for it in
mem_map.
remap_page_range(vma->vm_start, idev->base, size,
vma->vm_page_prot)
As with schar, remap_page_range is the heart of iomap_mmap. It does the hard work for us in setting
up the page tables. The actual function doesn’t require much code.
The data returned by the read and write functions is in little endian format, whether
that is the native byte ordering on the target machine or not. This is the ordering
used in PCI peripherals’ configuration space, for example, and the preceding func-
tions will byte swap the data if necessary. If data needs to be converted between the
two data types, Linux includes the primitives to do so. The “Portability” section later
in the chapter gives us a closer look at that.
768
Chapter 18
b544977 Ch18.qxd 12/1/03 8:57 AM Page 768
static int iomap_mmap(struct file *file, struct vm_area_struct *vma)
{
Iomap *idev = iomap_dev[MINOR(file->f_dentry->d_inode->i_rdev)];
unsigned long size;
/* no such device */
if (!idev->base)
return -ENXIO;
/* size must be a multiple of PAGE_SIZE */
size = vma->vm_end - vma->vm_start;
if (size % PAGE_SIZE)
return -EINVAL;
/* remap the range */
if (remap_page_range(vma->vm_start, idev->base, size,
vma->vm_page_prot))
return -EAGAIN;
MSG(“region mmapped\n”);
return 0;
}
We start by finding the specific device in the iomap_dev array and check whether this particular device
has been set up. If it hasn’t, we return an appropriate error message. We also require that the range that
is going to be remapped is a multiple of the page size and return an error. If all is in order, we call
remap_page_range and let it do its job.
Try It Out—The Iomap Module
Iomap’s source is also included in the code download from the Wrox Web site. Go to the
modules/iomap directory, where you should find the following files:
$ ls
iomap.c iomap.h iomap_setup.c Makefile
1. As the superuser, run make to build the iomap module, make two special file entries—one
with minor 0 and one with minor 1—and insert the module.
# make
# mknod /dev/iomap0 c 42 0
# mknod /dev/iomap1 c 42 1
# insmod iomap.o
iomap: module loaded
2. Now we are ready to take it for a spin. Iomap won’t do anything on its own, so we need to set
up two devices to experiment with. First, you will need to dig up the base address of the frame
buffer on your display adapter; examine
/proc/pci as explained at the beginning of the “I/O
Memory” section earlier in the chapter. Recall that the address was 0xe200000 on this system.
We will need this now when creating a small program that sets up the two devices through
ioctl calls. Create a file called iomap_setup.c in the directory where the Iomap module
sources are located, or edit the existing code, containing the following:
769
Device Drivers
b544977 Ch18.qxd 12/1/03 8:57 AM Page 769
#include <stdio.h>
#include <fcntl.h>
#include <sys/ioctl.h>
#include “iomap.h”
#define BASE 0xe2000000
int main(int argc, char *argv[])
{
int fd1 = open(“/dev/iomap0”, O_RDWR);
int fd2 = open(“/dev/iomap1”, O_RDWR);
Iomap dev1, dev2;
if (fd1 == -1 || fd2 == -1) {
perror(“open”);
return 1;
}
/* set up first device */
dev1.base = BASE;
dev1.size = 512 * 1024;
if (ioctl(fd1, IOMAP_SET, &dev1)) {
perror(“ioctl”);
return 2;
}
/* set up second device, offset the size of the first device */
dev2.base = BASE + dev1.size;
dev2.size = 512 * 1024;
if (ioctl(fd2, IOMAP_SET, &dev2)) {
perror(“ioctl”);
return 3;
}
return 0;
}
$ cc –Wall –o iomap_setup iomap_setup.c
$ ./iomap_setup
iomap: setting up minor 0
iomap: setup: 0xe2000000 extending 0x80000 bytes
iomap: setting up minor 1
iomap: setup: 0xe2080000 extending 0x80000 bytes
As you’d expect, you should change BASE to point to your frame buffer address!
Otherwise we might end up writing to another device in your system, which could
crash the system or render the affected device unusable. Compile and run the iomap_
setup program; this should define the two devices we are going to operate on.
770
Chapter 18
b544977 Ch18.qxd 12/1/03 8:57 AM Page 770
3. We have now set up two devices, one mapping 0.5MB from the start of the frame buffer and the
other mapping 0.5MB from the start of the first mapping. These map directly into the graphics
memory of the display adapter, and writing to them should cause a visible distortion on your
screen. Before running the next few lines to try that out, make sure that you have X loaded and
execute the commands from within a terminal there.
$ cp /dev/iomap1 /dev/iomap0
4. Now the effects of the above command should be apparent. The region on your monitor that
corresponds to the mapping of the second device should now also appear at the top the screen,
thus creating an odd-looking X session. Continue the fun and fill the top of the monitor with
garbage by copying random data to it:
$ dd if=/dev/random of=/dev/iomap0 bs=512 count=1024
I/O Ports
I/O ports are a phenomenon only seen on some platforms such as the x86 architecture. They can be either
a status port on a peripheral device or the serial port that your mouse is connected to. Data is read and
written to ports in sizes according to its width. Other platforms, Alpha for example, don’t have real
ports but only I/O memory. On platforms like that, reading and writing to memory locations achieves
access to I/O data.
Linux supports a wide variety of functions to read and write to and from I/O ports. They are all variants
of the same flavor and differ mainly in how wide a port they talk to. Note that this section deals with
regular I/O ports, not I/O memory, which was covered earlier in the chapter. The header file to browse
for this section is
asm/io.h; this is a very nasty file, so consider yourself warned!
A driver ought to verify that a given port can be used. Another driver might already have grabbed the
port we are looking for, and we do not want to wreak havoc by outputting data that might confuse the
device it handles.
int check_region(unsigned int from, unsigned long extent)
from is the port we are testing, and extent is how wide it is counted in bytes. The return value is 0 on
success or nonzero if the port is already taken. Once a proper port has been found, you can go ahead and
request it.
void request_region(unsigned int from, unsigned long extent, const char *name)
void release_region(unsigned int from, unsigned long extent)
The parameters are almost alike; name is the one that shows up in /proc/ioports and should be con-
sidered a device label along the lines with the
/proc/devices entry. Ports can be 8, 16, or 32 bits wide.
u8 inb(unsigned int port)
u16 inw(unsigned int port)
u32 inl(unsigned int port)
771
Device Drivers
b544977 Ch18.qxd 12/1/03 8:57 AM Page 771
The usage should be clear: They all read the respective size value from a port. The return value is the
data read, and depending on the platform used, different types fill the size requirement. The functions
for writing to ports are similar.
void outb(__u8 data, unsigned int port)
void outw(__u16 data, unsigned int port)
void outl(__u32 data, unsigned int port)
Again, the typing is a bit loose because it varies from one platform to another. Typing is not the only
problem with I/O ports, as some platforms don’t have regular ports but emulate them by reading and
writing to memory locations instead. We won’t detail this any further here; your best bet is to study
some of the drivers in the kernel.
In addition, Linux provides string versions that allow you to transfer more than one datum at a time
efficiently.
void insb(unsigned int port, void *addr, unsigned long count)
void outsb(unsigned int port, void *addr, unsigned long count)
addr is the location in memory to transfer to or from, and count is the number of units to transfer.
Similar versions exist for word- and doubleword-size transfers with the same naming convention as the
single datum functions. They are very fast and much more efficient than building a loop around the
inb,
for example.
Interrupt Handling
Most real hardware does not rely on polling to control the data flow. Instead, interrupts are used to signal
the availability of data or other hardware conditions to the device driver and let it take the appropriate
action. Writing an ISR (Interrupt Service Routine) is often surrounded by mysticism, but that can only be
because people have not seen how easy it really is to do in Linux. There is nothing special about it because
Linux exports a very elegant and uncomplicated interface for registering interrupt handlers and (eventu-
ally) handling interrupts as they come in.
An interrupt is a way for a device to get the device driver’s attention and tell it that the device needs to
be serviced somehow. This could be to signal that data is available for transfer or that a previously
queued command has now completed and the device is ready for a new one.
How interrupts are handled internally by Linux is very architecture-dependent: It all depends on the
interrupt controller that the platform is equipped with. If you are interested, you can find the necessary
information in
arch/<your arch>/kernel/irq.c file: arch/i386/kernel/irq.c, for example.
Some platforms do not have regular I/O ports like the x86 architecture but instead
implement them as a mapped region of regular memory. The above functions for
talking to I/O ports are also not the only variants that exist, as different platforms
have differing needs. The data returned is in little endian format, which might not
be suitable, and some big endian platforms provide variants that don’t byte swap
the result. Inspect asm/io.h from the various architecture-specific directories—
under arch in the kernel source tree—if you are curious.
772
Chapter 18
b544977 Ch18.qxd 12/1/03 8:57 AM Page 772
Interrupts that have no designated handler assigned to them are simply acknowledged and ignored by
Linux. You can find a listing of what handlers are installed on you system by listing the contents of
/proc/interrupts:
CPU0 CPU1
0: 1368447 1341817 IO-APIC-edge timer
1: 47684 47510 IO-APIC-edge keyboard
2: 0 0 XT-PIC cascade
4: 181793 182240 IO-APIC-edge serial
5: 130943 130053 IO-APIC-edge soundblaster
This is an incomplete listing of our system right now. The leftmost column is the interrupt number, and
the next two columns represent the number of times each CPU has handled the particular interrupt. The
last two items are the interrupt type and the device that registered the handler. So, the listing above
reveals that CPU0 has handled 130,943 interrupts from the
soundblaster device and CPU1 took care of
130,053. 0 is a special case—the timer interrupt (on the x86; other platforms are different)—and indicates
the number of ticks since the system was booted. The fourth column here indicates how the interrupts are
handled. This is not really important to us here, and it should suffice to know that in an SMP environment
the
IO-APIC distributes the interrupts between the CPUs. XT-PIC is the standard interrupt controller.
Another file you might want to look at is
/proc/stat. It contains, among other things, the total number
of interrupts that have transpired. The line of interest to us now is
intr, which has the following format:
intr total irq0 irq1 irq2 , where total is the sum of all interrupts, irq0 the sum of inter-
rupt 0, and so forth. This file might come in handy when you are experimenting with your first interrupt-
driven driver because it also lists triggered interrupts that don’t have a handler registered that
/proc/
interrupts
doesn’t.
Allocating an Interrupt
Now that we have looked at the interrupt statistics gathered in /proc, let’s move on to how you can
request your own IRQ. An explanation of the parameters follows.
int request_irq(unsigned int irq,
void (*handler)(int, void *, struct pt_regs *),
unsigned long irqflags,
const char *devname,
void *dev_id)
request_irq returns 0 on success, and failure is indicated by an appropriate negative error—most
notably,
-EINVAL if the IRQ is out of range and -EBUSY if a shared handler was requested and the
irqflags do not match with an already installed handler.
irq The actual IRQ that you wish to handle.
handler(int irq, When the interrupts occurs, this is the function that gets called.
void *dev_id, This is the IRQ handler.
struct pt_regs *regs)
irqflags
This controls the behavior of the interrupt. We will look more
at that later.
Table continued on following page
773
Device Drivers
b544977 Ch18.qxd 12/1/03 8:57 AM Page 773
devname The name that is listed in /proc/interrupts.
dev_id Helps support sharing of interrupts. It is the one that is passed
to the handler—the function passed as the second argument—
and can thus be used if you need to pass it information. The
IDE subsystem, for example, uses it to distinguish between the
master and slave that it controls per interrupt.
The
irqflags parameter comprises several possible combinations:
SA_INTERRUPT A handler registered with this flag runs with all IRQs dis-
abled. Not setting it only disables the IRQ being serviced by
the handler.
SA_SHIRQ Enable the IRQ line to be shared between more than one
device. The drivers must also agree on the rest of the
irqflags mask and supply the proper dev_id, otherwise
sharing is not allowed.
SA_SAMPLE_RANDOM The Linux kernel keeps an internal entropy pool managed by
the
random device. If the device being managed by the han-
dler does not interrupt at a fixed rate, it may be able to con-
tribute to the randomness of this pool and the flag should be
set. Naturally, this depends heavily on the actual hardware
being driven.
The handler being registered receives three arguments when invoked.
irq can only be considered useful
if the handler manages more than one IRQ, otherwise you would already know which specific interrupt
occurred.
regs contains the imagery of the CPU registers before the interrupt occurred. It is rarely useful,
but you can find the definition in
asm/ptrace.h if you are curious. The second argument is dev_id,
which we already covered.
Unregistering an IRQ handler is done with
free_irq. The arguments are similar to request_irq and
need no further explanation.
void free_irq(unsigned int irq, void *dev_id)
Getting an Appropriate IRQ
Before you can register a handler to use with your driver, you have to find out what IRQ to use. This is
highly hardware dependent, both in regards to the type of peripheral device and the host bus, be it ISA,
PCI, or SBUS (a host bus found on the SPARC). Regarding the former, some devices will let you read the
configuration from a status port; others you may have to probe. If you are going to write a driver for a
real piece of hardware, you need the programming specifications from the vendor; they will tell you
how to retrieve the needed information correctly.
The most prevalent bus types are ISA and PCI (at least on the x86 platform). Although efforts have been
made to partially add Plug and Play capabilities to ISA devices, ISA was invented before Plug and Play
was an issue and no real standard exists. Besides, we have probably all experienced how well that
works. PCI devices provide a clean and standardized way to retrieve configuration information without
774
Chapter 18
b544977 Ch18.qxd 12/1/03 8:57 AM Page 774
resorting to nasty probing and guesswork. How to handle PCI devices is beyond the scope of this book.
linux/pci.h is a good place to start if you want to deal with PCI, and, as always, plenty of examples
exist within the Linux sources. The rest of this section will deal only with legacy devices.
If the hardware allows you to retrieve the configuration directly, you will not have to do any probing
yourself. As mentioned previously, this information is located in hardware device manuals and we can’t
say anything generic about that. Linux provides interrupt detection for devices that don’t support nicer
alternatives.
unsigned long probe_irq_on(void)
int probe_irq_off(unsigned long mask)
probe_irq_on initiates the probing sequence, and probe_irq_off ends it. In between, you should put
code that will trigger an IRQ from the device, and this will then be the return value from
probe_irq_off.
If more than one IRQ fired,
probe_irq_off will return a negative value (in fact, corresponding to the
first triggered IRQ found, which could provide some hint). The probing sequence will typically look
something like the following:
int irq;
unsigned long foo;
/* clear dangling interrupts */
probe_irq_off(probe_irq_on());
foo = probe_irq_on();
/* this should provoke an interrupt from the device */
outb(TRIGGER_IRQ, PORT);
irq = probe_irq_off(foo);
if (irq > 0)
printk(“irq %d detected\n”, irq);
This is a purely theoretical example of how you might detect the IRQ used. The value returned by
probe_irq_on is a mask of all interrupts already in use. The interesting part is what is returned after
the probe—hopefully the interrupt you need.
The IRQ Handler
Once you have the available IRQ that you need, you need to write a handler to deal with the device
interrupts. The job of the handler is to acknowledge the interrupt and service the device in some way.
Typically some form of data is available and should be transferred from the device, or a state change
occurred and the hardware wants to let us know about it. The handler runs either with all interrupts
enabled except its own or no interrupts enabled depending on whether
SA_INTERRUPT was specified,
so any interrupts from the same device are lost until the handler has finished running. We’ll see later
how to deal with that issue.
The normal flow of execution is halted when an interrupt occurs; the kernel stops what it is currently
doing and invokes the appropriate handler registered. Interrupt handlers are different from the normal
driver entry points in that they run at interrupt time and as such are not running on behalf of a specific
775
Device Drivers
b544977 Ch18.qxd 12/1/03 8:57 AM Page 775
process. That means that the current process typically doesn’t have any relation to the driver and it
shouldn’t be touched. This also includes any access to user space, such as copying data back and forth.
Interrupt handlers should finish as soon as possible, or you may otherwise miss another interrupt from
the device. If you share the interrupt with another device, you are also preventing interrupts from there
being serviced. Although it has been mentioned before, it’s important to stress that you must not block
at interrupt time. If you do, the scheduler may be invoked and this is not allowed. It will inform you of
such an occurrence with “Scheduling in interrupt” on the console followed by an
Oops. Nor are you
allowed to sleep in the handler. In general, think carefully about how you interact with the rest of the
system while running at interrupt time.
There is nothing special about interrupt handlers other than what is mentioned above, so we won’t give
detailed examples on how to write one. As with the probe example, here is a theoretical interrupt handler:
void our_intr(int irq, void *dev_id, struct pt_regs *regs)
{
int status;
printk(“received interrupt %d\n”, irq);
/* reading status from board */
inb(STATUS_PORT, status);
/* we are sharing irq, check if it was our board */
if (status & MY_IRQ_STAT)
return;
/* acknowledge IRQ */
outb(STATUS_PORT, MY_ACK_IRQ);
>transfer data from the device, if needed<
/* schedule bottom half for execution */
our_taskqueue.routine = (void *)(void *)our_bh;
our_taskqueue.data = (void *)dev_id;
queue_task(&our_taskqueue, &tq_immediate);
mark_bh(IMMEDIATE_BH);
return;
}
The first thing we do is check whether the IRQ was generated from the device the driver is managing by
reading a status from a designated port on the hardware. This is one way of handling interrupt sharing.
If the handler was controlling several instances of the same hardware device, we could have used
dev_id to differentiate between them.
Bottom Halves
The handler in the previous section introduces a new concept, bottom halves. They were mentioned
briefly earlier in the chapter, but they deserve a little more attention. Instead of doing all the work in the
actual interrupt handler, we declare a task queue and add it to the immediate queue (thus guaranteeing
very swift execution).
our_bh is the bottom half for this device and will be consumed by the immediate
776
Chapter 18
b544977 Ch18.qxd 12/1/03 8:57 AM Page 776
queue as soon as we return from the top half (the actual interrupt handler). The top half will most likely
copy data from the device to an internal buffer and let the bottom half deal with necessary processing.
Whether keeping a separate bottom half is worth the effort depends on how much time you need to
spend in the top half and if the IRQ is shared or not. As soon as the interrupt handler returns from execu-
tion, the device IRQ reporting is enabled again. Bottom halves thus run with the device IRQ active and
thereby allow the handler to service more interrupts than it otherwise would have been able to. Bottom
halves are atomic with respect to each other, so you don’t have to worry about being re-entered. A top
half, however, can be invoked while the bottom half is still executing. If a bottom half is marked while it is
running, it will be run again as soon as possible, but marking it twice will still only make it run once.
Often, you need to share data between the two, since the bottom half is doing work for the top half. This
requires some care. We will talk more about atomicity and re-entrancy in the next few sections.
You don’t have to use
tq_immediate, but it is usually the one used simply because it is the quickest. Since
the regular bottom halves are all predefined in the kernel, this is the replacement to use if you need it.
Re-entrancy
One of the more important issues with device drivers is the issue of re-entrancy. We have already dis-
cussed some of the issues loosely throughout the text but only in passing, and the issue clearly needs
more attention than that. Imagine having your driver opened by several processes at once. Often a
driver for a real device has to maintain several internal structures that are manipulated in a myriad of
places. It goes without saying that the integrity of these structures must remain intact, so how do you
make sure that two processes aren’t modifying the same structure at the same time? The issue is even
more important as SMP systems are becoming more prevalent and having two CPUs these days is not
uncommon. Linux’s 2.0 kernel solved this problem by guarding the entire kernel space with a big lock,
thus making sure that only one CPU at a time was spending time in the kernel. While this solution
worked, it didn’t scale very well as the number of CPUs increased.
During the 2.1 kernel development cycle, it became apparent that finer-grained locking was needed if
Linux was to conquer machines with more than two CPUs and do it well. So instead of having one big
lock and having processes acquire it upon entering kernel space, new locking primitives were intro-
duced. Important data structures inside the kernel are now guarded with a separate lock, and having
numerous processes executing inside the kernel is now possible. Sections of code that modify structures
that can also be modified by others at the same time are called critical sections, and this is the piece of
code we need to protect against re-entrancy.
As we mentioned earlier, a process running in kernel space can’t be pre-empted on its own, so you can
be assured that
current won’t change beneath you; they have to give up execution. This was almost
true. Actually, interrupts can come in at any time and will break the current flow of execution. Of course,
there is also the issue of putting processes to sleep and explicitly calling
schedule() from within the
driver; here we must also be prepared to handle the consequences of being re-entered. Does this mean
that you have to guard all variables? No, luckily only global structures share the same address space.
Variables local to a function reside in the kernel stack for that process and are thus distinct to each
accessing process.
int global;
int device_open(struct inode *inode, struct file *file)
{
777
Device Drivers
b544977 Ch18.qxd 12/1/03 8:57 AM Page 777
int local;
printk(“pid = %d : “, current->pid);
printk(“global = 0x%p, local = 0x%p\n”, &global, &local);
}
The output of the preceding code in a module verifies that this is true; global variables are shared while
local variables are different copies:
pid = 909 : global = 0xc18005fc, local = 0xc08d3f2c
pid = 910 : global = 0xc18005fc, local = 0xc098df2c
While having local variables residing in the kernel stack is a relief, it also places certain constraints on
what you can fit in that space. The Linux kernel reserves approximately 7 Kb of kernel stack per process,
which should be sufficient for most needs. Some of this is reserved for interrupt handling and the like;
you should be careful not to overstep this limit. Should you need more than approximately 6 Kb, you
must allocate it dynamically.
The classic way of guarding yourself against re-entrancy was to disable interrupts globally, do your
work, and enable interrupts again. Interrupt handlers, and everything else that runs at interrupt time,
work asynchronously with your driver, and structures that are modified by these handlers need to be
protected against being changed while you are working with them.
unsigned long flags;
/* save processor flags and disable interrupts */
save_flags(flags);
cli();
_read/modify structures, critical section_
restore_flags(flags);
While this still works, it disables interrupts across all CPUs, and as such it is a slow and noncooperative
way of guarding yourself. If the target system is guaranteed to be UP (single CPU systems), this is all
you need since only one CPU can be executing kernel code. Instructions are thus guaranteed to be serial-
ized and are therefore atomic in respect to each other.
Disabling Single Interrupts
If you know that only your own interrupt handler modifies the internal structures, it can be considered
overkill to disable all interrupts in the system. All you really need is to make sure that your own handler
doesn’t run while you are mucking around with the interrupts. In this case, Linux provides functions to
disable a single IRQ line.
void disable_irq(unsigned int irq);
void disable_irq_nosync(unsigned int irq);
void enable_irq(unsigned int irq);
778
Chapter 18
b544977 Ch18.qxd 12/1/03 8:57 AM Page 778
The critical region can thus be placed between a disable and enable of the interrupt, and the top half
will not be invoked if the interrupt line is raised. The difference between the regular
disable_irq and
the
_nosync version is that the former guarantees that the specified IRQ is not running on any CPU
before returning, while the latter will disable the specified interrupt and return even if a top-half handler
is still running.
Atomicity
Instructions are said to be atomic when you know they are executed in one go (i.e., you will not be inter-
rupted until you are done). Disabling interrupts accomplishes this, as we saw above, since no one can
interrupt us in the critical section. Linux also offers atomic primitives that act on variables without the
need to lock everybody else out. They are defined in
asm/atomic.h.
void atomic_add(int i, volatile atomic_t *v)
void atomic_sub(int i, volatile atomic_t *v)
void atomic_inc(volatile atomic_t *v)
void atomic_dec(volatile atomic_t *v)
int atomic_dec_and_test(volatile atomic_t *v)
As you can see, these operate on the atomic_t type, which is a structure containing only a counter
member. What it contains doesn’t really matter, since you should only access it via the
atomic_x func-
tions and macros. Only then are you ensured atomicity. They are mainly used for keeping count for
semaphores but can be used any way you please.
Atomic operations are often needed to prevent race conditions. A race exists when a process decides to
sleep on an event based on evaluating an expression nonatomically.
schar does not have such a con-
struct, but it is common enough that we will give an example.
/* if device is busy, sleep */
if (device->stat & BUSY)
sleep_on(&queue);
If the test for checking whether the device is busy is not atomic, the condition may become false after the
test but before
sleep_on is invoked. The process may sleep forever on the queue. Linux has some handy
bit-testing operations that are guaranteed to execute atomically.
set_bit(int nr, volatile void *addr) Set, clear, or test the bit specified in nr
clear_bit(int nr, volatile void *addr)
from the bitmask at addr.
test_bit(int nr, volatile void *addr)
The preceding device busy test could then be implemented as
/* if device is busy, sleep */
if (test_bit(BUSY, &device->stat)
sleep_on(queue);
and be completely race safe. There are several others, including test-and-set operations, defined in
asm/bitops.h.
779
Device Drivers
b544977 Ch18.qxd 12/1/03 8:57 AM Page 779
Protecting Critical Sections
Assuming that your modules are going to be run only on UP systems is clearly a very bad idea. Linux
provides two variants of spin locks that can be used to protect structures against manipulation. On UP
systems, this defaults to the above construct of disabling interrupts with
cli, while on SMP systems
they only disable interrupts on the local CPU. The latter is sufficient as long as all the functions on your
driver acquire the same spin lock before modifying shared structures.
Basic Spin Locks
Spin locks are one of the most basic locking primitives. A process trying to enter a critical region already
protected by another process with a spin lock will “spin,” or loop, until the lock is released and can be
acquired.
The different types of spin locks can be found in
asm/spinlock.h. This is also the file to inspect if you
are at all interested in how they are implemented differently in single and multiple CPU configurations.
There are two basic types implemented in Linux. The first type is
spinlock_t our_lock = SPIN_LOCK_UNLOCKED;
spin_lock(&our_lock);
and the second is
spinlock_t our_lock = SPIN_LOCK_UNLOCKED;
unsigned long flags;
spin_lock_irqsave(&our_lock, flags);
If the structures are not going to be modified at interrupt time, spin_lock is all you need. It provides
safety from modification across CPUs but doesn’t disable interrupts even on the local CPU. This makes
it faster than
spin_lock_irqsave, which also provides assurance against interrupt handlers.
spin_unlock(&our_lock);
spin_unlock_irqrestore(&our_lock, flags);
These are the equivalent unlocking macros to be used when you’re done modifying structures.
There are a lot more functions in
asm/spinlock.h, including macros that allow you to test whether get-
ting a lock will succeed before trying to acquire it, and others. If you need more functionality, you can
find the needed information there.
Reader and Writer Locks
The preceding spin locks provide full locking and protect the code in between from being re-entered for
any purpose. It may also be useful to further differentiate access to structures, access with the purpose
of only reading data, or write access. For this purpose, Linux provides locks that allow you to acquire
either read or write access, thus allowing multiple readers or a single writer to enter the critical region at
the same time.
780
Chapter 18
b544977 Ch18.qxd 12/1/03 8:57 AM Page 780
rwlock_t our_lock = RW_LOCK_UNLOCKED;
unsigned long flags;
read_lock(&our_lock);
read_lock_irqsave(&our_lock, flags);
write_lock(&our_lock);
write_lock_irqsave(&our_lock, flags);
The semantics are exactly the same as for basic spin locks, so we won’t explain them further. Unlocking
the region is provided by similar macros.
read_unlock(&our_lock);
read_unlock_irqrestore(&our_lock, flags);
write_unlock(&our_lock);
write_unlock_irqrestore(&our_lock, flags);
Now you know how to protect yourself effectively against the gruesome effects of re-entrancy with basic
spin locks and reader/writer spin locks. In a UP environment, the non-IRQ versions all expand to no-
ops (IRQ versions still disable interrupts, since they are handled as soon as they come in and therefore
still run asynchronously) so you will not lose performance there, but the behavior on SMP systems is far
more attractive than the basic
cli construct.
Automated Locking
Most of the functions available to device drivers are protected internally by spin locks, courtesy of the ker-
nel, and no extra locking is thus required. An example of such was given in the “Timers” section earlier in
this chapter, where
add_timer internally acquired the timer_list lock before manipulating the given
timer structure. If the timer is local to the function, no locking is needed and
internal_add_timer could
be called directly. However, it is recommended to always use the “safer” variants, and this subsection is
purely added in case you were wondering why no locking was used to maintain integrity of wait queues
or timer lists in
schar, for example.
Block Devices
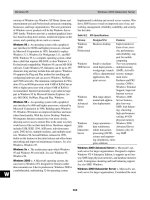
The second class of devices covered in this book is block devices. They are entirely different creatures
than character drivers in that they don’t serve bytes of data, but entire blocks instead. While character
drivers are usually accessed directly from applications by reading and writing to them, block device
accesses go through the buffer cache in the system.
Figure 18-5 is a half-truth since only reading and writing of blocks passes through the buffer cache.
open, close, and ioctl have normal entry points, for example.
Block devices usually host file systems and can be accessed randomly by specifying which block to read
or write. This is in contrast to character drivers, which only allow sequential, nonrandom access and
thus cannot be used for providing file system storage.
781
Device Drivers
b544977 Ch18.qxd 12/1/03 8:57 AM Page 781
Figure 18-5
Linux does not distinguish sharply between block and character devices and even provides the same
interface for both. When we were designing the first character driver,
schar, some of the elements of the
file_operations structure did not lend themselves to a character-oriented access scheme, exactly
because the same one is used for both types of devices.
radimo—A Simple RAM Disk Module
The best way to get a little familiar with the inner workings of block devices and the underlying system
they depend on is to dig in with a working example.
radimo is a RAM disk driver that will host a file
system of varying size, depending on the available memory in the system.
At the heart of every block device driver is the
request function that receives the read and write
requests and turns them into something that the device can comprehend. If we were to write an IDE
driver, the
request function would generate commands and send them to the controller to initiate the
transfer of data in both directions. Several items, including the
request function, need to be defined in a
special order at the beginning of the module. The normal order of include files applies, but the items in
the following table must be defined before
<linux/blk.h> is included.
#define MAJOR_NR RADIMO_MAJOR The major number of the device. This is
mandatory.
#define DEVICE_NAME “radimo” The name of the device. This may be omit-
ted and is then set to “unknown.” Serves
no particular function other than providing
a name to be printed in case of request
errors.
#define DEVICE_ radimo_request The request function for the
REQUEST device. Is also mandatory.
block
buffer cache
file system
Application
character
Kernel
Application
782
Chapter 18
b544977 Ch18.qxd 12/1/03 8:57 AM Page 782
#define DEVICE_NR (MINOR(device)) Used for partionable devices to enable
(device) them to use the minor number for partition
selection.
#define DEVICE_ON Motorized devices can set this to the
(device) functions related to spinning the device
#define DEVICE_OFF up and down. When a request has ended,
(device) the block system will call the off function.
DEVICE_OFF must be defined even as just
an empty define, but
DEVICE_ON can be
omitted.
#define DEVICE_ If defined, the device will not contribute
NO_RANDOM to system entropy. This is similar to SA_
SAMPLE_RANDOM for interrupt handlers.
After having defined the preceding,
linux/blk.h can be included.
Size Issues
There are two sector sizes associated with a block device: a hardware and software sector size. The for-
mer is how the data is arranged on the physical media controlled by the device, while the latter is the
arrangement within the device. By far, the majority of devices have a hardware sector size of 512 bytes,
although deviants such as MO-drives do exist and typically use 2,048-byte sector sizes.
The respective sizes are set at initialization time in global arrays indexed by major number.
#define RADIMO_HARDS_SIZE 512
#define RADIMO_BLOCK_SIZE 1024
static int radimo_hard = RADIMO_HARDS_SIZE;
static int radimo_soft = RADIMO_BLOCK_SIZE;
hardsect_size[RADIMO_MAJOR] = &radimo_hard;
blksize_size[RADIMO_MAJOR] = &radimo_soft;
We go with the flow and use a hardware sector size of 512 bytes. It does not really matter, since radimo
stores data in a buffer internally. The software block size can be any value, with a couple of restrictions:
It has to be equal to or bigger than the hardware sector size, a multiple of the hardware sector size, and
smaller than the
PAGE_SIZE. If you neglect to set either one, 512 is assumed for the hardware sector size
and 1,024 for the block size.
In addition to the sector sizes, the total size of the device is also kept in a global array. The size argument
is given in kilobytes and lets the kernel return
-ENOSPC (no space left on device) automatically.
blk_size[RADIMO_MAJOR] = &radimo_size;
If we kept several virtual devices (indexed by minor, for example) radimo_size and friends could be an
array and thus get
[MAJOR][MINOR] indexing. The actual definition of the various block-related global
structures resides in
drivers/block/ll_rw_blk.c and also contains comments about them.
783
Device Drivers
b544977 Ch18.qxd 12/1/03 8:57 AM Page 783