Beginning microsoft Visual Basic 2010 phần 6 pptx
Bạn đang xem bản rút gọn của tài liệu. Xem và tải ngay bản đầy đủ của tài liệu tại đây (3.91 MB, 72 trang )
326
❘
CHAPTER 10 DEBUGGING AND ERROR HANDLING
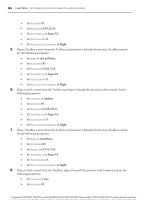
1. Stop your project and set a breakpoint in the
For
loop as shown in Figure 10-18. Remember that
to set a breakpoint, you need to click in the gray margin on the line of code where the breakpoint
should be.
FIGURE 10-18
2. Start your project again by clicking the Start icon on the toolbar.
FIGURE 10-19
.
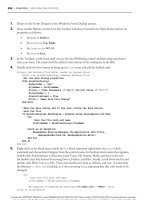
3. In the Breakpoints window, right-click the second
breakpoint and choose Hit Count from the context
menu to invoke the Breakpoint Hit Count dialog
box.
4. The breakpoint that you currently have set halts
execution every time it is encountered. Change it to
break only when the loop enters its third execution.
You do this by selecting the option ‘‘break when
the hit count is equal to’’ in the drop-down list and
then entering the number 3 in the text box displayed next to it, as shown in Figure 10-19.
Click the OK button to close this dialog box. Notice the Hit Count column in the Breakpoints
window in the IDE. The second breakpoint now displays the Hit Count condition that you just
defined. The red circle will now have a white plus in the center of it for this breakpoint.
5. At this point, click the Start button on the form. By clicking the Start button you are again stopped
at your first breakpoint.
6. This breakpoint is highlighted in the Breakpoints window. You no longer need this breakpoint, so
click it and then click the Delete icon in the Breakpoints window; the breakpoint will be deleted.
Your code is still paused at this point, so click the Continue button on the Debug toolbar.
7. You are now stopped at your breakpoint in the
For
loop as it enters its third execution. Notice
that the Breakpoints window shows both the hit count criteria that you selected and the current
hit count.
As you can see, this is a handy way to have a loop execute a definite number of iterations before
breaking at a defined breakpoint.
8. Now let your code continue executing by clicking the Continue button on the Debug toolbar.
9. Stop your project once the form has been displayed.
Debugging
❘
327
TRY IT OUT Changing Breakpoint Properties
Code file Debugging.zip available for download at Wrox.com
In this Try It Out, you modify the properties of the only breakpoint that you have left.
1. In the previous Try It Out, you modified the breakpoint while the project was running. This time
you will modify the breakpoint while the project is stopped. To view the Breakpoints window,
select Debug
➪ Windows ➪ Breakpoints.
2. In the Breakpoints window, right-click the breakpoint and choose Hit Count from the context
menu to display the Breakpoint Hit Count dialog box. Notice the Reset button. When you click
this button, you reset the hit counter for the next execution, but this is not what you’ll do at this
point.
3. Change the hit count back to its original setting. Select Break Always in the drop-down box and
then click the OK button to close this dialog.
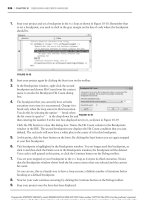
4. To set a specific condition for this breakpoint, right-click the breakpoint and choose Condition
from the context menu to invoke the Breakpoint Condition dialog box. Enter the condition as
shown in Figure 10-20. This causes this breakpoint to break only when the variable
intIndex
is
equal to
3
. Note that you could also specify that the breakpoint be activated when the value of a
variable changes. Click the OK button to close the dialog box and then start your project.
FIGURE 10-20
figure
5. Click the Start button on your form. Once the
intIndex
variable is equal to
3
, the breakpoint
is activated and execution of the code is paused at
the line where the breakpoint is specified. This is
actually your fourth time into the loop, as the
For
Next
loop specifies a starting index of
0
for the
variable
intIndex
.
6. Finally, let your code finish executing by click-
ing the Continue button on the Debug tool-
bar. Once your form is displayed, stop your
project.
Debugging Using the Watch Window and QuickWatch Dialog Box
The Watch window provides a method for you to observe variables and expressions eas-
ily while the code is executing — this can be invaluable when you are trying to debug
unwanted results in a variable. You can even change the values of variables in the Watch win-
dow. You can also add as many variables and expressions as needed to debug your program. This
provides a mechanism for watching the values of your variables change without any intervention on
your part. This is an easy place to watch many variables.
The QuickWatch dialog box is best for watching a single variable or expression. You can add or delete
variables or expressions in the QuickWatch dialog box only when your program is in break mode.
328
❘
CHAPTER 10 DEBUGGING AND ERROR HANDLING
Therefore, before you run your program, you need to set a breakpoint before the variable or expression
that you want to watch. When the breakpoint has been reached, you can add as many Watch variables
or expressions as needed.
TRY IT OUT Using QuickWatch
Code file Debugging.zip available from Wrox.com
In this Try It Out, you add the
intIndex
variable to the Watch window and add an expression using the
intIndex
variable. This enables you to observe this variable and expression as you step through your code.
1. Start your program again. When your form displays, switch to the IDE and clear the current
breakpoint by deleting it in the Breakpoints window or by clicking it in the gray margin where it
is set. Then set a new breakpoint, as shown in Figure 10-21.
FIGURE 10-21
2. You can add a QuickWatch variable or expression only while your program is paused. Click the
Start button on the form so the breakpoint will be encountered and your program paused.
FIGURE 10-22
figure
3. When the breakpoint has been encountered,
right-click the variable,
intIndex
,inthe
For
Next
loop and choose Expression: ‘intIndex’ and
then QuickWatch from the context menu to invoke
the QuickWatch dialog box. Note that this variable
has not only been added to the Expression drop-
down box but has also been placed in the current
value grid in the dialog, as shown in Figure 10-22.
Click the Add Watch button to add this variable to
the Watch window.
NOTE Because the variable is declared in the
For
Next
loop, you see an error
here. You can safely ignore this error because once the loop has started
processing, the variable will be declared.
Debugging
❘
329
4. While you have the QuickWatch dialog open, set an expression to be evaluated. Type the expres-
sion intIndex = 1 in the Expression drop-down box. Then click the Add Watch button to have
this expression added to the Watch window. Close the QuickWatch dialog by clicking the Close
button.
5. If you do not see the Watch window at the bottom of the IDE, select Debug ➪ Windows ➪ Watch
➪ Watch 1. You should see a variable and an expression in the Watch window, as shown in
Figure 10-23.
FIGURE 10-23
The second watch expression that you added here returns a value of
True
when the
intIndex
vari-
able equals
1
, so Visual Studio 2010 sets the type to
Boolean
once you enter the
For
Next
loop.
6. Step through your code line by line so that you can watch the value of the variable and expres-
sion change. Click the Step Into icon on the Debug toolbar to step to the next line of code. Keep
clicking the Step Into icon to see the values of the variable and expression in the Watch window
change.
NOTE As you step through the loop in your code, you continue to see the value
for the
intIndex
variable change in the Watch window. When the value of the
variable in the Watch window turns the color red, as shown in Figure 10-24
(although you will not see it in the black and white image well), the value has just
been changed. You can manually change the value at any time by entering a new
valueintheValuecolumnintheWatchwindow.
FIGURE 10-24
7. When you are done, click the Continue icon on the Debug toolbar to let your code finish execut-
ing. Then stop your project once the form has been displayed.
330
❘
CHAPTER 10 DEBUGGING AND ERROR HANDLING
Debugging with the Autos Window
The Autos window is similar to the Watch window, except that it shows all variables and objects, the
current statement and the three statements before and after the current statement. The Autos window
also lets you change the value of a variable or object, and the same rules that apply to the Watch
window apply here (that is, the program must be paused before a value can be changed). The text for
a value that has just changed also turns red, making it easy to spot the variable or object that was
changed.
Debugging with the Locals Window
The Locals window is similar to the Watch window, except that it shows all variables and objects for
the current function or procedure. The Locals window also lets you change the value of a variable or
object, and the same rules that apply to the Watch window apply here (that is, the program must be
paused before a value can be changed). The text for a value that has just changed also turns red, making
it easy to spot the variable or object that was changed.
The Locals window is great if you want a quick glance at everything that is going on in a function or
procedure, but it is not very useful for watching the values of one or two variables or expressions. That’s
because the Locals window contains all variables and objects in a procedure or function. Therefore, if
you have a lot of variables and objects, you have to scroll through the window constantly to view them.
This is where the Locals window comes in handy; it enables you to observe just the variables that you
need. You learned about the Watch window in the previous example.
TRY IT OUT Using the Locals Window
Code file Debugging.zip available for download at Wrox.com
In this Try It Out, you examine the contents of the Locals window in two different procedures. This demon-
strates how the contents of the Locals window changes from one procedure to the next.
1. To prepare for this exercise, you need to have the current breakpoint set and set a new breakpoint
in the
ListCustomer
procedure. Locate the
ListCustomer
procedure and set a breakpoint on the
one line of code in that procedure:
lstData.Items.Add(customerToList.CustomerID & _
"—" & customerToList.CustomerName)
2. Now start your program.
3. If you do not see the Locals window at the bottom of the IDE, select Debug ➪ Windows ➪ Locals.
Notice that at this point the Locals window contains no variables or objects. This is because you
have not entered a procedure or function. Click the Start button on the form. Your breakpoint in
the
ListCustomer
procedure is encountered first and execution is paused.
4. Notice the various objects and their types listed in the Locals window. The first item in the list is
Me
, which is the form itself. If you expand this item, you see all the objects and controls associated
with your form. If you expand the
customerToList
object, you’ll see the properties and variables
defined in the
Customer
class, as shown in Figure 10-25.
Error Handling
❘
331
FIGURE 10-25
5. Click the Continue icon on the Debug toolbar until you encounter your second breakpoint.
6. Take a look at the Locals window. You should see a different set of objects and variables. The one
constant item in both procedures is
Me
, which is associated with the form.
7. If you step through a couple of lines of code in the loop where the breakpoint has paused your
program, you see the values in the Locals window change. You can continue to step through your
code, or you can click the Continue icon on the Debug toolbar to let your program run to comple-
tion.
NOTE After you change your build configuration from Debug to Release,
debugging is no longer available; even if you have breakpoints set in your code,
they will not be encountered.
8. To clear all breakpoints in your code, you can delete each breakpoint in the Breakpoints window
or you can click the Debug menu and choose Delete All Breakpoints. When you are done, stop
your project.
ERROR HANDLING
Error handling is an essential part of any good code. In Visual Basic 2010, the error mechanism is based
on the concept of exceptions that can be thrown to raise an error and caught when the error is handled.
If you do not provide any type of error handling and an error occurs, your user receives a message
about an unhandled exception, which is provided by the CLR, and then the program may terminate,
depending on the type of error encountered. This is not a user-friendly message and does not inform
the user about the true nature of the error or how to resolve it. The unhandled exception could also
cause users to lose the data that they were working with or leave the user and the data in an unknown
state.
Visual Studio 2010 provides structured error-handling statements that are common across all lan-
guages. Structured error handling is a way to organize blocks of code in a structure that handles errors.
In this section you examine structured error handling and how it can be incorporated into your pro-
grams with very little effort.
Structured error handling in Visual Basic 2010 is incorporated with the
Try
Catch
Finally
block.
You execute the code that might throw an exception in the
Try
block, and you handle anticipated errors
332
❘
CHAPTER 10 DEBUGGING AND ERROR HANDLING
in the
Catch
block. The
Finally
block, which is optional, is always executed if present; it enables you
to place any cleanup code there regardless of whether an error has occurred. If an error occurs that
was not handled in the
Catch
block, the CLR displays its standard error message and terminates your
program. Therefore, it is important to try to anticipate all possible errors for the code that is contained
in the
Try
block.
Take a look at the syntax for the
Try
Catch
Finally
statement:
Try
[try statements]
[Exit Try]
Catch exceptionvariable As exceptiontype
[catch statements]
[Exit Try]
[Additional Catch blocks]
Finally
[finally statements]
End Try
➤ The
[try statements]
are the statements to be executed that may cause an error.
➤ The
exceptionvariable
can be any variable name. It will be set to contain the value of the
error that is thrown.
➤ The
exceptiontype
specifies the exception class type to which the exception belongs.
If this type is not supplied, your
Catch
block handles any exception defined in the
System.Exception
class. This argument enables you to specify the type of exception that you
may be looking for. An example of a specific exception is
IOException
, which is used when
performing any type of I/O (input/output) against a file.
➤ The
[catch statements]
handle and process the error that has occurred.
➤ The
[finally statements]
are executed after all other processing has occurred.
➤ The optional
Exit Try
statement enables you to completely break out of a
Try
Catch
Finally
block and resume execution of code immediately following the
Try
Catch
Finally
block. You can have multiple
Catch
blocks, meaning that you can test
for multiple errors with different exception types within the same
Try
block. When an error
occurs among the
Try
statements, control is passed to the appropriate
Catch
block for
processing.
When you define a
Catch
block, you can specify a variable name for the exception and define the type of
exception you want to catch, as shown in the following code fragment. This code defines an exception
variable named
IOExceptionErr
, and the type of exception is an
IOException
. This example traps any
type of I/O exception that may occur when processing files, and stores the error information in an
object named
IOExceptionErr
:
Catch IOExceptionErr As IOException
code to handle the exception goes here
When dealing with mathematical expressions, you can define and catch the various errors that you may
encounter, such as a divide-by-zero exception. You can also catch errors such as overflow errors, which
Error Handling
❘
333
may occur when multiplying two numbers and trying to place the result in a variable that is too small
for the result. However, in cases such as these it may be better to check for problems in advance — you
should use exceptions only in exceptional circumstances.
When testing
Try
Catch
statements, you can cause an error by using the
Throw
keyword inside the
Try
statement. To throw a new error, use the following syntax:
Throw New FileNotFoundException()
Inside of
Catch
statements, you can raise an error that has occurred back up to the caller. To throw an
error back up to the caller, use the following syntax, which will allow the caller to handle the actual
error:
Throw
Using Structured Error Handling
In the following Try It Out you add some structured error handling to the sample program
with which you have been working. When you first ran the Debugging project, you received the
NullReferenceException
that was shown in Figure 10-8 because you tried to access the properties
of the
strData
string variable before it had been set. This code is a prime candidate for structured
error handling. You temporarily bypassed the problem at that point by using an
If
Then
Else
statement to first see whether the variable had been initialized. Another way to handle such a case is in
a
Try
Catch
block.
TRY IT OUT Structured Error Handling
In this example, you will update your code to handle the null check with a
Try Catch
statement versus
an
If Then
statement.
Code file Debugging.zip available for download at Wrox.com
1. Modify the code for the
strData
variable in the
btnStart
_
Click
procedure as shown:
lstData.Items.Add("String variable data:")
Try
If strData.Length > 0 Then
lstData.Items.Add(strData)
End If
Catch NullReferenceExceptionErr As NullReferenceException
strData = "String now initialized"
lstData.Items.Add(strData)
End Try
How It Works
The code you entered contains a
Try
block and a
Catch
block. You opt not to use the
Finally
block in this
error-handling routine because the
Catch
block performs the necessary code to set the
strData
variable,
and have the contents of that variable added to the list box on your form:
Try
If strData.Length > 0 Then
334
❘
CHAPTER 10 DEBUGGING AND ERROR HANDLING
lstData.Items.Add(strData)
End If
Catch NullReferenceExceptionErr As NullReferenceException
strData = "String now initialized"
lstData.Items.Add(strData)
End Try
When you try to access the
Length
property of the
strData
variable in the
Try
block, a
NullReference
Exception
exception is thrown because the variable has been declared but not set.
The error that you want to trap is a
NullReferenceException
, and that exception is specified in the
Catch
block. You defined the variable
NullReferenceExceptionErr
for the exception variable argument; the
standard practice among most developers is to use the exception name along with a suffix of
Err
.Youthen
defined the type of exception that you want to test for and trap.
You place your error-handling code within the
Catch
block, as you have done here. When a
NullReferenceException
occurs, you set the
strData
variable to a string constant and then add the
contents of that variable to the list box on your form.
TRY IT OUT Testing Your Error Handler
In the final example for this chapter, you use the
Watch Window
to make sure your
Try
Catch
statement
is working.
Code file Debugging.zip available for download at Wrox.com
1. Set a breakpoint on the
Try
statement and then run your project. Once the form is displayed, click
the Start button.
2. Once the breakpoint is encountered, right-click the variable
strData
and add a Watch from the
context menu. Click the Watch1 window so that you can view the contents of the variable.
3. At this point, the
strData
variable has a value of
Nothing
. Click the Step Into icon on the toolbar;
you’ll be taken to the first line of code in the
Try
block.
4. Click the Step Into icon again. A
NullReferenceException
is thrown, and you are taken to the
Catch
block.
5. Note the value of the variable in the Watch1 window, click the Step Into icon twice more, and
note the value of the variable in the Watch1 window (see Figure 10-26).
6. Click the Continue icon on the toolbar to allow the rest of your code to run.
FIGURE 10-26
Summary
❘
335
How It Works
As you become more familiar with the types of errors that can occur, you will be able to write more sophis-
ticated structured error handlers. This comes only with experience and testing. You will discover more
errors and will be able to handle them only by thoroughly testing your code. The online documentation
for most methods that you use in Visual Studio 2010 will have Exceptions sections that list and explain the
possible exceptions that could occur by using the method.
SUMMARY
This chapter covered some useful debugging tools that are built into the Visual Studio 2010 develop-
ment environment. You saw how easy it is to debug your programs as you stepped through the various
Try It Out sections.
In the discussion of breakpoints, you learned how to stop the execution of your program at any given
point. As useful as this is, setting breakpoints with a hit counter in a loop is even more useful, because
you can execute a loop several times before encountering a breakpoint in the loop.
You also examined some of the various windows available while debugging your program, such as
the Watch window and the Locals window. These windows provide you with valuable information
about the variables and expressions in your program. You can watch the values change and are able to
change the values to control the execution of your code.
You should know what types of major errors you may encounter while developing and debugging your
code, and you should be able to recognize syntax and execution errors, correcting them if possible.
Although debugging a program for logic errors may be difficult at first, it does become easier with time
and experience.
This chapter also covered structured error handling, and you should incorporate this knowledge into
your programs at every opportunity. Structured error handling provides you with the opportunity to
handle and correct errors at runtime.
To summarize, you should know:
➤ How to recognize and correct major types of errors
➤ How to use breakpoints successfully to debug your program
➤ How to use the Locals and Watch windows to see and change variables and expressions
➤ How to use structured error handling
336
❘
CHAPTER 10 DEBUGGING AND ERROR HANDLING
EXERCISES
1. What window do you use to track a specific variable while debugging?
2. How do you look at all of the variables in scope while debugging?
3. How do you best add error handling to your code?
4. Sometimes you need to cause errors to happen in your code. What keyword do you use to cause
errors?
5. While debugging, how do you move to the very next statement?
Summary
❘
337
WHAT YOU HAVE LEARNED IN THIS CHAPTER
TOPIC CONCEPTS
Major Types of Errors Syntax, Execution and Logic Errors
Error handling Use
Try
Catch
Finally
statements to handle exceptions that are
raised or thrown from your code. The
Finally
block always executes.
Breakpoints Use breakpoints to stop execution of your code at a certain spot to
debug.
Debugging Step Into, Step Over, Step Out, Run, and Run To Cursor are common
commands you will use to debug your program. You will use the Watch
Window, QuickWatch Dialog, Locals Window and Autos Windows to aid
your debugging.
11
Building Objects
WHAT YOU WILL LEARN IN THIS CHAPTER:
➤ Building a reusable object with methods and properties
➤ Inheriting the object that you build in another object
➤ Overriding methods and properties in your base object
➤ Creating your own namespace
You may have heard the term object oriented a lot since you first started using computers. You
may also have heard that it is a scary and tricky subject to understand. In its early years it
was, but today’s modern tools and languages make object orientation (OO) a wonderfully
easy-to-understand concept that brings massive benefits to software developers. This is
mainly because languages such as Visual Basic and C# have matured to a point where
they make creating objects and the programs that use them very easy indeed. With these
languages, you will have no problem understanding even the most advanced object-oriented
concepts and will be able to use them to build exciting object-based applications.
You have been using objects and classes throughout this book, but in this chapter you look at
object orientation in detail and build on the foundations of the previous chapters to start pro-
ducing some cool applications using Visual Basic 2010.
UNDERSTANDING OBJECTS
An object is almost anything you can think of. We work with physical objects all the time:
televisions, cars, customers, reports, light bulbs — anything. In computer terms, an object is
a representation of a thing that you want to manipulate in your application. Sometimes, the
two definitions map exactly onto each other. So, if you have a physical car object sitting in your
driveway and want to describe it in software terms, you build a software
Car
object that sits in
your computer.
340
❘
CHAPTER 11 BUILDING OBJECTS
Likewise, if you need to write a piece of software that generates a bill for a customer, you may well
have a
Bill
object and a
Customer
object. The
Customer
object represents the customer and may be
capable of having a name, address, and also have the capability to generate the bill. The
Bill
object
would represent an instance of a bill for a customer and would be able to impart the details of the bill
and may also have the capability to print itself.
What is important here is the concept that the object has the intelligence to produce actions related to
it — the
Customer
object can generate the bill. In effect, if you have a
Customer
object representing a
customer, you can simply say to it: ‘‘Produce a bill for me.’’ The
Customer
object would then go away
and do all the hard work related to creating the bill. Likewise, when you have a
Bill
object, you can
say to it: ‘‘Print yourself.’’ What you have here are two examples of objectbehavior.
Objects are unbelievably useful because they turn software engineering into something conceptually
similar to wooden building blocks. You arrange the blocks (the objects) to build something greater
than the sum of the parts. The power of objects comes from the fact that, as someone using objects, you
don’t need to understand how they work behind the scenes. You’re familiar with this concept with real-
world objects too. When you use a mobile phone, you don’t need to understand how it works inside.
Even if you do understand how a mobile phone works inside — even if you made it yourself — it’s
still much easier to use the mobile phone’s simple interface. The interface can also prevent you from
accidentally doing something that breaks the phone. The same is true with computer objects. Even if
you build all the objects yourself, having the complicated workings hidden behind a simple interface
can make your life much easier and safer.
Object orientation is perhaps best explained by using a television metaphor. Look at the television in
your home. There are several things you know how to do with it:
➤ Watch the image on the screen
➤ Change channel
➤ Change volume
➤ Switch it on or off
What you don’t have to do is understand how everything works to allow you to carry out these activ-
ities. If asked, most people couldn’t put together the components needed to make a modern television.
We could, with a little research and patience, come up with something fairly basic, but nothing as com-
plex as the one sitting in my home. However, we do understand how to use a television. We know how
to change the channel, change the volume, switch it on and off, and so on.
Objects in software engineering work in basically the same way. When you have an object, you can
use it and ask it do things without having to understand how the internals of it actually work. This is
phenomenally powerful, as you’ll see soon.
Software objects typically have the following characteristics:
➤ Identity: User: ‘‘What are you?’’TV: ‘‘I’m a TV.’’
➤ State: User: ‘‘What channel am I watching?’’TV: ‘‘You’re watching Channel 4.’’
➤ Behavior: User: ‘‘Please turn up the volume to 50%.’’ Then, we can use the State again.
User: ‘‘How loud is the volume?’’ TV: ‘‘50%.’’
Understanding Objects
❘
341
Encapsulation
The core concept behind object oriented programming (OO) is encapsulation. This is a big word,
but it’s very simple to understand. What this means is that the functionality is wrapped up in a self-
contained manner and that you don’t need to understand what it’s actually doing when you ask it to
do something.
If you remember from Chapter 3, you built a function that calculated the area of a circle. In that func-
tion, you encapsulated the logic of calculating the area in such a way that anyone using the function
could find the area without having to know how to perform the operation. This is the same concept but
taken to the next level.
Methods and Properties
You interact with objects through methods and properties. These can be defined as follows:
➤ Methods are ways of instructing an object to do something.
➤ Properties are things that describe features of an object.
A method was defined previously as a self-contained block of code that does something. This is true,
but it is a rather simplistic definition. In fact, the strict definition of a method applies only to OO and is
a way to manipulate an object — a way to instruct it to perform certain behaviors. In previous chapters
you created methods that instructed an object — in most cases a form — to do something. When you
create a form in Visual Basic 2010, you are actually defining a new type of
Form
object.
So, if you need to turn on the TV, you need to find a method that does this, because a method is some-
thing you get the object to do. When you invoke the method, the object itself is supposed to understand
what to do to satisfy the request. To drive the point home, you don’t care what it actually does; you just
say, ‘‘Switch on.’’ It’s up to the TV to switch on relays to deliver power, boot up the circuitry, warm up
the electron gun, and all the other things that you don’t need to understand!
NOTE On the other hand, if you need to change the channel, you might set the
Channel
property. If you want to tune into Channel 10, you set the
Channel
property to the value 10. Again, the object is responsible for reacting to the
request; you don’t care about the technical hoops it has to go through to do that.
Events
In Visual Basic 2010 you listen for events to determine when something has happened to a control
on a form. You can consider an event as something that an object does. In effect, someone using an
object can listen to events, like a
Click
event on a button or a
PowerOn
event on a TV. When the event
is received, the developer can take some action. In OO terms, there is the
SwitchOn
method that gets
invoked on the TV object; when the TV has warmed up (some old TVs take ages to warm up), it raises
a
PowerOn
event. You could then respond to this event by adjusting the volume to the required level.
An event might also be used when the performer of an action is not the only entity interested in
the action taking place. For example, when you have the TV on, you might go and get a drink
342
❘
CHAPTER 11 BUILDING OBJECTS
during a commercial break. However, while you’re in the kitchen, you keep your ears open for
when the program starts again. Effectively, you are listening for a
ProgramResume
event. You do not
cause the program to resume, but you do want to know when it does.
Visibility
To build decent objects you have to make them easy for other developers to use. For example, internally
it might be really important for your TV object to know what frequency the tuner needs, but does the
person using the TV care? More important, do you actually want the developer to be able to change
this frequency directly? What you’re trying to do is make the object moreabstract.
Some parts of your object will be private, whereas other parts will be public. The public interface is
available for others to use. The private parts are what you expect the object itself to use internally.
The logic for the object exists in the private parts, and may include methods and properties that are
important but won’t get called from outside the object. For example, a TV object might have methods
for
ConnectPower
,
WarmUp
, and so on. These would be private and would all be called from the public
SwitchOn
method. Similarly, while there is a public
Channel
property, there will probably be a private
Frequency
property. The TV could not work without knowing the signal frequency it was receiving,
but the users are only interested in the channel.
Now that you understand the basics of object orientation, take a look at how you can use objects within
an application.
You’ll notice that some of the code samples you saw in previous chapters included a line that looked
similar to this:
lstData.Items.Add(strData)
That’s a classic example of object orientation!
lstData
is, in fact, an object.
Items
is a property of the
lstData
object. The
Items
property is an object in its own right and has an
Add
method. The period
(
.
) tells Visual Basic 2010 that the word to the right is a member of the word to the left. So,
Items
is
amemberof
lstData
,and
Add
is a member of
Items
. Members are either properties or methods of an
object.
lstData
is an instance of a class called
System.Windows.Forms.ListBox
(or just
ListBox
). This class is
part of the .NET Framework you learned about in Chapter 2.
The
ListBox
class can display a list of items on the form and let a user choose a particular one. Again,
here’s the concept of encapsulation. As a user of
ListBox
, you don’t need to know anything about
the technologies involved in displaying the list or listening for input. You may not have even heard of
GDI+, stdin, keyboard drivers, display drivers, or anything else that’s part of the complex action of
displaying a list on a form, yet you still have the capability to do it.
The
ListBox
is an example of an object that you can see. Users can look at a program running and know
that a
ListBox
is involved. Most objects in OO programming are invisible and represent something in
memory.
What Is a Class?
A class is the definition of a particular kind of object. The class is made up of the software code
needed to store and retrieve the values of the properties, carry out the methods, and undergo the events
pertaining to that kind of object. This is effectively the circuitry inside the black box. If you want to
Building Classes
❘
343
build a software object, you have to understand how the internals work. You express those internals
with Visual Basic 2010 code. So, when the software developer using your object says, ‘‘Turn up the vol-
ume,’’ you have to know how to instruct the amplifier to increase the output. (As a side note, remember
that the amplifier is just another object. You don’t necessarily need to know how it works inside. In OO
programming, you will often find that one object is made up of other objects with some code to link
them — just as a TV is made of standard components and a bit of custom circuitry.)
Each object belonging to a class is an instance of the class. So, if you have 50
TV
objects, you have
50 instances of the
TV
class. The action of creating an instance is called instantiation. From now on,
we won’t say that youcreate classes but that you instantiate objects. The difference is used to reduce
ambiguity. Creating a class is done at design time when you’re building your software and involves
writing the actual code. Instantiating an object is done at run time, when your program is being used.
A classic analogy is the cookie cutter. You can go out to your workshop and form a piece of metal
into the shape of a Christmas tree. You do this once and put the cutter in a drawer in your kitchen.
Whenever you need to create Christmas tree cookies, you roll some dough (the computer’s memory)
and stamp out however many you need. In effect you’re instantiating cookies. You can reuse the cutter
later to create more cookies, each the same shape as the ones before.
When you’ve instantiated the objects, you can manipulate each object’s properties defined for the class,
and you can invoke the methods defined for the class on the object. For example, suppose you build a
class once at design time that represents a television. You can instantiate the class twice to make two
objects from that class — say, one to represent the TV in the living room and one to represent the TV
in the bedroom. Because both instances of the object share the same class, both instances have the same
properties and methods. To turn on either TV you invoke the
SwitchOn
method on it. To change the
channel you set its
Channel
property, and so on.
BUILDING CLASSES
You have already started building classes, particularly in Chapters 5 and 10. In general, when you
design an algorithm, you will discover certain objects described. You need to abstract these real-world
objects into a software representation. Here’s an example:
1. Select a list of 10 customers from the database.
2. Go through each customer and prepare a bill for each.
3. When each bill has been prepared, print it.
For a pure object-oriented application (and with .NET you end up using objects to represent everything)
every real-world object needs a software object. For example:
➤
Customer:
An object that represents a customer.
➤
Bill:
An object that represents a bill that is produced.
➤
Printer:
An object that represents a hardware printer that can be used to print the bill.
When you write software in Visual Basic 2010, you are given a vast set of classes called the Microsoft
.NET Framework classes. These classes describe virtually everything about the computing environment
for which you’re trying to write software. Writing object-oriented software for .NET is simply a matter
of using objects that fit your needs and creating new objects if required. Typically, while building an
344
❘
CHAPTER 11 BUILDING OBJECTS
application, some of the classes you need are included in the .NET Framework, whereas you have to
build others yourself.
For example, some objects in the .NET Framework provide printing functionality and database access
functionality. As your algorithm calls for both kinds of functionality, you don’t need to write your
own. If you need to print something, you create an object that understands how to print, tell it what
you want to print, and then tell it to print it. Again, this is encapsulation — you don’t care how to turn
your document into PostScript commands and send it down the wire to the printer; the object knows
how to do this for itself. In this example, there are classes that deal with printing that you can use to
print bills, although there’s no specific
Printer
object.
In some cases, objects that you need to represent do not exist in the .NET Framework. In this example,
you need a
Customer
object and a
Bill
object.
REUSABILITY
Perhaps the hardest aspect of object-oriented programming is understanding how to divide responsi-
bility for the work. One of the most beautiful aspects of object orientation is code reuse. Imagine that
your company needs several different applications: one to display customer bills, one to register a new
customer, and one to track customer complaints. In each of those applications, you need to have a
Customer
object.
To simplify the issue, those three projects are not going to be undertaken simultaneously. You start by
doing the first; when finished, you move on to the second; when you’ve finished that, you move on to
the third. Do you want to build a new
Customer
class for each project, or do you want to build the class
once and reuse it in each of the other two projects?
Reuse is typically regarded as something that’s universally good, although there is a trade-off. Ideally,
if you build a
Customer
class for one project, and another project you’re working on calls for another
Customer
class, then you should use the same one. However, it may well be that you can’t just plug
the class into another project for some reason. We say ‘‘for some reason’’ because there are no hard-
and-fast rules when it comes to class design and reuse. It may also be easier or more cost-effective to
build simple classes for each project, rather than try to create one complex object that does everything.
This might sound like it requires a degree in clairvoyance, but luckily it comes with experience! As
you develop more and more applications, you’ll gain a better understanding of how to design great,
reusable objects.
Each object should be responsible for activities involving itself and no more. We’ve discussed only two
objects —
Bill
and
Customer
— so you’ll look only at those.
The activity of printing a bill (say, for telephone charges) follows this algorithm:
➤ For a given customer, find the call details for the last period.
➤ Go through each call and calculate the price of each one.
➤ Aggregate the cost of each call into a total.
➤ Apply tax charges.
➤ Print out the bill with the customer’s name, address, and bill summary on the first page, and
then the bill details on subsequent pages.
Designing an Object
❘
345
You have only two places where you can code this algorithm: the
Bill
object or the
Customer
object.
Which one do you choose?
The calls made are really a property of the
Customer
. Basically, you are using these details to create
a bill. Most of the functionality would be placed in the
Bill
object. A
Customer
is responsible for
representing a customer, not representing a bill. When you create a
Bill
object, you would associate it
with a particular customer by using a
Cust
property, like this:
myBill.Cust = myCustomer
The
Bill
object would then know that it was a bill for a given customer (represented by the
myCustomer
object) and could use the customer’s details when creating a bill. You might want to change some other
properties of the
Bill
, such as to where it will be mailed, whether it should contain a warning because
it is overdue, and so on. Finally, the
Bill
would have a
method:
myBill.Print()
The
Bill
object would then use a
Printer
object in order to print the bill. The
Bill
object would be
said to be the user or consumer of the
Printer
object. It would even be said to consume the
Printer
object, even though (at least you hope) the printer is not used up or destroyed in printing the bill.
DESIGNING AN OBJECT
Contrary to what’s been said so far, in this first project you’re not going to define an algorithm and
then build objects to support it. For this rather academic example, you’re going to walk through some
of the features of a typical object — in this case, a car.
There are certain facts you might want to know about the object:
What it looks like: A car includes things like make, model, color, number of doors, and so on. These
aspects of the car rarely change during the object’s lifetime.
Its capabilities: Horsepower, engine size, cylinder configuration, and so on
What it’s doing: Whether it’s stationary, moving forward or backward, and its speed and direction
Where it is: The Global Positioning System (GPS) coordinates of its current position. This is effectively
its position relative to another object (the planet Earth).
NOTE Controls on forms have coordinates that describe their location relative to
the form (say, in pixels to the right of and below the top left corner).
You might also want to be able to control the object — for example:
➤ Tell it to accelerate.
➤ Tell it to decelerate.
➤ Tell it to turn left.
➤ Tell it to turn right.
346
❘
CHAPTER 11 BUILDING OBJECTS
➤ Tell it to straighten out of a turn.
➤ Tell it to do a three-point turn.
➤ Tell it to stop completely.
As described earlier, there are three concepts about objects that you need to be aware of: identity, state,
and behavior. You should assume that identity is covered because you know what the class is, so the
state and behavior are of interest here.
State
State describes facts about the object now. For example, a car’s location and speed are part of its state.
When designing objects, you need to think about what aspects of state you need to handle. It might not
be useful to know a customer’s speed, for example, but you might well want to know that customer’s
current address.
State tends to be implemented as values inside an object. Some of these values are publicly available
through properties, and some are private. Also, some aspects of state might be publicly readable but not
changeable. For example, cars have a speedometer that is readable to anybody using the car. But you
can’t change the car’s speed by playing with the speedometer — you need to alter the car’s behavior by
using the brake or accelerator.
Behavior
While a car might have a read-only
Speed
property, it would have methods to accelerate and decelerate.
When you invoke an object’s method, you are telling your object to do something — so behavior is
usually associated with methods. Properties can also be associated with behavior. When you set a
property to a particular value (such as by changing the setting of a control), you can trigger behavior.
Behavior is implemented as a set of Visual Basic 2010 statements that do something. This usually
involves one or both of the following:
Changing its own state: When you invoke the
Accelerate
method on a car, it should get faster if it is
capable of doing so.
Somehow affecting the world outside the object: This could be manipulating other objects in the appli-
cation, displaying something to the user, saving something to a disk, or printing a document.
In this chapter, you won’t build all of the properties and methods discussed. Instead, you’ll build a
handful of the more interesting ones. You begin in the following Try It Out by creating a new class.
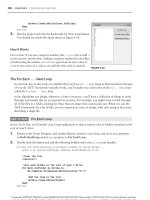
TRY IT OUT Creating a New Project and the Car Class
Code file Objects.zip is available for download at Wrox.com
In this example, you will create a simple Car class.
To learn how to add a class to a project, follow these simple steps:
1. Start Visual Basic 2010 and select File ➪ Add ➪ New Project from the menu.
Designing an Object
❘
347
2. When the Add New Project dialog box appears, select the Console Application template and enter
the name of the project as Objects. Click OK to create the project.
3. You now need to create a new class. This is done through the Solution Explorer, so right-click
the Objects project and select Add
➪ Class. When prompted for a new class name, enter Car.vb
and click Add. The new class is added to the Solution Explorer and the editor now shows the code
listing for it, albeit empty.
How It Works
In this example you learned how to add a class to a project. This is the first step in creating your own
custom objects.
Storing State
State describes what the object understands about itself, so if you give a
Car
object some state — for
example, ‘‘You are blue’’ — you’re giving the car object a fact: ‘‘The car I represent is blue.’’
How do you actually manage state in your classes? State is typically held in variables, and you define
those variables within the class. You will see how to do this in a moment.
Usually, the methods and properties you build will either affect or use the state in some way. Imagine
you’ve built a property that changes the color of the car. When youset that property, the variable that’s
responsible for storing the state is changed to reflect the new value that it has been given. When you
retrieve (get) that property, the variable responsible for storing the state is read and the current value is
returned to the caller.
In a way, then, properties are behaviors. Under the hood, a public property has two methods: a
Get
method and a
Set
method (defined by
Get
End Get
and
Set
End Set
blocks of code, as you
have already encountered in Chapter 5). A simple
Get
method for the
Color
property contains code
to tell the caller the color of the car. A simple
Set
method for the
Color
property sets a value that
represents the car’s color. In a real application, though,
Color
would probably mean something more
than just remembering a value. In a driving game, for example, the
Set
method of the
Color
property
would need to make the screen display change the color in which the car is shown on the screen.
When a property has no behavior at all, you can cheat. In the next Try It Out, you create a
Color
propertybydeclaringa
Color
variable and making it public. When a property is implemented like this,
it is also called a field. Although this can be a useful and very fast technique for adding properties,
declaring a field instead of the
Property
,
Get
,and
Set
blocks is not actually recommended, but for this
small example it is just fine.
TRY IT OUT Creating an Object and Adding a Color Property
Code file Objects.zip is available for download at Wrox.com
This example will teach you how to create a field or a property without a
Get
and
Set
block. Be sure to use
the class you created in the preceding example.
348
❘
CHAPTER 11 BUILDING OBJECTS
1. In the
Car
class, add this code below the
Public Car Class
statement:
Public Color As String
2. That’s it! However, you do need a way to consume the class so that you can see it working. Open
Module1.vb
and add this code:
Sub Main()
`Create a new car object
Dim objCar As New Car
`Set the Color property to Red
objCar.Color =
˝
Red˝
`Show what the value of the property is
Console.WriteLine(
˝
My car is this color:˝)
Console.WriteLine(objCar.Color)
`Wait for input from the user
Console.ReadLine()
End Sub
3. Save your project by clicking the Save All button on the toolbar.
4. Now run the project. A new window similar to Figure 11-1 will appear.
FIGURE 11-1
5. Press Enter to end the program.
How it Works
This example illustrates that defining a field is easy. The line of code
Public Color As String
tells the class that you want to create a variable called
Color
and you want the field to hold a string of
text characters. The use of the
Public
keyword when you declare the
Color
variable tells the class that the
variable is accessible to developers using the
Car
class, not only from within the class itself.
Using the object is simple, and you do this from within
Module1.vb
. This process actually takes two steps:
1. Declare a variable to refer to an object for the class.
2. Instantiate the object. The following line of code creates an object variable called
objCar
and
specifies that it’s going to hold exclusively any objects created using the
Car
class:
Dim objCar As Car
Designing an Object
❘
349
When you define the variable, it doesn’t yet have an object instance associated with it; you are simply
identifying the type of object. It’s a bit like telling the computer to give you a hook that you can hang a
Car
object on, and calling the hook
objCar
. You haven’t hung anything on it yet — to do that you have to
create an instance of the class. This is done using the
New
keyword:
Set objCar = New Car
But Visual Basic 2010 allows you to combine both steps into one line of code:
`Create a new car object
Dim objCar As New Car
What you’re saying here is, ‘‘Let
objCar
refer to a newly created object instantiated from the class
Car
.’’ In
other words, ‘‘Create a new car and hang it on the hook called
objCar
.’’ You now have a
Car
object and
can refer to it with the name
objCar
.
After you have an object instance, you can set its properties and call its methods. Here is how you set the
Color
property:
`Set the Color property to Red
objCar.Color =
˝
Red˝
After the property has been set, it can be retrieved as many times as you want or its value changed at a later
point. Here, retrieval is illustrated by passing the
Color
property to the
WriteLine
method on the
Console
class:
`Show what the value of the property is
Console.WriteLine(
˝
My car is this color:˝)
Console.WriteLine(objCar.Color)
The
Console.ReadLine
line means that the program does not continue until you press Enter. Basically, the
console window is waiting for input from you:
`Wait for input from the user
Console.ReadLine()
Even though this is not really a property from the point of view of a developer using the class, it works just
like one. In fact, real properties are methods that look like variables to users of the class. Whether you use
a method or a property really depends on what the users of your class find easier. You’ll start to see this in
the next section.
Real Properties
Now that you’ve seen how to cheat, let’s see how to do things properly. The property you saw can be
set to pretty much anything. As long as it’s a string, it will be accepted. Also, setting the property doesn’t
do anything except change the object’s internal state. Often you want to control what values a property
can be set to; for example, you might have a list of valid colors that a car can be. You might also want
to associate a change to a property with a particular action. For example, when you change a channel
on the TV, you want it to do a bit more than just change its mind about what channel it’s displaying.
You want the TV to show a different picture! Just changing the value of a variable won’t help here.
Another reason to use real properties is that you want to prevent the user of the class from directly
changing the value. This is called a read-only property. The car’s speed is a good example of how
350
❘
CHAPTER 11 BUILDING OBJECTS
a class that models a real-world object should behave like that real-world object. If you are going
60 mph, you cannot simply change the speed to a value you prefer. You can read the speed of a car
from the speedometer, but you cannot change (write) the speed of the car by physically moving the
needle around the dial with your finger. You have to control the car in another fashion, which you do
by stepping on the gas pedal or the brake to either accelerate or decelerate, respectively. To model this
feature in the
Car
class, you use methods (
Accelerate
,
Decelerate
) that affect the speed, and keep a
read-only property around called
Speed
that will report on the current speed of the vehicle.
You’ll still need to keep the speed around in a member variable, but what you need is a member variable
that can be seen or manipulated only by the class itself. You accomplish this by using the
Private
keyword:
Private intSpeed As Integer
The
intSpeed
variable is marked as
Private
and can, therefore, be accessed only by functions defined
inside the class itself. Users of
Car
will not even be aware of its presence.
TRY IT OUT Adding a Speed Property
Code file Objects.zip is available for download at Wrox.com
Now you’ll see how you can build a property that gives the user of the object read-only access to the car’s
speed.
1. To define a private variable, use the
Private
instead of the
Public
keyword. Add this statement to
the
Car
class:
Public Color As String
Private intSpeed As Integer
2. To report the speed, you need to build a read-only property. Add this code to your
Car
class:
`Speed—read-only property to return the speed
Public ReadOnly Property Speed() As Integer
Get
Return intSpeed
End Get
End Property
3. Now build a method called
Accelerate
that adjusts the speed of the car by however many miles
per hour you specify. Add this code after the
Speed
property:
`Accelerate—add mph to the speed
Public Sub Accelerate(ByVal accelerateBy As Integer)
`Adjust the speed
intSpeed += accelerateBy
End Sub
4. To test the object, you need to make some changes to the
Main
procedure in Module1. Open the
file and modify the code as shown:
Sub Main()
`Create a new car object
Dim objCar As New Car
`Report the speed