Beginning microsoft Visual Basic 2010 phần 7 pdf
Bạn đang xem bản rút gọn của tài liệu. Xem và tải ngay bản đầy đủ của tài liệu tại đây (4.56 MB, 72 trang )
398
❘
CHAPTER 12 ADVANCED OBJECT-ORIENTED TECHNIQUES
ByVal e As System.Windows.Forms.LinkLabelLinkClickedEventArgs) _
Handles lnkUrl.LinkClicked
‘Process the selected link
Process.Start(e.Link.LinkData)
End Sub
3. Run the project. You should now see that when a URL is selected from the list, the LinkLabel con-
trol changes to reflect the name of the selected item (refer to Figure 12-4). When you click the link,
Internet Explorer opens the URL in the LinkLabel control’s LinkCollection.
How It Works
Now that you have the application working in this example, let’s look at how it works. When you click
an item in the ListView control, the
Click
event is fired for that control. You add code to the
Click
event
to load the LinkLabel control with the selected link. You start by first setting the
Text
property of the
LinkLabel control. This is the text that will be displayed on the form as shown in Figure 12-4.
You set the
Text
property using the static text
Visit
followed by the actual favorite name. The favorite
name is retrieved from the ListView control’s
Item
collection. Each row in the ListView control is called
an item, and the first column contains the text of the item. Each column past the first column in a row is a
subitem of the item (the text in the first column). The text that gets displayed in the link label is taken from
the
Text
property of the
Item
collection:
Private Sub lvwFavorites_Click(ByVal sender As Object, _
ByVal e As System.EventArgs) Handles lvwFavorites.Click
‘Update the link label control Text property
lnkUrl.Text = "Visit " & lvwFavorites.SelectedItems.Item(0).Text
The
Links
property of the LinkLabel control contains a
LinkCollection
that contains a default hyperlink
consisting of the text that is displayed in the LinkLabel control. You clear this collection and set it using the
correct hyperlink for the selected Favorite. You do this by calling the
Clear
method on the
Links
property:
‘Clear the default hyperlink
lnkUrl.Links.Clear()
Finally, you add your hyperlink using the subitem of the selected item in the ListView control. The
Add
method of the
Links
property is an overloaded method, and the method that you are using here expects
three parameters:
start
,
length
,and
linkdata
.The
start
parameter specifies the starting position of the
text in the
Text
property that you want as the hyperlink, and the
length
parameter specifies how long the
hyperlink should be.
You do not want the word Visit to be part of the hyperlink, so you specify the starting position to be
6
,
which takes into account the space after the word Visit. Then you specify the
length
parameter using the
Length
property of the
Text
property of the selected item in the ListView control. Finally, you specify the
linkdata
parameter by specifying the selected subitem from the ListViewlist view control. This subitem
contains the actual URL for the favorite.
‘Add the selected hyperlink to the LinkCollection
lnkUrl.Links.Add(6, lvwFavorites.SelectedItems.Item(0).Text.Length, _
lvwFavorites.SelectedItems.Item(0).SubItems(1).Text)
End Sub
An Alternative Favorite Viewer
❘
399
When a hyperlink on the LinkLabel control is clicked, it fires the
LinkClicked
event, and this is where
you place your code to process the hyperlink of the favorite being displayed in this control. The
LinkLabelLinkClickedEventArgs
class contains information about the link label and, in particular, the
actual hyperlink in the
LinkCollection
.
To retrieve the hyperlink, you access the
LinkData
property of the
Link
property. Then you pass this data
to the
Start
method of the
Process
class, which causes a browser to be open and display the selected
hyperlink:
Private Sub lnkUrl_LinkClicked(ByVal sender As Object, _
ByVal e As System.Windows.Forms.LinkLabelLinkClickedEventArgs) _
Handles lnkUrl.LinkClicked
‘Process the selected link
Process.Start(e.Link.LinkData)
End Sub
AN ALTERNATIVE FAVORITE VIEWER
You know that building separate classes promotes code reuse, but let’s prove that. If code reuse is such
a hot idea, without having to rewrite or change any of the code you should be able to build another
application that can use the functionality in the classes to find and open favorites.
In this case, you might have given a colleague the
Favorites
,
WebFavorite
,and
WebFavoriteCollection
classes, and that colleague should be able to build a new application that uses this functionality
without having to understand the internals of how Internet shortcuts work or how Windows stores the
user’s favorites.
Building a Favorites Tray
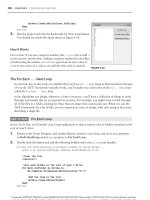
In this section, you build an application that displays a small icon on the system tray. Clicking this icon
opens a list of the user’s favorites as a menu, as shown in Figure 12-7. Clicking a favorite automatically
opens the URL in Internet Explorer or whatever browser the user has set to be the default. Later, when
you see Internet Explorer, it may be a different browser for you.
FIGURE 12-7
To demonstrate this principle of code reuse, you need to create a new Visual Basic 2010 project in this
solution.
400
❘
CHAPTER 12 ADVANCED OBJECT-ORIENTED TECHNIQUES
TRY IT OUT Building a Favorites Tray
Code file Favorites.zip is available for download at Wrox.com
In this example, you will add a new project
1. Using Visual Studio 2010, select File ➪ Add ➪ New Project from the menu and create a new Visual
Basic 2010 Windows Forms Application project called Favorites Tray.Now,youwillseetwo
projects in the Solution Explorer.
2. When the Designer for Form1 appears, click the form in the Forms Designer and then change the
WindowState
property to Minimized and change the
ShowInTaskbar
property to False. This, effec-
tively, prevents the form from being displayed.
3. Using the Toolbox, drag a NotifyIcon control onto the form. It will drop into the component
tray at the bottom of the form. Set the
Name
property of the new control to icnNotify and set
the
Text
property to Right-click me to view Favorites, and set the
Icon
property to
C:\Program
Files\Microsoft Visual Studio 10.0\Common7\VS2010ImageLibrary\1033\VS2010ImageLibrary\
Objects\ico_format\WinVista\Favorites.ico
.
4. Next, open the Code Editor for Form1. In the Class Name combo box at the top of the Code Edi-
tor, select (Form1 Events), and in the Method Name combo box select VisibleChanged.Addthe
following highlighted code to the event handler:
Private Sub Form1_VisibleChanged(ByVal sender As Object, _
ByVal e As System.EventArgs) Handles Me.VisibleChanged
‘If the user can see us, hide us
If Me.Visible = True Then Me.Visible = False
End Sub
FIGURE 12-8
figure
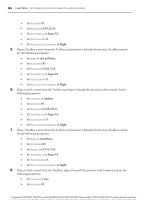
5. Right-click the Favorites Tray project in the Solution Explorer and
select Set As Startup Project. Now try running the project. You should
discover that the tray icon is added to your system tray as shown
in Figure 12-8, but no form window will appear. If you hover your
mouse over the icon, you’ll see the message that you set in the
Text
property of the NotifyIcon
control.
6. Also, you’ll notice that there appears to be no way to stop the program! Flip back to Visual Studio
2010 and select Debug
➪ Stop Debugging from the menu.
7. When you do this, although the program stops, the icon remains in the tray. To get rid of it, hover
the mouse over it and it should disappear. Windows redraws the icons in the system tray only
when necessary (for example, when the mouse is passed over an icon).
How It Works
You learn that setting a form to appear minimized (
WindowState = Minimized
) and telling it not to appear
in the taskbar (
ShowInTaskbar = False
) has the effect of creating a window that’s hidden in this example.
You need a form to support the tray icon, but you don’t need the form for any other reason. However, this
is only half the battle, because the form could appear in the Alt+Tab application switching list, unless you
add the following code, which you already did:
Private Sub Form1_VisibleChanged(ByVal sender As Object, _
ByVal e As System.EventArgs) Handles Me.VisibleChanged
An Alternative Favorite Viewer
❘
401
‘If the user can see us, hide us
If Me.Visible = True Then Me.Visible = False
End Sub
This event handler has a brute-force approach that says, ‘‘If the user can see me, hide me.’’
Displaying Favorites
In the next Try It Out, you look at how to display the favorites.
TRY IT OUT Displaying Favorites
Code file Favorites.zip is available for download at Wrox.com
In this example, the first thing you need to do is include the classes built in
Favorites Viewer
in this
Favorites Tray solution. You can then use the
Favorites
object to get a list of favorites back and build a
menu.
1. To display favorites, you need to get hold of the classes defined in the Favorites Viewer project. To
do this you add the
Favorites
,
WebFavorite
,and
WebFavoriteCollection
classes to this project.
Using the Solution Explorer, right-click the Favorites Tray project and select Add
➪ Existing Item.
Browse to the classes in your Favorites Viewer project and find the
Favorites
class. After clicking
Add, the class appears in the Solution Explorer for this project. You can select multiple files at
once by holding down the Ctrl key.
2. Repeat this for the
WebFavorite
and
WebFavoriteCollection
classes.
3. Create a new class in the Favorites Tray by clicking the project once more and selecting Add ➪
Class. Call the new class WebFavoriteMenuItem.vb and then click the Add button to add this class
to the project.
4. Set the new class to inherit from
System.Windows.Forms.MenuItem
by adding this code:
Public Class WebFavoriteMenuItem
Inherits MenuItem
5. Add this member and method to the class:
‘Public member
Public Favorite As WebFavorite
‘Constructor
Public Sub New(ByVal newFavorite As WebFavorite)
‘Set the property
Favorite = newFavorite
‘Update the text
Text = Favorite.Name
End Sub
6. Unlike
ListViewItem
,
MenuItem
objects can react to themselves being clicked by overload-
ing the
Click
method. In the Class Name combo box at the top of the Code Editor, select
402
❘
CHAPTER 12 ADVANCED OBJECT-ORIENTED TECHNIQUES
(
WebFavoriteMenuItem
Events) and then select the
Click
event in the Method Name combo box.
Add the following highlighted code to the
Click
event handler:
Private Sub WebFavoriteMenuItem_Click(ByVal sender As Object, _
ByVal e As System.EventArgs) Handles Me.Click
‘Open the favorite
If Not Favorite Is Nothing Then
Process.Start(Favorite.Url)
End If
End Sub
7. You need to do a similar trick to add an Exit option to your pop-up menu. Using the Solution
Explorer, create a new class called ExitMenuItem.vb in the Favorites Tray project. Add the fol-
lowing highlighted code to this class:
Public Class ExitMenuItem
Inherits MenuItem
‘Constructor
Public Sub New()
Text = "Exit"
End Sub
Private Sub ExitMenuItem_Click(ByVal sender As Object, _
ByVal e As System.EventArgs) Handles Me.Click
Application.Exit()
End Sub
End Class
8. Finally, you’re in a position where you can load the favorites and create a menu for use with the
tray icon. Add these members to Form1:
Public Class Form1
‘Public member
Public Favorites As New Favorites()
‘Private member
Private blnLoadCalled As Boolean = False
9. In the Class Name combo select (Form1 Events), and in the Method Name combo box, select the
Load
event. Then add the following highlighted code to this event handler:
Private Sub Form1_Load(ByVal sender As Object, _
ByVal e As System.EventArgs) Handles Me.Load
‘Load the favorites
Favorites.ScanFavorites()
‘Create a new context menu
Dim objMenu As New ContextMenu()
‘Process each favorite
For Each objWebFavorite As WebFavorite In Favorites.FavoritesCollection
‘Create a menu item
Dim objItem As New WebFavoriteMenuItem(objWebFavorite)
An Alternative Favorite Viewer
❘
403
‘Add it to the menu
objMenu.MenuItems.Add(objItem)
Next
‘Add a separator menu item
objMenu.MenuItems.Add("-")
‘Now add the Exit menu item
objMenu.MenuItems.Add(New ExitMenuItem())
‘Finally, tell the tray icon to use this menu
icnNotify.ContextMenu = objMenu
‘Set the load flag and hide ourselves
blnLoadCalled = True
Me.Hide()
End Sub
10. Modify the
Form1_VisibleChanged
procedure as follows:
Private Sub Form1_VisibleChanged(ByVal sender As Object, _
ByVal e As System.EventArgs) Handles Me.VisibleChanged
‘Don’t set the Visible property until the Load event has
‘been processed
If blnLoadCalled = False Then
Return
End If
‘If the user can see us, hide us
If Me.Visible = True Then Me.Visible = False
End Sub
11. Run the project, and the icon will appear on the system tray. Right-click the icon, and you’ll see a
list of favorites as was shown in Figure 12-7. Clicking one opens Internet Explorer; clicking Exit
closes the application. Depending on what applications you have open and your settings, the icon
may be grouped in the hidden icon section on the taskbar.
How It Works
That completes this example. One thing to note is that because of the order of events that are fired for your
form, you have to create a variable in Form1 called
blnLoadCalled
. This variable makes sure that your
favorites get loaded in the form’s
Load
event.
The
WebFavoriteMenuItem
class accepts a
WebFavorite
object in its constructor, and it configures itself as
a menu item using the class. However, this class provides a
Click
method that you can overload, so when
the user selects the item from the menu, you can immediately open the URL:
Private Sub WebFavoriteMenuItem_Click(ByVal sender As Object, _
ByVal e As System.EventArgs) Handles Me.Click
‘Open the favorite
If Not Favorite Is Nothing Then
Process.Start(Favorite.Url)
End If
End Sub
404
❘
CHAPTER 12 ADVANCED OBJECT-ORIENTED TECHNIQUES
The
ExitMenuItem
class does a similar thing. When this item is clicked, you call the shared
Application.Exit
method to quit the program:
Private Sub ExitMenuItem_Click(ByVal sender As Object, _
ByVal e As System.EventArgs) Handles Me.Click
Application.Exit()
End Sub
The important thing here is not the construction of the application itself but rather the fact that you can
reuse the functionality you built in a different project. This underlines the fundamental motive for reuse; it
means you don’t have to reinvent the wheel every time you want to do something.
The method of reuse described here was to add the existing classes to your new project, hence making
a second copy of them. This isn’t efficient, because it takes double the amount of storage needed for the
classes; however, the classes are small, so the cost of memory is minimal. It did save you from having to
create the classes from scratch, allowing you to reuse the existing code, and it was very easy to do.
An alternative way of reusing classes is to create them in a class library. This class library is a separate
project that can be referenced by a number of different applications so that only one copy of the code is
required. This is discussed in Chapter 13.
USING SHARED PROPERTIES AND METHODS
On occasion, you might find it useful to access methods and properties that are not tied to an instance
of an object but are still associated with a class.
Imagine you have a class that stores the user name and password of a user for a computer program.
You might have something that looks like this:
Public Class User
‘Public members
Public Username As String
‘Private members
Private strPassword As String
End Class
Now imagine that the password for a user has to be of a minimum length. You create a separate mem-
ber to store the length and implement a property like this:
Public Class User
‘Public members
Public Username As String
Public MinPasswordLength As Integer = 6
‘Private members
Private strPassword As String
‘Password property
Public Property Password() As String
Get
Using Shared Properties and Methods
❘
405
Return strPassword
End Get
Set(ByVal value As String)
If value.Length >= MinPasswordLength Then
strPassword = value
End If
End Set
End Property
End Class
That seems fairly straightforward. But now imagine that you have five thousand user objects in mem-
ory. Each
MinPasswordLength
variable takes up 4 bytes of memory, meaning that 20 KB of memory
is being used to store the same value. Although 20 KB of memory isn’t a lot for modern computer
systems, it’s extremely inefficient, and there is a better way.
Using Shared Properties
See how to use shared properties and understand them in the next example.
TRY IT OUT Using Shared Properties
Code file Shared Demo.zip is available for download at Wrox.com
Ideally, you want to store the value for the minimum password length in memory against a specific class
once and share that memory between all of the objects created from that class, as you’ll do in the following
Try It Out.
1. Close the existing solution if it is still open and create a new Windows Forms Application project
called Shared Demo.
FIGURE 12-9
figure
2. When the Designer for Form1 appears, change the
Text
prop-
erty of the form to Shared Demo and then drag a ListBox,
a Label, and a NumericUpDown control from the Toolbox
onto the form. Set the
Text
property of the Label to Password
Length. Arrange the controls as shown in Figure 12-9.
3. Set the
Name
property of the ListBox control to lstUsers.
4. Set the
Name
property of the NumericUpDown control to nud-
MinPasswordLength,setthe
Maximum
property to 10,andset
the
Value
property to 6.
5. Using the Solution Explorer, create a new class named
User
.
Add the highlighted code to the class:
Public Class User
‘Public members
Public Username As String
Public Shared MinPasswordLength As Integer = 6
406
❘
CHAPTER 12 ADVANCED OBJECT-ORIENTED TECHNIQUES
‘Private members
Private strPassword As String
‘Password property
Public Property Password() As String
Get
Return strPassword
End Get
Set(ByVal value As String)
If value.Length >= MinPasswordLength Then
strPassword = value
End If
End Set
End Property
End Class
6. View the code for Form1 and add this highlighted member:
Public Class Form1
‘Private member
Private arrUserList As New ArrayList()
7. Add this method to the
Form1
class:
Private Sub UpdateDisplay()
‘Clear the list
lstUsers.Items.Clear()
‘Add the users to the list box
For Each objUser As User In arrUserList
lstUsers.Items.Add(objUser.Username & ", " & objUser.Password & _
" (" & User.MinPasswordLength & ")")
Next
End Sub
8. Select (Form1 Events) in the Class Name combo box at the top of the Code Editor and the
Load
event in the Method Name combo box. Add the highlighted code to the
Load
event:
Private Sub Form1_Load(ByVal sender As Object, _
ByVal e As System.EventArgs) Handles Me.Load
‘Load 100 users
For intIndex As Integer = 1 To 100
‘Create a new user
Dim objUser As New User
objUser.Username = "Stephanie" & intIndex
objUser.Password = "password15"
‘Add the user to the array list
arrUserList.Add(objUser)
Next
‘Update the display
UpdateDisplay()
End Sub
Using Shared Properties and Methods
❘
407
9. Select
nudMinPasswordLength
in the Class Name combo box at the top of the Code Editor
and the
ValueChanged
event in the Method Name combo box. Add the highlighted code to the
ValueChanged
event:
Private Sub nudMinPasswordLength_ValueChanged(ByVal sender As Object, _
ByVal e As System.EventArgs) Handles nudMinPasswordLength.ValueChanged
‘Set the minimum password length
User.MinPasswordLength = nudMinPasswordLength.Value
‘Update the display
UpdateDisplay()
End Sub
FIGURE 12-10
figure
10. Save your project by clicking the Save All button on the tool-
bar.
11. Run the project. You should see a screen like the one shown in
Figure 12-10.
12. Scroll the NumericUpDown control up or down, and the
list updates; the number in parentheses changes to cor-
respond to the number shown in the NumericUpDown
control.
How It Works
To create a member variable, property, or method on an object that is shared, you use the
Shared
keyword
as you did in this example.
Public Shared MinPasswordLength As Integer = 6
This tells Visual Basic 2010 that the item should be available to all instances of the class.
Shared members can be accessed from within nonshared properties and methods as well as from shared
properties and methods. For example, here’s the
Password
property, which can access the shared
MinPasswordLength
member:
‘Password property
Public Property Password() As String
Get
Return strPassword
End Get
Set(ByVal value As String)
If value.Length >= MinPasswordLength Then
strPassword = value
End If
End Set
End Property
What’s important to realize here is that although the
Password
property and
strPassword
member belong
to the particular instance of the
User
class,
MinPasswordLength
does not; therefore, if it is changed the
effect is felt throughout all the object instances built from the class in question.
408
❘
CHAPTER 12 ADVANCED OBJECT-ORIENTED TECHNIQUES
In the form,
UpdateDisplay
is used to populate the list. You can gain access to
MinPasswordLength
as if it
were a normal, nonshared public member of the
User
object:
Private Sub UpdateDisplay()
‘Clear the list
lstUsers.Items.Clear()
‘Add the users to the list box
For Each objUser As User In arrUserList
lstUsers.Items.Add(objUser.Username & ", " & objUser.Password & _
" (" & User.MinPasswordLength & ")")
Next
End Sub
At this point, you have a listing of users that shows that the
MinPasswordLength
value of each is set to
6
(refer to Figure 12-10).
Things start to get interesting when you scroll the NumericUpDown control and change
MinPasswordLength
. As this is a shared member, you don’t specifically need an instance of the
class. Instead, you can set the property just by using the class name:
Private Sub nudMinPasswordLength_ValueChanged(ByVal sender As Object, _
ByVal e As System.EventArgs) Handles nudMinPasswordLength.ValueChanged
‘Set the minimum password length
User.MinPasswordLength = nudMinPasswordLength.Value
‘Update the display
UpdateDisplay()
End Sub
FIGURE 12-11
When building this method, you may notice that after
you type User., Visual Studio 2010’s IntelliSense pops
up a list of members, including the
MinPasswordLength
property, as shown in Figure 12-11.
Shared members, properties, and methods can all be
accessed through the class directly — you don’t specifi-
cally need an instance of the class.
When you change this member with code in the
ValueChanged
event handler, you update the display, and
this time you can see that the perceived value of
MinPasswordLength
has seemingly been changed for all
instances of
User
, even though you changed it in only one place.
Using Shared Methods
Although you’ve seen how to make a public member variable shared, you haven’t seen how to do this
with a method. The main limitation with a shared method is that you can access other shared methods
and shared properties only in the class in which it is defined.
NOTE This is a hypothetical example of using a shared method, as you could do
the same job here with a customized constructor.
Using Shared Properties and Methods
❘
409
TRY IT OUT Using a Shared Method
Code file Shared Demo.zip is available for download at Wrox.com
In this Try It Out, you look at an example of how to build a shared method that can create new instances
of
User
.
1. Open the Code Editor for
User
. Add the following code to the
User
class:
Public Shared Function CreateUser(ByVal userName As String, _
ByVal password As String) As User
‘Declare a new User object
Dim objUser As New User()
‘Set the User properties
objUser.Username = userName
objUser.Password = password
‘Return the new user
Return objUser
End Function
2. Open the Code Editor for Form1 and locate the
Load
event handler. Change the code so that it
looks like the following block. You’ll notice that as you type in the code, as soon as you type
User., IntelliSense offers
CreateUser
as an option:
Private Sub Form1_Load(ByVal sender As Object, _
ByVal e As System.EventArgs) Handles Me.Load
‘Load 100 users
For intIndex As Integer = 1 To 100
‘Create a new user
Dim objUser As New User
objUser = User.CreateUser("Stephanie" & intIndex, "password15")
‘Add the user to the array list
arrUserList.Add(objUser)
Next
‘Update the display
UpdateDisplay()
End Sub
3. If you run the project, you get the same results as the previous example.
How It Works
The important thing to look at in this example is the fact that
CreateUser
appears in the IntelliSense list
after you type the class name. This is because it is shared and you do not need a specific instance of a class
to access it. You create the method as a shared method by using the
Shared
keyword:
Public Shared Function CreateUser(ByVal userName As String, _
ByVal password As String) As User
410
❘
CHAPTER 12 ADVANCED OBJECT-ORIENTED TECHNIQUES
One thing to consider with shared methods is that you can access only members of the class that are also
shared. You cannot access nonshared methods, simply because you don’t know what instance of the class
you’re actually running on. Likewise, you cannot access
Me
from within a shared method for the same
reason.
UNDERSTANDING OBJECT-ORIENTED PROGRAMMING AND
MEMORY MANAGEMENT
Object orientation has an impact on how memory is used in an operating system. .NET is heavily object
oriented, so it makes sense that .NET would have to optimize the way it uses memory to best suit the
way objects are used.
Whenever you create an object, you’re using memory. Most of the objects you use have state, which
describes what an object knows. The methods and properties that an object has will either affect or
work with that state. For example, an object that describes a file on disk will have state that describes
its name, size, folder, and so on. Some of the state will be publicly accessible through properties. For
example, a property called
Size
returns the size of the file. Some state is private to the object and is
used to keep track of what the object has done or what it needs to do.
Objects use memory in two ways. First, something needs to keep track of the objects that exist on the
system in memory. This is usually a task shared between you as an application developer and .NET’s
Common Language Runtime (CLR). If you create an object, you’ll have to hold a reference to it in your
program’s memory so that you know where it is when you need to use its methods and properties. The
CLR also needs to keep track of the object to determine when you no longer need it. Second, the CLR
needs to allocate memory to the object so that the object can store its state. The more state an object
has, the more memory it will need to use it.
The most expensive resource on a computer is the memory. Expense here means in terms of what you
get for your money. For about $100, you can buy a 120GB hard drive, but for the same amount of
money you can’t buy 1GB of memory. Retrieving data from memory is thousands of times faster than
retrieving it from disk, so there’s a trade-off — if you need fast access, you have to store it in memory,
but there isn’t as much memory available as there is hard disk space.
When building an application, you want to use as little memory as possible, so there’s an implication
that you want to have as few objects as possible and that those objects should have as little state as
possible. The upside is that, today, computers have a lot more memory than they used to have, so your
programs can use more memory than their predecessors of 10 years ago. However, you still need to be
cognizant of your application’s memory usage.
The CLR manages memory in several distinct ways. First, it’s responsible for creating objects at the
request of the application. With a heavily object-oriented programming platform like .NET, this is
going to happen all the time, so Microsoft has spent an enormous amount of time making sure that the
CLR creates objects in the most efficient way. The CLR, for example, can create objects far faster than
its Component Object Model (COM) predecessor could. Second, the CLR is responsible for cleaning
up memory when it’s no longer needed. In the developer community, the manner in which the CLR
cleans up objects is one of the most controversial.
Understanding Object-Oriented Programming and Memory Management
❘
411
Imagine you’re writing a routine that opens a file from disk and displays the contents on the screen.
Well, with .NET you could use perhaps two .NET Framework objects to open the file and read
its contents — namely,
System.IO.FileStream
and
System.IO.StreamReader
. However, after the
contents have been read, do you need these objects anymore? Probably not, so you remove your
references to the objects and make the memory the objects were using available for creating more
objects.
Imagine now that you don’t remove your references to the objects. In this situation, the memory that the
objects were using can’t be used by anyone else. Now imagine that happening several thousand times.
The amount of memory that’s being wasted keeps growing. In extreme circumstances, the computer
runs out of memory, meaning that other applications wouldn’t ever be able to create any objects. This
is a pretty catastrophic state of affairs.
We describe an object that is no longer needed but that holds onto memory as a leak. Memory leaks
are one of the biggest causes of reliability problems on Windows, because when a program is no longer
able to obtain memory, it will crash.
With .NET this should never happen, or, at the very least, to leak memory you would have to go to
some pretty extreme steps. This is because of a feature called garbage collection. When an object is
no longer being used, the garbage collector (GC) automatically removes the object from memory and
makes the memory it was using available to other programs.
Garbage Collection
The garbage collector (GC) works by keeping track of how many parts of a program have a reference
to an object. If it gets to the point where there are no open references to the object, it is deleted.
To understand this, think back to the discussion of scope in Chapter 3. Imagine you create a method
and at the top of that method you define a variable with local scope. That variable is used to store an
object (it doesn’t matter what kind of object is used for this discussion). At this point, one part of the
program knows about the object’s existence — that is, the variable is holding a reference to the object.
When you return from the method, the variable goes out of scope, and therefore the variable forgets
about the object’s existence; in other words, the only reference to the object is lost. At this point, no
one knows about the object, and so it can be safely deleted.
For an example, look at the following code:
Dim objObject As New MyObject
Console.WriteLine(objObject.GetType().FullName)
objObject = Nothing
This code snippet creates a new object from class
MyObject
, invokes a method on it, and then removes
the reference to the object. In this case, when you create the object, the
objObject
variable is the only
thing that holds a reference to it. In the last line,
objObject
is set to
Nothing
, hence removing the only
reference to the object. The GC is then free to remove the reference to the object.
The GC does not run constantly. Instead, it runs periodically based on a complex algorithm that mea-
sures the amount of work the computer is doing and how many objects might need to be deleted. When
the GC runs, it looks through the master list of all the objects the program has ever created for any that
can be deleted at this point.
412
❘
CHAPTER 12 ADVANCED OBJECT-ORIENTED TECHNIQUES
In old-school programming, programmers were responsible for deleting their own objects and had the
freedom to say to an object, ‘‘You, now, clean yourself up and get out of memory.’’ With .NET this
ability is gone. Rather, an object will be deleted at some indeterminate time in the future.
Exactly when this happens is nondeterministic — in other words, as a developer you don’t know when
the GC is going to run. This means that there is no immediate connection between the removal of the
last reference to an object and the physical removal of that object from memory. This is known as
nondeterministic finalization.
Releasing Resources
In some cases, objects that you build may need access to certain system and network resources, such
as files and database connections. Using these resources requires a certain discipline to ensure that you
don’t inadvertently cause problems.
Here’s an example — if you create a new file, write some data to it, but forget to close it, no one else
will be able to read data from that file. This is because you have an exclusive lock on the file; it doesn’t
make sense for someone to be able to read from a file when it’s still being written to. You must take
care to release system resources should you open them.
When an object has access to scarce system or network resources like this, it’s important that the caller
tell the object that it can release those resources as soon as they’re no longer needed. For example,
here’s some code that creates a file:
‘Open a file
Dim objFileStream As New FileStream("c:\myfile.txt", FileMode.Create)
‘Do something with the file
‘Close the file
objFileStream.Close()
‘Release your reference to the object
objFileStream = Nothing
As soon as you finish working with the file, you call
Close
. This tells .NET that the consumer is finished
with the file and Windows can make it available for other applications to use. This is known as releasing
the lock. When you release the object reference in the next line by setting
objFileStream = Nothing
,
this is an entirely separate action from calling
Close
.
The
FileStream
object releases the lock on the file when its
Finalize
method is called. However,
as you’ve just learned, the time period between the instance of the
FileStream
object becoming a
candidate for garbage collection (which happens when
objFileStream = Nothing
)and
Finalize
being called is nondeterministic. So, if you had not called
Close
, the file would have remained
open for a period of time, which would have caused problems for anyone else who needed to use
the file.
Another way to release resources within objects is to implement the
IDisposable
interface, which you
did with the
WebFavorite
and
Favorites
classes. This interface provides a
Dispose
method for your
objects, in which you can put code to clean up the resources used in that class.
Ideally, the consumer of these objects would call the
Dispose
methods on these objects when they are
done using them, but if they do not, the
Finalize
method in these objects will, when the GC runs.
Understanding Object-Oriented Programming and Memory Management
❘
413
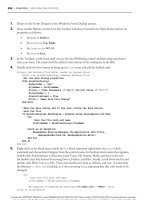
Defragmentation and Compaction
As the last item in its bag of tricks, the GC is able to defragment and compact memory. In much the
same way that your computer’s hard disk needs periodic defragmentation to make it run more effi-
ciently, so does memory. Imagine you create 10 small objects in memory, each about 1 KB in size.
Imagine that .NET allocates them all on top of each other, so you end up taking up one 10 KB piece
of memory. (In reality, you don’t usually care where objects exist in memory, so this discussion is a bit
academic.)
Next, imagine you want to create another object and this object is of medium size, say about 3 KB.
.NET has to create this object at the end of the 10 KB block. This means that you’ll have allocated 13
KB in total.
Then imagine that you delete every other small object, so now your 10 KB block of memory has holes
in it. Not much of a problem, but imagine you want to create another 3 KB object. Although there’s 5
KB of space in the original block, you can’t put it there because no gap is big enough. Instead, it has to
go on the end, meaning your application is now taking up 16 KB of memory.
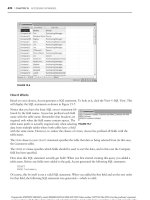
What the GC can do is defragment memory, which means that it removes the gaps when objects have
been removed, as shown in Figure 12-12. The upshot of this is that your application uses memory more
efficiently, so applications take up less memory.
1KB 1KB 1KB 1KB 1KB 1KB 1KB 1KB 1KB 1KB
10KB
11KB
12KB
13KB
14KB
15KB
16KB
1KB 1KB 1KB 1KB 1KB 1KB 1KB 1KB 1KB 1KB
1KB 1KB 1KB 1KB 1KB 3KB
1KB 1KB 1KB 1KB 1KB
1KB 1KB 1KB 1KB 1KB 3KB 3KB
We create 10x 1KB objects
New objects that won’t fit
in one of the gaps are
added to the end of the
block, increasing the
footprint.
When we create a new object,
it’s added to the end of
the available space.
When objects are
deleted, holes appear
in the available memory.
The GC compacts and
defragments the memory,
meaning that the program
uses memory more
efficiently.
3KB
3KB
3KB
FIGURE 12-12
Although this may not seem like a big deal on a PC with 1 GB of memory available, consider that
.NET could potentially be running on much smaller devices where memory usage is a big deal — for
example, a mobile device with 32MB of memory in total. Besides, imagine making three thousand 5
KB savings in this example; then you’ve have saved over 15MB of memory! Chapter 25 introduces you
to writing applications for mobile devices and to topics that you need to be aware of when coding for
these devices.
414
❘
CHAPTER 12 ADVANCED OBJECT-ORIENTED TECHNIQUES
SUMMARY
In this chapter, you took a look at some more valuable techniques that you are able to use to assist the
building of object-oriented software. Initially, you examined the idea of reuse. Specifically, you looked
at classes that allow you to examine the Internet Explorer Favorites stored on the user’s computer.
You consumed these classes from two applications — one standard desktop application and also a
mini-application that exists on the system tray.
You then examined the idea of shared members, properties, and methods. Sharing these kinds of items
is a powerful way to make common functionality available to all classes in an application.
Finally, you examined how consumers of objects should ensure that scarce systems resources are freed
whenever an object is deleted by the garbage collector using the
Dispose
and
Finalize
methods.
To summarize, you should know how to:
➤ Build a class that inherits from the
System.Collections.CollectionBase
namespace, add
methods that allow you to add and remove objects from the collection, and provide a prop-
erty that allows an application to query for the number of items in the collection
➤ Use the
Collections
class in your own application to create objects and add them to the
collection
➤ Use shared properties and methods in a class that can be shared among all instantiated
instances of the class
➤ Properly dispose of resources to make efficient use of the garbage collector
EXERCISES
1. Modify the Favorites Viewer project to select the first favorite in the ListView control automati-
cally after it has been loaded so that the LinkLabel control displays the first item when the form is
displayed.
You also need to modify the
Load
event in Form1, and ensure that the ListView control contains
one or more items before proceeding. You do this by querying the
Count
property of the
Items
property of the ListView control. Then you select the first item in the ListView control using the
lstFavorites.Items(0).Selected
property and call the
Click
event for the ListBox control to
update the LinkLabel control.
Summary
❘
415
WHAT YOU HAVE LEARNED IN THIS CHAPTER
TOPIC CONCEPTS
Code reuse You can access your classes by more than one application.
Shared methods and
properties
You can mark these as shared to have them associated with the class
and not each instance of the class.
Memory management Understand that garbage collection happens automatically and you
should release expensive resources as soon as the program is finished
using them.
13
Building Class Libraries
WHAT YOU WILL LEARN IN THIS CHAPTER:
➤ Creating your own class libraries
➤ Learning how to retrieve information about existing libraries that are
not part of the .NET Framework.
➤ Learning to assign strong-name assemblies (compiled files) so all
assemblies have a unique identity.
➤ Registering assemblies in a repository called the Global Assembly
Cache (GAC) to share them between applications on the same
computer.
In this chapter, you’re going to look at building libraries of classes, a process that gathers many
of the concepts covered in this book, so here’s a quick review. So far, you’ve learned a lot about
developing Windows applications by dragging controls onto forms, editing their properties, and
adding code. When you edit a form in the Forms Designer, you are actually designing a new
class that inherits from the
System.Windows.Forms.Form
class.
When you make changes to the form in the designer, the designer works out what code needs
to be added to the class. You can view this code by clicking the Show All Files icon in the Solu-
tion Explorer and then opening the designer-generated code for your form. When you run the
program, an instance of this class is created — an object. Like most objects, the form has state
and behavior — you can have variables and controls on the form (state) and you can perform
actions when, for example, the user clicks a button on the form (behavior). In theory, you could
write your forms without using the designer at all; very few programmers work this way while
creating Windows forms.
Right from the start you’ve been creating classes. You’ve also looked at creating your own
classes from scratch. Recall what you studied about building objects in Chapter 11, where you
418
❘
CHAPTER 13 BUILDING CLASS LIBRARIES
created a project called Objects, which contained the classes
Car
and
SportsCar
. These classes were
used in a console application because it made the objects easier to test, but they would have worked
just as well in a Windows application. You could even have used them in a web application or web
service. In fact, one of the key benefits of using classes is that once you’ve designed a good one, you can
use it over and over again in different applications.
UNDERSTANDING CLASS LIBRARIES
In Chapter 12 you used the same classes in two different applications. You built a favorites viewer in
your application and a task-bar application using the same underlying classes. You did this by creating
the class in one application and then adding a copy of that code to the second. This was a quick and
easy way of reusing code, but there were some problems with it:
➤ To use the class you needed to have access to the source code file. One of the advantages of
classes and objects is that they can be a black box. Developers should not need to know what
goes on inside the classes they use. It is often a good thing if they don’t. Also, if you’ve devel-
oped a class, you might want to keep your source code secret. You might be happy to let
people use it, but not let them copy the way it works or improve it, or even claim it as their
own work.
➤ Every time the program that uses the class is compiled, the class needs to be compiled too.
This is not really a problem if the application uses a few simple classes, but if it’s using a lot
of complex classes, it will make compilation slower. It will also make the resulting program
very big because one
.exe
file will include all of the classes.
➤ If you realize that there is a bug in the class or that there is a way to make it faster or more
efficient, you need to make the change in lots of different places — in every application that
uses the class.
The solution is class libraries. A class library is a collection of classes that compile to a file: a Windows
Dynamic Link Library (DLL, or
.dll
file). You cannot run a class library by itself, but you can use the
classes in it from your applications. You can use a class library without the source code; it does not
need to be recompiled when the application is compiled, and if the library changes, the applications
using it will automatically get the advantage of the improved code.
Creating a Class Library
These are instructions for creating a class library in Visual Studio.
TRY IT OUT Creating a Class Library
Code file Internet Favorites.zip available for download at Wrox.com
1. In Visual Studio 2010, select File → New Project.
2. Select Visual Basic from the Project Types list on the left and then choose the Class Library icon
from the Templates listed, as shown in Figure 13-1. Enter the name Internet Favorites.
Understanding Class Libraries
❘
419
3. Click OK. A new Class Library project will be created with a default class called
Class1.vb
.Right-
click
Class1.vb
in the Solution Explorer and choose Delete.
FIGURE 13-1
How It Works
This was a very easy example. Just think about what Visual Studio 2010 is doing during these two
steps. First, you choose a Class Library project. The template that you choose controls how Visual
Studio 2010 sets up the project and what type of file it compiles to. The most obvious difference is that
when you start a Windows Forms application you get a blank form in the Forms Designer. The blank
form is called
Form1.vb
. When you start a class library, you get no designer and a blank class called
Class1.vb
.
There are also more subtle differences. When you create a Windows Forms application, Visual Studio
2010 knows that you will be compiling it into a program that can run. When you choose a class library,
Visual Studio 2010 knows that the resulting library will not be run on its own, so the choices you make
here affect what Visual Studio 2010 does when you build the project. Selecting a class library means
that Visual Studio 2010 will build the project into a
.dll
(dynamic-link library) file instead of an
.exe
(executable) file.
After clicking OK, you delete the blank class that Visual Studio 2010 generates. Having classes with the
name
Class1
is not very helpful — it’s much better to start from scratch with meaningful file and class
names.
In the previous chapter you created classes and used the same class in two projects: Favorites Viewer
and Favorites Tray. In the following sections you see how to convert these applications so that both of
420
❘
CHAPTER 13 BUILDING CLASS LIBRARIES
them use a copy of the same compiled class library. Of course, this is a somewhat unrealistic situation.
Usually, you would build a class library and application, rather than create an application and then
split it into a smaller application and a class library. However, this will give you a good idea of how
you create a class library from scratch, and it will be much faster.
First, open the Favorites Viewer project using another instance of Visual Studio 2010. Remember that
this project consists of the following files:
➤
Favorites.vb
: Contains the
Favorites
class.
➤
WebFavorite.vb
: Contains the
WebFavorite
class.
➤
WebFavoriteCollection.vb
: Contains the
WebFavoriteCollection
class.
➤
Form1.vb
: Contains the
Form1
class, which represents the application’s main form.
Of these, the first three listed are also used in the Favorites Tray. The remaining file is specific to this
particular application. You want to build a class library that contains
Favorites
,
WebFavorite
,and
WebFavoriteCollection
.
Building a Class Library for Favorites Viewer
You create Class Libraries to be used by other applications. This allows you to create code that can be
reused by many others. You can even add a class library to your Windows Application. This is exactly
what you will do in the next example.
TRY IT OUT Adding a Class Library Project to an Existing Solution
Code file Internet Favorites.zip available for download at Wrox.com
When you’re writing Visual Basic 2010 applications, a solution can contain multiple projects. At the
moment you have two projects in the solution: the Favorites Viewer application and the Favorites Tray
application. In the next Try It Out, you add a Class Library project to this solution and then move the
classes from the Windows Forms Application project to the Class Library project.
1. Switch to the instance of Visual Studio 2010 containing the Internet Favorites project.
2. Save the project and then close Visual Studio 2010.
3. Switch to the instance of Visual Studio 2010 containing the Favorites Viewer project.
4. Click the File ➪ Add ➪ Existing Project.
5. Navigate to where you saved your Internet Favorites project and then select the
Internet
Favorites.vbproj
file. Click Open to add this project to the solution.
6. Right-click the Favorites Viewer project in the Solution Explorer and select Set As StartUp Project.
7. Right-click the Favorites Tray project in the Solution Explorer and select Remove.
Understanding Class Libraries
❘
421
How It Works
Now you have two projects within your solution. You have a Windows Forms application and a class
library. Currently, the class library is empty; all the classes that you want to add to it are in the Favorites
Viewer project.
You have already seen how to add a new class to a Windows Forms application, and you can add new
classes to a class library in exactly the same way. Just right-click the Internet Favorites project and select
Add → Class. You don’t want to do that, though, because the classes already exist. The quickest way to
move a class between two projects in the same solution is to drag and drop them, which is what you do in
the next Try It Out.
TRY IT OUT Moving Classes Between Projects
Code file Internet Favorites.zip available for download at Wrox.com
In this example, you will move classes from one project to another.
FIGURE 13-2
.
1. Select the
Favorites.vb
file in the Solution Explorer, as shown in
Figure 13-2, and drag it onto the Internet Favorites project. This causes
a copy of the
Favorites
classtobeaddedtotheInternetFavorites
project.
2. Follow the same procedure for
WebFavorite.vb
and
WebFavoriteCollection.vb
.
3. Right-click the
Favorites.vb
file in the Favorites Viewer project and
select Delete from the context menu to delete the file from that project.
4. Follow the same procedure for
WebFavorite.vb
and
WebFavoriteCollection.vb
.
How It Works
You now have a Class Library project and a Windows Forms Application project. However, even though
they are both contained in the same solution, they cannot see each other. If you try running the application
now, you will see an error that type
Favorites
is not defined.
These types of errors occur because the code in
Form1.vb
cannot see the classes in the class library. There
are two stages to solving this problem:
1. Add a reference to the Class Library project, so that the Windows Forms application knows to
look for the compiled
Internet Favorites.dll
file that contains the classes. Previously, all code
was compiled into one file, so you didn’t need to do this.
422
❘
CHAPTER 13 BUILDING CLASS LIBRARIES
2. Add an
Imports
statement to Form1, so that it can see the classes in the
Internet_Favorites
namespace without giving a fully qualified name (that is, including the namespace as well as the
class name). Previously, all classes were in the same namespace, so you didn’t need to do this. As
discussed in Chapter 4, classes are by default given their project name as their namespace. When
a project contains a space in the name, Visual Studio 2010 replaces the blank space in the name
with an underscore (
_
) character.
If this doesn’t seem very clear — don’t worry! Both of these things are easy to do.
TRY IT OUT Adding a Reference and Imports Statement
Code file Internet Favorites.zip available for download at Wrox.com
Now, you will hook up the new Class Library so you can use it in the application.
1. Right-click the Favorites Viewer project in the Solution Explorer and select Add Reference.
2. Select the Projects tab in the Add Reference dialog box and you’ll see that the Internet Favorites
project is already populated in the list, as shown in Figure 13-3. Click OK to have this reference
added to your Favorites Viewer project.
3. Right-click
Viewer.vb
in the Solution Explorer and select View Code. Add the following line at
the very top of the code file:
Imports Internet_Favorites
How It Works
By adding a reference in steps 1 and 2, you tell Visual Studio 2010 that the
Favorites Viewer.exe
file
will require the
Internet Favorites.dll
file to run. Visual Studio 2010 can use the classes exposed from
Internet Favorites to check the syntax of the code, so the automatic underlining of errors and so on will
work correctly.
NOTE Whenever you want to use a class library, you must add a reference to it.
You can add references to projects within the solution or to compiled DLLs.
However, if you try to run the application before you perform step 3, you still get errors because the
classes in the Favorites Viewer application would be trying to use classes in the
Internet Favorites
class
library without giving a fully qualified name. Unless you specify otherwise, classes are given the name of
the project they are in as their namespace name. This means that the classes you moved from Favorites
Viewer to Internet Favorites changed namespace too.
The easiest way to cope with this problem is to add an
Imports
statement to the top of the classes that rely
on this class library. This is what you did in Step 3, but remember that you have two other choices:
You can use fully qualified names every time you want to access a class in the class library from a class in
the application. This requires quite a few changes.