Beginning Microsoft Visual C# 2008 PHẦN 2 doc
Bạn đang xem bản rút gọn của tài liệu. Xem và tải ngay bản đầy đủ của tài liệu tại đây (1.78 MB, 135 trang )
99
Chapter 5: More About Variables
Figure 5-2
Figure 5-3
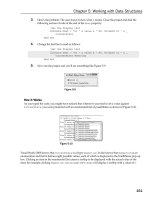
The property you want to change is one of the Advanced settings, so you click the Advanced button.
In the dialog that appears, enable the Check for arithmetic overflow/underflow option, as shown in
Figure 5 - 3 . By default, this setting is disabled, but enabling it provides the
checked behavior detailed
previously.
c05.indd 99c05.indd 99 3/24/08 3:32:22 PM3/24/08 3:32:22 PM
100
Part I: The C# Language
Explicit Conversions Using the Convert Commands
The type of explicit conversion you have been using in many of the Try It Out examples in this book is a
bit different from those you have seen so far in this chapter. You have been converting string values into
numbers using commands such as
Convert.ToDouble() , which is obviously something that won ’ t
work for every possible string.
If, for example, you try to convert a string like
Number into a double value using Convert.ToDouble() ,
then you will see the dialog shown in Figure 5 - 4 when you execute the code.
Figure 5-4
As you can see, the operation fails. For this type of conversion to work, the string supplied must be a
valid representation of a number, and that number must be one that won ’ t cause an overflow. A valid
representation of a number is one that contains an optional sign (that is, plus or minus), zero or more
digits, an optional period followed by one or more digits, and an optional "
e " or " E " followed by an
optional sign and one or more digits and nothing else except spaces (before or after this sequence). Using
all of these optional extras, you can recognize strings as complex as
- 1.2451e - 24 as being a number.
There are many such explicit conversions that you can specify in this way, as the following table shows:
Command Result
Convert.ToBoolean(val)
val
converted to bool
Convert.ToByte(val)
val
converted to byte
Convert.ToChar(val)
val
converted to char
Convert.ToDecimal(val)
val
converted to decimal
Convert.ToDouble(val)
val
converted to double
Convert.ToInt16(val)
val
converted to short
Convert.ToInt32(val)
val
converted to int
Convert.ToInt64(val)
val
converted to long
c05.indd 100c05.indd 100 3/24/08 3:32:23 PM3/24/08 3:32:23 PM
101
Chapter 5: More About Variables
Command Result
Convert.ToSByte(val)
val
converted to sbyte
Convert.ToSingle(val)
val
converted to float
Convert.ToString(val)
val
converted to string
Convert.ToUInt16(val)
val
converted to ushort
Convert.ToUInt32(val)
val
converted to uint
Convert.ToUInt64(val)
val
converted to ulong
Here val can be most types of variable (if it ’ s a type that can ’ t be handled by these commands, the
compiler will tell you).
Unfortunately, as the table shows, the names of these conversions are slightly different from the C# type
names; for example, to convert to an
int you use Convert.ToInt32() . That ’ s because these commands
come from the .NET Framework
System namespace, rather than being native C#. This enables them to
be used from other .NET - compatible languages besides C#.
The important thing to note about these conversions is that they are always overflow - checked, and the
checked and unchecked keywords and project property settings have no effect.
The next Try It Out is an example that covers many of the conversion types from this section. It declares
and initializes a number of variables of different types and then converts between them implicitly and
explicitly.
Try It Out Type Conversions in Practice
1.
Create a new console application called Ch05Ex01 and save it in the directory
C:\BegVCSharp\Chapter05.
2. Add the following code to Program.cs :
static void Main(string[] args)
{
short shortResult, shortVal = 4;
int integerVal = 67;
long longResult;
float floatVal = 10.5F;
double doubleResult, doubleVal = 99.999;
string stringResult, stringVal = “17”;
bool boolVal = true;
Console.WriteLine(“Variable Conversion Examples\n”);
doubleResult = floatVal * shortVal;
Console.WriteLine(“Implicit, - > double: {0} * {1} - > {2}”, floatVal,
c05.indd 101c05.indd 101 3/24/08 3:32:23 PM3/24/08 3:32:23 PM
102
Part I: The C# Language
shortVal, doubleResult);
shortResult = (short)floatVal;
Console.WriteLine(“Explicit, - > short: {0} - > {1}”, floatVal,
shortResult);
stringResult = Convert.ToString(boolVal) +
Convert.ToString(doubleVal);
Console.WriteLine(“Explicit, - > string: \”{0}\” + \”{1}\” - > {2}”,
boolVal, doubleVal, stringResult);
longResult = integerVal + Convert.ToInt64(stringVal);
Console.WriteLine(“Mixed, - > long: {0} + {1} - > {2}”,
integerVal, stringVal, longResult);
Console.ReadKey();
}
3. Execute the code. The result is shown in Figure 5 - 5 .
Figure 5-5
How It Works
This example contains all of the conversion types you ’ ve seen so far, both in simple assignments as in
the short code examples in the preceding discussion and in expressions. You need to consider both
cases, because the processing of every non - unary operator may result in type conversions, not just
assignment operators. For example:
shortVal * floatVal
Here, you are multiplying a short value by a float value. In situations such as this, where no
explicit conversion is specified, implicit conversion will be used if possible. In this example, the only
implicit conversion that makes sense is to convert the
short into a float (as converting a float into
a
short requires explicit conversion), so this is the one that will be used.
However, you can override this behavior should you wish, as shown here:
shortVal * (short)floatVal
This doesn ’ t mean that a short will be returned from this operation. Because the result of multiplying
two
short values is quite likely to exceed 32767 (the maximum value a short can hold), this
operation actually returns an
int .
Explicit conversions performed using this casting syntax take the same operator precedence as other
unary operators (such as
++ used as a prefix) — that is, the highest level of precedence.
c05.indd 102c05.indd 102 3/24/08 3:32:24 PM3/24/08 3:32:24 PM
103
Chapter 5: More About Variables
When you have statements involving mixed types, conversions occur as each operator is processed,
according to operator precedence. This means that “ intermediate ” conversions may occur:
doubleResult = floatVal + (shortVal * floatVal);
The first operator to be processed here is * , which, as discussed previously, will result in shortVal
being converted to a
float . Next, you process the + operator, which won ’ t require any conversion
because it acts on two
float values ( floatVal and the float type result of shortVal * floatVal ).
Finally, the
float result of this calculation is converted into a double when the = operator is processed.
This conversion process can seem complex at first glance, but as long as you break expressions down
into parts by taking the operator precedence order into account, you should be able to work things out.
Complex Variable Types
So far you ’ ve looked at all the simple variable types that C# has to offer. This section looks at three
slightly more complex (but very useful) sorts of variable: enumerations, structures, and arrays.
Enumerations
Each of the types you ’ ve seen so far (with the exception of string ) has a clearly defined set of allowed
values. Admittedly, this set is so large in types such as
double that it can practically be considered a
continuum, but it is a fixed set nevertheless. The simplest example of this is the
bool type, which can
only take one of two values:
true or false .
There are many other situations in which you might want to have a variable that can take one of a fixed
set of results. For example, you might want to have an
orientation type that can store one of the
values
north , south , east , or west .
In situations like this, enumerations can be very useful. Enumerations do exactly what you want in this
orientation type: They allow the definition of a type that can take one of a finite set of values that you
supply. What you need to do, then, is create your own enumeration type called
orientation that can
take one of the four possible values.
Note that there is an additional step involved here — you don ’ t just declare a variable of a given type;
you declare and detail a user - defined type and then you declare a variable of this new type.
Defining Enumerations
Enumerations can be defined using the enum keyword as follows:
enum
typeName
{
value1
,
value2
,
value3
,
valueN
}
c05.indd 103c05.indd 103 3/24/08 3:32:24 PM3/24/08 3:32:24 PM
104
Part I: The C# Language
Next, you can declare variables of this new type as follows:
typeName varName
;
You can assign values using the following:
varName
=
typeName
.
value
;
Enumerations have an underlying type used for storage. Each of the values that an enumeration type can
take is stored as a value of this underlying type, which by default is
int . You can specify a different
underlying type by adding the type to the enumeration declaration:
enum
typeName : underlyingType
{
value1
,
value2
,
value3
,
valueN
}
Enumerations can have underlying types of byte , sbyte , short , ushort , int , uint , long , and ulong .
By default, each value is assigned a corresponding underlying type value automatically according to the
order in which it is defined, starting from zero. This means that
value1 gets the value 0, value2 gets 1,
value3 gets 2, and so on. You can override this assignment by using the = operator and specifying actual
values for each enumeration value:
enum
typeName
:
underlyingType
{
value1
=
actualVal1
,
value2
=
actualVal2
,
value3
=
actualVal3
,
valueN
=
actualValN
}
In addition, you can specify identical values for multiple enumeration values by using one value as the
underlying value of another:
enum
typeName
:
underlyingType
{
value1
=
actualVal1
,
value2
=
value1
,
value3
,
valueN
=
actualValN
}
c05.indd 104c05.indd 104 3/24/08 3:32:24 PM3/24/08 3:32:24 PM
105
Chapter 5: More About Variables
Any values left unassigned are given an underlying value automatically, whereby the values used are in
a sequence starting from 1 greater than the last explicitly declared one. In the preceding code, for
example,
value3 will get the value value1 + 1.
Note that this can cause problems, with values specified after a definition such as
value2 = value1
being identical to other values. For example, in the following code
value4 will have the same value as
value2 :
enum
typeName
:
underlyingType
{
value1
=
actualVal1
,
value2
,
value3
=
value1
,
value4
,
valueN
=
actualValN
}
Of course, if this is the behavior you want then this code is fine. Note also that assigning values in a
circular fashion will cause an error:
enum
typeName
:
underlyingType
{
value1
=
value2
,
value2
=
value1
}
The following Try It Out shows an example of all of this. The code defines an enumeration called
orientation and then demonstrates its use.
Try It Out Using an Enumeration
1.
Create a new console application called Ch05Ex02 and save it in the directory
C:\BegVCSharp\Chapter05.
2. Add the following code to Program.cs :
namespace Ch05Ex02
{
enum orientation : byte
{
north = 1,
south = 2,
east = 3,
west = 4
}
class Program
{
static void Main(string[] args)
c05.indd 105c05.indd 105 3/24/08 3:32:25 PM3/24/08 3:32:25 PM
106
Part I: The C# Language
{
orientation myDirection = orientation.north;
Console.WriteLine(“myDirection = {0}”, myDirection);
Console.ReadKey();
}
}
}
3. Execute the application. You should see the output shown in Figure 5 - 6 .
Figure 5-6
4. Quit the application and modify the code as follows:
byte directionByte;
string directionString;
orientation myDirection = orientation.north;
Console.WriteLine(“myDirection = {0}”, myDirection);
directionByte = (byte)myDirection;
directionString = Convert.ToString(myDirection);
Console.WriteLine(“byte equivalent = {0}”, directionByte);
Console.WriteLine(“string equivalent = {0}”, directionString);
Console.ReadKey();
5. Execute the application again. The output is shown in Figure 5 - 7 .
Figure 5-7
How It Works
This code defines and uses an enumeration type called orientation . The first thing to notice is that
the type definition code is placed in your namespace,
Ch05Ex02 , but not in the same place as the rest
of your code. This is because definitions are not executed as such; that is, at runtime you don ’ t step
through the code in a definition as you do the lines of code in your application. Application execution
starts in the place you ’ re used to and has access to your new type because it belongs to the same
namespace.
c05.indd 106c05.indd 106 3/24/08 3:32:25 PM3/24/08 3:32:25 PM
107
Chapter 5: More About Variables
The first iteration of the example demonstrates the basic method of creating a variable of your new
type, assigning it a value and outputting it to the screen. Next, you modify the code to show the
conversion of enumeration values into other types. Note that you must use explicit conversions here.
Even though the underlying type of
orientation is byte , you still have to use the (byte) cast to
convert the value of
myDirection into a byte type:
directionByte = (byte)myDirection;
The same explicit casting is necessary in the other direction, too, if you want to convert a byte into an
orientation . For example, you could use the following code to convert a byte variable called
myByte into an orientation and assign this value to myDirection :
myDirection = (orientation)myByte;
Of course, care must be taken here because not all permissible values of byte type variables map to
defined
orientation values. The orientation type can store other byte values, so you won ’ t get
an error straight away, but this may break logic later in the application.
To get the string value of an enumeration value you can use
Convert.ToString() :
directionString = Convert.ToString(myDirection);
Using a (string) cast won ’ t work because the processing required is more complicated than just
placing the data stored in the enumeration variable into a
string variable. Alternatively, you can use
the
ToString() command of the variable itself. The following code gives you the same result as using
Convert.ToString() :
directionString = myDirection.ToString();
Converting a string to an enumeration value is also possible, except that here the syntax required is
slightly more complex. A special command exists for this sort of conversion,
Enum.Parse() , which
is used in the following way:
(
enumerationType
)Enum.Parse(typeof(
enumerationType
),
enumerationValueString
);
This uses another operator, typeof , which obtains the type of its operand. You could use this for your
orientation type as follows:
string myString = “north”;
orientation myDirection = (orientation)Enum.Parse(typeof(orientation),
myString);
Of course, not all string values will map to an orientation value! If you pass in a value that doesn ’ t
map to one of your enumeration values, you will get an error. Like everything else in C#, these values
are case sensitive, so you still get an error if your string agrees with a value in everything but case (for
example, if
myString is set to North rather than north ).
c05.indd 107c05.indd 107 3/24/08 3:32:25 PM3/24/08 3:32:25 PM
108
Part I: The C# Language
Structs
The next sort of variable that you will look at is the struct (short for structure). Structs are just that. That
is, data structures are composed of several pieces of data, possibly of different types. They enable you to
define your own types of variables based on this structure. For example, suppose that you want to store
the route to a location from a starting point, where the route consists of a direction and a distance in
miles. For simplicity you can assume that the direction is one of the compass points (such that it can be
represented using the
orientation enumeration from the last section) and that distance in miles can
be represented as a
double type.
You could use two separate variables for this using code you ’ ve seen already:
orientation myDirection;
double myDistance;
There is nothing wrong with using two variables like this, but it is far simpler (especially where multiple
routes are required) to store this information in one place.
Defining Structs
Structs are defined using the struct keyword as follows:
struct <
typeName
>
{
<
memberDeclarations
>
}
The < memberDeclarations > section contains declarations of variables (called the data members of the
struct) in almost the same format as usual. Each member declaration takes the following form:
<
accessibility
> <
type
> <
name
> ;
To allow the code that calls the struct to access the struct ’ s data members, you use the keyword public
for
< accessibility > . For example:
struct route
{
public orientation direction;
public double distance;
}
Once you have a struct type defined, you use it by defining variables of the new type:
route myRoute;
In addition, you have access to the data members of this composite variable via the period character:
myRoute.direction = orientation.north;
myRoute.distance = 2.5;
This is illustrated in the following Try It Out, where the orientation enumeration from the last Try It
Out is used with the
route struct shown previously. This struct is then manipulated in code to give you
a feel for how structs work.
c05.indd 108c05.indd 108 3/24/08 3:32:26 PM3/24/08 3:32:26 PM
109
Chapter 5: More About Variables
Try It Out Using a Struct
1.
Create a new console application called Ch05Ex03 and save it in the directory
C:\BegVCSharp\Chapter05.
2. Add the following code to Program.cs :
namespace Ch05Ex03
{
enum orientation : byte
{
north = 1,
south = 2,
east = 3,
west = 4
}
struct route
{
public orientation direction;
public double distance;
}
class Program
{
static void Main(string[] args)
{
route myRoute;
int myDirection = -1;
double myDistance;
Console.WriteLine(“1) North\n2) South\n3) East\n4) West”);
do
{
Console.WriteLine(“Select a direction:”);
myDirection = Convert.ToInt32(Console.ReadLine());
}
while ((myDirection < 1) || (myDirection > 4));
Console.WriteLine(“Input a distance:”);
myDistance = Convert.ToDouble(Console.ReadLine());
myRoute.direction = (orientation)myDirection;
myRoute.distance = myDistance;
Console.WriteLine(“myRoute specifies a direction of {0} and a “ +
“distance of {1}”, myRoute.direction, myRoute.distance);
Console.ReadKey();
}
}
}
3. Execute the code, select a direction by entering a number between 1 and 4, and then enter a
distance. The result is shown in Figure 5 - 8 .
c05.indd 109c05.indd 109 3/24/08 3:32:26 PM3/24/08 3:32:26 PM
110
Part I: The C# Language
Figure 5-8
How It Works
Structs, like enumerations, are declared outside of the main body of the code. You declare your route
struct just inside the namespace declaration, along with the
orientation enumeration that it uses:
enum orientation : byte
{
north = 1,
south = 2,
east = 3,
west = 4
}
struct route
{
public orientation direction;
public double distance;
}
The main body of the code follows a structure similar to some of the example code you ’ ve already
seen, requesting input from the user and displaying it. You perform some simple validation of user
input by placing the direction selection in a
do loop, rejecting any input that isn ’ t an integer between
1 and 4 (with values chosen such that they map onto the enumeration members for easy assignment).
Input that cannot be interpreted as an integer will result in an error. You ’ ll see why this happens, and
what to do about it, later in the book.
The interesting point to note is that when you refer to members of
route they are treated exactly the
same way that variables of the same type as the member would be. The assignment is as follows:
myRoute.direction = (orientation)myDirection;
myRoute.distance = myDistance;
You could simply take the input value directly into myRoute.distance with no ill effects as follows:
myRoute.distance = Convert.ToDouble(Console.ReadLine());
The extra step allows for more validation, although none is performed in this code. Any access to
members of a structure is treated in the same way. Expressions of the form
structVar.memberVar
can be said to evaluate to a variable of the type of
memberVar .
c05.indd 110c05.indd 110 3/24/08 3:32:26 PM3/24/08 3:32:26 PM
111
Chapter 5: More About Variables
Arrays
All the types you ’ ve seen so far have one thing in common: Each of them stores a single value (or a
single set of values in the case of structs). Sometimes, in situations where you want to store a lot of data,
this isn ’ t very convenient. Sometimes you want to store several values of the same type at the same time,
without having to use a different variable for each value.
For example, suppose you want to perform some processing that involves the names of all of your
friends. You could use simple string variables:
string friendName1 = “Robert Barwell”;
string friendName2 = “Mike Parry”;
string friendName3 = “Jeremy Beacock”;
But this looks like it will require a lot of effort, especially because you need to write different code to
process each variable. You couldn ’ t, for example, iterate through this list of strings in a loop.
The alternative is to use an array . Arrays are indexed lists of variables stored in a single array type
variable. For example, you might have an array called
friendNames that stores the three names shown
above. You can access individual members of this array by specifying their index in square brackets, as
shown here:
friendNames[ <
index
> ]
This index is simply an integer, starting with 0 for the first entry, using 1 for the second, and so on. This
means that you can go through the entries using a loop:
int i;
for (i = 0; i < 3; i++)
{
Console.WriteLine(“Name with index of {0}: {1}”, i, friendNames[i]);
}
Arrays have a single base type — that is, individual entries in an array are all of the same type. This
friendNames array has a base type of string because it is intended for storing string variables. Array
entries are often referred to as elements .
Declaring Arrays
Arrays are declared in the following way:
<
baseType
> [] <
name
> ;
Here, < baseType > may be any variable type, including the enumeration and struct types you ’ ve seen in
this chapter. Arrays must be initialized before you have access to them. You can ’ t just access or assign
values to the array elements like this:
int[] myIntArray;
myIntArray[10] = 5;
c05.indd 111c05.indd 111 3/24/08 3:32:27 PM3/24/08 3:32:27 PM
112
Part I: The C# Language
Arrays can be initialized in two ways. You can either specify the complete contents of the array in a
literal form, or you can specify the size of the array and use the
new keyword to initialize all array
elements.
Specifying an array using literal values simply involves providing a comma - separated list of element
values enclosed in curly braces:
int[] myIntArray = {5, 9, 10, 2, 99};
Here, myIntArray has five elements, each with an assigned integer value.
The other method requires the following syntax:
int[] myIntArray = new int[5];
Here, you use the new keyword to explicitly initialize the array, and a constant value to define the size.
This method results in all the array members being assigned a default value, which is 0 for numeric
types. You can also use nonconstant variables for this initialization:
int[] myIntArray = new int[arraySize];
In addition, you can combine these two methods of initialization if you wish:
int[] myIntArray = new int[5] {5, 9, 10, 2, 99};
With this method the sizes must match. You can ’ t, for example, write
int[] myIntArray = new int[10] {5, 9, 10, 2, 99};
Here, the array is defined as having 10 members, but only 5 are defined, so compilation will fail. A side
effect of this is that if you define the size using a variable, then that variable must be a constant:
const int arraySize = 5;
int[] myIntArray = new int[arraySize] {5, 9, 10, 2, 99};
If you omit the const keyword, this code will fail.
As with other variable types, there is no need to initialize an array on the same line that you declare it.
The following is perfectly legal:
int[] myIntArray;
myIntArray = new int[5];
Now it ’ s time to try out some code. In the following Try It Out you create and use an array of strings,
using the example from the introduction to this section.
c05.indd 112c05.indd 112 3/24/08 3:32:27 PM3/24/08 3:32:27 PM
113
Chapter 5: More About Variables
Try It Out Using an Array
1.
Create a new console application called Ch05Ex04 and save it in the directory
C:\BegVCSharp\Chapter05.
2. Add the following code to Program.cs :
static void Main(string[] args)
{
string[] friendNames = {“Robert Barwell”, “Mike Parry”,
“Jeremy Beacock”};
int i;
Console.WriteLine(“Here are {0} of my friends:”,
friendNames.Length);
for (i = 0; i < friendNames.Length; i++)
{
Console.WriteLine(friendNames[i]);
}
Console.ReadKey();
}
3. Execute the code. The result is shown in Figure 5 - 9 .
Figure 5-9
How It Works
This code sets up a string array with three values and lists them in the console in a for loop. Note
that you have access to the number of elements in the array using
friendNames.Length :
Console.WriteLine(“Here are {0} of my friends:”, friendNames.Length);
This is a handy way to get the size of an array. Outputting values in a for loop is easy to get wrong.
For example, try changing < to
< = as follows:
for (i = 0; i < = friendNames.Length; i++)
{
Console.WriteLine(friendNames[i]);
}
Compiling this results in the dialog shown in Figure 5 - 10 .
c05.indd 113c05.indd 113 3/24/08 3:32:27 PM3/24/08 3:32:27 PM
114
Part I: The C# Language
Figure 5-10
Here, you have attempted to access friendNames[3] . Remember that array indices start from 0, so
the last element is
friendNames[2] . If you attempt to access elements outside of the array size, then the
code will fail. It just so happens that there is a more resilient method of accessing all the members of
an array: using
foreach loops.
foreach Loops
A foreach loop enables you to address each element in an array using this simple syntax:
foreach ( <
baseType
> <
name
> in <
array
> )
{
// can use <
name
> for each element
}
This loop will cycle through each element, placing each one in the variable < name > in turn, without
danger of accessing illegal elements. You don ’ t have to worry about how many elements are in the array,
and you can be sure that you ’ ll get to use each one in the loop. Using this approach, you can modify the
code in the last example as follows:
static void Main(string[] args)
{
string[] friendNames = {“Robert Barwell”, “Mike Parry”,
“Jeremy Beacock”};
Console.WriteLine(“Here are {0} of my friends:”,
friendNames.Length);
foreach (string friendName in friendNames)
{
Console.WriteLine(friendName);
}
Console.ReadKey();
}
The output of this code will be exactly the same as that of the previous Try It Out. The main difference
between using this method and a standard
for loop is that foreach gives you read - only access to the
array contents, so you can ’ t change the values of any of the elements. You couldn ’ t, for example, do
the following:
c05.indd 114c05.indd 114 3/24/08 3:32:28 PM3/24/08 3:32:28 PM
115
Chapter 5: More About Variables
foreach (string friendName in friendNames)
{
friendName = “Rupert the bear”;
}
If you try this, then compilation will fail. If you use a simple for loop, however, then you can assign
values to array elements.
Multidimensional Arrays
A multidimensional array is simply one that uses multiple indices to access its elements. For example,
suppose you want to plot the height of a hill against the position measured. You might specify a position
using two coordinates,
x and y . You want to use these two coordinates as indices, such that an array
called
hillHeight would store the height at each pair of coordinates. This involves using
multidimensional arrays.
A two - dimensional array such as this is declared as follows:
<
baseType
> [,] <
name
> ;
Arrays of more dimensions simply require more commas:
<
baseType
> [,,,] <
name
> ;
This would declare a four - dimensional array. Assigning values also uses a similar syntax, with commas
separating sizes. To declare and initialize the two - dimensional array
hillHeight , with a base type of
double , an x size of 3, and a y size of 4 requires the following:
double[,] hillHeight = new double[3,4];
Alternatively, you can use literal values for initial assignment. Here, you use nested blocks of curly
braces, separated by commas:
double[,] hillHeight = {{1, 2, 3, 4}, {2, 3, 4, 5}, {3, 4, 5, 6}};
This array has the same dimensions as the previous one — that is, three rows and four columns. By
providing literal value these dimensions are defined implicitly.
To access individual elements of a multidimensional array, you simply specify the indices separated by
commas:
hillHeight[2,1]
You can then manipulate this element just as you can other elements. This expression will access the
second element of the third nested array as defined previously (the value will be 4). Remember that
you start counting from 0 and that the first number is the nested array. In other words, the first number
specifies the pair of curly braces, and the second number specifies the element within that pair of braces.
You can represent this array visually, as shown in Figure 5 - 11 .
c05.indd 115c05.indd 115 3/24/08 3:32:28 PM3/24/08 3:32:28 PM
116
Part I: The C# Language
hillHeight [0,0]
1
hillHeight [0,1]
2
hillHeight [0,2]
3
hillHeight [0,3
4
hillHeight [1,0]
2
hillHeight [1,1]
3
hillHeight [1,2]
4
hillHeight [1,3
5
hillHeight [2,0]
3
hillHeight [2,1]
4
hillHeight [2,2]
5
hillHeight [2,3
6
Figure 5-11
The
foreach loop gives you access to all elements in a multidimensional way, just as with single -
dimensional arrays:
double[,] hillHeight = {{1, 2, 3, 4}, {2, 3, 4, 5}, {3, 4, 5, 6}};
foreach (double height in hillHeight)
{
Console.WriteLine(“{0}”, height);
}
The order in which the elements are output is the same as the order used to assign literal values:
hillHeight[0,0]
hillHeight[0,1]
hillHeight[0,2]
hillHeight[0,3]
hillHeight[1,0]
hillHeight[1,1]
hillHeight[1,2]
Arrays of Arrays
Multidimensional arrays, as discussed in the last section, are said to be rectangular because each “ row ” is
the same size. Using the last example, you can have a
y coordinate of 0 to 3 for any of the possible x
coordinates.
It is also possible to have jagged arrays, whereby “ rows ” may be different sizes. For this, you need an
array in which each element is another array. You could also have arrays of arrays of arrays if you want,
or even more complex situations. However, all this is only possible if the arrays have the same base type.
The syntax for declaring arrays of arrays involves specifying multiple sets of square brackets in the
declaration of the array, as shown here:
int[][] jaggedIntArray;
c05.indd 116c05.indd 116 3/24/08 3:32:28 PM3/24/08 3:32:28 PM
117
Chapter 5: More About Variables
Unfortunately, initializing arrays such as this isn ’ t as simple as initializing multidimensional arrays. You
can ’ t, for example, follow the preceding declaration with this:
jaggedIntArray = new int[3][4];
Even if you could do this, it wouldn ’ t be that useful because you can achieve the same effect with simple
multidimensional arrays with less effort. Nor can you use code such as this:
jaggedIntArray = {{1, 2, 3}, {1}, {1, 2}};
You have two options. You can initialize the array that contains other arrays (I ’ ll call these sub - arrays for
clarity) and then initialize the subarrays in turn:
jaggedIntArray = new int[2][];
jaggedIntArray[0] = new int[3];
jaggedIntArray[1] = new int[4];
Alternately, you can use a modified form of the preceding literal assignment:
jaggedIntArray = new int[3][] {new int[] {1, 2, 3}, new int[] {1},
new int[] {1, 2}};
This can be simplified if the array is initialized on the same line as it is declared, as follows:
int[][] jaggedIntArray = {new int[] {1, 2, 3}, new int[] {1}, new int[] {1, 2}};
You can use foreach loops with jagged arrays, but you often need to nest these to get to the actual data.
For example, suppose you have the following jagged array that contains 10 arrays, each of which
contains an array of integers that are divisors of an integer between 1 and 10:
int[][] divisors1To10 = {new int[] {1},
new int[] {1, 2},
new int[] {1, 3},
new int[] {1, 2, 4},
new int[] {1, 5},
new int[] {1, 2, 3, 6},
new int[] {1, 7},
new int[] {1, 2, 4, 8},
new int[] {1, 3, 9},
new int[] {1, 2, 5, 10}};
The following code will fail:
foreach (int divisor in divisors1To10)
{
Console.WriteLine(divisor);
}
c05.indd 117c05.indd 117 3/24/08 3:32:30 PM3/24/08 3:32:30 PM
118
Part I: The C# Language
This is because the array divisors1To10 contains int[] elements, not int elements. Instead, you have
to loop through every sub - array as well as through the array itself:
foreach (int[] divisorsOfInt in divisors1To10)
{
foreach(int divisor in divisorsOfInt)
{
Console.WriteLine(divisor);
}
}
As you can see, the syntax for using jagged arrays can quickly become complex! In most cases, it is easier
to use rectangular arrays or a simpler storage method. However, there may well be situations in which
you are forced to use this method, and a working knowledge can ’ t hurt!
String Manipulation
Your use of strings so far has consisted of writing strings to the console, reading strings from the console,
and concatenating strings using the + operator. In the course of programming more interesting
applications, you will soon discover that manipulating strings is something that you end up doing a lot .
Because of this, it is worth spending a few pages looking at some of the more common string
manipulation techniques available in C#.
To start with, note that a
string type variable can be treated as a read - only array of char variables. This
means that you can access individual characters using syntax like the following:
string myString = “A string”;
char myChar = myString[1];
However, you can ’ t assign individual characters in this way. To get a char array that you can write to,
you can use the following code. This uses the
ToCharArray() command of the array variable:
string myString = “A string”;
char[] myChars = myString.ToCharArray();
Then you can manipulate the char array in the standard way. You can also use strings in foreach loops,
as shown here:
foreach (char character in myString)
{
Console.WriteLine(“{0}”, character);
}
As with arrays, you can also get the number of elements using myString.Length . This gives you the
number of characters in the string:
string myString = Console.ReadLine();
Console.WriteLine(“You typed {0} characters.”, myString.Length);
c05.indd 118c05.indd 118 3/24/08 3:32:31 PM3/24/08 3:32:31 PM
119
Chapter 5: More About Variables
Other basic string manipulation techniques use commands with a format similar to this < string >
.ToCharArray()
command. Two simple, but useful, ones are < string > .ToLower() and
< string > .ToUpper()
. These enable strings to be converted into lowercase and uppercase, respectively.
To see why this is useful, consider the situation in which you want to check for a specific response from a
user — for example, the string
yes . If you convert the string entered by the user into lowercase, then you can
also check for the strings
YES , Yes , yeS , and so on — you saw an example of this in the previous chapter:
string userResponse = Console.ReadLine();
if (userResponse.ToLower() == “yes”)
{
// Act on response.
}
This command, like the others in this section, doesn ’ t actually change the string to which it is applied.
Instead, combining this command with a string results in the creation of a new string, which you can
compare to another string (as shown here) or assign to another variable. The other variable may be the
same one that is being operated on:
userResponse = userResponse.ToLower();
This is an important point to remember, because just writing
userResponse.ToLower();
doesn ’ t actually achieve very much!
There are other things you can do to ease the interpretation of user input. What if the user accidentally
put an extra space at the beginning or end of their input? In this case, the preceding code won ’ t work.
You need to trim the string entered, which you can do using the
< string > .Trim() command:
string userResponse = Console.ReadLine();
userResponse = userResponse.Trim();
if (userResponse.ToLower() == “yes”)
{
// Act on response.
}
Using this, you will also be able detect strings like this:
“ YES”
“Yes “
You can also use these commands to remove any other characters, by specifying them in a char array,
for example:
char[] trimChars = {‘ ‘, ‘e’, ‘s’};
string userResponse = Console.ReadLine();
userResponse = userResponse.ToLower();
userResponse = userResponse.Trim(trimChars);
if (userResponse == “y”)
{
// Act on response.
}
c05.indd 119c05.indd 119 3/24/08 3:32:31 PM3/24/08 3:32:31 PM
120
Part I: The C# Language
This eliminates any occurrences of spaces, the letter " e , " and the letter " s " from the beginning or end of
your string. Providing there aren ’ t any other characters in the string, this will result in the detection of
strings such as
“Yeeeees”
“ y”
and so on.
You can also use the
< string > .TrimStart() and < string > .TrimEnd() commands, which will trim
spaces from the beginning and end of a string, respectively. These can also have
char arrays specified.
There are two other string commands that you can use to manipulate the spacing of strings:
< string >
.PadLeft()
and < string > .PadRight() . These enable you to add spaces to the left or right of a string
to force it to the desired length. You use these as follows:
< string >
.PadX(
< desiredLength >
);
Here is an example:
myString = “Aligned”;
myString = myString.PadLeft(10);
This would result in three spaces being added to the left of the word Aligned in myString . These
methods can be helpful when aligning strings in columns, which is particularly useful for positioning
strings containing numbers.
As with the trimming commands, you can also use these commands in a second way, by supplying the
character to pad the string with. This involves a single
char , not an array of char s as with trimming:
myString = “Aligned”;
myString = myString.PadLeft(10, ‘-’);
This would add three dashes to the start of myString .
There are many more of these string manipulation commands, many of which are only useful in very
specific situations. These are discussed as you use them in the forthcoming chapters. Before moving on,
though, it is worth looking at one of the features contained in both Visual C# 2008 Express Edition and
Visual Studio 2008 that you may have noticed over the course of the last few chapters, and especially this
one. In the following Try It Out, you examine auto - completion, whereby the IDE tries to help you out by
suggesting what code you might like to insert.
Try It Out Statement Auto - Completion in VS
1.
Create a new console application called Ch05Ex05 and save it in the directory
C:\BegVCSharp\Chapter05.
2. Type the following code to Program.cs , exactly as written, noting windows that pop up as
you do so:
c05.indd 120c05.indd 120 3/24/08 3:32:31 PM3/24/08 3:32:31 PM
121
Chapter 5: More About Variables
static void Main(string[] args)
{
string myString = “This is a test.”;
char[] separator = {‘ ‘};
string[] myWords;
myWords = myString.
}
3. As you type the final period, the window shown in Figure 5 - 12 appears.
Figure 5-12
4. Without moving the cursor, type s . The pop - up window changes, and a tooltip pop - up
appears (it is yellow, which can ’ t be seen in Figure 5 - 13 ).
Figure 5-13
5. Type the following characters: (separator); . The code should look as follows, and the pop -
up windows should disappear:
static void Main(string[] args)
{
string myString = “This is a test.”;
char[] separator = {‘ ‘};
string[] myWords;
myWords = myString.Split(separator);
}
c05.indd 121c05.indd 121 3/24/08 3:32:32 PM3/24/08 3:32:32 PM
122
Part I: The C# Language
6. Add the following code, noting the windows as they pop up:
static void Main(string[] args)
{
string myString = “This is a test.”;
char[] separator = {‘ ‘};
string[] myWords;
myWords = myString.Split(separator);
foreach (string word in myWords)
{
Console.WriteLine(“{0}”, word);
}
Console.ReadKey();
}
7. Execute the code. The result is shown in Figure 5 - 14 .
Figure 5-14
How It Works
Note two main aspects of this code: the new string command used and the use of the auto - completion
functionality. The command,
< string > .Split() , converts a string into a string array by splitting
it at the points specified. These points take the form of a
char array, which in this case is simply
populated by a single element, the space character:
char[] separator = {‘ ‘};
The following code obtains the substrings you get when the string is split at each space — that is, you
get an array of individual words:
string[] myWords;
myWords = myString.Split(separator);
Next, you loop through the words in this array using foreach and write each one to the console:
foreach (string word in myWords)
{
Console.WriteLine(“{0}”, word);
}
Each word obtained has no spaces, neither embedded in the word nor at either end. The separators are
removed when you use
Split() .
c05.indd 122c05.indd 122 3/24/08 3:32:32 PM3/24/08 3:32:32 PM
123
Chapter 5: More About Variables
Next, on to auto - completion. Both VS and VCE are very intelligent packages that work out a lot of
information about your code as you type it in. Even as you type the first character on a new line, the
IDE tries to help you by suggesting a keyword, a variable name, a type name, and so on. Only three
letters into the preceding code (
str ), the IDE correctly guessed that you want to type string . Even
more useful is when you type variable names. In long pieces of code, you often forget the names of
variables you want to use. Because the IDE pops up a list of these as you type, you can find them
easily, without having to refer to earlier code.
By the time you type the period after
myString , it knows that myString is a string, detects that you
want to specify a string command, and presents the available options. At this point, you can stop
typing if desired, and select the command you want using the up and down arrow keys. As you move
through the available options, the IDE describes the currently selected command and indicates what
syntax it uses.
As you start typing more characters, the IDE moves the selected command to the top of the commands
you might mean automatically. Once it shows the command you want, you can simply carry on typing
as if you ’ d typed the whole name, so typing “
( ” takes you straight to the point where you specify the
additional information that some commands require — and the IDE even tells you the format this
extra information must be in, presenting options for those commands that accept varying amounts of
information.
This feature of the IDE (known as IntelliSense) can come in very handy, enabling you to find
information about strange types with ease. You might find it interesting to look at all the commands
that the
string type exposes and experiment — nothing you do is going to break the computer, so
play away!
Sometimes the displayed information can obscure some of the code you have already typed, which can be
annoying. This is because the hidden code may be something that you need to refer to when typing.
However, you can press the Ctrl key to make the command list transparent, enabling you to see what
was hidden. This extremely useful technique is new in the 2008 editions of VS and VCE.
Summary
In this chapter, you ’ ve spent some time expanding your current knowledge of variables and filling in
some of the blanks left from earlier. Perhaps the most important topic covered in this chapter is type
conversion, because this is one that will come back to haunt you throughout this book. Getting a sound
grasp of the concepts involved now will make things a lot easier later.
You ’ ve also seen a few more variable types that you can use to help you store data in a more developer -
friendly way. You ’ ve learned how enumerations can make your code much more readable with easily
discernable values; how structs can be used to combine multiple, related data elements in one place; and
how you can group similar data together in arrays. You see all of these types used many times
throughout the rest of this book.
Finally, you looked at string manipulation, including some of the basic techniques and principles
involved. Many individual string commands are available, and you only examined a few, but you now
know how to view the available commands in your IDE. Using this technique, you can have some fun
trying things out. At least one of the following exercises can be solved using one or more string
commands you haven ’ t seen yet, but you ’ ll have to figure out which!
c05.indd 123c05.indd 123 3/24/08 3:32:32 PM3/24/08 3:32:32 PM