Beginning Microsoft Visual C# 2008 PHẦN 9 docx
Bạn đang xem bản rút gọn của tài liệu. Xem và tải ngay bản đầy đủ của tài liệu tại đây (1.96 MB, 135 trang )
Part V: Additional Techniques
1044
A similar method is used to set the Inherited property. If a custom attribute has properties, then you
can set these in the same manner. One example might be to add the name of the person who fixed
the bug:
public readonly string BugNumber;
public readonly string Comments;
public readonly string Author;
public override string ToString ()
{
if (string.IsNullOrEmpty(Author))
return string.Format (“BugFix {0} : {1}” ,
BugNumber , Comments);
else
return string.Format (“BugFix {0} by {1} : {2}” ,
BugNumber , Author , Comments);
}
This adds the Author field and an overridden ToString() implementation that displays the full details
if the
Author field is set. If the Author property is not defined when you attribute your code, then the
output from the
BugFix attribute just shows the bug number and comments. The ToString() method
would be used to display a list of bug fixes for a given section of code — perhaps to print and file away
somewhere. Once you have written the
BugFix attribute, you need some way to report the fixes made
on a class and the members of that class.
The way to report bug fixes for a class is to pass the class type (again a
System.Type ) to the following
DisplayFixes function. This also uses reflection to find any bug fixes applied to the class, and then
iterates through all methods of that class looking for
BugFix attributes:
public static void DisplayFixes (System.Type t)
{
// Get all bug fixes for the given type,
// which is assumed to be a class.
object[] fixes = t.GetCustomAttributes (typeof (BugFixAttribute) , false);
Console.WriteLine (“Displaying fixes for {0}” , t);
// Display the big fix information.
foreach (BugFixAttribute bugFix in fixes)
Console.WriteLine (“ {0}” , bugFix);
// Now get all members (i.e., functions) of the class.
foreach (MemberInfo member in t.GetMembers (BindingFlags.Instance |
BindingFlags.Public |
BindingFlags.NonPublic |
BindingFlags.Static))
{
// And find any big fixes applied to these too.
object[] memberFixes = member.GetCustomAttributes(typeof(BugFixAttribute)
, false);
if (memberFixes.Length > 0)
{
c30.indd 1044c30.indd 1044 3/25/08 12:33:17 PM3/25/08 12:33:17 PM
Chapter 30: Attributes
1045
Console.WriteLine (“ {0}” , member.Name);
// Loop through and display these.
foreach (BugFixAttribute memberFix in memberFixes)
Console.WriteLine (“ {0}” , memberFix);
}
}
}
The code first retrieves all BugFix attributes from the type itself:
object[] fixes = t.GetCustomAttributes (typeof (BugFixAttribute),
false);
These are enumerated and displayed. The code then loops through all members defined on the class, by
using the
GetMembers() method:
foreach (MemberInfo member in t.GetMembers (
BindingFlags.Instance | BindingFlags.Public |
BindingFlags.NonPublic | BindingFlags.Static))
GetMembers retrieves properties, methods, and fields from a given type. To limit the list of members that
are returned, the
BindingFlags enum is used (which is defined within System.Reflection ).
The binding flags passed to this method indicate which members you are interested in — in this case,
you ’ d like all instance and static members, regardless of visibility, so you specify
Instance and Static ,
together with
Public and NonPublic members.
After getting all members, you loop through these, finding any
BugFix attributes associated with the
particular member, and output these to the console. To output a list of bug fixes for a given class, you
just call the static
DisplayFixes() method, passing in the class type:
BugFixAttribute.DisplayFixes (typeof (MyBuggyCode));
For the MyBuggyCode class presented earlier, this results in the following output:
Displaying fixes for MyBuggyCode
BugFix 101 : Created some methods
DoSomething
BugFix 2112 : Returned a non-null string
BugFix 38382 : Returned OK
.ctor
BugFix 90125 : Removed call to base()
If you wanted to display fixes for all classes in a given assembly, you could use reflection to get all the
types from the assembly, and pass each one to the static
BugFixAttribute.DisplayFixes method.
c30.indd 1045c30.indd 1045 3/25/08 12:33:17 PM3/25/08 12:33:17 PM
Part V: Additional Techniques
1046
AttributeUsage.Inherited
An attribute may be defined as inheritable by setting this flag when defining the custom attribute:
[AttributeUsage (AttributeTargets.Class,
Inherited = true)]
public class BugFixAttribute { }
This indicates that the BugFix attribute will be inherited by any subclasses of the class using the
attribute, which may or may not be desirable. In the case of the
BugFix attribute, this behavior would
probably not be desirable, because a bug fix normally applies to a single class and not the derived
classes.
Suppose you have the following abstract class with a bug fix applied:
[BugFix(“38383”,”Fixed that abstract bug”)]
public abstract class GenericRow : DataRow
{
public GenericRow (System.Data.DataRowBuilder builder) : base (builder)
{
}
}
If you created a subclass from this class, you wouldn ’ t want the same BugFix attribute to be reflected in
the subclass — the subclass has not had that fix done on it. However, if you were defining a set of
attributes that linked members of a class to fields in a database table, then you probably would want to
inherit these attributes.
Armed with the knowledge you now have about custom attributes, you can probably think of several
places where adding extra information to assemblies is useful. You could take the
BugFix attribute
defined here and extend it too — one example would be to define the version number of the software
that the bug was fixed in. That would enable you to display to end users all bugs fixed for a given
version of your application simply by using reflection to find the
BugFix attributes and then checking
the version number of that fix against the versions that the end user has asked to see.
This would also be great for producing documentation at the end of a product cycle to list all fixes made
in the latest version. Obviously, you have to rely on the developers to add in these attributes, but it could
be made part of the code review cycle to ensure that all fixes were documented within the code.
Summary
This chapter described what attributes are and discussed some of the attributes defined within the .NET
Framework. There are many more attribute classes within the framework, and the best way to find out
what they are used for is to look through the .NET Framework SDK documentation. To find all attributes
in an assembly, just load it into Reflector, browse for the
System.Attribute class, and then display the
derived types. You may be surprised at just how many attributes are defined within .NET.
c30.indd 1046c30.indd 1046 3/25/08 12:33:18 PM3/25/08 12:33:18 PM
Chapter 30: Attributes
1047
In this chapter, you learned about the following attribute - related topics:
Using the
Conditional attribute to exclude debugging code from release mode binaries .
Using the
Obsolete attribute to revise libraries over time .
How serialization uses attributes to specify what should and what should not be serialized .
How to delay - sign an assembly .
How to create custom attributes.
Attributes are a powerful way to add extra, out - of - band information to your assemblies. You can create
your own attributes to add extra information to your classes as appropriate. This chapter described how
to create a
BugFix attribute, which could be used to provide a link between the source code that was
fixed and the bug originally raised by an end user. There are many other uses of attributes — and you
are encouraged to look into the .NET Framework for other attribute classes.
❑
❑
❑
❑
❑
c30.indd 1047c30.indd 1047 3/25/08 12:33:18 PM3/25/08 12:33:18 PM
c30.indd 1048c30.indd 1048 3/25/08 12:33:18 PM3/25/08 12:33:18 PM
31
XML Documentation
Up to this point in this book, you ’ ve seen the entire C# language and a great many things you can
do with it, including both Web and Windows programming. Along the way, you ’ ve seen and made
extensive use of the IntelliSense feature in Visual Studio. This helpful tool dramatically reduces the
amount of typing you have to do, because it suggests keywords, type names, variable names, and
parameters as you type. It also makes it easier to remember what methods and properties you
have at your disposal and often tells you exactly how to use them.
However, the classes you have made have suffered slightly here. While the classes and member
names are suggested for you, no handy hints pop up telling you how to do things. To achieve the
kind of behavior that you see with the .NET Framework types, you need to use XML
documentation . XML documentation enables you to include syntax, help, and examples for the
classes you create at the source - code level. This information may then be used to provide
IntelliSense information for Visual Studio as discussed previously, but there are other possibilities.
You can use XML documentation as a starting point for full, MSDN - link documentation of your
projects. You can also style the XML documentation using XSLT to obtain instant HTML
documentation with very little effort. You have seen in earlier chapters just how versatile XML is,
and you can use all of its power in the development and production life cycle of your applications.
Documentation is particularly important when you are working as part of a team, as it enables you
to show exactly how your types work. It can also be very useful to end users if you are creating an
SDK or similar product where you expect people to use your classes from their code. Having the
facility to create this documentation built into the tool you use to develop code is a very powerful
feature. Although adding XML documentation to your code can be a time - consuming process, the
result is well worth it. Dropping text in as you develop can make things easier in the long run and
provide you with a handy quick reference that will help to avoid confusion when the amount of
classes in your project starts getting out of hand.
In this chapter, you will learn two main things:
How to add and view basic XML documentation
How to use XML documentation
❑
❑
c31.indd 1049c31.indd 1049 3/25/08 12:36:32 PM3/25/08 12:36:32 PM
Part V: Additional Techniques
1050
Adding XML Documentation
Adding XML documentation to your code is a remarkably simple thing to do. As with attributes, which
you examined in the previous chapter, you can apply XML documentation to any type or member by
placing it on lines just before the member. XML documentation is added by using an extended version of
C# comment syntax, with three front slashes instead of two. For example, the following code shows how
to place XML documentation in a source code file for a class called
MyClass , and a method of that class,
MyMethod() :
/// (XML Documentation goes here.)
class MyClass
{
/// (And here.)
public void MyMethod()
{
}
}
XML documentation cannot be applied to namespace declarations.
Typically, XML documentation will span multiple lines and be marked up by using the XML
documentation vocabulary:
/// <
XMLDocElement
>
/// Content.
/// More content.
/// < /
XMLDocElement
>
class MyClass
{
Here, < XMLDocElement > is one of several available elements, and may contain nested elements, some
of which use attributes to further specify functionality. Note that the
/// parts of the lines of code
containing XML documentation are completely ignored and treated as whitespace. They are necessary to
prevent the compiler from thinking that the lines of documentation can be interpreted as code, which
would lead to compiler errors.
The most basic element for XML documentation is
< summary > , and it provides a short description of a
type or member. Before moving on to anything more complicated, you should take a look at the
following example, which illustrates this element and how the results become visible.
Try It Out Adding and Viewing Basic XML Documentation
1.
Create a new console application called FirstXMLDocumentation and save it in the directory
C:\BegVCSharp\Chapter31.
2. Add a class called DocumentedClass .
c31.indd 1050c31.indd 1050 3/25/08 12:36:33 PM3/25/08 12:36:33 PM
Chapter 31: XML Documentation
1051
3. Open the code for DocumentedClass , make the class definition public, add a new line before
the class declaration, and type
/// (three forward slashes).
4. Note that the IDE auto - completion adds the following code, placing the cursor inside the
< summary > element:
namespace FirstXMLDocumentation
{
/// < summary >
///
/// < /summary >
public class DocumentedClass
{
5. Add the following text to the < summary > element:
namespace FirstXMLDocumentation
{
/// < summary >
/// This is a summary description for the DocumentedClass class.
/// < /summary >
public class DocumentedClass
{
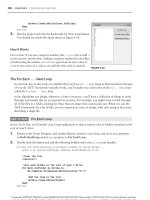
6. In Program.cs , type doc in the Main() method and note the IntelliSense information that
pops up, shown in Figure 31 - 1 .
Figure 31-1
c31.indd 1051c31.indd 1051 3/25/08 12:36:33 PM3/25/08 12:36:33 PM
Part V: Additional Techniques
1052
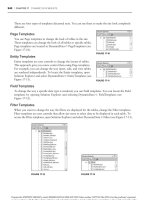
7. Open the Object Browser widow and expand the entry for the FirstXMLDocumentation
project until you can click
DocumentedClass . Note the summary information displayed in
the bottom - right pane, as shown in Figure 31 - 2 .
Figure 31-2
How It Works
This example demonstrates the basic technique for adding XML documentation and how this
documentation is used in the IDE. When adding the basic summary information for your
DocumentedClass class, you saw how the IDE dynamically detects what you have in mind and fills
out the basic code for you. IntelliSense and the Object Browser detect the documentation you added
without even having to compile the project. These basic techniques apply to all aspects of XML
documentation and make it easy to add and consume this information.
XML Documentation Comments
You can in fact add any XML you like to the XML documentation of a target (by target we mean type or
member ). However, some recommended elements and attributes will help your documentation to meet
standard guidelines. The recommended XML is enough for most situations, and following this standard
means that tools that consume XML documentation (including IntelliSense and the Object Browser) can
interpret your documentation effectively.
Brief descriptions of the basic elements for XML documentation are shown in the following table. You ’ ll
look at each of these in more depth in subsequent sections.
c31.indd 1052c31.indd 1052 3/25/08 12:36:33 PM3/25/08 12:36:33 PM
Chapter 31: XML Documentation
1053
Element Description
< c > Formats text in code font. Use this for individual code words embedded in
other text.
< code > Formats text in code font. Use this for multiple lines of code, not embedded
in other text.
< description > Marks text as being an item description. Used as a child element of < item >
or
< listheader > in lists.
< example > Marks text as an example usage of the target .
< exception > Specifies an exception that may be thrown by the target .
< include > Gets XML documentation from an external file .
< item > Represents an item in a list. Used as a child of < list > , and can have
< description > and < term > children.
< list > Defines a list. Can have < listheader > and < item > children.
< listheader > Represents the header row of a tabular list. Used as a child of < list > , and
can have
< description > and < term > children.
< para > Used to break text into separate paragraphs .
< param > Describes a parameter of the target .
< paramref > References a method parameter .
< permission > Specifies the permissions required for the target .
< remarks > Includes additional information concerning the target .
< returns > Describes the return value of the target; used with methods .
< see > References another target used in the body of an element such as
< summary > .
< seealso > References another target, usually used outside of other elements, or at the
end of, for example,
< summary > .
< summary > Holds summary information concerning the target .
< term > Marks text as being an item definition. Used as a child element of < item > or
< listheader > in lists.
< typeparam > Describes a type parameter for a generic target .
< typeparamref > References a type parameter .
< value > Describes the return value of the target; used with properties .
c31.indd 1053c31.indd 1053 3/25/08 12:36:34 PM3/25/08 12:36:34 PM
Part V: Additional Techniques
1054
Text Formatting Elements
Many of the elements shown in the preceding table are intended for formatting the text within other
elements. A
< summary > element, for example, might contain a combination of other elements that
specify the text to display. The text formatting elements are
< c > , < code > , < list > , and its associated
elements,
< para > , < paramref > , and < see > . < seealso > is a special case that you can also include in this
list, as it can be included in a body of text, although it usually occurs at the end.
< para >
The < para > element is used to separate text into paragraphs:
/// < summary >
/// < para > 1st paragraph of summary. < /para >
/// < para > 2nd paragraph of summary. < /para >
/// < /summary >
< c > and < code >
The < c > and < code > elements are both used to format text in a code font, typically a monospaced font
such as Courier. The difference is that
< c > can be thought of as “ code in text, ” that is, code words that
appear in the middle of sentences, whereas
< code > is used for sections of code outside of text. < c > and
< code > might be used as follows:
/// < summary >
/// < para >
/// This summary is about a < c > class < /c > that does interesting things. Try this:
/// < /para >
/// < code >
/// MyPoet poet = new MyPoet(“Homer”);
/// poet.AddMuse(“Thalia”);
/// poet.WriteMeAnEpic();
/// < /code >
/// < /summary >
< see > , < seealso > , < paramref > , and < typeparamref >
These four elements are all used to refer to other entries in the XML documentation for a project or to
external MSDN entries. Commonly, each of these will be rendered as a hyperlink, enabling
documentation browsers to jump to other entries.
< see > and < seealso > specify their target via a cref attribute, where the target can be any type or
member of any class, in the project or elsewhere.
< paramref > and < typeparamref > use a name
attribute to reference a parameter of the current target:
/// < summary >
/// < para >
/// This method uses < paramref name=”museName” / > to choose a muse.
/// For more details, see < see cref=”MyPoet” / > .
/// < /para >
/// < seealso cref=”MyParchment” / >
/// < seealso cref=”MyTheme” / >
/// < /summary >
c31.indd 1054c31.indd 1054 3/25/08 12:36:34 PM3/25/08 12:36:34 PM
Chapter 31: XML Documentation
1055
< see > can be particularly useful to refer to C# keywords using an alternative attribute, langword :
/// < summary >
/// For more information, see < see langword=”null” / > .
/// < /summary >
The benefit here is that because you have specified a language - specific keyword, it is possible to refactor
the documentation for other languages, such as Visual Basic. The
null keyword in C# is equivalent to
Nothing in Visual Basic, so it would be possible to cater to both languages — assuming that the tool you
use to format the XML documentation is aware of such things.
Note that the elements don ’ t include the text to display, which will typically be constructed from the
name , cref , or langword attribute. You should bear this in mind to avoid repetition of text, for example:
/// This method uses < paramref name=”museName” / > museName to choose a muse.
Here the word museName is likely to be repeated.
< list > and Associated Elements
The < list > element is the most complicated text formatting element because it can be used in different
ways. It has an attribute called
type that can be any of the following:
bullet — Formats a bulleted list
number — Formats a numbered list
table — Formats a table
A
< list > element typically has a single < listheader > element child and several < item > children.
Each of these may have
< term > and < description > children. The exact choice of which children to use
will depend on the type of the list and the way your chosen tool formats lists.
< term > , for example, is
optional in table format lists, while
< listheader > might make sense only in a table. For bulleted lists
you could use something like the following:
/// < summary >
/// < para >
/// This method uses < paramref name=”museName” / > to choose a muse.
/// < /para >
/// < para >
/// Try the following muses:
/// < list type=”bullet” >
/// < listheader >
/// < term > Muse name < /term >
/// < description > Muse’s favorite pizza < /description >
/// < /listheader >
/// < item >
/// < term > Calliope < /term >
/// < description > Ham & amp; Mushroom < /description >
/// < /item >
/// < item >
/// < term > Clio < /term >
/// < description > Four Seasons < /description >
/// < /item >
❑
❑
❑
c31.indd 1055c31.indd 1055 3/25/08 12:36:35 PM3/25/08 12:36:35 PM
Part V: Additional Techniques
1056
/// < item >
/// < term > Erato < /term >
/// < description > Meat Feast < /description >
/// < /item >
/// < /list >
/// < /para >
/// < /summary >
Because the exact behavior of the formatting with these elements may vary, it ’ s best to experiment a bit.
Note that whatever you do with these elements, you won ’ t see any difference in the Object Browser,
which ignores them.
Major Structural Elements
Several of the elements in the previous table are intended for use as top - level elements in the description
of a given target.
< summary > is a good example of this, as you saw in the earlier example. The < summary >
element should never be contained in another element, and it is always used to provide summary
information about the target. The other elements that fit this description are
< example > , < exception > ,
< param > , < permission > , < remarks > , < returns > , and < value > . < seealso > is a special case that
can be either a top - level element or a child of another element.
< include > is another special case,
because it effectively overrides other elements by fetching XML from an external file.
You ’ ll look at each of these elements in turn.
< summary > , < example > , and < remarks >
Each of these three elements provides general information about the target. You ’ ve already seen
< summary > , which you can use to provide basic information about a target. Because this information
appears in tooltips, it ’ s a good idea to keep this information short; put additional information in
< example > and < remarks > .
Often when you are introducing a class, it can be helpful to give an example of how that class should be
used. The same applies to methods, properties, and so on. Rather than include this information in
< summary > , it can make sense to separate it into a new section, < example > :
/// < summary >
/// < para >
/// This summary is about a < c > class < /c > that does interesting things.
/// < /para >
/// < /summary >
/// < example >
/// < para >
/// Try this:
/// < /para >
/// < code >
/// MyPoet poet = new MyPoet(“Homer”);
/// poet.AddMuse(“Thalia”);
/// poet.WriteMeAnEpic();
/// < /code >
/// < /example >
c31.indd 1056c31.indd 1056 3/25/08 12:36:35 PM3/25/08 12:36:35 PM
Chapter 31: XML Documentation
1057
Similarly, < remarks > is often used to provide a longer description of a target, and it may include more
< see > and < seealso > elements for cross - referencing.
< param > and < typeparam >
These elements describe a parameter, either a standard method parameter or a type parameter, for
generic targets. The parameter being referenced is set by using a
name attribute. These elements may
occur several times if several parameters are used, as shown here:
/// < summary >
/// Method to add a muse.
/// < /summary >
/// < param name=”museName” >
/// A < see langword=”string” / > parameter specifying the name of a muse.
/// < /param >
/// < param name=”museMood” >
/// A < see cref=”MuseMood” / > enumeration value specifying the mood of a muse.
/// < /param >
The name attribute of a < param > or < typeparam > element not only specifies the name of the parameter,
but also will match the
name attribute of any < paramref > or < typeparamref > elements that reference
the parameter.
< returns > and < value >
These two elements are similar in that they both refer to a return value: < returns > is used for the return
value for methods, and
< value > is used for the value of a property, which can also be thought of as a
return value. Neither of these elements uses any attributes.
For methods, you might use
< returns > as follows:
/// < summary >
/// Method to add a muse.
/// < /summary >
/// < param name=”museName” >
/// A < see langword=”string” / > parameter specifying the name of a muse.
/// < /param >
/// < param name=”museMood” >
/// A < see cref=”MuseMood” / > enumeration value specifying the mood of a muse.
/// < /param >
/// < returns >
/// The return value of this method is < see langword=”void” / > .
/// < /returns >
For properties, here is an example of < value > :
/// < summary >
/// Property for getting / setting a muse.
/// < /summary >
/// < value >
/// The type of this property is < see langword=”string” / > .
/// < /value >
c31.indd 1057c31.indd 1057 3/25/08 12:36:35 PM3/25/08 12:36:35 PM
Part V: Additional Techniques
1058
< permission >
This element is used to describe the permissions associated with a target. Actually setting the
permissions is performed by other means, such as applying a
PermissionSetAttribute attribute to a
method; the
< permission > element merely enables you to inform others about these permissions.
The
< permission > element includes a cref attribute, so you can, if you wish, reference a class that
includes additional information, such as
System.Security.PermissionSet . Here is an example:
/// < permission cref=”System.Security.PermissionSet” >
/// Only administrators can use this method.
/// < /permission >
< exception >
This element is used to describe any exceptions that might be thrown during the use of the target. It has
a
cref attribute that you can use to cross - reference an exception type. You might, for example, use this
element to state the range of allowed values for a property, and what would happen if someone
attempted to set the property to a value that isn ’ t allowed:
/// < exception cref=”System.ArgumentException” >
/// This exception will be thrown if you set < paramref name=”Width” / > to a
/// negative value.
/// < /exception >
< seealso >
As previously mentioned, you can use the < seealso > element as a top - level element. You can use
several of these, which, depending on the tool you use, may be formatted as a list of references at the end
of an entry for a target:
/// < summary >
/// This is a summary for the MyPoet class.
/// < /summary >
/// < seealso cref=”MyParchment” / >
/// < seealso cref=”MyTheme” / >
/// < seealso cref=”MyToenails” / >
< include >
Including a lot of XML documentation in your source files can get a little messy, and you might want to
consider placing it in completely separate files. This can also be desirable, for example, if someone else is
providing the documentation for your code, as you don ’ t have to give that person access to the source
files themselves.
The
< include > element enables you to do this, via its two attributes, file and path . file specifies the
external XML file that contains the XML documentation you want to include, and
path is used to locate
the specific section of XML within the document by using XPath syntax.
c31.indd 1058c31.indd 1058 3/25/08 12:36:36 PM3/25/08 12:36:36 PM
Chapter 31: XML Documentation
1059
For example, you could reference some external XML as follows:
/// < include file=”ExternalDoc.xml” path=”documentation/classes/MyClass/*” / >
public class MyClass
Here a file called ExternalDoc.xml is referenced. This may contain code such as the following:
< ?xml version=”1.0” encoding=”utf-8” ? >
< documentation >
< classes >
< MyClass >
< summary >
Summary in an external file.
< /summary >
< remarks >
Nice, eh?
< /remarks >
< /MyClass >
< /classes >
< /documentation >
This could then be equivalent to the following:
/// < summary >
/// Summary in an external file.
/// < /summary >
/// < remarks >
/// Nice, eh?
/// < /remarks >
public class MyClass
Adding XML Documentation Using a Class Diagram
In Chapter 9 , you were introduced to class diagrams, and since then you ’ ve seen how you can use class
diagrams to create classes diagrammatically, with changes reflected in your code in real time. You ’ ve also
learned how to add classes and members, modify the signatures of methods, and so on. It should,
therefore, come as no surprise that you can use class diagrams to add XML documentation to your
classes, without getting bogged down in source code.
Recall that class diagrams are available only in VS, and are not included in VCE. You need VS in order
to work through this example.
Unfortunately, as you will see, adding XML documentation in this way isn ’ t as flexible as adding it
manually, but you do get the advantage of being able to do things very quickly, without having to
remember any XML syntax.
You ’ ll see the capabilities in the following Try It Out.
c31.indd 1059c31.indd 1059 3/25/08 12:36:36 PM3/25/08 12:36:36 PM
Part V: Additional Techniques
1060
Try It Out Adding XML Documentation in a Class Diagram
1.
Create a new class library application called DiagrammaticDocumentation and save it in the
directory C:\BegVCSharp\Chapter31.
2. When the project has loaded, click the View Class Diagram button in the Solution Explorer
window. You should see a diagram containing just the
Class1 class that is generated for
you when you create a class library application.
3. Add a class called DocumentedClass and modify its members as shown in Figure 31 - 3 and
the following table.
Figure 31-3
Member Type Name Type Modifier Summary
Method
GetFactors long[] public Gets the factors of a number .
Property
IncludeOne bool public Include 1 in GetFactors()
result .
Property
IncludeSelf bool public Include self in GetFactors()
result .
c31.indd 1060c31.indd 1060 3/25/08 12:36:36 PM3/25/08 12:36:36 PM
Chapter 31: XML Documentation
1061
4. Click in the Summary box for the GetFactors() method, and then click the (ellipses)
button. Modify the text in the Description dialog as shown in Figure 31 - 4 and the
following table.
Figure 31-4
Field Value
Summary Gets the factors of a number .
Returns Returns a
long array .
Remarks This method is used to obtain the factors of a number — that is, all the numbers that
the number can be divided by without leaving a remainder.
If
IncludeOne and IncludeSelf are both true and the result returned consists of
exactly two numbers (the number itself and one), then the number is prime.
5. Similarly, modify the Value and Remarks text for the IncludeOne and IncludeSelf
properties, as shown in the following table:
Property Value Text Remarks Text
IncludeOne A bool value If this property is set to true , then GetFactors() will
include 1 in its
long[] result.
IncludeSelf A bool value If this property is set to true , then GetFactors() will
include its
numberToFactor parameter in its long[] result.
c31.indd 1061c31.indd 1061 3/25/08 12:36:37 PM3/25/08 12:36:37 PM
Part V: Additional Techniques
1062
6. Click the class in the class diagram, and in the properties for the class, modify the Summary
and Remarks for the class as shown in the next table:
Summary Text Remarks Text
This class enables you to factorize a number
according to certain rules.
Use
GetFactor() to factorize a number according
to the rules defined by the
IncludeOne and
IncludeSelf properties.
7. Examine the code for DocumentedClass . You should see the XML comments you have added
in place, such as the following:
/// < summary >
/// Gets the factors of a number.
/// < /summary >
/// < remarks > This method is used to obtain the factors of a number, that is, all
/// the numbers that the number can be divided by without leaving a
remainder.
/// If IncludeOne and IncludeSelf are both true and the result returned
consists of
/// exactly two numbers (the number itself and one) then the number is
/// prime. < /remarks >
/// < param name=”numberToFactor” > The number to factor. < /param >
/// < returns > Returns a long array. < /returns >
public long[] GetFactors(long numberToFactor)
{
throw new System.NotImplementedException();
}
How It Works
This example demonstrates how you can use a class diagram to set the XML documentation for a
project. After reading the preceding section, you may be wondering why you haven ’ t included cross -
references between methods and the like. For example, why wasn ’ t the Remarks text for
GetFactors() set as follows:
This method is used to obtain the factors of a number, that is, all the
numbers that the number can be divided by without leaving a remainder.
If < see cref=”IncludeOne” / > and < see cref=”IncludeSelf” / > are both < see
langword=”true” / > and the result returned consists of exactly two numbers
(the number itself and one) then the number is prime.
The reason is because the text editor in the class diagram automatically escapes text that is entered
into the
Description dialog, so the result of entering the previous code is actually the following:
/// < summary >
/// Gets the factors of a number.
/// < /summary >
/// < remarks > This method is used to obtain the factors of a number, that is, all
/// the numbers that the number can be divided by without leaving a remainder.
c31.indd 1062c31.indd 1062 3/25/08 12:36:37 PM3/25/08 12:36:37 PM
Chapter 31: XML Documentation
1063
/// If & lt;see cref=”IncludeOne” / & gt; and & lt;see cref=”IncludeSelf” / & gt; are
/// both & lt;see langword=”true” / & gt; and the result returned consists of exactly
/// two numbers (the number itself and one) then the number is prime. < /remarks >
/// < param name=”numberToFactor” > The number to factor. < /param >
/// < returns > Returns a long array. < /returns >
public long[] GetFactors(long numberToFactor)
{
throw new System.NotImplementedException();
}
This is unfortunately one of the inconveniences you have to cope with if you add XML documentation
by using a class diagram. It ’ s great for adding text, but to embed XML documentation markup, you
have to modify the code manually.
Generating XML Documentation Files
So far, all the XML documentation you have added has been confined to the development environment
while you are working with a project. If you want to actually do anything with the documentation you
add, you have to set the project to output the documentation as an XML file.
To do this, you need to modify the build settings for your project, as shown in Figure 31 - 5 .
Figure 31-5
c31.indd 1063c31.indd 1063 3/25/08 12:36:37 PM3/25/08 12:36:37 PM
Part V: Additional Techniques
1064
The only changes to make are to check the XML Documentation File box and supply an output filename.
It is generally a good idea to save the XML documentation file in the same directory as the assembly
because that is where the IDE searches for it. If you have a client application to a documented assembly
in a different solution, you get the benefits of IntelliSense and help in the Object Browser only if the IDE
can find the XML documentation file.
Once the build setting for XML documentation is turned on, the compiler will be configured to actively
search for XML documentation in your classes. While it isn ’ t necessarily an error to omit XML
documentation for a given class or method, the IDE will alert you to anything missing, in the form of
warnings in the Error List window. An example is shown in Figure 31 - 6 .
Figure 31-6
This warning, obtained from the previous example, indicates that documentation is missing for the
Class1 class (which you left unchanged).
Here ’ s the XML documentation file created for the previous example:
< ?xml version=”1.0”? >
< doc >
< assembly >
< name > DiagrammaticDocumentation < /name >
< /assembly >
< members >
< member name=”T:DiagrammaticDocumentation.DocumentedClass” >
< summary >
This class allows you to factorize a number according to certain rules.
< /summary >
< remarks > Use GetFactor() to factorize a number according to the rules
defined by the IncludeOne and IncludeSelf properties. < /remarks >
< /member >
< member name=”M:DiagrammaticDocumentation.DocumentedClass.GetFactors” >
< summary >
Gets the factors of a number.
< /summary >
< remarks >
This method is used to obtain the factors of a number, that is, all the
numbers that the number can be divided by without leaving a remainder.
If IncludeOne and IncludeSelf are both true and the result returned
consists of exactly two numbers (the number itself and one) then the
number is prime.
< /remarks >
< returns > Returns a long array. < /returns >
< /member >
c31.indd 1064c31.indd 1064 3/25/08 12:36:38 PM3/25/08 12:36:38 PM
Chapter 31: XML Documentation
1065
< member name=”P:DiagrammaticDocumentation.DocumentedClass.IncludeOne” >
< summary >
Include 1 in GetFactors() result.
< /summary >
< remarks > If this property is set to true, then GetFactors() will include
1 in its long[] result. < /remarks >
< value > A bool value. < /value >
< /member >
< member name=”P:DiagrammaticDocumentation.DocumentedClass.IncludeSelf” >
< summary >
Include self in GetFactors() result.
< /summary >
< remarks > If this property is set to true, then GetFactors() will include
its numberToFactor parameter in its long[] result. < /remarks >
< value > A bool value. < /value >
< /member >
< /members >
< /doc
This document contains the following:
A root level
< doc > element containing all other documentation information .
An
< assembly > element containing a < name > element containing the name of the assembly to
which the XML documentation applies .
A
< members > element containing the XML documentation for each member in the assembly .
Several
< member > elements, each with a name attribute stating to which type or member the
XML documentation contained by the
< member > element applies .
The
name attributes of the < member > elements follow a consistent naming scheme. They are all names
belonging to one of the following namespaces — that is, they all start with one of the following letters:
T — Specifies that the member is a type (class, interface, strut, enumeration, or delegate) .
M — Specifies that the member is a method .
P — Specifies that the member is a property or indexer .
F — Specifies that the type is a field or enumeration member (not shown in the example) .
E — Specifies that the member is an event (not shown in the example) .
Any errors in the XML documentation for a type are shown in the generated file as a commented
< member > element:
< ! Badly formed XML comment ignored for member
“T:DiagrammaticDocumentation.DocumentedClass” >
Within a < member > element, the XML documentation for a target is inserted exactly as is (unless there is
a problem with the XML).
❑
❑
❑
❑
❑
❑
❑
❑
❑
c31.indd 1065c31.indd 1065 3/25/08 12:36:38 PM3/25/08 12:36:38 PM
Part V: Additional Techniques
1066
Example Application with XML Documentation
For the remainder of this chapter, you ’ ll look at ways to use XML documentation files; and to make this
easier, you ’ ll be using a fully functional example class library called DocumentedClasses, which comes
packed with XML documentation of almost all types.
The classes in the DocumentedClasses library are shown in Figure 31 - 7 .
Figure 31-7
The idea behind this class library is that a client application can create an instance of a Garden class and
then add instances of classes derived from
GardenContent to the garden. This can then be used to
obtain a simple graphical representation of the garden. The classes effectively form a very basic garden
design tool.
The downloadable code for this chapter includes this class library, should you want to investigate the
code for yourself, but there is no real need to present it all here. Also included in the downloadable code
is a simple client application called DocumentedClassesClient, with code as follows:
static void Main(string[] args)
{
int gardenWidth = 40;
int gardenDepth = 20;
Garden myGarden = new Garden(gardenWidth, gardenDepth);
c31.indd 1066c31.indd 1066 3/25/08 12:36:38 PM3/25/08 12:36:38 PM
Chapter 31: XML Documentation
1067
myGarden.Add(new Bench(4, 2));
myGarden.Add(new Bench(10, 2));
myGarden.Add(new Sprinkler(20, 10));
myGarden.Add(new Tree(3, 13));
myGarden.Add(new Tree(25, 7));
myGarden.Add(new Tree(35, 15));
myGarden.Add(new Flower(36, 0));
myGarden.Add(new Flower(37, 0));
myGarden.Add(new Flower(38, 0));
myGarden.Add(new Flower(39, 0));
myGarden.Add(new Flower(37, 1));
myGarden.Add(new Flower(38, 1));
myGarden.Add(new Flower(39, 1));
myGarden.Add(new Flower(37, 2));
myGarden.Add(new Flower(38, 2));
myGarden.Add(new Flower(39, 2));
myGarden.Add(new Statue(16, 3));
myGarden.Add(new Bush(20, 17));
char[,] plan = myGarden.GetPlan();
for (int y = 0; y < gardenDepth; y++)
{
for (int x = 0; x < gardenWidth; x++)
{
Console.Write(plan[x, y]);
}
Console.WriteLine();
}
Console.ReadKey();
}
This illustrates how to use the classes in DocumentedClasses, and results in the output shown in
Figure 31 - 8 .
Figure 31-8
c31.indd 1067c31.indd 1067 3/25/08 12:36:39 PM3/25/08 12:36:39 PM
Part V: Additional Techniques
1068
As you can see, very basic indeed! (Luckily, if you are a garden designer, there are better tools available.)
Of course, here you are merely interested in the XML documentation contained in DocumentedClasses.
Making Use of XML Documentation
This chapter has mentioned in several places that there is much more that you can do with XML
documentation than simply use it to supply IntelliSense information to the IDE — which isn ’ t to say that
customized IntelliSense isn ’ t an extremely useful feature.
Perhaps the simplest thing you can do with XML documentation is ship it with your assemblies and
leave it up to other people to make use of it, but this is far from ideal. In this section, you look at some of
the possibilities for getting the most out of your documentation.
Programmatically Processing XML Documentation
The most obvious thing to do with XML documentation is to make use of the wealth of XML tools in the
.NET namespaces. Using the techniques and classes you saw in Chapter 25 , it is possible to load XML
documentation into an
XmlDocument object. The following Try It Out is a simple console application that
does just that.
This Try It Out requires the XML documentation output from the example project, DocumentedClasses.
Before starting this Try It Out, download and build the DocumentedClasses solution.
Try It Out Processing XML Documentation
1.
Create a new console application called XMLDocViewer in the directory
C:\BegVCSharp\Chapter31.
2. Add a using statement for the System.Xml namespace to Program.cs :
using System;
using System.Collections.Generic;
using System.Linq;
using System.Text;
using System.Xml;
3. Modify the code in Main() as follows:
static void Main(string[] args)
{
// Load XML documentation file
XmlDocument documentation = new XmlDocument();
documentation.Load(@” \ \ \ \DocumentedClasses”
+ @”\DocumentedClasses\bin\debug\DocumentedClasses.xml”);
// Get < member > elements.
c31.indd 1068c31.indd 1068 3/25/08 12:36:39 PM3/25/08 12:36:39 PM