Beginning asp net 2.0 with c phần 2 potx
Bạn đang xem bản rút gọn của tài liệu. Xem và tải ngay bản đầy đủ của tài liệu tại đây (3.87 MB, 77 trang )
General Guidelines for Site Design
Prior to designing any web site, you benefit from reviewing the principles of a good site design. In this
book, you should keep in mind three general concepts:
❑ Endeavor to separate the presentation from the information. For example, design the title, lay-
out, and format of a page (the presentation). On that page, put a control that is configured to get
and display information (such as the list of players for the team). By dividing these goals, you
are able to make updates to each without impacting the other. For example, when a new player
is added to the team, you enter the information about the player into the site’s database, and the
page automatically displays the new list of players on the team without you having to modify
the presentation layer.
❑ Strive for a consistent look and feel throughout the site. By keeping the same colors, logo, and
arrangement on the screen, you develop a sense of presence. The loyal followers immediately
feel at home with the team colors. Return visitors will be able to use the same set of learned
behaviors for using the site.
❑ Make the site as easy to navigate as possible. First, a menu bar on all pages provides easy jumps
form one part of the site to another. Use ASP.NET 2.0 tools to indicate where the currently
viewed page is located in the site.
Standard Files for ASP.NET 2.0 Applications
ASP.NET 2.0 uses two files, common to every ASP.NET site, to hold configuration information and code
that applies to the entire site. These are the
Web.config and Global.asax files, respectively.
❑
Web.config contains configuration settings for a site; for example, for specifying a standard
customized error page to display to end users if anything on the site breaks.
❑
Global.asax contains code that handles events raised by any page on the entire site; for exam-
ple, code that is run each time a user first accesses the site (the start of a session).
Web.config Holds Settings for the Entire Site
Web.config stores values that apply to the entire site. Structured as an XML file and located in the root,
nodes hold information in three major areas:
❑ Application settings for feature availability used in development versus deployment
❑ Connection strings that hold values used when reading or writing from a data source
❑ System.Web and System.Net settings that hold everything else
System.Web settings are then broken into several subcatagories, including the following (not all are used
in WroxUnitedCS):
❑ HTTP Modules that point the page to other pages for execution of code
❑ Debugging routines that should be turned on at the time of compilation
❑ Authentication Technique
45
Site Design
05_042583 ch02.qxd 4/4/06 2:40 PM Page 45
❑ Role Manager settings (on or off?)
❑ Anonymous Identification settings (permitted or not)
❑ Error handling settings
❑ Web.SiteMap file data used for navigation and menus
❑ Profile data that is used for identifying users
❑ E-mail settings for the Simplified Mail Transfer Protocol (SMTP) (not used in WroxUnitedCS)
❑ Definition of Namespaces that identify the location of objects within larger objects (not used in
WroxUnitedCS)
System.Net holds just one setting for your purposes: a series of values for sending e-mail.
You can amend the contents of this file in two ways; the first is to edit it by hand in VWD, which, thank-
fully, is not too tricky to do. The alternative is to use the ASP.NET Web Site Administration Tool, which
you can launch from within VWD. Go to the main VWD menu and select Website➪ASP.NET
Configuration. A series of dialog boxes enable you to set values that VWD will change in Web.config
without directly opening the file. You can have a look at this tool later on in the last Try It Out in this
chapter.
The following explanation of the structure of a Web.config file takes a look at parts of the Wrox United
Web.config file, looking at sections from the top of the file and working down. If you open the file, you
can see that the structure (with opening and closing tags, each with attributes, and sometimes with child
nodes) is the same as for any other XML file. Application-wide configuration settings are made by adding
appropriate nodes and attributes. Text within the special
<! > characters is treated as a comment,
which you can add to the file to help other users understand what each part of the file is used for.
When VWD creates a
Web.config file it includes many comments that provide advice for the
settings of each section. A list of all of the values is contained in a text file located at
C:\Windows\
Microsoft.NET\Framework\v2.xxx\CONFIG\Web.config.Comments
.
The following is the start of the Wrox United
Web.config file that you can view in the download. Feel
free to import it into your site instead of typing a new web.config yourself.
<?xml version=”1.0”?>
<! Note: As an alternative to hand editing this file you can use the web admin
tool to configure settings for your application. Use the Website->Asp.Net
Configuration option in Visual Studio.
A full list of settings and comments can be found in machine.config.comments
usually located in \Windows\Microsoft.Net\Frameworks\v2.x\Config >
<configuration>
Three lines of code here are added by default to all new Web.config files. The first line contains the XML
declaration, specifying that the
Web.config file follows the XML standard. The next section is a large
comment that reminds you that you can use the administration tool, instead of editing the code. The last
item to note is the root node for the file; the
<configuration> node contains all child nodes with set-
tings relating to the content stored on the site.
46
Chapter 2
05_042583 ch02.qxd 4/4/06 2:40 PM Page 46
The next section contains a custom application setting that can be useful to change the way the sample
application runs for different environments. The large section between
<! and > is a note to pro-
grammers from VWD and is not part of the actual settings:
<!
Mode defines certain feature availability:
Full: No restrictions
Real: Runs as if a real site, without the view code and download links
>
<appSettings>
<add key=”mode” value=”Full” />
</appSettings>
The next section, the connection string section, holds sets of information about data sources. This string
generally includes authentication information that you can use to connect your code to the data stored in
your database. Connection strings are discussed in detail in Chapter 7. For now, simply notice that
within the connection strings section you have one or more tags that add strings:
<!
define the connection string to the database
>
<connectionStrings>
<add name=”WroxUnited”
connectionString=” Data Source=.\SQLEXPRESS;
AttachDbFilename=|DataDirectory|WroxUnited.mdf;
Integrated Security=True;
User Instance=True”
providerName=”System.Data.SqlClient”/>
</connectionStrings>
Note that the connectionString attribute wraps here because of page width limitations. This line of
code should remain on one line in your code.
After the connection strings, the remainder of the settings are within the
<system.web> tag. They can be
in any order—here the
httpModules setting is covered first. This value allows the site to handle user-
selected themes centrally, without requiring code in pages. Themes are covered in Chapter 5, and
although the
httpModule isn’t covered in detail in this text, the code is well commented:
<system.web>
<httpModules>
<add name=”Page” type=”Wrox.Web.GlobalEvents.ThemeModule” />
</httpModules>
Next within System.Web is the compilation value. When set to true (as illustrated in the following
code), ASP.NET 2.0 will provide output to the page describing any problems that were found during the
build of the page. This feature is useful when you’re developing the site, but it should be set to
false
prior to deployment:
<system.web>
<compilation debug=”true”>
</compilation>
47
Site Design
05_042583 ch02.qxd 4/4/06 2:40 PM Page 47
Wrox United declares site-wide values for three security settings: authentication, roles, and profiles.
Chapters 4 and 11 discuss these functions in detail. The section of
Web.config in the following code
gives you a preview of what you will learn to write. Notice how the settings establish the page to use for
log-on (
Default.aspx) and then turn on the Role Manager. You then have a set of tags that create the
Member type of role. Again, these are explained in detail in Chapters 4 and 11. The following code list-
ing saves space by not listing the VWD programmers help comments. Also, there is a break in the
WroxUnited
Web.config between the second and third settings. where there are other settings.
<authentication mode=”Forms”>
<forms loginUrl=”Default.aspx”></forms>
</authentication>
<roleManager enabled=”true”/>
<anonymousIdentification enabled=”true”/>
<profile enabled=”true”>
<properties>
<add name=”MemberName”/>
<add name=”Name”/>
<add name=”Cart” serializeAs=”Binary” type=”Wrox.Commerce.ShoppingCart”
allowAnonymous=”true”/>
</properties>
</profile>
The next section concerns handling errors that can (and will) affect the day-to-day running of your site.
Chapter 15 discusses error handling in detail, but as an introduction, ASP.NET can be set to redirect the
user to a custom error page if there is a problem. The file to display in the case of an error is declared in
the
Web.config defaultRedirect setting as follows:
<! The <customErrors> section enables configuration of what to do if/when an
unhandled error occurs during the execution of a request. Specifically, it enables
developers to configure html error pages to be displayed in place of a error stack
trace. >
<customErrors mode=”RemoteOnly”>
<error statusCode=”404” redirect=”missingPage.aspx”/>
</customErrors>
So, for example, if your database server was the victim of a power cut, your users don’t need to know
the details, but they’d like to be reassured, along the lines of “Sorry, there is a fault —we’re working
hard to fix the problem. Normal service will resume shortly.” Local administrators, on the other hand,
would like to know what the problem is so that they can get it back up and running as quickly as possi-
ble. The
RemoteOnly attribute in this example means that remote users see the friendly message,
whereas the administrator will see all the details of any error.
The last setting of System.Web identifies the file that will hold the site map, an index to all of the pages,
and their relationships to each other (as covered in Chapter 2). ASP.NET 2.0 also requires the identifica-
tion of what Provider, or reading tool, to use for the site map.
48
Chapter 2
05_042583 ch02.qxd 4/4/06 2:40 PM Page 48
<! Redefine the Site Map Provider, to add the security trimming attribute, which
is off by default >
<siteMap defaultProvider=”AspXmlSiteMapProvider” enabled=”true”>
<providers>
<clear/>
<add name=”AspXmlSiteMapProvider”
type=”System.Web.XmlSiteMapProvider,
System.Web,
Version=2.0.3600.0,
Culture=neutral,
PublicKeyToken=b03f5f7f11d50a3a”
siteMapFile=”web.sitemap”
securityTrimmingEnabled=”true”/>
</providers>
</siteMap>
The last group of settings is in System.Net. Although not explicitly used in the WroxUnitedCS applica-
tion, it could be used so that automated e-mails can be sent to a user when they forget their password,
and request that the password be sent in an e-mail. Regardless of how the e-mail is created, you must
declare the SMTP (Simplified Mail Transfer Protocol) in
Web.config as follows:
<system.net>
<mailSettings>
<! these settings define the mail server settings from: the user name from
which the email is sent - this is the application that is sending the message host:
the name of your mail server userName: the name the application will use to log
into the mail server password: the password for the above user name
>
<smtp from=””>
<network host=”your-mail-server-name”
userName=”your-user-name”
password=”your-password” />
</smtp>
</mailSettings>
</system.net>
Finally, as with all XML files, each opening tag must have a closing tag, so you finish up the file with the
following:
</system.web>
</configuration>
Web.config, as you have seen, holds site-wide settings to which all other pages can refer. This saves
you from having to repeatedly specify the same pieces of information in every page that needs it, and
you have one place to go to change settings.
Later in the book, you’ll be adding more capabilities to all your site pages, including adding code to deal
with various events that happen on each page. But, in the same way that you don’t want to specify the
same settings in every page, if you need to have the same behavior repeated on multiple pages, you’ll
need a way to share that code. There was no executable code in
Web.config —for that you need
another site-wide file —the
Global.asax file.
49
Site Design
05_042583 ch02.qxd 4/4/06 2:40 PM Page 49
Global.asax Holds Code for the Entire Site
Whereas Web.config holds values, Global.asax holds code. Global.asax, like Web.config, resides
in the root of the site. Writing code is discussed in detail in Chapter 9, but for now you can get an
overview of
Global.asax.
The code in
Global.asax executes in one of three cases. First is the case of the application as a whole
starting or stopping. Second is when each user starts or stops using the site. Third is in response to spe-
cial events taking place that could happen on any page, such as a user logging in or an error occurring.
Each of these is known as an event. When each of these events occurs, ASP.NET lets
Global.asax know,
and by editing
Global.asax, you can put code into it that will be executed in response to the events.
You’ll be using
Global.asax to share code across all the pages of the Wrox United web site later in the book.
Editing Site Configuration Through a Web Browser
Now, it’s perhaps a little daunting looking at the complex XML syntax of Web.config and the code in
Global.asax. Editing these files to make changes to the overall configuration and behavior of your appli-
cation requires a good understanding of the files’ syntax rules, and accurate typing to avoid introducing lit-
tle errors. Conveniently, though, ASP.NET 2.0 provides a graphical tool that lets you modify many of the
settings you could manually enter in
Web.config, through the Web Site Properties dialog box.
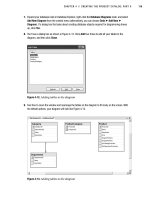
Bring up the Web Site Administration Tool by clicking the ASP.NET Configuration button at the top of
the Solution Explorer, as shown in Figure 2-8.
Figure 2-8
50
Chapter 2
05_042583 ch02.qxd 4/4/06 2:40 PM Page 50
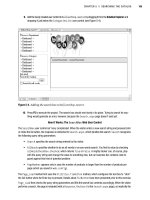
The Properties window opens, as shown in Figure 2-9.
Figure 2-9
As you can see, VWD has actually opened up a web browser showing a web site that is built into
ASP.NET, called the ASP.NET Administration Tool, through which you can edit the settings of your web
application. You’ll be using this administration tool in depth later in the book, but for now, you can
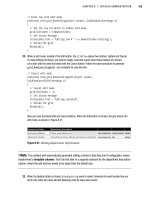
explore the Application Configuration section of the tool. Figure 2-10 shows what options are presented
to you by this page.
Although you can’t administer everything that you looked at earlier, some of the key sections from
Web.config are represented here. You have the ability to edit application settings (the contents of the
<appSettings> element you looked at earlier), e-mail settings (the <smtpMail> section you saw in the
Web.config file), and debugging and error handling (the <compilation> and <customErrors> sec-
tions you examined before).
51
Site Design
05_042583 ch02.qxd 4/4/06 2:40 PM Page 51
Figure 2-10
In this Try It Out, you see how the ASP.NET Administration Tool edits the
Web.config file for you.
Try It Out Changing Settings with the Administration Tool
1.
Working in VWD’s Solution Explorer, import into your site missingPage.aspx from the down-
load files (
C:\BegASPNET2\WroxUnitedCS).
2. Open the Web Site Administration Tool by clicking the icon on the Solution Explorer.
3. Navigate to the Application Configuration page, and click Define Default Error Page.
If you have imported the WroxUnitedCS web.config from the download at
www.wrox.com, you will find that it uses a namespace called Wrox, which has not
yet been created in this book. Ignore the warning to this effect.
52
Chapter 2
05_042583 ch02.qxd 4/4/06 2:40 PM Page 52
4. Select the Specify a URL to Use as the Default Error Page option, and select MissingPage.aspx
as the page to redirect users to when an error occurs.
5. Click the Save button.
6. Return to VWD, and open the Web.config file.
7. Scroll down until you find the <customErrors> section of the configuration, and notice that
the value of the
defaultRedirect attribute has been changed to the path of the page you
chose in the Administration Tool:
<customErrors mode=”RemoteOnly” defaultRedirect=”MissingPage.aspx”>
</customErrors>
How It Works
The Administration Tool is just a friendlier way to edit some of the settings present in Web.config,
including the default error page. When you change the application’s error handling setting through the
Administration Tool, it edits
Web.config for you —without your having to get your hands dirty editing
XML data.
Troubleshooting Site Design Errors
Now that you have a good idea of what goes into site design, here are the most common errors you
might run into when using Master pages, and the other facilities you’ve looked at in this chapter:
❑ The reference to the Master page is misspelled in a Content page. This will prevent ASP.NET
from being able to find the Master page template for a page. To avoid this, whenever possible,
use the VWD check box in the template dialog box to create the master reference.
❑ A mismatch between the ID of the content placeholder in the Master page and the
ContentPlaceHolder ID property of the content tag in the Content page will prevent your
page from displaying. Double-check that they match.
❑ The
Web.config or Global.asax files are very strict about their syntax, and errors in them
(such as typos) can be hard to track down. You can get around having to edit
Web.config by
using the ASP.NET Administration Tool, so you can be sure you haven’t introduced typographi-
cal errors into the file.
Summary
Web sites are easy to create, use, and maintain if they are well designed. ASP.NET 2.0 offers several tools
to organize the design of the site.
In this chapter, you learned that Master and Content pages create a consistent look and feel to the site.
Master pages provide the consistent sections of the pages along with a position for the material con-
tained in the Content page. Whenever possible, create the Master and Content pages using the Add New
Item choice after right-clicking the root of the site in the Solution Explorer. A Master page must have the
normal HTML and XML typing tags,
<%@ master %> on the first line, and an <asp:Content
PlaceHolder>
tag with an ID. Content pages must not have the basic HTML and XML typing tags,
53
Site Design
05_042583 ch02.qxd 4/4/06 2:40 PM Page 53
must have <%@ page masterPageFile= %> on the first line, and must at some point use an <asp:
content>
tag to contain the material to be displayed. A Master page <head> can contain the link to a
CSS if you are using one. Additionally, this chapter covered the following topics:
❑ Your site can implement multiple levels of Master pages. You can also create several Master
pages to be served depending on the requesting browser. Furthermore, a Master page can sup-
port several
<ContentPlaceHolder> tags provided that each has its own ID.
❑ Site maps contain a description of each file and its relationship to surrounding files. This XML
file can then be read by ASP.NET 2.0 server-side controls to create navigation aids. VWD does
not have a way to automatically create a site map, but the XML structure is not hard to under-
stand because each page is a SiteMapNode.
❑ Two files hold information for an entire application.
Web.config holds settings such as connec-
tion strings used with a data source, debugging routines for compilation, security settings, and
values for handling errors, among other settings.
Global.asax holds code for the entire site,
including code to run when the application as a whole starts or stops. Additional code blocks
can run when each user starts or stops using the site.
Global.asax also houses code that can
run on any page.
In the next chapter, you learn about the various server-side controls and how to use them to build
proper pages. You will construct the Wrox United home page and fill in some of the Master page you
created in this chapter.
Exercises
1. Describe the functional difference between the Web.config file and Global.asax.
2. What files discussed in this chapter are in XML format?
3. Take a look at the code for a Content page. Why does it lack directives and tags?
<!DOCTYPE HTML PUBLIC “-//W3C//DTD XHTML 1.0 Transitional//EN”
“ /><html xmlns=” /><head ></head>
4. What values must match between a set of Master and Content pages?
54
Chapter 2
05_042583 ch02.qxd 4/4/06 2:41 PM Page 54
3
Page Design
Successful web sites are generally easy to use, intuitive, and clearly presented. It’s your job (possi-
bly with the help of a friendly designer) to ensure that the sites you develop are not just functional,
but can be presented in a meaningful manner. After you have a basic site outline structure in place,
you need to make decisions about how to present the information and user interface elements.
ASP.NET, in conjunction with VWD, has some great tools for designing and laying out pages.
Recall that you’ve already created a few pages with simple content simply by dragging and drop-
ping from the Toolbox in VWD. Designing an entire site is obviously going to involve a whole lot
more dragging and dropping, but there are ways of making this process less painful.
This chapter looks at the following topics:
❑ Creating and laying out static pages
❑ HTML and the HTML viewer in VWD
❑ Server controls and dynamic content
❑ Configuring controls in Design View
❑ The controls available in the web control library
❑ Adding dynamic navigation controls to a page, and getting them to work without writing
a single line of code
If you have experience programming in HTML, some of this chapter may cover familiar territory,
but the toolset available for working with HTML in VWD is quite advanced, so it’s worth sticking
around and enjoying a light refresher.
Static Page Design
The term static refers purely to the fact that the page shown in Figure 3-1, like many others on the
Internet, is view-only (imagine an HTML page with nothing but text, or just a series of images) —
you don’t always want to have every page in a site include a form for submitting information, or
react to user input. Static pages contain, by definition, content that doesn’t change (or that rarely
06_042583 ch03.qxd 4/4/06 2:41 PM Page 55
needs to be updated). Imagine you had a personal web site that contained an “About Me” page —you
might want to change the content from time to time (if you move, change jobs, or get married), but on
the whole, you’re not likely to want to change that page more than a couple of times a year.
Figure 3-1
Static pages remind me of the Web circa 1995 —most of the sites I’d view at the time would be simple,
plain sites, and the joy of just playing with HTML tables for layout was enough to keep me occupied for
a few afternoons. Time for a quick Try It Out— you’re going to create a really simple page and see what
this page looks like in HTML view, looking at how HTML elements are structured.
Try It Out Creating a Static Page
Fire up VWD and get started. This is a light run-through —you don’t have to do much at this stage, just
follow the steps and feel comfortable with the techniques.
1. First, it will help if you download the base code for this chapter from www.wrox.com. Make
sure you place the base code folder in the following location:
C:\BegASPNET2\Chapters\
Begin\Chapter03
.
2. Open VWD and select Open Web Site from the main menu. In the dialog box that appears,
select the Chapter03 folder and click Open (see Figure 3-2).
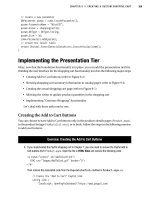
3. In the Solution Explorer on the right (shown in Figure 3-3), right-click the Chapter03 site and
select Add New Item.
4. The Add New Item dialog box appears, where you need to select a new HTML page called
StaticHTMLPage.htm, and click Add (see Figure 3-4).
56
Chapter 3
06_042583 ch03.qxd 4/4/06 2:41 PM Page 56
Figure 3-2
Figure 3-3
57
Page Design
06_042583 ch03.qxd 4/4/06 2:41 PM Page 57
Figure 3-4
5. Switch to Design View by clicking the Design button at the bottom of the page, and then type in
some text, as depicted in Figure 3-5.
Figure 3-5
Don’t worry about the actual text —this is a simple example, and you don’t have to publish this
on the web.
6. Next, from the toolbar select Layout➪Insert Table to add a table to the page. Give it two rows,
two columns, and borders and padding if you like, all of which appear in Figure 3-6.
58
Chapter 3
06_042583 ch03.qxd 4/4/06 2:41 PM Page 58
Figure 3-6
7. After you have a table, you can add content within each cell. Try adding some text to a cell, and
then drag an image tag from the HTML section of the Toolbox on the left of VWD onto the page,
as shown in Figure 3-7.
Figure 3-7
When you have a table in the designer, you can click the
<table> button at the bottom of the
screen to select only that element on the page (see Figure 3-8) —you can then modify the
padding and border attributes on the table by changing the values in the Properties box on the
right.
59
Page Design
06_042583 ch03.qxd 4/4/06 2:41 PM Page 59
Figure 3-8
8. Click the Source button at the bottom of the screen and you can see the HTML that’s generated
for you (see Figure 3-9). With some small tweaks, you can add a small amount of styling and
some links to your images.
Figure 3-9
9. To turn the nascent page into the finished example, I added some more text and images to my
version. Here’s the code for the version of the finished page that you can download from
www.wrox.com —notice the <style> attribute on the <body> tag:
<body style=”color: darkolivegreen; font-family: georgia”>
This is a simple static web page with an image and some interesting information
about some places I have been:<br />
<br />
60
Chapter 3
06_042583 ch03.qxd 4/4/06 2:41 PM Page 60
<table cellspacing=”3” cellpadding=”3” border=”1”>
<tr>
<td>
<img src=”azoreschurch.jpg” height=”100” /><br />
A church near Faja Grande, a small town on the western-most edge
of Flores - one of the 9 islands in the Azores.</td>
<td>
<img src=”budapest.jpg” height=”100” /><br />
A view of old parts of Budapest (Hungary) across the Danube.</td>
</tr>
<tr>
<td style=”height: 192px”>
<img src=”sirmione.jpg” width=”100” /><br />
A castle on the end of a peninsula on the shores of Lake Garda, Italy.</td>
<td style=”height: 192px”>
<img src=”bullring.jpg” width=”100” /><br />
Selfridges at the Bullring shopping centre - a truly remarkable piece of
architecture in Birmingham, UK.<br /></td>
</tr>
</table>
</body>
When you finish adding content to the page, you can view the page by pressing Ctrl+F5. The
result is a page that looks like Figure 3-10 (which is the same as Figure 3-1).
Figure 3-10
61
Page Design
06_042583 ch03.qxd 4/4/06 2:41 PM Page 61
How It Works
As you proceed through this chapter, you’ll become increasingly familiar with the technique of adding
layout elements in the design window, and making some changes either in the Properties pane on the
right, or by modifying the code manually. Static elements such as the ones used in this example (simple
text within a body tag, tables, and images) are used throughout both static and dynamic pages, and
understanding how to add and integrate these elements is all part of building dynamic web applications.
In this example, you gained a bit of practice in working with a simple HTML layout of a page. For exam-
ple, the elements on the page were laid out in a simple HTML table, and within each of the cells in the
table were some text and some images:
<td>
<img src=”azoreschurch.jpg” height=”100” /><br />
A church near Faja Grande, a small town on the western-most edge of Flores - one
of the 9 islands in the Azores.
</td>
The body tag in the rendered page has some simple styling attached to it that defines the color and font
used for the text on the page:
<body style=”color: darkolivegreen; font-family: georgia”>
This attribute will apply to all of the elements within the opening and closing <body> tags, hence all of
the content of the visible page.
Don’t worry if a lot of this is new to you —the next section is designed as a crash course in HTML to
help you get up to speed.
The World of HTML
If you are unfamiliar with HTML, here are some of the basic concepts you need to understand:
❑ An HTML file is human-readable text with a few extra brackets — when you browse a web
page, your web browser will understand how to convert the bracketed bits into something that
looks interesting.
❑ The bracketed bits are called elements, though strictly speaking, the element normally consists of
two tags that open and close the element, and sometimes have textual or other HTML content
between them. Some elements have only a single tag.
❑ Elements have attributes that give the browser extra information about how the element should
appear on the page.
Here’s a simple HTML element:
<div id=”divUserDetails”
style=”width:300px;height:100px;float:left;background:darkred;color:white”>
These are my details, my favorite color, and my hobbies
</div>
In this example, the <div > and </div> parts are tags describing the div element, the id=””
and style=”” bits are attributes, and the text between the two tags is the content of the element.
62
Chapter 3
06_042583 ch03.qxd 4/4/06 2:41 PM Page 62
❑ Rendering is the process of turning HTML code into visual elements, so the preceding code will
render as shown in Figure 3-11.
Figure 3-11
The following table contains some of the HTML elements you’re likely to run into.
Element Description Example Usage
<img> An image tag. This tag places an image <img src=”myimage.gif” />
on a page.
<div> A paragraph-style block of text. Text <div style=”float:left”
contained in a <div> element can be >Left-hand content
positioned on a page using various here</div>
attributes. For example, to place two <div style=”float:right”>
div
elements side-by-side, you could Right-hand content
have one with a float:left style, and here</div>
one with a float:right style.
<span> A tag used to format characters of text, <div>
so you could surround a word in a Some standard text with a
sentence with a <span> tag and make <span style=”font-weight:
the span have bold styling to highlight bold”>
that word. bold</span> word in the middle
</div>
<table> A table element that contains rows <table border=”1”>
<tr>
(<tr>) and cells (<td>). Commonly <tr>
<td>
used to position elements on a page, <td>The contents of a
should ideally be used only for tabular cell</td>
data. According to accessibility guidelines, </tr>
<div>
elements should be used for layout </table>
and positioning, but a lot of sites still use
tables because they are simpler to develop.
Table continued on following page
63
Page Design
06_042583 ch03.qxd 4/4/06 2:41 PM Page 63
Element Description Example Usage
<a> An anchor element. Defines a hyperlink Some text with a
on a page, enabling the developer to <a href=”page.htm”>
specify both the target content (in the hyperlink
href
attribute) and the text to display </a> in it
to the user.
<head> The two main parts of an HTML page <html>
<body>
are the <head> and the <body>. The <head>
<head>
is where the <title> element <title>Page Title</title>
and <link> elements (along with a </head>
variety of metadata) are placed. The <body>
<body>
contains the display elements. Contents of page
</body>
</html>
<form> A form element. When creating a site that <form id=”form1”
<input>
has a data entry form, the elements that runat=”server”>
are used to transmit data to the server <input id=”Text1”
must be contained within a <form> type=”text” />
element. The HTML <input> element is <input id=”Submit1”
quite versatile. With a type attribute of type=”submit”
text
, it appears as a text box on the screen. value=”submit” />
With a type of submit, it appears as a </form>
button that, when clicked, submits the
form to the server.
<title> Within the <head> of the page, the <title> <head>
<link>
element controls the text in the title bar of <title>Page Title</title>
the page. The <link> is most often used to <link rel=”Stylesheet”
link a page with a CSS style sheet. type=”text/css”
href=”MyCss.css” />
</head>
<script> Can contain either client-side script (script <script language=
run on the browser, normally written in ”JavaScript”>
JavaScript, or possibly VBScript), or server- alert(‘Hello World!’);
side .NET code. </script>
<script runat=”server”>
protected void Page_Load(
object sender,
EventArgs e)
{
}
</script>
64
Chapter 3
06_042583 ch03.qxd 4/4/06 2:41 PM Page 64
Element Description Example Usage
<br /> Used to help to lay out a page, the <br /> This is a string of text with a
<hr />
tag adds a line break to a string of text, and line<br />break and
the   forcibly enters a non-breaking a space.
space character; hence two words (or <hr />
elements) separated only by a   Two images separated by a
character cannot be split apart over two space:<br />
lines. The <hr /> element displays a <img src=”1.gif”> 
horizontal line across the page. ;<img src=”2.gif”>
A sample HTML page called SampleHTMLElements.htm that includes these simple examples is avail-
able in the code download for this chapter, and it appears as shown in Figure 3-12.
Figure 3-12
Gaining familiarity with the common elements in HTML is a necessity for any ASP.NET developer, and
not only do you have to understand how to use these elements, you have to learn how to use them cor-
rectly, in adhering to the standards and making sure that sites you develop are accessible by as many
users as possible.
65
Page Design
06_042583 ch03.qxd 4/4/06 2:41 PM Page 65
It’s very easy to end up with HTML that’s almost impossible to maintain, with tags and styling all over
the place. Many older tools for constructing HTML pages would take pride in destroying your carefully
crafted HTML code, and supposedly correct your code to follow the guidelines within the tool. Anyone
who used older versions of FrontPage would have cursed many a time at the fact that simply opening an
HTML page and closing it in FrontPage would permanently mangle your HTML code. Thankfully, VWD
has one of the best HTML editors I’ve ever used.
Perhaps the best way to make your code clean and easy to maintain is to adhere to a common standard.
The introduction of XHTML brought many more guidelines to web development, and following these
guidelines is a great way to improve your technique.
From HTML to XHTML Code
Although most people speak of HTML code, the fact is that if you write good HTML code, you’re actu-
ally writing XHTML. XHTML is a set of rules that, if you follow them when you write HTML code,
result in code that is more standards-compliant, and hence more likely to render as you want it to on a
variety of different client browsers.
The core rules of XHTML are as follows:
❑ Always close your tags (so you always have both a
<p> and a </p> for a paragraph) or use self-
closing tags (such as
<br /> instead of <br>).
❑ Tag and attribute names must be lowercase (so
<div id=”myDiv”> is acceptable, but <Div
ID=”myDiv”>
is not) because XHTML is case-sensitive (so <div>, <Div> and <DIV> are all dif-
ferent entities to XHTML).
❑ Attribute values must be enclosed within double quotes.
This is only a brief summary of XHTML. If you want to know more about the rules, refer to the W3 site
www.w3.org/TR/xhtml1/ where you can learn all about the XHTML standard. Section 4 of that page
deals specifically with the way XHTML differs from standard HTML.
In essence, the aim of XHTML is to provide a common set of guidelines for web developers and browser
developers to to follow. With newer web browsers such as Firefox starting to gain ground on the
Microsoft Internet Explorer–dominated landscape, it’s important that all parties agree to support
XHTML in all future iterations of their products to move away from the old problem of developing a site
that worked just fine on Internet Explorer, but looked awful on Netscape.
The move toward XHTML as the standard language of the web is gradual, and will likely never happen
fully (with browsers likely to support older tags and markup for many years yet for backward compati-
bility), but you’ll find that future maintenance of web sites that you write today will be much simpler if
you follow the XHTML guidelines. You should be less likely to see your sites break when the next ver-
sion of Internet Explorer or Firefox arrives.
Visual Web Developer has a great feature for helping you to develop standards-compliant web sites. If
you open up
SampleHTMLElements.htm in VWD, you’ll notice that there is a toolbar at the top of the
page (see Figure 3-13) that lists Internet Explorer 6.0 as the target for the web page.
Now if you change the selection so that your page is supposed to target the XHTML 1.1 standard, you’ll
see plenty of red squiggly underlining, as shown in Figure 3-14.
66
Chapter 3
06_042583 ch03.qxd 4/4/06 2:41 PM Page 66
Figure 3-13
Figure 3-14
The highlighted error shown in Figure 3-14 refers to the fact that
<br /> tags are supposed to only
appear within a block element, such as a
<div>. If you changed the first part of the page to be enclosed
within a
<div> element, this error would be fixed, without any discernable change to the appearance of
the page:
67
Page Design
06_042583 ch03.qxd 4/4/06 2:41 PM Page 67
<div>
<div style=”float:left”>Left-hand content here</div>
<div style=”float:right”>Right-hand content here</div>
<br />
</div>
Switch the validation target back to Internet Explorer 6.0 and you will see that the highlighted errors will
all disappear. Building a site for a specific browser, like IE 6.0, gives you more flexibility with the code
you write, but you cannot guarantee that your site will appear as designed on other browsers.
The rules of XHTML are also followed in any code that ASP.NET generates dynamically. You haven’t cre-
ated much in the way of dynamic content so far, so let’s move on to looking at how you can make pages
a bit more exciting.
Dynamic Content
In order to move from the static world of HTML to the dynamic world of ASP.NET, it’s important to
know what is meant by dynamic content.
When you click a button on a form on a web page, you expect something to happen —and most of the
time (if the page has been coded correctly), something does happen. You might submit an order form for
a stack of CDs by clicking a button. You might also select an item on a menu on a page— take, for exam-
ple, a menu from the Wrox United web site. Clicking the menu causes the menu contents to pop out (see
Figure 3-15) and become selectable in a similar way to clicking your Start button.
Figure 3-15
68
Chapter 3
06_042583 ch03.qxd 4/4/06 2:41 PM Page 68
Now notice that there’s no lag between clicking the menu and clicking a different menu— the page
responds just like your own system. Your browser’s actually executing some local code in order to dis-
play these items. Click a button or a hyperlink on a form and the page will likely take longer to respond.
Clicking buttons, hyperlinks, or other similar elements on a page causes your browser to start talking to
the server, asking for something, or sending some data.
Dynamic Client Code and Dynamic Server Code
Hovering over the menu on the Wrox United web site will run some code on the page that is likely writ-
ten in JavaScript, a programming language that most browsers can understand and run, and is used to
provide quick responses to user input. The page won’t flicker and refresh (unlike clicking a hyperlink)
because the browser already knows what to display when you hover over the menu. This is an example
of dynamic client code.
When a more complicated response is required (for example, when you submit an order on a shopping
site or when you want to search for a specific item on a shopping site), the page submits information
back to the web server for processing. The processing on the server is dynamic server code, and this is
the code that you will learn to write over the course of this book.
Server-side code can be written in many different languages, not just ASP.NET with VB.NET, C#, or
other .NET languages. You probably have heard of PHP and perhaps JSP (Java Server Pages) —these are
just two examples of other languages used by developers to write server-side code. Each language has
its strengths and weaknesses, but you’ll be hard-pressed to find a server-side technology that’s as easy to
use and as powerful as ASP.NET.
When it comes to creating dynamic pages in ASP.NET, the fastest way to build a dynamic page is to drag
server controls onto the page, set properties on those controls, and eventually write code to customize
their functionality. This drag-and-drop architecture has improved greatly in the latest edition of ASP.NET,
making it possible to create the structural framework for an entire site without having to write any code.
Introduction to Server Controls
When you look at the Visual Web Developer Toolbox, you’ll notice several different sections, each con-
taining a different set of tools. Many of these tools are server controls, and you’ll be using these controls
regularly when you develop ASP.NET applications.
This section starts by taking a look at some of the categories of controls available to you, and then dis-
cussing how they work.
A server control appears on the source code for an ASP.NET page as a tag; for exam-
ple,
<asp:textbox />. These tags are not standard HTML elements, so a
browser will not be able to understand them if they appear on a page. However,
when you request an ASP.NET page from a web server, these tags are converted into
HTML elements dynamically, so the browser only receives HTML content that it can
understand.
69
Page Design
06_042583 ch03.qxd 4/4/06 2:41 PM Page 69