Beginning ASP.NET 2.0 E-Commerce in C# 2005 From Novice to Professional PHẦN 2 ppt
Bạn đang xem bản rút gọn của tài liệu. Xem và tải ngay bản đầy đủ của tài liệu tại đây (3.03 MB, 70 trang )
CHAPTER 3 ■ CREATING THE PRODUCT CATALOG: PART I
49
featured products in the department page, in part because the complete list would be too long.
The text above the list of featured products is the description for the selected department,
which means you’ll need to store in the database both a name and a description for each
department.
In this page, when a particular category from the categories list is selected, all of its prod-
ucts are listed, along with updated title and description text. In Figure 3-3, you can see how that
page appears when selecting the “Birthdays” category. Also note the paging controls, which
appear in any product listings that contain more than an established number of products.
Figure 3-3. The “Birthdays” category
In any page that displays products, you can click the name or the picture of a product to
view its product details page (see Figure 3-4). In later chapters, you’ll add more functionality to
this page, such as product recommendations.
Darie-Watson_4681C03.fm Page 49 Thursday, September 15, 2005 5:42 AM
50
CHAPTER 3
■ CREATING THE PRODUCT CATALOG: PART I
Figure 3-4. The product details page
Roadmap for This Chapter
We’ll cover a lot of ground in this chapter. To make sure you don’t get lost on the way, let’s have
a look at the big picture.
The departments list will be the first dynamically generated data in your site, as the names
of the departments will be extracted from the database. We cover just the creation of the
department list in this chapter, in the form of a Web User Control, because we’ll also take a
closer look at the mechanism that makes the control work. After you understand what happens
behind the list of departments, you’ll quickly implement the other components in Chapter 4.
In Chapter 2, we discussed the three-tiered architecture that you’ll use to implement the
Web Application. The product catalog part of the site makes no exception to the rule, and its
components (including the departments list) will be spread over the three logical layers. Figure 3-5
previews what you’ll create at each tier in this chapter to achieve a functional departments list.
Darie-Watson_4681C03.fm Page 50 Thursday, September 15, 2005 5:42 AM
CHAPTER 3 ■ CREATING THE PRODUCT CATALOG: PART I
51
Figure 3-5. The components of the departments list
To implement the departments list, you’ll start with the database and make your way to
the presentation tier:
1. You’ll create the Department table in the database. This table will store data regarding
the store’s departments. Before adding this table, you’ll learn the basic concepts of
working with relational databases.
2. You’ll add the GetDepartments stored procedure to the database, which (like all the
other stored procedures you’ll write) is logically located in the data tier part of the appli-
cation. At this step, you’ll learn how to speak with relational databases using SQL.
Darie-Watson_4681C03.fm Page 51 Thursday, September 15, 2005 5:42 AM
52
CHAPTER 3
■ CREATING THE PRODUCT CATALOG: PART I
3. You’ll create the business tier components of the departments list. You’ll learn how to
communicate with the database by calling the stored procedure and sending the results
to the presentation tier.
4. Finally, you’ll implement the DepartmentsList.ascx Web User Control to display a
dynamic list of departments for your visitor, which is the goal of this chapter.
You’ll implement the rest of the product catalog in Chapter 4. So, let’s start with the database.
Storing Catalog Information
The vast majority of Web Applications, e-commerce web sites being no exception, live around
the data they manage. Analyzing and understanding the data you need to store and process is
an essential step in successfully completing your project.
The typical data storage solution for this kind of application is a relational database. However,
this is not a requirement—you have the freedom to create your own data access layer and have
whatever kind of data structures to support your application.
■Note In some particular cases, it may be preferable to store your data in plain text files or XML files instead
of databases, but these solutions are generally not suited for applications like BalloonShop, so we won’t cover
them in this book. However, it’s good to know there are options.
Although this is not a book about databases or relational database design, you’ll learn all
you need to know to understand the product catalog and make it work. For more information
about database programming using SQL Server, you should read an SQL Server book such as
Beginning SQL Server 2005 Programming (Wiley, 2005).
Essentially, a relational database is made up of data tables and the relationships that exist
between them. Because in this chapter you’ll work with a single data table, we’ll cover only the
database theory that applies to the table as a separate, individual database item. In the next
chapter, when you add the other tables to the picture, we’ll take a closer look at more theory
behind relational databases by analyzing how the tables relate to each other and how SQL
Server helps you deal with these relationships.
■Note In a real world situation, you would probably design the whole database (or at least all the tables
relevant to the feature you build) from the start. However, we chose to split the development over two chapters
to maintain a better balance of theory and practice.
So, let’s start with a little bit of theory, after which you’ll create the Department data table
and the rest of the required components.
Darie-Watson_4681C03.fm Page 52 Thursday, September 15, 2005 5:42 AM
CHAPTER 3 ■ CREATING THE PRODUCT CATALOG: PART I
53
Understanding Data Tables
This section is a quick database lesson that covers the essential information you need to know
to design simple data tables. We’ll briefly discuss the main parts that make up a database table:
• Primary keys
• Unique columns
• SQL Server data types
• Nullable columns and default values
•Identity columns
• Indexes
■Note If you have enough experience with SQL Server, you might want to skip this section and go directly
to the “Creating the Department Table” section.
A data table is made up of columns and rows. Columns are also referred to as fields, and
rows are sometimes called records. Still, in a relational database, a good deal of hidden logic
exists behind a simple list of data rows.
The Department Table
The database element of the product catalog is composed of tables, table relationships, and
stored procedures. Because this chapter only covers the departments list, you’ll only need to
create one data table: the Department table. This table will store your departments’ data and is
one of the simplest tables you’ll work with.
With the help of tools such as the Visual Studio .NET or Visual Web Developer, it’s easy to
create a data table in the database if you know what kind of data it will store. When designing a
table, you must consider which fields it should contain and which data types should be used
for those fields. Besides a field’s data type, there are a few more properties to consider; we’ll
learn about them in the following pages.
To determine which fields you need for the Department table, write down a few examples
of records that would be stored in that table. Remember from the previous figures that there
isn’t much information to store about a department—just the name and description for each
department. The table containing the departments’ data might look like Figure 3-6.
Figure 3-6. Data from the Department table
Darie-Watson_4681C03.fm Page 53 Thursday, September 15, 2005 5:42 AM
54
CHAPTER 3
■ CREATING THE PRODUCT CATALOG: PART I
From a table like this, the names would be extracted to populate the list in the upper-left
part of the web page, and the descriptions would be used as headers for the featured products list.
Primary Keys
The way you work with data tables in a relational database is a bit different from the way you
usually work on paper. A fundamental requirement in relational databases is that each data
row in a table must be uniquely identifiable. This makes sense because you usually save records
into a database so that you can retrieve them later; however, you can’t do that if each row isn’t
uniquely identifiable. For example, suppose you add another record to the Department table
shown previously in Figure 3-6, making it look like the table shown in Figure 3-7.
Figure 3-7. Two departments with the same name
Now look at this table, and tell me the description of the “Balloons for Children” depart-
ment. Yep, we have a problem! The problem arises because there are two departments with
this name. If you queried the table using the Name column and wanted to add new products to
the “Balloons for Children” department, to change the department’s name, or to do literally
anything, you would get two results!
To solve this problem, you use a primary key, which allows you to uniquely identify a
specific row out of many rows. Technically, a PRIMARY KEY is a constraint applied on a table
column that guarantees that the column will have unique values across the table.
■Note Applying a PRIMARY KEY constraint on a field also generates a unique index by default. Indexes are
objects that improve the performance of many database operations, speeding up your Web Application (you’ll
learn more about indexes a bit later).
A table can have a single PRIMARY KEY constraint, which can be composed of one or more
columns. Note that the primary key is not a column itself; instead, it’s a constraint that applies
to one or more of the existing columns. Constraints are rules that apply to data tables and make
up part of the data integrity rules of the database. The database takes care of its own integrity
and makes sure these rules aren’t broken. If, for example, you try to add two identical values for
a column that has a PRIMARY KEY constraint, the database will refuse the operation and generate
an error. We’ll do some experiments later in this chapter to show this.
Darie-Watson_4681C03.fm Page 54 Thursday, September 15, 2005 5:42 AM
CHAPTER 3 ■ CREATING THE PRODUCT CATALOG: PART I
55
■Note Although a PRIMARY KEY is not a column, but a constraint that applies to that column, from now
on, for the sake of simplicity, when we refer to primary key, we’ll be talking about the column that has the
PRIMARY KEY constraint applied to it.
Back to the example, setting the Name column as the primary key of the Department table
would solve the problem because two departments would not be allowed to have the same
name. If Name is the primary key of the Department table, searching for a row with a specific Name
will always produce exactly one result if the name exists, or no results if no records have the
specified name.
An alternative solution, and usually the preferred one, is to have an additional column in
the table, called an ID column, to act as its primary key. With an ID column, the Department
table would look like Figure 3-8.
Figure 3-8. Adding an
ID column as the primary key of Department
The primary key column is named DepartmentID. We’ll use the same naming convention
for primary key columns in the other data tables we’ll create.
There are two main reasons why it’s better to create a separate numerical primary key
column than to use Name (or another existing column) as the primary key:
• Performance: The database engine handles sorting and searching operations much
faster with numerical values than with strings. This becomes even more relevant in the
context of working with multiple related tables that need to be frequently joined (you’ll
learn more about this in Chapter 4).
• Department name changes: If you need to rely on the ID value being stable in time,
creating an artificial key solves the problem because it’s unlikely you’ll ever need to
change the ID.
In Figure 3-8, the primary key is composed of a single column, but this is not a requirement.
If the primary key is composed of more than one column, the group of primary key columns
(taken as a unit) is guaranteed to be unique (but the individual columns that form the primary
key can have repeating values in the table). In Chapter 4, you’ll see an example of a multivalued
primary key. For now, it’s enough to know that they exist.
Darie-Watson_4681C03.fm Page 55 Thursday, September 15, 2005 5:42 AM
8213592a117456a340854d18cee57603
56
CHAPTER 3
■ CREATING THE PRODUCT CATALOG: PART I
Unique Columns
UNIQUE is yet another kind of constraint that can be applied to table columns. This constraint is
similar to the PRIMARY KEY constraint because it doesn’t allow duplicate data in a column. Still,
there are differences. Although there is only one PRIMARY KEY constraint per table, you are allowed
to have as many UNIQUE constraints as you like.
Columns with the UNIQUE constraint are useful when you already have a primary key, but
you still have columns for which you want to have unique values. You can set Name to be unique
in the Department table if you want to forbid repeating values, when the DepartmentID column
is the primary key. (We won’t use the UNIQUE constraint in this book, but we mention it here for
completeness.) We decided to allow identical department names because only site administra-
tors will have the privileges to modify or change department data.
The facts that you need to remember about UNIQUE constraints are
•The UNIQUE constraint forbids having identical values on the field.
• You can have more that one UNIQUE field in a data table.
• Unlike with primary keys, a UNIQUE constraint can’t apply to more than one field.
•A UNIQUE field is allowed to accept NULL values, in which case it can only accept one
NULL value.
• Indexes are automatically created on UNIQUE and PRIMARY KEY columns.
Columns and Data Types
Each column in a table has a particular data type. By looking at the previously shown Figure 3-8
with the Department table, it’s clear that DepartmentID has a numeric data type, whereas Name
and Description contain text.
It’s important to consider the many data types that SQL Server supports so that you can
make correct decisions concerning how to create your tables. Table 3-1 isn’t an exhaustive list
of SQL Server data types, but it focuses on the main types you might come across in your project.
Refer to SQL Server 2005 Books Online, which can be freely accessed and downloaded from
for a more detailed list.
■Note Table 3-1 was created with SQL Server 2005 in mind, but these data types exist in SQL Server 2000
as well, and even SQL Server 7 comes close. The differences between SQL Server versions are reflected in
details such as the maximum size for character data.
To keep the table short, under the Data Type heading we’ve listed only the most frequently
used types, while similar data types are explained under the Description and Notes heading.
You don’t need to memorize the list, but you should get an idea of which data types are available.
Darie-Watson_4681C03.fm Page 56 Thursday, September 15, 2005 5:42 AM
CHAPTER 3 ■ CREATING THE PRODUCT CATALOG: PART I
57
Table 3-1. SQL Server 2005 Data Types
Data Type Size in Bytes Description and Notes
Int 4 Stores whole numbers from -2,147,483,648 to 2,147,483,647.
You’ll use them for ID columns and in other circumstances that
require integer numbers. Related types are SmallInt and
TinyInt. A Bit data type is able to store values of 0 and 1.
Money 8 Stores monetary data with values from -2
63
to 2
63
-1 with a
precision of four decimal places. You’ll use this data type to
store product prices, shopping cart subtotals, and so on. SQL
Server also supports the Float data type, which holds floating-
point data, but Float is not recommended for storing monetary
information because of its lack of precision. A variation of
Money is SmallMoney, which has a smaller range, but the same
precision.
DateTime 8 Supports date and time data from January 1, 1753 through
December 31, 9999 with an accuracy of three hundredths of a
second. A SmallDateTime type has a range from January 1, 1900
to June 6, 2079 with an accuracy of one minute. You’ll use this
data type to store information such as order shipping dates.
UniqueIdentifier 16 Stores a numerical Globally Unique Identifier (GUID). A GUID
is guaranteed to be unique; this property makes it very useful
in certain situations. In this book, we prefer to generate unique
identifiers using other methods, but it’s good to know there
are options.
VarChar, NVarChar Variable Stores variable-length character data. NVarChar stores Unicode
data with a maximum length of 4,000 characters and VarChar
non-Unicode data with a maximum length of 8,000 characters.
This data type is best used for storing short strings (note their
length limitation) without fixed lengths.
Char, NChar Fixed Stores fixed-length character data. Values shorter than the
declared size are padded with spaces. NChar is the Unicode
version and goes to a maximum of 4,000 characters, whereas
Char can store 8,000 characters. When the size of the strings
to be stored is fixed, it’s more efficient to use Char rather than
VarChar.
Text, NText Fixed Stores large character data. NText is the Unicode version and
has a maximum size of 1,073,741,823 characters. Text has
double this maximum size. Using these data types can slow
down the database, and it’s generally recommended to use
Char, VarChar, NChar, or NVarChar instead. When adding Text
or NText fields, their length is fixed to 16, which represents the
size of the pointer that references the location where the actual
text is stored, and not the size of the text itself. The Text data
type can be used to store large character data such as para-
graphs, long product descriptions, and so on. We won’t use
this data type in this book.
Darie-Watson_4681C03.fm Page 57 Thursday, September 15, 2005 5:42 AM
58
CHAPTER 3
■ CREATING THE PRODUCT CATALOG: PART I
■Note The names of the SQL Server 2005 data types are not case sensitive, and most programmers write
them either in full uppercase or lowercase. We’ve cased them properly in the table for readability.
Now let’s get back to the Department table and determine which data types to use. Don’t
worry that you don’t have the table yet in your database, you’ll create it a bit later. For now, you
just need to understand how data types work with SQL Server.
If you know what these data types mean, Figure 3-9 is self-explanatory. DepartmentID is an Int,
and Name and Description are VarChar data types. The little golden key at the left of DepartmentID
specifies that the column is the primary key of the Department table.
Figure 3-9. Designing the Department table
You can also see the length of the VarChar fields. Note that “length” means different things
for different data types. For numerical data types, the length is usually fixed (so it doesn’t show
up in some designers, such as the one in Figure 3-9) and it specifies the number of bytes it takes
to store one record, whereas for string data types (excluding Text and NText), the length specifies
the number of characters that can be stored in a record. This is a subtle but important difference
because for Unicode text data (NChar, NVarChar, NText), the actual storage space needed is 2 bytes
per character.
We choose to have 50 characters available for the department’s name and 1,000 for the
description. Some prefer to use NVarChar instead of VarChar—this is actually a requirement
when you need to store Unicode characters (such as Chinese text). Otherwise, the non-Unicode
versions are usually preferred because they occupy half the size their Unicode pairs need. With
large databases, the smaller size of the non-Unicode versions can make some difference.
Binary, VarBinary Fixed/Variable Stores binary data with a maximum length of 8,000 bytes.
Image
Variable
Stores binary data of maximum 2
31
- 1 bytes. Despite its name,
this field can store any kind of binary data, not just pictures. In
most circumstances, it’s easier and faster to store the files in
the OS file system and store only their names in the database,
but there are situations when it makes more sense to use the
database for storing binary data. For BalloonShop, you’ll store
the product images in the file system.
Table 3-1. SQL Server 2005 Data Types (Continued)
Data Type Size in Bytes Description and Notes
Darie-Watson_4681C03.fm Page 58 Thursday, September 15, 2005 5:42 AM
CHAPTER 3 ■ CREATING THE PRODUCT CATALOG: PART I
59
Nullable Columns and Default Values
Observe the Allow Nulls column in the design window of the Department table—some fields
have this check box checked, but others don’t. If the check box is checked, the column is allowed
to store the NULL value.
The best and shortest definition for NULL is “undefined.” In your Department table, only
DepartmentID and Name are required, so Description is optional—meaning that you are allowed
to add a new department without supplying a description for it. If you add a new row of data
without supplying a value for columns that allow nulls, NULL is automatically supplied for them.
Especially for character data, a subtle difference exists between the NULL value and an
“empty” value. If you add a product with an empty string for its description, this means that
you actually set a value for its description; it’s an empty string, not an undefined (NULL) value.
The primary key field never allows NULL values. For the other columns, it’s up to you to
decide which fields are required and which are not.
In some cases, instead of allowing NULLs, you’ll prefer to specify default values. This way, if
the value is unspecified when creating a new row, it will be supplied with the default value. The
default value can be a literal value (such as 0 for a Salary column or "Unknown" for a Description
column), or it can be a system value (such as the GETDATE function, which returns the current
date). In Chapter 10, you’ll have a column named DateCreated, which can be set to have the
default value supplied by the GETDATE function.
Identity Columns
Identity columns are “auto-numbered” columns. This behavior is similar to AutoNumber columns
in Microsoft Access. When a column is set as an identity column, SQL Server automatically
provides values for it when inserting new records into the table; by default, the database doesn’t
permit manually specified values for identity columns.
SQL Server guarantees that the generated values are always unique, which makes them
especially useful when used in conjunction with the PRIMARY KEY constraint. You already know
that primary keys are used on columns that uniquely identify each row of a table. If you set a
primary key column to also be an identity column, SQL Server automatically fills that column
with values when adding new rows (in other words, it generates new IDs), ensuring that the
values are unique.
When setting an identity column, you must specify an identity seed, which is the first value
that SQL Server provides for that column, and an identity increment value, which specifies the
number of units to increase between two consecutive records.
By default, identity seed and identity increment values are both set to 1, meaning that the
first value will be 1 and the following ones will be generated by adding 1 to the last created
value. You don’t need to specify other values because you don’t care what values are generated
anyway.
Although it wasn’t shown in the earlier Figure 3-9, DepartmentID in your Department table
is an identity column. You’ll learn how to set identity columns a bit later, when creating the
Department table.
Darie-Watson_4681C03.fm Page 59 Thursday, September 15, 2005 5:42 AM
60
CHAPTER 3
■ CREATING THE PRODUCT CATALOG: PART I
■Note The generated values for identity columns are unique over the life of your table. A value that was
generated once will never be generated again, even if you delete all the rows from the table. If you want SQL
Server to restart numbering from the initial value, you need to either delete and re-create the table or truncate
the table using the TRUNCATE SQL command. Truncating a table has the same effect as deleting and creating
it again.
Indexes
Indexes are related to SQL Server performance tuning, so we’ll mention them only briefly. For
more in-depth information about SQL Server indexes, read a specialized book on SQL Server 2005.
Indexes are database objects meant to increase the overall speed of database operations.
Indexes work on the assumption that the vast majority of database operations are read opera-
tions. Indexes increase the speed of search operations, but slow down insert, delete, and update
operations. Usually, the gains of using indexes considerably outweigh the drawbacks.
On a table, you can create one or more indexes, with each index working on one column
or on a set of columns. When a table is indexed on a specific column, its rows are either indexed
or physically arranged based on the values of that column and of the type of index. This makes
search operations on that column very fast. If, for example, an index exists on DepartmentID,
and then you do a search for department 934, the search is performed very quickly. Adding or
updating new rows is a bit slower because the index must be actualized (or the table rows
rearranged) each time these operations occur.
You should keep the following in mind about indexes:
• Indexes greatly increase search operations on the database, but they slow down operations
that change the database (delete, update, and insert operations).
• Having too many indexes can slow down the general performance of the database. The
general rule is to set indexes on columns frequently used in WHERE, ORDER BY, and GROUP BY
clauses, used in table joins, or having foreign-key relationships with other tables.
• By default, indexes are automatically created on primary key and unique table columns.
You can use dedicated tools to test the performance of a database under stress conditions
with and without particular indexes; in fact, a serious database administrator will want to make
some of these tests before deciding on a wining combination for indexes. You can also use the
Database Tuning Advisor that can be accessed through SQL Server Management Studio (this
doesn’t ship with the Express Edition, however). Consult a specialized SQL Server book for
more details on these subjects.
In your application, you’ll rely on the indexes that are automatically created on the
primary key columns, which is a safe combination for our kind of web site.
Darie-Watson_4681C03.fm Page 60 Thursday, September 15, 2005 5:42 AM
CHAPTER 3 ■ CREATING THE PRODUCT CATALOG: PART I
61
Creating the Department Table
You created the BalloonShop database in Chapter 2. In the following exercise, you’ll add the
Department table to it.
We recommend that you create the Department table by following the steps in the exercise.
Alternatively, you can use the SQL scripts for this book in the Source Code area of the Apress
web site ( to create and populate the Department table. The script file
that creates the Department table is named CreateDepartment.sql, and you can execute it using
the SQL Server Express Manager utility (see Appendix A for installation instructions).
Exercise: Creating the Department Table
1. Using the Database Explorer window in Visual Web Developer, open the BalloonShop data connection
that you created in Chapter 2. Remember, if Database Explorer is not visible, activate it using View ➤
Database Explorer or by using the default shortcut Ctrl+Alt+S.
2. Expand the BalloonShop database connection node, right-click the Tables node, and select Add New
Table from the context menu. Alternatively, after connecting to the database, you can choose Data ➤
Add New ➤ Table.
3. A form appears where you can add columns to the new table. Using this form, add three columns, with
the properties described in Table 3-2.
■Note You set a column to be the primary key by right-clicking it and clicking the Set Primary Key item
from the context menu. You set a column to be an identity column by expanding the Identity Specification
item from its Column Properties window, and setting the (Is Identity) node to Yes. You can also access the
Identity Increment and Identity Seed values, if you should ever want to use other values than the defaults.
After adding these fields, the form should look like Figure 3-10 in Visual Studio.
Table 3-2. Designing the Department Table
Field Name Data Type Other Properties
DepartmentID int Primary Key and Identity column
Name varchar(50) Don’t allow NULLs
Description varchar(1000) Allow NULLs
Darie-Watson_4681C03.fm Page 61 Thursday, September 15, 2005 5:42 AM
62
CHAPTER 3
■ CREATING THE PRODUCT CATALOG: PART I
Figure 3-10. The three fields of the Department table
4. Now that everything is in place, you need to save the newly created table. Press Ctrl+S or select File ➤
Save Table1. When asked, type Department for the table name.
5. After creating the table in the database, you can open it to add some data. To open the Department
table for editing, right-click it in Database Explorer and select Show Table Data from the context
menu. (Alternatively, you can choose Database ➤ Show Table Data after selecting the table in Database
Explorer.) Using the integrated editor, you can start adding rows. Because DepartmentID is an identity
column, you cannot manually edit its data—SQL Server automatically fills this field, depending on the
identity seed and identity increment values that you specified when creating the table.
6. Add two departments, as shown in Figure 3-11.
Figure 3-11. Adding two sample rows to the Department table
Darie-Watson_4681C03.fm Page 62 Thursday, September 15, 2005 5:42 AM
8213592a117456a340854d18cee57603
CHAPTER 3 ■ CREATING THE PRODUCT CATALOG: PART I
63
■Note To ensure consistency with the scripts in the Source Code area on the Apress web site (and to make
your life easier), make sure the department IDs are 1 and 2, as shown in Figure 3-11. Because DepartmentID
is an identity column, an ID value is generated only once, even if you remove records from the table in the
meantime. The only way to reset the identity values generator is to delete and re-create the table, or to truncate
the table. The easiest way to truncate the table is to start SQL Server Express Manager, log in to your local
SQL Server Express Instance (by default, named localhost\SqlExpress), and execute the following
SQL commands:
USE BalloonShop
TRUNCATE TABLE Department
How It Works: The Database Table
You have just created your first database table! You also set a primary key, set an identity column, and then filled the
table with some data. As you can see, as soon as you have a clear idea about the structure of a table, Visual Web
Developer and SQL Server make it very easy to implement.
Let’s continue by learning how to programmatically access and manipulate this data with SQL code.
Communicating with the Database
Now that you have a table filled with data, let’s do something useful with it. The ultimate goal
with this table is to get the list of department names from the database using C# code.
To get data from a database, you first need to know how to communicate with the database.
SQL Server understands a language called Transact-SQL (T-SQL). The usual way of communi-
cating with SQL Server is to write a T-SQL command, send it to SQL Server, and get the results
back. However, these commands can be sent either directly from the business tier to SQL Server
(without having an intermediary data tier) or can be centralized and saved as stored procedures
as part of the database.
Stored procedures are database objects that store programs written in T-SQL. Much like
normal functions, stored procedures accept input and output parameters and have return values.
■Note As mentioned in Chapter 2, SQL Server 2005 introduces for the first time the notion of managed
stored procedures, which are programs written in a .NET language that execute inside SQL Server. Writing
managed stored procedures is an advanced topic outside the scope of this book, but it’s good to know that
they exist.
Darie-Watson_4681C03.fm Page 63 Thursday, September 15, 2005 5:42 AM
64
CHAPTER 3
■ CREATING THE PRODUCT CATALOG: PART I
You don’t need to use stored procedures if you want to perform database operations. You
can directly send the SQL commands from an external application to SQL Server. When using
stored procedures, instead of passing the SQL code you want executed, you just pass the name
of the stored procedure, and the values for any parameters it might have. Using stored proce-
dures for data operations has the following advantages:
•Storing SQL code as a stored procedure usually results in better performance because
SQL Server generates and caches the stored procedure execution plan when it’s first
executed.
• Using stored procedures allows for better maintainability of the data access and manip-
ulation code, which is stored in a central place, and permits easier implementation of
the three-tier architecture (the stored procedures forming the data tier).
• Security can be better controlled because SQL Server permits setting different security
permissions for each individual stored procedure.
• SQL queries created ad hoc in C# code are more vulnerable to SQL injection attacks,
which is a major security threat. Many Internet resources cover this security subject,
such as the article at />• This might be a matter of taste, but having the SQL logic separated from the C# code
keeps the C# code cleaner and easier to manage; it looks better to call the name of a
stored procedure than to join strings to create an SQL query to pass to the database.
Your goal for this section is to write the GetDepartments stored procedure, but first, let’s
take a quick look at SQL.
Speaking the Database Language
SQL (Structured Query Language) is the language used to communicate with modern Relational
Database Management Systems (RDBMS). Most database systems support a particular dialect
of SQL, such as T-SQL (Transact-SQL) for SQL Server and PL/SQL (Procedural Language extensions
to SQL) for Oracle. Because T-SQL is a big subject when analyzed in detail, we’ll briefly introduce it
and cover just enough so you’ll understand the code in your stored procedures.
■Tip If you’re interested in entering the world of SQL, we recommend another book we’ve authored called
The Programmer’s Guide to SQL (Apress, 2003). It covers the SQL standard and its dialects implemented in
SQL Server, Oracle, DB2, MySQL, and Access.
The basic and most important SQL commands are SELECT, INSERT, UPDATE, and DELETE. Their
names are self-explanatory, and they allow you to perform basic operations on the database.
You can use SQL Server Express Manager to test these commands with your newly created
Department table. Start SQL Server Express Manager, log in to your local SQL Server Express
Instance (by default, named localhost\SqlExpress), and then execute the following command
Darie-Watson_4681C03.fm Page 64 Thursday, September 15, 2005 5:42 AM
CHAPTER 3 ■ CREATING THE PRODUCT CATALOG: PART I
65
that connects you to the BalloonShop database (to execute the command, you can use the Execute
button on the toolbar, or choose Query ➤ Execute, or press the F5 shortcut key):
USE BalloonShop
After executing this command, you should get a “Command(s) completed successfully”
message. After you connect to the database, you’re ready to test the SQL commands you’re
about to learn.
Be aware that each SQL command has many optional arguments, and they can become
more complex than those presented here. Still, to keep the presentation short and simple,
you’ll learn the most important and frequently used parameters, and we’ll get into more details
later in the book.
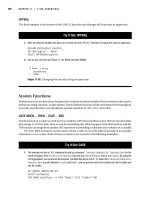
SELECT
The SELECT statement is used to query the database and retrieve selected data that match the
criteria you specify. Its basic structure is
SELECT <column list>
FROM <table name(s)>
[WHERE <restrictive condition>]
■Note Although SQL is not case sensitive, in this book the SQL commands and queries appear in uppercase
for consistency and clarity. The WHERE clause appears in brackets because it’s optional.
The simplest SELECT command you can execute on your BalloonShop database is
SELECT * FROM Department
If you’ve created and populated the Department table as described in the exercises, you
should get the results shown in Figure 3-12.
Figure 3-12. Executing a simple SQL command using SQL Express Manager
Darie-Watson_4681C03.fm Page 65 Thursday, September 15, 2005 5:42 AM
66
CHAPTER 3
■ CREATING THE PRODUCT CATALOG: PART I
The “*” wildcard you used in the SQL query means “all columns.” Most of the time, unless
you have a serious reason to use it, it’s good to avoid using this wildcard and to specify the
columns you want returned manually, like this:
SELECT DepartmentID, Name, Description
FROM Department
The following command returns the name of the department that has the DepartmentID of
1. In your case, the returned value is "Anniversary Balloons", but you would receive no results
if there were no departments with an ID of 1.
SELECT Name FROM Department WHERE DepartmentID = 1
INSERT
The INSERT statement is used to insert or add a row of data into the table. Its syntax is as follows:
INSERT [INTO] <table name> (column list) VALUES (column values)
The following INSERT statement adds a department named “Mysterious Department” to
the Department table:
INSERT INTO Department (Name) VALUES ('Mysterious Department')
■Tip The INTO keyword is optional, but including it makes the statement easier to read.
We didn’t specify any value for the Description field because it was marked to allow NULLs
in the Department table. This is why you can omit specifying a value, if you want to. However,
the Name field is required, so if you tried, for example, to specify a description without specifying
a name, you would get an error:
INSERT INTO Department (Description) VALUES ('Some Description Here')
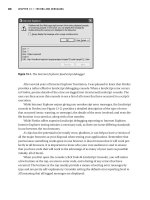
The error message specifies
.Net SqlClient Data Provider: Msg 515, Level 16, State 2, Line 1
Cannot insert the value NULL into column 'Name',
table 'balloonshop.dbo.Department'; column
does not allow nulls. INSERT fails.
The statement has been terminated.
Also note that you didn’t specify a DepartmentID. Because DepartmentID was set as an identity
column, you’re not allowed to manually specify values for this column. SQL Server can guarantee
this has unique values, but only if you don’t interfere with it.
So, if you can’t specify a value for DepartmentID, how can you determine which value was
automatically supplied by SQL Server? For this, you have a special variable named @@IDENTITY.
You can type its value by using the SELECT statement. The following two SQL commands add a
new record to Department and return the DepartmentID of the row just added:
Darie-Watson_4681C03.fm Page 66 Thursday, September 15, 2005 5:42 AM
CHAPTER 3 ■ CREATING THE PRODUCT CATALOG: PART I
67
INSERT INTO Department (Name) Values ('Some New Department')
SELECT @@IDENTITY
UPDATE
The UPDATE statement is used to modify existing data and has the following syntax:
UPDATE <table name>
SET <column name> = <new value> [, <column name> = <new value> ]
[WHERE <restrictive condition>]
The following query changes the name of the department with the ID of 43 to Cool➥
Department. If there were more departments with that ID, all of them would be modified, but
because DepartmentID is the primary key, you can’t have more departments with the same ID.
UPDATE Department SET Name='Cool Department' WHERE DepartmentID = 43
Be careful with the UPDATE statement, because it makes it easy to mess up an entire table.
If the WHERE clause is omitted, the change is applied to every record of the table, which you
usually don’t want to happen. SQL Server will be happy to change all your records; even if all
departments in the table would have the same name and description, they would still be
perceived as different entities because they have DepartmentIDs.
DELETE
The syntax of the DELETE command is actually very simple:
DELETE [FROM] <table name>
[WHERE <restrictive condition>]
The FROM keyword is optional and can be omitted. We generally use it because it makes the
query sound more like normal English.
Most times, you’ll want to use the WHERE clause to delete a single row:
DELETE FROM Department
WHERE DepartmentID = 43
As with UPDATE, be careful with this command, because if you forget to specify a WHERE
clause, you’ll end up deleting all the rows in the specified table. The following query deletes
all the records in Department. The table itself isn’t deleted by the DELETE command.
DELETE FROM Department
■Tip As with INSERT [INTO], the FROM keyword is optional. Add it if you feel it makes the statement
easier to understand.
Darie-Watson_4681C03.fm Page 67 Thursday, September 15, 2005 5:42 AM
68
CHAPTER 3
■ CREATING THE PRODUCT CATALOG: PART I
Creating Stored Procedures
You need to create the GetDepartments stored procedure, which returns department information
from the Department table. This stored procedure is part of the data tier and will be accessed
from the business tier. The final goal is to have this data displayed in the user control.
The SQL code that retrieves the necessary data and that you need to save to the database
as the GetDepartments stored procedure is the following:
SELECT DepartmentID, Name, Description FROM Department
This command returns all the department information.
■Caution Unless you have a specific reason to do so, never ask for all columns (using the * wildcard) when
you only need a part of them. This generates more traffic and stress on the database server than necessary
and slows down performance. Moreover, even if you do need to ask for all columns in the table, it’s safer to
mention them explicitly to protect your application in case the number or order of columns changes in future.
Saving the Query As a Stored Procedure
As with data tables, after you know the structure, implementing the stored procedure is a piece
of cake. Now that you know the SQL code, the tools will help you save the query as a stored
procedure easily.
The syntax for creating a stored procedure that has no input or output parameters is
as follows:
CREATE PROCEDURE <procedure name>
AS
<stored procedure code>
If the procedure already exists and you just want to update its code, use ALTER PROCEDURE
instead of CREATE PROCEDURE.
Stored procedures can have input or output parameters. Because GetDepartments doesn’t
have any parameters, you don’t have to bother about them right now. You’ll learn how to use
input and output parameters in Chapter 4.
In the following exercise, you’ll add the GetDepartments stored procedure to your database.
■Note Alternatively, you can execute the GetDepartments.sql script file in the BalloonShop database,
which creates the GetDepartments stored procedure.
Darie-Watson_4681C03.fm Page 68 Thursday, September 15, 2005 5:42 AM
CHAPTER 3 ■ CREATING THE PRODUCT CATALOG: PART I
69
Exercise: Writing the Stored Procedure
1. Make sure the data connection to the BalloonShop database is expanded and selected in Database
Explorer. Choose Data ➤ Add New ➤ Stored Procedure. Alternatively, you can right-click the Stored
Procedures node in Server Explorer and select Add New Stored Procedure.
2. Replace the default text with your GetDepartments stored procedure:
CREATE PROCEDURE GetDepartments AS
SELECT DepartmentID, Name, Description
FROM Department
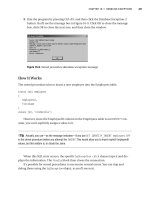
3. Press Ctrl+S to save the stored procedure. Unlike with the tables, you won’t be asked for a name because the
database already knows that you’re talking about the GetDepartments stored procedure.
■Note Saving the stored procedure actually executes the SQL code you entered, which creates the stored
procedure in the database. After saving the procedure, the CREATE keyword becomes ALTER, which is the
SQL command that changes the code of an existing procedure.
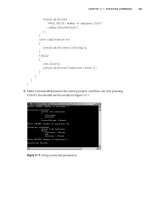
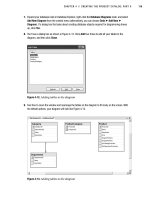
4. Now test your first stored procedure to see that it’s actually working. Navigate to the GetDepartments
stored procedure node in Database Explorer and select Execute, as shown in Figure 3-13.
Figure 3-13. Executing a stored procedure from Visual Web Developer
Darie-Watson_4681C03.fm Page 69 Thursday, September 15, 2005 5:42 AM
8213592a117456a340854d18cee57603
70
CHAPTER 3
■ CREATING THE PRODUCT CATALOG: PART I
5. After running the stored procedure, you can see the results in the Output window (see Figure 3-14). You
can open the Output window by choosing View ➤ Other Windows ➤ Output or by pressing Ctrl+Alt+O.
Figure 3-14. The Output window shows the results.
How it Works: The GetDepartments Stored Procedure
You’ve just finished coding the data tier part that reads the departments list!
The results in the Output window confirm your stored procedure works as expected. You can also test the stored
procedure by using SQL Express Manager and executing the stored procedure from there:
USE BalloonShop
EXEC GetDepartments
Adding Logic to the Site
The business tier (or middle tier) is said to be the brains of the application because it manages
the application’s business logic. However, for simple tasks such as getting a list of departments
from the data tier, the business tier doesn’t have much logic to implement. It just requests the
data from the database and passes it to the presentation tier.
For the business tier of the departments list, you’ll implement three classes:
• GenericDataAccess implements common functionality that you’ll then reuse whenever
you need to access the database. Having this kind of generic functionality packed in a
separate class saves keystrokes and avoids bugs in the long run.
• CatalogAccess contains product catalog specific functionality, such the GetDepartments
method that will retrieve the list of departments from the database.
• BalloonShopConfiguration and Utilities contain miscellaneous functionality such as
sending emails, which will be reused in various places in BalloonShop.
In Chapter 4, you’ll keep adding methods to these classes to support the new pieces of
functionality.
Darie-Watson_4681C03.fm Page 70 Thursday, September 15, 2005 5:42 AM
CHAPTER 3 ■ CREATING THE PRODUCT CATALOG: PART I
71
Connecting to SQL Server
The main challenge is to understand how the code that accesses the database works. The .NET
technology that permits accessing a database from C# code is called ADO.NET. ADO.NET
groups all .NET classes that are related to database access. This is the most modern Microsoft
data-access technology, and it can be used from any .NET language.
ADO.NET is a complex subject that requires a separate book by itself, so we’ll cover just
enough to help you understand how your business tier works. For more information about
ADO.NET, refer to Beginning ASP.NET 2.0 Databases: From Novice to Professional (Apress, 2005).
The data access class named GenericDataAccess that you’ll write will make extensive use of
many ADO.NET features, including features new to ADO.NET 2.0 (we’ll highlight these features
at the proper time). The GenericDataAccess class deals with accessing the database, executing
stored procedures, and returning the retrieved data. This class will be part of the business tier
and will provide generic functionality for the other business tier classes.
Each database operation always consists of three steps:
1. Open a connection to the SQL Server database.
2. Perform the needed operations with the database and get back the results.
3. Close the connection to the database.
Before you implement the GenericDataAccess class itself, which implements all these
steps, we’ll have a quick look at each step individually.
■Tip Always try to make the second step (executing the commands) as fast as possible. Keeping a data
connection open for too long or having too many database connections open at the same time is expensive
for your application’s performance. The golden rule is to open the connection as late as possible, perform the
necessary operations, and then close it immediately.
The class used to connect to SQL Server is SqlConnection. When creating a new database
connection, you always need to specify at least three important pieces of data:
• The name of the SQL Server instance you’re connecting to
• The authentication information that will permit you to access the server
• The database you want to work with
This connection data is grouped in a connection string, which needs to be passed to the
SqlConnection object. The following code snippet demonstrates how to create and open a
database connection:
Darie-Watson_4681C03.fm Page 71 Thursday, September 15, 2005 5:42 AM
72
CHAPTER 3
■ CREATING THE PRODUCT CATALOG: PART I
// Create the connection object
SqlConnection connection = new SqlConnection();
// Set the connection string
connection.ConnectionString = "Server=(local)\SqlExpress; " +
"User ID=johnny; Password=qwerty;" +
"Database=BalloonShop";
// Open the connection
connection.Open();
The code is fairly straightforward: you first create a SqlConnection object, then set its
ConnectionString property, and finally open the connection. A connection needs to be opened
before using it for any operations.
Understanding the connection string is important—if your program has problems
connecting to the database, these problems likely can be solved by “fixing” the connection
string (assuming that SQL Server is properly configured and that you actually have access to it).
The connection string contains the three important elements. The first is the name of the
SQL Server instance you’re connecting to. For the SQL Server 2005 Express Edition, the default
instance name is (local)\SqlExpress. You’ll want to change this if your SQL Server instance
has another name. You can use your computer name instead of (local). Of course, if you
connect to a remote SQL Server instance, you’ll need to specify the complete network path
instead of (local).
After specifying the server, you need to supply security information needed to log in to the
server. You can log in to SQL Server by either using SQL Server Authentication (in which case
you need to supply a SQL Server username and password as shown in the code snippet) or by
using Windows Authentication (also named Windows Integrated Security). With Windows
Integrated Security, you don’t have to supply a username and password because SQL Server
uses the Windows login information of the currently logged-in user.
To log in using Windows Authentication, you’ll need to supply Integrated Security=True
(or Integrated Security=SSPI) instead of User ID=username; Password=password. The final part
of the connection string specifies the database you’ll be working with.
Instead of setting the connection string after creating the SqlConnection object, you can
provide the connection string right when creating the SqlConnection object:
// Create the connection object and set the connection string
SqlConnection connection = new SqlConnection(" connection string ");
// Open the connection
connection.Open();
A final note about the connection string is that several synonyms can be used inside it; for
example, instead of Server, you can use Data Source or Data Server, and instead of Database,
you can use Initial Catalog. The list is much longer, and the complete version can be found
in SQL Server 2005 Books Online.
Darie-Watson_4681C03.fm Page 72 Thursday, September 15, 2005 5:42 AM
CHAPTER 3 ■ CREATING THE PRODUCT CATALOG: PART I
73
CONFIGURING SQL SERVER SECURITY
Because connection problems are common, many readers have asked for additional information about fixing
connection problems. Let’s talk about configuring SQL Server to accept connections from within your web site,
considering that you have done the installation procedures as explained in Appendix A. If you’re using an external
SQL Server instance, such as the one provided by your web hosting company, you’ll need to request the
connection string details from the system administrator or the hosting company.
Because the configuration details can be boring, you can skip these sections for now, if you want. If the
BalloonShop project throws a connectivity exception when executed, you can come back and see what’s wrong.
SQL Server can be configured to work in Windows Authentication Mode or in Mixed Mode. In Mixed
Mode, SQL Server accepts connections through both Windows Authentication and SQL Server Authentication.
You can’t set SQL Server to accept connection only through SQL Server Authentication.
If you don’t specify otherwise at installation, by default SQL Server works in Windows Authentication
Mode, in which SQL Server recognizes you by your Windows login. This is why you don’t need to specify any
extra credentials when accessing SQL Server from Visual Web Developer or when connecting to your database
using SQL Express Manager.
However, an ASP.NET application running through IIS will authenticate itself using a special account
named ASPNET (in Windows 2003 Server, this account is named Network Service), which doesn’t have by
default privileges to access SQL Server, not to mention the BalloonShop database. As a result, if you’re
using IIS, you’ll need to give rights to the ASPNET account to access the BalloonShop database, in order for
your application to function properly. The integrated web server that ships with Visual Web Developer runs
under the credentials of the logged-in user, making your life easier from this point of view (you don’t need to
set any security options, as your site will have full privileges to the BalloonShop database by default).
Alternative methods to solve the connection problem when you use IIS include enabling SQL Server
Authentication and using a user ID and password in the connection string, or using a technique called ASP.NET
impersonation, when the ASP.NET application is executed under the credentials of another Windows user
than ASPNET. However, we’ll not discuss the details of using these techniques here.
To enable the ASPNET account to access the BalloonShop database, you need to follow these steps:
1. Start SQL Express Manager, specify the SQL Server Instance name (localhost\SqlExpress by
default), and log in using Windows Authentication.
2. Use the sp_grantlogin stored procedure to add a Windows user account to the SQL Server database.
This command grants the ASPNET account the privilege to connect to SQL Server. Be sure to use the
name of your local machine instead of MachineName.
EXEC sp_grantlogin 'MachineName\ASPNET'
3. After giving the ASPNET account the privilege to connect to SQL Server, you need to give it the privilege
to access to the BalloonShop database:
USE BalloonShop
EXEC sp_grantdbaccess 'MachineName\ASPNET'
Darie-Watson_4681C03.fm Page 73 Thursday, September 15, 2005 5:42 AM