LEGO MINDSTORMS - Dark Side Robots Transports and Creatures Part 6 pot
Bạn đang xem bản rút gọn của tài liệu. Xem và tải ngay bản đầy đủ của tài liệu tại đây (2.22 MB, 20 trang )
Robot 4 • Go-Rilla
88
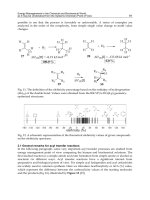
Drive Step: 20
Again, take a look at the
smaller image; it shows
how all of these pieces
fit together from the
front view of the drive
sub-assembly.
Inventing…
Customizing the Go-Rilla
The Go-Rilla’s center of gravity plays a very important role
in allowing him to move so quickly—however, this also
makes it one of the most difficult Droids in this book to
customize. Any additions to one side of the Go-Rilla will
have to be balanced out on the opposite side. For
example, if you add some facial features to the front of
the Go-Rilla, you will need to add something to its back
as well to compensate for the shift in weight.
227_LEGO_DSR_04.qxd 7/23/02 4:36 PM Page 88
Robot 4 • Go-Rilla
89
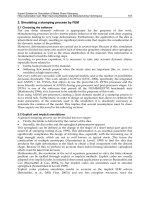
Right Leg Step: Complete
Here is what the right leg sub-
assembly should look like
when it is complete.
Right Leg Step: 1
Right Leg Step: 2
The Right Leg
Let’s begin constructing the
right leg sub-assembly.
227_LEGO_DSR_04.qxd 7/23/02 4:36 PM Page 89
Robot 4 • Go-Rilla
90
Right Leg Step: 3
The Left Leg
Left Leg Step: Complete
Here is what the left leg
sub-assembly should look
like when it is complete.
Left Leg Step: 1
Let’s begin constructing the
left leg sub-assembly.
227_LEGO_DSR_04.qxd 7/23/02 4:36 PM Page 90
Robot 4 • Go-Rilla
91
Left Leg Step: 2
Left Leg Step: 3
227_LEGO_DSR_04.qxd 7/23/02 4:36 PM Page 91
Robot 4 • Go-Rilla
92
Final Assembly
You are now ready to take all of the sub-assemblies you have made (the right and left leg sub-
assemblies), and attach them to the drive sub-assembly.
Final Assembly Step: Complete
Here is what the
Go-Rilla should
look like when
the final assembly
is complete.
Final Assembly Step: 1
Begin the final assembly by using a
#3 axle to attach the right leg sub-
assembly to the drive sub-assembly
as shown.
227_LEGO_DSR_04.qxd 7/23/02 4:36 PM Page 92
Robot 4 • Go-Rilla
93
Final Assembly Step: 2
Use a #3 axle to attach the left
leg sub-assembly to the drive sub-
assembly as shown, and the Go-Rilla
is complete!
227_LEGO_DSR_04.qxd 7/23/02 4:36 PM Page 93
227_LEGO_DSR_04.qxd 7/23/02 4:36 PM Page 94
Robot 5
95
X-Stormer
227_LEGO_DSR_05.qxd 7/29/02 9:35 AM Page 95
The X-Stormer, a four-legged transport and combat vehicle, was a prototype of
what would eventually become the AT-AT. Imperial engineers worked for many
years to create the X-Stormers, but once the newer AT-ATs were introduced to
the Imperial Army, the X-Stormers were quickly phased out. However, many of
them ended up on the black market, where they were picked up by a variety of
interested buyers. Rumor has it that the Hutts own several of these surplus X-
Stormers, although what they intend to do with them is unknown.
The X-Stormer needs two rubber bands to make its head bounce up and
down as it jumps. We recommend small rubber bands like the ones orthodon-
tists use in dental work if you can find them.
Bricks & Chips…
Micro Scout Programs
You can use any of the Micro Scout’s programs with the X-Stormer.
Robot 5 • X-Stormer
96
227_LEGO_DSR_05.qxd 7/29/02 9:36 AM Page 96
Robot 5 • X-Stormer
97
The Body
Body Step: Complete
Here is what the body sub-assembly
should look like when it is complete.
Body Step: 1
Body Step: 2
Body Step: 3
227_LEGO_DSR_05.qxd 7/29/02 9:36 AM Page 97
Robot 5 • X-Stormer
98
Body Step: 4
Body Step: 5
Body Step: 6
227_LEGO_DSR_05.qxd 7/29/02 9:36 AM Page 98
Robot 5 • X-Stormer
99
Body Step: 7
Body Step: 8
Body Step: 9
Body Step: 10
227_LEGO_DSR_05.qxd 7/29/02 9:36 AM Page 99
Robot 5 • X-Stormer
100
Body Step: 11
Body Step: 12
Insert the #5 axle through the
middle hole of th 1x3 brick and
the gears as shown.
227_LEGO_DSR_05.qxd 7/29/02 9:36 AM Page 100
Robot 5 • X-Stormer
101
Body Step: 13
Body Step: 14
227_LEGO_DSR_05.qxd 7/29/02 9:36 AM Page 101
Robot 5 • X-Stormer
102
Body Step: 16
Body Step: 15
227_LEGO_DSR_05.qxd 7/29/02 9:36 AM Page 102
Robot 5 • X-Stormer
103
Body Step: 17
Body Step: 18
227_LEGO_DSR_05.qxd 7/29/02 9:36 AM Page 103
Robot 5 • X-Stormer
104
Body Step: 19
Body Step: 20
227_LEGO_DSR_05.qxd 7/29/02 9:36 AM Page 104
Robot 5 • X-Stormer
105
Body Step: 21
Body Step: 22
227_LEGO_DSR_05.qxd 7/29/02 9:36 AM Page 105
Robot 5 • X-Stormer
106
Body Step: 23
Body Step: 24
227_LEGO_DSR_05.qxd 7/29/02 9:36 AM Page 106
Robot 5 • X-Stormer
107
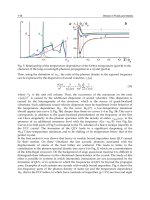
Body Step: 25
Attach the 1x3 liftarms
as shown (all pointing in
the same direction). If you
want the X-Stormer to walk instead
of jump, put the 1x3 liftarms on one side pointing in the opposite direction from
those on the other side (i.e. pointing up on one side and down on the other).
The Front Laser
Front Laser Step: Complete
Here is what the front laser
sub-assembly should look like
when it is complete.
Front Laser Step: 1
Front Laser Step: 2
227_LEGO_DSR_05.qxd 7/29/02 9:36 AM Page 107