Newnes Sensor Technology Handbook 2005 Yyepg Lotb Part 11 pdf
Bạn đang xem bản rút gọn của tài liệu. Xem và tải ngay bản đầy đủ của tài liệu tại đây (816.93 KB, 40 trang )
Chapter 15
390
These two signals are subtracted from each other by the error amplifier to yield an AC
error signal of the form:
V sinωt [sinθ cosϕ – cosθ sinϕ]. Using a simple trigonometric identity, this re-
duces to:
V sinωt [sin (θ –ϕ)].
The detector synchronously demodulates this AC error signal, using the resolver’s ro-
tor voltage as a reference. This results in a DC error signal proportional to sin(θ – ϕ).
The DC error signal feeds an integrator, the output of which drives a voltage-con-
trolled-oscillator (VCO). The VCO, in turn, causes the up/down counter to count in
the proper direction to cause:
sin (θ – ϕ) → 0.
When this is achieved,
θ – ϕ → 0,
and therefore
ϕ = θ
to within one count. Hence, the counter's digital output, ϕ, represents the angle θ. The
latches enable this data to be transferred externally without interrupting the loop’s
tracking.
Figure 15.3.14: Resolver-to-digital converter (RTD).
Position and Motion Sensors
391
This circuit is equivalent to a so-called type-2 servo loop, because it has, in effect, two
integrators. One is the counter, which accumulates pulses; the other is the integrator at
the output of the detector. In a type-2 servo loop with a constant rotational velocity in-
put, the output digital word continuously follows, or tracks the input, without needing
externally derived convert commands, and with no steady state phase lag between the
digital output word and actual shaft angle. An error signal appears only during periods
of acceleration or deceleration.
As an added bonus, the tracking RDC provides an analog DC output voltage directly
proportional to the shaft’s rotational velocity. This is a useful feature if velocity is to
be measured or used as a stabilization term in a servo system, and it makes tachom-
eters unnecessary.
Since the operation of an RDC depends only on the ratio between input signal am-
plitudes, attenuation in the lines connecting them to resolvers doesn’t substantially
affect performance. For similar reasons, these converters are not greatly susceptible to
waveform distortion. In fact, they can operate with as much as 10% harmonic distor-
tion on the input signals; some applications actually use square-wave references with
little additional error.
Tracking ADCs are therefore ideally suited to RDCs. While other ADC architectures,
such as successive approximation, could be used, the tracking converter is the most
accurate and efficient for this application.
Because the tracking converter doubly integrates its error signal, the device offers a
high degree of noise immunity (12 dB-per-octave rolloff). The net area under any giv-
en noise spike produces an error. However, typical inductively coupled noise spikes
have equal positive and negative going waveforms. When integrated, this results in
a zero net error signal. The resulting noise immunity, combined with the converter’s
insensitivity to voltage drops, lets the user locate the converter at a considerable dis-
tance from the resolver. Noise rejection is further enhanced by the detector’s rejection
of any signal not at the reference frequency, such as wideband noise.
The AD2S90 is one of a number of integrated RDCs offered by Analog Devices. Key
specifications are shown in Figure 15.3.15. The general architecture is similar to that
of Figure 15.3.14. The input signal level should be 2 V rms ± 10% in the frequency
range from 3 kHz to 20 kHz.
Chapter 15
392
■ 12-Bit Resolution (1 LSB = 0.08° = 5.3 arc min)
■ Inputs: 2 V rms ±10%, 3 kHz to 20 kHz
■ Angular Accuracy: 10.6 arc min ±1 LSB
■ Maximum Tracking Rate: 375 revolutions per second
■ Maximum VCO Clock Rate: 1.536 MHz
■ Settling Time:
– 1° Step: 7 ms
– 179° Step: 20 ms
■ Differential Inputs
■ Serial Output Interface
■ ±5 V Supplies, 50 mW Power Dissipation
■ 20-Pin PLCC
Figure 15.3.15: Performance characteristics for AD2S90 resolver-to-digital converter.
I
nductosyns
Synchros and resolvers inherently measure rotary position, but they can make linear
position measurements when used with lead screws. An alternative, the Inductosyn™
(registered trademark of Farrand Controls, Inc.) measures linear position directly. In
addition, Inductosyns are accurate and rugged, well-suited to severe industrial envi-
ronments, and do not require ohmic contact.
The linear Inductosyn consists of two magnetically coupled parts; it resembles a
multipole resolver in its operation (see Figure 15.3.16). One part, the scale, is fixed
(e.g., with epoxy) to one axis, such as a machine tool bed. The other part, the slider,
moves along the scale in conjunction with the device to be positioned (for example,
the machine tool carrier).
The scale is constructed of a base material such as steel, stainless steel, aluminum,
or a tape of spring steel, covered by an insulating layer. Bonded to this is a printed-
circuit trace, in the form of a continuous rectangular waveform pattern. The pattern
typically has a cyclic pitch of 0.1 inch, 0.2 inch, or 2 millimeters. The slider, about 4
inches long, has two separate but identical printed circuit traces bonded to the surface
that faces the scale. These two traces have a waveform pattern with exactly the same
cyclic pitch as the waveform on the scale, but one trace is shifted one-quarter of a
cycle relative to the other. The slider and the scale remain separated by a small air gap
of about 0.007 inch.
Position and Motion Sensors
393
Inductosyn operation resembles that of a resolver. When the scale is energized with a
sine wave, this voltage couples to the two slider windings, inducing voltages propor-
tional to the sine and cosine of the slider’s spacing within the cyclic pitch of the scale.
If S is the distance between pitches, and X is the slider displacement within a pitch,
and the scale is energized with a voltage V sinωt, then the slider windings will see
terminal voltages of:
V (sine output) = V sinωt sin[2πX/S]
V (cosine output) = V sinωt cos[2πX/S].
As the slider moves the distance of the scale pitch, the voltages produced by the two
slider windings are similar to those produced by a resolver rotating through 360°. The
absolute orientation of the Inductosyn is determined by counting successive pitches in
either direction from an established starting point. Because the Inductosyn consists of
a large number of cycles, some form of coarse control is necessary in order to avoid
ambiguity. The usual method of providing this is to use a resolver or synchro operated
through a rack and pinion or a lead screw.
In contrast to a resolver’s highly efficient transformation of 1:1 or 2:1, typical Induc-
tosyns operate with transformation ratios of 100:1. This results in a pair of sinusoidal
output signals in the millivolt range which generally require amplification.
Figure 15.3.16: Linear Inductosyn.
Chapter 15
394
Since the slider output signals are derived from an average of several spatial cycles,
small errors in conductor spacing have minimal effects. This is an important reason
for the Inductosyn’s very high accuracy. In combination with 12-bit RDCs, linear
Inductosyns readily achieve 25 microinch resolutions.
Rotary inductosyns can be created by printing the scale on a circular rotor and the
slider’s track pattern on a circular stator. Such rotary devices can achieve very high
resolutions. For instance, a typical rotary Inductosyn may have 360 cyclic pitches per
rotation, and might use a 12-bit RDC. The converter effectively divides each pitch into
4096 sectors. Multiplying by 360 pitches, the rotary Inductosyn divides the circle into a
total of 1,474,560 sectors. This corresponds to an angular resolution of less than 0.9 arc
seconds. As in the case of the linear Inductosyn, a means must be provided for counting
the individual pitches as the shaft rotates. This may be done with an additional resolver
acting as the coarse measurement.
V
ector
AC I
nduction
M
otor
C
ontrol
Long known for its simplicity of construction, low-cost, high efficiency and long-term
dependability, the AC induction motor has been limited by the inability to control
its dynamic performance in all but the crudest fashion. This has severely restricted
the application of AC induction motors where dynamic control of speed, torque and
response to changing load is required. However, recent advances in digital signal
processing (DSP) and mixed-signal integrated circuit technology are providing the
AC induction motor with performance never before thought possible. Manufacturers
anxious to harness the power and economy of vector control can reduce R&D costs
and time-to-market for applications ranging from industrial drives to electric automo-
biles and locomotives with a standard chipset/development system.
It is unlikely that Nikola Tesla (1856–1943), the inventor of the induction motor,
could have envisioned that this workhorse of industry could be rejuvenated into a new
class of motor that is competitive in most industrial applications.
Before discussing the advantages of vector control it is necessary to have a basic
understanding of the fundamental operation of the different types of electric motors in
common use.
Until recently, motor applications requiring servo-control tasks such as tuned re-
sponse to dynamic loads, constant torque and speed control over a wide range were
almost exclusively the domain of DC brush and DC permanent magnet synchronous
motors. The fundamental reason for this preference was the availability of well
understood and proven control schemes. Although easily controlled, DC brush mo-
tors suffer from several disadvantages; brushes wear and must be replaced at regular
Position and Motion Sensors
395
intervals, commutators wear and can be permanently damaged by inadequate brush
maintenance, brush/commutator assemblies are a source of particulate contami-
nants, and the arcing of mechanical commutation can be a serious fire hazard is
some environments.
The availability of power inverters capable of controlling high-horsepower motors
allowed practical implementation of alternate motor architectures such as the DC per-
manent magnet synchronous motor (PMSM) in servo control applications. Although
eliminating many of the mechanical problems associated with DC brush motors, these
motors required more complex control schemes and suffered from several draw-
backs of their own. Aside from being costly, DC PMSMs in larger, high-horsepower
configurations suffer from high rotor moment-of-inertia as well as limited use in high-
speed applications due to mechanical constraints of rotor construction and the need to
implement field weakening to exceed baseplate speed.
In the 1960s, advances in control theory, in particular the development of indirect
field-oriented control, provided the theoretical basis for dynamic control of AC induc-
tion motors. Because of the intensive mathematical computations required by indirect
field-oriented control, now commonly referred to as vector control, practical imple-
mentation was not possible for many years. Available hardware could not perform the
high-speed precision sensing of rotor position and near real-time computation of dy-
namic flux vectors. The current availability of precision optical encoders, isolated gate
bipolar transistors (IGBTs), high-speed resolver-to-digital converters and high-speed
digital signal processors (DSPs) has pushed vector control to the forefront of motor
development due to the advantages inherent in the AC induction motor.
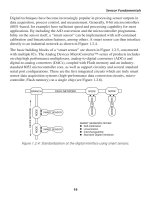
A simplified block diagram of an AC induction motor control system is shown in Fig-
ure 15.3.17. In this example, a single-chip IC (ADMC300, ADMC330, or ADMC331)
performs the control functions. The inputs to the controller chip are the motor cur-
rents (normally three-phase) and the motor rotor position and velocity. Hall-effect
sensors are often used to monitor the currents, and a resolver and an RDC monitor
the rotor position and velocity. The DSP is used to perform the real time vector-type
calculations necessary to generate the control outputs to the inverter processors. The
transformations required for vector control are also accomplished with the DSP.
The ADMC300 comprises a high performance, 5-channel 16-bit ADC system, a
12-bit 3-phase PWM generation unit, and a flexible encoder interface for position sen-
sor feedback. The ADMC330 includes a 7-channel 12-bit ADC system and a 12-bit
3-phase PWM generator. The ADMC331 includes a 7-channel 12-bit ADC system,
and a programmable 16-bit 3-phase PWM generator. It also has additional power
factor correction control capabilities. All devices have on-chip DSPs (approximately
Chapter 15
396
20 MHz) based on Analog Device’s Modified Harvard Architecture 16-bit DSP core.
Third-party DSP software and reference designs are available to facilitate motor con-
trol system development using these chips.
Figure 15.3.17: AC induction motor control application.
A
ccelerometers
Accelerometers are widely used to measure tilt, inertial forces, shock, and vibra-
tion. They find wide usage in automotive, medical, industrial control, and other
applications. Modern micromachining techniques allow these accelerometers to be
manufactured on CMOS processes at low cost with high reliability. Analog Devices
iMEMS® (Integrated Micro Electro Mechanical Systems) accelerometers represent
a breakthrough in this technology. A significant advantage of this type of accelerom-
eter over piezoelectric-type charge-output accelerometers is that DC acceleration can
be measured (e.g., they can be used in tilt measurements where the acceleration is a
constant 1g).
The basic unit cell sensor building block for these accelerometers is shown in Figure
15.3.19. The surface micromachined sensor element is made by depositing poly-
silicon on a sacrificial oxide layer that is then etched away leaving the suspended
sensor element. The actual sensor has tens of unit cells for sensing acceleration, but
the diagram shows only one cell for clarity. The electrical basis of the sensor is the
differential capacitor (CS1 and CS2) which is formed by a center plate which is part
of the moving beam and two fixed outer plates. The two capacitors are equal at rest
(no applied acceleration). When acceleration is applied, the mass of the beam causes
Position and Motion Sensors
397
it to move closer to one of the fixed plates while moving further from the other. This
change in differential capacitance forms the electrical basis for the conditioning elec-
tronics shown in Figure 15.3.20.
■ Tilt or Inclination
■ Car Alarms
■ Patient Monitors
■ Inertial Forces
■ Laptop Computer Disc Drive Protection
■ Airbag Crash Sensors
■ Car Navigation systems
■ Elevator Controls
■ Shock or Vibration
■ Machine Monitoring
■ Control of Shaker Tables
■ ADI Accelerometer Fullscale g-Range: ±2g to ±100g
■ ADI Accelerometer Frequency Range: DC to 1 kHz
Figure 15.3.18: Accelerometer applications.
Figure 15.3.19: ADXL-family micromachined accelerometers.
(Top view of IC.)
APPLIED ACCELERATION
AT REST
DENOTES ANCHOR
CS1
CS2
CS1
= CS2
CS1
CS2
FIXED
OUTER
PLATES
TETHER
BEAM
CENTER
PLATE
Chapter 15
398
The sensor’s fixed capacitor plates are driven differentially by a 1 MHz square wave:
the two square wave amplitudes are equal but are 180° out of phase. When at rest,
the values of the two capacitors are the same, and therefore the voltage output at their
electrical center (i.e., at the center plate attached to the movable beam) is zero. When
the beam begins to move, a mismatch in the capacitance produces an output signal
at the center plate. The output amplitude will increase with the acceleration experi-
enced by the sensor. The center plate is buffered by A1 and applied to a synchronous
demodulator. The direction of beam motion affects the phase of the signal, and syn-
chronous demodulation is therefore used to extract the amplitude information. The
synchronous demodulator output is amplified by A2 which supplies the acceleration
output voltage, V
OUT
.
An interesting application of low-g accelerometers is measuring tilt. Figure 15.3.21
shows the response of an accelerometer to tilt. The accelerometer output on the dia-
gram has been normalized to 1g fullscale. The accelerometer output is proportional
to the sine of the tilt angle with respect to the horizon. Note that maximum sensitivity
occurs when the accelerometer axis is perpendicular to the acceleration. This scheme
allows tilt angles from –90° to +90° (180° of rotation) to be measured. However, in
order to measure a full 360° rotation, a dual-axis accelerometer must be used.
Figure 15.3.20: ADXL-family accelerometers internal signal conditioning.
APPLIED ACCELERATION
OSCILLATOR
SYNC
CS2 CS1
SYNCHRONOUS
DEMODULATOR
A2
A1
CS2
CS1
PLATE
BEAM
PLATE
0°
180°
V
OUT
Position and Motion Sensors
399
Figure 15.3.21: Using an accelerometer to measure tilt.
1g
Acceleration
X
X
+90°
+90°
−90°
−90°
0°
0°
0g
+1g
−1g
θ
Acceleration = 1g × sin θ
θ
R
eferences
1. Herman Schaevitz, The Linear Variable Differential Transformer, Proceedings
of the SASE, Volume IV, No. 2, 1946.
2. Dr. Ernest D.D. Schmidt, Linear Displacement – Linear Variable Differential
Transformers – LVDTs, Schaevitz Sensors, .
3. E-Series LVDT Data Sheet, Schaevitz Sensors, .
Schaevitz Sensors is now a division of Lucas Control Systems, 1000 Lucas
Way, Hampton, VA 23666.
4. Ramon Pallas-Areny and John G. Webster, Sensors and Signal Conditioning,
John Wiley, New York, 1991.
5. Harry L. Trietley, Transducers in Mechanical and Electronic Design,
Marcel Dekker, Inc., 1986.
6. AD598 and AD698 Data Sheet, Analog Devices, Inc., .
7. Bill Travis, Hall-Effect Sensor ICs Sport Magnetic Personalities, EDN, April 9,
1998, pp. 81–91.
8. AD22151 Data Sheet, Analog Devices, Inc., .
9. Dan Sheingold, Analog-Digital Conversion Handbook, Third Edition,
Prentice-Hall, 1986.
10. F. P. Flett, Vector Control Using a Single Vector Rotation Semiconductor for
Induction and Permanent Magnet Motors, PCIM Conference, Intelligent
Motion, September 1992 Proceedings, available from Analog Devices.
Chapter 15
400
11. F. P. Flett, Silicon Control Algorithms for Brushless Permanent Magnet Syn-
chronous Machines, PCIM Conference, Intelligent Motion, June 1991
Proceedings, available from Analog Devices.
12. P.J.M. Coussens, et al, Three Phase Measurements with Vector Rotation Blocks
in Mains and Motion Control, PCIM Conference, Intelligent Motion, April
1992 Proceedings, available from Analog Devices.
13. Dennis Fu, Digital to Synchro and Resolver Conversion with the AC Vector
Processor AD2S100, available from Analog Devices.
14. Dennis Fu, Circuit Applications of the AD2S90 Resolver-to-Digital Converter,
AN-230, Analog Devices.
15. Aengus Murray and P. Kettle, Towards a Single Chip DSP Based Motor
Control Solution, Proceedings PCIM – Intelligent Motion, May 1996,
Nurnberg Germany, pp. 315–326. Also available at .
16. D. J. Lucey, P. J. Roche, M. B. Harrington, and J. R. Scannell, Comparison
of Various Space Vector Modulation Strategies, Proceedings Irish DSP and
Control Colloquium, July 1994, Dublin, Ireland, pp. 169–175.
17. Niall Lyne, ADCs Lend Flexibility to Vector Motor Control Applications,
Electronic Design, May 1, 1998, pp. 93–100.
18. Frank Goodenough, Airbags Boom when IC Accelerometer Sees 50g,
Electronic Design, August 8, 1991.
Position and Motion Sensors
401
15.4 Selecting Position and Displacement Transducers
Tom Anderson, SpaceAge Control, Inc.
As an application development manager for a position transducer supplier, I receive
numerous queries on how to solve a broad range of position-measurement challenges.
These inquiries run the gamut from the common (aircraft flight-control surface
movement) to the exotic (Formula One racecar suspension travel) to the seemingly
impossible (three-dimensional tracking of a golf ball in flight from a fixed position).
These position-measurement challenges usually share one common element. They
can be solved using a variety of solutions, but it’s not always easy to determine the
best one.
There are possibly more options for measuring position than any other type of sensed
variable. While there may be more suppliers for pressure transducers, the variety of
position transducer types and technologies is unmatched.
The 1997 Thomas Register lists 264 suppliers of pressure transducers and 229 suppli-
ers of displacement and position transducers. However, there are 13 categories related
to displacement and position measurement, compared to just four categories for pres-
sure measurement.
In this chapter, I introduce you to various position-transducer selection parameters.
You’ll also find information on position-measurement techniques, technologies, and
choices.
Basic Terminology
A brief note on semantics: for ease of communication, this guide refers to transducers
and sensors as being the same. While not strictly true, is generally irrelevant whether
you are using a position sensor or transducer. The purpose of both is the same—to
find out where something is!
Transducers covered here provide position, displacement, and proximity measure-
ments, which are defined as:
■ position – location of the object’s coordinates with respect to a selected
reference
■ displacement – movement from one position to another for a specific distance
or angle
■ proximity – a critical distance signaled by an on/off output
Chapter 15
402
In this chapter, I focus primarily on transducers for position and displacement mea-
surement. Unless otherwise noted, I use the term “position transducer” to refer to
displacement and proximity transducers as well.
The Parameters
On what basis should you select a position transducer? As a starting point, let’s look
at the laundry list of parameters shown in Figure 15.4.1. While this list is not all-in-
clusive, it helps you begin to decide what parameters are relevant to your application.
Perhaps the first parameter to address in any application is whether the transducer can
physically touch the object being monitored. If your application is sensitive to outside
influences, a noncontact transducer may be the most appropriate. Otherwise, a contact
sensor might offer advantages not found in a noncontact sensor.
Figure 15.4.1: What are your requirements?
Parameter Relevant? Ranking Choices
Contact
❏ Yes ❏ No ❏ Contact ❏ Noncontact
Motion Type
❏ Yes ❏ No ❏ Linear ❏ Rotary
Dimensions
❏ Yes ❏ No ❏ One-dimensional ❏ Multidimensional
Measurement Type
❏ Yes ❏ No ❏ Absolute ❏ Incremental ❏ Threshold (Proximity)
Range
❏ Yes ❏ No ❏ Less than 1” ❏ 1–30” ❏ Greater than 30”
Physical Size/Weight
❏ Yes ❏ No ❏ Size Restriction____ ❏ Weight Restriction____
Environmental
❏ Yes ❏ No ❏ Humidity
❏ Moisture
❏ Vibration
❏ Temperature
❏ Corrosion
❏ Other____
Installation/Mounting
❏ Yes ❏ No ❏ Removable ❏ Installation ❏ Time Limit____
Accuracy
❏ Yes ❏ No ❏ Linearity
❏ Hysteresis
❏ Resolution ❏ Repeatability
Lifetime
❏ Yes ❏ No ❏ Cycles____ ❏ Hours of Continuous Operation____
Cost
❏ Yes ❏ No ❏ Less than $50 ❏ $50–$500 ❏ Greater than $500
Delivery
❏ Yes ❏ No ❏ Less than 1 Week ❏ 1–4 Weeks ❏ Greater than 4 Weeks
Output
❏ Yes ❏ No ❏ Analog Voltage
❏ Sensor Bus____
❏ Analog Current
❏ Visual
❏ Digital
❏ Other____
Frequency Response
❏ Yes ❏ No ❏ Less than 5 Hz ❏ 5–50 Hz ❏ Greater than 50 Hz
At first thought, noncontact transducers may seem like the superior solution for all
applications. However, the decision isn’t that clear cut. Noncontact products can emit
potentially harmful laser- or ultrasonic-based signals. These products also rely on
having a clear visual environment to operate in. Frequency response isn’t always as
high as with a contact sensor, but costs are often higher. Finally, operating-tempera-
ture ranges are typically not as broad.
Position and Motion Sensors
403
Figure 15.4.2: Cable position transducers
provide extended ranges in small sizes.
Another parameter to consider early on
is whether you need to measure linear
or rotary movement. Note that using
cable position transducers (like the one
shown in Figure 15.4.2), cams, pulleys,
levers, electronics, software, and other
methods can enable a rotary transducer
to measure linear motion, and vice
versa. Lack of space, cost, and ease of
mounting are a few reasons for doing
this.
Once you decide if you require a
contact or noncontact solution and are
measuring rotary or linear movement, selecting a transducer technology becomes
much easier.
Next, determine if you’re monitoring one-dimensional or multidimensional motion. If
the motion is multidimensional, determine whether you need to measure in multiple
dimensions or if the object is moving in multiple dimensions and you only have to
measure one of them.
Often, multidimensional motion is measured with multiple one-dimensional transducers.
Also, think about the type of signal you need to obtain. If you need a signal that speci-
fies a unique position, be sure to specify a transducer with absolute output.
However, if all you need is relative position from a prior position or a simple on/off
indicator, then incremental or threshold technology is more appropriate. Figure 15.4.3
gives you a view of some incremental
rotary optical encoders.
An important difference between incre-
mental and absolute transducers is that
incremental transducers typically need
to be reinitialized after powerdown by
moving the monitored object to a home
position at powerup. This limitation
is unacceptable in some applications.
Threshold measurements are on/off in nature and usually involve limit switches or
similar devices. As you might guess, absolute devices are usually more expensive than
incremental or threshold devices.
Figure 15.4.3: Incremental rotary optical
encoders provide quadrature digital output.
Chapter 15
404
Travel, also known as range, varies from microns to hundreds of feet (or more, de-
pending on your definition of transducer). The range of many precision transducers is
limited to 10 inches or less.
If your application needs to operate on the Space Station or some other size- and
weight-sensitive platform, you need to specify the maximum values for the transduc-
er’s dimensions and weight.
The application’s operating environment can have a large impact on your technology
choice as well. You need to determine what operating and storage temperatures the
device will be in and whether you need to meet commercial, industrial, or military
environmental requirements.
Also consider whether excessive humidity, moisture, shock, vibration, or EMF will be
encountered. Determine whether your environment has other unique aspects, such as
high or low pressure or the presence of hazardous or corrosive chemicals.
An often-overlooked parameter is the method and time required for transducer instal-
lation and mounting. For testing applications, this parameter may not be so important.
However, OEM and large-volume applications often require simple installation and
removal to reduce labor costs and enable easy maintenance. See if the transducer can
only be mounted with manufacturer-provided special mounting bases or if a variety of
mounting techniques can be used. Besides the common threaded fastener approach,
some other nonpermanent mounting techniques include suction cups, magnets, indus-
trial adhesives, grooved fittings, and clamping.
In going through the previous parameters, you might have asked yourself, “Hey, what
about accuracy?” While accuracy is certainly important and sometimes critical, it’s
often the last degree of freedom in the selection of a transducer. As you may know
from experience, accuracy is not a well-agreed-on term. Typically, various compo-
nents of accuracy, linearity, repeatability, resolution, and hysteresis are quoted for
vendor convenience or per user requirements.
With the availability of software calibration tools today, linearity isn’t as important as it
once was. For many applications, in fact, repeatability is the most important component.
Accuracy is typically specified in absolute units like mils or microns or in relative
units such as percent of full-scale measurement. If you are comparing the accuracy of
one device against another, make sure you are comparing apples to apples. For exam-
ple, see if the accuracies being quoted are at a single temperature or over a temperature
range. If you need it, find out if temperature compensation is available.
Position and Motion Sensors
405
If you expect to see significant numbers of cycles or if the transducer will be in ser-
vice for an extended period of time, specify the lifetime and reliability requirements
as well. When choosing the transducer, find out what warranties are offered as well as
how maintenance and repairs are handled.
A transducer that can be repaired in-house can reduce costs significantly. You should
also consider what type of periodic recalibration is recommended and whether cali-
bration procedures are provided.
It’s a good idea to ask vendors what type of use their transducers see most often.
Common uses include OEM, retrofit, industrial control, commercial, and test and mea-
surement. Hopefully, the transducer has seen previous use in your type of application.
In the early stages of transducer specification, product cost sometimes doesn’t even
make the list. More often than not, this parameter gains importance as the project
moves forward.
Figure 15.4.4: Selection tradeoffs; typical performance of linear position transducers.
Price Legend
0.03'
0.001 or less 0.08 or Greater
Accuracy ±% or full scale
0.4
0.3'
Laser ($$$)
Inductive ($$)
Magneto-restrictive ($$$)
Cable Position ($$)
Po
tenti
ometr
ic ($)
Ultrasonic ($$)
Encoder
($$$
)
3' 30'
$
$$
$$$
Less than $50
$350–$500
Greater than $500
When determining costs, make sure to look at the initial acquisition cost as well as the
cost over the product’s life. For example, are special signal conditioning electronics,
power supplies, electrical connectors, housings, installation tools, or mounting fix-
tures required? Ask the vendor for typical repair, maintenance, and replacement costs.
And, inquire about the cost of the transducer in volume and single-unit quantities. The
Chapter 15
406
cost savings (e.g., a cost of $100 in volume but $600 in single quantities) may be an
important factor if small-quantity replacement units will be needed in the future.
Another parameter that’s occasionally overlooked is the time it takes the product to be
delivered to you after you order it. The custom nature of some transducers combined
with production processes and manufacturing economics requires lead times of eight
weeks or more. This delivery schedule might be acceptable now, but what about in six
months when you need extra quantities or a spare part? Evaluate whether or not you
can afford to be without a part for an extended period of time.
Obviously, the transducer is going to be a part of a system. So, determine your pre-
ferred electrical input and output requirements. Common output choices include
analog AC and DC voltage, resistive, current (4–20 mA), digital, and visual (meter).
Increasingly, outputs using sensor bus protocols are being offered. Most position
transducers require 50 V or less, and some are self-powered.
Finally, for fast-moving applications, determine the maximum velocity or acceleration
that needs to be monitored. Ensure that your data acquisition or control system has an
adequate sampling rate to record the resulting data stream.
Check Your Requirements
Now that you’re aware of the key parameters, you need to determine which ones are
relevant to your application and of these relevant parameters, which are most critical.
If you don’t prioritize your requirements, it’s going to be difficult to make a selection
decision. You may come to the conclusion that there is no transducer that can meet
your needs. This may be true, but it’s more likely that your requirements are too strin-
gent and that you need to make a tradeoff to arrive at the optimum selection.
For example, an engineer recently approached our company looking for a transducer
with ±0.0001 inch resolution over 30 inches, and he wanted to keep the cost under
$500. He was adamant that all three specifications be met. Our products didn’t meet
all of his specifications, and we were at a loss as to where we would refer him. After
some more discussion, we found out that the resolution requirement was only neces-
sary over a limited portion of the total range and that the cost goal, while important,
did have some flexibility.
Hence, in this situation, range was most important, followed by resolution, and then
cost.
The moral of this story: focus on your top requirements. Make the best decision you
can, given the specifications you need. And keep in mind that you can’t have every-
thing, unfortunately.
Position and Motion Sensors
407
Next Steps
In this chapter, I’ve given you some parameters for selecting position transducers. But
in case you hadn’t noticed, I didn’t provide any information on what type of technol-
ogy you should select for your position transducer. The constant change in transducer
technology and the difficulty in generalizing about a particular technology’s capabili-
ties and limitations mean there’s no way
I can cover this area in detail here. Refer
to the previous sections of this chapter
for more details on various technologies.
Additionally, choosing the technology
should come after determining and pri-
oritizing your requirements. Once your
requirements are well known, the choice
of technology tends to be self-selecting.
For example, just knowing whether you
require a contact or noncontact technol-
ogy can cut your choices almost in half.
If you need the latter, a laser position
sensor like the one in Figure 15.4.5 may
be a good choice.
To get a feel for the capabilities of some of the more prevalent linear position-mea-
surement technologies, Figure 15.4.4 maps out how these technologies compare
against each other based on cost, accuracy, and maximum range. Note that not all
technologies are shown.
It may be difficult to clearly define the parameter values you require as well as which
parameters are most important in your application. However, it can be even more
difficult to obtain these parameters from vendors and then compare one vendor’s
statements against another’s. To get information on products beyond what you see in
the vendor’s product literature, review transducer-related publications such as Mea-
surement and Control and Sensors for articles on position-measurement products and
technologies.
Also, be sure to ask your colleagues about their experiences and recommendations.
They may have a position transducer on hand that you may be able to test for your
application.
Figure 15.4.5: Laser position sensors have
resolutions of 0.1 µm or better.
Chapter 15
408
Of course, in this day and age, make an effort to search Web engines and Internet
newsgroups. Numerous engineering, instrumentation, and measurement-oriented
newsgroups can be reached via search engines. Extensive sources of position-trans-
ducer manufacturers can be found in the Thomas Register and the Sensors Buyer’s
Guide.
Contact vendors and request references of similar applications. Ask these references
why they selected the product they did and whether they’re happy with their decision.
Also, find out what other options they considered.
Finally, ask the vendor for product samples or evaluation units that you can use for
testing before purchase. If the vendor is hesitant to do this, offer to provide them with
a test report summarizing your evaluation. This information may be valuable to them,
and they may be more willing to assist you.
Photos 15.4.2, 15.4.3, and 15.4.5 are courtesy of Space Age Control, Oak Grigsby,
and Dynamic Control Systems, respectively.
References
[1] J. Fraden, AIP Handbook of Modern Sensors, American Institute of Physics,
New York, NY, p. 264, 1993, 1996.
Resources
Texts
Schaevitz Engineering, Handbook of Measurement and Control, Pennsauken, NJ,
1976.
I. Busch-Vishniac, Electromechanical Sensors and Actuators, Springer-Verlag,
New York, NY, 1998.
Thomas Register Directory of American Manufacturers, Thomas Publishing Co.,
New York, NY, 1997.
Internet
Sensors Buyer’s Guide, www.sensorsmag.com.
Thomas Register, www.thomasregister.com.
Position and Motion Sensors
409
Sources
Sensors
Dynamic Control Systems 7088 Venture St., Ste. 205 Delta, BC Canada V4G 1H5
(604) 940-0141 Fax: (604) 940-0793, www.dynavision.com.
MicroStrain, Inc. 294 N. Winooski Ave. Burlington, VT 05401 (802) 862-6629
Fax: (802) 863-4093, www.microstrain.com.
Midori America 2555 E. Chapman Ave., Ste. 400 Fullerton, CA 92831
(714) 449-0997 Fax: (714) 449-0139, www.thomasregister.com/midori.
OakGrigsby, Inc. 84 N. Dugan Rd. Sugar Grove, IL 60554 (630) 556-4200
Fax: (630) 556-4216 www.oakgrigsby.com.
Senix Corp. 52 Maple St. Bristol, VT 05443 (802) 453-5522
Fax: (802) 453-2549 www.senix.com.
SpaceAge Control, Inc. 38850 20th St. E Palmdale, CA 93550 (661) 273-3000
Fax: (661) 273-4240, www.spaceagecontrol.com.
This page intentionally left blank
411
C H A P T E R
16
Pressure Sensors
16.1 Piezoresistive Pressure Sensing
Glenn Harman, Global Product Leader, Honeywell Sensing and Control
Pressure sensors convert input pressures to electrical outputs to measure pressure,
force and airflow. These measurements are used to control everything from the wa-
ter level in your washing machine to the gases emitted by your car’s exhaust system.
Pressure sensors are used in medical equipment to monitor blood pressure, regulate
intravenous infusions, and to detect such things as changes in cranial pressure, hear-
ing problems and glaucoma. People in the manufacturing and process industries rely
on pressure sensors to control their machinery and processes. They are essential to the
operation of HVAC systems, forklifts, and earth-moving equipment. They measure
altitude and turbidity on aircraft and are an important feature of the flight data record-
ers required on all commercial flights.
Wherever pressure, force or airflow needs to be precisely controlled, there is a poten-
tial pressure sensing application. Today’s pressure sensors provide a high degree of
repeatability, low hysteresis, and long-term stability in applications with input pres-
sures ranging from less than one pound per square inch gauge (psig) to thousands of
psig.
Fundamentals of Pressure Sensing Technology
Most pressure, force and airflow sensors are fabricated using silicon-processing
techniques common in the semiconductor industry. Therefore, much of the same
terminology used in the semiconductor industry also applies to pressure sensor
technology. Piezoresistive ion implanted semiconductor technology dominates the
component market for pressure sensors for many good reasons. Other approaches,
including variable reluctance, variable capacitance, fiber optic, and piezoelectric, are
available for niche applications; however, those technologies are not covered in this
chapter.
Chapter 16
412
Piezoresistive pressure sensors (strain gage sensors) are often referred to as IC
(integrated circuit) sensors, solid-state sensors, monolithic sensors (formed from
single-crystal silicon) or just silicon sensors. They are processed in wafer form, where
each wafer will contain a few hundred to a few thousand sensor die, depending on the
size of the sensor die. A typical sensor chip measures 80 × 80 mils or 2 mm × 2 mm.
Piezoresistive (silicon) pressure sensors contain a sensing element made up of a
silicon chip with a thin, circular silicon diaphragm and four piezoresistors. These
nearly identical solid-state resistors are buried in the surface of the silicon.
The piezoresistance of a semiconductor refers to the change in resistance caused
by strain when pressure or force is applied to the diaphragm. Pressure causes the
diaphragm to flex, inducing a stress on the diaphragm and also on the buried resis-
tors.
The resistor values change depending on the amount of pressure applied to the
diaphragm. Therefore, a change in pressure (mechanical input) is converted to a
change in resistance (electrical output). The sensing element converts or transduc-
es the energy from one form to another, hence the term “pressure transducer.”
Pressure sensors are produced first by ion implanting the four piezoresistors into
the silicon. Ion implantation is used increasingly to provide improved perfor-
mance over sensors produced by diffusion.
After the four piezoresistors are formed, the diaphragm is created by chemically
etching a controlled shape in the silicon from its backside (on the surface oppo-
site the piezoresistors). The unetched portion of the silicon slice provides a rigid
boundary constraint for the diaphragm and a surface for mounting it to some other
member.
The thickness of the diaphragm determines the pressure range (sensitivity) of the
sensor. However, this relationship is not a linear function. For example, doubling
the thickness of the diaphragm decreases the sensitivity by a factor of four. Typi-
cal diaphragm thicknesses are 5 to 200 microns (pretty thin stuff), depending on
their pressure range. Overpressure is a term used to specify the maximum pressure
that may be applied to a sensor’s sensing element without causing a permanent
change in its output characteristics.
The high sensitivity or gage factor of silicon strain gages is approximately 100
times that of metal strain gages. By implanting the piezoresistors into a ho-
mogenous single crystalline silicon medium, they are integrated into the silicon
Pressure Sensors
413
Figure 16.1.1
force-sensing element. Typically, other types of strain gages are bonded to force
sensing members of dissimilar material, resulting in thermoelastic strain and
complex fabrication processes. Most discrete strain gages are inherently unstable
due to bond degradation, temperature sensitivity, and hysteresis caused by thermo-
elastic strain. Silicon diaphragm pressure sensors are extremely reliable because
silicon is an ideal material for receiving the applied force, and the implanted gages
are not subject to bonding problems.
As a perfect crystal, silicon does not become permanently stretched but returns
to its original shape. Silicon wafers are better than metal for pressure sensing
diaphragms because silicon offers extreme elasticity within its operating range.
Silicon diaphragms normally fail only by rupturing, usually due to extreme
overpressure. Micromachining and laser trimming help
manufacturers produce reliable sensors capable of ex-
treme accuracy.
The sensor’s resistors can be connected in either a
half-bridge or a full “Wheatstone bridge” arrangement,
whereby two resistors increase with positive pressure
while the other two decrease in resistance. When pres-
sure is applied to the device as shown in Figure 16.1.1,
the resistors in the arms of the bridge change by an
amount, ∆R. The alignment of the resistor on the sili-
con determines if the resistor will increase or decrease
with applied pressure.
The resulting differential output voltage VO, is easily shown to be VO = VBx AR/R.
Since the change in resistance is directly proportional to pressure, VO can be written
as: VO = (SxPxVB) ± VOS where:
VO is the output voltage in mV
S is the sensitivity in mV/V per psi.
P is the pressure in psi.
VB is the bridge voltage in volts.
VOS is the offset error (the differential output voltage when
the applied pressure is zero).
The differential output of a “raw” pressure sensor is, however, not precise in terms of
calibration and temperature effects. It is partially because of this that sensor manufac-