Computer Programming for Teens phần 6 pptx
Bạn đang xem bản rút gọn của tài liệu. Xem và tải ngay bản đầy đủ của tài liệu tại đây (461.42 KB, 35 trang )
Both functions have the word void in the return type position. This indicates that
no values will be sent back to the calling place after the functions have been
executed.
So let’s practice using these functions so you can see how they work. The first
thing we will do is draw a huge capital letter M. We’ll draw this by using the
following algorithm.
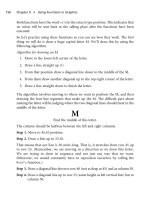
Algorithm for drawing an M
1. Move to the lower-left corner of the letter.
2. Draw a line straight up (|).
3. From that position draw a diagonal line down to the middle of the M.
4. From there draw another diagonal up to the top-right corner of the letter.
5. Draw a line straight down to finish the letter.
The algorithm involves moving to where we want to position the M, and then
drawing the four line segments that make up the M. The difficult part about
making the letter will be judging where the two diagonal lines should meet in the
middle of the letter.
M
Find the middle of this letter.
The column should be halfway between the left and right columns.
Step 1. Move to 45,10 position.
Step 2. Draw a line up to 25,10.
That means that our line is 20 units long. That is, it stretches from row 45 up
to row 25. (Remember, we are moving in a direction as we draw this letter.
We are trying to draw in sequence and not just any way that we want.
Otherwise, we would constantly have to reposition ourselves by calling the
MoveTo function.)
Step 3. Draw a diagonal line down to row 40 (not as deep as 45) and at column 30.
Step 4. Draw a diagonal line up to row 25 (same height as left vertical line) but at
column 50.
156 Chapter 9
n
Using Functions in Graphics
Notice that these last two steps position the top tips of the M 40 units apart. (The
left tip is at column 10, and the right tip is at column 50.) The middle point of the
letter (let’s call it the vertex) is at column 30. By adding or subtracting 20
columns from this vertex we get symmetry—a natural mirror-like quality where
one side of the letter is a mirror image of the other.
Step 5. Draw a line from the right tip down to the bottom (from the point 25,50
to 45,50).
Let’s look at each of these steps as a connection of points on a surface. Consider
that you map the points first, then afterward you connect them to create the letter
M. See Figure 9.5.
Now let’s list the sequence of steps to draw the letter M that would be used in a
program.
The first part of the program is to include the library (group of files) that contains
these functions. If you recall, we have already seen the iostream library (which
has the functions that facilitate showing output and receiving input) and the
string library (which has the functions that manipulate strings). A graphics
library will include these functions that I have mentioned. So let’s examine a
small program to draw the letter M. The program is not complete because some
of the initial commands to open a window on which to draw will vary from
machine to machine.
#include iostream.h
#include graphics.h
Drawing Lines and Points 157
Figure 9.5
The outline of the letter M is shown as a group of unconnected points on a surface.
int main ()
{.
.
.
MoveTo (45,10);/*we position ourselves at the lower-left corner. Nothing is
drawn yet.*/
LineTo (25,10);// a line is drawn up to the top left
LineTo (40,30);// a line is drawn to the middle of the M
LineTo (25,50);// a line is drawn up to the top right
LineTo (45,50);// a line is drawn down to the bottom right
return 0;
}
So we have just drawn the letter M by moving to a point on the grid and then
drawing a sequence of lines from that first point through the other points we saw
in Figure 9.5.
Some Helpful Hints When Drawing
In addition to some of the functions we just examined, we need to consider
additional functions that help us draw. One of the understood features of
drawing when using these functions is that you draw with an imaginary pen. The
pen’s thickness and color can be controlled by the programmer through func-
tions that we will examine next.
Using the ‘‘Pen’’ to Draw
Before using the pen, we will want to set the size of the pen tip. Imagine that the
tip of the pen is a rectangle rather than a point. How big that rectangular tip is
will determine the thickness of the lines we can draw. Imagine the differences
among pens whose tips are rectangles with these sizes:
2 Â 2
4 Â 6
8 Â 10
The smallest tip will be the 2 Â 2 tip, and it will not be as big of a tip as the 8 Â 10.
See Figure 9.6.
158 Chapter 9
n
Using Functions in Graphics
We set the size of the pen tip through a function called PenSize. This function
takes two integers as parameters—one to set the height of the rectangle and one
for the width. Here is the heading of the function followed by some calls to the
function.
void PenSize ( int height, int width);
PenSize (2,2);
PenSize (4,6);
PenSize (8,10);
Later in the section titled ‘‘Using Functions to Draw,’’ we will look at a function
that allows us to change the color with which we draw. For now, you may assume
that we are drawing black lines on a white background.
Background vs. Foreground
It is important to define two terms in graphics, and these are the background and
foreground. The background represents the window onto which we are drawing.
Usually it is white. The foreground represents anything we draw onto the
background. In the section titled ‘‘Using Functions to Draw,’’ we will look at the
functions that allow us to control the foreground color.
Some Helpful Hints When Drawing 159
Figure 9.6
Lines drawn with pen tips of varying sizes.
Note
It is important to familiarize yourself with the graphics functions that are available to you. These
functions will be dependent on the hardware of your computer and its operating system.
How to Make an Object Move
A nice thing to do after creating an image is to make the object move—that is,
appear in a new position. Making an object move uses an interesting algorithm.
We begin by displaying the object in some foreground color, called the forecolor.
(The forecolor is the color with which we draw against the background color—
usually white.) Then we ‘‘erase’’ it by drawing it again in the same color as the
background. This has the effect of making the object disappear. After that, we
draw the image again in its new position. It will appear to have moved!
By manipulating the colors with which we draw the image, we can make the image,
drawn in some forecolor, either match the background color or contrast with it.
When the image is drawn in a contrasting forecolor, it is visible on the screen. When
the image is drawn in the same color as the background, it will not be visible. This
has the effect of ‘‘erasing’’ the image.
Once you practice drawing an image in either the forecolor or the background
color, you will start to understand how a programmer gets an image to move on
the screen. She will change the image’s forecolor to match the background color.
Then she will draw the image in a new position with a contrasting forecolor. The
image will appear to have moved.
But there is another thing to consider. Computers process instructions so quickly
that any programming statements used to display images will execute so rapidly that
you may not recognize what happened on the screen. So to slow down, or delay,the
computer so that you can see the images as you intended them to look, we add a loop.
Let’s look at the algorithm that accomplishes movement:
1. Display the image (using the code that creates the image).
2. Change the color of the pen to the same color as the background color that
you are drawing on.
3. Redraw the image in the background color. (The object will have seemed to
disappear.)
4. Delay the computer.
160 Chapter 9
n
Using Functions in Graphics
5. Change the pen back to the original color.
6. Redraw the image using new points for positions
Every time you move the object, you need to match its color to the background
color to ‘‘erase’’ it, and then redraw it in a new position.
Delaying the Computer
Nowadays, most computers’ microprocessors are so fast that the computer will
be able to execute your program very quickly. In the case of moving an image, the
computer will execute your instructions perhaps too quickly, to the point that a
viewer will not recognize what you are trying to do.
Before you are able to give the appearance of movement, you will need to
control the speed of that movement. What we want to do is delay the computer,
or slow it down. One of the easiest ways to do this is give it an empty
for loop to
execute. This is the name I give to a
for loop that spins but does nothing.
(Think of the analogy of lifting the back bicycle wheel and then turning the
pedal.Youseethewheelspin,butthebikecan’tgoanywherebecausethewheel
is not on the ground.)
So you write the code for the
for loop, but the loop itself is empty—that is, the
body of the loop has no programming statements. The compiler then spends
time setting the initial variable, checking the boolean condition using that
variable, and then increasing the value of the variable. It repeatedly does these
three steps, but because there is nothing to do inside the loop itself, the user does
not see anything happen on the screen. The computer is, in effect, spinning its
wheels and being kept busy. After delaying the computer, we can allow the
computer to do the next thing.
Examples
Let’s look at the syntax of an empty for loop. We will set the control variable to 1
in each example, but we will change the upper limit used in each boolean con-
dition. The higher the upper limit, the more times the loop spins.
for ( int x ¼ 1 ; x < 1000 ; x ¼ x þ 1);
for ( int x ¼ 1 ; x < 100000 ; x ¼ x þ 1);
How to Make an Object Move 161
In the first example, the loop spins 1,000 times. (That’s a lot.) However, in the
second example, the loop spins 100,000 times. (That’s really a lot.) Notice in each
example that a semicolon (;) follows immediately after the statement to show
that the loop ends right away. This design shows that the loop is not controlling
any other statements—it has no statements (called the body of the loop) to spin.
The best way to see the results of using an empty
for loop is to run your program
without this loop. If what you see appears to be happening too fast, then maybe
you will need to slow down the program. This loop can be helpful for you.
When you become a more experienced programmer, you can also write code to
access the clock function, which will return the time elapsed, in number of tics,
from the beginning of the processing in the program. Accessing this time will
allow you to more accurately occupy the processor. There is a constant called
CLK_TICS, which tells you how many tics occur per second. (On many computers,
this number will be 1,000).
If you take the number of ticks per second and multiply by the number of
seconds you wish to delay the processor, you will get a new number that can be
used with the elapsed processor clock time of the CPU.
Look at this example:
Clock_t firstTime ¼ clock();// the present elapsed tics of the processor
double m ¼ 3 * CLK_TICS ;// the number of tics needed to equal 3 seconds
While ( clock() – firstTime <m);/*theempty loop which will execute until
the present number of tics exceeds the number needed for 3 seconds.*/
Using Functions to Draw
Most applications of a programming language will provide some graphics cap-
abilities in the form of a toolbox or a library of functions. You need to access that
library and look at those functions. The frustrating thing, however, is finding out
what functions have been provided for your use. Depending on what version of
what language you purchase, your graphics functions will be specific to that
version and the hardware on which you run your programs.
You need to look at the functions themselves and examine their headings—just
like we did with
MoveTo and LineTo. Once you understand what parameters (the
variable types each function needs) and what each function does, then you can
make decisions about how you wish to draw some object.
162 Chapter 9
n
Using Functions in Graphics
In this section, we will examine some generic functions that are simulated in
languages that provide graphics capabilities. You might be able to use these exact
same functions or something like them.
n PenSize. Takes the height and width of the pen.
n ForeColor. Allows you to set the color of the foreground.
n SetRect. Sets the coordinates of each of the corners of a rectangle, but does
not draw it.
n FrameRect. Draws the outline of the rectangle.
n PaintRect. Paints the rectangle with the forecolor you choose.
n FrameOval. Outlines the circle.
n PaintOval. Fills in the circle with a color.
First I’ll need to explain how each of these functions work. Then you can use
them to make whatever drawings you wish. A rectangle has four sides. It is a
special type of variable whose syntax I will explain in Chapter 11, when you learn
about a struct. (I won’t forget!) Each side of the rectangle has a name that
represents either a row or a column. See Figure 9.7.
Using Functions to Draw 163
Figure 9.7
Each side has been named and drawn as either a row or a column.
Both the top and bottom of the rectangle are rows, which you need to estimate
depending on the size of the screen on which you are drawing. Both the left and
right sides of the rectangle are columns that you position. There are two things to
consider when you construct a rectangle: its position relative to the screen and its
dimensions (width and height).
If a screen is 400 rows by 600 columns, then you might want to position a r ectangle
in the middle of the screen. You would start to think about being at row 200 and
column 300. If you want the rectangle to be 50 units wide and 100 units long, then
you need to consider the following positions. The right side of the rectangle should
be at column 350. If you want the rectangle to be 100 units long, then you should set
the bottom of the rectangle to be 100 units below row 200 at row 300.
The difference between the two sides (left and right) of the rectangle is 50 units
(350–300). The difference between the other two sides (top and bottom) is 100
units (300–200). Every time you construct a rectangle, you need to consider
where you will position it and then how to adjust the sides of the rectangle so that
they have the appropriate dimensions you want.
Once you decide which rows and columns you will use for your rectangle’s sides,
then you set their values by calling the
SetRect function. You need to follow the
heading given in
SetRect, which might look like this:
void SetRect ( rect * R; int Top, Left, Bottom, Right );
Notice that the parameters of the function are all integers, exce pt for the first
parameter, which is a
rect. But what is a rect? It is a special variable (called a
pointer variable) which we will examine later in Chapter 17. For now, just think of
it as a rectangle and follow the syntax used in the example.
We want to make a call to
SetRect, but we don’t have any name for the rectangle
yet. So let’s call it by this name (
house), and we will declare it in the following
manner:
rect * house;// use the ’*’ in between the rect and its name
Next we make the call by using the integers that comprise the sides of the
rectangle:
top ¼ 200;
bottom ¼ 300;
left ¼ 300;
right ¼ 350;
164 Chapter 9
n
Using Functions in Graphics
Our call would be this:
SetRect ( house, top, bottom, left, right );
Notice that in the call, there are no types mentioned (i.e., int or rect * ), only the
names of the variables are used. After calling this function, the rectangle is ready
to be drawn, since all its coordinates have been set. Now to draw it, we need to
call another function,
FrameRect. FrameRect has only one parameter, the rect
itself, R. Let’s look at its heading.
void FrameRect ( rect * R);
Now we will call FrameRect in the main program using our rectangle called house.
Notice that since the function is a function that does not return anything (note
the word
void), the call looks like this:
FrameRect (house);
The next thing you should do is fill i n the house with som e color so that it is
not just an outline of a house. We will call the function
PaintRect next. Here is
its heading and the call we should use with it. Notice the differences in syntax
between the heading and the call. In the tables that follow, each part of the
function heading is separated so you can understand the syntax better. First
the return type of the function is listed, followed by the function name, and
then what parameters it requires. Recall from Chapter 8 that all functions
must indicate what they return as a v alue. If they don’t return a value, the
word
void is listed. All functions have names so that they can be called, and
usually they require some variable to work on. This variable is called a
parameter.
void PaintRect (rect * R ); // function heading
Return Type Function Name Parameter Type Parameter Name
void PaintRect (rect * R );
Parentheses begin here and end here.
Next, the function call is listed in a table so that you can see the syntax is almost
the same as the heading. Because the return type was
void, as listed previously,
the call is made with the function name only and the parameter it requires, which
we saw was a
rect type variable.
Using Functions to Draw 165
PaintRect (house); // function call
Return Type Function Name Actual Parameter
None PaintRect (house);
Expected
Caution
Calls always differ from headings because the
type
of variable is not mentioned in the call, only
the
name
of the variable. The compiler will ‘‘know’’ what type is being sent in because it has
already translated the heading.
Now let’s take care of some of the smaller details that we need to consider.
Following is a list of typical colors from which you can choose. We will pick a
color with which we will draw the house. Let’s pick black.
n Cyan
n Magenta
n Green
n Red
n Yellow
n Blue
n Black
n White
Let’s look back at the heading that set the color for the drawing. It was called
ForeColor. It sets the color in the foreground—the area where we are drawing
everything. For the second time, you will see an unfamiliar type. After the
rect *
type we saw in SetRect, we are now seeing the color type. Think of the color type
as a built-in type that is independent of the language. It really was defined for the
sake of the computer’s hardware. Since we need to pay attention to syntax, let’s
follow the syntax given in
ForeColor’s heading so that we can make an appro-
priate call. Here again, we list the elements in a table so that you can better
understand the different parts of the function heading.
void ForeColor (color c );// function heading
166 Chapter 9
n
Using Functions in Graphics
Return Type Function Name Parameter Type Parameter Name
void ForeColor (color c );
Parentheses begin here and end here.
ForeColor (black); //function call
Return Type Function Name Actual Parameter
None ForeColor (black);
Expected
One last detail is to set the size of the pen with which we are drawing. The pen tip
size is measured in height and width. Let’s set the width of the pen tip to be
4 units wide by 6 units long. Look at the following table to see the different
elements of the function heading.
void PenSize ( int height, int width );//function heading
Return Type Function Name Parameter Type Parameter Name
void PenSize ( 2 ints Height, width );
Parentheses begin here and end here.
PenSize (4, 6); // function call
Return Type Function Name Actual Parameter
None PenSize (4, 6);
Expected
Notice that in the call to PenSize, I did not use any variables—only the direct
values 4 and 6. We can do this when we are using value parameters. Recall that
the function just needs the values of the variables, not the variable holders
Using Functions to Draw 167
themselves. Now we will put together all the separate parts into one program
fragment in the main function:
rect * house;
int top, bottom, left, right;
top ¼ 200;
bottom ¼ 300;
left ¼ 300;
right ¼ 350;
PenSize (4, 6);
ForeColor (black);
SetRect (house, top, bottom, left, right );
FrameRect (house);
PaintRect (house);
That should draw a house that looks like Figure 9.8.
So in your algorithm for drawing any object, you need to set the color of the
objects being drawn. You will probably have to change the color each time you
draw something new.
Drawing the Sun By Using the Oval Commands
Next if we wish to draw the sun in the sky, for example, we need to call a function
that allows us to draw a circle. Circles are drawn through
Oval functions, which
168 Chapter 9
n
Using Functions in Graphics
Figure 9.8
A black rectangle is shown representing a house.
are functions that can draw any oval of any size specified. The size of the oval is
determined from a circumscribed rectangle—that is, a rectangle drawn around
the oval. First the rectangle’s size is set according to the previous sides mentioned
(top, bottom, left, and right). Then the largest possible oval (one that touches all
sides) is drawn to fit inside of the rectangle. See Figure 9.9.
Here are the headings of a couple of oval functions. By using the
SetRect function
that you saw previously, you can set the coordinates for the sides of the frame of
the rectangle and then call on the oval commands to actually draw the oval. Here
are the headings of the oval functions:
void FrameOval (rect * r );
void PaintOval ( rect * r );
Before calling SetRect, we will set the coordinates of the rectangle in which we
will draw the oval representing the sun. We will position it above the house and
Using Functions to Draw 169
Figure 9.9
Two rectangles are shown empty and then with the largest oval that fits inside each. In the second
example, the oval is a circle since the rectangle in which it is drawn is a square.
to the left of it by using the values that follow:
rect * sun;
int top, bottom, left, right;
top ¼ 75;
bottom ¼ 100;
left ¼ 200;
right ¼ 225;
//we will change the forecolor to yellow so that it looks
//appropriate.
ForeColor (yellow);
SetRect (sun, top, bottom, left, right );
FrameOval (sun);
PaintOval (sun);
Examining the rectangle’s width, you can see that it is 25 units wide (100–75),
and the length is also 25 units long (225–200). This demonstrates that the rec-
tangle is really a square (25 units by 25 units). So the oval drawn inside that
square will be a circle.
Just from these two examples, you can see that it is a lot of work to call on these
functions to draw objects. You also need to work within the parameters specified
by the function. Imagine that drawing a circle involves designing a rectangle that
is really a square so that an oval drawn inside it appears to be a circle. That is
complicated! The good part about these functions is that they are good practice
for working within a function’s parameters.
Summary
First we began by defining graphics as programming the computer to draw
shapes. We introduced a type called vector graphics, where lines are drawn with
direction in mind. A line is always drawn from an initial position to a new
position where it ends and for this reason is an example of vector (directed)
graphics. Most graphics will be drawn by calling functions that do the work for
you. The only thing to be careful about is what type of parameters each function
needs to operate properly. Functions will vary from language to language and will
also be dependent on the operating system used.
The first two functions we examined were
LineTo and MoveTo, used to draw lines
from your present position to a new position and for moving to a new position.
There are certain tricks that allow the programmer to make a drawing disappear.
The first point is to draw the shape and then redraw it in the background color.
170 Chapter 9
n
Using Functions in Graphics
That has the effect of erasing it. Then move the shape by drawing it in a new
position. Every time you want to move, you have to draw it in the background
color so that it can ‘‘disappear.’’ If any of these tricks are executed too quickly by
the computer, there is an additional tactic to be employed—delaying the com-
puter. This is done by inserting an empty
for loop to make the computer spin its
wheels.
There are many graphics functions that allow the programmer to draw different
shapes on the screen. By calling these functions properly, the programmer only
has to decide where a particular shape should be drawn. The screen is divided
into rows and columns. Depending on the number of rows and columns visible
on your screen, you will position shapes accordingly.
Rectangles are used in many of these functions and consist of a top and a bottom
(both of which are rows) and a left and a right (both of which are columns).
Functions like
SetRect, FrameRect, and PaintRect will set the size of the rectangle,
then draw its outline and fill it in with the foreground color. The oval functions
(
FrameOval and PaintOval) are extensions of these rectangle functions that allow
the largest possible oval to be drawn within a rectangle whose position is set by
the programmer.
Summary 171
This page intentionally left blank
Running Out of Holders?
It’s Time for the Array
In this chapter, we will look at a data holder that is very useful in programming
languages. It is called the array. The array is used to hold several values of the same
type of variable. We’ll start with some analogies before we look at the array itself.
In This Chapter
n The array—keeping what’s alike together
n Members bound by their type
n Loops work well with arrays
n Programming with arrays
n Assigning an array
n Printing an array
n Copying an array
An Analogy for the Array Holder
The array is designed to hold a collection of data. When we deal with a large
collection of data, we need to put each piece of data into a separate variable
holder. If you have, let’s say, 50 data items, you would have to sit and think of
50 variable names—one name for each data item. That can be difficult, since
173
chapter 10
there are only 26 letters in the alphabet. You could certainly use a, b, c, d, and so
on, but what would you use after that? The array type holder provides a useful
technique for holding large quantities of information. In order to understand the
array, let’s look at an analogy.
Think of a large chest of drawers. Most bureaus have only three or four drawers.
Imagine if you had a bureau with 50 drawers. You could refer to each drawer by a
number—drawer 1, drawer 2, drawer 3, and so forth. You would put clothes in
each drawer, but the clothes would differ from drawer to drawer.
Socks would be in drawer 1. Shirts would be in drawer 2. In drawer 3, you would
put sweaters for spring. In drawer 4 you could put shorts. In drawer 5 you could
put jeans, and so on. Each drawer has different items—socks, shirts, sweaters,
shorts, jeans—but each of these items is an item of clothing. All of these items
belong in the bureau because they are clothing items.
An array is similar to a bureau—it has many different drawers (or slots) called
members. Each member is identified with a number. The array is used to hold
different values that are of the same type. You could have an array of integers.
Let’s look at a bureau that has a different integer in each drawer. Compare it with
the bureau of clothing we just discussed. See Figure 10.1.
Caution
In the programming language C++, the array ‘‘drawers’’ (members) are numbered beginning with 0
instead of with 1. So if you are trying to reference the 7th member of the array, you will need to use slot
6 because the numbering started at 0. If you wanted the 3rd member you would use slot 2, and so on.
An Array Is Used for a Collection
An array is used for a collection of items. Each item is unique, but it does belong
to a common type. Think about a collection of MP3s. If you were really orga-
nized, you might make an excel file with a number for each MP3 you own. Then
you could generate a list of MP3s like the following:
n MP3 1: My Chemical Romance’s The Black Parade’s All Time Hits
n MP3 2: Radiohead’s In Rainbows
n MP3 3: U2’ s How to Dismantle an Atomic Bomb
n MP3 4: The Best of Beethoven
n MP3 5: Evanescence’s Fallen
174 Chapter 10
n
Running Out of Holders? It’s Time for the Array
The collection is a collection of MP3s, and each MP3 is unique. Rather than
referring to each MP3 individually by its title, we refer to each MP3 by its number
in the collection, MP3 1, MP3 2, MP3 3, and so on. What we have created is an
array of MP3s—a collection of MP3s.
Why Is the Array Used?
The array is used to group together variables of the same type but differing in
values.
As you learn to program, you may need to deal with large quantities of data. For
example, if you know that you will have to store 50 names of people you know,
then the array is a good choice of holder for this information.
The array would allow you to put each name into a drawer of a bureau, so to speak.
Instead of calling each drawer a drawer, we’ll call it a name—name 1, name 2,
Why Is the Array Used? 175
Figure 10.1
Two bureaus are shown o n e with different clothing items and another with different integers in each
drawer.
name 3, name 4, and so forth. Otherwise, you would have to come up with a list of
unique variable names like
first_friend, second_friend, third_ friend, and so on.
When we get to array syntax, you will see how much easier it is to create 50
variables that are unique without having to type a variable name for each.
Array Syntax
When you declare an array to the compiler, you are telling it to create a large bureau
with each drawer of the bureau numbered. After you declare the array, you can start
to load the array by assigning each member (or ‘‘drawer’’) a value. The key thing
about array syntax is letting the compiler know how many drawers it should set
aside in memory and what type item should it expect to store in each drawer.
So far we have used the
int, char, double, string, and boolean types. We could
make an array of each of these types if we wanted.
Example
Let’s look at a declaration of an array of 50 members where each member is an
integer.
Just as we did with the collection of MP3s by naming each MP3, MP3 1, MP3 2,
and so on, we need to come up with a name for the collection. Let’s use the term
group.
int group [50];
int group [50];
Type Name Number of Members
Notice that brackets [ ] were used to let the compiler know it should create
50 integer holders. If the brackets had been missing, the declaration would have
looked like a straightforward integer declaration.
int group;
That would have meant we were declaring one integer called gr oup.Thearray
defined earlier, however, enables us to create 50 integers, all with the common
name
group. Here’s how these integers would be named. I need to forewarn you
that in C++, the array members are numbered beginning with zero. Let’s look at
176 Chapter 10
n
Running Out of Holders? It’s Time for the Array
how each variable is named—first in English and then in a programming
language.
English Programming Language
group 1 group[0]
group 2 group[1]
group 3 group[2]
group 4 group[3]
group 48
group[47]
group 49 group[48]
group 50 group[49]
There is no group[50] in the programming column because group[49] is the
50th member of the array. (That’s because we started at
group[0] instead of at
group[1].) The brackets are used to identify the member number (‘‘drawer
number’’) of the array. See Figure 10.2.
Why Is the Array Used? 177
Figure 10.2
Each member of the array is shown with its value inside of it.
Caution
Note that values have no correlation with the number member where they are stored.
Different Types of Arrays
Let’s declare some other arrays using of different variable types. We’ll start with
an array of strings to hold a collection of phone numbers. We’ll declare an array
of 35 strings.
string phone_book [35];
Look at this table, which indicates each part of the declaration:
Type Array Name Number of Members
string phone_book [35];
Another example of an array would be one used to hold a collection of real
numbers. Imagine that you were trying to store the checking account balance for
a group of 40 individuals. Each person would need a slot, or drawer, in the array
for her balance. Consider this declaration followed by a table that clarifies each
part of the code.
double account_balance [40];
Type Array Name Number of Members
double account_balance [40];
Assigning Values to an Array
Now that we have declared a couple of different arrays, it is time to load an array.
What that means is we will assign each member of an array a value. Let’s start
with the
phone_book array we declared previously. Consider this list of members
and the value each slot contains.
Member Value
phone_book [0] ‘‘555-2222’’
phone_book [1] ‘‘555-4567’’
phone_book [2] ‘‘555-2345’’
178 Chapter 10
n
Running Out of Holders? It’s Time for the Array
phone_book [3] ‘‘555-4567’’
phone_book [4] ‘‘555-1234’’
phone_book [31] ‘‘555-5678’’
phone_book [32] ‘‘555-6789’’
phone_book [33] ‘‘555-9876’’
phone_book [34] ‘‘555-4567’’
We have only used 18 slots in the array; the other 17 are empty and have nothing
in them—not even blanks. The compiler considers them to be uninitialized. This
means that they have not been given any value. Remember that if you try to work
with a variable that has no value, the compiler will have problems.
Note
If you try to use a value that has not been initialized such as the 36th member in a 35-element
array t he compiler will use whatever value it finds in that memory location, which could be
anything. At best, your program will have seemingly random errors, and at worst, your program
will crash your computer.
Now another point to notice about the array values in phone_book is that integer
values have been mixed with the dash (-). Yet we know that this array has been
declared as an array of strings. A string type is useful because you can mix
characters with numbers and still store them in one variable holder.
The next point to consider is how we will assign values to members of an array.
Of course, you could use several assignment statements to load (assign) the array
like this:
phone_book [0] = "641-2222";
phone_book [1] = "123-4567";
phone_book [2] = "654-2345";
phone_book [3] = "234-4567";
phone_book [4] = "890-1234";
.
.
.
phone_book [31] = "345-5678" ;
phone_book [32] = "567-6789";
phone_book [33] = "345-9876";
phone_book [34] = "432-4567";
Why Is the Array Used? 179
But that seems to be a tedious way of assigning values to several variables. You
might also start to think ‘‘what is the point of the array?’’ because we don’t appear
to be saving any time at all. The answer to this tedium is found in the application
of a loop to our problem; a loop is ideally suited for accessing members of the
array efficiently. The real power of the array is using it in conjunction with a loop
to save time.
How to Use Loops with Arrays
In order to understand how a loop can be used in conjunction with an array, let’s
start by comparing the members of the array with a control variable from a
for
loop. (If you recall, the control variable is the variable that is increased or
decreased during the loop.) We’ll start by declaring an array of 10 members, each
of which is an integer. Next to it we’ll declare a control variable that will be used
in a
for loop.
int list [10];
int x;
The first step in understanding how a control variable might be useful with an
array is to think of the control variable as a variable that moves through the
members (slots or drawer s) of an array. The control variable changes during a
for
loop. If we use it to move through the array members—one at a time—we can
use a loop to access the members more efficiently. Consider this list of array
members, slot position, and the control variable’s values.
Member Slot # Control Variable Value
list [0] 0 0
list [1] 1 1
list [2] 2 2
list [3] 3 3
list [4] 4 4
list [5] 5 5
list [6] 6 6
list [7] 7 7
list [8] 8 8
list [9] 9 9
180 Chapter 10
n
Running Out of Holders? It’s Time for the Array