Adobe Photoshop CS4 for Photographers phần 6 pptx
Bạn đang xem bản rút gọn của tài liệu. Xem và tải ngay bản đầy đủ của tài liệu tại đây (8.56 MB, 71 trang )
329
Image editing essentials
Chapter 5
Multiple adjustment layers
When you add multiple adjustment layers you can preview
how the image will look using various combinations
of adjustment layers and readjust the settings as many
times as you want before applying them permanently to
the photo. For example, you might want to use multiple
adjustment layers to apply different coloring treatments
to a picture. Instead of producing three versions of an
image, all you need to do is add three adjustment layers,
each using a different coloring adjustment, and switch the
adjustment layer visibility on or off to access each of the
color variations (Saving Layer Comps can help here).
While it is possible to keep adding more adjustment
layers to an image, you should try to avoid any unnecessary
duplication of the layers. It is wrong to assume that when
the image is fl attened the cumulative adjustments will
somehow merge to become a single image adjustment.
When you merge down a series of adjustment layers,
Photoshop will apply them sequentially, the same as if
you had made a series of normal image adjustments.
So the main thing to watch out for is any doubling up
of the adjustment layers. If you fi nd you have a Curves
adjustment layer above a Levels adjustment layer, it
would be better to try and combine the Levels adjustment
within the Curves adjustment instead. Of course, when
you use masked adjustment layers to adjust specifi c areas
of a picture you can easily end up with lots of adjustment
layers. One potential drawback of this is that it may slow
down the screen preview times. This slowness is not a
RAM memory issue, but to do with the extra calculations
that are required to redraw the pixels on the screen. If you
think this is happening then try switching off some of the
adjustment layers while you are editing the photograph.
To summarize, the chief advantages of adjustment
layers are: the ability to defer image adjustment processing,
and the ability to edit the layers and make selective image
adjustments.
Figure 5.54
This shows an example of how
adjustments can be grouped together and a
single mask applied to the combined group of
layers.
Grouped adjustments
If you place your image adjustment layers
inside a layer group you can use the layer
group visibility to turn multiple image
adjustments on or off at once (see Figure
5.54). You can also add a layer mask to a
layer group and use this to hide or show all
the adjustments in a group.
Fi
gu
re
5
.5
4
Th
is
s
ho
ws
a
n
ex
am
pl
e
of
h
ow
Repeated adjustments warning
It is important to stress here that the
pixel data in an image can easily become
degraded through repeated image
adjustments. Pixel data information
will progressively become lost through
successive adjustments as the pixel values
are rounded off. This is one reason why it is
better to use adjustment layers, because you
can keep revising these adjustments without
damaging the photograph until you fi nally
decide to fl atten the image.
Martin Evening
Adobe Photoshop CS4 for Photographers
330
Adjustment layer masks
Although there are dodge and burn tools in Photoshop,
which have been improved in Photoshop CS4, they are
not really suited for dodging and burning broad areas in
a photograph. If you want to dodge or burn a photograph,
such as darken a sky or lighten someone’s face, then the
best way to do this is to use a masked adjustment layer.
This is not to say that the dodge and burn tools serve no
use. Even though they have been improved in CS4, they
are just not ideal for this type of photographic retouching.
Working with adjustment layers is by far the best way
to shade or lighten portions of an image, because you
have the freedom to re-edit an adjustment layer to make
the adjustment lighter or darker. Adjustment layers have
an active layer mask, which means that whenever an
adjustment layer is active, you can paint or fi ll using
black to selectively hide an adjustment effect, and paint
or fi ll with white to reveal again. Plus you can also keep
editing the adjustment layer mask (painting with black or
white) until you are happy with the quality of the mask
(see Figure 5.55).
Masks panel controls
The Masks panel (Figure 5.57) is also new to Photoshop
CS4 and can be used to refi ne the mask or masks associated
with a layer. Layer masking is a topic I’ll be discussing
more fully in Chapter 9 but, because it is relevant to
masking adjustment layers, I thought it best to briefl y
introduce the Masks panel features here fi rst.
Adjustment layers are added to the layer stack with a
pixel mask attached, so the default mode for the Masks
panel will show the Pixel mask mode options. If you click
on the Vector mask mode button next to it, you can add and
edit a vector layer mask (see Step 4 on page 333). You can
tell which mode is active because it will say Pixel Mask or
Vector mask at the top of the panel and the relevant mode
button will have a stroked border.
The Density slider can be used to adjust the density
of the mask. If you apply a black mask this will normally
Figure 5.55
This shows an example of a
darkening adjustment layer applied to an image,
but with a black to white gradient applied to the
layer mask to fade out the adjustment from the
middle of the image downwards.
o
e
w
(
M
T
C
w
m
m
in
igure 5 55
This shows an example of a
‘Stalkers’ by The Wrong Size.
Photograph: © Eric Richmond
331
Image editing essentials
Chapter 5
Figure 5.57
The Masks panel controls.
Figure 5.56
The Refi ne Edge dialog (see
Chapter 9 for more information on using Refi ne
Edge).
hide all the black masked contents on a layer, but if you
reduce the Density, this lightens the black mask color and
therefore allows you to soften the contrast of the mask.
So, when Density is set to 50%, the black mask colors will
only apply a 50% opacity mask and the lighter mask colors
will be proportionally reduced.
The Feather slider can be used to soften the mask edges
up to a 250 pixel radius. Beneath this though is the Mask
Edge button which will open the Refi ne Edge dialog
(Figure 5.56), where you’ll fi nd you have even greater
control over the mask edges and softness.
The Color Range button allows you to make selections
based on colors that are in the image you are editing. This
means that you can select colors to add or subtract from a
Color Range selection and see the results applied directly
as a mask. Beneath that is the Invert button for reversing a
masking effect and at the bottom of the panel are options
for converting a mask to a selection, deleting the mask and
applying it to the layer, enabling/disabling the mask and a
Delete button to remove the mask.
Feather slider
Convert mask to a selection
Apply mask to layer Enable/disable mask
Density slider
Mask preview Vector mask mode
Masks panel options
Refi ne mask edges
Make a Color Range selection
Invert the mask
Delete mask
Pixel mask mode
V
R
M
I
D
M
E
Martin Evening
Adobe Photoshop CS4 for Photographers
332
1
You can add a vignette in Photoshop by adding a darkening Levels (or Curves)
adjustment, making an elliptical selection and fi lling the pixel mask with black.
2
If you go to the Masks panel you can increase the Feather amount to make the hard
mask edge softer.
Masks panel editing
333
Image editing essentials
Chapter 5
3
But let’s say I wanted to soften the transition between the masked and unmasked
areas. By decreasing the Density one can make the black areas of the mask lighter
and thereby reveal more of the adjustment effect in the center of the image.
4
This technique is not just limited to pixel masks. This last step shows how I could
have started with a subtractive elliptical pen path shape, applied this as a Vector mask
and used the exact same Masks panel settings to soften the mask edge.
Martin Evening
Adobe Photoshop CS4 for Photographers
334
Color Range adjustment layer masking
1
In this example I wanted to demonstrate how to use the Masks panel controls in
conjunction with an image adjustment to modify the image shown here, so that I could
simultaneously control the adjustment effect and the adjustment masking. To start
with, I added a new Hue/Saturation adjustment layer. I then went to the Masks panel
and clicked on the Color Range button, which opened the Color Range dialog shown
here. With the Localized Color Clusters option checked, I used the plus eyedropper
tool to add color samples to the selection, sampling the blues in the central area of
the photograph while avoiding the walls. I then adjusted the Fuzziness and Range,
till I was happy with the way the selection looked, and clicked OK to the Color Range
selection.
335
Image editing essentials
Chapter 5
2
I then went to the Masks panel and feathered the selection, adding a 50 pixel
feather. You can see a preview of the mask in both the small Masks panel preview as
well as in the Layers panel. All I needed to do now was to adjust the Hue/Saturation
sliders in the Adjustments panel. For this step I decided to make some of the blue
colors more green and reduce the color saturation slightly.
The main thing to learn from this particular example is that you can switch
back and forth between the Adjustments panel and the Masks panel to re-edit the
adjustment effect and masking. When you combine the ease of adjustment editing
with the power of the new Masks panel and Color Range selections, Photoshop
CS4 has the potential to allow you to make selections and modify images like never
before.
Photograph: © Eric Richmond
Martin Evening
Adobe Photoshop CS4 for Photographers
336
Blend mode adjustments
You can lighten, darken or add contrast to an image by
adding an adjustment layer above the Background layer
(or at the top of the layer stack) and simply change the
blend mode to Screen, Multiply or Overlay. You don’t
need to apply a specifi c image adjustment, just add a
neutral adjustment layer (any will do) and select one of
the above layer blending modes. The Screen mode can be
used to lighten an image, Multiply to darken and Overlay
to add more contrast. You could achieve the same type of
result by duplicating the Background layer and changing
the blend mode of the duplicate layer, but this is actually
quite unnecessary and you’ll end up with an image that is
twice the fi le size, whereas adding an adjustment layer will
normally increase the fi le size by just a few kilobytes.
Blend modes are in effect a shorthand for applying
different, set-value Curves adjustments. For example, the
late Bruce Fraser devised a semi-automated workfl ow in
which he recorded separate Photoshop actions to apply a
Screen, Multiply of Overlay neutral adjustment layer and
fi lled the layer mask with black. All he had to do then was
select a paint brush or gradient tool to paint on the layer
mask and reveal the adjustment effect.
Figure 5.58
Here is the fi rst of two examples
showing how you can use blend modes to
adjust an image. In this example I dragged the
Background layer down to the New Layer panel
button to make a duplicate layer and changed the
layer blending mode from Normal to Multiply.
When the image was saved, the fi le size doubled
to 64 MB.
d
l
w
S
fi
s
m
B
Y
a
(
b
n
n
t
u
F
i
g
ure 5.5
8
H
ere is the fi rst of two exam
p
les
1
This shows a photograph processed using the default Camera Raw settings.
Figure 5.59
In this example I added a new
Levels adjustment layer, but didn’t apply any
changes to the Levels settings. I then changed
the adjustment layer blend mode from Normal to
Multiply. Both this and the Figure 5.58 example
produced identical results, but in this case the
fi le size was only increased by 57 kilobytes.
337
Image editing essentials
Chapter 5
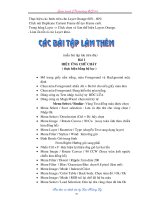
2 I started by adding a neutral adjustment layer (in this case, Levels) and changed
the layer blend mode to Screen. This step lightened the whole image, but since
I was mainly interested in lightening the water, I applied a linear, black to white
gradient to the adjustment layer mask to fade out the adjustment from the horizon
upwards.
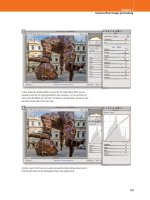
3 I then wanted to darken the sky, so I added a second neutral adjustment layer.
At this stag
e I could have used a Multipl
y blend mode to darken the image, but
instead, I used the Overlay blend mode to apply more contrast. Again, I used the
gradient tool to add a linear, black to white gradient to fade out the adjustment, this
time from the horizon downwards.
Overlay alternatives
Instead of using the Overlay blend mode,
you might also like to try using the Soft
Light or Hard Light blend modes for
gentler or stronger contrast adjustments.
Martin Evening
Adobe Photoshop CS4 for Photographers
338
Cropping
The image you are editing will most likely require some
kind of crop, either to remove unwanted edges or to focus
more attention on the subject. Select the crop tool from
the Tools panel and drag to defi ne the area to be cropped.
To zoom in on the image as you make the crop, you may
sometimes fi nd it useful to use the zoom tool shortcut:
hold down the Spacebar followed by the
C L key and
marquee drag over the area you want to magnify, and to
zoom out use the Spacebar plus
O A or use C0
L0 (which is the shortcut for View ➯ Fit To Window).
You can then zoom back in again to magnify another
corner of the image to adjust the crop handles.
If the crop tool does not behave as expected try clicking
on the Clear button in the tool Options bar and this will reset
the tool. In the normal default mode the crop tool will allow
you to set any rectangular-shaped crop you like and merely
trim away the unwanted pixels without changing the image
size or resolution. Figures 5.60 and 5.61 show and explain
the normal and modal states for the crop tool options.
Crop tool presets Swap height and width
Crop resolution
Load foreground image dimensions and resolution
Clear crop settings
Front Image cropping
If you want a crop to match the dimensions
and resolution of a document that is
already open in Photoshop, click on that
document to make it active. Then click
on the Front Image button in the Crop
Options bar. This will load the document
dimensions and resolution into the Crop
Options settings. Now select the image you
wish to crop and, as you drag with the crop
tool, the aspect ratio of the front image
will be applied. When you OK the crop, the
image size will be adjusted to match the
front image resolution.
Figure 5.60
Here are the primary options for the crop tool. If you mouse down
on the triangle button next to the crop tool you will see a list of any preloaded crop
tool presets. If none are visible click on the triangle button (circled), or go to the
Tool Presets panel to load the Crop and Marquee.tpl preset. New individual custom
presets can be added by clicking on the New Preset button in the Tool Presets panel
(circled). To set a custom crop, enter the crop unit dimensions in the Width and
Height boxes followed by: mm, cm, in or px to denote the unit dimension type. In this
example the crop tool has been set to a fi xed crop of 8 inches wide by 10 inches tall
at a resolution of 300 pixels per inch. If you click on the button between the Width
and Height boxes, you can swap these dimensions. Clicking on the Clear button
clears the current crop options.
339
Image editing essentials
Chapter 5
1
I selected the crop tool and dragged across the image to defi ne
the crop area. The cursor can then be placed above any of the eight
handles in the bounding rectangle to readjust the crop.
2
Dragging the cursor inside the crop area will allow you to move
the crop. You can also drag the crop bounding box center point to
create a new central axis of rotation.
3
You can mouse down outside the crop area and drag to rotate the
crop around the center point (which can even be positioned outside
the crop area). You normally do this to realign an image that has
been scanned slightly at an angle.
4
The shield color and shade opacity can be anything you like. In
this example I increased the shading opacity to 100% to produce
a completely opaque shield. You can even use
Ch Lh
to hide the bounding box completely and still be able to drag the
corners or sides of the crop to make adjustments.
Martin Evening
Adobe Photoshop CS4 for Photographers
340
Selection-based cropping
You can also make a crop that is based on an active
selection by simply choosing Image ➯ Crop. Where the
selection has an irregular shape, the crop will be made to
the outer limits of the selection and the selection will be
retained. The practical advantages of this is that you might
want to C L-click a layer to make a selection based
on a single layer and then e
x
ecute a crop (as described in
Figure 5.63 below).
Figure 5.61
After you have dragged with the crop tool and before you commit to a
crop, the tool Options bar will change (as shown here) to what is known as a modal
state. These modal crop tool options allow you to change the color and opacity of the
shield/shading of the outer crop areas. To apply a crop, you can click on the Apply
Crop button in the Options bar, double-click inside the crop area or hit the E or
R k
eys. Click on the Cancel Crop button or hit the ‰ k
ey to cancel a crop.
Enable perspective cropping
Shade cropped area Shade color
Shade opacity Cancel crop
Apply crop
Figure 5.62
If you select the rectangular marquee tool you can use the Constrain
Aspect Ratio option to make a proportional crop without altering the image resolution
or dimension units. Enter the desired proportions in the Width and Height boxes,
drag the marquee selection tool across the image to defi ne the area to be cropped and
then chose Image
➯
Crop.
Figure 5.63
Sometimes it is quicker to make
a crop from a selection instead of trying to
precisely position the crop tool. In the example
shown here, if we want to make a crop of the
box containing the letter D, the quickest solution
would be to
C L
-click on the relevant layer
in the Layers panel and then choose Image
➯
Crop.
Fixed aspect ratio crops
One of the big advantages of using the
rectangular marquee tool to make a
selection crop is that you can set a fi xed
aspect ratio for the crop in the marquee
tool options (see Figure 5.62).
341
Image editing essentials
Chapter 5
Perspective cropping
With Photoshop’s crop tool you can crop and correct any
converging vertical or horizontal lines in a picture with
a single crop action. In Figure 5.64 we might wish to
remove the converging verticals or ‘ keystone’ effect in
the photograph. If you check the Perspective box, you can
accurately reposition the corner handles on the image to
match the perspective of the building and then apply the crop
to straighten the lines that should be vertical. A perspective
crop adjustment can be made even more precisely if you
hold down the
S key as you drag a corner handle. This
will restrict the movement to one plane only. I also fi nd the
perspective crop tool is useful when preparing photographs
of fl at copy artwork as it enables me to always get the copied
artwork perfectly aligned.
Figure 5.64
The crop tool is great for correcting the perspective in a photograph. Once the crop is defi ned you are then able to check the
Perspective box in the Options bar and move the corner handles independently. By using this method, you will fi nd it much easier to zoom
in and gauge the alignment of the crop edges against the converging verticals in the photograph. It also helps here to switch on the Grid
display. Go to the Window menu and choose Show
➯
Grid (or use the
C' L'
keyboard shortcut).
Disable edge snapping
Edge snapping can be distracting when
you are working with the crop tool. But
this can easily be disabled in the View
➯
Snap To submenu (or by using the
CS; LS; shortcut).
Martin Evening
Adobe Photoshop CS4 for Photographers
342
Image rotation
If an image needs rotating you can use the Image ➯ Rotate
controls to orientate your picture the correct way up or fl ip
it horizontally or vertically even. More likely you will want
to make a precise image rotation, especially if a critical part
of the picture is not perfectly straight. You can correct a
wonky image by making a rotated crop with the crop tool,
or by making an angle measurement with the measure tool
followed by an arbitrary rotation as described in Figure 5.66.
Figure 5.66
When an image is opened up in Photoshop, you may discover that
it is not perfectly aligned. Although the crop tool will allow you to both crop and
rotate at the same time, there is another more accurate way you can correct the
alignment. Select the measure tool from the Tools panel and drag along what should
be a vertical or horizontal edge in the photo. After doing this, go to the Image menu
and select Rotate Canvas
➯
Arbitrary . You will fi nd that the angle you have just
measured is already entered in the Angle box. Choose to rotate either clockwise
or counterclockwise and the image will be accurately rotated so that it appears to
be perfectly level (although Photoshop usually manages to auto-select the correct
direction to rotate with).
Figure 5.65
The Image
➯
Rotate menu
including the Arbitrary option which is described
below in Figure 5.66.
343
Image editing essentials
Chapter 5
Figure 5.68
To use the crop tool as a canvas size tool, fi rst make a full frame crop,
release the mouse and then drag any one of the bounding box handles outside of
the image and into the canvas area. Double-click inside the bounding box area or hit
E to add to the canvas size, fi lling with the background color.
Figure 5.67
To add extra pixels beyond the
current document bounds, use the Canvas Size
from the Image menu. In the example shown
here, the image is anchored so that pixels will
be added equally left and right and to the bottom
of the image only. The Relative box is checked
and this allows you to enter the number of units
of measurement you wish to add ‘relative’ to the
current image size.
Canvas size
The Image
➯
Canvas size lets you enlarge the image
canvas area, extending it in any direction. This is useful if
you want to extend the image dimensions in order to place
new elements. If you check the Relative box you can enter
the unit dimensions you want to see added to the current
image size. The pixels that are added will then be fi lled
using the current background color but you can also choose
other fi ll options from the Canvas Size dialog (see Figure
5.67). It is also possible to add to the canvas area without
using Canvas Size. You can use the crop tool as an ‘add
canvas tool’ by dragging beyond the document boundaries
(see the instructions in Figure 5.68 below).
Martin Evening
Adobe Photoshop CS4 for Photographers
344
Content-Aware Scaling
This is probably the star feature of Photoshop CS4, yet also
the most controversial since it invites Photoshop users to
tamper with photographs in ways that are likely to raise the
hackles of photography purists. Does this spell the ‘death
of real photography (DORP)’? I don’t know, but over the
next few pages I have outlined some of the ways you can
work with this new tool and suggested some practical
uses. Advertising and design photographers will at least
appreciate the benefi ts of being able to adapt a single image
to multiple layout designs.
To use this feature, you need an image that’s on a
normal layer (not a Background layer) and you simply go
to the Edit menu and choose Content-Aware Scale (or use
the COSc LASc shortcut). You can
then drag the handles that appear on the bounding box for
the selected layer to scale the image, making it narro
wer/
wider or shorter/taller
. The preview updates to show you
the outcome and you can use the Options bar to access
some of the extra features discussed here.
1
There is a set routine that you will want to carry out before applying any kind of
‘content aware scaling’. To start with, double-click the background layer (or create a
new merged copy layer, positioned at the top of the layer stack) and then add extra
canvas to the image. This can be done using either of the methods shown on the
previous page. You can use the Canvas Size dialog to enter a precise image size, or
simply drag with the crop tool beyond the boundaries of the image. Alternatively, use
Image
➯
Reveal All after applying a scale adjustment.
Photograph: © Jeff Schewe 2008
Edge detection success rate
The Content-Aware Scale feature is very
clever at detecting which edges you would
like to keep and those you would like
to stretch or squash, but it won’t work
perfectly on every image. You can’t expect
miracles, but if you follow the suggestions
on these pages you will pick up some of
the basic tips for content-aware scaling.
What I have noticed though is it
does appear to do a very good job of
recognizing circular objects and can
preserve these without distorting them.
Russell Brown has done some very cool
demos on working with this feature and I
can recommend you check them out on his
site:
www.russellbrown.com/tips_tech.html
345
Image editing essentials
Chapter 5
2
This shows what the photograph looked like after I had used the Edit
➯
Content-Aware Scale command to stretch the image width-ways. You’ll notice how
the penguins have not been stretched, but instead have been moved further apart, and
the left side of the image has been stretched most of all.
3
This shows what happened when I used the Content-Aware Scale command to
make the photograph taller. Whenever you scale an image using this command, you
have to watch carefully for the point where parts of the picture start to show jagged
edges, or critical areas of the photo (such as the penguins) show signs they are being
stretched. When this happens, you’ll need to ease off and consider scaling the image
in stages. In this example I stretched the photo upwards halfway, clicked OK and then
applied a second scaling to complete the picture.
Amount slider
After you have scaled a photograph, you
can use the Amount slider to determine
the amount of content-aware scaling that
is applied to the layer. If you set this to
zero, no special scaling is applied, and
the image will be stretched as if you had
applied a normal transform. You will note
that I left the slider setting to 100% in
all the examples shown here, in order to
demonstrate the full effect of the content-
aware scaling.
Martin Evening
Adobe Photoshop CS4 for Photographers
346
How to protect skin tones
Photograph: © Jeff Schewe 2008
1
In this example I wanted to show how you can help protect people’s faces from
being squashed or stretched as you scale an image.
2
In general, you will fi nd that the Content-Aware Scale feature does a pretty good
job of distinguishing and preserving the important areas of a photograph and tends
to scale the less busy areas of a photograph fi rst, such as a sky, or in this case the
mottled backdrop. However, if you click on the Protect Skin Tones button (circled),
this will usually ensure that faces in a photograph remain protected by the scaling
adjustments. As you can see here, I was able to stretch this picture so that the couple
in this photograph were moved across to the right. I stretched the image quite a bit,
but without distorting the faces.
347
Image editing essentials
Chapter 5
How to remove objects from a scene
Photograph: © Jo Cowler 2003
1
The Content-Aware Scale feature can also be used as a tool to selectively remove
objects from a scene. The results won’t be completely fl awless, but it can still work
pretty well where you wish to squash an image tighter and remove certain elements
as you do so. For the fi rst step, I hit the q key to switch to Quick Mask mode (see
Chapter 9) and painted on the image to outline the bits that I wished to remo
ve from
the scene. Remember, white protects and black indicates the areas to remove.
2
Next, I reselected the RGB composite channel in the Channels panel and then
selected the Edit
➯
Content-Aware Scale command. In the Protect menu in the
Options bar, I selected the Quick Mask I had just created and, as I scaled the image,
the masked fi gure started to disappear. As before, it is important to watch carefully for
jagged edges and not compress the image too much. As you can see, this technique
doesn’t completely remove all the pixels, but this edited image could easily be tidied
up using the healing brush.
Martin Evening
Adobe Photoshop CS4 for Photographers
348
Big data
The Photoshop, PDF and TIFF formats all support ‘ big
data’. This means that if any of the layered image data
extends beyond the confi nes of the canvas boundary, it
will still be saved as part of the image when you save it,
even though it is no longer visible. If you have layers in
your image that extend outside the bounds of the canvas,
you can expand the canvas to reveal all of the big data by
choosing Image ➯ Reveal All. But remember, you will
only be able to reveal the big data again providing you have
saved the image using the PSD, PDF or TIFF format. When
you crop a picture using the crop tool, you can delete or
hide the layered big data by selecting either of these radio
buttons in the modal crop Options bar (see Figure 5.69).
Figure 5.69
The cropped version of this picture contains several layers which, when
expanded using the Image
➯
Reveal All command, show all the hidden ‘big data’ that
extends outside of the cropped view. The Hide option in the crop tool options allows
you to preserve the pixels that fall outside the selected crop area instead of deleting
them. Note also how the Background layer has been converted to a normal Photoshop
layer (Layer 0). This is essential if you wish to preserve all the information on this
layer as big data.
Client: Rainbow Room. Model: Nicky Felbert @ MOT.
Background layers and big data
If your image contains a Background layer
and you want to preserve the data on this
layer after making a ‘hide’ crop, you must
fi rst double-click the Background layer to
promote it to a normal layer. If you don’t
take this step you will still end up deleting
everything on this layer when you crop.
349
Black and White
I
was eleven years old when I fi rst got into
photography. My fi rst darkroom was kept under
the stairs of our house and, like most other
budding amateurs, my early experiments were all
done in black and white. Back then, very few amateur
photographers were competent enough to know how to
process color, so black and white was all that most of us
could work with!
There has always been something rather special about
black and white photography and digital imaging has
done nothing to diminish this. If anything, I would say
that the quality of capture from the latest digital cameras,
coupled with the processing expertise of Photoshop and
improvements in inkjet printing, have made black and
white photography an even more exciting proposition.
Chapter 6
Martin Evening
Adobe Photoshop CS4 for Photographers
350
Converting color to black and white
The most important tip here is to always shoot in color.
Whether you shoot fi lm or shoot digitally, you are always
far better off capturing a scene in full color and using
Camera Raw or Photoshop to carry out the color to mono
conversion. Although having said that, you do need to
use the right conversion methods to get the best black and
white conversions from your color fi les.
The dumb black and white conversions
When you change a color image from RGB to Grayscale
mode in Photoshop, the tonal values of the three RGB
channels are averaged out, usually producing a smooth
continuous tone grayscale. The formula for this conversion
consists of blending 60% of the Green channel with 30%
of the Red and 10% of the Blue. The rigidity of this color
to mono conversion limits the scope for obtaining the best
grayscale conversion from a scanned color original (see
Figure 6.1). The same thing is true if you were to simply
desaturate the image or make a Lab mode conversion, copy
the Luminosity channel, convert the image back to RGB
mode and choose Edit ➯ Paste. There is nothing necessarily
wrong with either of these methods, but you are not really
making full use of the information contained in the image.
Smarter black and white conversions
If you capture in color, the RGB master image will contain
three different grayscale versions of the original scene and
these can be blended together in different ways. One of the
best ways to do this is by using the Black & White image
adjustment which, while not perfect, can still do a good
job of providing you with most of the controls you need
to make full use of the RGB channel data when applying
a conversion. Black & White image adjustments can be
applied to images directly, or by using the Adjustment
panel, and the advantage of this is that you can quickly
convert an image to black and have the option to play
with the blending modes to refi ne the black and white
conversion. Let’s start by looking at the typical steps used
when working with the Black & White adjustment controls.
Black & White slider adjustments
The Black & White slider adjustments will,
for the most part, manage to preserve
the image luminance range without
clipping the shadows or highlights, unless
you apply extreme negative or positive
weightings to two or more sliders.
Black and white fi lm conversions
Traditional black and white fi lm emulsions
can all differ slightly in the way they
respond to different portions of the visual
spectrum (as well as the colors we can’t
see). This is partly what gives emulsion
fi lms their ‘signature’ qualities. So in a
way, you could say that fi lm also uses
standard formulas for converting color
to black and white and that these too are
like rigid grayscale conversions. You may
also be familiar with the concept of using
strong colored fi lters over the lens when
shooting with black and white fi lm and how
this technique can be used to emphasize
the contrast between certain colors, such
as the use of yellow, orange and red fi lters
to add more contrast to a sky. Well, the
same principles apply to the way you can
use the Black & White adjustment to mix
the channels to produce different kinds of
black and white conversions.
Figure 6.1
If you convert direct to Grayscale,
Photoshop advises you there are better ways to
convert to black and white!
351
Black and white
Chapter 6
1
The following steps show the basic method for converting a full color original
photograph into black and white. The Black & White image adjustment can be applied
directly by going to the Image
➯
Image Adjustments menu, or you can go to the
Adjustments panel and click on the Black & White button (circled) to add a new
adjustment layer.
2
To begin with I clicked on the Auto button (circled). This applied an auto slider
setting based on an analysis of the image color content. The auto setting usually
offers a good starting point for most color to black and white conversions and won’t
do anything too dramatic to the image, but this is immediately a lot better than
choosing Image
➯
Mode
➯
Grayscale.
Martin Evening
Adobe Photoshop CS4 for Photographers
352
3
If you don’t like the auto setting result, you can adjust the sliders manually to
achieve a better conversion. In this example, I lightened the Reds and Yellows and
darkened the Cyans.
4
Lastly, I clicked on the target adjustment mode button (circled) for the Black &
White adjustment. This allowed me to move the cursor over particular areas of
interest (such as the sky). I then dragged directly on the image to modify the Black &
White adjustment. This action selects the nearest color slider in the Black & White
adjustment panel. Dragging to the left makes the black and white tones go darker and
dragging to the right, lighter. The end result was a photograph in which I managed to
lighten the sculpture more and increased the contrast in the sky.
353
Black and white
Chapter 6
Black & White adjustment presets
As with other image adjustments, the Black & White
adjustment has a Presets menu at the top from which
you can select from a number of shipped preset settings.
Figure 6.3 shows some examples of the radically different
outcomes that can be achieved through selecting different
presets.
Once you have created a Black & White adjustment
setting that you would like to use again, you can choose
Save Preset from the Adjustment panel options menu
(Figure 6.2). For example, the slider settings used here
were saved as a custom ‘Red Contrast’ preset.
Figure 6.2
Once you have found a setting for a Black & White adjustment that you
would like to use again, you can choose Save Preset from the Adjustment panel
options menu. The slider settings used here were saved as a ‘Red Contrast’ preset
and the saved presets can be accessed by mousing down on the presets menu at the
top of the adjustments panel (circled).
Figure 6.3
Examples of different Black & White
Adjustment presets applied to a color image.
Blue Filter
Green Filter
High Contrast Red
Infrared
RGB original