The Welding of Aluminum & Its Alloys Part 4 pdf
Bạn đang xem bản rút gọn của tài liệu. Xem và tải ngay bản đầy đủ của tài liệu tại đây (382.39 KB, 20 trang )
12.5mm, argon–hydrogen is regarded as the best choice for the plasma gas,
this gas mixture giving the best quality cut, irrespective of thickness. The
secondary cutting gas may be carbon dioxide or nitrogen.Table 4.1 lists the
recommended cutting/shielding gases and typical parameters for plasma
cutting the aluminium alloys.Water injection into the nozzle can be used in
addition to the orifice gas.This restricts the plasma jet further and produces
a better quality, more square, cut, although above 50mm thickness these
advantages are reduced.
A development of the process known as high-tolerance plasma-arc
cutting (HT-PAC), also known as plasma-constricted arc, fine plasma or
high-definition plasma, has been developed and is being used as a cheaper
alternative to laser cutting of material less than 12mm in thickness. This
variation to the plasma-arc process achieves a better quality cut with
more perpendicular faces, a narrower kerf and a less rough finish than the
Preparation for welding 55
Table 4.1 Suggested parameters for plasma-jet cutting
Metal Plasma Gas Shield Gas Current Voltage Cutting Method
thickness gas flow gas flow (amps) (volts) speed
(l/min) (l/min) (mm/min)
1.0 Air 98 4800 Manual
1.5 Air 98 6300 Manual
3 Air 98 3000 Manual
6.5 Air 98 1000 Manual
6.5 N
2
34 CO
2
100 1800 Manual
6.5 Ar + H
2
25 200 50 1500 Manual
10 N
2
35 CO
2
100 200 1250 Manual
12.5 Ar + H
2
28 280 55 1000 Manual
25 Ar + H
2
33 330 70 500 Manual
50 Ar + H
2
45 400 85 500 Manual
6 Ar + H
2
55 300 140 7500 Mechanise
6N
2
32 CO
2
100 115 1800 Mechanise
10 N
2
32 CO
2
100 120 900 Mechanise
12.5 N
2
32 CO
2
100 120 480 Mechanise
12.5 N
2
32 CO
2
100 300 3200 Mechanise
12.5 Ar + H
2
60 300 140 5000 Mechanise
25 N
2
70 CO
2
100 400 1800 Mechanise
25 Ar + H
2
60 375 160 2300 Mechanise
50 N
2
32 CO
2
100 400 800 Mechanise
50 Ar + H
2
60 375 165 500 Mechanise
75 Ar + H
2
95 420 170 380 Mechanise
75 Ar + H
2
45 N
2
100 400 500 Mechanise
75 Ar + H
2
45 N
2
100 700 650 Mechanise
100 Ar + H
2
95 450 180 750 Mechanise
125 Ar + H
2
95 475 200 250 Mechanise
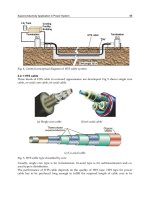
plasma-arc cut by a combination of a redesigned nozzle and a constricting
magnetic field (Fig. 4.4). Typical cutting parameters are given in Table 4.2.
A variation to the conventional plasma cutting process is the plasma
gouging technique. This utilises a plasma-jet torch which, as shown in Fig.
4.5, is presented to the surface at a glancing angle. In doing so the surface
is blown away and a groove is formed. The technique may be used to
remove excess metal, to excavate for defect removal, to back-gouge the
reverse side of welds and to establish a weld preparation. Needless to say
it requires a skilled operator to achieve an acceptable surface and should
not be entrusted to unskilled personnel since it is capable of removing large
amounts of metal very rapidly.
4.3.1 Health and safety
The plasma-arc process uses higher open circuit and arc voltages than does
the TIG process, with operating voltages as high as 400 volts in some appli-
cations. These voltages present a serious risk of electric shock and suitable
56 The welding of aluminium and its alloys
Parent metal
Cooling water – in
and out
Magnetic field coil
Plasma
4.4 HT-PAC torch. Courtesy of TWI Ltd.
Table 4.2 Suggested parameters for HT-PAC
Metal thickness Plasma Shield Current Stand off Cutting
(mm) gas gas (A) (mm) speed
(mm/min)
1.2 Air Air 70 2 3800
2 Air Air 70 2.5 2540
4 Air Air 70 2 1800
precautions must therefore be taken to ensure that cutting operations are
carried out in a safe manner. Only fully trained operators should be per-
mitted to operate the cutting equipment. All frames, casings, etc., should be
connected to a good electrical earth and all electrical connections and
terminals must be adequately protected. Any equipment maintenance or
modification must be carried out by suitably trained and qualified staff and
connections, insulation,etc. inspected at regular intervals for soundness and
deterioration.
The plasma-arc produces large amounts of infra-red and ultra-violet radi-
ation. All personnel in the vicinity of plasma-arc cutting operations there-
fore need to be provided with protective clothing, goggles and helmets to
protect both eyes and skin. The operator must use the correct filter lenses
for electric arc welding, with shade numbers ranging from 9 to 14, depend-
ing upon the current.
As with any thermal cutting process copious amounts of fume are pro-
duced. The fume will contain not only aluminium oxide but the oxides
of the other elements present in the alloy, ozone, oxides of nitrogen,
any surface plating or coating, any contamination and the cutting gases.
These present a health hazard that is best dealt with at source by local
fume extraction. Fume extraction, either local or general, will almost
certainly be mandatory if the fume and gas limits set by the Control of
Substances Hazardous to Health (COSHH) Regulations are to be com-
plied with. Cutting in confined spaces presents a particular problem. Fume
extraction and ventilation must be provided in these circumstances. It
should be remembered that many of the cutting gases, although not toxic,
are asphyxiant, are heavier than air and can accumulate in low-lying areas
Preparation for welding 57
Power inlet
Shielding gas inlet
Plasma gas inlet
Shielding gas
Plasma stream
Tungsten electrode
Shielding gas shroud
Path of
plasma
Direction of gouge
4.5 Plasma-arc gouging principles. Courtesy of TWI Ltd.
such as pits and wells. Forced ventilation should be considered in such
circumstances.
When plasma-arc cutting is carried out under water the dross that is
produced may build up on the tank bottom. Over a period of time this dross
reacts with the water,producing hydrogen which may accumulate under the
item being cut, leading to a risk of explosion. This is best avoided by clean-
ing the tank of the dross at regular intervals or using a forced circulation
water supply to carry away any gas as it is formed.
Plasma-arc cutting is a very noisy process, the noise level increasing as
the cutting current is increased. Ear protection is required for the operator
and personnel working in the vicinity to avoid discomfort or ear damage.
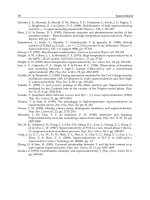
4.4 Laser beam cutting
A laser (light amplification by the stimulated emission of radiation) gener-
ates a coherent beam of light at an essentially constant wavelength. When
this beam is focused on a surface there is sufficient energy concentrated in
this focused spot that the material may be melted or vaporised (Fig. 4.6).
This enables the laser to be used for either welding or cutting. The laser
light is produced by exciting a lasing medium, this being either a suitable
gas or solid.The excitation is provided by the passage of an electric current
or by means of high-intensity light. There are two commonly used lasers to
be found in industrial applications: the gas CO
2
laser and the solid state
crystal laser, the neodymium-doped yttrium–aluminium–garnet (Nd-YAG)
laser. Of the two, the CO
2
laser is the most powerful with average power
outputs of up to 50 kilowatts. Both types of laser can be designed to provide
58 The welding of aluminium and its alloys
Laser beam
Focusing lens
Pressurised assist
gas inlet
Focused laser and gas jet
Work piece
Nozzle
Kerf
4.6 Laser cutting principles. Courtesy of TWI Ltd.
a steady output, continuous wave (CW) laser light or in a pulsed output
mode. In this latter case the power output on the peak pulse may be as
much as 20 times the average power.
The wavelength of light from the CO
2
laser is 10.6 microns (micro-
metres) and at this wavelength is easily absorbed by most solids, enabling
the CO
2
laser to be used on a wide variety of materials. This long wave-
length has a disadvantage, however, in that it cannot be transmitted by glass
or fibre optics but requires reflecting metal mirrors for manipulating the
beam and materials such as zinc selenide or gallium arsenide for focusing
lenses.The Nd-YAG laser light is an order of magnitude less at 1.06 microns,
allowing the use of glass lenses for focusing and fibre optic cable for beam
transmission. This offers a clear advantage over the CO
2
laser, since it
permits the marriage of commercially available manipulating equipment
such as NC (numerically controlled) gantries and robots with the laser.
The power output of currently available Nd-YAG lasers is limited to around
6 kilowatts, however, restricting the thickness of materials that can be
cut.
The laser cutting process consists of focusing the beam through a cutting
nozzle onto the surface to be cut, the concentration of energy being suffi-
cient to vaporise the material, creating a ‘keyhole’. With continuous wave
lasers there is generally more melting than vaporisation and an assist gas is
used to blow away the vapour and any molten metal, creating a narrow
clean cut as the beam is traversed along the item. The pulsed lasers gener-
ally provide enough energy that the laser beam imparts sufficient force to
the vapour that the vapour itself removes any molten metal. The assist gas,
introduced either through the cutting nozzle or co-axially with it, is used
not only to blow away any molten metal but also to protect the lens from
spatter or debris ejected from the cut.
The assist gas for cutting aluminium may be oxygen, nitrogen or air.
Oxygen is a reactive gas with aluminium and will give higher cutting speeds
than nitrogen. Nitrogen, however, will give a better quality cut in terms of
squareness and roughness than will oxygen. Air is a compromise but is the
cheapest of the gases. Gas pressure is an important variable that needs to
be controlled to give the best quality of cut – high gas pressures give the
most effective metal removal but too high a pressure may damage the focus-
ing lens, since this forms part of the pressure system. As the assist gas pres-
sure is increased the lens also needs to be thickened in order to carry the
increased pressure. The pressure of gas in the cut is also influenced by the
distance between the nozzle and the workpiece. For example, high-pressure
cutting may require a stand-off distance of only some 2.5mm. The rela-
tionship between stand-off and pressure in the kerf is not simple, however,
as most laser cutting is done with supersonic gas velocities. It is essential
that the nozzle stand-off distance and nozzle condition are closely
Preparation for welding 59
controlled to provide consistent and high-quality cuts. Typical laser cutting
parameters are given in Table 4.3.
A number of advantages accrue from using a laser for the cutting of weld
preparations:
• Low heat input, resulting in minimal distortion and narrow heat affected
zones.
• Edges that are smooth and perpendicular to the surface and often
require no further cleaning before welding.
• Narrow kerfs and heat affected zones, meaning that more efficient
nesting can be achieved, resulting in material savings.
• Very thin materials can be cut without distortion.
• Very accurate cuts can be made, resulting in more easy assembling for
welding, this giving reduced fit-up time, more accurate fit-up and fewer
weld defects.
• The process is easily automated and can be readily interfaced with other
NC equipment (Fig. 4.7).
The main drawbacks to the use of lasers for the cutting of aluminium are
as follows:
• The capital cost of equipment, which may be in the order of several
hundreds of thousands of pounds for a laser interfaced with suitable
manipulating equipment. A 1.5kW CW Nd-YAG laser interfaced with
a robotic system, together with its appropriate safety equipment will
cost in the region of £250k to £300k at today’s (2002) prices.
• The coupling of the beam with the work surface is not very good since
aluminium can be highly reflective. This means that higher power is
needed to cut an aluminium component than a similar item in steel.
Aluminium may also reflect the beam back into the lens, resulting in
damage, although this problem has lessened with the development of
more accurate lenses and focusing systems.
• Laser cut aluminium may have a heavy dross on the underside of the
cut. Removal of this can make the process non-competitive with other
processes. Higher gas pressures will assist in reducing or eliminating the
problem.
• The cut edges of the age-hardening alloys may contain microfissures
that will need to be removed.
4.4.1 Health and safety
The laser cutting process is a thermal process and therefore metal fume
mixed with the assist gas will be generated. This fume will need to be
removed, preferably by local fume extraction at source. As laser cutting is
60 The welding of aluminium and its alloys
Table 4.3 Parameters for laser cutting
Process Thickness Average power Pulse frequency Pulse width Assist gas Gas pressure Cutting speed
(mm) (kW) (Hz) (ms) (mm/min)
Pulsed Nd-YAG
1.2 0.174 120 1 oxygen 4 6000
2 0.414 100 0.5 oxygen 6 540
4 0.224 31 1.5 oxygen 7 60
CW Nd-YAG
2 2 na na oxygen 4500
2 2 na na nitrogen 300
CW CO
2
1.2 1.41 na na oxygen 3800
2 1.2 na na oxygen 3000
4 1.5 na na oxygen 1200
performed with mechanised or automated systems using remote control
there is only a limited risk of fume exposure for the operator. However, a
laser cutting system generally has a very high usage and fume extraction
will be required to control the general fume level within the shop.
The voltages used in laser equipment are sufficiently high to present a
serious risk of electric shock. Access panels should be secured and suitably
marked to highlight the risks. Only authorised and trained personnel should
be permitted access to the equipment for repair and maintenance purposes.
A typical laser work cell is illustrated in Fig. 4.8.
There are two hazards associated with laser radiation which, depending
upon the wavelength, can damage either the eye or the skin. The radiation
can damage the retina and/or the cornea, particularly the shorter wave-
length radiation which can be focused by the lens of the eye on to the retina.
Exposure of the skin can result in burns.With high-power lasers these burns
may be deep and can cause permanent damage. To prevent such damage it
is generally necessary to position the laser inside a suitable enclosure with
interlocks to prevent access when the laser is operating. Screening of the
CO
2
laser beam can be provided by clear glass or acrylic screens. Tinted
welding screens are required for the solid state lasers since the radiation is
closer to the wavelength of visible light than that of the gas laser. Personal
eye protection for the operator is also recommended, selected to filter out
the appropriate wavelength of laser light.
62 The welding of aluminium and its alloys
4.7 CNC CO
2
laser cutting machine. Courtesy of Messer Griesheim.
Visible radiation is also emitted during laser cutting,this light being similar
to that produced from a welding arc containing both ultra-violet and infra-
red light.To filter this out requires tinted filter glasses,the density of the shade
being sufficient that no discomfort is felt when viewing the bright plume asso-
ciated with the beam. This radiation may also cause skin reddening. It goes
without saying that all personnel involved in laser processing operations
should be fully trained in the use of eye and skin protection equipment.
4.5 Water jet cutting
Water jet cutting uses an abrasive powder introduced into a very high-
pressure and velocity water jet and is capable of cutting both metallic and
non-metallic materials essentially by a process of erosion. Water velocity is
in the region of 2500km/h (1600mph) and water pressure between 2000
bar (30000psi) and 4000 bar (60000psi). One of the most important uses
of water jet cutting is the roughing out of parts prior to finish machining.
The great advantage that water jet cutting has over the laser or plasma-arc
is that no heat is used in the process. There are therefore no heat affected
zones and no thermal distortion. Parts can be cut very accurately and closely
nested, resulting in material savings. Cut part tolerances are very small,
simplifying the task of fitting up for welding.
Although aluminium up to 450mm in thickness can be cut using the
process, the limitations with water jet cutting are the cutting speed, which
Preparation for welding 63
4.8 Laser welding and cutting work cell. Courtesy of TWI Ltd.
may be only a quarter the speed of a laser cut component, particularly in
thin sections.The other limitation is the bevel or taper of the cut face which
may be twice that of laser cutting, some 25% of the nozzle diameter or
around 0.2mm at the optimum cutting speed. The bevel can be reduced by
slowing the cutting speed with the penalty of an increased cost.
4.6 Mechanical cutting
Although the methods mentioned above can be applied to many fabricat-
ing activities, mechanical cutting techniques are used by most welding work-
shops as being the most cost-effective and versatile method. Cutting and
machining equipment is freely available in most fabrication shops and is
frequently less capital intensive than the sophisticated laser or plasma
cutting systems discussed above. Furthermore, the systems described in
Sections 4.2, 4.3 and 4.4 are capable of straight or simple bevel cuts only –
if double bevel preparations are required then two or more cuts are nec-
essary and J-preparations are not feasible. Edge preparations can be pro-
duced in a number of ways such as high-speed milling machines, edge
planers, routers and various types of saws. Where air-powered equipment
is used care needs to be taken to ensure that the air supply is clean, dry and
oil-free to prevent contamination of the surfaces, which would give rise to
porosity during welding.
Routers, planers and edge millers are capable of producing J- and U-
preparations when fitted with the correct shape of tools.The equipment for
these tasks can be hand-held and similar to that used for wood working,
the only requirement being the need for slightly greater power or floor
mounts for greater capacity. High cutting speeds can be used without the
need for lubricants or coolants, although this does not remove the need for
thorough cleaning. Hand-held rotary cutting machines are ideally suited to
back-gouging and for removing excess weld metal. The depth of cut can be
adjusted and various cutter forms are available, including V-blades for
bevelling and flat blades for weld cap removal.
The guillotine can be used to shear sheets of up to 6mm thickness without
the need for further preparation work. Over this thickness some dressing
of the sheared edges is necessary if the best weld quality is to be achieved.
Shearing of the edges of alloys containing more than 3.5% Mg is not
recommended if the edges are to enter service ‘as sheared’ because of the
risk of the work-hardened edges suffering from stress corrosion cracking.
Edges that are welded after shearing do not suffer from this problem.
Sawing is a very effective method of cutting and bevelling aluminium
using either portable or floor-mounted equipment. To achieve a good
quality cut high cutting speeds are necessary, around 2500 metres per
minute (mpm) peripheral surface speed for high-speed steel circular saw
64 The welding of aluminium and its alloys
blades, 3500mpm for tungsten-tipped blades and 1800mpm for band saw
blades. It is usual for band saw blades to have wider spacing on the teeth
than for steel to prevent snagging, 8 to 16 teeth per centimetre being rec-
ommended. Band and circular saws can produce straight cuts and, when
equipped with a tilting table, bevelled cuts. The saw cut surface tends to be
rough and readily traps grease and dirt, making cleaning and degreasing
difficult. It is recommended that the sawn faces are milled or filed to
produce a smooth surface when the best quality of weld is required.
Grinding is best performed with high-speed, semi-flexible aluminium
oxide grinding discs. Care needs to be taken to ensure that the grinding is
controlled and is not heavy handed. Over-enthusiastic grinding can give a
torn and rough surface which will be difficult to clean. Material may also
be smeared over the surface, physically trapping dirt and grease and giving
rise to porosity on welding. Rotational speed of the discs needs to be in
the region of 8500rpm. Care should be taken that the grinding machines
are capable of maintaining these speeds when under load – some machines
are incapable of attaining or maintaining these speeds in operation. Grit
sizes range from 24 to 120 and the discs selected should be of the non-
loading type. Under these conditions the discs should not become clogged
and the speed of metal removal should not be affected. Grinding can
be used to clean the weld preparation prior to welding, to blend the weld
into the parent metal, to remove excess weld metal and to back-grind a
partially penetrated weld to sound metal. To achieve the best results
this requires suitable and well-maintained equipment operated by trained
personnel.
Hand-held abrasive belt sanders are readily available and enable finish-
ing operations to be carried out without too great a risk of damage owing
to incorrect manipulation of the sander. Belt widths of 3–100mm can be
purchased; the narrow belts in conjunction with sander arms of up to
500mm in length enable dressing operations to be carried out when access
is very restricted.
Most machining and grinding operations can be carried out without lubri-
cation. Dust may therefore be a problem and operators may need to be
equipped with dust masks or respirators and the equipment with dust
collectors. Noise can also be a problem and ear defenders will be needed
for some of the machining and grinding tasks.
One last but very important point to be made before ending this section
on the cutting and machining of weld preparations is that the equipment
must not be used on aluminium if it has been used on other metals. Cross-
contamination of aluminium with copper, iron, etc., may result in welding
or service problems. Wire brushes, grinding discs, cutters and milling heads
must only be used on aluminium and should be identified as such if there
is any possibility of cross-contamination. Machining equipment should be
Preparation for welding 65
thoroughly cleaned of any foreign metals before being used on aluminium
alloys.
4.7 Cleaning and degreasing
Components for welding may be flat, preformed, sheared, sawn or milled
to give the desired shape or to provide the weld preparation. Lubricants
used during these processes must be removed if weld quality is to be main-
tained. Degreasing may be accomplished by wiping, brushing, spraying or
vapour degreasing with commercially available solvents. This is best done
before any mechanical cleaning takes place. Mechanically cut edges may
carry burrs along the cut edge that will trap dirt and grease. These burrs
should therefore be removed from weld preparations by scraping with a
draw tool – do not wire brush only as this may fail to remove them com-
pletely. Scraping is also an excellent method for removing the oxide film.
Stainless steel wire brushes, stainless steel wire wool or files may also be
used to remove the oxide. As mentioned above in Section 4.6, under no
circumstances should carbon steel, brass or copper brushes be used. Make
sure that any cleaning tools are segregated and are used only on aluminium,
otherwise cross-contamination can occur.
In certain cases, particularly when striving to achieve freedom from
porosity, chemical cleaning or pickling may be required. A pickling shop is
illustrated in Fig. 4.9 and a schedule of chemical cleaning treatments is given
in Table 4.4.
66 The welding of aluminium and its alloys
4.9 Typical pickling shop. Courtesy of R. Andrews.
Table 4.4 Chemical treatments for cleaning and oxide removal
Solution Concentration Temp (°C) Procedure Container material Purpose
Nitric acid 50% water 18–24 Immerse 15min Stainless steel Removal of thin oxide film
50% HNO
3
Rinse in cold water for fusion welding
(technical Rinse in hot water
grade) Dry
Sodium hydroxide 5% NaOH in 70 Immerse 10 to 60s Mild steel Removal of thick oxide film
followed by nitric water Rinse in cold water Stainless steel for all welding and
acid brazing operations
Concentrated 18–24 Immerse 30s
HNO
3
Rinse in cold water
Rinse in hot water
Dry
Sulphuric – chromic 5 litres H
2
SO
4
70–80 Dip for 2 to 3min Antimonial lead lined Removal of films and stains
acid 1.4kg CrO
3
Rinse in cold water steel tank from heat treating and
40 litres water Rinse in hot water oxide coatings
Dry
Phosphoric – chromic 1.98 litres of 95 Dip for 5–10min Stainless steel Removal of anodic coatings
acid 75% H
3
PO
3
Rinse in cold water
0.65kg of CrO
3
Rinse in hot water
45 litres of water Dry
Once degreased and cleaned the parent material should be welded within
a short period of time; typically four hours would be regarded as reason-
able. The component must be maintained in a clean condition during this
time and this may require the item to be covered with polythene sheets or
brown paper. If the item is left standing overnight the joints may require
an additional cleaning operation so it is advisable to clean only those parts
that can be welded within a four or five hour production period.
There are a couple of points concerning cleanliness that are worth men-
tioning. If the chemical cleaning has been extremely good then it is possi-
ble to leave the components for a longer period of time, perhaps overnight
if the storage conditions are clean and dry. It has also been noticed that
when the items are ‘super clean’ the TIG or MIG welder can experience
arc starting and stability problems. The reason for this is not clear but is
probably associated with the complete absence of any oxide. It is thought
that a small amount of oxide assists in the formation of an active anode
spot, resulting in a more stable arc.
The aluminium fabrication area ideally should be separated physically
from other fabrication areas. For example, dust from activities such as
grinding, settling on the surface will cause problems, particularly if this is
from the grinding of steel items in adjacent bays. Aluminium and steel
should never be welded in the same welding booth. It cannot be empha-
sised too strongly how important attention to cleanliness is if sound, defect-
free welds are to be made consistently.
68 The welding of aluminium and its alloys
5.1 Introduction
In all constructional applications where welded connections are used either
a stress analysis is carried out or ample experience of acceptable perfor-
mance exists for the specific joint design. The principles of stress analysis
are outside the scope of this chapter – it deals instead with those shop-floor
fabrication activities that the designer directly influences. There are many
national and international specifications dealing with the design aspects of
specific structures. For instance, BS 8118 deals with the structural use of alu-
minium, as does the US specification D 1.2. Pressure vessel design is
covered by BS PD 5500 and ASME VIII. For advice on the design of such
structures the designer can do no better than consult the relevant specifi-
cations. For a list of relevant specifications see Appendix A at the end of
this book.
The objective of the designer is to provide an assembly with adequate
strength for the specific application with the least amount of weld metal
and the minimum number of joints. This requires the designer to plan for
a smooth flow of stresses through the joint, to compensate for any strength
loss due to welding, to design the component such that there is sufficient
access for welding and to select the metal to be welded with optimum weld-
ability in mind. As mentioned in Chapter 2 there is little that can be done
to improve the strength of the weldment to match that of the cold worked
or precipitation-hardened alloy.All that the designer can do to compensate
for the loss is to thicken the component, either overall or locally, or to move
the weld to an area of low stress. For advice consult British Standard BS
8118 or the AWS Structural Design Code D 1.2, as mentioned above.
There are a number of factors that the designer needs to take into
account that are specific to designs in aluminium. Some of these have been
mentioned in earlier chapters and include such physical properties as the
high coefficients of thermal conductivity and expansion, the major loss
of strength of certain alloys in the HAZ and the low Young’s modulus. In
5
Welding design
69
addition, the designer must consider access for both welding and inspec-
tion, joint design to enable high-quality welds to be made, the effects and
minimisation of distortion and the effect of welding on stress concentra-
tions and fatigue.
The ease with which a weld can be made is crucially dependent on joint
design and this will have a direct effect on fabrication costs. It is thus essen-
tial that the designer is aware of certain fundamentals of welding practice
in order to achieve the objectives of the lightest structure capable of per-
forming its desired function at the lowest cost.
There are a number of ‘golden rules’ that the designer should keep in
mind when detailing the drawings:
• Remember that weld metal is very expensive. Do not over-specify fillet
weld throat thickness and specify the narrowest weld preparation angle
that is consistent with quality. Specify these sizes clearly.
• Keep welding to a minimum – use formed sections instead of welded
plate, keep stiffeners to a minimum. The cheapest weld of all is the one
you do not make!
• Specify welds to be made in the flat position.
• Allow adequate access for the welder – see below.
5.2 Access for welding
The two most common design faults are failing to recognise that full vision
of the weld pool is essential for manual welding and that the weld must be
at a comfortable distance from the operator, neither too close nor at a dis-
tance where the welder’s arm is at full stretch. These errors can frequently
be recognised at the design stage and the benefits of requiring an ex-
perienced welding engineer to review draft drawings cannot be over-
emphasised. The distance from the operator’s head to the weld can easily
be checked on drawings. Ideally this distance should be in the region of
200mm minimum to 450mm maximum. It should be remembered that the
diameter of the welder’s helmet is about 300mm and that this will affect
the access requirements.
For a joint to be accessible for manual welding welders must be able com-
fortably to position themselves and their equipment if high-quality welds
are to be produced. This requires sufficient space to permit free movement
of the welding torch or electrode and to enable the torch to be presented
to the weld pool at the correct angle. Detail design must also take into
account the proximity of adjacent material which should be such that the
welder is allowed an unrestricted view of the arc. The amount of space
required will depend on the size of the equipment to be used, in particular
the size of the torch. Welding aluminium with the gas shielded processes
70 The welding of aluminium and its alloys
requires a large diameter gas shroud and a short arc length.This means that
the welder’s view of the weld pool is more restricted than when welding a
similar configuration in steel. The sketch in Fig. 5.1 illustrates a situation
that is often encountered in practice where the designer has failed to take
into account the need for adequate access. As a rule of thumb the distance
between the plates should be as shown.A further limitation for TIG welding
is the need to add a filler wire that restricts further the welder’s view of the
arc and the ease of manipulation as both of the welder’s hands need to be
in the work area.
The welding of attachments or nozzles to plates or pipes can present
problems when the nozzle is presented to the surface at an angle less than
45°.Access into the acute angle is difficult, resulting in lack-of-fusion defects
in the root of the weld as illustrated in Fig. 5.2.
5.3 Welding speed
Aluminium is normally welded at higher travel speeds than when welding
steels, particularly when using the MIG process. The implication of this is
that abrupt changes of direction are to be avoided. It is, for example, impos-
sible to weld around a 90° corner as the MIG torch cannot be moved rapidly
enough to keep the correct lead angle. It is also difficult to weld around
small diameter bosses fixed in position. In this sort of application the boss
needs to be rotated with the torch held stationary. Such comments do not
necessarily apply when fully mechanised or robotic equipment is used.
Welding design 71
y
x
For adequate access to the fillet
welds between the two upright plates
y should always be less than x
5.1 Access requirements for welding.
Face side weldRoot sealing pass
Inability to achieve correct arc length
MIG torch
gas shroud
5.2 Access problems of angled plates or pipes.
Automation or the use of robots enables torch positioning and motion to
be controlled with the precision required for the production of quality
welds.
5.4 Welding position
Welding in the flat or downhand position is preferred for all arc welding
activities. It is easier for the welder to deposit high-quality weld metal at
high deposition rates in the flat position than in any of the other positions.
The weld pool is larger in this position with slower solidification and cooling
rates, permitting gases to evolve from the pool and reducing the amount of
porosity. The force of gravity in positions such as the horizontal–vertical,
however, means that the weld pool tends to sag, making it more difficult to
achieve an acceptable weld profile. These effects are more marked with
MIG than with TIG. Flat position welding therefore gives the best quality
weld metal at the lowest cost.
The designer should take these points into account when considering the
design of a structure. Wherever possible welding should be performed in
the flat position.This may require the fabrication of sub-assemblies that are
more easily manipulated. Manipulating equipment such as rotators or face-
plate manipulators are useful for items too large for manual handling. The
use of this equipment, however, may require the welding of temporary
attachments to the component to facilitate fitting the component to the
manipulator.As much care must be taken with the welding and removal of
these attachments as is applied to the permanent joints – formal welding
procedures should be considered in order to exercise control over this
sometimes haphazard activity.
5.5 Edge preparation and joint design
There are few more important decisions that affect the success of welding
than that of correct joint design. Problems with weld quality or performance
can often be attributed to the wrong design of edge preparation. Joint
design is determined by the strength requirements, the alloy, the thickness
of the material, the type and location of the joint, the access for welding
and the welding process to be used.
There are three fundamental forms of weld, the butt, the fillet and the
edge weld, illustrated in Fig. 5.3, from which can be developed six basic
joint types.These are the butt,T-joint, corner, cruciform, edge and lap joint,
illustrated in Fig. 5.4.
The static tensile strength of these weld types is determined by the throat
thickness (Fig. 5.5). The size of a fully penetrated butt weld is determined
by the thickness of weld metal deposited within the plane of the plate or
72 The welding of aluminium and its alloys
Welding design 73
BUTT weld
FILLET weld
EDGE weld
5.3 Butt, fillet and edge welds.
(a) BUTT joint
(c) LAP joint
(b) T-joint
(d) CRUCIFORM joint (f) CORNER joint
(e) EDGE joint
5.4 Joint types developed from the butt, fillet and edge weld.
pipe, t
1
in Fig. 5.5. No credit is taken in calculating permissible static design
stress of either a butt or fillet weld for the excess weld metal, i.e. that above
the surface of the parent metal for a butt or outside the isosceles triangle
of a fillet weld as given by (t
2
- t
1
).
74 The welding of aluminium and its alloys
(a)
(b)
(c)
t
2
t
1
t
2
t
2
t
1
t
1
5.5 Throat thickness in a butt weld: (a) full pen butt weld; (b) partial
pen butt weld; (c) T-butt weld.
(a)
(b)
t
1
= t
2
t
2
t
1
5.6 Throat thickness in a fillet weld: (a) fillet weld; (b) mitre and
convex fillet weld.