ASP.NET 2.0 Instant Results phần 7 pptx
Bạn đang xem bản rút gọn của tài liệu. Xem và tải ngay bản đầy đủ của tài liệu tại đây (1.58 MB, 54 trang )
New Customer(CType(Membership.GetUser().ProviderUserKey, Guid), _
Profile.FirstName, Profile.LastName, Profile.Address.Street, _
Profile.Address.ZipCode, Profile.Address.City, Profile.Address.Country)
Dim orderId As Integer = ShopManager.FinalizeOrder(theCustomer)
Response.Redirect(“ThankYou.aspx?OrderNumber=” & _
orderId.ToString() & “&Total=” & orderAmount.ToString(“c”))
Catch ex As Exception
lblFailure.Visible = True
btnFinalize.Visible = False
End Try
The customer details come from two different sources — the customer ID is taken from the
MembershipUser class, which exposes a ProviderUserKey property that is unique for each user in the
system. All the other properties come from the user’s profile.
The
FinalizeOrder method in the ShopManager class performs two actions. First it inserts the order
and order details in the database by calling
FinalizeOrder on the ShopManagerDB class. When the
order has been saved successfully, the cart is then emptied to avoid the same order from being saved
twice. The
FinalizeOrder method in the ShopManagerDB class contains quite a bit of code, so the
method is broken down in pieces and discussed line by line. The code begins by declaring a variable
called
myTransaction of type SqlClient.SqlTransaction:
Public Shared Function FinalizeOrder(ByVal theShoppingCart As ShoppingCart, _
ByVal theCustomer As Customer) As Integer
Dim myTransaction As SqlClient.SqlTransaction = Nothing
The order is saved partially in the OrderBase table and partially in the OrderDetail table. This is done
with multiple
INSERT statements. If any of the statements fails, you want to roll back the entire operation
to avoid having incomplete orders in the database. It’s the
SqlTransaction object’s responsibility to
manage that process. All you need to do is wrap the code in a
Try Catch block, assign the transaction
object to each
SqlCommand object you want to execute, and call Commit or Rollback, depending on the
success of the operation. The
SqlTransaction object is instantiated by calling the BeginTransaction
method of a connection:
Try
Using myConnection As New SqlConnection(AppConfiguration.ConnectionString)
myConnection.Open()
myTransaction = myConnection.BeginTransaction
The next block of code sets up the first SqlCommand object that inserts the order’s base data in the
OrderBase table:
Dim myCommand As SqlCommand = New SqlCommand( _
“sprocOrderBaseInsertSingleItem”, myConnection)
myCommand.Transaction = myTransaction
myCommand.CommandType = CommandType.StoredProcedure
With the SqlCommand object instantiated, it’s time to pass the customer’s details to the stored procedure
using
SqlParameters and execute it. The code for the stored procedure isn’t shown here because it
doesn’t do anything special. All it does is insert a new record in the OrderBase table, returning its new
303
Wrox WebShop
12_749516 ch09.qxp 2/10/06 9:18 PM Page 303
ID using the Scope_Identity() function of SQL Server. As of SQL Server 2000, Scope_Identity() is
preferred over
@@IDENTITY because the former returns the ID created in the current scope, like a stored
procedure, whereas the latter could return an unrelated ID caused by a trigger on the table that you’re
inserting the record into.
The next step is to add the parameters to the
SqlCommand object using the AddWithValue method:
myCommand.Parameters.AddWithValue(“@CustomerId”, theCustomer.CustomerId)
Other parameters are added here
myCommand.Parameters.AddWithValue(“@Country”, theCustomer.Country)
Dim theReturnValue As SqlParameter = New SqlParameter()
theReturnValue.Direction = ParameterDirection.ReturnValue
myCommand.Parameters.Add(theReturnValue)
myCommand.ExecuteNonQuery()
The stored procedure returns the ID of the new record in the OrderBase table. That ID can be retrieved
from the parameter
theReturnValue. Because the return value is passed back as a generic object, it
must be cast to an Integer using
Convert.ToInt32:
Dim orderId As Integer = Convert.ToInt32(theReturnValue.Value)
The next block of code is responsible for inserting the order details and binding it to the OrderBase
record that was created earlier. Another
SqlCommand object is set up and assigned the transaction object
that was created earlier (see the following code). This way this new command will participate in the
same transaction:
Dim myCommand2 As SqlCommand = _
New SqlCommand(“sprocOrderDetailInsertSingleItem”, myConnection)
myCommand2.Transaction = myTransaction
myCommand2.CommandType = CommandType.StoredProcedure
Just as with the first command, you need to pass parameters to the stored procedure. The code block
that sets the parameters for the
myCommand object used the convenient AddWithValue method that sets
up the parameter automatically. However, in the case of the order details you cannot use that technique
because you need to be able to use the parameters multiple times; once for each ordered product in the
shopping cart. That’s why you need to declare and instantiate each parameter explicitly:
Dim orderBaseIdParam As SqlParameter = _
New SqlParameter(“OrderBaseId”, SqlDbType.Int)
myCommand2.Parameters.Add(orderBaseIdParam)
Dim productIdParam As SqlParameter = _
New SqlParameter(“productId”, SqlDbType.Int)
myCommand2.Parameters.Add(productIdParam)
Dim priceParam As SqlParameter = _
New SqlParameter(“price”, SqlDbType.Money)
myCommand2.Parameters.Add(priceParam)
Dim quantityParam As SqlParameter = _
New SqlParameter(“quantity”, SqlDbType.Int)
myCommand2.Parameters.Add(quantityParam)
304
Chapter 9
12_749516 ch09.qxp 2/10/06 9:18 PM Page 304
With the explicit parameters set up it’s now very easy to reuse them in a loop and assign them a different
value that is retrieved from the ordered product being added:
For Each myOrderedProduct As OrderedProduct In theShoppingCart.Items
orderBaseIdParam.Value = orderId
productIdParam.Value = myOrderedProduct.ProductId
priceParam.Value = myOrderedProduct.Price
quantityParam.Value = myOrderedProduct.Quantity
myCommand2.ExecuteNonQuery()
Next
Just as the stored procedure that inserts the order base details, the stored procedure that inserts the order
details is very simple as well. It simply inserts the product ID, the price, and the quantity of each item,
and then relates the record to the OrderBase table by setting the OrderBaseId column. At this point, the
entire order has been saved successfully so you call
Commit to commit the transaction in the database
and then return the new order ID to the calling code:
myTransaction.Commit()
Return orderId
End Using
If an error occurred anywhere in this method, the code in the Catch block is executed. By calling Rollback
on the transaction object you can let the database know that an error occurred and then it will undo any
changes it has made so far. At the end, you call
Throw to pass up the error in the call chain:
Catch ex As Exception
myTransaction.Rollback()
‘ Pass up the error
Throw
End Try
End Sub
The order ID returned from the FinalizeOrder method in the data access layer is passed through the
business layer to the Check Out page. That page passes it, together with the total order amount, to the
Thank You page:
Response.Redirect(“ThankYou.aspx?OrderNumber=” & _
orderId.ToString() & “&Total=” & orderAmount.ToString(“c”))
The Thank You page instructs the user to transfer the money to the Wrox WebShop account before the
goods will be shipped. As a reference, the order number and total order amount are displayed. Passing
the order amount in the query string sounds like a security risk, but in this case it isn’t. The order has
been completely finalized so there is no way to change it anymore. Also, the goods won’t be shipped
until the customer has paid the full amount into the shop’s bank account.
This concludes the discussion of the front end of the web shop. With the finalization page, the whole
ordering process is complete. Users can browse the product catalog, add items to their shopping cart, get
a customer account and log in, and finalize their orders.
305
Wrox WebShop
12_749516 ch09.qxp 2/10/06 9:18 PM Page 305
The Management Folder
The Management folder is used to allow an administrator of the site to make changes to the products in the
catalog. You have already seen most of the concepts used in this mini content management system in
Chapter 5. However, there may be one thing you’re unfamiliar with. Whenever you create a new product
and upload an image, three thumbnails are created automatically. In the classic ASP days, you’d need to buy
a commercial third-party component or write some hefty C++ to resize images automatically. However, in
the .NET era you need only a few lines of code. Take a look first at the code that fires whenever a new
product is about to be inserted. You find the following code in the
FormView1_ItemInserting method in
the AddProduct.aspx.vb file:
‘ First. try to save the images
Dim theFileUpload As FileUpload = CType( _
FormView1.FindControl(“FileUpload1”), FileUpload)
If theFileUpload.HasFile Then
Dim fileNameSmall As String = “~/Images/Products/” & Guid.NewGuid.ToString()
Dim fileNameMedium As String = “~/Images/Products/” & Guid.NewGuid.ToString()
Dim fileNameLarge As String = “~/Images/Products/” & Guid.NewGuid.ToString()
Dim theExtension As String = Path.GetExtension(theFileUpload.FileName)
fileNameSmall &= theExtension
fileNameMedium &= theExtension
fileNameLarge &= theExtension
theFileUpload.SaveAs(Server.MapPath(fileNameLarge))
‘ Now resize the images
Helpers.ResizeImage(Server.MapPath(fileNameLarge), _
Server.MapPath(fileNameSmall), 40)
Helpers.ResizeImage(Server.MapPath(fileNameLarge), _
Server.MapPath(fileNameMedium), 100)
Helpers.ResizeImage(Server.MapPath(fileNameLarge), _
Server.MapPath(fileNameLarge), 250)
The code first checks if an image has been uploaded. If HasFile of the Upload control returns True,
three filenames are generated, one for each thumb. The extension for the files is determined by using
Path.GetExtension and passing it the name of the uploaded file.
The final block of code creates the three thumbs by calling
Helpers.ResizeImage and passing it the
name of the image to resize, the name the thumb should be saved to, and the maximum width or height
for each image (40 for the thumb used in the shopping cart, 100 for the image in the product catalog, and
250 for the image on the detail page). You see the implementation for the
ResizeMethod in Chapter 11,
where it’s discussed in full detail.
With this short description of the Management folder, you’ve come to the end of the “Code and Code
Explanation” section. The next section describes the installation process of the WebShop application.
306
Chapter 9
12_749516 ch09.qxp 2/10/06 9:18 PM Page 306
Setting up the WebShop
You can choose to install the WebShop manually or by using the supplied installer application (available
on the companion CD-ROM and for download at
www.wrox.com). You can use the installer when you
have IIS running on your machine and want to use it for the WebShop. Running the installer creates a
virtual directory under IIS. The folders it creates contain the full source.
Alternatively, you can choose to unpack the supplied zip file to a folder of your location. This gives you
a bit more choice with regards to where the files are placed, but you’ll have to set up IIS manually, or
browse to the site from within Visual Web Developer.
For both installation methods it’s assumed that the .NET Framework 2.0, which is an installation require-
ment for Visual Web Developer, has already been installed. It’s also assumed that you have installed SQL
Server 2005 Express edition with an instance name of SqlExpress. If you chose a different instance name,
make sure you use that name in the connection string for the WebShop in the Web.config file.
Using the Installer
On the CD-ROM that comes with this book, locate the folder Chapter 09 - WebShop and then open the
Installation folder. Inside that folder you’ll find two files: setup.exe and WebShopInstaller.msi. Double-
click setup.exe to start the installation. Keep clicking Next until the application is installed and then click
Close to finish the installation wizard.
The WebShop is now ready to be run under IIS. However, before you can use it you may have to config-
ure IIS to use the .NET Framework 2.0 version instead of version 1.x. Refer to the section “Changing IIS
Settings” in Chapter 5 for information about changing this setting.
Manual Installation
Another way to set up the WebShop is by manually extracting the files from the accompanying zip file to
your local hard drive. To install manually, locate the folder Chapter 09 - WebShop and then open the
Source folder. In that folder you’ll find a zip file called Chapter 09 - WebShop.zip. Extract the contents of
the zip file to a location on your hard drive (for example,
C:\Websites). Make sure you extract the files
with the option Use Folder Names or something similar to maintain the original folder structure. You
should end up with a folder like
C:\Websites\WebShop that in turn contains a number of files and
other folders. If you want to open the web site in Visual Web Developer, choose File➪Open Web Site,
and browse to the folder where you extracted the files.
Modifying Security Settings
The maintenance section of the WebShop creates thumbnail images automatically for each product you
add to the catalog. The account that your web site runs under needs permissions to write to that folder.
To change the settings, open Windows Explorer and locate the Images folder inside the WebShop. The
path should be something like
C:\Inetpub\wwwroot\WebShop\Images, depending on where you
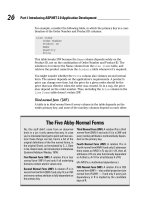
installed the application. Inside the Images folder you’ll find a Products folder. Right-click it, choose
Properties, and then open the Security tab, which is depicted in Figure 9-16.
307
Wrox WebShop
12_749516 ch09.qxp 2/10/06 9:18 PM Page 307
Figure 9-16
Click the Add button and add one of the accounts from the following table:
If You’re Using Running On Add the Account
Windows 2000 IIS ASPNET
Windows 2000 Built-in web server of The account you use to log on to
Visual Web Developer your machine.
Windows XP IIS ASPNET
Windows XP Built-in server of Visual The account you use to log on to
Web Developer your machine.
Windows Server 2003 IIS Network Service
Windows Server 2003 Built-in server of Visual The account you use to log on to
Web Developer your machine.
If you don’t see a Security tab, open Windows Explorer, choose Tools➪Folder
Options, and then click the View tab. At the bottom of the Advanced Settings list,
make sure that Use Simple File Sharing (Recommended) is unchecked.
308
Chapter 9
12_749516 ch09.qxp 2/10/06 9:18 PM Page 308
Once you add the account, make sure you give it at least Read and Write permissions.
Changing E-mail Settings
The WebShop uses e-mail functionality in a couple of places. Before you can use the functions that rely
on e-mail, such as the password reminder and the order confirmation, you need to change a few set-
tings. The first setting is at the top of the Web.config file in the root. Change the
MailFromAddress ele-
ment, used by the
PasswordRecovery control in Login.aspx, to your own e-mail address. Then at the
bottom of the Web.config file, change the settings in the
<smtp> node.
The final change you need to make is in the file Global.asax, in the root of the site. In the
Application_Error method, set sendMailOnErrors to True if you want to be notified of errors by
e-mail. Near the end of the method, change the fake e-mail addresses in the line with
New MailMessage
to your own address.
Managing Products
You can manage the products in the product catalog by clicking the Login link on the main menu of the
Wrox WebShop. You can log in with a username of
Administrator and a password of Admin123# or
the account you created yourself in the previous section. Once you’re logged in, you’ll see the Admin
menu appear. If you click that menu item, you see two links that allow you to view the product list or to
enter a new product.
For a walkthrough of possible extensions you can develop for the WebShop, the companion CD-ROM
that comes with this book has an additional document with the details on implementing one of those
extensions: sending an order confirmation to the customer by e-mail. The CD-ROM also features the
complete source for this walkthrough. In addition, you can download the source from
www.wrox.com.
Summary
The Wrox WebShop presented in this chapter features all the elements that you need for any serious
e-commerce web shop: a product catalog, a shopping cart, and a mechanism to store the orders in a
database.
The chapter started with a quick tour of the web site from an end-user’s point of view. You also saw how
to manage the product catalog in the protected Management section.
You then got a thorough look at the application’s design. You saw the classes the make up the business
and data access layers, and an explanation of each of the methods in these layers.
In addition to looking at the site from a customer’s point of view, you learned about the site’s classes,
user controls, and pages. In particular, you learned how to do the following:
❑ Build a business and data access layer to retrieve information about products and categories.
❑ Develop a shopping cart that stores the
OrderedProducts in session state so they are available
throughout the lifetime of a user’s session.
309
Wrox WebShop
12_749516 ch09.qxp 2/10/06 9:18 PM Page 309
❑ Customize the GridView control and change its default behavior to streamline the user’s
browsing experience. By removing unneeded buttons, such as the Update button, the shopping
cart becomes easier and more intuitive to use.
❑ Use the
SqlTransaction object in data access code to ensure that multiple database actions
either complete as a unit or are rolled back in case of a failure.
❑ Make use of the ASP.NET 20 Profile provider to store user details in the database. Instead of
writing custom code to get this information in and out of a database, you can now simply add a
few settings to the Web.config file, and these properties become available on the
Profile class.
With the knowledge you gained in this chapter, you can now build full-featured e-commerce web sites
that are easy to manage, extend, and maintain.
310
Chapter 9
12_749516 ch09.qxp 2/10/06 9:18 PM Page 310
10
Appointment Booking
System
No matter what business you’re in or what organization you work for, a lot of day-to-day tasks
involve appointments. Whether you run a hairdresser shop, hire out conference rooms or laptops,
or you have a technical consultancy firm, you need a way to keep track of appointments that have
been made. Quite often these kinds of appointments are made by phone, and then written down
on sticky notes or saved in a calendar application like Microsoft Outlook or in a planning tool.
Wouldn’t it be great if you could remove all the hassle these phone calls bring and allow your
customers to make the appointments online?
The Appointment Booking System presented in this chapter allows you to do just that. The appli-
cation — which can be installed as part of your intranet or corporate web site — enables registered
end-users to check availability and make direct appointments. To minimize abuse of the system,
users have to sign up for an account and confirm their e-mail address before they can access the
system’s vital areas. Users from your organization have direct access to the appointments that
have been made online.
The chapter has a strong focus on working with controls. You see how to use some of the less-known
controls like the
Wizard and the MultiView. You learn how to create reusable user controls with
custom properties and methods. Finally, you see how to create instances of server controls on the fly
using code in code-behind files to create output that cannot be achieved with the existing ASP.NET
2.0 server controls.
Using the Appointment Booking System
The Appointment Booking System consists of two parts: the public end-user section and the
maintenance section. The public user section is where end-users can sign up for an account, check
availability, and make appointments. To allow you to determine at run time what kind of appoint-
ments you want to book in the system, the system is built around a generic term called Booking
Objects. A booking object is the person or object — such as a mechanic or a conference room — you
can make an appointment with. Because this term doesn’t make sense to an end-user, the application
13_749516 ch10.qxp 2/10/06 9:19 PM Page 311
can be configured to display a user-friendly description, such as Mechanic, Hairdresser, or Conference
Room, instead. This configuration can be done in the Web.config file for the application or through the
administrative interface of the application. Because this configuration has an impact on the public interface,
that section is discussed first. After that, you see how to use the Appointment Booking System from an
end-user’s point of view.
The remainder of this chapter uses conference rooms as the booking object so whenever you see Conference
Room, think booking object and vice versa. However, because it’s likely you’ll use a different description
for the booking object, your screens will be slightly different than the ones you see in this chapter.
Maintaining the Appointment Booking System
If the application is installed, you can browse to it by entering http://localhost/Appointment
Booking
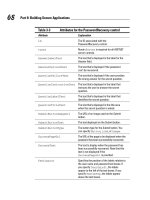
in your browser (see “Setting up the Appointment Booking System” later in this chapter for
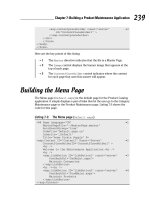
more details about setting up the application). The screen shown in Figure 10-1 appears.
Figure 10-1
The first thing you’ll need to do is change the user-friendly description of the booking object. To do this,
click the Management link in the left menu. You’ll be forced to log in first because the Management section
is protected and can be accessed only by users in the Manager role. Type
Administrator as the user-
name and
Admin123# as the password. Then click Application Settings in the Management menu (visible
in Figure 10-2) that has appeared and provide a name for the singular form and for the plural form of
your booking object.
So if you’re using this application to make appointments for hairdressers, type in Hairdresser and
Hairdressers. You can leave the Require Comments setting checked for now. This setting determines
whether users have to enter a comment when they make an appointment. The Start Time and End Time
312
Chapter 10
13_749516 ch10.qxp 2/10/06 9:19 PM Page 312
settings determine the opening hours of your business. Changing these settings will impact the
Appointment Wizard, the Availability Checker, and the management pages; all of which are shown later.
Be aware that saving the settings forces an application restart as the new settings are written to the
Web.config file.
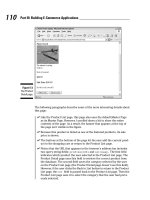
With the user-friendly name set up, click the second link in the Management menu (visible in Figure 10-2),
which should now display the name of the booking object you entered in the previous section. In addition
to that link in the Management menu, the page title and the introduction text of the page now also show
the user-friendly name you gave to the booking objects.
Figure 10-2
This page allows you to create new or change existing booking objects. The application comes with three
pre-installed booking objects, but you can click the Edit link to change the description for each booking
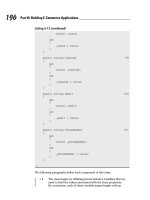
object. When you click Edit, the screen in Figure 10-3 appears.
Here you can give the booking object a title and determine between what times and on what days it’s
available for appointments. Once you’re done, click the Update link and you’re back at the page that
lists the booking objects. Use the New link to create as many booking objects as your application
requires. Note that in Figure 10-2 the link is called New Conference Room, but in your application it
should show the name of your booking object.
Once you create the booking objects, the application is ready for use by end-users. You see how the public
area of the web site works in the next section.
313
Appointment Booking System
13_749516 ch10.qxp 2/10/06 9:19 PM Page 313
Figure 10-3
Making Appointments with the Appointment Booking System
To make the process of booking an appointment as simple as possible, the application features a wizard
that guides the user through the process. Two menu items allow you to access this wizard. First, you can
click the Check Availability link to see if your favorite booking object is available on a date and time of
your choice. If it is, you can make an appointment by clicking an available timeslot. The alternative is
through the Make Appointment menu option that allows you to make an appointment request directly.
Both these menu items are blocked for unauthenticated users, so you’ll need to create an account first.
Creating an Account
Before you can create an appointment, you need to have a valid account. You can create one on the Sign
Up page available from the left menu. This page features a standard
CreateUserWizard control that
asks you for some information, such as your name and e-mail address. Once you have created an account,
you’ll receive an e-mail with a confirmation link that you’ll need to click before your account is activated.
This technique, called double opt-in, ensures that only users with a valid and confirmed e-mail address
can use your application. You see later how this double opt-in technique works. Once your account is
activated, you can login by clicking the Login link and then start using the Appointment Booking
System.
The Availability Checker
When you click Check Availability in the main menu, you’ll see a little calendar icon that allows you to
select a date for which you want to see the availability. When you select a date, the page reloads and you
see a screen similar to Figure 10-4.
314
Chapter 10
13_749516 ch10.qxp 2/10/06 9:19 PM Page 314
Figure 10-4
On this screen you see a grid that displays the booking objects. The first row in the grid is the header
and displays the name of the booking object (Conference Room in this example) and the available hours,
ranging from 7 a.m. until 8 p.m. You can also see that for this date, only Conference Room 1 is available,
and only between 7 a.m. and 1 p.m. If you click Book for a free timeslot, you’re taken to the appointment
wizard that is discussed in the next section. You can click the calendar again to select a different date for
which you want to see the availability.
The Appointment Wizard
If you click Make Appointment in the main menu, the Booking Object Selection Wizard, depicted in
Figure 10-5, appears.
Figure 10-5
315
Appointment Booking System
13_749516 ch10.qxp 2/10/06 9:19 PM Page 315
Notice that the text in the wizard menu and in the introduction text does not speak about general booking
objects, but uses the term that’s configured in the application, Conference Rooms in this case. You see
how this works later in this chapter when the code is discussed.
The wizard is pretty straightforward and thus easy to use. Click Next to select an available booking object,
then Next again to select a date, and then the time and duration. On the Comments page you can enter
comments to go with the appointment. For example, you can enter special instructions for the lunch you’d
like to have in the conference room. Finally, on the Review Your Request tab, you get a summary of the
selections you made. When you click Finish, you get a screen that either confirms your appointment or
explains to you that the requested booking object, date, and time are not available. In the latter case, you
can restart the wizard and make a different selection, or go to the Availability Checker to find out when
you can make an appointment.
Design of the Appointment Booking System
Similar to other applications you have seen in this book, the Appointment Booking System is built on a
three-tier approach, which means it has a data access layer, a business layer, and a presentation layer.
The data access layer is responsible for accessing the database and nothing else. The business layer is
responsible for checking of business rules and serves as the bridge between the data access layer and the
presentation layer. Finally, the presentation layer, which consists of .aspx and .ascx files, is responsible
for the interaction with the user.
In this section, you see the design of the classes and methods in the data access and business layer. You’ll
find the code for the business layer in a subfolder called BusinessLogic inside the special App_Code folder
in the root of the site. Similarly, you’ll find the classes for data access in a folder called DataAccess.
The presentation layer is discussed in the section “Code and Code Explanation” later in the chapter.
The Business Layer
The application uses two main entities that each has its own class: BookingObject and Appointment.
The
BookingObject represents the real-life objects that you can make an appointment with, such as a
conference room, whereas the Appointment represents the actual appointment made. To be able to work
with instances of these classes, each class also has a
Manager class that is capable of retrieving and saving
the other classes by interacting with the data access layer.
The business layer also has an enumeration called
Weekdays that represents the available days of the week.
In the sections that follow, each of these classes and the enumeration are discussed in more detail.
BookingObject
The BookingObject class (see Figure 10-6) exposes only public properties that are stored in so-called
backing variables (the private fields prefixed with an underscore in the upper-half of Figure 10-6). Because
all interaction with instances of the
BookingObject class is done by the BookingObjectManager class,
the
BookingObject itself has no methods.
316
Chapter 10
13_749516 ch10.qxp 2/10/06 9:19 PM Page 316
Figure 10-6
The following table describes the five public properties of the
BookingObject class:
Property Type Description
AvailableOnWeekDays Weekdays This property is of type Weekdays, which is an
enumeration. This property is used to store multiple
days on which the booking object is available.
EndTime Integer The last hour that the booking object is available on
a day. Because the application books appointments
for a full hour, the maximum value for
EndTime is
23, which means the booking object is available
until midnight. (The last appointment then starts at
11 o’clock at night and lasts until midnight.)
Id Integer The unique ID of the BookingObject in the
database.
StartTime Integer The first hour of the day that the booking object
becomes available; for example, 9 for 9 a.m.
Title String The description for the BookingObject, such as
Conference Room 1—East Wing.
Next up is the
BookingObjectManager class.
BookingObjectManager
This class is responsible for getting booking objects in and out of the database by interacting with the
data access layer. It’s also used to return a list with available working days from the data access layer
through its
GetWorkingDays method. The class has the methods shown in Figure 10-7.
317
Appointment Booking System
13_749516 ch10.qxp 2/10/06 9:19 PM Page 317
Figure 10-7
Because the class exposes shared methods exclusively, its constructor has been hidden by marking it as
Private. This prevents calling code from instantiating the BookingObjectManager directly. Besides
the constructor, the class exposes four shared and public methods that all call methods with the same
name in the
BookingObjectManagerDB class in the data access layer:
Method Return Type Description
Public Shared Function BookingObject Returns a single BookingObject instance by
GetBookingObject (ByVal its ID.
id As Integer)
Public Shared Function DataSet Returns a list of available booking object
GetBookingObjectList () records as a DataSet.
Public Shared Function DataSet Returns a list with the available Working
GetWorkingDays() Days.
Public Shared Sub n/a Saves a new or an existing booking object in
SaveBookingObject the database.
(ByVal myBookingObject
As BookingObject)
With the BookingObject and BookingObjectManager classes done, the next class is the Appointment
class, which is used to make an actual appointment with a booking object.
Appointment
The Appointment class, shown in Figure 10-8, represents an appointment that has been made in the system.
It exposes only public properties that are used to track when the appointment takes place, who made it,
and for what booking object.
318
Chapter 10
13_749516 ch10.qxp 2/10/06 9:19 PM Page 318
Figure 10-8
To help you understand what these properties are used for, the following table lists them all and
describes their purpose:
Property Type Description
BookingObjectId Integer The ID of the booking object in the database that this
appointment was booked against.
Comments String Stores the comment for an appointment. When a user
makes an appointment, she has the opportunity to add
a comment. Whether this comment is required depends
on the application’s settings.
EndDate DateTime The date and time the appointment ends.
Id Integer The unique ID of the appointment in the database.
StartDate DateTime The date and time the appointment starts.
UserEmailAddress String Holds the e-mail address of the user in the application
and is retrieved through the Membership services in
ASP.NET.
UserName String Holds the name of the user in the application and is
retrieved through the Membership services in ASP.NET.
319
Appointment Booking System
13_749516 ch10.qxp 2/10/06 9:19 PM Page 319
Similar to the BookingObject class, the Appointment class also has an accompanying Manager class,
the
AppointmentManager, discussed next.
AppointmentManager
The AppointmentManager class, depicted in Figure 10-9, has useful methods to get and create appoint-
ments. It can also determine whether a new appointment overlaps with an existing one, and it is capable
of retrieving appointment information from the database to feed the Availability Checker.
Figure 10-9
Just as with the
BookingObjectManager, the constructor for the AppointmentManager (the New method
in Figure 10-9) has been hidden by marking it as
Private. This prevents calling code from instantiating
objects from this class. You never require an instance of these classes, because they expose shared methods
that work only on a class and not on an instance of that class.
Besides the constructor, the
AppointmentManager has five public and shared methods that all call methods
with the same name in the
AppointmentManagerDB class. These methods are discussed in the following
table:
Method Return Type Description
Public Shared Function Boolean Checks whether the requested appointment
CheckAppointment overlaps with an existing one. It returns
(ByVal myAppointment True when the appointment passed in can
As Appointment) be made, or False when it overlaps.
Public Shared Function Boolean Creates an appointment in the database. It
CreateAppointment returns True when the appointment is
(ByVal myAppointment successfully made, or False when it could
As Appointment) not be booked.
Public Shared Function Appointment Retrieves a single instance of an appointment
GetAppointment (ByVal from the database by its ID. This method is
id As Integer) used in the reporting pages in the Manage-
ment section of the site.
Public Shared Function DataSet Retrieves a list of all the appointments for a
GetAppointmentList specific date from the database. This method
(ByVal selectedDate is used in the reporting pages in the
As DateTime) Management section of the site.
320
Chapter 10
13_749516 ch10.qxp 2/10/06 9:19 PM Page 320
Method Return Type Description
Public Shared Function DataSet Returns a DataSet with two DataTables,
GetTimeSheet (ByVal holding booking objects and appointments.
selectedDate As DateTime) This DataSet is used generate the chart for
the Availability Checker.
The final object in the business layer that you need to look at is not a class, but an enumeration. This
enumeration, called
Weekdays, is discussed next.
Weekdays
Although there is already good support for working with days of the week in .NET, the Appointment
Booking System features a separate enumeration that lists all of the available weekdays. This enumeration
allows you to store multiple selected weekdays in a single variable. The
BookingObject uses this enumera-
tion to indicate on which day the object can be booked. Instead of this enumeration, the
BookingObject
could expose seven Boolean properties, such as AvailableOnMonday, AvailableOnTuesday, and so
forth, but that makes the class look a bit cluttered. Using this
Weekdays enumeration, displayed in Figure
10-10, you can store the availability for multiple days in a single variable.
Figure 10-10
With this simple enumeration, you can store, for example, Friday and Wednesday in a variable of type
Weekdays with the following code:
Dim myWeekdays As Weekdays = Weekdays.Wednesday Or Weekdays.Friday
Later, you can use similar code to determine whether a certain day has been stored in that variable:
If myWeekdays And Weekdays.Friday Then
‘ Friday was selected and stored in myWeekdays
Else
‘ Friday was NOT selected
End If
Because the Appointment Booking System is quite data-centric, it should come as no surprise it has its own
database and data access layer. In the next section, the two classes in the data access layer are discussed.
Once you understand how these classes work, you get a good look at the tables and stored procedures that
make up the database.
321
Appointment Booking System
13_749516 ch10.qxp 2/10/06 9:19 PM Page 321
The Data Access Layer
Because the BookingObject and Appointment classes have no behavior themselves but are managed
by their respective
Manager classes instead, they also have no companion class in the data access layer.
The only classes that interact with the stored procedures in the database directly are the
BookingObjectManagerDB and the AppointmentDB classes.
BookingObjectManagerDB
The BookingObjectManagerDB class (see Figure 10-11) exposes the exact same four public and shared
methods and the private constructor as the
BookingObjectManager class. Of course this isn’t a coinci-
dence, because each method in the business layer forwards the call to a method in the data access layer.
Figure 10-11
Because the methods are identical as those in the
BookingObjectManager in terms of signature, return
type, and functionality, they aren’t described here again. Refer to the description of the
BookingObject
class earlier in this chapter for a full description of the four methods. The only difference between the
methods in the business and data access layer is, of course, their implementation. The methods in the
business layer forward their calls to methods in the data access layer. Those methods in turn perform the
real work and communicate with the database. You see how this works in the section “Code and Code
Explanation.”
AppointmentManagerDB
The AppointmentManagerDB class (see Figure 10-12) is responsible for getting appointments, lists of
appointments, and time sheet information from the database. It’s also capable of checking and creating
appointments.
Figure 10-12
Each of the methods in this class has the same signature as those in the
AppointmentManager class in
the business layer, so refer to that section for more detail about their signatures and description.
322
Chapter 10
13_749516 ch10.qxp 2/10/06 9:19 PM Page 322
In addition to these classes, the data access layer also consists of the database itself, including the stored
procedures used to access the data. The following section describes the data model of the Appointment
Booking System and describes each of the four tables.
The Data Model
The database for the Appointment Booking System contains three main tables and one junction table.
Both the
BookingObject and the Appointment classes you saw in the design of the business layer have
their own table in the database.
There is also a table called WorkingDay that stores the available working days for the application. Don’t
confuse this table with the
Weekdays enumeration. This enumeration always defines all seven days of
the week, whereas the WorkingDay table stores only the actual days of the week that are appropriate for
your booking objects. If your booking objects are available only during the week, you could remove
Saturday and Sunday from this table.
The final table in the database is called BookingObjectWorkingDay. This junction table relates a certain
booking object to one or more working days, as you can see in Figure 10-13. This allows you to have a
different availability for different booking objects.
Figure 10-13
The BookingObject and Appointment tables require a bit more explanation, so they are described in
more detail in the following two tables.
BookingObject
Column Name Data Type Description
Id int Stores the unique ID of each booking object.
Title nvarchar (100) Stores the title of a booking object such as Conference
Room 6.
StartTime
datetime Stores the first available time a booking object is available
during the day. Although the column type is
datetime,
only the time portion of the datetime is used.
EndTime
datetime Stores the last available time a booking object is available
during the day. Although the column type is
datetime,
only the time portion of the datetime is used.
323
Appointment Booking System
13_749516 ch10.qxp 2/10/06 9:19 PM Page 323
This BookingObject table is the data store for the BookingObject class. Four of the properties of that
class have their own column in this table. The
AvailableOnWeekdays property is not stored in that
table, but in the junction table called
BookingObjectWorkingDay.
Similar to this, the
Appointment class has its own table, also called Appointment.
Appointment
Column Name Data Type Description
Id int Stores the unique ID of the appointment.
UserName nvarchar (256) Stores the name of the user that made the appointment.
UserEmailAddress
nvarchar (256) Stores the e-mail address of the user that made the
appointment.
StartDate datetime Stores the start date and time of the appointment.
EndDate datetime Stores the end date and time of the appointment.
Comments
nvarchar (max) Stores the comments that a user may have added to the
appointment request.
BookingObjectId
int Stores the ID of the booking object that this appointment
was booked against.
All of the interaction with the database is done through stored procedures. Some of the procedures are
pretty straightforward and require no explanation. The others that are a bit more complex are discussed
in detail when the inner workings of the Appointment Booking System are discussed.
Helper Classes
In addition to the classes and enumeration defined in the business and data access layer, the
Appointment Booking System has two more classes: an
AppConfiguration class that exposes configu-
ration properties used throughout the application and a
Helpers class that supplies a useful helper
method.
AppConfiguration
The AppConfiguration class (see Figure 10-14) is essentially a wrapper around some of the configuration
keys in the Web.config file. Although ASP.NET 2.0 provides a convenient way to bind keys from the
Web.config file to controls in the markup of a page using the new expression syntax you see later, you still
need to write some code to accomplish the same thing in code-behind files or in code in the App_Code
folder. To avoid repeating this code many times over, the
AppConfiguration class provides convenient
access to the keys in the Web.config file through read-only and shared properties.
The
BookingObjectNamePlural and BookingObjectNameSingular properties expose the user-
friendly descriptions of the booking object. These properties are used to customize the user interface in
the public and Management section of the web site.
324
Chapter 10
13_749516 ch10.qxp 2/10/06 9:19 PM Page 324
Figure 10-14
The
RequireCommentsInRequest property determines whether a user has to enter a comment in the
appointment wizard. You see how this works later.
The
ConnectionString property is used by all methods in the two classes in the data access layer.
Helpers
The Helpers class, shown in Figure 10-15, provides one shared method—GetCurrentServerRoot —
that returns the full root URL of the current application.
Figure 10-15
Instead of hard-coding the application URL, like
somewhere in your code,
this method determines the application’s address at run time. It is used to customize the opt-in e-mail
message in the Sign Up page that you see later.
Code and Code Explanation
Most of the pages in the root of the application and the Management folder are part of the public front
end and Management sections of the site and are discussed in full detail later. There are, however, a few
files and folders that you need to look at first.
Web.config
The Web.config file contains three <appSettings> keys and one connection string that map directly to
the four properties of the
AppConfiguration class you just saw. Most of the other settings in this file
are either the default settings or have been discussed in previous chapters, so they aren’t covered here
anymore. The only exception are the three
<location> nodes at the bottom of the file. These three
nodes block access to the Management folder and the files CreateAppointment.aspx and
CheckAvailability.aspx for unauthenticated users.
325
Appointment Booking System
13_749516 ch10.qxp 2/10/06 9:19 PM Page 325
Global.asax
Just as in the previous three chapters, the Global.asax contains code that can send e-mail whenever an
error is raised in the site. The code is identical to that in Chapter 6, so refer to that chapter if you want to
know how the code works.
Default.aspx
This is the homepage for the Appointment Booking System and is based on the MasterPage.master page
(discussed next).
Master Pages
The public section and the protected Management section each have their own master page. The difference
between the public master (MasterPage.master) and the master page for the Management section
(ManagementMaster.master) is the inclusion of the
ManagementMenu user control in the latter.
Other Files and Folders
In addition to the files in the root, the Appointment Booking System uses other files and folders as well:
❑ App_Themes: The App_Themes folder contains a single .skin file that controls the looks of each
<asp:Calendar> used in the web site. The <pages> node in the Web.config file instructs the
application to apply this theme to each page in the site.
❑ Controls: This folder stores the user controls that are used throughout the site. The
MainMenu
and ManagementMenu controls are used to define the menus in the various pages in the site,
similar to other applications in this book. The
HourPicker and TimeSheet controls are very
specific controls that are described in full later.
❑ Css: The Css folder contains two CSS files that control the general structure and look of the site
(Core.css) and that influence more specific elements, such as the time sheet and error messages
(Styles.css).
❑ Images: This folder contains the logo for the site, the calendar icon, and the arrow used in the
main menu.
❑ JavaScripts: This folder contains a single file called ClientScripts.js that holds a JavaScript function
used in multiple pages in the site.
❑ StaticFiles: The StaticFiles folder contains one HTML file with the contents for the opt-in e-mail.
This file is used as a template for the body of the confirmation e-mail that users receive after
they sign up for an account.
Now that you have seen the design of the application and database, it’s time to look at the actual func-
tionality of the site and the code that drives it. Instead of discussing the files in the application one by
one, a more usage-oriented approach is taken. You see the typical workflows of the application and the
files that are involved in the process.
326
Chapter 10
13_749516 ch10.qxp 2/10/06 9:19 PM Page 326
The Availability Checker is discussed first, followed by the Appointment Wizard. You then see how the
Sign Up page with its double opt-in feature works. Near the end of the chapter, you see some of the
more complicated pages in the Management section.
The Availability Checker
As you saw in the section “Using the Appointment Booking System” at the beginning of this chapter, the
Availability Checker displays a time sheet for all available booking objects for a specific date. The pro-
cess for displaying the time sheet consists of the following steps:
1. Get the requested date from an <asp:Calendar> control on the page.
2. Get a list with available booking objects and appointments for the selected date from the
database in a
DataSet.
3. Build up the time sheet by adding a table row for each available booking object:
❑ For each booking object in the
DataSet, add an HTML row to the HTML table.
❑ For each booking object being added to the table, get the appointments for the selected
date from the database.
❑ For each hour on the time sheet, see if the booking object is available on that hour. If the
object is available, see if the hour conflicts with an existing appointment. If the hour
doesn’t conflict, add a link to allow a user to make an appointment.
4. Add a legend below the table, to visually differentiate the available and the unavailable hours.
The user interface for this functionality consists of two parts: the page CheckAvailability.aspx located in
the root of the site and a user control called TimeSheet.ascx that you find in the Controls folder.
Technically, the Time Sheet doesn’t have to be a user control and could have been placed in the
CheckAvailability.aspx directly. However, now that it is implemented as a user control, it’s easy to reuse
its functionality. For example, you could add another
TimeSheet control on the homepage that shows
the availability for today’s date.
A huge improvement in working with user controls in Visual Web Developer is design-time support.
When your user control has public properties, they show up automatically in the control’s Property grid.
Changes to public properties are now stored in the markup for the control automatically. Take a look at
the
TimeSheet control in the page to see how this works:
<Wrox:TimeSheet ID=”TimeSheet1” runat=”server”
StartTime=”<%$ AppSettings:FirstAvailableWorkingHour %>”
EndTime=”<%$ AppSettings:LastAvailableWorkingHour %>” />
In this case, both the StartTime and EndTime properties get their values from the Web.config file (you
see later what these properties are used for). Now if you look at the Property grid for the control you’ll
see Figure 10-16.
327
Appointment Booking System
13_749516 ch10.qxp 2/10/06 9:19 PM Page 327