ASP.NET 2.0 Instant Results phần 9 pdf
Bạn đang xem bản rút gọn của tài liệu. Xem và tải ngay bản đầy đủ của tài liệu tại đây (1.54 MB, 54 trang )
First of all, there is the connection string that is used throughout the site:
<add name=”BugBase”
connectionString=”server=(local)\SqlExpress;AttachDbFileName=|DataDirectory|BugBase
.mdf;Integrated Security=true;User Instance=true” />
This connection string points to a local name instance of SQL Server called SqlExpress and uses a
database called BugBase. The
|DataDirectory| token in the AttachDbFileName attribute tells SQL
Server to try to automatically attach the database located in the App_Data folder of the web site.
The next important piece in the Web.config file is the setup for the Membership and Roles providers that
are used in the Bug Base. These providers allow you to implement security on your site with little to no
coding. By default, when you enable the Membership on a site, ASP.NET creates a default database
called aspnetdb.mdf for you. For the Bug Base, a different database was created that, in addition to the
tables and procedures for membership and roles, also holds the objects required for the Bug Base. To tell
the ASP.NET run time where to look for that database, the
<providers> section of the <membership>
node in the Web.config file must be configured correctly:
<membership>
<providers>
<clear />
<add name=”AspNetSqlMembershipProvider”
type=”System.Web.Security.SqlMembershipProvider, System.Web,
Version=2.0.0.0, Culture=neutral,
PublicKeyToken=b03f5f7f11d50a3a”
connectionStringName=”BugBase”
enablePasswordRetrieval=”false”
enablePasswordReset=”true”
requiresQuestionAndAnswer=”false”
applicationName=”/”
requiresUniqueEmail=”true”
passwordFormat=”Hashed”
maxInvalidPasswordAttempts=”5”
passwordAttemptWindow=”10”
passwordStrengthRegularExpression=””
/>
</providers>
</membership>
The <clear /> element removes the AspNetSqlMembershipProvider that is set up by default in the
Machine.config file that applies to all sites on your server. The default setup points to the aspnetdb.mdf
database mentioned earlier. Without removing this element, it’s not possible to override the settings
and have the
MembershipProvider use the custom database instead. With the original element
removed, you can add your own and then indicate you want to use the BugBase database by setting the
connectionString attribute that in turn points to the connection string defined earlier. The other
attributes have to do with security settings for the provider. Refer to the MSDN documentation for their
usage.
The Bug Base uses a role-based security mechanism to determine which actions a user is allowed to per-
form. Just as with the
MembershipProvider, ASP.NET 2.0 has a ready-made provider for this, called the
RoleProvider. The section that sets up this provider in the Web.config file looks like this:
411
The Bug Base
15_749516 ch12.qxp 2/10/06 9:21 PM Page 411
<roleManager defaultProvider=”SqlProvider”
enabled=”true”
cacheRolesInCookie=”true”
cookieName=”.ASPROLES”
cookieTimeout=”30”
cookiePath=”/”
cookieRequireSSL=”false”
cookieSlidingExpiration=”true”
cookieProtection=”All”
>
<providers>
<add
name=”SqlProvider”
type=”System.Web.Security.SqlRoleProvider”
connectionStringName=”BugBase”
/>
</providers>
</roleManager>
To show you the different options, the <roleManager> takes a different approach. Instead of using the
<clear /> element to clear a previously defined role manager (called AspNetSqlRoleProvider in the
Machine.config file), this code block sets up an entirely new provider with the name of
SqlProvider.
Because there is no conflict with an existing provider on the system, you don’t need to use
<clear /> first.
This is all that’s required to configure the application so it uses the built-in Membership and Role
providers.
The Web.config file also contains settings that determine if and to what e-mail address errors that occur
should be e-mailed by code in the Global.asax file. The usage of these keys is further explained when the
Global.asax file is discussed.
At the bottom of the Web.config file you find a number of
<location> nodes. These nodes override the
default
<authorization> element to block or allow access to some files and folders for specific roles.
MasterPage.master
The master page defines the look and feel for all the pages in the site. This ensures a consistent layout
throughout the site and makes it very easy to apply site-wide changes. The file consists largely of static
HTML for the layout of the site, but a few sections are worth examining in greater detail.
The main menu that appears at the top of every page is made up of nested
<ul> and <li> tags. The CSS
file for the menu, Menu.css, is responsible for hiding or displaying the menus when you hover over
them. Inside the menu a
LoginView control is used to determine which menu items a user has access to,
based on the current user’s role. The following code snippet demonstrates this:
<asp:LoginView runat=”server” ID=”lvReporting”>
<RoleGroups>
<asp:RoleGroup Roles=”Manager”>
<ContentTemplate>
<li>
<div>
<a href=”~/Reporting/Default.aspx” runat=”server”>Reporting</a>
</div>
412
Chapter 12
15_749516 ch12.qxp 2/10/06 9:21 PM Page 412
<ul>
<li>
<a href=”~/Reporting/Default.aspx” runat=”server”>Reports</a>
</li>
</ul>
</li>
</ContentTemplate>
</asp:RoleGroup>
</RoleGroups>
</asp:LoginView>
The content defined in the ContentTemplate is only accessible to users that are in the roles defined on
the
RoleGroup element, in this case the Manager role only.
The second important piece in the Master file is the use of
ContentPlaceHolder controls. A Content
PlaceHolder
defines a region that can be overridden by pages that use the master page. The master
page has two placeholders —one for the page title and one for content section of the page. The page title
looks like this:
<h1>
<asp:ContentPlaceHolder ID=”plcTitle” runat=”server”></asp:ContentPlaceHolder>
</h1>
The placeholder is put inside an <h1> tag so the content is always rendered as a heading. The place-
holder for the main content section of each page looks very similar to the one for the heading.
Global.asax
The Global.asax file contains code for only one of the events, namely Application_Error. Whenever
an unhandled exception occurs in the application, this event is fired. The code for this event builds up a
string with the error details and sends it as an e-mail to the address configured in the Web.config. Before
you enable this feature by setting
SendMailOnErrors to True, make sure you also set valid e-mail
addresses and an SMTP server in the Web.config file.
Web.sitemap
The final file in need of discussion is Web.sitemap. This file contains a lot of siteMapNode elements that
define a conceptual map of the web site. This file is used as the data source for the
SiteMapPath control
in the BreadCrumb section of the master page. It’s also used to feed the
TreeView control used in the
SiteMap.aspx page in the Help folder.
Now that you’ve seen some of the framework files, it’s time to look at the files that are used in a typical
workflow.
Filing a Bug
The central action of a Bug Base application is of course filing a bug, so it’s a logical choice to look at that
first. This section walks you through filing a new bug, explaining each of the important parts of the files you
visit in the process. This section assumes that the Bug Base is installed at
http://localhost/BugBase.
Refer to the section called “Setting up the Bug Base” for more details about installing the application.
413
The Bug Base
15_749516 ch12.qxp 2/10/06 9:21 PM Page 413
When you open the homepage of the Bug Base at http://localhost/BugBase the first time, you’re
presented with a Login screen instead. The
<authorization> section in the Web.config file blocks
access to each of the pages in the site to unauthorized users. When an unauthorized request is made,
you’re redirected to the Login page instead. This Login page contains very little code because most of the
functionality required to log in a user is available out of the box. The markup section of the page contains
just a
Login control:
<asp:Login ID=”Login1” runat=”server” InstructionText=”Before you can
work with the Bug Base, you need to login.<br />Please type your user name and
password and click the Log In button.”
TitleText=”” DestinationPageUrl=”~/Bugs/SwitchApplication.aspx”
DisplayRememberMe=”False”>
</asp:Login>
The DestinationPageUrl attribute is set to SwitchApplication.aspx, the page the user is redirected
to after a successful login. As a security measure, the Remember Me checkbox is disabled so users are
required to log in each time they visit the bug base. If you get tired of entering your name and password
every time, simply set the
DisplayRememberMe attribute to True. This will display an additional
Remember Me checkbox allowing you to automatically log in each time you return to the site.
There is no code in the code-behind file for this page— the authentication is completely carried out by
the ASP.NET Framework.
When you supply a valid username and password (you can log in with the accounts listed at the beginning
of this chapter) and click the Log In button you’re automatically logged in. ASP.NET validates the user
against the database, and when the login details are correct the roles for the user are retrieved and stored in
an encrypted cookie.
After you log in you’re redirected to SwitchApplication.aspx. Before you can work with most of the
pages in the Bug Base you need to select an active application to work with. The SwitchApplication page
allows you to select that application. In the
Page_Load event of this page, the following code fires:
Helpers.SetMemberId()
The SetMemberId method, which you’ll find in the Helpers.vb file in the App_Code folder, tries to
retrieve the current user’s
ProviderUserKey, which is the unique ID for the user. This key is stored in a
session variable so it’s available to all pages in the site. When the retrieval fails, the user is redirected
back to Login.aspx.
The drop-down on the SwitchApplication page lists all the applications to which the user has access. The
drop-down is filled by an
ObjectDataSource control that calls an overloaded version of the method
GetApplicationItems in the business layer:
<asp:ObjectDataSource ID=”ObjectDataSource1” runat=”server”
SelectMethod=”GetApplicationItems” TypeName=”ListManager”>
<SelectParameters>
<asp:SessionParameter Name=”memberId” SessionField=”MemberId” />
</SelectParameters>
</asp:ObjectDataSource>
This method expects the current user’s ID, which is passed to this method using a SessionParameter
that retrieves the ID from a session variable called MemberId set earlier by the SetMemberId method.
414
Chapter 12
15_749516 ch12.qxp 2/10/06 9:21 PM Page 414
The GetApplicationItems method in turn calls another overloaded version that delegates the call to a
method with the same name in the data access layer. This method is responsible for retrieving the appli-
cations from the database. The code in this method is typical for many of the data access methods in the
data access layer:
Public Shared Function GetApplicationItems( _
ByVal activeOnly As Boolean, ByVal memberId As Guid) As DataSet
Dim dataSet As DataSet = New DataSet()
Dim sql As String = “sprocApplicationSelectList”
Try
Using myConnection As New SqlConnection(AppConfiguration.ConnectionString)
Dim myCommand As SqlCommand = New SqlCommand(sql, myConnection)
myCommand.CommandType = CommandType.StoredProcedure
myCommand.Parameters.AddWithValue(“@activeOnly”, activeOnly)
If Not memberId = Guid.Empty Then
myCommand.Parameters.AddWithValue(“@memberId”, memberId)
End If
Dim myDataAdapter As SqlDataAdapter = New SqlDataAdapter()
myDataAdapter.SelectCommand = myCommand
myDataAdapter.Fill(dataSet)
myConnection.Close()
Return dataSet
End Using
Catch ex As Exception
Throw
End Try
End Function
First, the name of the stored procedure in the database is set. Then a new SqlConnection is created.
The connection string comes from the custom class
AppConfiguration that you saw earlier.
Then a
SqlCommand is set up by assigning important properties such as the CommandText, CommandType,
and
Connection. The activeOnly parameter of the stored procedure determines whether all or only the
active applications are to be retrieved from the database. As a second parameter, the ID of the member is
passed. This ensures that you only get applications back that are assigned to the current user.
Finally, a
SqlDataAdapter is created, which is then used to fill the DataSet with the results from the
database using the
SqlDataAdapter’s Fill method.
The stored procedure that gets the items from the database looks like this:
CREATE PROCEDURE sprocApplicationSelectList
@activeOnly bit = null,
@memberId uniqueidentifier = null
AS
SELECT DISTINCT
415
The Bug Base
15_749516 ch12.qxp 2/10/06 9:21 PM Page 415
Id,
Description,
IsActive
FROM
Application
LEFT OUTER JOIN MemberApplication
ON Application.Id = MemberApplication.ApplicationId
WHERE
(IsActive = @activeOnly OR @activeOnly IS NULL)
AND (MemberApplication.MemberId = @memberId OR @memberId IS NULL)
ORDER BY
Descriptionn
This stored procedure retrieves a list of all the applications that are assigned to the current member.
You’ll recall from the discussion of the data model that members are linked to applications with the junc-
tion table called MemberApplication. The code in the stored procedure uses that junction with the
LEFT
OUTER JOIN
to limit the list of applications to those that the member has access to. The LEFT OUTER
JOIN
as opposed to an INNER JOIN is used to allow the procedure to return all applications regardless
of the member’s access rights when the parameter
@memberId is null. This is used in the Management
section that you see later.
When the
ObjectDataSource in the .aspx page is done with the GetApplicationItems method, hav-
ing retrieved the data, it fires its
Selected event. In this event you can check if any data was returned
from the database by looking at the
ReturnValue property of the e argument. If the DataSet is empty —
which it will be when the current member has no applications assigned— the drop-down is hidden and
the user is presented with an error message:
Protected Sub ObjectDataSource1_Selected(ByVal sender As Object, _
ByVal e As System.Web.UI.WebControls.ObjectDataSourceStatusEventArgs) _
Handles ObjectDataSource1.Selected
If CType(e.ReturnValue, DataSet).Tables.Count > 0 _
AndAlso CType(e.ReturnValue, DataSet).Tables(0).Rows.Count = 0 Then
lblErrorMessage.Visible = True
lstApplication.Visible = False
btnApply.Visible = False
End If
End Sub
When the user has chosen an application from the drop-down and clicked the Apply button, the following
code is executed:
Helpers.SetApplication (Convert.ToInt32( _
lstApplication.SelectedValue), lstApplication.SelectedItem.Text)
Dim redirectUrl As String = “~/Bugs/”
If Request.QueryString.Get(“OriginalPage”) IsNot Nothing Then
redirectUrl = Request.QueryString.Get(“OriginalPage”)
End If
Response.Redirect(redirectUrl)
This code sets the active application by calling Helpers.SetApplication, which stores the application
ID in a session variable and then redirects the user to the previous page or to the default page in the
Bugs folder when there was no previous page.
416
Chapter 12
15_749516 ch12.qxp 2/10/06 9:21 PM Page 416
With all the required variables set up, it’s time to file an actual bug. If you choose File New Bug from the
main Bugs menu, the AddEditBug.aspx page located in the Bugs folder appears. This page is shown in
Figure 12-3 at the beginning of this chapter.
Theoretically, the form on that page would have been an ideal candidate for the new
<asp:FormView>
control that allows you to quickly set up an Insert and Edit page. All you need to do is bind the FormView
control to a few methods in your business layer, and Visual Web Developer will create the necessary insert
and edit templates for you. However, the way the Bug class is designed proves to be problematic for the
FormView. By design, the FormView can only work with direct properties such as the Bug’s Title or
Description. However, some of the Bug’s properties are actually
NameValue objects of which the FormView
has no knowledge. Because of this lack of knowledge, the FormView isn’t able to correctly bind to the data
stored in the
Bug object. Future versions of the .NET Framework may bring direct support for more com-
plex properties like the
NameValue object, but until that time you need to work around these limitations.
Although there are ways to make the
FormView work with the NameValue objects, the amount of code
required to make that work isn’t worth the benefit of the
FormView in the first place. That’s why the Insert
and Update forms were built as a regular form with text boxes and drop-down controls nested in an HTML
table. If you do decide to implement a
FormView to bind to objects with complex custom properties, the
trick is to use
Eval in your binding syntax in the .aspx portion of the page instead of Bind. Then in the
code-behind you can write code for the
FormView control’s ItemInserting and ItemUpdating events
and create and assign new instances of your custom objects to the
e.Values or e.NewValues properties of
the arguments of the Inserting and Updating methods.
The AddEditBug.aspx page can be viewed in two different ways—one where each of the controls like the
drop-downs are editable, and one where most of the controls have been replaced with static labels. The first
view is used when any user is filing a new bug or when a developer or manager is editing a bug. The second
view is used when a tester is editing a bug. Once a bug has been filed, a tester can no longer change the
properties of a bug, so all controls are replaced with static text, showing the underlying values.
Determining which controls to show and which to hide takes place in the
LoadData method, which is
discussed after the exploration of
Page_Load.
The first thing that the AddEditBug.aspx page does when it loads is execute the following code in the
Page_Load event:
If Request.QueryString.Get(“ApplicationId”) IsNot Nothing Then
Dim applicationId As Integer = _
Convert.ToInt32(Request.QueryString.Get(“ApplicationId”))
Dim applicationDescription As String = _
ListManager.GetApplicationDescription(applicationId)
Helpers.SetApplicationSession(applicationId, applicationDescription)
End If
Helpers.CheckApplicationState ( _
Server.UrlEncode(Page.AppRelativeVirtualPath & “?” & _
Request.QueryString.ToString()))
If Request.QueryString.Get(“Id”) IsNot Nothing Then
bugId = Convert.ToInt32(Request.QueryString.Get(“Id”))
End If
If Not Page.IsPostBack Then
LoadData()
End If
417
The Bug Base
15_749516 ch12.qxp 2/10/06 9:21 PM Page 417
The first seven lines of code check if there is an ApplicationId on the query string. If there is one it
switches to that application automatically. This is used in the Reporting page, described later in this chapter.
Then the application is validated. The AddEditBug page requires an active application stored in a session
variable. If the variable isn’t present, the
CheckApplicationState method redirects the user to the
SwitchApplication page and passes along the URL of the current page so the user can be redirected back
after an application has been chosen.
If there is also an
Id on the query string, it’s converted to an Integer and stored in the private variable
bugId. This bugId variable is later used in the code to determine the bug that must be retrieved from
and stored in the database.
Finally, when the page is loading for the first time, all the controls are data-bound by calling
LoadData().
The
LoadData() method starts off with binding the four drop-downs (lstFeature, lstFrequency,
lstReproducibility, and lstSeverity) to their data sources. Each of these controls is bound to an
Object
DataSource
control. These ObjectDataSource controls get their data by calling static methods in the
ListManager class. Take a look at how the Frequency drop-down is bound to understand how this
works. First, the page contains the following
DataSource declaration:
<asp:ObjectDataSource ID=”odsFrequency” runat=”server”
SelectMethod=”GetFrequencyItems” TypeName=”ListManager”>
</asp:ObjectDataSource>
The page also contains the following declaration for a drop-down:
<asp:DropDownList ID=”lstFrequency” runat=”server”
AppendDataBoundItems=”True” DataSourceID=”odsFrequency”
DataTextField=”Description” DataValueField=”Id” Width=”180px”>
<asp:ListItem Value=””>Please make a selection</asp:ListItem>
</asp:DropDownList>
The drop-down is bound to the DataSource by setting its DataSourceID attribute. To ensure that the
static “Please make a selection” list item remains present,
AppendDataBoundItems is set to True.
When the drop-down is data-bound in the code-behind, the
ObjectDataSource control’s DataBind
method is invoked. The control then calls the GetFrequencyItems method located in the ListManager
class. This method calls a private method called GetListItem and passes it an enumeration of ListType
.Frequency
. The GetListItem method then gets the requested items from the database and stores them
in the cache with a
SqlCacheDependency attached to it. This ensures that the cached item is invalidated
when the table used for the dependency is changed. The
GetListItem method looks like this:
Private Shared Function GetListItems( _
ByVal myListType As ListType) As DataSet
Dim listItems As DataSet
Dim cacheKey As String = myListType.ToString() + “DataSet”
Dim tableName As String = myListType.ToString()
Dim SqlDep As SqlCacheDependency = Nothing
If HttpContext.Current.Cache(myListType.ToString() _
418
Chapter 12
15_749516 ch12.qxp 2/10/06 9:21 PM Page 418
+ “DataSet”) IsNot Nothing Then
listItems = CType(HttpContext.Current.Cache(cacheKey), DataSet)
Else
‘ (Re)create the data and store it in the cache
listItems = ListManagerDB.GetListItems(myListType)
Try
‘ Create a new SqlCacheDependency.
SqlDep = New SqlCacheDependency( _
AppConfiguration.DatabaseName, tableName)
Catch exDNEFNE As DatabaseNotEnabledForNotificationException
‘ Handle DatabaseNotEnabledForNotificationException
Throw
Catch exTNEFNE As TableNotEnabledForNotificationException
Throw
Finally
HttpContext.Current.Cache.Insert(cacheKey, listItems, SqlDep)
End Try
End If
Return listItems
End Function
This method first tries to get the requested item from the cache. If it exists, it’s cast to a DataSet so it can
be returned to the calling code. If the item no longer exists, it’s created by calling
GetListItems in the
ListManagerDB class and passing it the requested ListType. That method returns a DataSet that is
stored in the cache using a
SqlCacheDependency.
Before you can use
SqlCacheDependencies in your application, you need to set up your database to sup-
port them. The database that comes with the Bug Base has already been set up for SQL cache invalidation,
but if you’re using your own database, or need to enable caching on an existing database, use the following
command from your ASP.NET 2.0 installation folder (located under
%WinDir%\Microsoft.NET\
Framework
):
aspnet_regsql.exe -S (local)\InstanceName -E -ed -d DatabaseName -et -t TableName
This registers the table you specify with TableName in the database DatabaseName. You can type aspnet
_regsql.exe /?
to get a help screen for this application.
The constructor for the
SqlCacheDependency expects the name of the database you’re setting up the
dependency against. Instead of hard-coding BugBase in the constructor method, there is a shared and
public property in the
AppConfiguration class that returns the name of the database. With that property,
you can simply pass
AppConfiguration.DatabaseName as the first argument to the constructor.
The constructor for the
SqlCacheDependency class throws errors when either the database or the
requested table hasn’t been set up for SQL caching. When an error is thrown, you simply rethrow it using
the
Throw keyword, so it will bubble up in the application to eventually cause an error that is caught by the
Application_Error handler in the Global.asax file. If you don’t want to use SQL caching because you’re
using a different database, you can simply remove the caching code from the
GetListItems method.
Alternatively, you can decide to store the data in the cache for a limited amount of time. This way you still
have the benefits of caching, but you run the risk of working with stale data.
419
The Bug Base
15_749516 ch12.qxp 2/10/06 9:21 PM Page 419
The code for the GetListItems method in the ListManagerDB class is very similar to the code you saw
earlier for the
GetApplicationItems. The only thing that’s different is the way the name of the stored
procedure is determined by looking at the
ListType argument that is passed to this method:
Dim sql As String = “”
Select Case theListType
Case ListType.Frequency
sql = “sprocFrequencySelectList”
Case ListType.Reproducibility
sql = “sprocReproducibilitySelectList”
Case ListType.Severity
sql = “sprocSeveritySelectList”
Case ListType.Status
sql = “sprocStatusSelectList”
Case Else
Throw New ArgumentException(“ListType must be a valid “ & _
“ListType enum. Current value is “ + theListType.ToString)
End Select
This process is repeated for each of the four drop-downs at the top of the page: lstFeature, lstReproducibility,
lstFrequency, and lstSeverity.
With the four drop-downs bound to their data source the next step is to retrieve the bug from the database,
but only when AddEditBug.aspx is in edit mode. Retrieval of a bug is done with the
BugManager class:
Dim myBugManager As BugManager = New BugManager(Helpers.GetMemberId)
A new instance of the BugManager is created and the current member’s ID is passed to the constructor
by calling
Helpers.GetMemberId, which simply returns the session variable MemberId as a Guid. The
MemberId is used for access rights checks in each of the BugManagerDB methods.
Dim myBug As Bug = myBugManager.GetBug(bugId)
The Bug object is retrieved by calling GetBug and passing it the ID of the requested bug. The GetBug
method checks if a valid member ID has been passed and then delegates the responsibility of retrieving
the bug from the database to the
GetBug method in the BugManagerDB class. This method is similar to
other methods in the data access layer when it comes to setting and opening the SQL connection. What’s
different is that a
SqlDataReader is used to hold the data instead of a DataSet. This DataReader is then
used to fill the properties of the
Bug object like this:
Using myReader As SqlDataReader = _
myCommand.ExecuteReader(CommandBehavior.CloseConnection)
If myReader.Read Then
theBug = New Bug(myReader.GetInt32(myReader.GetOrdinal(“Id”)))
theBug.Title = myReader.GetString(myReader.GetOrdinal(“Title”))
‘ other properties are set here
Else
theBug = Nothing
End If
myReader.Close()
End Using
420
Chapter 12
15_749516 ch12.qxp 2/10/06 9:21 PM Page 420
If the bug was found in the database, a new Bug object is created and then all of its public properties are
set. Notice that
GetOrdinal is used to retrieve a column’s index in the DataReader. This is because
each of the
Get* methods expects an Integer with the column’s position and not a string with the column
name. Using
GetOrdinal might make this code just a little slower, but it also makes it a lot more readable
and flexible. Instead of knowing the exact location of a column in the result set, all you need to remember
is the column’s name.
You pass the enumeration
CommandBehavior.CloseConnection to the ExecuteReader method to
ensure that the connection is closed when the reader is closed at the end of the
Using block. This is good
programming practice, because it explicitly closes the connection object, freeing up valuable resources.
Six of the properties of the
Bug class are NameValue objects to expose both their internal ID and the user-
friendly description. The
NameValue objects are retrieved from the DataReader like this:
theBug.Status = New NameValue(myReader.GetInt32( _
myReader.GetOrdinal(“StatusId”)), _
myReader.GetString(myReader.GetOrdinal(“StatusDescription”)))
This code creates a new NameValue object, passes the ID and Name to the constructor of that class, and
then assigns the object to the
Bug object’s Status property. This allows you to access the property in
your code like this, for example:
lblStatus.Text = theBug.Status.Name
When the bug is not found in the database, or the user doesn’t have enough rights to view it, Nothing is
returned. Therefore, in the calling code back in AddEditBug.aspx you need to check if the object equals
Nothing. If the bug is not Nothing, the bug’s properties are bound to the form controls:
If myBug IsNot Nothing Then
If User.IsInRole(“Developer”) OrElse User.IsInRole(“Manager”) Then
If lstFeature.Items.FindByValue( _
myBug.Feature.Value.ToString()) IsNot Nothing Then
lstFeature.Items.FindByValue(myBug.Feature.Value.ToString()).Selected = True
End If
‘ other controls are set here
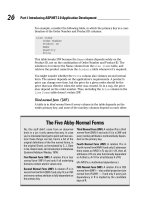
This code executes only when the current user is in one of the required roles. If the user is a not a devel-
oper or a manager, she is not allowed to change any of the existing fields; static labels are shown instead,
as in Figure 12-18.
Figure 12-18
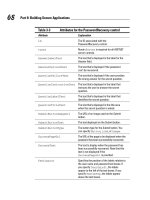
Whereas a developer or a manager sees Figure 12-19.
421
The Bug Base
15_749516 ch12.qxp 2/10/06 9:21 PM Page 421
Figure 12-19
The rest of the code in this method is responsible for hiding or displaying the relevant controls on the page.
When the Save button is clicked,
btnSave_Click is called and the page is validated by calling Page
.Validate()
. When the page is completely valid, a new Bug object is created or an existing one is
retrieved from the database using an instance of the
BugManager:
Dim memberId As Guid = Helpers.GetMemberId()
Dim myBugManager As BugManager = New BugManager(memberId)
Dim myBug As Bug
If bugId > 0 Then
myBug = myBugManager.GetBug(bugId)
Else
myBug = New Bug()
myBug.Application.Value = Helpers.GetApplicationId()
myBug.CreateMemberId = memberId
End If
Next, each of the bug’s properties is retrieved from the form controls:
myBug.Title = txtTitle.Text
myBug.Feature.Value = Convert.ToInt32(lstFeature.SelectedValue)
myBug.Frequency.Value = Convert.ToInt32(lstFrequency.SelectedValue)
myBug.Priority = Convert.ToInt32(lstPriority.SelectedValue)
‘ other properties are set here
If bugId > 0 Then
‘ Only when we’re editing the bug, update the status field.
myBug.Status.Value = Convert.ToInt32(lstStatus.SelectedValue)
End If
Notice that you only need to set the Value of each of the NameValue properties. The database only works
with the internal IDs and doesn’t care about the “friendly descriptions” of these objects.
Once all the public properties have been set, the bug is saved by calling
myBugManager.Insert
UpdateBug(myBug)
on the BugManager class. The InsertUpdateBug method passes the bug to a
method with the same name in the data access layer that saves the bug in the database:
Public Shared Function InsertUpdateBug(ByVal theBug As Bug) As Integer
Dim sql As String = “sprocBugInsertUpdateSingleItem”
Try
Using myConnection As New SqlConnection(AppConfiguration.ConnectionString)
Dim myCommand As SqlCommand = New SqlCommand(sql, myConnection)
myCommand.CommandType = CommandType.StoredProcedure
If theBug.Id > 0 Then
422
Chapter 12
15_749516 ch12.qxp 2/10/06 9:21 PM Page 422
myCommand.Parameters.AddWithValue(“@id”, theBug.Id)
End If
myCommand.Parameters.AddWithValue(“@title”, theBug.Title)
myCommand.Parameters.AddWithValue(“@description”, theBug.Description)
‘ other properties are set here
myCommand.Parameters.AddWithValue(“@frequencyId”, theBug.Frequency.Value)
Dim myParam As SqlParameter = New SqlParameter
myParam.Direction = ParameterDirection.ReturnValue
myCommand.Parameters.Insert(0, myParam)
myConnection.Open()
myCommand.ExecuteNonQuery()
theBug.Id = CType(myParam.Value, Integer)
myConnection.Close()
Return theBug.Id
End Using
Catch ex As Exception
Throw
End Try
End Function
When the Bug.Id is greater than zero, it is passed to the stored procedure by the AddWithValue method
that creates a new parameter and sets the ID of the bug. Otherwise, the parameter remains null. The
stored procedure knows that when the
@id parameter is null it should insert a new bug item or update
the item otherwise. Just as with the
Id property, the code adds parameters for each of the public properties
of the bug. At the end, an additional
ReturnValue parameter is set up that retrieves the ID of the bug
once it has been inserted or updated. With all the parameters set up,
ExecuteNonQuery is called to save
the bug in the database.
After the bug has been saved, the user is redirected back to the Bug List page, where the new bug appears
at the top of the list. From this list, you can click the bug’s title to open the ViewBug page. This page displays
a read-only version of the bug that is easy to print. The concepts used in this page are very similar to
those in the AddEditBug page, without the additional complexity of hiding and displaying the relevant
controls.
This concludes the process of inserting and updating bugs. The next step is to look at how you can
retrieve bugs that have been filed from the database.
Searching and Viewing Bugs
When the number of bugs you have logged in the Bug Base grows, it becomes harder to manage them.
The Bug List page for an application allows you to select active or inactive bugs, allowing you to focus
on the open bugs. However, even that list of open bugs may grow quite long. And what if you wanted to
find an older bug you know exists that has similar characteristics as a new bug you have found? With
just the bug list pages, you’d be browsing through the list of bugs forever.
So to make it easier to find bugs, you need a good search tool. Fortunately, the Bug Base comes with a
useful search tool. In fact, it comes with two search tools! On the main Bugs menu you find the Search
Bugs item, which allows you to search for bugs in the current application. Under Reporting you find the
423
The Bug Base
15_749516 ch12.qxp 2/10/06 9:21 PM Page 423
Reports menu item that also allows you to search for bugs. Both search pages have a lot in common, but
there are some important differences.
First of all, the Reports page is only accessible by members of the Manager group. If you’re not in that
group, the menu item Reporting is not even visible. On the reporting page, you can search for bugs in all
applications at the same time, whereas on the Search page your search is limited to the current applica-
tion. This distinction is necessary to prevent testers or developers on one application from seeing bugs
logged in an application they don’t have access to. Another difference is the possibility to search for a
bug by its ID or a keyword on the search page. When searching for a bug, this is very useful because
bugs are often referred to by their ID. On the reporting page, this option makes less sense. Usually, the
purpose of the reporting page in a bug tracking tool is to get a list of bugs of a certain status, such as all
open bugs. This allows a manager to quickly view the progress made in an application, or get a list of all
bugs that still need work.
Despite the differences in functionality from a user’s point of view, these two pages work pretty much the
same in terms of code. The next section dissects the Reports page and shows you how it works. Once you
understand the Reports page you should have no trouble finding out what goes on in the Search page.
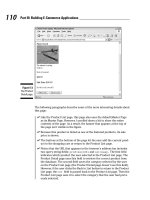
When you open the Reports page from the Reporting menu, you get the screen displayed in Figure 12-20.
Figure 12-20
424
Chapter 12
15_749516 ch12.qxp 2/10/06 9:21 PM Page 424
This form allows a user to set up a list of search criteria including the period the bug was filed, the appli-
cation and its features, the person who filed the bug, and the severity, the status, and the priority. Once
you choose an application from the Application drop-down, the page reloads to show you a list of fea-
tures for the selected application. Except for the Application drop-down, you can select multiple options
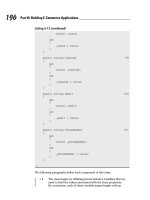
for all the other lists. Once you click the Report button, you get a list with the bugs that match your crite-
ria, as shown in Figure 12-21.
Figure 12-21
If you want to change your search criteria, click the Change Search Criteria link at the top of the page.
This reveals the form controls from Figure 12-20 again.
Take a look at the markup of Default.aspx in the Reports folder to see how this page works. Most of the
concepts used in this page have already been used in other pages, such as AddEditBug. The page con-
sists largely of controls that are bound to
ObjectDataSource controls, which in turn are bound to meth-
ods in the business layer. A few things are different, though, and worth examining more closely. First of
all, there’s the
ObjectDataSource called odsMembers created with the following code:
<asp:ObjectDataSource ID=”odsMembers” runat=”server”
SelectMethod=”GetAllUsers”
TypeName=”System.Web.Security.Membership”
>
425
The Bug Base
15_749516 ch12.qxp 2/10/06 9:21 PM Page 425
Instead of calling a method in the business layer of the Bug Base, this control is hooked up to the
Membership provider and calls its
GetAllUsers method. This method then returns a collection of
MembershipUser objects. A MemberhipUser has a ProviderKey and a UserName, the two fields that
are used as the
DataKeyField and DataValueField of the drop-down that displays the users:
<asp:ListBox ID=”lstMember” runat=”server” DataSourceID=”odsMembers”
DataTextField=”UserName” DataValueField=”ProviderUserKey”
AppendDataBoundItems=”True” SelectionMode=”Multiple”>
<asp:ListItem Value=”” Selected=”True”>[Don’t Filter]</asp:ListItem>
</asp:ListBox>
Getting a list of users in a web page doesn’t get any easier than this!
The next piece of code you should look at is the code for the drop-down that displays the applications.
The drop-down has its
AutoPostBack property set to True, which means the page is posted back to the
server whenever a new item is chosen in the drop-down. In the code-behind for the page you’ll find a
method that fires whenever a postback occurs:
Protected Sub lstApplications_SelectedIndexChanged( _
ByVal sender As Object, ByVal e As System.EventArgs) _
Handles lstApplications.SelectedIndexChanged
lstFeature.Visible = True
lstFeature.Items.Clear()
lstFeature.Items.Insert(0, New ListItem(“[Don’t Filter]”, “”))
lstFeature.Items(0).Selected = True
End Sub
Inside this method, the Visible property of the Feature drop-down is set to True, and a new, static item
is added to the list. By making the control visible, the ASP.NET run time knows that it now has to bind
the control to its associated
ObjectDataSource that looks like this:
<asp:ObjectDataSource ID=”odsFeature” runat=”server”
SelectMethod=”GetFeatureItems” TypeName=”ListManager”>
<SelectParameters>
<asp:ControlParameter ControlID=”lstApplications”
DefaultValue=”-1” Name=”applicationId”
PropertyName=”SelectedValue” Type=”Int32” />
</SelectParameters>
</asp:ObjectDataSource>
This ObjectDataSource control has a SelectParameter of type ControlParameter that looks at the
SelectedValue property of the Applications drop-down and passes it to the GetFeatureItems method.
This method, placed in the business layer, only returns the features for the requested application.
The
ObjectDataSource for the feature then fires its Selected event when it’s done retrieving the data.
Inside this method for this event, the Feature drop-down is hidden when there are no items returned
from the database:
Protected Sub odsFeature_Selected(ByVal sender As Object, ByVal e _
As System.Web.UI.WebControls.ObjectDataSourceStatusEventArgs) _
Handles odsFeature.Selected
Dim featureListVisible As Boolean = _
426
Chapter 12
15_749516 ch12.qxp 2/10/06 9:21 PM Page 426
(CType(e.ReturnValue, DataSet)).Tables(0).Rows.Count > 0
lstFeature.Visible = featureListVisible
lblFeature.Visible = featureListVisible
End Sub
The first line of code in this method looks at the number of rows in the table in the DataSet, exposed by
the
ReturnValue property of the e argument. When the number is greater than zero, feature
ListVisible
is True and the list is visible. Otherwise, the list is made invisible.
All the other drop-down controls don’t need additional code to function. Because they are always visible,
the ASP.NET Framework binds them when the page loads. And with their
EnableViewState property set
to
True (the default), they automatically maintain their state so there is no need to bind them again on
postback.
There is, however, one control that must be bound manually and that’s the
GridView. There is no need to
bind that control on every page load or postback, because you should be able to make a detailed selection
first. Once the selection is complete, you should click the Report button to get the selected bugs from the
database. The
Click event of the Report button causes the following chain of events to fire.
First, the
LoadData method is called:
Private Sub LoadData()
GridView1.Visible = True
GridView1.DataSourceID = “odsBugList”
GridView1.DataBind()
End Sub
In this method the GridView is made visible and then its DataSourceID is set to the ID of the
odsBugList that is defined in the markup of the page. Finally, by calling DataBind() on the GridView
control, odsBugList gets the data from the database so it can be displayed on the page. Easy as that last
sentence sounds, it’s actually quite a complicated process. You need to look at a few sections in more
detail to understand how this works.
First, there is the
ObjectDataSource control in the markup that is set up to call GetBugList in the
business layer:
<asp:ObjectDataSource ID=”odsBugList” runat=”server”
SelectMethod=”GetBugList” SortParameterName=”sortExpression”
TypeName=”BugManager” EnableViewState=”False”>
<SelectParameters>
<asp:Parameter Name=”sortExpression” Type=”String” />
<asp:Parameter Name=”searchCriteria” />
</SelectParameters>
</asp:ObjectDataSource>
In the discussion of the BugManager class you learned that the GetBugList has two overloads. The
ObjectDataSource is targeting the overload with two parameters: the first is a string holding the name
of a property the bug list should be sorted on, and the other is a
SearchCriteria object that holds a
range of criteria that the list should be filtered on:
Public Function GetBugList(ByVal sortExpression As String, _
ByVal searchCriteria As SearchCriteria) As List(Of Bug)
427
The Bug Base
15_749516 ch12.qxp 2/10/06 9:21 PM Page 427
How is ASP.NET able to pass the correct parameters to this method? If you look at the definition for the
ObjectDataSource you see two <asp:Parameter> attributes defined in the <SelectParameters>
section. The first one holds the name of the argument of the SelectMethod that is used when sorting.
Here the
GridView and the DataSource play nice together. Whenever you click one of the column
headings of the
GridView, the SortExpression of the GridView’s column is passed into the
SelectMethod defined on the DataSource. Eventually, this sortExpression ends up in the
GetBugList method where it’s used to sort the list of bugs. This is examined in more detail later.
The second
<SelectParameter> — called searchCriteria — is set up in the code-behind for the page.
To see how that object is created and passed to the
GetBugList, you first need to understand how the
ObjectDataSource sets up the BugManager it’s going to use. Whenever the ObjectDataSource tries to
bind itself to its
DataSource (triggered by calling DataBind on the GridView in the LoadData()
method), the DataSource fires its ObjectCreating event. Inside this event, you can assign the
BugManager to the DataSource object:
Protected Sub odsBugList_ObjectCreating(ByVal sender As Object, _
ByVal e As System.Web.UI.WebControls.ObjectDataSourceEventArgs) _
Handles odsBugList.ObjectCreating
e.ObjectInstance = myBugManager
End Sub
The myBugManager object is defined as a private variable at the top of the code-behind for the Reports
page and instantiated in
Page_Load. In other circumstances there is often no need for this additional
code; the
ObjectDataSource itself is able to figure out how to create a new instance of the object it’s
bound to. However, in the Reports page you need access to an instance of the
BugManager class to get
the total number of bugs it’s holding, using the
Count property.
Once the
ObjectDataSource is done with the Creating method, it fires its Selecting event. This event
fires right before the data is retrieved, so it’s a perfect location to set up the values for the arguments that
are going to be passed to
GetBugList. In the case of the Reports page, a searchCriteria object is passed:
Protected Sub odsBugList_Selecting(ByVal sender As Object, _
ByVal e As System.Web.UI.WebControls.ObjectDataSourceSelectingEventArgs) _
Handles odsBugList.Selecting
‘ Build up a SearchCriteria object and set its properties
Dim searchCriteria As SearchCriteria = New SearchCriteria()
‘ Set the Application when selected
If Not lstApplications.SelectedValue = “” Then
searchCriteria.ApplicationId = Convert.ToInt32(lstApplications.SelectedValue)
End If
‘ Set the Feature when selected
For Each myItem As ListItem In lstFeature.Items
If myItem.Selected = True Then
searchCriteria.AddFeature(myItem.Value)
End If
Next
‘ other properties are set here
‘ Set Start Date
428
Chapter 12
15_749516 ch12.qxp 2/10/06 9:21 PM Page 428
If Not calStartDate.SelectedDate = DateTime.MinValue Then
searchCriteria.StartDate = calStartDate.SelectedDate
End If
‘ other properties are set here
‘ Assign the SearchCriteria object to the InputParameters
‘ collection of the DataSource
e.InputParameters.Item(1) = searchCriteria
End Sub
In this method a new SearchCriteria object is instantiated. Then the values of each of the controls on the
page used for filtering are added to the
SearchCriteria object. You’ll notice that for some properties a
method is used that starts with
Add. This method adds the value passed to it to an internal comma-separated
list. So, if you selected the features 1, 4, and 16 in the list, the internal variable would hold 1,4,16. When the
stored procedure for the
GetBugList method is explained, you discover how this list is used.
Once the properties for the
ObjectDataSource are set up, the object is assigned to the InputParameters
collection of the ObjectDataSourceSelectingEventArgs object, using e.InputParameters.Item(1)
= searchCriteria
.
The next step in the process is the actual call to
GetBugList in the business layer. This method simply
checks if the internal
_memberId field is valid, and then calls into the BugManagerDB class, passing up
the
memberId and the searchCriteria object:
_theBugList = BugManagerDB.GetBugList(searchCriteria, _memberId)
The GetBugList method in the data access layer and its associated stored procedure are probably the
most complicated pieces of code in the application, so again they are explained in great detail. First take
a look at the beginning of the function:
Public Shared Function GetBugList(ByVal searchCriteria As SearchCriteria, _
ByVal memberId As Guid) As List(Of Bug)
Dim sql As String = “sprocBugSelectList”
Dim theBugList As New List(Of Bug) ‘ BugList to hold all the bugs
Try
Using myConnection As New SqlConnection(AppConfiguration.ConnectionString)
Dim myCommand As SqlCommand = New SqlCommand(sql, myConnection)
myCommand.CommandType = CommandType.StoredProcedure
The syntax As New List(Of Bug) creates a new strongly typed list that can hold Bug objects. This is
part of the new generics feature in .NET 2.0 languages that allow you to quickly create custom strongly
typed lists and collections without the need to write a lot of code. This code simply creates a new
List,
which is basically an array that can hold only
Bug items and whose size automatically changes when
you add new items to it.
Next, the properties of the
searchCriteria object are added as parameters on the SqlCommand object:
If searchCriteria IsNot Nothing Then
‘ Add the Application Id
If searchCriteria.ApplicationId <> -1 Then
429
The Bug Base
15_749516 ch12.qxp 2/10/06 9:21 PM Page 429
myCommand.Parameters.AddWithValue(“@applicationId”, _
searchCriteria.ApplicationId)
End If
This code creates a new parameter called @applicationId and assigns it the value held in the Application
Id
property of the searchCriteria if it has been set. This process is repeated for each of the properties
of the
SearchCriteria class. Notice that the comma-separated list of values for properties like Status
and Severity are simply passed as strings to the stored procedure:
‘ Add the severity, which can be a comma separated list
If Not searchCriteria.Severity = String.Empty Then
myCommand.Parameters.AddWithValue(“@severity”, searchCriteria.Severity)
End If
Then a temporary bug is declared and the connection is opened:
Dim theBug As Bug ‘Temp bug to add to the BugList
myConnection.Open()
The bugs are retrieved from the database using a SqlDataReader that is executed with the following code:
Using myReader As SqlDataReader = _
myCommand.ExecuteReader(CommandBehavior.CloseConnection)
While myReader.Read()
‘ Add bugs retrieved from the database to the list here.
‘ This is shown later
End While
myReader.Close()
End Using
The code for the stored procedure that is used to feed this SqlDataReader is quite lengthy, so it doesn’t
appear here; rather, this section focuses on the important bits. The complete code for the BugBase appli-
cation is available on the companion CD-ROM and can also be downloaded from
www.wrox.com. The
first important thing you’ll notice in the procedure is the use of the
dbo.fnSplit function in some of
the
JOINs:
LEFT OUTER JOIN dbo.fnSplit(@feature, ‘,’) joinFeature ON Bug.FeatureId LIKE
joinFeature.[value]
Remember that some of the SearchCriteria properties were actually comma-separated strings with
values? This is where those come into play. Here you’ll discover how it works for the Bug’s feature, but
the principle applies to each of the other properties that use the
fnSplit function.
To select the bugs that are filed for one or more features, you would normally use a SQL
IN statement
like this:
SELECT Bug.Id FROM Bugs WHERE Bug.FeatureId IN (1, 4, 16)
430
Chapter 12
15_749516 ch12.qxp 2/10/06 9:21 PM Page 430
This selects all the bugs that are filed for either feature 1, 4, or 16. This IN statement cannot be used in a
stored procedure directly because SQL Server does not support parameterized
IN filters. One way to
work around that is to create your SQL statement dynamically in the stored procedure and then use
EXEC to execute it. However, in addition to the messy code this creates, it also opens up SQL Server to all
kinds of SQL injection attacks if no additional security measures are taken.
Instead, you should use a function that accepts the comma-separated list of IDs and returns it as a table
object that can be used in a
JOIN. If you think of the result of the fnSplit function as a table that has one
column called
value that holds three rows with 1, 4, and 16, the JOIN becomes a lot easier to understand:
LEFT OUTER JOIN FeatureTempTable ON Bug.FeatureId LIKE
FeatureTempTable.[value]
This JOIN links the list of bugs to the Features in the temp table returned by the function.
You’ll find the
dbo.fnSplit function — taken directly from Microsoft’s MSDN web site — under the
Functions node of the Database Explorer in Visual Web Developer. The function has inline comments
describing how it works.
The
WHERE clause in the procedure eventually filters the bugs that match the items in the temp tables:
AND ((Bug.FeatureId LIKE joinFeature.[value]) OR (@feature IS NULL))
This statement filters the bug list to those that have a direct match to a record in the temp for Features. If
the parameter
@feature is null, no filtering takes place and all records are returned.
This process is repeated for the other bug properties such as the
Severity and Status, resulting in a
sophisticated filter on the bug list.
Once the procedure is done selecting the right bugs from the Bug table, it returns a result set back to the
SqlDataReader in the GetBugList method. The code then loops through each of the items in the
SqlDataReader, creates a new instance of a Bug object, sets all of its properties by filling them with data
from the database, and then adds the new
Bug object to the BugList, as illustrated by the following
highlighted code:
Using myReader As SqlDataReader = _
myCommand.ExecuteReader(CommandBehavior.CloseConnection)
While myReader.Read()
theBug = New Bug(myReader.GetInt32(myReader.GetOrdinal(“Id”)))
theBug.Title = myReader.GetString(myReader.GetOrdinal(“Title”))
theBug.Description = myReader.GetString(myReader.GetOrdinal(“Description”))
‘ other properties are set here
theBug.Application = New NameValue(myReader.GetInt32( _
myReader.GetOrdinal(“ApplicationId”)), myReader.GetString( _
myReader.GetOrdinal(“ApplicationDescription”)))
theBug.UpdatedDateAndTime = _
myReader.GetDateTime(myReader.GetOrdinal(“UpdatedDateAndTime”))
theBugList.Add(theBug)
End While
myReader.Close()
End Using
Return theBugList
431
The Bug Base
15_749516 ch12.qxp 2/10/06 9:21 PM Page 431
This code is very similar to the code that retrieved a single bug from the database. The only difference
here is that the bug itself is not returned, but that it is added to the
BugList first, which is then returned
at the end of the function.
As soon as the
BugList is returned from the data access layer back to the business layer, the remainder
of the code in the
GetBugList method fires:
_theBugList = BugManagerDB.GetBugList(searchCriteria, _memberId)
‘ If there is more than 1 item in the list , sort it.
If _theBugList.Count > 1 Then
_theBugList.Sort(New BugComparer(sortExpression))
End If
Return _theBugList
The Sort method of the generics List class expects a generic class that implements IComparer. The
BugComparer class is such a class and implements Compare, the only method in the interface. This
method should return an Integer indicating whether an object is less than, equal to, or greater than
another object. The
Compare method contains the following code:
Public Function Compare(ByVal a As Bug, _
ByVal b As Bug) As Integer Implements IComparer(Of Bug).Compare
Dim retVal As Integer = 0
Select Case _sortColumn.ToLower()
Case “id”, “”
retVal = a.Id.CompareTo(b.Id)
Case “title”
retVal = String.Compare(a.Title, b.Title, _
StringComparison.InvariantCultureIgnoreCase)
Case “feature”
retVal = String.Compare(a.Feature.Name, b.Feature.Name, _
StringComparison.InvariantCultureIgnoreCase)
‘ other properties are compared here
Case “updateddateandtime”
retVal = DateTime.Compare(a.CreatedDateAndTime, b.CreatedDateAndTime)
End Select
Dim _reverseInt As Integer = 1
If (_reverse) Then
_reverseInt = -1
End If
Return (retVal * _reverseInt)
End Function
The method is designed to accept two instances of a bug object, Bug a and Bug b, which are passed to
this method. The private variable
_sortColumn holds the name of the property that the bugs should be
compared on. This takes place in the
Select Case block where each of the comparable properties of a
bug has its own
Case block. Instead of trying to figure out which property is larger than the other with
432
Chapter 12
15_749516 ch12.qxp 2/10/06 9:21 PM Page 432
custom code, this code uses the Compare method of the underlying data types. Note that when
NameValue objects are compared, the Name property is used and not the Value. The user is expecting
the list to be sorted alphabetically on the name of the properties and not on the underlying value.
Finally, when all retrieving and sorting is done, the
BugList is returned to the presentation layer where
it is displayed in the
GridView. Displaying of the Bug objects and paging through the list is all handled
by the
GridView and works similarly to other GridViews you have seen before. The only thing that
might be different is the way that the
GridView displays the information for the NameValue objects:
<asp:TemplateField HeaderText=”Feature” SortExpression=”Feature”>
<ItemTemplate>
<asp:Label ID=”Label1” runat=”server” Text=’<%# Eval(“Feature.Name”) %>’ />
</ItemTemplate>
<ItemStyle Width=”130px” />
</asp:TemplateField>
The ItemTemplate holds a label with its Text property bound to the Name property of the Feature
item so the end user sees the friendly name and not just a number.
With the Reports page done, you have come full circle. Testers and developers can file new bugs in the
system. Developers can then change the bugs in the Bug Base, marking them as Closed, Fixed, or
Deferred, for example. Members of the Manager group can get detailed lists about bugs in the system on
the criteria they specify.
This also concludes the detailed explanation of the pages that make up the Bug Base. The final section of
“Code and Code Explanation” lists the other files that are used in the application and describes their
purpose.
Other Files and Folders
You have seen many of the concepts used in these files in the previous chapters, so how the files work
isn’t explained in detail here. They come with extensive inline documentation where possible, so you’re
encouraged to open the files and see how they work.
❑ GridView.skin: This file, located in the BugBase skins folder (under App_Themes), defines the
look and feel of the many
GridView controls used throughout the site. Instead of defining their
looks and behavior in each of the files, a simple skin file was created so you need to define the
layout only once. If you want to change any of the colors, CssClasses, PageSize, and padding of
the
GridView, you should change it right here in the .skin file. The design was abstracted even
one step further by not setting fonts and colors in the skin file directly. Instead, various styles,
such as the HeaderStyle and AlternatingRowStyle, were defined and their CssClass was set to a
class defined in the file Styles.css, discussed later.
❑ Controls: This folder contains a single user control named MemberDetails.ascx that displays
information about the current member, and the application she has chosen to work with. This
user control is added in the master page, so each page in the site is displaying its content.
❑ Css: To increase the maintainability of the site, almost all presentation details are put in separate
CSS files. This allows you to quickly change the look and feel of the site by modifying a few
properties in these files. The folder contains four files (outlined in the following table), each
serving a distinct purpose:
433
The Bug Base
15_749516 ch12.qxp 2/10/06 9:21 PM Page 433
Filename Purpose
Core.css Contains the behavior for standard HTML elements, such as images and
links. It also defines the general layout of the site, such as the location of
the menu, the page header, the breadcrumb, and the content section. Refer
to the discussion of the master page to see where these classes are used.
Menu.css Defines the look and feel for the main menu of the application.
PrintStyles.css The styles in this file are applied when printing pages in the Bug Base.
This allows you to hide screen elements that don’t make sense on a
printed sheet of paper, such as the main menu.
Styles.css This CSS file contains all the custom classes used in the site. The selectors
in this file change the look and feel of form controls, error messages, and
data that is displayed in repeating controls.
❑ Help: This folder contains the Help index file, accessed by choosing Help➪Overview from the
main menu. This page provides help for the various tasks in the Bug Base. The About page dis-
plays general information about the Bug Base.
❑ SiteMap.aspx: Displays a hierarchical view of the site, using a
SiteMapDataSource control
that in turn uses the file Web.sitemap, located in the root of the site. You can open the SiteMap
page by clicking the little Site Map icon on the main menu of the Bug Base.
❑ Images: This folder contains a few images that are used throughout the site, such as the Logo
and the background image for the main menu.
❑ JavaScripts: This folder contains a single file called ClientScripts.js that holds various JavaScript
functions used at the client.
❑ Maintenance: This folder allows you to make changes to the configuration of the Bug Base. You can
add new applications and features; modify the items that appear in the drop-downs for Severity,
Reproducibility, and so on; and manage Members. The following table lists each of the pages in the
Maintenance folder:
Filename Purpose
AddMember.aspx Allows you to create a new Member. By default, this member will be put
in the Tester role.
Applications.aspx Allows you to create new and change existing applications.
BugProperties.aspx Allows you to change the items for Severity, Reproducibility, and Frequency.
Default.aspx This is the homepage for the Maintenance section and provides links to
the other pages.
Features.aspx Allows you to manage the features that belong to an application.
Members.aspx Displays a list with the Members in the system and allows you to assign
members to roles and applications.
Status.aspx This page allows you to manage the Status items in the system.
434
Chapter 12
15_749516 ch12.qxp 2/10/06 9:21 PM Page 434
With the discussion of the entire Bug Base application done, including the Management section and all the
additional files in the site, it’s time to find out how you can install the Bug Base so you can start using it.
Setting up the Bug Base
Setting up the Bug Base is a pretty straightforward process. You can choose between the installer that
comes with this book or manually unzip the application’s files to a folder of your choice. Using the
installer is ideal when you have IIS running on your machine and want to use it for the Bug Base. If you
plan on using the Bug Base with Visual Web Developer’s web server, the manual deployment is a better
choice.
The next two sections describe how to use to the installer and how to manually set up the application.
For both methods it’s assumed that the .NET Framework, which is an installation required for Visual
Web Developer, has already been installed. It’s also assumed that you have installed SQL Server 2005
Express edition with an instance name of SqlExpress. If you chose a different instance name, make sure
you use that name in the set up of the Bug Base.
Using the Installer
On the CD-ROM that comes with this book or from the code download for this chapter that you can get
from
www.wrox.com, locate the folder Chapter 12 - Bug Base and then open the Installer folder. Inside
that folder you’ll find two files: setup.exe and BugBaseInstaller.msi. Double-click setup.exe to start the
installation. Keep clicking Next until you get a confirmation dialog that the Bug Base has been installed.
Then click Close to dismiss the installer.
On a default installation of Windows, the files that make up the web site are now available in the folder
C:\Inetpub\wwwroot\BugBase.
Before you can browse to the Bug Base, there is one more change to make. By default, if you have earlier
versions of the .NET Framework installed, new web sites created in IIS will run against that older version.
To tell IIS to use ASP.NET 2.0 instead, you need to change the settings for the virtual folder BugBase so it
runs against the .NET 2.0 Framework. Refer to Chapter 5 for detailed instructions about changing these
settings.
The Bug Base is now set up to be run under IIS. However, before you can use it there may be a few oth-
ers settings you need to configure before you can run the Bug Base application. Refer to the section
“Browsing to the Bug Base” for the next steps.
Manual Installation
Another way to set up the Bug Base is by manually copying the file from the accompanying zip file to
your local hard drive. To install manually, locate the folder Chapter 12 - Bug Base on the CD-ROM or
from the code download and then open the Source folder. In that folder you’ll find a zip file called
Chapter 12 - Bug Base.zip. Extract the contents of the zip file to a location on your hard drive (for exam-
ple,
C:\Projects). You should end up with a folder similar to C:\Projects\BugBase. If you want to
open the web site in Visual Web Developer, choose File➪Open Web Site and browse to the folder where
you extracted the files.
435
The Bug Base
15_749516 ch12.qxp 2/10/06 9:21 PM Page 435