ASP.NET at Work: Building 10 Enterprise Projects PHẦN 3 ppt
Bạn đang xem bản rút gọn của tài liệu. Xem và tải ngay bản đầy đủ của tài liệu tại đây (704.81 KB, 64 trang )
111
One of the problems with having lots of people bidding for your time is trying to keep
them all posted on your schedule. When I started doing training courses several years
ago, I found that it was impossible to maintain static copies of my schedule, so I built a
Web-based calendar application. People could now use this to check my availability
and schedule appointments. Part of the calendar was still kept hidden, however, since
people don’t need to know all the details on my engagements.
We’ll be building a similar system in this project. The events you put on the calendar
can be single-day or multiday events. They can also be recurring events, using several
different methods to schedule them. An event can be scheduled for a particular day in
the month, such as the first Friday of the month. Events can also be scheduled to repeat
every two weeks. Events can even be scheduled for the same day of the month, each
month, if you can have an event that occurs on the 15th of every month, for example.
We’ll be building all this logic into a series of objects so that we can display and edit the
data through a series of Web pages. We’ll also be creating both a monthly and daily
view of the calendar. For the monthly view, we’ll be using the built-in Calendar control
to save ourselves some tedious formatting work. Then, all we have to do is fill in the
boxes with our data. The daily view will require a bit more programming, but it won’t
require a lot of new logic. We’ll also be building a management page for adding and
modifying the events that are on the calendar.
Building the Calendar
Application
PROJECT
3
THE PROBLEM
You need a calendar that is accessible and modifiable through the Web and that doesn’t
require the purchase of an expensive server, such as Microsoft Exchange.
THE SOLUTION
An ASP.NET application that provides the ability to do simple and recurring events, as
well as the ability to publish the calendar on the Web.
Project Background
You’ll need to complete the following steps to build this project:
1. Design the Events table.
2. Build the business objects.
3. Build the administration Web pages to add, modify, and delete events.
4. Build the monthly calendar viewing page.
5. Build the daily calendar viewing page.
You Will Need
✔ Windows 2000
✔ Internet Information Server 5.0 with .NET Framework installed
✔ Visual Studio .NET
✔ SQL Server 7.0 or 2000
✔ A text editor, like HomeSite or TextPad, to edit pages if you don’t want to edit
them within Visual Studio .NET
Designing the Events Table
In this section, we’ll design the tblEvents table used to hold our events. We first have
to determine how we’re going to handle each type of event. We can then move on to
the actual table design and creation.
Creating the Recurrence Logic
Our calendar is going to support the following types of events:
Simple events that occur only once. These events may span several days; how-
ever, they only occur once.
Events that occur at a regular interval, such as every two weeks or once a year.
These events can be ongoing or can have specific starting and ending dates.
112 Project 3
✄
TEAMFLY
Team-Fly
®
Events that occur on a particular day in a month. These events can also be ongo-
ing or can have specific starting and ending dates.
Anniversaries. These events occur on the same day of the month, once a year.
They may be a birthday, an anniversary, or some other type of yearly event.
You might come up with other types of recurring events you want to add to the sys-
tem, but this list will keep us busy in this project. Most other recurrences are simply
combinations of these basic types. Once you’ve seen how the system works in han-
dling these events, you’ll be able to add your own and expand this system.
The first order of business is to design the table into which we’ll store the events
shown on the calendar. Part of the table contains basic information common to every
type of event, but we also have to make space for storing information about each type
of recurring event that we need to store in the system. For simplicity, we’ll be storing
the information for each type of recurrence in a different field or set of fields and using
a flag in one of the fields to indicate the type of event it is. This will make it easier to
select the appropriate events when displaying them on the calendar.
The general information we need to store for each event is as follows:
Name. A short description of event that can be shown in small views of the calen-
dar.
Description. A text field for notes about the event.
Event Start and End. The starting and ending dates for this particular event. These
dates will be used in events that occur periodically so that you can have an
event that is a week long occur every two weeks. The starting and ending dates
will be used in calculations to determine when the recurrence should occur.
Public or Private. Event details are shown to everyone on a public calendar. Pri-
vate events are also shown on the calendar, but no details are provided.
For recurring events, we have to store the following additional information, based
on the rules that we established earlier in the project:
Recurrence Type. This is a single-letter code indicating what type of recurrence
we’re using. N = Non-recurring, P = periodic event, occurring on a regular basis,
M = monthly event, A = anniversary.
Recurrence Start, Recurrence End. This indicates when the recurring event should
start and end. This is separate from the start and end date we already identified.
For an event that doesn’t have an ending date, the Recurrence End can be empty
or null.
Periodic Code, Periodic Amount. For events that occur at regular intervals, the
Periodic Code is the code used by the date functions (DateAdd, DateDiff) to
indicate the time period. The Periodic Amount is the number of those units. The
codes for the Periodic Code are shown in Table 3.1. We have left out the codes
for units smaller than a day.
Monthly Code, Monthly Ordinal, Monthly Day. For events that occur once a
month, we have to first indicate whether the event is on a particular day of the
month or if the event is on a logical day in the month, like the first Thursday, for
example. The Monthly Code value will hold an A for the first case, standing for
Building the Calendar Application 113
Actual, and a L for the second case, standing for Logical. The Monthly Ordinal
field will only be used when we are using a logical date and will have a number
in it from 1-5, since there can only be five Mondays, for instance, in any month.
The Monthly Day field will be used in both actual and logical date events. For
actual events, this value will be the day number to use. For logical events, it will
be a number from 1-7 indicating the day of the week, with the value 1 indicating
Sunday, which is the U.S. standard.
AnniversaryDate. This field will hold the anniversary date for yearly events. Users
can store the actual date, such as the date of a wedding or birthday, along with
the year. While the year is irrelevant for date calculations, it is easier to store this
way than as separate fields.
These codes are also documented in the DateAdd and DateDiff
function documentation in your .NET installation.
It may seem that we’re using a lot of separate and even duplicate fields, but each
type of recurrence requires slightly different information to be processed correctly. You
could combine them, but it makes it more difficult to work with later.
Creating the tblEvents Table
Since this application is separate from the previous two applications you’ve built, I
decided to start a brand new database for it, which I’m naming ASPNetProject03 in my
own system. You could easily combine the application built in the last project with this
one, at which point you’d probably want to have a single database for both parts. We’re
going to create a new table called tblEvents to hold both single and recurring events.
The table definition is shown in Table 3.2.
Table 3.1 Periodic Code Values
CODE UNIT
d Day
m Month
q Quarter of year
w Weekday
ww Week of year
yyyy Year
114 Project 3
Table 3.2 tblEvents Table Definition
FIELD NAME SQL DATA TYPE LENGTH OTHER
pkEventID int N/A Identity, Primary
Key, Not Null
Name varchar 80 Not Null
Description text N/A Nullable
EventStart datetime N/A Not Null
EventEnd datetime N/A Not Null
IsPublic bit N/A Not Null, Default =
0
RecurrenceType char 1 Not Null, Default =
‘N’
RecurrenceStart datetime N/A Nullable
RecurrenceEnd datetime N/A Nullable
PeriodicCode varchar 4 Nullable
PeriodicAmount tinyint N/A Nullable
MonthlyCode char 1 Nullable
MonthlyOrdinal tinyint N/A Nullable
MonthlyDay tinyint N/A Nullable
AnniversaryDate datetime N/A Nullable
If you’re using SQL Server, a copy of the script to create this table is available on the
CD-ROM. If you’re not using SQL Server, you can use the table above to convert to
your particular database’s data types.
We’ll be adding test data along the way to test various conditions and recurrence
types of the calendar. For now, I’d hold off adding data until you understand how the
table is designed to hold it.
Building the Business Objects
The next step is to build the objects that will help manage our calendar data. We’re
going to use some of the code we built in the previous project. Specifically, we’ll be
using the AtWorkUtilities assembly and the BaseServices class. The AtWorkUtilities
assembly is already done, so I’m simply making a copy of it for this new project. In real
Building the Calendar Application 115
life, you wouldn’t need to copy the project, but I’m doing this so that everything is kept
together and so you don’t have to hunt for the files.
The second assembly we’ll be building will contain the logic for the CalendarEvent
class and will be built on top of the BaseServices class we built in the previous project.
I’ll be creating a new assembly project and copying the BaseServices class to be used
here. For simplicity, we’ll be calling this assembly CalendarObjects, but feel free to
name it whatever you want. If you have decided to combine this application with the
application you built in the last project, the Event class will become part of the Busi-
nessObjects assembly.
The class is called CalendarEvent since the word Event is a reserved
word in Visual Basic .NET.
Preparing the Environment
Since this Web application will use a number of graphical controls, it’s easiest to build
it from scratch within the Visual Studio environment. Our Solution file will contain all
of these projects when we’re done:
AtWorkUtilities. Assembly created in Project 2 with the Database class.
CalendarObjects. Assembly you’ll build in this project to manipulate your events.
Calendar. ASP.NET application that will be used to show and administer the calen-
dar.
You may also have a test Windows application to work with your CalendarObjects
class, but you won’t typically need to keep that application.
Since I want to keep all the projects together in a single solution, I use Visual Studio
.NET to create a blank solution, into which I can add projects. This makes it easier to
get the Solution file in the right place. You don’t have to use this method, but it makes
for easier organization. To create a blank solution, do the following:
1. Select New from the File menu. Then select New Solution.
2. In the dialog box that appears, select where to put the solution. Note that
Visual Studio automatically creates a new folder for your solution.
Once you have the empty solution, you can copy other project directories to the
Solution directory and then add each project to the solution. The first project you’ll
want to add, either as an actual project or as a reference to the assembly DLL, is the
AtWorkUtilities assembly. If you’re not sure how to build it, you can look at Project 2
for all the details on this assembly and the features and classes it provides. At this time,
the only object included in the AtWorkUtilities assembly is the Database class. The
code for the class is shown in Listing 3.1.
Imports System.Data.SqlClient
Imports System.Configuration
Public Class Database
Listing 3.1 Database class in AtWorkUtilities assembly
116 Project 3
Private m_cnDB As SqlConnection
‘
‘ This constructor reads the application configuration
‘ file (Web.config for web applications) for a string
‘ called ConnectionString. If it’s not there, an exception
‘ is thrown. Otherwise, the connection is made.
‘
Public Sub New()
Dim objCnf As ConfigurationSettings
If objCnf.AppSettings(“ConnectionString”) = “” Then
Throw New Exception(“Connection string not found “ _
& “in application configuration file.”)
Else
m_cnDB = New _
SqlConnection(objCnf.AppSettings(“ConnectionString”).ToString)
m_cnDB.Open()
End If
End Sub
‘
‘ This constructor accepts a connection string as input
‘ and makes a connection to that SQL Server.
‘
Public Sub New(ByVal ConnectionString As String)
m_cnDB = New SqlConnection(ConnectionString)
m_cnDB.Open()
End Sub
‘
‘ In case there are other objects that need the live
‘ connection, make it available through a read-only
‘ property.
‘
Public ReadOnly Property Connection() As SqlConnection
Get
Return m_cnDB
End Get
End Property
‘
‘ Run a query that does not return records.
‘
Public Function Execute(ByVal SQL As String) As Integer
Dim lngRecords As Integer
Dim cmdQuery As New SqlCommand()
cmdQuery.Connection = m_cnDB
cmdQuery.CommandText = SQL
cmdQuery.CommandType = CommandType.Text
lngRecords = cmdQuery.ExecuteNonQuery()
End Function
Listing 3.1 Database class in AtWorkUtilities assembly (continued)
Building the Calendar Application 117
‘
‘ Run a stored procedure that does not return records.
‘
Public Function ExecuteStoredProc(ByVal SQL As String) As Integer
Dim lngRecords As Integer
Dim cmdQuery As New SqlCommand()
cmdQuery.Connection = m_cnDB
cmdQuery.CommandText = SQL
cmdQuery.CommandType = CommandType.StoredProcedure
lngRecords = cmdQuery.ExecuteNonQuery()
End Function
‘
‘ Run a query that returns records in the form
‘ of a SqlDataReader.
‘
Public Function GetDataReader(ByVal SQL As String, _
Optional ByVal blnSkipRead As Boolean = False) As SqlDataReader
Dim cmdQuery As New SqlCommand()
Dim dr As SqlDataReader
cmdQuery.Connection = m_cnDB
cmdQuery.CommandText = SQL
cmdQuery.CommandType = CommandType.Text
dr = cmdQuery.ExecuteReader
If Not blnSkipRead Then dr.Read()
Return dr
End Function
‘
‘ Run a query that returns records in the form
‘ of a DataSet.
‘
Public Function GetDataSet(ByVal SQL As String) As DataSet
Dim da As New SqlDataAdapter(SQL, m_cnDB)
Dim ds As New DataSet(“Results”)
da.Fill(ds)
Return ds
End Function
‘
‘ Replaces all single quotes with two single
‘ quote characters. Useful for building SQL
‘ statements.
‘
Public Function Clean(strInput as string) as string
Return strInput.Replace(“‘“, “‘’”)
End Function
‘
‘ Close the database connection.
‘
Listing 3.1 Database class in AtWorkUtilities assembly (continued)
118 Project 3
Public Sub Close()
m_cnDB.Close()
End Sub
End Class
Listing 3.1 Database class in AtWorkUtilities assembly (continued)
One change that we’ve made is to the GetDataReader method, which now accepts a
second, optional argument. The SqlDataReader object requires that you do a read call
in order to access data. However, if you’re looping through the data, you’ll use a While
loop and read all the records. This new optional argument allows the code to skip the
initial read.
Once you’ve got the AtWorkUtilities assembly or project added to the solution, your
next step is to create a new VB Class Library project called CalendarObjects. This is
where you should add a copy of the BaseServices class you built in the previous proj-
ect, provided you’re building a new assembly for this project. The BaseServices class is
shown in Listing 3.2 and is documented in the previous project.
Imports System.Text
Imports System.Data
Imports System.Data.SqlClient
Imports AtWorkUtilities
Public MustInherit Class BaseServices
Private m_arrErrors As ArrayList
Protected m_DB As Database
Protected m_DA As SqlDataAdapter
Protected m_CB As SqlCommandBuilder
Protected m_DS As DataSet
‘
‘ This constructor should be overloaded and called
‘ by each derived class. It sets up the protected
‘ objects available to all derived classes for handling
‘ database activities.
‘
Protected Sub New(ByVal DB As Database, ByVal strSQL As String)
m_DB = DB
m_DA = New SqlDataAdapter(strSQL, m_DB.Connection)
m_CB = New SqlCommandBuilder(m_DA)
m_DS = New DataSet()
m_DA.Fill(m_DS)
End Sub
‘
‘ The DataSet will have either zero rows or one row
‘ so we simply return the current row in the dataset.
‘ This code makes it easier to get at the data instead
Listing 3.2 BaseServices class
Building the Calendar Application 119
‘ of having to duplicate the full hierarchy in the
‘ calling code. For empty DataSets, we return an empty
‘ row that can be populated.
‘
Public Function GetRow() As DataRow
If m_DS.Tables(0).Rows.Count > 0 Then
Return m_DS.Tables(0).Rows(0)
Else
Return m_DS.Tables(0).NewRow()
End If
End Function
‘
‘ This routine accepts a data row as input and stores
‘ the data into the dataset. In cases where the row
‘ is new, we add the new row to the DataSet. If the
‘ DataSet has data in it, we read the data row and
‘ replace each field in the DataSet one column at a
‘ time.
‘
Protected Sub SaveRow(ByVal dr As DataRow)
Dim val As DataColumn
‘
‘ Handle new row
‘
If m_DS.Tables(0).Rows.Count = 0 Then
m_DS.Tables(0).Rows.Add(dr)
Exit Sub
End If
‘
‘ Handle existing row
‘
m_DS.Tables(0).Rows(0).BeginEdit()
For Each val In m_DS.Tables(0).Columns
m_DS.Tables(0).Rows(0).Item(val) = dr.Item(val)
Next
m_DS.Tables(0).Rows(0).EndEdit()
End Sub
‘
‘ Adds another validation error to the array list
‘ object. This saves some work for the calling/inheriting
‘ class.
‘
Protected Sub AddError(ByVal strInput As String)
If m_arrErrors Is Nothing Then
m_arrErrors = New ArrayList()
End If
m_arrErrors.Add(strInput)
End Sub
Listing 3.2 BaseServices class (continued)
120 Project 3
‘
‘ This method empties the array list of any previous errors
‘ that had been detected.
‘
Protected Sub ClearErrors()
If m_arrErrors Is Nothing Then
m_arrErrors = New ArrayList()
Else
m_arrErrors.Clear()
End If
End Sub
‘
‘ This method formats the array into a message that can be
‘ used in a message box.
‘
Public Function ValidationError( _
Optional ByVal Header As String = _
“The following errors were detected in your data:” & vbCrLf, _
Optional ByVal ItemFormat As String = “- {0}” & vbCrLf, _
Optional ByVal Footer As String = “”) As String
Dim strMessage As New StringBuilder()
Dim strErr As String
If m_arrErrors.Count > 0 Then
strMessage.Append(Header)
For Each strErr In m_arrErrors
strMessage.AppendFormat(ItemFormat, strErr)
Next
strMessage.Append(Footer)
Return strMessage.ToString
Else
Return “”
End If
End Function
‘
‘ Provides access to the list of errors that were detected
‘ during the validation process. This is used for applications
‘ that need custom error messages.
‘
Public ReadOnly Property ValidationErrors() As ArrayList
Get
Return m_arrErrors
End Get
End Property
‘
‘ Indicates whether any validation errors were detected
‘ as the data was stored into the object.
Listing 3.2 BaseServices class (continued)
Building the Calendar Application 121
‘
Public ReadOnly Property IsValid() As Boolean
Get
Return (m_arrErrors.Count = 0)
End Get
End Property
End Class
Listing 3.2 BaseServices class (continued)
For this class to work properly, you have to add a reference from the new Class
Library project to the AtWorkUtilities project or to the AtWorkUtilities assembly DLL.
Otherwise, the Database object will be unresolved and will have a blue squiggly line
under it.
The CalendarObjects project also needs a populated assembly information file,
which is shown in Listing 3.3. I made a copy of the BusinessObject assembly informa-
tion file and made a few minor changes.
Imports System.Reflection
Imports System.Runtime.InteropServices
‘ General Information about an assembly is controlled through the
following
‘ set of attributes. Change these attribute values to modify the
information
‘ associated with an assembly.
‘ Review the values of the assembly attributes
<Assembly: AssemblyTitle(“ASP.NET At Work - Project 3”)>
<Assembly: AssemblyDescription(“This assembly contains business “ _
& “objects for Project 3. “)>
<Assembly: AssemblyCompany(“Northstar Computer Systems”)>
<Assembly: AssemblyProduct(“ASP.NET At Work”)>
<Assembly: AssemblyCopyright(“Copyright 2001 by Northstar “ _
& “Computer Systems. All Rights Reserved.”)>
<Assembly: AssemblyTrademark(“Copyright 2001 by Northstar “ _
& “Computer Systems. All Rights Reserved.”)>
<Assembly: CLSCompliant(True)>
‘The following GUID is for the ID of the typelib if this project
‘is exposed to COM
<Assembly: Guid(“5AC6EBE3-2690-41F1-B6BA-862C515715C8”)>
‘ Version information for an assembly consists of the following four
values:
Listing 3.3 AssemblyInfo.vb file for CalendarObjects project
122 Project 3
TEAMFLY
Team-Fly
®
‘
‘ Major Version
‘ Minor Version
‘ Build Number
‘ Revision
‘
‘ You can specify all the values or you can default the Build and
Revision Numbers
‘ by using the ‘*’ as shown below:
<Assembly: AssemblyVersion(“3.0.*”)>
Listing 3.3 AssemblyInfo.vb file for CalendarObjects project (continued)
In this assembly, we’ve updated the comments to indicate that this is Project 3, and
the version of the assembly has been marked as 3.0. The build number and revision
will be automatically generated by Visual Studio .NET as we recompile the applica-
tion. Feel free to fill these values in if you have a development scheme already in place.
Now that the CalendarObjects project is ready, we can add the ASP.NET application
to our solution. You don’t need to create any code here yet; however, you should refer-
ence both the CalendarObjects project and the AtWorkUtilities assembly or project in
the References item in the Solution Explorer. This will give the Web application access
to all the objects we’ve built already and to the new ones that we’ll be building in this
project.
With the configuration done, the next step is to start building the classes in the Cal-
endarObjects project.
Creating the CalendarEvent Class
The next object you need to build is the CalendarEvent class. As mentioned earlier, we
have to use a longer name than just Event, since the word Event is a reserved word in
Visual Basic .NET. This object follows the same pattern as all the other objects we’ve
built so far, but it does a great deal more validation of the data being stored in it. The
validation rules we set up so far in this project provide for five different types of event
data to be stored in this single object and single table. This means that we have quite a
bit of conditional validation to do, based on the input provided by the user.
The CalendarEvent class is shown in Listing 3.4 and is part of a separate assembly
called CalendarObjects.
Imports AtWorkUtilities
Imports System.Data.SqlClient
Public Class CalendarEvent
Inherits BaseServices
Private Const RECUR_NONE = “N”
Listing 3.4 CalendarEvent class
Building the Calendar Application 123
Private Const RECUR_PERIODIC = “P”
Private Const RECUR_MONTHLY = “M”
Private Const RECUR_ANNIV = “A”
Private Const MONTHLY_ACTUAL = “A”
Private Const MONTHLY_LOGICAL = “L”
‘
‘ If no arguments are supplied, build a separate
‘ database connection for this object.
‘
Public Sub New()
MyBase.New(New Database(), “SELECT * FROM tblEvents WHERE 1=0”)
End Sub
‘
‘ If database connection is supplied, store it
‘ in the private connection variable for this
‘ object.
‘
Public Sub New(ByVal db As Database)
MyBase.New(db, “SELECT * FROM tblEvents WHERE 1=0”)
End Sub
‘
‘ If both database and ID are supplied, retrieve
‘ data into the object from the database.
‘
Public Sub New(ByVal db As Database, _
ByVal ID As Integer)
MyBase.New(db, “SELECT * FROM tblEvents WHERE pkEventID = “ _
& ID.ToString)
End Sub
‘
‘ Verify that all data validation rules have been
‘ met. Any errors get stored into the errors collection
‘ inherited from the BaseServices class.
‘
Public Sub Validate()
Dim dr As DataRow
ClearErrors()
For Each dr In m_DS.Tables(0).Rows
If dr.RowState = DataRowState.Added _
Or dr.RowState = DataRowState.Modified Then
ValidateRow(dr)
End If
Next
End Sub
Listing 3.4 CalendarEvent class (continued)
124 Project 3
‘
‘ Checks an individual row for validation rule
‘ compliance. Any errors are added to the errors
‘ collection.
‘
Private Sub ValidateRow(ByVal dr As DataRow)
If IsDBNull(dr(“Name”)) Then
AddError(“The name of the event is required.”)
Else
If dr(“Name”) = “” Then
AddError(“The name of the event is required.”)
ElseIf dr(“Name”).ToString.Length > 80 Then
AddError(“The event name must be 80 characters or less.”)
End If
End If
If IsDBNull(dr(“EventStartDate”)) Then
AddError(“The start date of the event is required.”)
End If
If IsDBNull(dr(“EventStartTime”)) Then
AddError(“The start time of the event is required.”)
End If
If IsDBNull(dr(“EventEndDate”)) Then
AddError(“The ending date of the event is required.”)
End If
If IsDBNull(dr(“EventEndTime”)) Then
AddError(“The ending time of the event is required.”)
End If
If IsDBNull(dr(“IsPublic”)) Then
AddError(“The start date/time of the event is required.”)
End If
If IsDBNull(dr(“RecurrenceType”)) Then
AddError(“The type of event is required.”)
Else
Select Case dr(“RecurrenceType”)
Case RECUR_NONE
‘
‘ No additional data is required for a
‘ non-recurring event
Case RECUR_PERIODIC, RECUR_MONTHLY, RECUR_ANNIV
If IsDBNull(dr(“RecurrenceStart”)) Then
AddError(“For a recurring event, the “ _
& “recurrence start date is required.”)
End If
Select Case dr(“RecurrenceType”)
Case RECUR_PERIODIC
ValidatePeriodicEvent(dr)
Listing 3.4 CalendarEvent class (continued)
Building the Calendar Application 125
Case RECUR_MONTHLY
ValidateMonthlyEvent(dr)
Case RECUR_ANNIV
If IsDBNull(dr(“AnniversaryDate”)) Then
AddError(“For an anniversary event, the “ _
& “anniversary date is required.”)
End If
End Select
Case Else
AddError(“The recurrence type must be N, P, M, or A.”)
End Select
End If
End Sub
Private Sub ValidatePeriodicEvent(ByVal dr As DataRow)
If IsDBNull(dr(“PeriodicCode”)) Then
AddError(“For a periodically recurring event, “ _
& “the period code is required.”)
Else
If dr(“PeriodicCode”) = “” Then
AddError(“For a periodically recurring event, “ _
& “the period code is required.”)
End If
End If
If IsDBNull(dr(“PeriodicAmount”)) Then
AddError(“For a periodically recurring event, “ _
& “the period amount is required.”)
End If
End Sub
Private Sub ValidateMonthlyEvent(ByVal dr As DataRow)
If IsDBNull(dr(“MonthlyCode”)) Then
AddError(“For a monthly event, the monthly “ _
& “type code is required to be either A or L.”)
Else
Select Case dr(“MonthlyCode”)
Case MONTHLY_ACTUAL
If IsDBNull(dr(“MonthlyDay”)) Then
AddError(“For this type of monthly event, “ _
& “the day of the month must be specified.”)
Else
If dr(“MonthlyDay”) < 1 Or dr(“MonthlyDay”) > 31 Then
AddError(“The day of the month is out of range.”)
End If
End If
Case MONTHLY_LOGICAL
If IsDBNull(dr(“MonthlyOrdinal”)) Then
AddError(“For this type of monthly event, “ _
& “the day ordinal is required.”)
Else
If dr(“MonthlyOrdinal”) < 1 Or dr(“MonthlyOrdinal”) > 5
Then
Listing 3.4 CalendarEvent class (continued)
126 Project 3
AddError(“The day ordinal must be between 1 and 5.”)
End If
End If
If IsDBNull(dr(“MonthlyDay”)) Then
AddError(“The day number is required.”)
Else
If dr(“MonthlyDay”) < 1 Or dr(“MonthlyDay”) > 7 Then
AddError(“The day number must be between 1 and 7.”)
End If
End If
Case Else
AddError(“The monthly event type must be either A or L.”)
End Select
End If
End Sub
‘
‘ The base Save method stores the DataRow into the
‘ DataSet, whether it’s a new or existing row. The
‘ rest of this routine handles specific validation
‘ for this type of data.
‘
Public Overloads Sub SaveRow(ByVal dr As DataRow)
MyBase.SaveRow(dr)
Validate()
End Sub
‘
‘ We separate the SaveRow method from the Save method
‘ to give us a chance to handle any validation. We have
‘ a verification here that the data is good before we
‘ continue, however.
‘
Public Sub Save()
If Not Me.IsValid Then
Throw New CalendarException(Me.ValidationError)
Exit Sub
End If
m_DA.Update(m_DS)
End Sub
‘
‘ Since we only have a single row in our DataSet,
‘ delete it and then update the database with the
‘ change.
‘
Listing 3.4 CalendarEvent class (continued)
Building the Calendar Application 127
Public Sub Delete()
If m_DS.Tables(0).Rows.Count > 0 Then
m_DS.Tables(0).Rows(0).Delete()
m_DA.Update(m_DS)
End If
End Sub
End Class
Listing 3.4 CalendarEvent class (continued)
Because the validation is fairly complex, it is broken down into a series of subrou-
tines that are used for each type of event that we have identified. Let’s work through
the validation code first, since it is the most important and unique part of this class.
As part of this class, we define a series of constants to use in each of the flag values.
These constants are defined as Private to the class, but if we wanted to, we could make
them Public and make them usable outside of the class. This is not necessary, but feel
free to do so if you want.
The first thing we do is make sure that the standard data required for all events is
provided. This routine verifies that the name of the event is provided and that the data
is not more characters than is allowed by the field. We have to do this in several steps
and check for both null values and empty values, as they are not the same thing. A null
value means that no value has ever been stored in the field. This is common in data-
bases and when you retrieve data from a database. An empty value means that the
value is of zero length. These two conditions sound similar but they have to be checked
individually. The length check is done after verifying that something is in the field. We
then verify that the Starting and Ending Date and Time fields are provided. We’re not
doing data-type validation here since that will be done when the data is parsed and
stored in the DataRow object.
The next part of the code begins working with the various recurrence types and ver-
ifies that one of the event types has been selected and stored in the object. Because our
Web form automatically selects an option when the form is initially started, it is nearly
impossible to cause this error to occur. However, we have to be sure to prevent invalid
data from entering the database.
Once we’ve determined what type of event we have, we call the specific method in
this class to verify that the data is supplied for each type of event we support. For all
recurring events, the recurrence start date is required. Anniversary events only require
that the anniversary date be entered. The complex recurring events have subroutines
for each type. The code for periodic events is in the ValidatePeriodicEvent subroutine,
shown here:
Private Sub ValidatePeriodicEvent(ByVal dr As DataRow)
If IsDBNull(dr(“PeriodicCode”)) Then
AddError(“For a periodically recurring event, “ _
& “the period code is required.”)
128 Project 3
Else
If dr(“PeriodicCode”) = “” Then
AddError(“For a periodically recurring event, “ _
& “the period code is required.”)
End If
End If
If IsDBNull(dr(“PeriodicAmount”)) Then
AddError(“For a periodically recurring event, “ _
& “the period amount is required.”)
End If
End Sub
We pass the DataRow object into this object and then check the fields specific for
periodic-type events. Again, we are just verifying that the data is in the fields. When
we fill the DataRow, data-type errors will be detected and trapped. Some errors will
already be trapped, such as if the user enters a negative number of time units as the
periodic amount. Since we’re storing this field in a Tinyint field, we can only handle
positive numbers from 0 to 255. Any numbers that don’t fit this range will be trapped
by our other code.
The monthly event validation routine is shown here:
Private Sub ValidateMonthlyEvent(ByVal dr As DataRow)
If IsDBNull(dr(“MonthlyCode”)) Then
AddError(“For a monthly event, the monthly “ _
& “type code is required to be either A or L.”)
Else
Select Case dr(“MonthlyCode”)
Case MONTHLY_ACTUAL
If IsDBNull(dr(“MonthlyDay”)) Then
AddError(“For this type of monthly event, “ _
& “the day of the month must be specified.”)
Else
If dr(“MonthlyDay”) < 1 Or dr(“MonthlyDay”) > 31 Then
AddError(“The day of the month is out of range.”)
End If
End If
Case MONTHLY_LOGICAL
If IsDBNull(dr(“MonthlyOrdinal”)) Then
AddError(“For this type of monthly event, “ _
& “the day ordinal is required.”)
Else
If dr(“MonthlyOrdinal”) < 1 Or dr(“MonthlyOrdinal”) > 5 Then
AddError(“The day ordinal must be between 1 and 5.”)
End If
End If
If IsDBNull(dr(“MonthlyDay”)) Then
AddError(“The day number is required.”)
Else
If dr(“MonthlyDay”) < 1 Or dr(“MonthlyDay”) > 7 Then
AddError(“The day number must be between 1 and 7.”)
End If
Building the Calendar Application 129
End If
Case Else
AddError(“The monthly event type must be either A or L.”)
End Select
End If
End Sub
We first verify that a particular type of monthly event has been specified in the Month-
lyCode field. For actual monthly events, we are dealing with an event that occurs, for
example, on the 15th of every month. For these events, only the day number is required.
For logical monthly events that occur, on the third Tuesday of the month, for example,
we have to specify both the day of the week and the ordinal number during the month.
Again, data-type errors will be detected when we store the data into the DataRow object.
As in the other classes, we generate a CalendarException if an error is detected. The
code for this class is shown in Listing 3.5. You need to build this class and add it to the
project before you attempt to compile the CalendarEvent class you built in the last sec-
tion. If you don’t, you’ll get errors when the compiler sees references to this class that
doesn’t exist yet.
Public Class CalendarException
Inherits Exception
Public Sub New()
MyBase.New()
End Sub
Public Sub New(ByVal Message As String)
MyBase.New(Message)
End Sub
Public Sub New(ByVal Message As String, ByVal baseError As Exception)
MyBase.New(Message, baseError)
End Sub
End Class
Listing 3.5 CalendarException class
This class works just like the other exception classes that we’ve used, so we’ll move
on to the Web portion of the administration application next.
Building the Administration Application
The next feature to build is the Web administration application. You can use this to
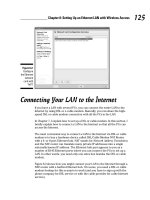
view, add, modify, and delete events on the calendar. This view is simply a list of all the
events in the system . . . we’ll be building the actual calendar next. The View Events
window is shown in Figure 3.1 and shows the event name, description, start and end
date, as well as a flag indicating if the event is a recurring event or not.
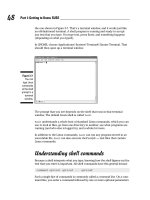
We’ll start with the list window and then go on to the editing window, shown in Fig-
ure 3.2. It provides a lengthy but complete interface for entering all the required data
for events, especially the recurring events, which are the most complex.
130 Project 3
Figure 3.1 View Events window.
Figure 3.2 Add and Update Event window.
Building the Calendar Application 131
The editing window uses a new technique to combine the code for both adding and
editing records so that we don’t have to duplicate our efforts. The code for handling
deletions works in the same way as the other applications in prior projects.
Coding the View Events Window
The first window to build is the View Events window. This window displays a list of
all the events on the calendar and provides links for adding, updating, and deleting
them. The ASPX file for this portion of the application is shown in Listing 3.6. We’re
using the data-binding method here to show each column. In addition, we are linking
to the style sheet instead of using a server-side include. A server-side include works
just as well, but at one point would not work properly in Netscape. Be sure to test the
page and the related styles in your target browser first.
<%@ Page Inherits=”Proj03Web.ViewEvents” Src=”viewevents.aspx.vb” %>
<html>
<head>
<title>Calendar Manager: View Events</title>
<link href=”styles.css” rel=”stylesheet” type=”text/css”>
</head>
<body bgcolor=”#FFFFFF”>
<p class=”pageheading”>View Events</p>
<p class=”tabletext”>
<a href=”addevent.aspx”>Add New Event</a>
</p>
<asp:Repeater id=”rptList” runat=”server”>
<HeaderTemplate>
<table cellpadding=”4” cellspacing=”0” width=”100%”>
<tr class=”tableheading”>
<td width=”20%”>Name</td>
<td width=”40%”>Description</td>
<td width=”10%”>Start Date</td>
<td width=”10%”>End Date</td>
<td width=”5%”>Recurring?</td>
<td width=”15%”>Actions</td>
</tr>
</HeaderTemplate>
<ItemTemplate>
<tr class=”tabletext”>
<td valign=”top”><%# DataBinder.Eval(Container.DataItem, _
“Name”) %></td>
<td valign=”top”><%# DataBinder.Eval(Container.DataItem, _
“Description”) %></td>
<td valign=”top” align=”center”>
<%# DataBinder.Eval(Container.DataItem, _
“EventStartDate”).ToShortDateString %>
</td>
<td valign=”top” align=”center”>
Listing 3.6 Viewevents.aspx
132 Project 3
TEAMFLY
Team-Fly
®
<%# DataBinder.Eval(Container.DataItem, _
“EventEndDate”).ToShortDateString %>
</td>
<td valign=”top” align=”center”>
<%# DataBinder.Eval(Container.DataItem, _
“IsRecurrence”) %></td>
<td valign=”top” align=”center”>
<a href=”updateevent.aspx?id=<%#
DataBinder.Eval(Container.DataItem, _
“pkEventID”) %>”>Update</a>
<a href=”deleteevent.aspx?id=<%#
DataBinder.Eval(Container.DataItem, _
“pkEventID”) %>”>Delete</a>
</td>
</tr>
</ItemTemplate>
<AlternatingItemTemplate>
<tr class=”tabletext_gray”>
<td valign=”top”>
<%# DataBinder.Eval(Container.DataItem, _
“Name”) %></td>
<td valign=”top”>
<%# DataBinder.Eval(Container.DataItem, _
“Description”) %></td>
<td valign=”top” align=”center”>
<%# DataBinder.Eval(Container.DataItem, _
“EventStartDate”).ToShortDateString %>
</td>
<td valign=”top” align=”center”>
<%# DataBinder.Eval(Container.DataItem, _
“EventEndDate”).ToShortDateString %>
</td>
<td valign=”top” align=”center”>
<%# DataBinder.Eval(Container.DataItem, _
“IsRecurrence”) %></td>
<td valign=”top” align=”center”>
<a href=”updateevent.aspx?id=<%# DataBinder.Eval(Container.DataItem, _
“pkEventID”) %>”>Update</a>
<a href=”deleteevent.aspx?id=<%# DataBinder.Eval(Container.DataItem, _
“pkEventID”) %>”>Delete</a>
</td>
</tr>
</AlternatingItemTemplate>
<FooterTemplate>
</table>
</FooterTemplate>
</asp:Repeater>
</body>
</html>
Listing 3.6 Viewevents.aspx (continued)
Building the Calendar Application 133
We use the same syntax as in the last project to show each data field in the ItemTem-
plate and AlternatingItemTemplate sections. The code-behind file is shown in Listing
3.7 and binds the class to this page so that the data is displayed properly.
Imports System
Imports System.Data
Imports System.Data.SqlClient
Imports System.Web.UI
Imports System.Web.UI.WebControls
Namespace Proj03Web
Public Class ViewEvents
Inherits System.Web.UI.Page
Protected rptList As Repeater
Sub Page_Load(Src As Object, e As EventArgs)
Dim DB as New AtWorkUtilities.Database()
Dim DS As DataSet = DB.GetDataSet(“sp_RetrieveAllEvents”)
rptList.DataSource = DS
rptList.DataBind()
db.Close()
End Sub
End Class
End Namespace
Listing 3.7 Viewevents.aspx.vb
The stored procedure being used here retrieves all the events from the table and
translates the type of event into a Yes or No based on whether the event is recurring or
not. The code for the stored procedure is shown here:
CREATE PROCEDURE dbo.sp_RetrieveAllEvents
AS
SELECT *,
IsRecurrence = (CASE RecurrenceType WHEN ‘N’ THEN ‘No’ ELSE ‘Yes’ END)
FROM tblEvents
ORDER BY EventStartDate
GO
The Case statement here is actually part of SQL Server’s language and shows a Yes
when any type of recurring event is being used. This makes it easier to display the
data, since we don’t have to do any verification along the way. This is the easiest way
to write code, especially when you are doing data binding to a Repeater control.
In order to use this page, you’ll need to create a bin directory for the DLLs used by this
Web application, if you haven’t done so already. Be sure to put both the AtWorkUtilities
and the new CalendarObjects assemblies into this directory before trying this application.
134 Project 3
Creating the Event Data Entry
Windows
In the last two projects, we’ve been doing a bit of duplicate effort to handle adding and
editing records. When you think about it, the two functions are fairly similar. In an
update, you simply populate the form with the existing data. In this application, we’re
going to combine the code for adding and updating records for this application. We’ll
start by building the data entry form, creating the separate add and edit pages, and
then build the code-behind file that will be shared between the two files.
Building the Data Entry Form
The first step is to build the shared HTML form used in both add and update modes.
This is just a series of ASP.NET Web controls that accept each piece of data for the event
being entered. The code is shown in Listing 3.8, and this file is called Eventform.inc.
<form runat=”server”>
<input type=”hidden” id=”pkEventID” runat=”server”>
<input type=”hidden” id=”returnURL” runat=”server”>
<table cellspacing=”5”>
<tr class=”tabletext”>
<td align=”right”>Name:</td>
<td>
<asp:textbox
id=”txtName”
columns=”50”
maxlength=”80”
runat=”server” /></td>
</tr>
<tr class=”tabletext”>
<td valign=”middle” align=”right”>Description:</td>
<td>
<asp:textbox
id=”txtDescription”
rows=”5”
columns=”40”
wrap=”true”
textmode=”Multiline”
runat=”server” /></td>
</tr>
<tr class=”tabletext”>
<td align=”right”>Start Date:</td>
<td>
<asp:textbox
id=”txtEventStartDate”
columns=”10”
Listing 3.8 Entryform.inc
Building the Calendar Application 135