Beginning Web Development, Silverlight, and ASP.NET AJAX From Novice to Professional phần 2 pot
Bạn đang xem bản rút gọn của tài liệu. Xem và tải ngay bản đầy đủ của tài liệu tại đây (919.55 KB, 44 trang )
Figure 2-14. Creating a web reference
Visual Studio will then create a special type of class called a proxy. This is simply a
local repr
esentation of the remote service, allowing you to call methods as if they were
implemented on your local computer. However, under the covers, ASP.NET will forward
all of the proxy method calls to the remote service for execution.
If Visual Studio interprets the file successfully, you will see a list of available methods
(
GetStockQuotes in the example in Figur
e 2-14). You can then create a name for the web
reference and add the reference to your project. At this point in your project, you can
create an instance of the web reference proxy class and call the method on it to get data
back fr
om the web service.
I
n fact, let’s do that now so that we can call a remote web service to obtain stock
quotes for our example. Right-click the project name and select Add Web Reference.
When the Add Web Reference dialog box appears, type
/>soap/urn:xmethods-delayed-quotes.wsdl into the URL field and click Go. We’ll be using a
service provided by XMethods (
www.xmethods.com) that reports delayed stock quotes given
a stock ticker symbol. You can see this in Figure 2-14. After clicking Go, Visual Studio con-
tacts XMethods, downloads the WSDL, and displays the available methods it finds for you
to review. Note the value in the Web reference name field (
net.xmethods.services), which
will ultimately form the namespace of the proxy class you’ll be using. Change the value
you find there to “QS” for “quote service,” and then click Add Reference. At this point,
CHAPTER 2 ■ BASICS OF WEB DEVELOPMENT WITH ASP.NET24
9594CH02.qxd 1/3/08 10:46 AM Page 24
Visual Studio converts the WSDL into a C# class (the proxy) and stores it under the
App_WebReferences folder, which Visual Studio also creates for you. Later in the chapter,
we’ll use this quote service to actually retrieve stock quote values.
Copy Web Site
This enables you to copy your web site to a new location. This can be another directory
on your file system or a remote directory on an FTP or IIS server. Copy Web Site can also
be used to back up or deploy your web site.
Start Options
This enables you to specify the action to take when you start the project. It’s a shortcut to
the Property Pages window, with the start options already selected (see Figure 2-15).
Figure 2-15. Web Start options
You can use this dialog box to specify how the application will start—for example,
launching the current page (in the IDE) as the start page, specifying a particular page, or
starting an external program first before launching the site. You can also specify the
server to use and how to authenticate against that server.
CHAPTER 2 ■ BASICS OF WEB DEVELOPMENT WITH ASP.NET 25
9594CH02.qxd 1/3/08 10:46 AM Page 25
View in Browser
The default browser on your system shows the currently selected page (or the default
page as specified in Web Start options if nothing is selected).
Browse With
This option enables you to specify the browser that you will use to browse the site. By
default, Microsoft Internet Explorer and the Visual Studio built-in browser are available,
but you can easily use the dialog box to add other browsers such as Mozilla Firefox.
Refresh Folder
This option refreshes and redraws the contents of the Solution Explorer. If you’ve added
new files or references and they haven’t shown up yet, choose Refresh Folder to see them.
Property Pages
This option calls up the Property Pages dialog box. You’ve already seen this with the Web
Start options selection, where the property pages were launched with the Start Options
section already selected. You can also use the Property Pages option to manage refer-
ences and the build process. Figure 2-16 shows an example of Property Pages being used
to manage references.
Figure 2-16. Managing application references with Property Pages
CHAPTER 2 ■ BASICS OF WEB DEVELOPMENT WITH ASP.NET26
9594CH02.qxd 1/3/08 10:46 AM Page 26
You can use Property Pages to view existing references, which will either be
application references (type GAC) or web references (type WEB) on the references list.
You can also add application or web references from this window, following the same
workflow that you followed when you chose to add them directly from the context menu.
If you want to remove unwanted references, select them and click Remove. Finally, web
services may change over time, causing your proxy to break because it is out of sync with
the originating service. If you want to make sure that your proxy is up-to-date and able to
communicate with the service, select the web reference and click Update. Of course,
when the update to your web reference indicates the originating service actually did
change, you may need to change your own code that uses the web service.
Figure 2-17 shows the Build options.
Figure 2-17. The Build options
I
n
Visual Studio, pressing the F5 key starts your application. You can use the Property
P
ages dialog bo
x to specify what should happen when the application star
ts. By default,
the web site will be built every time, but there are other available options, including No
Build (where the current build of the site will be run, ignoring changes since the last
build) and B
uild P
age (wher
e only the curr
ent page will be built befor
e executing).
The
latter option is useful, for example
, in a lar
ger site when y
ou just want to unit test one
page without
r
ebuilding ev
er
ything.
CHAPTER 2 ■ BASICS OF WEB DEVELOPMENT WITH ASP.NET 27
9594CH02.qxd 1/3/08 10:46 AM Page 27
The Code and Design Windows
At the center of the IDE screen you’ll see the Source and Design window. If you are view-
ing an ASPX file and you select the Source tab at the bottom, the window will look like
Figure 2-18.
Figure 2-18. The Source and Design window
At the bottom of the screen, you can select Design view or Source view. Source view
for an ASPX page looks a lot like HTML, and in fact that’s exactly what it is—specially
marked-up HTML that the ASP.NET-based server recognizes. At the top of the document,
you see the markup beginning with
<%@, which indicates to the server that this is an active
page and that the content should be parsed to generate HTML code. The code-behind
file is specified as part of the
Page tag at the top. In addition, as you place controls on the
page, you’ll see the server-side code specified using tags such as
<asp:Button> for a server-
side button. As the server parses the page, it recognizes tags like this and generates the
appropriate HTML to render the desired content.
Design view shows the design surface for the page. In Design view, you can drag and
drop controls from the Toolbox onto the page to create your web UI. See the example in
Figure 2-19, where an ASP.NET Button, Label, and TextBox control have been added to
the page.
CHAPTER 2 ■ BASICS OF WEB DEVELOPMENT WITH ASP.NET28
9594CH02.qxd 1/3/08 10:46 AM Page 28
Figure 2-19. The design surface
You can use the Properties window to set the properties of the currently selected
item. So, for example, you can change the label on the button from
Button to Get by find-
ing the
Text entry in the Properties window and using it to set the button text to Get (see
Figure 2-20). You can also change the name of a button using the
ID property.
Figure 2-20. Setting the label for a button by using the Properties window
CHAPTER 2 ■ BASICS OF WEB DEVELOPMENT WITH ASP.NET 29
9594CH02.qxd 1/3/08 10:46 AM Page 29
For the stock quote application you are creating, set the properties of the three
controls as follows:
TextBox: Change the ID to txtTicker.
Button: Change the ID to btnGet, and change the text to Get.
Label: Change the ID to lblQuote, and change the text to '' (an empty string).
The page will now look something like what you see in Listing 2-1.
Listing 2-1. The Stock Quote Application
<%@ Page Language="C#" AutoEventWireup="true"
CodeFile="Default.aspx.cs" Inherits="_Default" %>
<!DOCTYPE html
PUBLIC "-//W3C//DTD XHTML 1.0 Transitional//EN"
" /><html xmlns=" >
<head runat="server">
<title>Untitled Page</title>
</head>
<body>
<form id="form1" runat="server">
<div>
<asp:TextBox ID="txtTicker" runat="server"></asp:TextBox>
<asp:Button ID="btnGet" runat="server" Text="Get" />
<asp:Label ID="lblQuote" runat="server"></asp:Label></div>
</form>
</body>
</html>
You can see the <asp:> labels for the three controls as well as their attributes, which
define the properties that you just set. If you don’t want to use the Property Editor to set
the properties, you can instead use the source editor to enter these properties manually,
and IntelliSense will even help you with this.
If you haven’t done so already, make sure that you add a web reference to the
XM
ethods quote ser
vice at
www.swanandmokashi.com/HomePage/WebServices/StockQuotes.
asmx?WSDL. C
all the ser
vice r
efer
ence
'QS'.
CHAPTER 2 ■ BASICS OF WEB DEVELOPMENT WITH ASP.NET30
9594CH02.qxd 1/3/08 10:46 AM Page 30
Now, in the Default.aspx page’s Design view, double-click the button, and a click
event handler will be added to the code-behind file. This event handler will be called
btnGet_Click. Edit the event handler so that it looks like this:
p
rotected void btnGet_Click(object sender, EventArgs e)
{
QS.StockQuotes myQuote = new QS.StockQuotes();
QS.Quote[] res;
res = myQuote.GetStockQuotes(txtTicker.Text);
lblQuote.Text = res[0].StockQuote;
}
This code creates an instance of the web service proxy called 'MyQuote'. It then calls
the
getStockQuotes method on this proxy (and by extension the web service), which
returns a stock quote for the string ticker. As you can see from the code, the contents of
the txtTicker text box are being passed to the quote retrieval web service. The service
returns an array of
Quote objects, and the label then has its text set to the value of the
StockQuote property of the first element in this array, converted to a string. Do note, how-
ever, that this is just example code. In a real scenario, you would likely want to at least
add some form of error handling to check for a timeout or other error in calling the web
service. For production systems, you may also want to look into asynchronous web serv-
ice calls.
Now if you run the application, type a stock ticker (e.g., MSFT, RTRSY, or BEAS) into
the text box, and click Get, the web service will return a stock quote for that ticker. You
can see this in action in Figure 2-21.
Figure 2-21. The simple stock quote web site
CHAPTER 2 ■ BASICS OF WEB DEVELOPMENT WITH ASP.NET 31
9594CH02.qxd 1/3/08 10:46 AM Page 31
Architecture of ASP.NET
The simplicity of developing the stock quote application proves the power that ASP.NET
affords you as a web developer. Some fairly complex stuff was going on behind the
scenes, enabling you to focus on the business logic for your application, instead of all the
underlying plumbing necessary to get it to work.
Figure 2-22 shows how the underlying ASP.NET components all work together in an
ASP.NET application. At the bottom of the figure, you see the host operating system on
which the web server runs. The web server for ASP.NET can be Cassini or IIS. The web
server receives the incoming request from the browser and passes it to the ASP.NET run-
time, which sits on top of the operating system.
This runtime can use a global application file, called
Global.asax, to manage func-
tions that are central to your web site. A number of modules are available to the runtime
for handling sessions, authentication, and caching.
Finally, your application or web service sits on top of these modules and executes.
Upon executing, it generates HTML markup that gets passed back to the process that
initiated the request thr
ough the web server.
Figure 2-22. ASP
.NET ar
chitectur
e
CHAPTER 2 ■ BASICS OF WEB DEVELOPMENT WITH ASP.NET32
9594CH02.qxd 1/3/08 10:46 AM Page 32
The ASP.NET Worker Process and State Management
In the stock quote application, when the web browser requested the page from the
server, the server recognized the
.aspx page name extension as an ASP.NET page, and
passed the request to the ASP.NET runtime, which processed the ASP.NET code and
returned the output to the client. Take a look back at Listing 2-1, where the page was
defined using extended HTML. If you look at the code being rendered by the browser
(by selecting View Source from your browser when viewing the
Default.aspx page), you’ll
see something different. Take a look at Listing 2-2.
Listing 2-2. The Stock Quote Application As Rendered by the Browser
<!DOCTYPE html
PUBLIC "-//W3C//DTD XHTML 1.0 Transitional//EN"
" /><html xmlns=" >
<head>
<title>Untitled Page</title>
</head>
<body>
<form name="form1" method="post" action="Default.aspx" id="form1">
<div>
<input type="hidden" name="__VIEWSTATE" id="__VIEWSTATE"
value="/wEPDwUKMTU5MTA2ODYwOWRk1kQjjKUNXCMmyhw9mwUkqs1+CdU=" />
</div>
<div>
<input name="txtTicker" type="text" id="txtTicker" />
<input type="submit" name="btnGet" value="Get" id="btnGet" />
<span id="lblQuote"></span>
</div>
<div>
<input type="hidden" name="__EVENTVALIDATION" id="__EVENTVALIDATION"
value="/wEWAwKQ0uDFBALGsPqoBgKLk8m1C0va3iCLI38aZ+8cKQVn2KcWFC3g" />
</div>
</form>
</body>
</html>
CHAPTER 2 ■ BASICS OF WEB DEVELOPMENT WITH ASP.NET 33
9594CH02.qxd 1/3/08 10:46 AM Page 33
As you can see, the stock quote application as rendered by the browser is very differ-
ent from the stock quote application you saw in Listing 2-1. The
<asp:> controls have
been replaced by pure HTML, the text box has been replaced by an input control of
type
"text", the button has been replaced by a form input control of type "submit", and
the label has been replaced by an HTML span. There are also a couple of new, hidden
input controls, called
__VIEWSTATE and __EVENTVALIDATION, which contain a series of
characters.
These fields simply contain a binary serialized representation of the page controls
that are passed to the server and deserialized when the page inputs are submitted, or
posted back, to the server. The server then uses this information to retrieve the contents
of the controls (e.g., to reconstitute the text in the text box if the page is rerendered) and
to change them when necessary (e.g., to set the value of the label). This is the concept of
page
state management
, which is implemented for y
ou by ASP.NET.
Using the Web Configuration File
When you first ran the stock quote application, the IDE should have noticed that debug-
ging wasn’t enabled, and would hav
e asked if you wanted a default
Web.config with
debugging enabled. If you chose Yes, your project directory will include a new file,
Web.config.
This file is used to define how the .NET Framework should handle your site. Informa-
tion such as security, caching, debugging, and globalization settings are typically stored
in
Web.config.
Here’s an example of the
Web.config file:
<?xml version="1.0"?>
<configuration>
<appSettings/>
<connectionStrings/>
<system.web>
<!
Set compilation debug="true" to insert debugging
symbols into the compiled page. Because this
affects performance, set this value to true only
during development.
>
<compilation debug="true"/>
<!
The <authentication> section enables configuration
of the security authentication mode used by
ASP.NET to identify an incoming user.
>
CHAPTER 2 ■ BASICS OF WEB DEVELOPMENT WITH ASP.NET34
9594CH02.qxd 1/3/08 10:46 AM Page 34
<authentication mode="Windows"/>
<!
The <customErrors> section enables configuration
of what to do if/when an unhandled error occurs
during the execution of a request. Specifically,
it enables developers to configure html error pages
to be displayed in place of an error stack trace.
<customErrors mode="RemoteOnly" defaultRedirect="GenericErrorPage.htm">
<error statusCode="403" redirect="NoAccess.htm" />
<error statusCode="404" redirect="FileNotFound.htm" />
</customErrors>
>
</system.web>
</configuration>
Here, the configuration for the system.web namespace is being set up. As you can see,
the compilation attribute is set to
"true", enabling application debugging. Any references
that were added will have their assemblies referenced here, and the authentication type
that should be used to talk to the site is set.
Web.config is a useful and powerful tool, and
something you should become familiar with. As you step through the examples in this
book, you
’ll be using it extensively to fine-tune and configure your site to work to the best
of its abilities.
The recommended methodology for editing
Web.config is to use the Web Site ➤
ASP.NET Configuration menu option within the IDE. This menu option launches an
editor for
Web.config, called the Web Site Administration Tool, which ensures that the
settings are placed in the correct location in the file and that they are using the correct
syntax. Invalid syntax or settings within
Web.config will break your site, so be careful
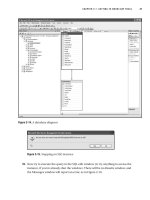
when editing it by hand! You can see the Web Site Administration Tool in Figure 2-23.
CHAPTER 2 ■ BASICS OF WEB DEVELOPMENT WITH ASP.NET 35
9594CH02.qxd 1/3/08 10:46 AM Page 35
Figure 2-23. The Web Site Administration Tool
Summary
In this chapter, you took a brief look at ASP.NET and how you can use the VWDE tool to
build a simple ASP.NET application. You were given a tour of the development environ-
ment and how it is used to build and manage web sites. After this tour, you should have
an understanding of how development is done using a server-side paradigm—which was
reinforced with a brief look at the architecture of ASP.NET.
Additionally, you looked at using configuration and web site administration to define
how ASP.NET should behave when serving your site. Ultimately, you were able to build a
site with some pretty sophisticated functionality using only four lines of code, demon-
str
ating just ho
w much the framework can do behind the scenes for you! One of the
concepts that y
ou w
ere introduced to was the
web form. Chapter 3 will go into this in
mor
e detail, looking at ho
w pages are processed by ASP.NET and how the technology can
be used to build scalable
, performant web applications.
CHAPTER 2 ■ BASICS OF WEB DEVELOPMENT WITH ASP.NET36
9594CH02.qxd 1/3/08 10:46 AM Page 36
Web Forms with ASP.NET
At the heart of web applications and web sites in ASP.NET are the elements that you use
to build the pages that the user will see. These are called
web forms, terminology that is a
holdover from Windows development when windows were built using
forms.
This methodology is unique and innovative in web development. It enables you to
create your pages in a visual manner, using server-side controls (as you saw in Chapter 2)
that are converted into HTML markup by the ASP.NET runtime at the time they are
served to the client. This chapter will go into some detail about web forms and how they
work in ASP.NET. You’ll learn about the event model of a page, and how postbacks work.
This chapter will also show you the life cycle of a page, and it will go into the object
model that the page supports, going through the control tree that ASP.NET exposes to
you as a developer. Finally, you’ll take an in-depth look at the
Page class, and how it can
be used to control the flow between the server and your users, enabling you to access the
request and response streams, and parse and/or override them as necessary.
By the end of the chapter, you’ll have a good understanding of how web forms work,
and how you can use them to add great power to your web applications.
Understanding Page Processing
It is important to understand that there are a number of major differences between
building web applications and building standard Windows client applications. If you are
coming to web development from a Windows client development background, there are
several aspects of web development that are significantly different from Windows client
application development. Most Windows applications are designed to work with a single
user, but web applications that don’t scale to thousands of users are considered a failure.
Also, the application from a user’s perspective executes in a web browser, so local file sys-
tem permissions and system access is very limited. And perhaps the hardest concept to
grasp if you’re used to virtually unlimited memory and computational horsepower is that
web applications are by and large stateless, meaning that information isn’t retained on
the server between page invocations. (There are techniques to bypass this obstacle, but
even those require some design thought.)
37
CHAPTER 3
9594CH03.qxd 1/2/08 2:57 PM Page 37
Web applications are multiuser: When building an application for the Web, you have
to remember that your application should be designed to be scaled out to many
users, which in some cases can number in the millions. This leads to two major chal-
lenges. The first is that when the application has to scale out to huge numbers of
users, it will operate in a clustered environment, meaning that it is deployed to a
number of servers, and the clustering hardware manages who speaks to which
server. In an environment such as this, you have to make sure that the experience
each user has when using your application is consistent. Thus, a level of commonal-
ity is necessary, and this is achieved using shared pools of resources such as data,
styling, and connectivity to outside applications. You have to make sure that your
application cooperates with other instances of itself in accessing shared application
resources. Similarly, you have to make sure that the users accessing your application
ar
e doing so concurrently, leading to potential concurrency issues. This means that
you have to be careful in ho
w you write classes that are going to be shared by user
sessions. The framework
helps you in this regard, but it doesn’t do everything for you.
Your user classes will need to be carefully crafted and deployed.
Web applications are designed to execute on a server and be viewed in a browser:Your
application is used within users’ browsers on their machines, but the application
actually executes (for the most part) on your server. So, if you think about the simple
case where the user is filling out a form on the browser (like our stock quote applica-
tion in Chapter 2), what is happening is that the user sets the state of some of the
controls in the form and invokes an HTML form data submission process, which
sends the data to the server. The server executes the application and then returns the
results to the client. This process is called a
postback. Newer application program-
ming interfaces (APIs) and methodologies such as Ajax move some of the processing
to the client, providing a richer client experience (they make more frequent asyn-
chronous postbacks to the server to make the application appear more responsive),
but y
our web applications still have a server element to them, and understanding
how to handle this is vital as you write your web applications.
Typical web applications are stateless: To maintain a clean relationship between the
client and the server, particularly to avoid confusion when in a clustered environ-
ment, no state of the condition of a client is stored on the server in a typical web
application. This can be overridden to some degree, but the typical scenario has the
server destroy all instances of web page objects residing in its memory for a particu-
lar page once the page has been sent to the client. This is great for scalability, but it
can hurt the user and developer experience—for example, when information should
be persisted throughout a number of sessions and a mechanism has to be grown to
achieve this. ASP.NET assists you in building applications that maintain state
through a process called
view state, in which information about the form can be
stored in hidden HTML form fields. You’ll be looking at view state a little later in this
CHAPTER 3 ■ WEB FORMS WITH ASP.NET38
9594CH03.qxd 1/2/08 2:57 PM Page 38
chapter. Additionally, ASP.NET offers a session state mechanism that allows sessions
to be persisted in a SQL server, allowing them to work in a clustered environment.
This allows you to build a stateful web application, but the typical web application
does not do this and is stateless.
Looking at Web Forms
In the next few sections, you’ll look into different types of web forms and how they exe-
cute. First, you’ll look at a typical HTML form and what goes on when the user submits it
to the server.
HTML Forms
The World Wide Web Consortium (W3C) defines an HTML form as a section of an HTML
document that contains normal content markup as well as special elements called
controls. This is not to be confused with ASP.NET controls, which execute on the server.
HTML controls are client-side controls that are part of the HTML specification and thus
ar
e handled and rendered by the browser. Examples of these HTML controls are text
boxes, radio buttons, lists, and standard push buttons. When you use server controls to
create a UI that has more sophisticated visual representations such as grids, ASP.NET
generates HTML made up of these client controls to represent what you wanted. An
HTML form is wrapped in a
<form>, which contains a number of important attributes.
The two most important that you’ll use as a developer are the
action and the method
attributes. In the action attribute, you specify the Uniform Resource Indicator (URI) of
the
agent that handles the processing of the form. This agent can be a number of things,
from a Personal HyperText Processor (PHP) script to an ASP page or a Common Gateway
Interface (CGI). With the
method attribute, you specify that the form will use either the
HTTP-POST or the HTTP-GET verb to talk to the server. When using HTTP-GET, the URI of the
agent is called with the parameters specified in the form as name/value pairs in the URI.
As a result, the call will look something like this:
http://server/application?param=value ¶m=value
When using HTTP-POST, the values are embedded within the body of the HTTP request
itself, following the HTTP header values:
POST /application HTTP/1.1
Accept-Language: en-us
Content-Type: application/x-www-form-urlencoded
User-Agent: Mozilla/4.0 (compatible; MSIE 7.0)
Host: server
CHAPTER 3 ■ WEB FORMS WITH ASP.NET 39
9594CH03.qxd 1/2/08 2:57 PM Page 39
Content-Length: nnnn
Connection: Keep-Alive
Cache-Control: no-cache
¶m=value¶m=value
The headers provide the server with client information for routing and processing.
The name/value pairs follow the headers after a blank line. The
HTTP-GET verb is generally
used to request information from the server (pull model), such as when you want to see a
web page or other resource, while
HTTP-POST is used to send information to the server for
processing (push model), such as when submitting data from a web form in response to a
button click. In Chapter 2, the browser issued an
HTTP-GET verb to request the Default.aspx
page, and then an HTTP-POST verb in response to the button click, sending the stock ticker
value recorded in the TextBox control to the server for processing by the web service.
Take a look at what happens when you create a new ASP.NET page. Create a new web
application and take a look at the
Default.aspx page that is created for you. You can see
the HTML form by looking at the Source pane. Listing 3-1 shows an example.
Listing 3-1. Standard Default ASP.NET Web Form
<html xmlns=" >
<head runat="server">
<title>Untitled Page</title>
</head>
<body>
<form id="form1" runat="server">
<div>
</div>
</form>
</body>
</html>
What is interesting is what is missing. There are no action or method attributes present
in the
<form> tag! What ASP.NET does for you is add a runat=server attribute. This isn’t a
tag that is defined by the W3C for handling forms, but that’s OK, because this is some-
thing that is processed by the server and translated into
action and method attributes at
runtime, enabling the form to be rendered on any browser that supports the W3C stan-
dard. Run this application and use your browser’s View Source functionality to look at the
result. You’ll see something like Listing 3-2.
CHAPTER 3 ■ WEB FORMS WITH ASP.NET40
9594CH03.qxd 1/2/08 2:57 PM Page 40
Listing 3-2. Viewing the Form in a Browser
<form name="form1" method="post" action="Default.aspx" id="form1">
<div>
<input type="hidden" name="__VIEWSTATE" id="__VIEWSTATE" value=" " />
</div>
<div>
</div>
</form>
You can see that the ASP.NET runtime recognized that it encountered the <form> tag
by saying
runat="server", and realized that the tag was a server control, not a raw HTML
<form> tag. Therefore, it generated the required form, defaulting the method to HTTP-POST
and specifying itself (Default.aspx) as the agent (via the action attribute) to handle the
form feedback.
An HTML Forms Example in ASP.NET
The following example contains an ASP.NET form, which is a server-side control that
generates a client-side form, as well as a number of client-side form elements. If this is
confusing, don’t worry—it will soon become second nature. I’ve deliberately chosen this
complex scenario to demonstrate how ASP.NET makes it easy for you to mix and match
server-side and client-side functionality to make your work as easy as possible.
First, use VWDE to create a new web site. Open the default page that is created for
you for editing, and select Design view within the Visual Studio UI.
Now take a look at the Toolbox for the HTML controls. It should look something like
Figure 3-1. Remember that you are going to use the ASP.NET HTML controls, which have
a programming interface similar to the actual HTML controls they represent. (This is in
contrast to the standard ASP.NET controls, which ultimately generate HTML but have a
more robust programming interface.)
CHAPTER 3 ■ WEB FORMS WITH ASP.NET 41
9594CH03.qxd 1/2/08 2:57 PM Page 41
Figure 3-1. The HTML controls tab in the Toolbox
Drag three Input (Text) boxes, two Input (Radio) controls, and an Input (Submit)
control to your design surface. Note that you will be using the HTML controls as shown
in Figure 3-1, not the similar ASP.NET controls. Set their properties and arrange them so
that they look like the layout in Figure 3-2. The label text can be added to the design sur-
face by placing the cursor in the desired area and simply typing in the text.
Figure 3-2. The layout for your HTML form
CHAPTER 3 ■ WEB FORMS WITH ASP.NET42
9594CH03.qxd 1/2/08 2:57 PM Page 42
Next, be sure to use the Properties window to give your controls some friendly
names. The names used in this example are shown in Table 3-1. You’ll see what they look
like in HTML in Listing 3-3.
Table 3-1. Naming Your HTML Controls
Control Name
First Number TextBox txtFirst
Second Number TextBox txtSecond
First radio button (Add) optOption
Second radio button (Subtract) optOption (using the same name groups the radio buttons)
Submit button btnSubmit
Result TextBox txtResult
If you aren’t familiar with HTML forms code, a few things may seem a little quirky,
particularly when dealing with the radio buttons. To create a group of radio buttons
where only one is selectable, use the
name property and set each one to the same value.
So, as you can see in Listing 3-3, each radio button is called
optOperation. You distinguish
them from each other using the
value property. In this listing, you can see that they con-
tain the values
Add and Subtract, respectively.
Listing 3-3. Your HTML Form
<%@ Page Language="C#" AutoEventWireup="true" CodeFile="Default.aspx.cs"
Inherits="_Default" %>
<!DOCTYPE html PUBLIC "-//W3C//DTD XHTML 1.0 Transitional//EN"
" /><html xmlns=" >
<head runat="server">
<title>Untitled Page</title>
</head>
<body>
<form id="form1" runat="server">
<div>
First Number
<input name="txtFirst" type="text" />
CHAPTER 3 ■ WEB FORMS WITH ASP.NET 43
9594CH03.qxd 1/2/08 2:57 PM Page 43
<br />Second Number
<input name="txtSecond" type="text" /><br />
<br />
<input name="optOperation" value="Add"
type="radio" checked="CHECKED"/>Add
<br />
<input name="optOperation" value="Subtract"
type="radio" />Subtract
<br />
<br />
<input name="btnSubmit" type="submit" value="submit" />
<br />
<br />
The Result is:
<input name="txtResult" type="text" /></div>
</form>
</body>
</html>
Now if you load this page and click the submit button, the browser indicates some
network activity because it is calling the agent (in other words, itself), resulting in a page
refresh, or
postback. However, since there is no server-side code to process the postback,
very little actually happens!
Now let’s add a little server-side code to the page so that the resulting button click on
the server takes some tangible action. To do this, turn to the Solution Explorer and dou-
ble-click the
Default.aspx.cs file, which is the code-behind file for the page, and scan the
C# code for the
Page_Load method Visual Studio inserted for you when it created the page.
A nice tool that the ASP.NET Framework gives you is a class that can be used to
examine and pull information from the HTTP request—
HttpRequest. If there had been
parameters encoded in the query string (the URL), as is the case with
HTTP-GET, we could
access those values through the
HttpRequest.QueryString parameter. In this case, how-
ever, the form’s method indicated we’re to return parameters to the server using
HTTP-POST, so the information is available in the HttpRequest.Form array, like this:
string strVal = Request.Form["ItemName"];
The HttpRequest is av
ailable to y
our ASP
.NET page through the
Page.Request pr
oper
ty
,
which is av
ailable to all ASP
.NET pages
. You can use the
Request.Form arr
ay to access and
then pr
ocess the for
m par
ameters, as shown in Listing 3-4.
CHAPTER 3 ■ WEB FORMS WITH ASP.NET44
9594CH03.qxd 1/2/08 2:57 PM Page 44
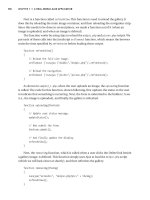
Listing 3-4. Handling the HTML Form in the ASP.NET Agent
using System;
using System.Data;
using System.Configuration;
using System.Web;
using System.Web.Security;
using System.Web.UI;
using System.Web.UI.WebControls;
using System.Web.UI.WebControls.WebParts;
using System.Web.UI.HtmlControls;
public partial class _Default : System.Web.UI.Page
{
protected void Page_Load(object sender, EventArgs e)
{
if (IsPostBack)
{
string sFirst = Request.Form["txtFirst"];
string sSecond = Request.Form["txtSecond"];
string sOperation = Request.Form["optOperation"];
int nF = 0;
int nS = 0;
int.TryParse(sFirst, out nF);
int.TryParse(sSecond, out nS);
int nR = 0; if (sOperation == "Add")
nR = nF + nS;
else
nR = nF - nS;
}
}
}
In this listing, you see that the strings sFirst, sSecond, and sOperation contain the
values entered into the
txtFirst and txtSecond text boxes, and the value of the selection
radio button, respectively. The values in the text boxes are converted to integers, and—
depending on which operation is selected—are either added or subtracted.
Sending the results back to the user can be problematic, however. You may think that
you could simply call into play the
txtResult control using code like this:
txtResult.Value = nR.ToString();
CHAPTER 3 ■ WEB FORMS WITH ASP.NET 45
9594CH03.qxd 1/2/08 2:57 PM Page 45
But you can’t, because the text box that you added earlier for txtResult was an
ASP.NET HTML control. Based on the fact that web applications are stateless, the server
doesn’t recognize the control, and your code will not compile!
Why is this the case? The answer lies in the fact that ASP.NET was designed for effi-
ciency. For ASP.NET to be able to change the value of a page control when the page posts
back, ASP.NET needs to first be made aware that the control could potentially have its
value changed, and then ASP.NET needs to keep track of the value. This is called control
state. We’ll see how to do this in the next section.
For completeness, I should mention that if you don’t want to use the input text
control to return the mathematical result to the user, you could use the
Page.Response
(HttpResponse) str
eam to write HTML directly to the response stream, overwriting the
default HTML to be returned to the client (i.e., the HTML that makes up your form) with
your own content. However, this isn’t recommended in general, because you will com-
pletely overwrite your application within the browser.
Using a Server Control to Provide Feedback
Earlier, you added an ASP.NET HTML text box to your page markup with the expectation
that it could be used to store the results of the mathematical operation. But simply
assigning the mathematical result to the text box will yield a compilation error. Clearly
ASP.NET needs to provide a mechanism for returning calculated page values to the user!
The answer to providing feedback to a form operation is to introduce the control to
ASP.NET’s
view state mechanism, which can be done in one of two ways.
If you want to continue to use the HTML input text box, simply add this attribute to
its definition in your page markup:
runat="server"
Since the control has a name attribute but not an id attribute, which ASP.NET requires,
you also need to add this:
id="txtResult"
B
y doing this, you make ASP.NET aware that this control,
txtResult, should be acces
-
sible on the ser
ver (allowing you to change its content, or
state).
B
ut you may elect to forego the ASP.NET HTML controls and instead use the full-
fledged ASP
.NET server controls. In the following example, you’ll modify the previous
example to use a ser
ver-side Literal control, and this control will be populated with the
results of the operation.
Go back to Design view for the
Default.aspx page and amend it by removing the
txtResults HTML control and replacing it with an ASP.NET Literal control. You can find
this control on the Standard Visual Studio Toolbox tab. Once you’ve done so, your screen
should look like Figure 3-3.
CHAPTER 3 ■ WEB FORMS WITH ASP.NET46
9594CH03.qxd 1/2/08 2:57 PM Page 46
Figure 3-3. Using the ASP.NET Literal control in your page
The listing for this page will look like Listing 3-5.
Listing 3-5. The Revised Form
<%@ Page Language="C#" AutoEventWireup="true" CodeFile="Default.aspx.cs"
Inherits="_Default" %>
<!DOCTYPE html PUBLIC "-//W3C//DTD XHTML 1.0 Transitional//EN"
" /><html xmlns=" >
<head runat="server">
<title>Untitled Page</title>
</head>
<body>
<form id="form1" runat="server">
<div>
First Number
<input name="txtFirst" type="text" />
<br />
Second Number
<input name="txtSecond" type="text" /><br />
<br />
<input name="optOperation" value="Add"
type="radio" checked="CHECKED" />Add<br />
<input name="optOperation" value="Subtract"
CHAPTER 3 ■ WEB FORMS WITH ASP.NET 47
9594CH03.qxd 1/2/08 2:57 PM Page 47
type="radio" />Subtract<br />
<br />
<input name="btnSubmit" type="submit" value="submit" />
<br />
<br />
The Result is:
<asp:Literal ID="litResult" runat="server"></asp:Literal></div>
</form>
</body>
</html>
You can see that the Literal control is prefixed with <asp:>, like this:
<asp:Literal ID="litResult" runat="server"></asp:Literal>
Now it is a simple matter to provide feedback of the operation to your users. Modify
the
Page_Load event handler to look like Listing 3-6.
Listing 3-6. Modified Page_Load to Provide Feedback
using System;
using System.Data;
using System.Configuration;
using System.Web;
using System.Web.Security;
using System.Web.UI;
using System.Web.UI.WebControls;
using System.Web.UI.WebControls.WebParts;
using System.Web.UI.HtmlControls;
public partial class _Default : System.Web.UI.Page
{
protected void Page_Load(object sender, EventArgs e)
{
if (IsPostBack)
{
string sFirst = Request.Form["txtFirst"];
string sSecond = Request.Form["txtSecond"];
string sOperation = Request.Form["optOperation"];
int nF = 0;
int nS = 0;
int.TryParse(sFirst, out nF);
int.TryParse(sSecond, out nS);
CHAPTER 3 ■ WEB FORMS WITH ASP.NET48
9594CH03.qxd 1/2/08 2:57 PM Page 48