Beginning Web Development, Silverlight, and ASP.NET AJAX From Novice to Professional phần 7 doc
Bạn đang xem bản rút gọn của tài liệu. Xem và tải ngay bản đầy đủ của tài liệu tại đây (1.03 MB, 44 trang )
Step 4: Installing the Webs
The final step is very straightforward, and depending on which sample set you are
installing, it creates the virtual web mapping IIS to the directory containing the web
content so you can access it via
http://localhost/samplename.
Creating Your Own CardSpace-Secured Web
Now that the SDK setup scripts have configured your environment by installing the cer-
tificates, registering the
CAPICOM.dll, and editing your hosts file, you are ready to create
your own CardSpace-secured web.
Note that CardSpace-secured webs run on HTTPS, so you will create this application
as an HTTP web application on IIS, not a file system site as you have been doing in earlier
chapters in this book.
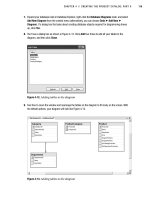
Run Visual Studio (with administrative permissions on Vista) and select File
➤ New
Web Site. You’ll get the New Web Site dialog (see Figure 10-11).
Figure 10-11. Creating a new HTTP site
C
all the site Chapter10E
xample1, as sho
wn in Figure 10-11.
The site will hav
e a page
,
Default.aspx, that is used as the w
elcome page
, and will
r
edir
ect to
SignedIn.aspx when the user passes cr
edentials and attempts to sign in. I
n
CHAPTER 10 ■ .NET 3.0: PROGRAMMING WITH CARDSPACE244
9594CH10.qxd 1/22/08 12:12 PM Page 244
addition, it uses a set of helper classes in the Microsoft.IdentityModel.TokenProcesser
namespace, which is implemented in the TokenProcessor.cs file that is part of the Win-
dows SDK. We’ll take a closer look at it a little later in the chapter.
Edit your
Default.aspx page so that it looks like Listing 10-1.
Listing 10-1. Default.aspx
<%@ Page Language="C#" AutoEventWireup="true"
CodeFile="Default.aspx.cs" Inherits="_Default" %>
<!DOCTYPE html PUBLIC "-//W3C//DTD XHTML 1.0 Transitional//EN"
" /><html xmlns=" >
<head>
<title>CardSpace Secured Site</title>
<object type="application/x-informationcard" name="_xmlToken">
<param name="tokenType" value="urn:oasis:names:tc:SAML:1.0:assertion" />
<param name="requiredClaims"
value="
/>/>
</object>
<script language="javascript">
function GoGetIt()
{
var xmltkn=document.getElementById("_xmltoken");
var thetextarea = document.getElementById("xmltoken");
thetextarea.value = xmltkn.value ;
}
</script>
</head>
<body>
<form id="form1" method="post" action="SignedIn.aspx">
<div>
<h1>
Welcome to my Web Site</h1>
This site is secured using Windows CardSpace.
Please press the 'Use Card' button
to retrieve your card and then click 'Sign In'
CHAPTER 10 ■ .NET 3.0: PROGRAMMING WITH CARDSPACE 245
9594CH10.qxd 1/22/08 12:12 PM Page 245
<br />
<br />
<button name="go" id="go" onclick="javascript:GoGetIt();">
Use Card!</button><br />
<br />
<br />
<button type="submit">
Sign in now!</button><br />
<br />
<input id="xmltoken" name="xmlToken" type="hidden" />
</div>
</form>
</body>
</html>
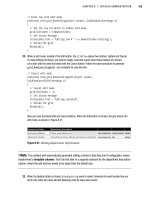
Running this page will give you the simple site that you saw earlier in this chapter. It
is shown again in Figure 10-12.
Figure 10-12. The CardSpace site
Y
ou
’
ll see that there are two buttons on here: Use Card!, which interfaces with Card-
S
pace to get a car
d fr
om the user; and “Sign in now!”, which passes the token from the
user
’
s card to the
SignIn.aspx page
. Let
’s take a look back at the code and see how this
hangs together
.
CHAPTER 10 ■ .NET 3.0: PROGRAMMING WITH CARDSPACE246
9594CH10.qxd 1/22/08 12:12 PM Page 246
The Use Card! button is defined with this markup:
<button name="go" id="go" onclick="javascript:GoGetIt();">
Use Card!</button>
Upon clicking the button, the JavaScript function GoGetIt is invoked. Here’s the
function:
function GoGetIt()
{
var xmltkn=document.getElementById("_xmltoken");
var thetextarea = document.getElementById("xmltoken");
thetextarea.value = xmltkn.value ;
}
This script uses the element _xmltoken to get its value and load that into a var that will
fill a text box on the page. The
_xmltoken field is a CardSpace object, whose definition looks
like this:
<object type="application/x-informationcard" name="_xmlToken">
<param name="tokenType" value="urn:oasis:names:tc:SAML:1.0:assertion" />
<param name="requiredClaims"
value="
/>/>
</object>
This is how you use CardSpace on a page—by declaring an object of type
application/x-informationcard and naming it. There are a number of properties sup-
por
ted b
y this object, including the facility to specify the data that
’s required by the site.
R
emember the earlier example in which the last name
, first name
, and so on w
er
e
r
equir
ed data fr
om the site—it is the
requiredClaims pr
oper
ty that dictates this
. As y
ou
can see
, it contains a list of the schemas of the r
equir
ed v
alues
.
When y
ou quer
y its
value pr
oper
ty
, the object inv
okes the C
ardSpace client and
allo
ws y
ou to specify a car
d. S
hould y
ou specify and send a card, the value will become
the token associated with that car
d; other
wise it will be null.
The J
av
aScript code then
loads the v
alue of the token into the hidden text field
xmltoken.
N
ext, when the user clicks
“
S
ign in no
w!” they are in fact invoking a standard HTML
for
m whose action is the
SignedIn.aspx page
, and one of whose elements is the hidden
text field.
This causes the token to be submitted to
SignedIn.aspx fr
om wher
e it can be
parsed.
CHAPTER 10 ■ .NET 3.0: PROGRAMMING WITH CARDSPACE 247
9594CH10.qxd 1/22/08 12:12 PM Page 247
If you don’t have this page already, add a new web form to your project and call it
SignedIn.aspx.
Listing 10-2 shows the code for this page.
Listing 10-2. SignedIn.aspx
<%@ Page Language="C#" Debug="true" ValidateRequest="false" %>
<%@ Import Namespace="System.IdentityModel.Claims" %>
<%@ Import Namespace="Microsoft.IdentityModel.TokenProcessor" %>
<!DOCTYPE html PUBLIC "-//W3C//DTD XHTML 1.0 Transitional//EN"
" /><script runat="server">
protected void ShowError(string text)
{
fields.Visible = false;
errors.Visible = true;
errtext.Text = text;
}
protected void Page_Load(object sender, EventArgs e)
{
string xmlToken;
xmlToken = Request.Params["xmlToken"];
if (xmlToken == null || xmlToken.Equals(""))
{
ShowError("Token presented was null");
}
else
{
Token token= new Token(xmlToken);
givenname.Text = token.Claims[ClaimTypes.GivenName];
surname.Text = token.Claims[ClaimTypes.Surname];
email.Text = token.Claims[ClaimTypes.Email];
}
}
</script>
CHAPTER 10 ■ .NET 3.0: PROGRAMMING WITH CARDSPACE248
9594CH10.qxd 1/22/08 12:12 PM Page 248
<html xmlns=" >
<head id="Head1" runat="server">
<title>Login Page</title>
</head>
<body>
<form id="form1" runat="server">
<div runat="server" id="fields">
<h1>
Welcome to my Site!</h1>
Thank you for signing in:
<asp:Label ID="givenname" runat="server"
Text="" ForeColor="Red"></asp:Label>
<asp:Label ID="surname" runat="server"
Text="" ForeColor="Red"></asp:Label><br />
<br />
<br/>
Email Address:
<asp:Label ID="email" runat="server"
Text="" ForeColor="Blue"></asp:Label><br/>
</div>
<div runat="server" id="errors" visible="false">
Error:<asp:Label ID="errtext" runat="server" Text=""></asp:Label><br/>
</div>
</form>
</body>
</html>
When this page loads, it takes the xmlToken value off the request parameters. This
value was passed in as a hidden form field by the
Default.aspx page, and if a card was
assigned by the user, it will contain the token associated with that card.
It creates an instance of the
Token class from this value. This class is implemented in
the SDK
TokenProcessor.cs class, so make sure you have included it in your solution
within the
App_Code folder. It provides a collection of the metadata associated with the
token (such as name or e-mail address) as a text collection. The page then pulls the
values of the First Name, Last Name, and Email Address claims and assigns them to the
Text property of the associated ASP.NET label controls.
Then, when the page renders, the labels get filled with the values from the card,
received via the token and exposed via the claims. You can see the result in Figure 10-13.
CHAPTER 10 ■ .NET 3.0: PROGRAMMING WITH CARDSPACE 249
9594CH10.qxd 1/22/08 12:12 PM Page 249
Figure 10-13. Rendering the data from the card on the site
As you can see, this example demonstrated that CardSpace is very easy to use once
your site is set up to use HTTPS. At the heart of accessing and decrypting the information
is the
Token class, which is part of the Microsoft.IdentityModel.TokenProcessor name-
space, which is supplied by the SDK (not a default part of .NET 3.0).
Exploring the TokenProcessor API
The TokenProcessor API provides a single class, Token, that is used to parse token infor-
mation received from a card. It provides the following properties:
IdentityClaims: This r
eturns a
System.IdentityModel.Claims.ClaimSet collection,
which contains all the claim objects in the token.
Claims: This returns a ClaimTextCollection, which is a read-only string collection of
the claims in the token.
IssuerIdentityClaim: This returns a System.IdentityModel.Claims.Claim object with
the issuer’s identity claim (which is typically the private key of the issuer of a card).
AuthorizationContext: This is the System.IdentityModel.Policy.AuthorizationContext
value that is returned when all the policies are evaluated by the System.ServiceModel.
ServiceAuthorizationManager. This is used when handling tokens with WCF.
UniqueID: This gets the UniqueID (IdentityClaim) of this token.
CHAPTER 10 ■ .NET 3.0: PROGRAMMING WITH CARDSPACE250
9594CH10.qxd 1/22/08 12:12 PM Page 250
The earlier example used the Claims property to pull the desired claims from the
token and set the value of some label controls to their values like this:
T
oken token= new Token(xmlToken);
g
ivenname.Text = token.Claims[ClaimTypes.GivenName];
surname.Text = token.Claims[ClaimTypes.Surname];
email.Text = token.Claims[ClaimTypes.Email];
Summary
As security is becoming more and more of a necessity as opposed to a luxury when deal-
ing with the Web, it is essential to make users’ experiences with security as friendly as
possible, while still protecting them from malicious web sites.
CardSpace fills this void by providing an easy-to-use and attractive way of storing
your personal information securely and digitally, and an easy means to send it to a web
site that requests it. It is designed to be a long-term replacement for passwords, and can
effectively form a client-based single sign-on for all of your favorite sites.
In this chapter, you explored CardSpace and how it looks from the user’s point of
view. You then went into putting together a development environment where you can
host your own sites that accept CardSpace credentials. As part of this exercise, you looked
briefly at site certificates and how they prevent domain spoofing. You then went into the
process of building your own CardSpace-enabled site, looking at how to embed the
CardSpace object on your pages and process it, taking user credentials and using them to
customize the site for the end user.
Finally, you took a tour of a helper class that is provided by the SDK and that imple-
ments the token in an easily manageable way.
I hope this was a good taste of what you can do with CardSpace to make your users’
lives a lot easier. There’s a lot more information that you can drill into—and a great
resource for this is the Windows SDK documentation.
In the next chapter, we’ll get back onto the traditional web development route—
looking at the technology that effectively gave birth to Web 2.0—Asynchronous JavaScript
and XML, also known as Ajax.
CHAPTER 10 ■ .NET 3.0: PROGRAMMING WITH CARDSPACE 251
9594CH10.qxd 1/22/08 12:12 PM Page 251
9594CH10.qxd 1/22/08 12:12 PM Page 252
Ajax Applications and
Empowering the Web
User Experience
Ajax (Asynchronous J
avaScript and XML) has become a major value proposition in the
Web development industry. Indeed, 2006 was often called the “year of Ajax” because no
matter where you turned, it seemed every software vendor was pushing their Ajax toolkit,
Ajax sessions at conferences were filled to the rafters, and everybody wanted to use it on
their web site. But Ajax has been around a lot longer than this—it’s just that it seemed to
hit critical mass in that year.
In this chapter, you
’ll look at what Ajax is at its core—no toolkits, no value-adds or
complexities, just a good look at the technology underpinning the whole Ajax phenome-
non. You’ll start with a history of where it came from, an analysis of why it evolved, a
good look at its architecture, and some hands-on experience in building some simple
Ajax interactions using good old-fashioned JavaScript and HTML.
After that, the next few chapters will look at the AJA
X extensions for ASP.NET and
how these can empower your Ajax development experience by bringing the productivity
of the server-side paradigm of ASP.NET and a suite of new JavaScript libraries to bear.
A Brief History of Ajax
The ter
m
A
jax
was coined b
y
Jesse James Garrett, and made its first public appearance in
early 2005. A
t its heart is the ability to make web applications more responsive and more
competitiv
e with desktop applications. One part of this is to remove the need for the typi-
cal full
page refresh that occurs when the user wants to see some new content on a page.
F
or example, consider a page like MSN MoneyCentral (shown in Figure 11-1).
253
CHAPTER 11
9594CH11.qxd 1/22/08 10:48 AM Page 253
Figure 11-1. MSN MoneyCentral
This web site is a pretty typical one, presenting a portal of information to customers.
There are many information panes on this portal, three of which can be seen in the
screenshot (Video on MSN Money, Quote watchlist, and The Basics). Some of these infor-
mation panes provide user interaction—for example, the Quote watchlist allows you to
enter the stocks that you are interested in monitoring. It uses a simple HTML form where
you enter the ticker of the stock you are interested in and click Add.
The typical web site will refresh the entire page once you click the Add button, caus-
ing a lag for the user, and the expense of traffic for the web site administrator. If you were
to use a technique that allows for a
partial refresh, then only the information pane that
you want to change (i.e., the Quote watchlist) would be changed.
It was with use cases like this in mind that browser developers started adding new
features long before the term
Ajax was coined. The first attempt at allowing something
like this was the IFrame, introduced in Internet Explorer 3 in 1996. This allowed you to
use something similar to a frameset, but to have a frame showing a different set of con-
tent to be embedded within a page
.
Thus
, in an application such as M
oneyC
entr
al, y
ou
would hav
e one master page
, and one complete subpage for each of the infor
mation
panes
.
These pages would then be r
ender
ed on the master page using an IF
r
ame
.
This
technology still wor
ks and is useful today
, but it makes for mor
e complex management of
a por
tal such as M
oneyC
entr
al, as many independent pages need to be maintained.
The
IF
r
ame
, and other new elements such as
<div> and <span>, when gr
ouped together with
J
av
aScr
ipt, ev
olv
ed into the gener
ic ter
m
DHTML (D
ynamic HTML), with the intent
being that dev
elopers could pr
oduce pages that r
ewr
ite their o
wn HTML in r
esponse to
CHAPTER 11 ■ AJAX APPLICATIONS AND EMPOWERING THE WEB USER EXPERIENCE254
9594CH11.qxd 1/22/08 10:48 AM Page 254
user actions, providing a dynamic environment that reduces postbacks and page
refreshes.
Another increment to this came with Microsoft’s Remote Scripting technology, which
took this to the next level, providing a browser plug-in that could communicate with a
server over sockets and expose the data that it received to JavaScript. This plug-in was a
Java applet and was released with Internet Explorer 4.
After this, an ActiveX control that provided a dependency-free plug-in was produced
by Microsoft. This object, called
XMLHttpRequest, came with Internet Explorer 5. The first
major application to use this functionality was the web-based version of Microsoft’s pop-
ular Outlook e-mail program, Outlook Web Access. The e-mail scenario is perfect for
asynchronous web page updates—when a new e-mail comes in, you would like it to
appear in your inbox without a complete page refresh, just like it does in your desktop
application.
This
XMLHttpRequest ActiveX control is the hear
t of Ajax. Oddly enough, although it
was released to the wild in 2000, it didn’t really pick up until nearly five years later.
There are a number of possible reasons for this, including browser support—initially,
XMLHttpRequest was Internet Explorer–only. Another reason was likely the availability of
broadband. Increasing broadband penetration over that five-year period lead to a greater
demand for richer web applications and more incentive for web sites to provide richer
exper
iences.
The first Ajax application that I used was Google Maps—with mapping being the per-
fect sweet spot for consumer-oriented rich applications. Consider your workflow when
using a mapping application—you enter an address and receive a map showing the area
around your address. You then likely want to inspect the area around that address, for
example, to plot routes to that address. Before Ajax was used, you would pan around
the map using North, South, East, and West buttons. The Ajax implementation used
XMLHttpRequest to download the surrounding areas of the map in the background while
you were inspecting the map. You would then drag the mouse around the map, and they
would appear. Of course, if you dragged quickly, the tiles may not have been in place yet,
and you would get a blank map while they downloaded—but the experience was still
vastly superior to full page refreshes.
The improvement in the user experience and the reduced amount of bandwidth that
needed to be served to provide it created an irresistible new design pattern for web sites
and experiences, and it wasn’t long before use of
XMLHttpRequest became commonplace.
At the same time, the concept of Web 2.0 was emerging. This concept, invented by
Tim O’Reilly, described the next phase of the Web, built around services that allowed
users, not just web developers, to be contributors of information. Effective collaboration
from novice users requires an enhanced experience, and Ajax was there to provide it. As
such, in dev
eloper ter
ms
, Ajax is pr
etty synonymous with
W
eb 2.0. I
n the next section,
w
e
’
ll take a look at getting star
ted with Ajax pr
ogr
amming and some of the neat things
that y
ou can do with it!
CHAPTER 11 ■ AJAX APPLICATIONS AND EMPOWERING THE WEB USER EXPERIENCE 255
9594CH11.qxd 1/22/08 10:48 AM Page 255
Coding with Ajax
As mentioned earlier, the heart of Ajax is the XMLHttpRequest object. For the rest of this
chapter, you’ll look at this object, building applications that use it to communicate with
a back-end system.
XMLHttpRequest is as useful as it is simple—but as with anything that is powerful and
simple, you should exercise caution in using it, and use it only when appropriate. It isn’t,
for example, appropriate to write a JavaScript function that uses
XMLHttpRequest to script
navigation between complete HTML pages, thus turning it into a browser within a
browser!
While
XMLHttpRequest is supported in all major modern browsers, there are differ-
ences that need to be coped with in your scripts. Internet Explorer 7, Firefox, Safari, and
Opera support it as a native JavaScript object, whereas Internet Explorer 6 and earlier
implement it as an ActiveX object—your code to implement the object needs to cater for
all these browsers.
Listing 11-1 shows simple JavaScript code that loads an instance of
XMLHttpRequest
into a standard var.
Listing 11-1. Creating an Ajax Instance
var ajaxRequest
try
{
ajaxRequest = new XMLHttpRequest();
}
catch(error)
{
ajaxRequest = new ActiveXObject("Microsoft.XMLHTTP");
}
This code simply tries to create an instance of the native XMLHttpRequest object,
which will succeed in Mozilla, Safari, Opera, and Internet Explorer 7. This instantiation
will fail in Internet Explorer 6, but will be caught by the
catch clause, and will then instan-
tiate a
Microsoft.XMLHTTP ActiveX object instead. The script will fail in older browsers that
do not suppor
t Ajax, such as I
nter
net E
xplor
er 4.
Communicating with the Web Server
The XMLHttpRequest object suppor
ts two methods that allo
w communication with back-
end ser
v
ers
.
They ar
e the
open method, which y
ou use to specify the r
equest, and the
send
method, which y
ou use to send it.
The r
esponses ar
e r
eturned asynchronously to call
back J
av
aScr
ipt functions that y
ou specify using the
onreadystatechange pr
oper
ty
.
CHAPTER 11 ■ AJAX APPLICATIONS AND EMPOWERING THE WEB USER EXPERIENCE256
9594CH11.qxd 1/22/08 10:48 AM Page 256
When building an Ajax application, you’ll typically go through the same workflow to
develop an asynchronous area on your page.
The first step is to use the
open method, which supports up to four parameters:
• The first parameter, which is mandatory, is an HTTP command verb such as
GET,
POST, HEAD, PUT, or DELETE. You’ll typically use GET to retrieve data when using Ajax.
• The second parameter is the URL of the resource that you are accessing. This is
also a mandatory parameter.
• The third (optional) parameter predates Ajax, and is a Boolean determining
whether an asynchronous request will be used. It defaults to
true; setting it to false
will disable asynchronicity, thus rendering the application non-Ajax. When this is
false, the script processing will pause until the service returns.
• The fourth (optional) parameter is used to send a username to the service.
• The fifth (optional) parameter is used to send a password to the service.
The typical Ajax application will just use the first two parameters, as it will always be
asynchronous, and it is very bad practice to put a username and password into a client
script where they can easily be inspected with a View
➤ Source command in the browser.
The second step is to use
onreadystatechange to set the name of the function to be
used to handle callbacks. This function should be used to handle the different states of
the transaction (available from the
readyState property) to respond to these states. The
states are uninitialized, open, sent, receiving, and loaded. You’ll see how this is used in
the examples later in this chapter.
The third step is to call the
send method to send your request. This accepts a text
parameter, which you’ll use in the case of a
POST transaction to contain the variables that
you want to post to the server. When doing an
HTTP-GET (which is typical for Ajax), you
don’t use this parameter—simply call
send with no parameters.
That
’
s it, y
our application is now using Ajax. Your callback function will typically wait
until the
readyState is loaded, meaning that all the data has been r
etur
ned fr
om the ser
v
-
ice
, and y
ou can update y
our page with the r
esults
.
I
n the next section, y
ou
’
ll look at a simple example—multiplying two numbers
. You’ll
see ho
w it will wor
k in a typical ASP
.NET page that uses postbacks
, and then y
ou’ll see
ho
w it wor
ks with Ajax, and ho
w just using Ajax can make the user exper
ience better
.
Simple Ajax and ASP.NET Example
Create a new ASP.NET web form called MultiplyNumbers using Visual Studio (or Visual
Web Developer Express). Drag a couple of text boxes, a button, and three labels to it.
Arrange them so that your screen looks something like that in Figure 11-2.
CHAPTER 11 ■ AJAX APPLICATIONS AND EMPOWERING THE WEB USER EXPERIENCE 257
9594CH11.qxd 1/22/08 10:48 AM Page 257
Figure 11-2. Creating an ASP.NET number multiplier
The associated markup for this page is shown in Listing 11-2.
Listing 11-2. Markup for ASP.NET Multiplier
<%@ Page Language="C#" AutoEventWireup="true" CodeFile="MultiplyNumbers.aspx.cs"
Inherits="MultiplyNumbers" %>
<!DOCTYPE html PUBLIC "-//W3C//DTD XHTML 1.0 Transitional//EN"
" /><html xmlns=" >
<head runat="server">
<title>Untitled Page</title>
</head>
<body>
<form id="form1" runat="server">
<div>
<asp:Label ID="Label2" runat="server" Text="First"></asp:Label>
<asp:TextBox ID="TextBox1" runat="server">0</asp:TextBox><br />
<asp:Label ID="Label1" runat="server" Text="Second"></asp:Label>
<asp:TextBox ID="TextBox2" runat="server">0</asp:TextBox> <br />
<asp:Button ID="btnMult" runat="server" OnClick="btnMult_Click"
Text="Multiply" Width="193px" /><br />
<asp:Label ID="lblAnswer" runat="server" Height="45px"
CHAPTER 11 ■ AJAX APPLICATIONS AND EMPOWERING THE WEB USER EXPERIENCE258
9594CH11.qxd 1/22/08 10:48 AM Page 258
Text="Answer" Width="201px"></asp:Label></div>
</form>
</body>
</html>
Finally, add a click event handler to the button, and add this code to it:
protected void btnMult_Click(object sender, EventArgs e)
{
int nX = Convert.ToInt16(TextBox1.Text);
int nY = Convert.ToInt16(TextBox2.Text);
int nAns = nX * nY;
lblAnswer.Text = nAns.ToString();
}
The ideal user experience for a program like this would be a dynamic one, whereby
when you type the numbers, the answer displays while you are typing. For example, if
the second field has 5 in it and you type 4 in the first, the answer would immediately
show 20. If you then type a 0 in the first field so that it displays 40, the answer should
update to 200.
The problem with this approach is that
TextChanged events on ASP.NET controls do
not fire until a postback, so this isn’t possible in a web application. Of course, for a simple
calculation like multiplication, you could always use JavaScript to do it on the client
side—but consider a more complex mathematical scenario, such as calculating a moving
aver
age or Bollinger band on a time series of data for a stock, and you’ll see that this rap-
idly becomes infeasible.
So, for a server-side calculation, you have to perform a postback, and then you can-
not do it on the changed text, so the desired user experience hits a technical constraint.
In this case, you add the button and get it to trigger the postback, and you can then per-
form the calculation on the button’s click event.
N
ow when you run the application, you can type numbers in the two text boxes
and
click the button. You’ll get a page refresh, and then you’ll see the answer to your
calculation.
Improving the UI Using Ajax
N
o
w consider the same scenar
io using Ajax. Thanks to the asynchronous updates that
don
’
t use a postback, y
ou can give more dynamic feedback to your users—as they type
numbers in the text bo
xes
, they’
ll get immediate feedback of the results of the
calculation.
CHAPTER 11 ■ AJAX APPLICATIONS AND EMPOWERING THE WEB USER EXPERIENCE 259
9594CH11.qxd 1/22/08 10:48 AM Page 259
The first thing you’ll do is split the application into two pages: the page that runs on
the server and provides the calculation, and the page that provides the UI and calls the
first page.
To add the server page, add a new ASP.NET Web Forms page to your project, and call
it
MultiplyAJAXServer.aspx.
In Source view, remove all the markup on the page
except for the ASP.NET markup on
the top line, which looks like this:
<%@ Page Language="C#" AutoEventWireup="true"
CodeFile="MultiplyAJAXServer.aspx.cs"
Inherits="MultiplyAJAXServer" %>
Now, in the Page_Load event handler, add this code:
protected void Page_Load(object sender, EventArgs e)
{
int nX = 0;
int nY = 0;
try
{
nX = Convert.ToInt16(Request.Params["nx"]);
nY = Convert.ToInt16(Request.Params["ny"]);
}
catch (Exception ex)
{
nX = 0;
nY = 0;
}
int nAns = nX * nY;
Response.Write(nAns);
}
This takes two HTTP parameters, nX and nY, and multiplies them out, writing the
response back to the output buffer. You’ll take these results and load them into the
answer field when you write the Ajax UI layer. This is why you removed all the markup
from the page earlier, as you do not want to write out unnecessary HTML tags from this
service (such as
<head> and <body>).
To create the Ajax UI, add a new HTML page to the solution and call it
MultiplyAJAXClient.htm. Make a similar layout to the earlier example, but use HTML
controls. When you are ready, the HTML should look like this:
CHAPTER 11 ■ AJAX APPLICATIONS AND EMPOWERING THE WEB USER EXPERIENCE260
9594CH11.qxd 1/22/08 10:48 AM Page 260
<!DOCTYPE html PUBLIC "-//W3C//DTD XHTML 1.0 Transitional//EN"
" /><html xmlns=" >
<head>
<title>AJAX Multiplier Client</title>
</head>
<body>
<div>First <input id="Text1" type="text" /><br /></div>
<div>Second
<input id="Text2" type="text" /><br /><br /></div>
<div id="ans">Answer</div>
</body>
</html>
Figure 11-3 shows how this will look on the screen.
Figure 11-3. MultiplyAJAXClient in the Designer
The next step will be to make sure that the page instantiates the Ajax components.
The logical place and time to do this is when the page loads and renders. To do this, add a
<script> block to the page and add an initAJAX function to it. It should look like this:
<script type="text/javascript">
var ajaxRequest
function initAJAX()
{
try
{
ajaxRequest = new XMLHttpRequest();
CHAPTER 11 ■ AJAX APPLICATIONS AND EMPOWERING THE WEB USER EXPERIENCE 261
9594CH11.qxd 1/22/08 10:48 AM Page 261
}
catch(error)
{
ajaxRequest = new ActiveXObject("Microsoft.XMLHTTP");
}
}
</script>
Now change your <body> tag to call this function when it loads using the onload
parameter.
<body onload="initAJAX();">
Now that you’re set up for Ajax, the next thing is to configure the text boxes to do
something when a key has been pressed on them. You’ll write the event-handler function
in the next step. You do this by specifying the event handler for the
onkeyup event on the
text boxes, like this:
<input id="Text1" type="text" onkeyup="handleInput();" />
<input id="Text2" type="text" onkeyup="handleInput();"/>
The handleInput function then gets the value of the text boxes and uses Ajax to make
a call to the server that you created earlier, passing in the parameters. It also sets up the
callback handler using the
onreadystatechange property. Here’s the code:
function handleInput()
{
var T1 = document.getElementById("Text1");
var T2 = document.getElementById("Text2");
var theURL = "MultiplyAJAXServer.aspx?nx=" + T1.value + "&ny=" + T2.value;
ajaxRequest.open("GET", theURL);
ajaxRequest.onreadystatechange = handleUpdate;
ajaxRequest.send();
}
As you can see, this function gets a reference to each of the text boxes, and then
uses their values to construct a URL to the server page. It then uses the
open method
on the
ajaxRequest to set up an HTTP-GET to that URL, specifies the callback function
(
handleUpdate, which you’ll see next), and starts the communication by calling send.
CHAPTER 11 ■ AJAX APPLICATIONS AND EMPOWERING THE WEB USER EXPERIENCE262
9594CH11.qxd 1/22/08 10:48 AM Page 262
The final piece of the puzzle is the callback. When you specify a callback function,
the
XMLHttpRequest object will call it four times, setting the readyState property to the
values
1, 2, 3, and 4, respectively. These correspond to the following states:
1: Communication open
2: Message sent to server
3: Payload downloading from server
4: Payload download complete
The
responseText property contains the returned values from the server.
So, if you are only interested in updating the page when the server has completed its
operation and sent its payload, then check the
readyState for the value 4. You can see this
in action here:
function handleUpdate()
{
var ansDiv = document.getElementById("ans");
if(ajaxRequest.readyState == 4)
{
ansDiv.innerHTML = ajaxRequest.responseText;
}
}
This checks the readyState of the ajaxRequest, and when it is 4, it takes the
responseText and loads it into the <div> element that is assigned to contain the answer.
If you run this application, you can see the effect. As you type in the text boxes, the
Ajax code will execute, calling the server and processing the return, loading it into the
answer
<div>, and giving a much more fluid user experience.
Again, as this is a simple case (multiplying two numbers), you could argue that you
don’t need a server, and thus don’t need Ajax—but it indicates the methodology that you
would use in a scenar
io wher
e the mathematical functions may be too complex to do in
J
av
aScr
ipt, or may involve proprietary algorithms, as is the case with many financial ana-
lytics calculations
.
Y
ou can see it in action in F
igure 11-4.
CHAPTER 11 ■ AJAX APPLICATIONS AND EMPOWERING THE WEB USER EXPERIENCE 263
9594CH11.qxd 1/22/08 10:48 AM Page 263
Figure 11-4. Running the Ajax Multiplier
The full listing for the client page is shown in Listing 11-3.
Listing 11-3. The Full Ajax Client
<!DOCTYPE html PUBLIC "-//W3C//DTD XHTML 1.0 Transitional//EN"
" /><html xmlns=" >
<head>
<title>AJAX Multiplier Client</title>
<script type="text/javascript">
var ajaxRequest
function initAJAX()
{
try
{
ajaxRequest = new XMLHttpRequest();
}
catch(error)
{
ajaxRequest = new ActiveXObject("Microsoft.XMLHTTP");
}
}
function handleInput()
{
var T1 = document.getElementById("Text1");
var T2 = document.getElementById("Text2");
var theURL = "MultiplyAJAXServer.aspx?nx=" +
T1.value + "&ny=" + T2.value;
CHAPTER 11 ■ AJAX APPLICATIONS AND EMPOWERING THE WEB USER EXPERIENCE264
9594CH11.qxd 1/22/08 10:48 AM Page 264
ajaxRequest.open("GET", theURL);
ajaxRequest.onreadystatechange = handleUpdate;
ajaxRequest.send();
}
function handleUpdate()
{
alert(ajaxRequest.readyState);
var ansDiv = document.getElementById("ans");
if(ajaxRequest.readyState == 4)
{
ansDiv.innerHTML = ajaxRequest.responseText;
}
}
</script>
</head>
<body onload="initAJAX();">
<div>First <input id="Text1"
type="text" onkeyup="handleInput();" /><br /></div>
<div>Second
<input id="Text2" type="text" onkeyup="handleInput();"/><br /><br /></div>
<div id="ans">Answer</div>
</body>
</html>
Using Ajax for Forward Caching
One popular methodology for Ajax is to use Ajax to do intelligent forward caching of data,
improving the overall speed and usability of the application. This is commonly used in
mapping applications.
Consider, for example, the mapping scenario shown in Figure 11-5. At this moment,
the user is looking at a part of the Microsoft campus in Redmond, Washington.
The current zoom level is pretty close to the buildings, so the entire campus cannot
be seen. I
f the user dr
ags the mouse around, then they instantly receive new content.
This is achiev
ed using
for
war
d caching.
I
n this scenar
io, a map is made up of a number of
tiles
.
While the user is looking at a portion of the map, the Ajax application is download-
ing and caching the surr
ounding ar
eas of the map. Thus, when the user drags the mouse
ar
ound, the new tiles are already in the cache and are loaded from there, instead of wait-
ing for a do
wnload from the server.
CHAPTER 11 ■ AJAX APPLICATIONS AND EMPOWERING THE WEB USER EXPERIENCE 265
9594CH11.qxd 1/22/08 10:48 AM Page 265
Figure 11-5. Using a mapping application
Implementing forward caching using Ajax is pretty straightforward. This example will
step you through how to do it by building a browser for the product photos in the Adven-
tureWorks database. It will show one picture, and give you browse buttons that allow you
to look at the next and previous pictures in the set.
You’ll build a server page that pulls a picture based on a parameter from the Adven-
tureWorks database, and tie the Ajax front end up to it.
Building the Image Server
The image
ser
v
er fr
onts the A
dv
entur
eW
orks database. If you don’t have it already
installed on y
our machine
, look back to Chapter 4 for a walk-thr
ough.
The image ser
v
er will be a simple w
eb for
m application that takes in a par
ameter
,
quer
ies the database for the image with the corr
esponding ID
, and wr
ites the image back
to the r
esponse when it finds one
.
U
nfor
tunately
, A
dv
entur
eW
orks doesn’t have a contiguous set of images, so you’ll get
a lot of br
oken links in y
our application. F
or example
, ther
e is an image corr
esponding to
CHAPTER 11 ■ AJAX APPLICATIONS AND EMPOWERING THE WEB USER EXPERIENCE266
9594CH11.qxd 1/22/08 10:48 AM Page 266
product ID 100, but none for product ID 101. To get around this, you would have to
download a set of existing product IDs to the client and navigate through them—but for
the sake of simplicity, this application just allows you to add and subtract 1 on the cur-
rent ID, so you will end up with broken links in the final version.
The first step is to add a new ASPX web form to your project. Call it
GetPicture.aspx.
In the Source view for the page, delete all the HTML markup, leaving only the top line,
which contains the ASP.NET directives. When you are done, the source for your page
should consist of just one line, and look like this:
<%@ Page Language="C#" AutoEventWireup="true"
CodeFile="GetPicture.aspx.cs" Inherits="GetPicture" %>
The next step is to add some code to the Page_Load event handler for this page.
Make sure that the set of
using includes everything that you’ll need for this operation.
This includes the IO stuff to handle the streams, the
Sql.DataClient to handle the data-
base connection, and the imaging APIs to handle the graphics.
Here’s the complete set:
using System;
using System.Data;
using System.Configuration;
using System.Collections;
using System.Web.Configuration;
using System.Web;
using System.Web.Security;
using System.Web.UI;
using System.Web.UI.WebControls;
using System.Web.UI.WebControls.WebParts;
using System.Web.UI.HtmlControls;
using System.IO;
using System.Drawing;
using System.Drawing.Imaging;
using System.Data.SqlClient;
Now that you are ready to start coding, the first step will be to handle the input
parameter. This page will be called using a URI like this:
GetPicture.aspx?PicID=
<something>, and the parameterized ID will be used to call the database for a specific
picture. This is achieved with the following code:
int picID;
if (Request.Params["PicID"] != null)
picID = Convert.ToInt16(Request.Params["PicID"]);
else
picID = 100;
CHAPTER 11 ■ AJAX APPLICATIONS AND EMPOWERING THE WEB USER EXPERIENCE 267
9594CH11.qxd 1/22/08 10:48 AM Page 267
This simply checks to see if the parameter is present. If it is, it loads its value into the
integer
picID; otherwise it defaults it to 100.
Next, you set up your data connection and initialize a SQL query to use this
parameter:
string connectionString =
WebConfigurationManager.ConnectionStrings["AdventureWorksConnectionString"]
.ConnectionString;
SqlConnection con = new SqlConnection(connectionString);
string sql = "Select * from Production.ProductPhoto where ProductPhotoID=@ID";
SqlCommand cmd = new SqlCommand(sql, con);
cmd.Parameters.Add("@ID", picID);
This code pulls the connection string from the Web.Config file for the web applica-
tion. If you don’t have one already, refer back to Chapter 4 for instructions on installing
and configuring the database on your web site.
It then creates a new instance of a
SqlConnection object, initializing it with this con-
nection string.
The SQL is simply a string, and in SQL strings you can specify parameters using the
@ directive, so it knows that when you say ProductPhotoID=@ID, it will be expecting a
parameter.
Next, a new
SqlCommand is created using this SQL code on the configured connection.
Finally, the parameter is added to the command.
SQLCommand objects have a collection of
parameters that is empty by default. When you add parameters to this collection, you
specify the parameter name (
@ID in this case) and the parameter value (picID in this case).
When the command is executed, the SQL is assembled with the parameter values filling
in the placeholders.
The next step is to open the database and execute the SQL. When you execute a com-
mand, a SqlDataReader object is returned, allowing you to read the results line by line.
This query will at most return one line (as there is only one picture per
ProductPhotoId).
con.Open();
SqlDataReader sqlRead = cmd.ExecuteReader();
To access the contents of the SqlDataReader, the Read function is called. This reads a
single record at a time. As we have at most one record, we call this once. Calling this func-
tion loads the next record, and returns
true if it succeeds (i.e., if there is a next record),
and
false if it doesn’t.
Thus, in this case, we can gate the
sqlRead.Read, and in the true clause handle the
loading and writing of the image to the response. In the
false clause, we can provide an
error message. Here’s the code:
CHAPTER 11 ■ AJAX APPLICATIONS AND EMPOWERING THE WEB USER EXPERIENCE268
9594CH11.qxd 1/22/08 10:48 AM Page 268