Beginning XNA 2.0 Game Programming From Novice to Professional phần 4 pptx
Bạn đang xem bản rút gọn của tài liệu. Xem và tải ngay bản đầy đủ của tài liệu tại đây (609.93 KB, 45 trang )
// Game Stuff
protected int score;
protected int power;
private const int INITIALPOWER = 100;
public Player(Game game, ref Texture2D theTexture, PlayerIndex playerID,
Rectangle rectangle) : base(game)
{
texture = theTexture;
position = new Vector2();
playerIndex = playerID;
// Create the source rectangle.
// This represents where the sprite picture is in the surface
spriteRectangle = rectangle;
#if XBOX360
// On the 360, we need to take care about the TV "safe" area.
screenBounds = new Rectangle((int)(Game.Window.ClientBounds.Width *
0.03f),(int)(Game.Window.ClientBounds.Height * 0.03f),
Game.Window.ClientBounds.Width -
(int)(Game.Window.ClientBounds.Width * 0.03f),
Game.Window.ClientBounds.Height -
(int)(Game.Window.ClientBounds.Height * 0.03f));
#else
screenBounds = new Rectangle(0, 0, Game.Window.ClientBounds.Width,
Game.Window.ClientBounds.Height);
#endif
}
/// <summary>
/// Put the ship in your start position in screen
/// </summary>
public void Reset()
{
if (playerIndex == PlayerIndex.One)
{
position.X = screenBounds.Width/3;
}
else
{
CHAPTER 4 ■ IMPROVING YOUR FIRST 2-D GAME 109
9241CH04.qxd 3/10/08 10:34 AM Page 109
position.X = (int) (screenBounds.Width/1.5);
}
position.Y = screenBounds.Height - spriteRectangle.Height;
score = 0;
power = INITIALPOWER;
}
/// <summary>
/// Total Points of the Player
/// </summary>
public int Score
{
get { return score; }
set
{
if (value < 0)
{
score = 0;
}
else
{
score = value;
}
}
}
/// <summary>
/// Remaining Power
/// </summary>
public int Power
{
get { return power; }
set { power = value; }
}
/// <summary>
/// Update the ship position, points, and power
/// </summary>
public override void Update(GameTime gameTime)
{
// Move the ship with the Xbox controller
CHAPTER 4 ■ IMPROVING YOUR FIRST 2-D GAME110
9241CH04.qxd 3/10/08 10:34 AM Page 110
GamePadState gamepadstatus = GamePad.GetState(playerIndex);
position.Y += (int) ((gamepadstatus.ThumbSticks.Left.Y*3)*-2);
position.X += (int) ((gamepadstatus.ThumbSticks.Left.X*3)*2);
// Move the ship with the keyboard
if (playerIndex == PlayerIndex.One)
{
HandlePlayer1KeyBoard();
}
else
{
HandlePlayer2KeyBoard();
}
// Keep the player inside the screen
KeepInBound();
// Update score
elapsedTime += gameTime.ElapsedGameTime;
if (elapsedTime > TimeSpan.FromSeconds(1))
{
elapsedTime -= TimeSpan.FromSeconds(1);
score++;
power ;
}
base.Update(gameTime);
}
/// <summary>
/// Keep the ship inside the screen
/// </summary>
private void KeepInBound()
{
if (position.X < screenBounds.Left)
{
position.X = screenBounds.Left;
}
if (position.X > screenBounds.Width - spriteRectangle.Width)
{
position.X = screenBounds.Width - spriteRectangle.Width;
CHAPTER 4 ■ IMPROVING YOUR FIRST 2-D GAME 111
9241CH04.qxd 3/10/08 10:34 AM Page 111
}
if (position.Y < screenBounds.Top)
{
position.Y = screenBounds.Top;
}
if (position.Y > screenBounds.Height - spriteRectangle.Height)
{
position.Y = screenBounds.Height - spriteRectangle.Height;
}
}
/// <summary>
/// Handle the keys for the player 1 (arrow keys)
/// </summary>
private void HandlePlayer1KeyBoard()
{
KeyboardState keyboard = Keyboard.GetState();
if (keyboard.IsKeyDown(Keys.Up))
{
position.Y -= 3;
}
if (keyboard.IsKeyDown(Keys.Down))
{
position.Y += 3;
}
if (keyboard.IsKeyDown(Keys.Left))
{
position.X -= 3;
}
if (keyboard.IsKeyDown(Keys.Right))
{
position.X += 3;
}
}
/// <summary>
/// Handle the keys for the player 2 (ASDW)
/// </summary>
private void HandlePlayer2KeyBoard()
{
KeyboardState keyboard = Keyboard.GetState();
if (keyboard.IsKeyDown(Keys.W))
CHAPTER 4 ■ IMPROVING YOUR FIRST 2-D GAME112
9241CH04.qxd 3/10/08 10:34 AM Page 112
{
position.Y -= 3;
}
if (keyboard.IsKeyDown(Keys.S))
{
position.Y += 3;
}
if (keyboard.IsKeyDown(Keys.A))
{
position.X -= 3;
}
if (keyboard.IsKeyDown(Keys.D))
{
position.X += 3;
}
}
/// <summary>
/// Draw the ship sprite
/// </summary>
public override void Draw(GameTime gameTime)
{
// Get the current spritebatch
SpriteBatch sBatch = (SpriteBatch)
Game.Services.GetService(typeof (SpriteBatch));
// Draw the ship
sBatch.Draw(texture, position, spriteRectangle, Color.White);
base.Draw(gameTime);
}
/// <summary>
/// Get the bound rectangle of ship position in screen
/// </summary>
public Rectangle GetBounds()
{
return new Rectangle((int) position.X, (int) position.Y,
spriteRectangle.Width, spriteRectangle.Height);
}
}
}
CHAPTER 4 ■ IMPROVING YOUR FIRST 2-D GAME 113
9241CH04.qxd 3/10/08 10:34 AM Page 113
As you can see, this is practically the same class as in the previous chapter, but in the
Update() method you handle the user input a little differently, testing the PlayerIndex to
check for the correct gamepad or keyboard keys. In a multiplayer game, you’ll instantiate
two objects for this class with different
PlayerIndexes and different rectangles in texture,
for different ship sprites.
Bringing Everything Together
Now you have all the action scene components. The meteors, the score, and the player
(or players) are ready to be put to work. Now add a class called
ActionScene. This scene is
the most complex scene of the game. It coordinates the action of all the components, as
well as controls the game state, such as
pause and gameOver.
Start declaring all elements of this scene, as follows:
// Basics
protected Texture2D actionTexture;
protected Cue backMusic;
protected SpriteBatch spriteBatch = null;
// Game Elements
protected Player player1;
protected Player player2;
protected MeteorsManager meteors;
protected PowerSource powerSource;
protected SimpleRumblePad rumblePad;
protected ImageComponent background;
protected Score scorePlayer1;
protected Score scorePlayer2;
// GUI Stuff
protected Vector2 pausePosition;
protected Vector2 gameoverPosition;
protected Rectangle pauseRect = new Rectangle(1, 120, 200, 44);
protected Rectangle gameoverRect = new Rectangle(1, 170, 350, 48);
// GameState elements
protected bool paused;
protected bool gameOver;
protected TimeSpan elapsedTime = TimeSpan.Zero;
protected bool twoPlayers;
CHAPTER 4 ■ IMPROVING YOUR FIRST 2-D GAME114
9241CH04.qxd 3/10/08 10:34 AM Page 114
It looks like the attributes from the game in the previous chapter, but you now have
two
Player instances (for a multiplayer game), two attributes for controlling the game
state (
paused and gameOver) and the components for Score, PowerSource, Meteors, and so on.
The constructor initializes all these objects, as follows:
/// <summary>
/// Default Constructor
/// </summary>
/// <param name="game">The main game object</param>
/// <param name="theTexture">Texture with the sprite elements</param>
/// <param name="backgroundTexture">Texture for the background</param>
/// <param name="font">Font used in the score</param>
public ActionScene(Game game, Texture2D theTexture,
Texture2D backgroundTexture, SpriteFont font) : base(game)
{
// Get the current audiocomponent and play the background music
audioComponent = (AudioComponent)
Game.Services.GetService(typeof (AudioComponent));
background = new ImageComponent(game, backgroundTexture,
ImageComponent.DrawMode.Stretch);
Components.Add(background);
actionTexture = theTexture;
spriteBatch = (SpriteBatch)
Game.Services.GetService(typeof (SpriteBatch));
meteors = new MeteorsManager(Game, ref actionTexture);
Components.Add(meteors);
player1 = new Player(Game, ref actionTexture, PlayerIndex.One,
new Rectangle(323, 15, 30, 30));
player1.Initialize();
Components.Add(player1);
player2 = new Player(Game, ref actionTexture, PlayerIndex.Two,
new Rectangle(360, 17, 30, 30));
player2.Initialize();
Components.Add(player2);
scorePlayer1 = new Score(game, font, Color.Blue);
scorePlayer1.Position = new Vector2(10, 10);
CHAPTER 4 ■ IMPROVING YOUR FIRST 2-D GAME 115
9241CH04.qxd 3/10/08 10:34 AM Page 115
Components.Add(scorePlayer1);
scorePlayer2 = new Score(game, font, Color.Red);
scorePlayer2.Position = new Vector2(
Game.Window.ClientBounds.Width - 200, 10);
Components.Add(scorePlayer2);
rumblePad = new SimpleRumblePad(game);
Components.Add(rumblePad);
powerSource = new PowerSource(game, ref actionTexture);
powerSource.Initialize();
Components.Add(powerSource);
}
See how you create two instances for the Player class. For each player, just change
the
PlayerIndex and the Rectangle of the image of the ship in the texture.
You also need to control the game state and define if the game is for one or two players,
or check if some of the players are already dead. Add these properties to the class:
/// <summary>
/// Indicate the 2-players game mode
/// </summary>
public bool TwoPlayers
{
get { return twoPlayers; }
set { twoPlayers = value; }
}
/// <summary>
/// True, if the game is in gameOver state
/// </summary>
public bool GameOver
{
get { return gameOver; }
}
/// <summary>
/// Paused mode
/// </summary>
public bool Paused
{
get { return paused; }
set
CHAPTER 4 ■ IMPROVING YOUR FIRST 2-D GAME116
9241CH04.qxd 3/10/08 10:34 AM Page 116
{
paused = value;
if (paused)
{
backMusic.Pause();
}
else
{
backMusic.Resume();
}
}
}
Like all the other scenes, you can use the Show() and Hide() methods to initialize and
release scene components. In the
Show() method you start playing the background music
and setting the
player2 status if you have a two-player game:
/// <summary>
/// Show the action scene
/// </summary>
public override void Show()
{
backMusic = audioComponent.GetCue("backmusic");
backMusic.Play();
meteors.Initialize();
powerSource.PutinStartPosition();
player1.Reset();
player2.Reset();
paused = false;
pausePosition.X = (Game.Window.ClientBounds.Width -
pauseRect.Width)/2;
pausePosition.Y = (Game.Window.ClientBounds.Height -
pauseRect.Height)/2;
gameOver = false;
gameoverPosition.X = (Game.Window.ClientBounds.Width -
gameoverRect.Width)/2;
gameoverPosition.Y = (Game.Window.ClientBounds.Height -
gameoverRect.Height)/2;
CHAPTER 4 ■ IMPROVING YOUR FIRST 2-D GAME 117
9241CH04.qxd 3/10/08 10:34 AM Page 117
// Is it a two-player game?
player2.Visible = twoPlayers;
player2.Enabled = twoPlayers;
scorePlayer2.Visible = twoPlayers;
scorePlayer2.Enabled = twoPlayers;
base.Show();
}
/// <summary>
/// Hide the scene
/// </summary>
public override void Hide()
{
// Stop the background music
backMusic.Stop(AudioStopOptions.Immediate);
// Stop the rumble
rumblePad.Stop(PlayerIndex.One);
rumblePad.Stop(PlayerIndex.Two);
base.Hide();
}
And, as always, the Update() method synchronizes all these objects, checking the
collisions and changing the game state for game over when some players die.
/// <summary>
/// Allows the GameComponent to update itself.
/// </summary>
/// <param name="gameTime">Provides a snapshot of timing values.</param>
public override void Update(GameTime gameTime)
{
if ((!paused) && (!gameOver))
{
// Check collisions with meteors
HandleDamages();
// Check if a player gets a power boost
HandlePowerSourceSprite(gameTime);
// Update score
scorePlayer1.Value = player1.Score;
scorePlayer1.Power = player1.Power;
CHAPTER 4 ■ IMPROVING YOUR FIRST 2-D GAME118
9241CH04.qxd 3/10/08 10:34 AM Page 118
if (twoPlayers)
{
scorePlayer2.Value = player2.Score;
scorePlayer2.Power = player2.Power;
}
// Check if player is dead
gameOver = ((player1.Power <= 0) || (player2.Power <= 0));
if (gameOver)
{
player1.Visible = (player1.Power > 0);
player2.Visible = (player2.Power > 0) && twoPlayers;
// Stop the music
backMusic.Stop(AudioStopOptions.Immediate);
// Stop rumble
rumblePad.Stop(PlayerIndex.One);
rumblePad.Stop(PlayerIndex.Two);
}
// Update all other GameComponents
base.Update(gameTime);
}
// In gameOver state, keep the meteors' animation
if (gameOver)
{
meteors.Update(gameTime);
}
}
The HandleDamages() and HandlePowerSourceSprite() methods check the collisions
with the meteors (and lose some player power), check the collision with the power source
(and add some power to the player), and check if a player has zero or less power to end
the game and put him or her in a game over state.
The
HandleDamages() method is also similar to the collision test method from the pre-
vious chapter. Again, this method checks the collision with the players and meteors and
one player with another player. For each collision the player loses ten points and ten
power units:
/// <summary>
/// Handle collisions with a meteor
/// </summary>
private void HandleDamages()
CHAPTER 4 ■ IMPROVING YOUR FIRST 2-D GAME 119
9241CH04.qxd 3/10/08 10:34 AM Page 119
{
// Check Collision for player 1
if (meteors.CheckForCollisions(player1.GetBounds()))
{
// Shake!
rumblePad.RumblePad(PlayerIndex.One, 500, 1.0f, 1.0f);
// Player penalty
player1.Power -= 10;
player1.Score -= 10;
}
// Check Collision for player 2
if (twoPlayers)
{
if (meteors.CheckForCollisions(player2.GetBounds()))
{
// Shake!
rumblePad.RumblePad(PlayerIndex.Two, 500, 1.0f, 1.0f);
// Player penalty
player2.Power -= 10;
player2.Score -= 10;
}
// Check for collision between the players
if (player1.GetBounds().Intersects(player2.GetBounds()))
{
rumblePad.RumblePad(PlayerIndex.One, 500, 1.0f, 1.0f);
player1.Power -= 10;
player1.Score -= 10;
rumblePad.RumblePad(PlayerIndex.Two, 500, 1.0f, 1.0f);
player2.Power -= 10;
player2.Score -= 10;
}
}
}
The HandlePowerSourceSprite() method does the same job, but with the PowerSource
sprite. If some player collides with this sprite, he or she gets 50 power units. The method
also checks if it’s time to send a new power source in the game, using an interval of
15 seconds.
CHAPTER 4 ■ IMPROVING YOUR FIRST 2-D GAME120
9241CH04.qxd 3/10/08 10:34 AM Page 120
/// <summary>
/// Handle power-up stuff
/// </summary>
private void HandlePowerSourceSprite(GameTime gameTime)
{
if (powerSource.CheckCollision(player1.GetBounds()))
{
// Player 1 gets the power source
audioComponent.PlayCue("powerget");
elapsedTime = TimeSpan.Zero;
powerSource.PutinStartPosition();
player1.Power += 50;
}
if (twoPlayers)
{
// Player 2 gets the power source
if (powerSource.CheckCollision(player2.GetBounds()))
{
audioComponent.PlayCue("powerget");
elapsedTime = TimeSpan.Zero;
powerSource.PutinStartPosition();
player2.Power += 50;
}
}
// Check for sending a new power source
elapsedTime += gameTime.ElapsedGameTime;
if (elapsedTime > TimeSpan.FromSeconds(15))
{
elapsedTime -= TimeSpan.FromSeconds(15);
powerSource.Enabled = true;
}
}
And finally, the Draw() method just draws some objects for a specified game state:
/// <summary>
/// Allows the GameComponent to draw itself.
/// </summary>
/// <param name="gameTime">Provides a snapshot of timing values.</param>
public override void Draw(GameTime gameTime)
{
CHAPTER 4 ■ IMPROVING YOUR FIRST 2-D GAME 121
9241CH04.qxd 3/10/08 10:34 AM Page 121
// Draw all GameComponents
base.Draw(gameTime);
if (paused)
{
// Draw the "pause" text
spriteBatch.Draw(actionTexture, pausePosition, pauseRect,
Color.White);
}
if (gameOver)
{
// Draw the "gameover" text
spriteBatch.Draw(actionTexture, gameoverPosition, gameoverRect,
Color.White);
}
Observe that once again, a great deal of the game logic that you created in the previ-
ous chapter was kept. You only added the two-player support and two more game states:
one when the user pauses the game (pressing the Enter key or pressing the A button on
the Xbox 360 gamepad during the game), or when one of the players runs out of energy.
When this happens, the game shows a message on the screen and waits for the player to
press the E
nter key or the A button on the Xbox 360 gamepad.
Navigating Between the Scenes
With all the scenes created, now you only need to show them according to users’ wishes.
Thr
ough the menu in the opening scene, users can show the help scene, the action scene
(with one or two players), or just leave the game. Here, you’ll use a technique in which
you concentrate all the inputs that refer to the navigation or control of the scene states in
one class. In this case you use the
Game1 class, so that you have a central point where you
shoot the scenes and control the
Game1 class’s state. Add the following code in the Game1
class:
private readonly GraphicsDeviceManager graphics;
private SpriteBatch spriteBatch;
// Textures
protected Texture2D helpBackgroundTexture, helpForegroundTexture;
protected Texture2D startBackgroundTexture, startElementsTexture;
protected Texture2D actionElementsTexture, actionBackgroundTexture;
// Game Scenes
protected HelpScene helpScene;
CHAPTER 4 ■ IMPROVING YOUR FIRST 2-D GAME122
9241CH04.qxd 3/10/08 10:34 AM Page 122
protected StartScene startScene;
protected ActionScene actionScene;
protected GameScene activeScene;
// Audio Stuff
private AudioComponent audioComponent;
// Fonts
private SpriteFont smallFont, largeFont,
scoreFont;
// Used to handle input
protected KeyboardState oldKeyboardState;
protected GamePadState oldGamePadState;
In the LoadContent() method, add the code to create and load the content for the
ActionScene object:
// Create the action scene
actionElementsTexture = Content.Load<Texture2D>("rockrainenhanced");
actionBackgroundTexture = Content.Load<Texture2D>("SpaceBackground");
scoreFont = Content.Load<SpriteFont>("score");
actionScene = new ActionScene(this, actionElementsTexture,
actionBackgroundTexture, scoreFont);
Components.Add(actionScene);
// Start the game in the start scene :)
startScene.Show();
activeScene = startScene;
Again, in this class you’ll load all the game assets and initialize all the scenes, putting
the
StartScene as the scene to be opened initially
.
The
Update() method handles all user input for each scene
, and changes the active
scene if necessar
y
:
/// <summary>
/// Allows the game to run logic such as updating the world,
/// checking for collisions, gathering input, and playing audio.
/// </summary>
/// <param name="gameTime">Provides a snapshot of timing values.</param>
protected override void Update(GameTime gameTime)
{
// Handle Game Inputs
HandleScenesInput();
CHAPTER 4 ■ IMPROVING YOUR FIRST 2-D GAME 123
9241CH04.qxd 3/10/08 10:34 AM Page 123
base.Update(gameTime);
}
H
andleScenesInput()
just calls the handler for the active scene in the game:
/// <summary>
/// Handle input of all game scenes
/// </summary>
private void HandleScenesInput()
{
// Handle Start Scene Input
if (activeScene == startScene)
{
HandleStartSceneInput();
}
// Handle Help Scene Input
else if (activeScene == helpScene)
{
if (CheckEnterA())
{
ShowScene(startScene);
}
}
// Handle Action Scene Input
else if (activeScene == actionScene)
{
HandleActionInput();
}
}
The CheckEnterA() method
is a simple code to test the Enter key and the A button on
an Xbo
x 360 gamepad:
/// <summary>
/// Check if the Enter Key or A button was pressed
/// </summary>
/// <returns>true, if Enter key or A button was pressed</returns>
private bool CheckEnterA()
{
// Get the Keyboard and GamePad state
GamePadState gamepadState = GamePad.GetState(PlayerIndex.One);
KeyboardState keyboardState = Keyboard.GetState();
CHAPTER 4 ■ IMPROVING YOUR FIRST 2-D GAME124
9241CH04.qxd 3/10/08 10:34 AM Page 124
bool result = (oldKeyboardState.IsKeyDown(Keys.Enter) &&
(keyboardState.IsKeyUp(Keys.Enter)));
result |= (oldGamePadState.Buttons.A == ButtonState.Pressed) &&
(gamepadState.Buttons.A == ButtonState.Released);
oldKeyboardState = keyboardState;
oldGamePadState = gamepadState;
return result;
}
The HandleStartSceneInput() shows the correct scene following the user selection in
the menu. If a two-player game is selected, you just set the
TwoPlayers attribute in the
actionScene to true:
/// <summary>
/// Handle buttons and keyboard in StartScene
/// </summary>
private void HandleStartSceneInput()
{
if (CheckEnterA())
{
audioComponent.PlayCue("menu_select3");
switch (startScene.SelectedMenuIndex)
{
case 0:
actionScene.TwoPlayers = false;
ShowScene(actionScene);
break;
case 1:
actionScene.TwoPlayers = true;
ShowScene(actionScene);
break;
case 2:
ShowScene(helpScene);
break;
case 3:
Exit();
break;
}
}
}
CHAPTER 4 ■ IMPROVING YOUR FIRST 2-D GAME 125
9241CH04.qxd 3/10/08 10:34 AM Page 125
HandleActionInput() handles input in the action scene to pause and cancel a game,
using a keyboard or an Xbox 360 gamepad:
/
// <summary>
/
// Check if the Enter Key or A button was pressed
/// </summary>
/// <returns>true, if Enter key or A button was pressed</returns>
private void HandleActionInput()
{
// Get the Keyboard and GamePad state
GamePadState gamepadState = GamePad.GetState(PlayerIndex.One);
KeyboardState keyboardState = Keyboard.GetState();
bool backKey = (oldKeyboardState.IsKeyDown(Keys.Escape) &&
(keyboardState.IsKeyUp(Keys.Escape)));
backKey |= (oldGamePadState.Buttons.Back == ButtonState.Pressed) &&
(gamepadState.Buttons.Back == ButtonState.Released);
bool enterKey = (oldKeyboardState.IsKeyDown(Keys.Enter) &&
(keyboardState.IsKeyUp(Keys.Enter)));
enterKey |= (oldGamePadState.Buttons.A == ButtonState.Pressed) &&
(gamepadState.Buttons.A == ButtonState.Released);
oldKeyboardState = keyboardState;
oldGamePadState = gamepadState;
if (enterKey)
{
if (actionScene.GameOver)
{
ShowScene(startScene);
}
else
{
audioComponent.PlayCue("menu_back");
actionScene.Paused = !actionScene.Paused;
}
}
if (backKey)
{
ShowScene(startScene);
CHAPTER 4 ■ IMPROVING YOUR FIRST 2-D GAME126
9241CH04.qxd 3/10/08 10:34 AM Page 126
}
}
The S
howScene()
method is just a helper to S
how()
a new scene and H
ide()
a previous
scene, as follows:
/// <summary>
/// Open a new scene
/// </summary>
/// <param name="scene">Scene to be opened</param>
protected void ShowScene(GameScene scene)
{
activeScene.Hide();
activeScene = scene;
scene.Show();
}
What about the Draw() method? Well, all elements of your game are GameComponents
now, so just let XNA do its job:
/// <summary>
/// This is called when the game should draw itself.
/// </summary>
/// <param name="gameTime">Provides a snapshot of timing values.</param>
protected override void Draw(GameTime gameTime)
{
// Begin
spriteBatch.Begin();
// Draw all GameComponents
base.Draw(gameTime);
// End.
spriteBatch.End();
}
That
’
s it. Compile and execute the game to see the final result. The architecture is
flexible, and it’s easy to add new features to your game, as you’ll see in the next chapter.
However, try putting new meteor types or new ways to acquire energy, for instance. You’ll
start to understand how games are “assembled” from
GameComponents.
CHAPTER 4 ■ IMPROVING YOUR FIRST 2-D GAME 127
9241CH04.qxd 3/10/08 10:34 AM Page 127
Summary
You started from a simple game and evolved that into a more elaborate game with simple
techniques that are useful to any kind of game. You saw the value of the
G
ameComponent
s
and their reuse capability. Feel free to improve and change this game and build your own
awesome version of Rock Rain!
CHAPTER 4 ■ IMPROVING YOUR FIRST 2-D GAME128
9241CH04.qxd 3/10/08 10:34 AM Page 128
Basics of Game Networking
In this chapter you’ll see basic concepts involved in creating games that support net-
working, so you’ll be prepared to create a real multiplayer game in the next chapter.
Introducing Multiplayer Games
Online multiplayer games, also known as network-enabled games or simply networked
games, are hard to code. Period.
That said, it’s also important to state that, in XNA, this difficulty is not r
elated to cod-
ing for connecting the machines (PCs or Xbox 360) or making them talk with each other.
That’s because XNA hides all complexities from you in this case, as it does with every-
thing else in the framework.
Networked games are hard to code because there are many extra problems to deal
with: your progr
am will receive messages from the host or other players, send messages
back to them, process the local player input, and perform the physics and artificial intel-
ligence calculations, while not letting the screen freeze between each frame drawn (one
of the worst things that might happen in a multiplayer game).
Fortunately, XNA can help us with most of the communication problems, such as
providing ways to control the message flow between players and host to guarantee that
no message is lost and that all messages arrive in the same order they were sent, if you
want to. Nevertheless, there will still be some problems to solve.
Before discussing the details of XNA support for networking, let’s look at some basic
concepts about networked games and some of the most common problems faced when
coding such games, in the next sections.
Choosing the N
etw
ork Topology
The most common topologies for networked games are peer-to-peer and client/server
connections, and because XNA network implementation is not tied to any type of con-
nection, you can code any of these types depending on the way you organize your
network code.
129
CHAPTER 5
9241CH05.qxd 3/12/08 11:44 AM Page 129
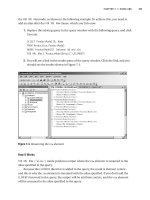
In peer-to-peer connections, every player is aware of every other player in the game,
sending and receiving messages from, and to, all players, as illustrated in Figure 5-1.
Figure 5-1. Peer-to-peer connection
The most obvious benefit of using this network organization is that you don’t need a
dedicated server to play the game, so every group of players can play it within their own
local area network (LAN), or even through the Internet, as long as they know the
addresses of the other members of the group.
In this type of connection, one of the players acts as a host, so all the new players
connect to that player. However, once connected, the messages flow directly from one
player to all the others. If the player who is also the host disconnects from the game, the
game might stop or simply choose another player as the new host, depending on what
the game developers defined.
The main problem you face when coding peer-to-peer games is that you can’t have
too many players in the same game session, because the number of messages will
increase exponentially with every new player who joins. For instance, in Figure 5-1 we
have 4 players, so every time a player needs to update his or her status (for example,
move), you send 3 messages, one for each player. Because you have 4 players, during
each game turn you exchange 4
✕ 3 = 12 messages. Making the same calculations with a
5-player game increases this to 5
✕ 4 = 20 messages per turn, and in a 6-player game
you’ll reach 6
✕ 5 = 30 messages.
Usually, having more than ten players in the same game session is not suggested,
because every message can take dozens of bytes and you’ll consume the bandwidth
available in your network quickly. But it’s still possible if the game development team can
make the messages as small as possible; for example, passing only the players’ inputs
across the computers, and letting games on every player’s machine calculate everything
else from these inputs.
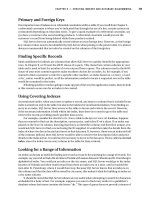
The second most common game network topology is client/server. In this kind of
network, all players connect to a host, which usually processes the messages and does
CHAPTER 5 ■ BASICS OF GAME NETWORKING130
9241CH05.qxd 3/12/08 11:44 AM Page 130
the game synchronization, sending messages back to each of the players, as presented in
Figure 5-2.
Figure 5-2. Client/server connection
Client/server games consume a lot less bandwidth per player, which allows you to
send more data (and maybe create a more complex game). However, on the other hand,
the player depends on having a host to connect to (so it usually can’t be played on a
home LAN).
When coding client/server games, you must decide which actions will take place on
the host, and which actions will take place on the client machines. Is it better to put all
the game physics and intelligence on the players’ machines, using a host just as a for-
warder of messages, or is it better to include all the game code on the host, leaving just
the input gather
ing and rendering code on the players’ machines?
Ther
e is no right answer for this question, because it depends largely on the game
constraints and goals. When making your decision, you’ll have to take into account how
many players will be connected to the server, and how much it will cost the server
processor to perform each activity (for all players). You also might need to verify the cost
for each player’s machine to do its own calculations against the bandwidth impact for
doing all calculations on the server and passing the results to the players. Even when the
server could do a specific operation better, you might decide to run it on the client if
passing the results of the operation will use a large amount of the available bandwidth.
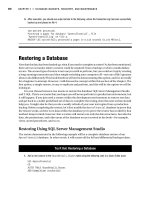
Besides these two types of topology, there are other types of network organization.
Some are useful in game development, others are not. For example, in a ring topology
each player sends messages to one specific player, creating a ring that will eventually
return to the first player in the sequence, as shown in Figure 5-3.
CHAPTER 5 ■ BASICS OF GAME NETWORKING 131
9241CH05.qxd 3/12/08 11:44 AM Page 131
Figure 5-3. Ring network topology
This network organization is usually not practical for games, because the first player
in the sequence would have to wait for the message to go around to every other player
before it got back to him or her, which can easily lead to unacceptable waiting times.
Another example of a different approach is using network groups: each player
exchanges messages only with the other players in his or her group, and the host (which
could be a dedicated server or a player) exchanges information with other groups, when
needed. The group organization is designed for the number of messages passed between
the groups to be as small as possible. Figure 5-4 illustrates a game network topology
based on groups.
Figure 5-4. A group-based network topology
This approach is also used in network games, being a mix of the client/server and
peer-to-peer topologies that tries to gather the benefits of each one.
CHAPTER 5 ■ BASICS OF GAME NETWORKING132
9241CH05.qxd 3/12/08 11:44 AM Page 132
In the next section we’ll discuss some choices you must make when producing your
network game project.
Turn-Based vs. Real-Time Games
This is probably one of the first decisions when thinking about multiplayer games, and
probably the one that will have the greatest impact on your game project.
In turn-based games, each player will think about his or her move, do the proper
action, and then pass the control to the next player. Although the first type of game that
comes to mind is board games, such as chess or Monopoly, there are sophisticated action
games based on turns, such as the old X-COM series, where you move each of your sol-
diers (using his energy to walk or fire), and then the enemies move, using the same rules.
Choosing this approach will save you a lot of headaches when trying to deal with the
latency between your game messages, especially when running through the Internet, but
might lead to a less than optimal game play because this type of game is unusual. Never
choose this approach if you have many players (say, more than three or four, depending
on the game pace), because if each player needs to wait more than a couple minutes to
play again, the game will rapidly become uninteresting—ex
cept, of course, if the players
actually expect a delay, like in a chess match. A practical idea is letting the players com-
municate with one another (by voice or by typing a message) even when it is not their
turn, so you can improve the interaction between players and make the waiting less
boring.
Creating continuous action multiplayer games that support remote players, like
Halo, is challenging. That’s mainly because you must transfer a certain amount of data
within tight time frames, which unfortunately depends on the response time of some-
thing beyond your control—the network. At the same time, you need to make sure that
all players have synchronized information, especially in fast-paced action games where
players are fighting against one another.
One possible approach is to send all the data updates to each of the players, so that
you can ensure that everyone has the most recent events on their machines. However,
this approach consumes the entire bandwidth available even for few players.
In the other extreme, you can carefully calculate exactly which information should
be sent to each player, and then send the minimum data needed. For instance, if another
player is behind you or in another part of the game level, you can’t see him or her, so you
don’t need to receive information from that player. Although it saves bandwidth, this
approach consumes CPUs cycles on the players’ machines by calculating the data to
send, leaving fewer cycles to calculate the game physics and draw the graphics.
Then again, the best approach is to find a balance according to your game require-
ments
.
Ther
e is no r
ight answ
er
; just minimiz
e the data while tr
ying not to expend too
much pr
ocessing time on this minimization, and always keep in mind that y
our game
will r
un on slo
w
er machines and might face unpr
edictably bad networ
k r
esponse times
.
CHAPTER 5 ■ BASICS OF GAME NETWORKING 133
9241CH05.qxd 3/12/08 11:44 AM Page 133