Beginning C# 2008 Databases From Novice to Professional phần 4 ppsx
Bạn đang xem bản rút gọn của tài liệu. Xem và tải ngay bản đầy đủ của tài liệu tại đây (777.04 KB, 52 trang )
the FOR XML RAW mode, as shown in the following example. To achieve this, you need to
add an alias after the
FOR XML RAW clause, which you’ll do now.
1. Replace the existing query in the query window with the following query, and click
Execute.
SELECT ProductModelID, Name
FROM Production.ProductModel
WHERE ProductModelID between 98 and 101
FOR XML RAW ('ProductModelDetail'),ELEMENTS
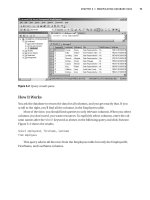
2. You will see a link in the results pane of the query window. Click the link, and you
should see the results shown in Figure 7-3.
Figure 7-3. Renaming the row element
How It Works
FOR XML RAW ('alias') mode produces output where the row element is renamed to the
alias specified in the query.
Because the
ELEMENTS directive is added in the query, the result is element centric,
and this is why the
row element is renamed with the alias specified. If you don’t add the
ELEMENTS keyword in the query, the output will be attribute centric, and the row element
will be renamed to the alias specified in the query.
CHAPTER 7 ■ USING XML 127
9004ch07final.qxd 12/13/07 4:14 PM Page 127
Observations About FOR XML RAW Formatting
FOR XML RAW does not provide a root node, and this is why the XML structure is not a well-
formed XML document.
FOR XML RAW supports attribute- and element-centric formatting, which means that
all the columns must be formatted in the same way. Hence it is not possible to have the
XML structure returned with both the XML attributes and XML elements.
FOR XML RAW generates a hierarchy in which all the elements in the XML structure are
at the same level.
Using FOR XML AUTO
FOR XML AUTO mode returns query results as nested XML elements. This does not provide
much control over the shape of the XML generated fr
om a query result.
FOR XML AUTO
mode queries are useful if you want to generate simple hierarchies.
Each table in the
FROM clause, from which at least one column is listed in the SELECT
clause, is represented as an XML element. The columns listed in the SELECT clause are
mapped to attributes or subelements.
Try It Out:
Using FOR XML AUTO
To see how to use FOR XML AUTO to format query results as nested XML elements, follow
these steps:
1. Replace the existing query in the query window with the following query and click
Execute:
SELECT Cust.CustomerID,
OrderHeader.CustomerID,
OrderHeader.SalesOrderID,
OrderHeader.Status,
Cust.CustomerType
FROM Sales.Customer Cust, Sales.SalesOrderHeader
OrderHeader
WHERE Cust.CustomerID = OrderHeader.CustomerID
ORDER BY Cust.CustomerID
FOR XML AUTO
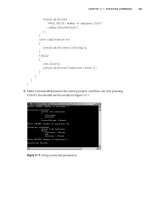
2. You will see a link in the results pane of the query window. Click the link, and you
should see the results shown in Figure 7-4.
CHAPTER 7 ■ USING XML128
9004ch07final.qxd 12/13/07 4:14 PM Page 128
Figure 7-4. Using FOR XML AUTO
How It Works
The CustomerID references the Cust table. Therefore, a Cust element is created and
CustomerID is added as its attribute.
Next, three columns, OrderHeader.CustomerID, OrderHeader.SaleOrderID, and
OrderHeader.Status, reference the OrderHeader table. Therefore, an
OrderHeader element
is added as a subelement of the
Cust element, and the three columns are added as attrib-
utes of
OrderHeader.
Next, the Cust.CustomerType column again references the Cust table that was
already identified by the Cust.CustomerID column. Therefore, no new element is cre-
ated. I
nstead, the
CustomerType attr
ibute is added to the
Cust element that was pr
evi-
ously created.
The query specifies aliases for the table names. These aliases appear as correspon-
ding element names.
ORDER BY is required to group all children under one parent.
Observations About FOR XML AUTO Formatting
FOR XML AUTO does
not pr
ovide a root node, and this is why the XML structure is not a
w
ell-for
med XML document.
CHAPTER 7 ■ USING XML 129
9004ch07final.qxd 12/13/07 4:14 PM Page 129
FOR XML AUTO supports attribute- and element-centric formatting, which means that
all the columns must be formatted in the same way. Hence it is not possible to have the
XML structure returned with both the XML attributes and XML elements.
FOR XML AUTO does not provide a renaming mechanism the way FOR XML RAW does.
However,
FOR XML AUTO uses table and column names and aliases if present.
Using the xml Data Type
SQL Server 2005 has a new data type, xml, that is designed not only for holding XML doc-
uments (which are essentially character strings and can be stored in any character col-
umn big enough to hold them), but also for processing XML documents. When we
discussed parsing an XML document into a DOM tree, we didn’t mention that once it’s
parsed, the XML document can be updated. You can change element contents and attrib-
ute values, and you can add and remove element occurrences to and from the hierarchy.
We won’t update XML documents here, but the
xml data type provides methods to do
it. It is a very different kind of SQL Server data type, and describing how to exploit it
would take a book of its own—maybe more than one. Our focus here will be on what
every database programmer needs to know: how to use the
xml type to store and retrieve
XML documents.
■Note There are so many ways to process XML documents (even in ADO.NET and with SQLXML, a sup-
port package for SQL Server 2000) that only time will tell if incorporating such features into a SQL Server
data type was worth the effort. Because XML is such an important technology, being able to process XML
documents purely in T-SQL does offer many possibilities, but right now it’s unclear how much more about
the
xml data type you’ll ever need to know. At any rate, this chapter will give you what you need to know
to start experimenting with it.
Try It Out: Creating a Table to Store XML
T
o cr
eate
a table to hold XML documents
, replace the existing query in the query window
with
the follo
wing quer
y and
click Execute:
create table xmltest
(
xid int not null primary key,
xdoc xml not null
)
CHAPTER 7 ■ USING XML130
9004ch07final.qxd 12/13/07 4:15 PM Page 130
How It Works
This works in the same way as a CREATE TABLE statement is expected to work. Though
we’ve said the
xml data type is different from other SQL Server data types, columns of xml
type are defined just like any other columns.
■Note The xml data type cannot be used in primary keys.
Now, you’ll insert your XML documents into xmltest and query it to see that they
were stored.
Try It Out:
Storing and Retrieving XML Documents
To insert your XML documents, follow these steps:
1. Replace the code in the SQL query window with the following two INSERT
statements:
insert into xmltest
values(
1,
'
<states>
<state>
<abbr>CA</abbr>
<name>California</name>
<city>Berkeley</city>
<city>Los Angeles</city>
<city>Wilmington</city>
</state>
<state>
<abbr>DE</abbr>
<name>Delaware</name>
<city>Newark</city>
<city>Wilmington</city>
</state>
</states>
'
)
CHAPTER 7 ■ USING XML 131
9004ch07final.qxd 12/13/07 4:15 PM Page 131
insert into xmltest
values(
2,
'
<states>
<state abbr="CA" name="California">
<city name="Berkeley"/>
<city name="Los Angeles"/>
<city name="Wilmington"/>
</state>
<state abbr="DE" name="Delaware">
<city name="Newark"/>
<city name="Wilmington"/>
</state>
</states>
'
)
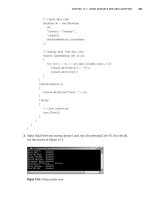
2. Run the two INSERT statements by clicking Execute, and then display the table with
select * from xmltest. You see the two rows displayed. Click the xdoc column in
the first row, and you should see the XML shown in Figure 7-5.
Figure 7-5. Viewing an XML document
CHAPTER 7 ■ USING XML132
9004ch07final.qxd 12/13/07 4:15 PM Page 132
How It Works
This works the same way all INSERTs work. You simply provide the primary keys as inte-
gers and the XML documents as strings. The query works just as expected, too.
Summary
This chapter covered the fundamentals of XML that every C# programmer needs to
know. It also showed you how to use the most frequently used T-SQL features for extract-
ing XML from tables and querying XML documents like tables. Finally, we discussed the
xml data type and gave you some practice using it.
How much more you need to know about XML or T-SQL and ADO.NET facilities
for using XML documents depends on what you need to do. As for many developers,
this chapter may be all you ever really need to know and understand. If you do more
sophisticated XML processing, you now have a strong foundation for experimenting
on your own.
In the next chapter, you will learn about database transactions.
CHAPTER 7 ■ USING XML 133
9004ch07final.qxd 12/13/07 4:15 PM Page 133
9004ch07final.qxd 12/13/07 4:15 PM Page 134
Understanding Transactions
For any business, transactions, which may comprise many individual operations and
even other transactions, play a key role. Transactions are essential for maintaining data
integrity, both for multiple related operations and when multiple users update the data-
base concurrently.
This chapter will talk about the concepts related to transactions and how trans-
actions can be used in SQL Server 2005 and C#.
In this chapter, we’ll cover the following:
• What is a transaction?
• When to use transactions
• Understanding ACID properties
• Transaction design
• Transaction state
• Specifying transaction boundaries
• T-SQL statements allowed in a transaction
• Local transactions in SQL Server 2005
• Distributed transactions in SQL Server 2005
•
G
uidelines to code efficient tr
ansactions
•
How to code transactions
What Is a Transaction?
A transaction is
a set of oper
ations per
formed so all operations are guaranteed to succeed
or fail as one unit.
135
CHAPTER 8
9004ch08final.qxd 12/13/07 4:13 PM Page 135
A common example of a transaction is the process of transferring money from a
checking account to a savings account. This involves two operations: deducting money
from the checking account and adding it to the savings account. Both must succeed
together and be
committed to the accounts, or both must fail together and be rolled back
so that the accounts are maintained in a consistent state. Under no circumstances should
money be deducted from the checking account but not added to the savings account (or
vice versa)—at least you would not want this to happen with the transactions occurring
with your bank accounts. By using a transaction, both the operations, namely debit and
credit, can be guaranteed to succeed or fail together. So both accounts remain in a con-
sistent state all the time.
When to Use Transactions
You should use transactions when several operations must succeed or fail as a unit. The
following are some frequent scenarios where use of transactions is recommended:
• In batch processing, where multiple rows must be inserted, updated, or deleted as
a single unit
• Whenever a change to one table requires that other tables be kept consistent
• When modifying data in two or more databases concurrently
• In distributed transactions, where data is manipulated in databases on different
servers
When y
ou use transactions, you place locks on data pending permanent change to
the database. No other operations can take place on locked data until the lock is r
eleased.
You could lock anything from a single row up to the whole database. This is called
con-
currency
, which means how the database handles multiple updates at one time.
In the bank example, locks ensure that two separate transactions don’t access the
same accounts at the same time. If they did, either deposits or withdrawals could be lost.
■Note It’s important to keep transactions pending for the shortest period of time. A lock stops others from
accessing the locked database resource. Too many locks, or locks on frequently accessed resources, can
seriously degrade performance.
CHAPTER 8 ■ UNDERSTANDING TRANSACTIONS136
9004ch08final.qxd 12/13/07 4:13 PM Page 136
Understanding ACID Properties
A transaction is characterized by four properties, often referred to as the ACID properties:
atomicity, consistency, isolation, and durability.
■Note The term ACID was coined by Andreas Reuter in 1983.
Atomicity: A transaction is atomic if it’s regarded as a single action rather than a col-
lection of separate operations. So, only when all the separate operations succeed
does a transaction succeed and is committed to the database. On the other hand,
if a single operation fails during the transaction, everything is considered to have
failed and must be undone (rolled back) if it has already taken place. In the case of
the order-entry system of the Northwind database, when you enter an order into the
Orders and Order Details tables, data will be saved together in both tables, or
it won’t be saved at all.
Consistency: The transaction should leave the database in a consistent state—
whether or not it completed successfully. The data modified by the transaction
must comply with all the constraints placed on the columns in order to maintain
data integr
ity. In the case of Northwind, you can’t have rows in the Order Details
table without a corresponding row in the Orders table, as this would leave the data
in an inconsistent state.
Isolation: Every transaction has a well-defined boundary—that is, it is isolated from
another transaction. One transaction shouldn’t affect other transactions running at
the same time. Data modifications made by one transaction must be isolated from
the data modifications made by all other transactions. A transaction sees data in the
state it was in before another concurrent transaction modified it, or it sees the data
after the second transaction has completed, but it doesn’t see an intermediate state.
Durability: Data modifications that occur within a successful transaction are kept
permanently within the system regardless of what else occurs. Transaction logs are
maintained so that should a failure occur the database can be restored to its original
state before the failure. As each transaction is completed, a row is entered in the
database transaction log. If you have a major system failure that requires the data-
base to be restored from a backup, you could then use this transaction log to insert
(roll forward) any successful transactions that have taken place.
Every database server that offers support for transactions enforces these four ACID
properties automatically.
CHAPTER 8 ■ UNDERSTANDING TRANSACTIONS 137
9004ch08final.qxd 12/13/07 4:13 PM Page 137
Transaction Design
Transactions represent real-world events such as bank transactions, airline reservations,
remittance of funds, and so forth.
The purpose of transaction design is to define and document the high-level charac-
teristics of transactions required on the database system, including the following:
• Data to be used by the transaction
• Functional characteristics of the transaction
• Output of the transaction
• Importance to users
• Expected rate of usage
There are three main types of transactions:
•
Retrieval transactions: Retrieves data from display on the screen
•
Update transactions: Inserts new records, deletes old records, or modifies existing
records in the database
•
Mixed transactions: Involves both retrieval and updating of data
Transaction State
In the absence of failures, all transactions complete successfully. However, a transaction
may not always complete its execution successfully. Such a transaction is termed
aborted.
A transaction that completes its execution successfully is said to be
committed. Fig-
ure 8-1 shows that if a transaction has been partially committed, it will be committed but
only if it has not failed; and if the transaction has failed, it will be aborted.
Figure 8-1. States of a transaction
CHAPTER 8 ■ UNDERSTANDING TRANSACTIONS138
9004ch08final.qxd 12/13/07 4:13 PM Page 138
Specifying Transaction Boundaries
SQL Server transaction boundaries help you to identify when SQL Server transactions
start and end by using API functions and methods:
•
Transact-SQL statements: Use the BEGIN TRANSACTION, COMMIT TRANSACTION, COMMIT
WORK, ROLLBACK TRANSACTION, ROLLBACK WORK, and SET IMPLICIT_TRANSACTIONS state-
ments to delineate transactions. These are primarily used in DB-Library appli-
cations and in T-SQL scripts, such as the scripts that are run using the
osql
command-prompt utility.
•
API functions and methods: Database APIs such as ODBC, OLE DB, ADO, and the
.NET Framework
SQLClient namespace contain functions or methods used to
delineate transactions. These are the primary mechanisms used to control trans-
actions in a database engine application.
Each transaction must be managed by only one of these methods. Using both meth-
ods on the same transaction can lead to undefined results. For example, you should not
start a transaction using the ODBC API functions, and then use the T-SQL
COMMIT state-
ment to complete the transaction. This would not notify the SQL Server ODBC driver that
the transaction was committed. In this case, use the ODBC
SQLEndTran function to end
the transaction.
T-SQL Statements Allowed in a Transaction
You can use all T-SQL statements in a transaction, except for the following statements:
ALTER DATABASE, RECONFIGURE, BACKUP, RESTORE, CREATE DATABASE, UPDATE STATISTICS, and
DROP DATABASE.
Also, you cannot use
sp_dboption to set database options or use any system proce-
dures that modify the master database inside explicit or implicit transactions.
Local Transactions in SQL Server 2005
All database engines are supposed to provide built-in support for transactions. Trans-
actions that are restricted to only a single resource or database are known as
local
transactions
. Local transactions can be in one of the following four transaction modes:
CHAPTER 8 ■ UNDERSTANDING TRANSACTIONS 139
9004ch08final.qxd 12/13/07 4:13 PM Page 139
Autocommit Transactions Autocommit mode is the default transaction management
mode of SQL Server. Every T-SQL statement is committed or rolled back when it is com-
pleted. If a statement completes successfully, it is committed; if it encounters any errors,
it is bound to roll back. A SQL Server connection operates in autocommit mode when-
ever this default mode has not been overridden by any type transactions.
Explicit Transactions Explicit transactions are those in which you explicitly control when
the transaction begins and when it ends. Prior to SQL Server 2000, explicit transactions
were also called
user-defined or user-specified transactions.
T-SQL scripts for this mode use the
BEGIN TRANSACTION, COMMIT TRANSACTION, and
ROLLBACK TRANSACTION statements. Explicit transaction mode lasts only for the duration
of the transaction. When the transaction ends, the connection returns to the transaction
mode it was in before the explicit transaction was started.
Implicit Transactions When you connect to a database using SQL Server Management
Studio Express and execute a DML query, the changes are automatically saved. This
occurs because, by default, the connection is in autocommit transaction mode. If you
want no changes to be committed unless you explicitly indicate so, you need to set the
connection to implicit transaction mode.
You can set the database connection to implicit transaction mode by using
SET
IMPLICIT _TRANSACTIONS ON|OFF.
After implicit transaction mode has been set to
ON for a connection, SQL Server auto-
matically starts a transaction when it first executes any of the following statements:
ALTER
TABLE, CREATE, DELETE, DROP, FETCH, GRANT, INSERT, OPEN, REVOKE, SELECT, TRUNCATE TABLE, and
UPDATE.
The transaction remains in effect until a
COMMIT or ROLLBACK statement has been
explicitly issued. This means that when, say, an
UPDATE statement is issued on a particular
record in a database, SQL Server will maintain a lock on the data scoped for data modifi-
cation until either a
COMMIT or ROLLBACK is issued. I
n case neither of these commands is
issued, the transaction will be automatically rolled back when the user disconnects. This
is why it is not a best practice to use implicit transaction mode on a highly concurrent
database.
Batch-Scoped T
ransactions
A connection
can be in batch-scoped tr
ansaction mode
, if the
tr
ansaction r
unning in it is M
ultiple A
ctiv
e Result Sets (MARS) enabled. Basically MARS
has an associated batch execution envir
onment, as it allo
ws ADO .NET to take adv
antage
of SQL S
er
v
er 2005’
s capability of having multiple activ
e commands on a single connec-
tion object.
When MARS is enabled, y
ou can hav
e multiple interleav
ed batches executing at the
same time
, so all the changes made to the execution envir
onment ar
e scoped to the spe
-
cific batch until the execution of the batch is complete
. O
nce the execution of the batch
CHAPTER 8 ■ UNDERSTANDING TRANSACTIONS140
9004ch08final.qxd 12/13/07 4:13 PM Page 140
completes, the execution settings are copied to the default environment. Thus a connec-
tion is said to be using batch-scoped transaction mode if it is running a transaction, has
MARS enabled on it, and has multiple batches running at the same time.
MARS allows executing multiple interleaved batches of commands. However, MARS
does not let you have multiple transactions on the same connection, it only allows having
Multiple Active Result Sets.
Distributed Transactions in SQL Server 2005
In contrast to local transactions, which are restricted to a single resource or database,
distributed transactions span two or more servers, which are known as resource man-
agers
. Transaction management needs to be coordinated among the resource managers
via a server component known as a
transaction manager or transaction coordinator. SQL
Server can operate as a resource manager for distributed transactions coordinated by
transaction managers such as the Microsoft Distributed Transaction Coordinator (MS DTC).
A transaction with a single SQL Server that spans two or more databases is actually
a distributed transaction. SQL Server, however, manages the distributed transaction
internally.
At the application level, a distributed transaction is managed in much the same way
as a local transaction. At the end of the transaction, the application requests the trans-
action to be either committed or rolled back. A distributed commit must be managed
differently by the transaction manager to minimize the risk that a network failure might
lead you to a situation when one of the resource managers is committing instead of
rolling back the transactions due to failure caused by various reasons. This critical situa-
tion can be handled by managing the commit process in two phases, also known as
two-
phase commit
:
Prepare phase: When the transaction manager receives a commit request, it sends a
prepare command to all of the resource managers involved in the transaction. Each
resource manager then does everything required to make the transaction durable,
and all buffers holding any of the log images for other transactions are flushed to
disk. As each resource manager completes the prepare phase, it returns success or
failure of the prepare phase to the transaction manager.
Commit phase: If the transaction manager receives successful prepares from all of
the resource managers, it sends a
COMMIT command to each resource manager. If all
of the resource managers report a successful commit, the transaction manager sends
notification of success to the application. If any resource manager reports a failure to
prepare, the transaction manager sends a
ROLLBACK statement to each resource man-
ager and indicates the failure of the commit to the application.
CHAPTER 8 ■ UNDERSTANDING TRANSACTIONS 141
9004ch08final.qxd 12/13/07 4:13 PM Page 141
Guidelines to Code Efficient Transactions
We recommend you use the following guidelines while coding transactions to make them
as efficient as possible:
•
Do not require input from users during a transaction.
Get all required input from users before a transaction is started. If additional user
input is required during a transaction, roll back the current transaction and restart
the transaction after the user input is supplied. Even if users respond immediately,
human reaction times are vastly slower than computer speeds. All resources held
by the transaction are held for an extremely long time, which has the potential to
cause blocking problems. If users do not respond, the transaction remains active,
locking critical resources until they respond, which may not happen for several
minutes or even hours.
•
Do not open a transaction while browsing through data, if at all possible.
Transactions should not be started until all preliminary data analysis has been
completed.
•
Keep the transaction as short as possible.
After you know the modifications that have to be made, start a transaction, execute
the modification statements, and then immediately commit or roll back. Do not
open the transaction before it is required.
•
Make intelligent use of lower cursor concurrency options, such as optimistic concur-
rency options.
In a system with a lo
w probability of concurrent updates, the overhead of dealing
with an occasional
“
somebody else changed your data after you read it” error can
be much lo
w
er than the overhead of always locking rows as they are read.
•
Access the least amount of data possible while in a transaction.
The smaller the amount of data that you access in the transaction, the fewer the
number of rows that will be locked, reducing contention between transactions.
CHAPTER 8 ■ UNDERSTANDING TRANSACTIONS142
9004ch08final.qxd 12/13/07 4:13 PM Page 142
How to Code Transactions
The following three T-SQL statements control transactions in SQL Server:
•
BEGIN TRANSACTION: This marks the beginning of a transaction.
•
COMMIT TRANSACTION: This marks the successful end of a transaction. It signals the
database to save the work.
•
ROLLBACK TRANSACTION: This denotes that a transaction hasn’t been successful and
signals the database to roll back to the state it was in prior to the transaction.
Note that there is no
END TRANSACTION statement. Transactions end on (explicit or
implicit) commits and rollbacks.
Coding Transactions in T-SQL
You’ll use a stored procedure to practice coding transactions in SQL. It’s an intentionally
artificial example but representativ
e of transaction processing fundamentals. It keeps
things simple so you can focus on the important issue of what can happen in a trans-
action. That’s what you really need to understand, especially when you later code the
same transaction in C#.
■Warning Using ROLLBACK and COMMIT inside stored procedures typically requires careful consideration
of what transactions may already be in progress and have led to the stored procedure call. The example runs
by itself, so you don’t need to be concerned with this here, but you should always consider whether it’s a
potential issue.
Try It Out: Coding a Transaction in T-SQL
H
ere, you’ll code a transaction to both add a customer to and delete one from the
N
orthwind Customers table. The Customers table has eleven columns; two columns,
C
ustomerID and CompanyName, don’t allow null values, whereas the rest do, so you’ll
use just the C
ustomerID and CompanyName columns for inserting values. You’ll also use
arbitr
ary customer IDs to make it easy to find the rows you manipulate when viewing
customers sor
ted by ID.
CHAPTER 8 ■ UNDERSTANDING TRANSACTIONS 143
9004ch08final.qxd 12/13/07 4:13 PM Page 143
1. Open SQL Server Management Studio Express, and in the Connect to Server dia-
log box, select
<ServerName>\SQLEXPRESS as the server name and then click
Connect.
2. In Object Explorer, expand the Databases node, select the Northwind database,
and click the New Query button.
3. Create a stored procedure named sp_Trans_Test using the code in Listing 8-1.
Listing 8-1. sp_Trans_Test
create procedure sp_Trans_Test
@newcustid nchar(5),
@newcompname nvarchar(40),
@oldcustid nchar(5)
as
declare @inserr int
declare @delerr int
declare @maxerr int
set @maxerr = 0
begin transaction
Add a customer
insert into customers (customerid, companyname)
values(@newcustid, @newcompname)
Save error number returned from Insert statement
set @inserr = @@error
if @inserr > @maxerr
set @maxerr = @inserr
Delete a customer
delete from customers
where customerid = @oldcustid
Save error number returned from Delete statement
set @delerr = @@error
if @delerr > @maxerr
set @maxerr = @delerr
CHAPTER 8 ■ UNDERSTANDING TRANSACTIONS144
9004ch08final.qxd 12/13/07 4:13 PM Page 144
If an error occurred, roll back
if @maxerr <> 0
begin
rollback
print 'Transaction rolled back'
end
else
begin
commit
print 'Transaction committed'
end
print 'INSERT error number:' + cast(@inserr as nvarchar(8))
print 'DELETE error number:' + cast(@delerr as nvarchar(8))
return @maxerr
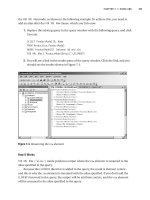
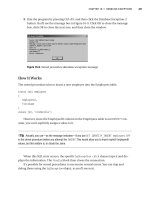
4. Enter the following query in the same query windows as the Listing 8-1 code. Select
the statement as shown in Figure 8-2, and then click Execute to run the query.
exec sp_Trans_Test 'a ', 'a ', 'z '
The results window should show a return value of zero, and you should see the
same messages as shown in Figure 8-2.
Figure 8-2. E
x
ecuting the stor
ed pr
ocedure
CHAPTER 8 ■ UNDERSTANDING TRANSACTIONS 145
9004ch08final.qxd 12/13/07 4:13 PM Page 145
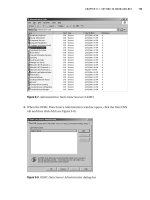
5. In the same query window, enter the following SELECT statement:
S
elect * from Customers
Select the statement as shown in Figure 8-3 and then click the Execute button. You
will see that the customer named “a” has been added to the table, as shown in the
Results tab in Figure 8-3.
Figure 8-3. Row inserted in a transaction
6. Add another customer with parameter value “aa” for both @newcustid and
@newcompname and “z” for @oldcustid. Enter the following statement and execute
it as you’ve done previously with other similar statements.
exec sp_Trans_Test 'aa ', 'aa ', 'z '
You should get the same results shown earlier in Figure 8-2 in the Messages tab.
7. Try the SELECT statement shown in Figure 8-3 one more time. You should see that
customer “aa” has been added to the Customers table. Both customer “a” and “aa”
have no child records in the Orders table.
CHAPTER 8 ■ UNDERSTANDING TRANSACTIONS146
9004ch08final.qxd 12/13/07 4:13 PM Page 146
How It Works
In the stored procedure, you define three input parameters:
create procedure sp_Trans_Test
@newcustid nchar(5),
@newcompname nvarchar(40),
@oldcustid nchar(5)
as
You also declare three local variables:
declare @inserr int
declare @delerr int
declare @maxerr int
These local variables will be used with the stored procedure, so you can capture and
display the error numbers returned if any from the
INSERT and DELETE statements.
You mark the beginning of the transaction with a
BEGIN TRANSACTION statement and
follow it with the
INSERT and DELETE statements that are part of the transaction. After each
statement, you save the return number for it.
begin transaction
Add a customer
insert into customers (customerid, companyname)
values(@newcustid, @newconame)
Save error number returned from Insert statement
set @inserr = @@error
if @inserr > @maxerr
set @maxerr = @inserr
Delete a customer
delete from customers
where customerid = @oldcustid
Save error number returned from Delete statement
set @delerr = @@error
if @delerr > @maxerr
set @maxerr = @delerr
CHAPTER 8 ■ UNDERSTANDING TRANSACTIONS 147
9004ch08final.qxd 12/13/07 4:13 PM Page 147
Error handling is important at all times in SQL Server, and it’s never more so than
inside transactional code. When you execute any T-SQL statement, there’s always the
possibility that it may not succeed. The T-SQL
@@ERROR function returns the error number
for the last T-SQL statement executed. If no error occurred,
@@ERROR returns zero.
@@ERROR is reset after every T-SQL statement (even SET and IF) is executed, so if you
want to save an error number for a particular statement, you must store it before the next
statement executes. That’s why you declare the local variables
@inserr and @delerr and
@maxerr.
If
@@ERROR returns any value other than 0, an error has occurred, and you want to roll
back the transaction. You also include
PRINT statements to report whether a rollback or
commit has occurred.
If an error occurred, roll back
if @maxerr <> 0
begin
rollback
print 'Transaction rolled back'
end
else
begin
commit
print 'Transaction committed'
end
■Tip T-SQL (and standard SQL) supports various alternative forms for keywords and phrases. You’ve used
just ROLLBACK and COMMIT here.
Then you add some more instrumentation, so you could see what error numbers are
encountered during the transaction.
print 'INSERT error number:' + cast(@inserr as nvarchar(8))
print 'DELETE error number:' + cast(@delerr as nvarchar(8))
return @maxerr
N
o
w let
’
s look at what happens when y
ou execute the stored procedure. You run it
twice
, first b
y adding customer
“
a
” and next by adding customer “aa”, but you also enter
the same nonexistent customer to delete each time
. I
f all statements in a tr
ansaction ar
e
supposed to succeed or fail as one unit, why does the
INSERT succeed when the DELETE
doesn
’
t delete anything?
CHAPTER 8 ■ UNDERSTANDING TRANSACTIONS148
9004ch08final.qxd 12/13/07 4:13 PM Page 148
Figure 8-2 should make everything clear. Both the INSERT and DELETE return error
number zero. The reason
DELETE returns error number zero even though it has not deleted
any rows is that when a
DELETE doesn’t find any rows to delete, T-SQL doesn’t treat that as
an error. In fact, that’s why you use a nonexistent customer. The rest of the customers
(well, all but the two you have just added) have child orders, and you can’t delete these
existing customers unless you delete their orders first.
Try It Out: What Happens When the First Operation Fails
In this example, you’ll try to insert a duplicate customer and delete an existing customer.
Add customer “a” and delete customer “aa” by entering the following statement, and
then click the Execute button.
exec sp_Trans_Test 'a', 'a ', 'aa '
The result should appear as in Figure 8-4.
Figure 8-4. Second operation rolled back
In the Messages pane shown in Figure 8-4, note that the transaction was rolled back
because the
INSERT failed and was terminated with error number 2627 (whose error mes-
sage appears at the top of the window). The
DELETE error number was 0, meaning it exe-
cuted successfully but was rolled back. (If you check the table, you’ll find that customer
“aa” still exists in the Customers table.)
How It Works
Since customer “a” already exists, SQL Server prevents the insertion of a duplicate, so
the first operation fails. The second
DELETE statement in the transaction is executed, and
customer “aa” is deleted since it doesn’t have any child records in the Orders table; but
because
@maxerr isn’t zero (it’s 2627, as you see in the Results pane), you roll back the
transaction by undoing the deletion of customer “aa”.
CHAPTER 8 ■ UNDERSTANDING TRANSACTIONS 149
9004ch08final.qxd 12/13/07 4:13 PM Page 149
Try It Out: What Happens When the Second Operation Fails
In this example, you’ll insert a valid new customer and try to delete a customer who has
child records in Orders table.
Add customer “aaa” and delete customer ALFKI by entering the following statement,
and then click the Execute button.
exec sp_Trans_Test 'aaa', 'aaa ', 'ALFKI'
The result should appear as in Figure 8-5.
Figure 8-5. First operation rolled back.
In the Messages window shown in Figure 8-5, note that the transaction was rolled
back because the
DELETE failed and was terminated with error number 547 (the message
for which appears at the top of the window). The
INSERT error number was 0, so it appar-
ently executed successfully but was rolled back. (If you check the table, you’ll find “aaa”
is not a customer.)
How It Works
Since customer “aaa” doesn’t exist, SQL Server inserts the row, so the first operation
succeeds
.
When the second statement in the transaction is executed, SQL Server pre-
vents the deletion of customer ALFKI because it has child records in the Orders table,
but since
@maxerr isn’t zero (it’s 547, as you see in the Results pane), the entire trans-
action is rolled back.
Try It Out: What Happens When Both Operations Fail
In this example, you’ll try to insert an invalid new customer and try to delete an
undeletable one.
CHAPTER 8 ■ UNDERSTANDING TRANSACTIONS150
9004ch08final.qxd 12/13/07 4:13 PM Page 150
Add customer “a” and delete customer ALFKI by entering the following statement,
and then click the Execute button.
exec sp_Trans_Test 'a ', 'a ', 'ALFKI'
The result should appear as in Figure 8-6.
Figure 8-6. Both operations rolled back
In the Messages window shown in Figure 8-6, note that the transaction was rolled
back (even though neither statement succeeded, so there was nothing to roll back)
because
@maxerr returns 2627 for the INSERT and 547 for the DELETE. Error messages for
both failing statements are displayed at the top of the window.
How It Works
By now, you should understand why both statements failed. This example proves that
even when the first statement fails, the second is executed (and in this case fails with
error number 547). Our original example, where the error code is zero when there are no
rows to delete, didn’t necessarily prove this since the error number there may have come
from the line
set @maxerr = @inserr
immediately befor
e the
DELETE statement.
Coding Transactions in ADO.NET
I
n ADO
.NET, a transaction is an instance of a class that implements the interface
System.Data.IDbTransaction.
Like a data r
eader, a transaction has no constructor of its
o
wn but is cr
eated by calling another object’s method—in this case, a connection’s
BeginTransaction method
. C
ommands are associated with a specific transaction for a
specific connection, and any SQL submitted b
y these commands is executed as par
t of
the same tr
ansaction.
CHAPTER 8 ■ UNDERSTANDING TRANSACTIONS 151
9004ch08final.qxd 12/13/07 4:13 PM Page 151