build your own ajax web applications PHẦN 8 ppsx
Bạn đang xem bản rút gọn của tài liệu. Xem và tải ngay bản đầy đủ của tài liệu tại đây (599.44 KB, 32 trang )
var enable = false;
self.ajax = new Ajax();
self.form = document.getElementById('searchForm');
document.getElementById('resultsDiv').style.display = 'block';
self.form.onsubmit = function() { return false; };
self.hand['searchButton'] = self.submitSearch;
self.evalSearchTextState();
The init method starts off by doing all your normal app initialization stuff—it
creates the Ajax object for submitting searches and sets up a reference to the web
form.
Next, it “turns on” the results section of the UI. A CSS declaration of display:
none is associated with the div that has the ID resultsDiv; as such, non-JavaS-
cript browsers won’t see the div, but browsers that do support JavaScript will.
This is the div that will contain our AJAX-powered UI. As part of this application,
we’ll be looking at how we could build an alternate UI for non-JavaScript browsers
that will POST to a different page.
Next, init sets up an event handler for the form’s Submit button. We’re using
an input type="submit" element for this button, which allows the form to work
for non-JavaScript-capable clients too. We don’t want our JavaScript clients to
submit the actual form because we’re making our requests with AJAX; thus, we
have to suppress form submission.
Then, the method places a reference to what will become the Submit button’s
onclick event handler into the hand property—an associative array with the
button ID as key.
Then, the method places into the hand property an associative array with the
button ID as its key. The method places into hand a reference to the method
that will become the Submit button’s onclick event handler.
This gives us a convenient way to store all the onclick handlers for the buttons
so we can turn buttons on and off at will. We’ll see how this works in the next
section.
Next is a call to evalSearchTextState, which looks at the SearchText field, and
either enables or disables the Search button based on whether or not it contains
any text. Here’s the code for evalSearchTextState:
203
The init Method
Licensed to
File: webservices2.js (excerpt)
this.evalSearchTextState = function() {
var self = Search;
var enableState = 'off';
if (self.form.SearchText.value.length > 0) {
enableState = 'on';
}
self.setButtonState(self.form.searchButton, enableState);
};
This method prevents users from trying to submit a search without entering any
search terms.
The middle chunk of the init method deals with the Back button code:
File: webservices2.js (excerpt)
if (BROWSER_BACK) {
self.startHist();
}
else {
self.addHistoryNav();
}
The first part of the if-else branch is for the browser Back button fix. It fires up
some code that watches for changes to the browser history and the location
bar—we’ll be covering how this works in the section devoted to the browser Back
button fix. The other branch sets up an application navigation panel that has
both Back and Forward buttons. You’ll see how all this works in the section that
explains how to build your own Back button.
The final chunk of code turns on these features for users with screen readers:
File: webservices2.js (excerpt)
self.enableScreenReaderFeatures();
};
This method is almost identical to the method with the same name that was part
of our login application in Chapter 4. There are a few tweaks that need to be
made to the screen reader code that’s specific to this app. We’ll be going over
these in the section on screen reader code near the end of the chapter.
204
Chapter 7: More Web Services and a Back Button
Licensed to
Disabling and Enabling Buttons
We saw above that the evalSearchTextState method called from init prevents
users from submitting searches with no search text. It does so by calling
setButtonState to enable or disable the Submit button according to whether or
not the SearchText field has a value.
Here’s the code for setButtonState:
File: webservices2.js (excerpt)
this.setButtonState = function(buttonRef, enableState) {
var self = Search;
if (enableState == 'on') {
buttonRef.disabled = false;
buttonRef.onclick = self.hand[buttonRef.id];
}
else {
buttonRef.disabled = true;
buttonRef.onclick = null;
}
};
The method takes two parameters — buttonRef, a reference to the button to be
toggled on and off, and enable, a boolean that says whether we’re turning the
button on or off.
Enabling the button sets its disabled property to false. The code then looks
at the associative array of handler methods stored in hand, and uses the button’s
ID as a key to figure out which method should be attached to that button.
Disabling the button is simple—we just set its disabled property to true so that
it appears properly dimmed out, and set the button’s onclick event handler to
null so that clicking the button will have no effect.
Enabling Search
Now that we’ve got the UI all set up, it’s time to perform some searches. Initially,
the Search button is disabled, because the search text box is empty. This approach,
which is similar to what we did with the application login in Chapter 4, represents
a proactive approach to validating input. In this way, we prevent users from
making mistakes, rather than waiting until they’ve taken some action before we
205
Disabling and Enabling Buttons
Licensed to
tell them “sorry, that was wrong.” When the button is disabled, it’s impossible
for legitimate users to submit an empty search.
Once the user has typed something into the text field, we need to enable the
Search button. We do this in the same way we enabled the Search button in
Chapter 4—via a method attached to the document.onkeyup event for the page:
File: webservices2.js (excerpt)
document.onkeyup = Search.keyup;
That method will fire each time users hit a key, and will check to see whether or
not they’re typing into the search text box. Here’s the code for keyup:
File: webservices2.js (excerpt)
this.keyup = function(e) {
var self = Search;
e = e || window.event;
if (e.keyCode == 13) {
if (!self.form.searchButton.disabled) {
self.submitSearch();
}
}
else {
self.evalSearchTextState();
}
};
Note that since all keyboard input goes through this method, we’re also using it
to submit the search when the user hits the Enter key (which has a keyCode of
13). If the pressed key was the Enter key, it will submit the search—but only if
the Search button has been enabled.
The submitSearch Method
Once users have typed something into the search text box, and the Search button
is enabled, they can either click the Search button or hit Enter to perform the
search. Both options call the submitSearch method. Here’s the first chunk of
the code for submitSearch:
File: webservices2.js (excerpt)
this.submitSearch = function() {
var self = Search;
var service = '';
206
Chapter 7: More Web Services and a Back Button
Licensed to
var searchText = '';
var proxyURI = '';
var dt = new Date();
service = self.form.SearchService.value;
searchText = self.form.SearchText.value;
if (service != self.service || searchText != self.searchText) {
self.service = service;
self.searchText = searchText;
self.setButtonState(self.form.searchButton, 'off');
This code is fairly straightforward. It pulls the form values into some local variables
(service for the web service to use for the search, and searchText for the string
of text to search on), then checks that this isn’t the user’s previous search by
comparing service and searchText against properties of the same names.
Provided at least one of these doesn’t match, we disable the Search button and
store service and searchText in these properties. This stops an impatient user
from repeating the same search over and over again. The service and searchText
properties will be used later as we navigate the user’s search history with the Back
button.
Passing to the Proxy Script
The next chunk of the code looks like this:
File: webservices2.js (excerpt)
proxyURI = '/webservices2_proxy.php' +
'?search=' + escape(self.searchText) +
'&service=' + self.service +
'&dt=' + dt.getTime;
As in the previous chapter, this application will use a proxy script to relay our
AJAX requests to URIs on a server that’s different from the one on which our
AJAX app lives. Browser security prevents us from making requests directly to
those other servers, so we go through a proxy script on our own server. Note that
we need to escape the service and search terms in order to pass them along on
the query string.
Submitting the Search
Here’s the last chunk of code for the submitSearch method:
207
Passing to the Proxy Script
Licensed to
File: webservices2.js (excerpt)
document.getElementById('resultsDiv').innerHTML =
'<div class="resultsPaneDiv">Processing </div>';
self.ajax.doGet(proxyURI, self.handleResp, 'xml');
}
};
The code clears out the div used to display search results, and sets its displayed
text to “Processing … .”
That’s right, folks: for this application we’re going to take a break from fancy
animated status animations, and just use a plain text notification to let the user
know that the app is busy performing the search. If you have seen the animations
in our other demo applications, you may be surprised to see how effective static
text can be. The really important thing, in any case, is to give your users clear
cues about what the app is doing.
The other thing to notice is the method we’re using to set the processing status
text—the dreaded innerHTML property. Despite the fact that it may make some
of the more dogmatic developers among us hyperventilate, in this app, there are
good reasons to use innerHTML. I’ll explain more about why we’re using it a little
later, in the section that talks about processing the response from the web service.
Finally, we pass the request to the proxy page using the doGet method of our
Ajax object, passing xml as the last parameter so that we get the results back as
an XML document.
You may remember from this chapter’s introduction that this application is
supposed to work with web services by sending XML-RPC and SOAP requests;
XML-RPC and SOAP rely on POST requests that send XML back to the server.
You might be wondering how we’re going to do all that with this simple GET re-
quest and a couple of variables on the query string. Well, sending the POST request
will be a job for our proxy script.
The Proxy Script
Dealing with all the different web services that we want to use for searches is
going to require more complicated server-side code than what we saw in the last
chapter. After all, we’re not just sending simple REST requests with GET any
more—some of these web services use XML-RPC; others use SOAP. As such,
we’ll need to use different libraries of code to talk to the different web services.
208
Chapter 7: More Web Services and a Back Button
Licensed to
The proxy script for this application is webservices2_proxy.php. We’re devel-
oping it in PHP, but you could easily use another language, such as Ruby, Python,
Perl, ASP, or Java.
To make things as clear and easy as possible to follow, I’ve arranged the code as
a bunch of case statements—one for each web service. All the web services we’re
using in our example code return the result as an XML document; we then return
this document to our client-side JavaScript code for parsing and display.
Requirements
Just like with the simple web services example we saw in the last chapter, we’re
using the PHP PEAR module HTTP_Request to perform the HTTP requests in
this app’s proxy script. These code examples will not work unless you have the
HTTP_Request package installed.
Additionally, the SOAP calls to the Google Web APIs will require that you either
use the PEAR SOAP package,
1
or that your PHP installation is compiled with
enable-soap.
Initial Setup
Here’s how the code for the proxy script starts:
File: webservices2_proxy.php (excerpt)
<?php
require_once "HTTP/Request.php";
var $searchText = $_REQUEST['search'];
var $service = $_REQUEST['service'];
var $uri = '';
var $key = null;
var $userToken = '';
var $xml = '';
switch ($service) {
After including the HTTP_Request package, we make some variable declarations.
The first two variables are the inputs passed on the query string—$service, the
web service we want to use to perform the search, and $searchText, the text for
which we’re searching.
1
/>209
Requirements
Licensed to
Validate Input from the Client
Because this is only a demonstration app, we’re not doing anything special
to validate the input from the browser. However, if this were a production
application, you would absolutely want to take steps to make sure that the
data coming from the browser was safe before you used it in your code.
The other variables will contain some fairly basic pieces of information that we
need for the request, such as the URI, access keys, and $xml, the variable into
which we’re going to put the response from the server.
In the last line of this code snippet, we start a switch statement that will contain
a case for each of the services that our application can access.
Amazon Web Services
We’ll start with Amazon’s E-Commerce Service, the service we accessed in the
last chapter. Here’s the code we’ll use in our new proxy script to set up a search
with the Amazon E-Commerce Service:
File: webservices2_proxy.php (excerpt)
case 'amazon':
$key = 'Access Key ID';
$uri = ' /> '?Service=AWSECommerceService' .
'&AWSAccessKeyId=' . urlencode($key) .
'&Operation=ItemSearch' .
'&SearchIndex=Books' .
'&Keywords=' . urlencode($searchText) .
'&Sort=relevancerank';
var $req =& new HTTP_Request($uri);
var $result = $req->sendRequest();
if (PEAR::isError($result)) {
die($result->getMessage());
}
else {
$xml = $req->getResponseBody();
}
break;
This looks very similar to the code we saw in the last chapter. We set the access
key, then add it to the query string along with our search term. Be sure to URL-
encode the term.
210
Chapter 7: More Web Services and a Back Button
Licensed to
We then use the HTTP_Request module to make the request and put the result
in the $xml variable.
Printing the Response
The code for printing out the result lives at the very bottom of the page, outside
the switch statement.
File: webservices2_proxy.php (excerpt)
}
header('Content-Type: text/xml');
print($xml);
?>
This very simple scrap of code sets the Content-Type header for the response to
text/xml, and prints the result into $xml. Once executed, the code for each web
service puts its results into $xml, which is then returned to our AJAX client.
Google Web APIs
Next, we’ll have a look at how to perform a search using Google’s web service
APIs. To access the Google Web APIs, you need an access key, as was the case
with Amazon Web Services. You can sign up for an account and get your free
key from the Google Web APIs site.
2
Unlike Amazon, Google’s web services limit you to 1000 requests per day. If you
attempt to make more than 1000 queries in a day, Google’s server will respond
with a SOAP fault stating that you have exceeded the maximum number of
queries allowed. The Google Web APIs FAQ suggests that in such cases “you
might want to get some sleep and start querying again tomorrow.”
Using a SOAP Library
Google’s web services use SOAP, which we mentioned briefly in the overview of
web services in the previous chapter. The idea with SOAP is that you should be
able to use a library to make simple calls to the service as if you were calling
methods on an object in your own code.
2
/>211
Printing the Response
Licensed to
However, sometimes getting your library set up and working properly can be a
bit of a challenge. PHP provides SOAP support via an extension, but to use it
you have to compile PHP with the enable-soap option. The alternative is to
use the SOAP module from PHP’s PEAR repository.
3
Since that module is officially
still in beta at the time of writing, installation using the command-line pear
command will not work—you’ll need to download the package, unzip it, and
place the SOAP directory in a place where the webservices2_proxy.php page can
find it.
Here’s the first part of our Google code:
File: webservices2_proxy.php (excerpt)
case 'google':
var $wsdlURI = '
$key = 'Licence Key';
This section sets up your licence key and the location of the WSDL document
for Google’s web service.
We talked about WSDL a little bit in last chapter’s introduction to web services.
A WSDL document provides a description of a SOAP web server. Our SOAP
library uses it kind of like a remote configuration file to set itself up to perform
calls to the Google service.
Code for the SOAP Extension
First comes the section of code that works with the SOAP extension that you
made available by compiling PHP with the enable-soap option:
File: webservices2_proxy.php (excerpt)
if (extension_loaded('soap')) {
$soapClient = new SoapClient($wsdlURI, array('trace' => 1));
$result = $soapClient->doGoogleSearch($key, $searchText, 0, 10,
false, '', false, '', 'latin', 'latin');
if (is_soap_fault($result)) {
trigger_error("SOAP Fault: (faultcode: {$result->faultcode},
faultstring: {$result->faultstring})", E_ERROR);
}
else {
$xml = $soapClient->__getLastResponse();
}
}
3
/>212
Chapter 7: More Web Services and a Back Button
Licensed to
The code sets up a SOAP client using Google’s WSDL document, makes the call
to doGoogleSearch, and receives the raw XML output of the request.
You’ll notice the call to the doGoogleSearch method is very simple—it looks just
like you’re calling any other normal method in your code, even though it’s actually
making a call to Google’s servers. This is the power of SOAP—once you actually
set everything up so that SOAP can work, the function call is very simple.
The WSDL file describes the methods that the web service offers so the SOAP
client can expose them as if it was just another method of the class. For example,
Google’s WSDL file includes the following description of the doGoogleSearch
method:
<message name="doGoogleSearch">
<part name="key" type="xsd:string"/>
<part name="q" type="xsd:string"/>
<part name="start" type="xsd:int"/>
<part name="maxResults" type="xsd:int"/>
<part name="filter" type="xsd:boolean"/>
<part name="restrict" type="xsd:string"/>
<part name="safeSearch" type="xsd:boolean"/>
<part name="lr" type="xsd:string"/>
<part name="ie" type="xsd:string"/>
<part name="oe" type="xsd:string"/>
</message>
Here, the parameters for the doGoogleSearch method are defined, including the
Google Web APIs license key, the actual search terms, and so on. What these
parameters actually do is documented on the Google Web APIs site.
4
If you’re
interested in learning more about WSDL, the Further Reading section at the end
of this chapter offers some links to get you started.
When you create the SoapClient using the SOAP PHP extension, the second
parameter is an associative array of options for the SOAP client. One option that
we must turn on in order to get access to the response XML is trace. When this
has been set to 1, we can get access to the raw XML response using the
__getLastResponse method.
Code for the PEAR SOAP Module
Here’s the code that uses the PEAR SOAP client module to access Google’s web
service:
4
/>213
Using a SOAP Library
Licensed to
File: webservices2_proxy.php (excerpt)
else {
require_once 'SOAP/Client.php';
$wsdl = new SOAP_WSDL($wsdlURI);
$soapClient = $wsdl->getProxy();
$result = $soapClient->doGoogleSearch($key, $searchText, 0, 10,
false, '', false, '', 'latin', 'latin');
if (PEAR::isError($result)) {
die($result->getMessage());
}
else {
$xml = $soapClient->xml;
}
}
break;
This code is pretty similar to the code for the compiled-in extension. After the
require statement for the SOAP client module, the code sets up the SOAP client,
makes the call to doGoogleSearch, then gets the raw XML output of the response.
Again, once everything is in place, making the call to doGoogleSearch is super-
simple. In fact, the call is exactly the same for both the extension and the PEAR-
module clients, thanks to the WSDL definition.
The PEAR module makes it a bit easier to get the XML from the response. It
provides a built-in xml property for the client object that contains the actual
XML response from the server.
Remember that once we break from this case, the content of $xml will be printed
out, so we’re all done with our Google proxy!
The eBay Platform
eBay also provides a set of web services to application developers.
5
It offers a
wide range of ways to access the service, including REST, SOAP, and plain XML.
Since we’ve already seen examples of REST and SOAP, we’ll use XML-RPC to
access eBay’s web services.
5
/>214
Chapter 7: More Web Services and a Back Button
Licensed to
A Few Hurdles
Since eBay provides full access to buying and selling functions through its web
services, there are a few extra security hurdles you’ll need to jump in order to get
eBay web services working. eBay requires us to use SSL encryption when commu-
nicating with the server, three separate keys (as opposed to Amazon and Google,
which require just one), and a user token that represents the user performing the
transaction. As we’ll only be performing searches, we’ll just set up a single user
and use the same token for every query.
SSL Encryption
Communicating with eBay requires SSL encryption, so please note that the
example code we’ll use to work with the eBay service will only work if your
server can send HTTPS requests. To find out if your server supports SSL,
ask your system administrator. PHP users can run phpinfo and look for
OpenSSL. If OpenSSL is present, you shouldn’t have a problem.
Access Keys and User Tokens
Instead of the single key we’ve used with other web services, eBay requires us to
use three keys, plus a user token, to access the service. You receive the three access
keys when you sign up for the Developers’ Program, but you’ll need to go through
a separate process to obtain the user token. The three keys are:
AppID
the unique identifier for the application
DevID
the developer’s unique identifier
CertID
an authentication certificate that ensures the application really is what
it says it is
To get your own keys, you’ll need to sign up on eBay’s Developers’ Program web
site.
6
Once you’ve signed up, instructions on how to get your keys will be emailed
to you.
Once you have your keys, it’s time to create a user token in the eBay Sandbox.
6
/>215
A Few Hurdles
Licensed to
The Sandbox
Your eBay developer account gives you unlimited access to the eBay Sandbox,
7
and the opportunity to self-certify your application to gain limited free access to
the eBay production environment. The eBay Sandbox is a mockup of the real
eBay environment that contains realistic “dummy” data. It gives you a chance
to play around with realistic data without worrying that you might wreak havoc
with actual customer information. Our test code performs its searches using the
Sandbox, which means we won’t be displaying the same results we’d receive from
a search on the actual eBay site.
To create a user in the Sandbox environment, sign in to eBay’s developer program
web site, then click the Sandbox User Registration link to register a dummy user.
Once you’ve registered your dummy user, click the link to generate an authentic-
ation and authorization token. You’ll need to sign in as the dummy user as part
of this process, and eventually you’ll be presented with a user token—a rather
lengthy string of characters.
The Code
Here’s the section of code that creates the request for eBay:
File: webservices2_proxy.php (excerpt)
case 'ebay':
require_once "eBayXMLRPC.php";
$key['devID'] = 'Your DevID';
$key['appID'] = 'Your AppID';
$key['certID'] = 'Your CertID';
$userToken = 'Your User Token';
$xmlRPC = new eBayXMLRPC();
$xmlRPC->createSession($key, 'GetSearchResults');
$xml = $xmlRPC->GetSearchResults($userToken, $searchText);
break;
This code uses a small helper library, eBayXMLRPC.php, which contains a class
for making XML-RPC requests to eBay. The library takes care of creating the
XML message for your search, and sets the eBay-specific HTTP request headers
that set up your eBay session. The library is included in the code archive, so have
a look at it if you’re interested in what XML-RPC is doing behind the scenes.
7
/>216
Chapter 7: More Web Services and a Back Button
Licensed to
Our proxy script simply uses the library to create an instance of eBayXMLRPC, an
XML-RPC client for the eBay Platform. Then, it creates a session and performs
the search. As before, we’re sticking the result into $xml so that we can print it
out later.
Testing the Proxy Script
A very simple way to test the proxy code is to enter the proxy page’s address into
your browser’s location bar manually, along with the query string that the client-
side JavaScript would add, and view the results directly in the browser window.
For example, if you were to search Amazon for a certain famous kung fu movie
studio, you might enter an address like this:
http://…/webservices2_proxy.php?search=shaw%20brothers&service=amazon
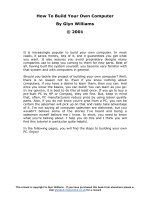
The browser will display the XML data response inline, without any styling. It’s
a fairly ugly response, but at least you can see what it is. Figure 7.2 shows how
the result from that search will display in the browser.
Figure 7.2. Displaying search results as plain XML in the browser
217
Testing the Proxy Script
Licensed to
Handling the Results
Now that we’re receiving XML results from a few different web services through
our proxy script, it’s time to hop back over to the client side and insert those
results—formatted nicely, of course—into a web page.
We made the original request to the proxy page with this call to our ajax object:
File: webservices2.js (excerpt)
self.ajax.doGet(proxyURI, self.handleResp, 'xml');
In this case, the handler function for the response is the intuitively named
handleResp, and the xml flag that’s passed last indicates that we’re expecting the
results to come back as XML.
The code for handleResp is broken up into a number of case statements inside
one large switch statement, like the one we used in the proxy script:
File: webservices2.js (excerpt)
this.handleResp = function(xml) {
var self = Search;
var res = [];
var item = '';
var str = '';
self.setButtonState(self.form.searchButton, 'on');
if (!xml) {
str += '<div class="resultsPaneDiv">' +
'(Error or no response from the server)</div>';
}
else {
switch (self.service) {
The first thing we need to do is to re-enable the Search button to let the user run
more searches. Then, after a cursory check to make sure we received an XML
result from the server, the code goes on to the cases for each different web service.
Amazon
Let’s start by handling responses from Amazon; the code below is very similar to
that from the previous chapter:
218
Chapter 7: More Web Services and a Back Button
Licensed to
File: webservices2.js (excerpt)
case 'amazon':
res = XMLParse.xml2ObjArray(xml, 'Item');
str += self.noResultsCheck(res.length);
for (var i = 0; i < res.length; i++) {
item = '<div class="itemDiv">';
item += '<div><a' +
' href=" /> + res[i].ASIN + '">' +
res[i].ItemAttributes.Title + '</a></div>';
if (res[i].ItemAttributes.Author) {
item += '<div>' + res[i].ItemAttributes.Author + '</div>';
}
item += '</div>';
str += item;
}
break;
The first step in the process for the Amazon service is to get an array of JavaScript
objects from the XML response returned by the server.
The XMLParse library makes this fairly easy—we just call the
XMLParse.xml2ObjArray method, passing it the XML document and the name
of the element in that document that we want transformed. xml2ObjArray returns
an array of JavaScript Objects. In the case of Amazon, we pass xml2ObjArray
Item, because each of the items is in an Item element.
If you’re adding your own services later, note that this parameter is case-sensitive.
Next, we use the noResultsCheck method to make sure we have some results.
This method simply sets the string to display a “no results” message if the returned
array is empty:
File: webservices2.js (excerpt)
this.noResultsCheck = function(len) {
str = '';
if (len == 0) {
str = '<div class="resultsPaneDiv">(No results returned)' +
'</div>';
}
return str;
};
If there are any JavaScript Objects in the res array, the code proceeds to jump
through that array, creating a string of markup that we can display in the results
219
Amazon
Licensed to
pane. We’ll be displaying the results with innerHTML in this application; you’ll
see the reason why in the next section.
Displaying Google’s results is a bit trickier than the process for Amazon’s results.
Let’s take a look:
File: webservices2.js (excerpt)
case 'google':
var resultsArr = xml.getElementsByTagName('resultElements');
xml = resultsArr[0];
res = XMLParse.xml2ObjArray(xml, 'item');
str += self.noResultsCheck(res.length);
for (var i = 0; i < res.length; i++) {
item = '<div class="itemDiv">';
item += '<div>';
item += '<a href="' + res[i].URL + '">';
if (res[i].title) {
item += res[i].title;
}
else {
item += res[i].URL;
}
item += '</a></div>';
if (res[i].snippet) {
item += '<div>' + res[i].snippet + '</div>';
}
item += '</div>';
str += item;
}
break;
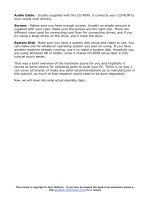
Google makes it a bit harder on us. In the XML document that Google returns,
there are actually two different sets of elements called item. Figure 7.3 shows
these two different sections within the results.
We’re only interested in the items inside resultElements.
220
Chapter 7: More Web Services and a Back Button
Licensed to
Figure 7.3. Google results with two sections of item elements
221
Licensed to
Getting the resultElements XML
Here, DOM methods save the day, letting us get our hands on the list of item
elements we want. We do so with these two lines:
File: webservices2.js (excerpt)
var resultsArr = xml.getElementsByTagName('resultElements');
xml = resultsArr[0];
We use the getElementsByTagName method to get an array of all the resultEle-
ments in our XML response. In this case, there’s only the one, so the returned
array has only a single item in it. We then set xml to that resultElements ele-
ment, which contains all the items we’re interested in. Once we’ve narrowed
down our document to the element that contains the item elements we want,
we can parse our result the normal way using xml2ObjArray.
After that, we check to make sure that there are some results in res, then we
jump through the array, building a string of HTML that we’ll display using
innerHTML.
Is innerHTML Evil?
Depending on which web developers you talk to, you might get very different
reactions when you talk about using innerHTML. This property is not a
W3C standard, and it’s seen as being somewhat “less clean” than DOM
methods; indeed, putting long strings of markup in your JavaScript code can
make things very sloppy. However, innerHTML is fully supported in all
modern browsers.
Practically speaking, despite the fact that it gives some developers conniption
fits, the question of whether or not to use innerHTML should be decided on
a case-by-case basis, and often is purely a matter of personal taste. In the
case of this web service-based search application, it turns out that using
innerHTML to display our results makes more sense than using DOM
methods, as Google returns formatted HTML (that is, markup such as <b>
tags) in its results.
If we were to insist on using DOM methods like createTextNode to display
Google’s response, we’d have to strip all of the markup out of the results,
which would mean more development work, and see us lose a lot of
presentation information simply because we want to avoid innerHTML.
A good rule thumb for deciding whether to use innerHTML or DOM methods
is this: if you’re dealing with content that contains a lot of HTML or XHTML
markup, using innerHTML is likely the way to go.
222
Chapter 7: More Web Services and a Back Button
Licensed to
eBay
After our battle with Google, parsing the results from eBay seems a breeze. Here’s
the code:
File: webservices2.js (excerpt)
case 'ebay':
res = XMLParse.xml2ObjArray(xml, 'Item');
str += self.noResultsCheck(res.length);
for (var i = 0; i < res.length; i++) {
item = '<div class="itemDiv">';
item += '<div><a href="' +
res[i].ListingDetails.ViewItemURL + '">' +
res[i].Title + '</a></div>';
item += '<div>Started: ' +
res[i].ListingDetails.StartTime + '</div>';
item += '<div>End: ' +
res[i].ListingDetails.EndTime + '</div>';
item += '<div>Current Bids: ' +
res[i].SellingStatus.BidCount + '</div>';
item += '<div>Current Price: ' +
res[i].SellingStatus.CurrentPrice + '</div>';
item += '</div>';
str += item;
}
break;
Displaying the Results
Now that we have our search results in an HTML string, displaying the results
is easy—we just set the innerHTML of the results div element to the content string
str that we built for the specific service we used to search:
File: webservices2.js (excerpt)
}
}
document.getElementById('resultsDiv').innerHTML = str;
};
Fallback for Non-JavaScript Browsers
To provide a fallback for browsers that don’t support JavaScript, we have set up
our page to work as an old-fashioned web form that submits directly to a page
223
eBay
Licensed to
with server-side code that’s similar to our client-side AJAX code. Here’s an example
of how we could display results from eBay in PHP (this code assumes that we’ve
already loaded the search result XML into a variable called $xml):
header('Content-Type: text/html');
$resp = new DomDocument();
$resp->loadXML($xml);
print("<!DOCTYPE html PUBLIC \"-//W3C//DTD XHTML 1.0 Strict//EN" .
"\" \" .
">\n");
print("<html xmlns=\" /> print("<head>\n");
print("<title>Search Results</title>\n");
print("</head>\n");
print("<body>\n");
switch ($service) {
case "ebay":
$items = $resp->getElementsByTagName("Item");
if ($items->length > 0) {
foreach($items as $item) {
$title = $item->getElementsByTagName("Title");
$url = $item->getElementsByTagName("ViewItemURL");
$startTime = $item->getElementsByTagName("StartTime");
$endTime = $item->getElementsByTagName("EndTime");
$bidCount = $item->getElementsByTagName("BidCount");
$currPrice = $item->getElementsByTagName(
"CurrentPrice");
print("<div class=\"itemDiv\">\n");
print("<div><a href=\"" . $url->item(0)->nodeValue .
"\">" . $title->item(0)->nodeValue .
"</a></div>\n");
print("<div>Started: " .
$startTime->item(0)->nodeValue . "</div>\n");
print("<div>End: " . $endTime->item(0)->nodeValue .
"</div>\n");
print("<div>Current Bids: " .
$bidCount->item(0)->nodeValue . "</div>\n");
print("<div>Current Price: " .
$currPrice->item(0)->nodeValue . "</div>\n");
print("</div>\n");
}
}
break;
// Cases for other web services would go here
}
}
224
Chapter 7: More Web Services and a Back Button
Licensed to
Once you get the values of the properties for each item, it’s fairly easy to display.
The section that prints out the result here is basically a PHP clone of the JavaS-
cript code in the AJAX version.
Screen Reader Code
As you may remember from the login code in Chapter 4, screen readers are capable
of dealing with DHTML content in the browser—you simply have to observe
some basic principles that allow screen readers to take advantage of your AJAX
code.
Much of the screen reader code for this application is identical to the code we
saw in Chapter 4. There are just a few specific tweaks we need to make for the
code to work with this search app.
File: webservices2.js (excerpt)
this.enableScreenReaderFeatures = function() {
var self = Search;
var appendDiv = document.getElementById('searchForm');
var beforeDiv = document.getElementById('searchTypeTitleDiv');
var msg = '';
var readerDiv = null;
var innerDiv = null;
var resultsA = null;
var changeCheck = null;
msg = 'This Web page uses dynamic content. Page content may' +
' change without a page refresh. Check the following' +
' checkbox if you would like an alert dialog to inform' +
' you of page content changes.';
readerDiv = document.createElement('div');
readerDiv.className = 'screenReader';
readerDiv.appendChild(document.createTextNode(msg));
appendDiv.insertBefore(readerDiv, beforeDiv);
readerDiv = document.createElement('div');
readerDiv.className = 'screenReader';
innerDiv = document.createElement('div');
innerDiv.appendChild(
document.createTextNode('Content Change Alert'));
readerDiv.appendChild(innerDiv);
innerDiv = document.createElement('div');
changeCheck = document.createElement('input');
changeCheck.type = 'checkbox';
changeCheck.id = 'ChangeAlert';
changeCheck.name = 'ChangeAlert';
225
Screen Reader Code
Licensed to
changeCheck.value = 'true';
changeCheck.title = 'Content Change Alert';
innerDiv.appendChild(changeCheck);
readerDiv.appendChild(innerDiv);
appendDiv.insertBefore(readerDiv, beforeDiv);
appendDiv = document.getElementById('pageTopDiv');
resultsA = document.createElement('a');
resultsA.href = '#searchResults';
resultsA.appendChild(document.createTextNode(
'Skip to search results'));
appendDiv.appendChild(resultsA);
self.form.SearchText.onchange = self.evalSearchTextState;
self.form.SearchText.title = 'Search Text. Enter text' +
' to activate Search button.';
};
The difference between this and the code that we saw in Chapter 4 is that here,
we’ve added a link that can be used to jump straight to the top of the search
results—the link points to a named anchor within the page. We’ll insert this an-
chor into the page in handleResp, just after the switch statement, as shown in
bold below:
File: webservices2.js (excerpt)
str = '<div class="screenReader"><a id="searchResults" ' +
'name="searchResults"></a>Search results for: ' +
self.searchText + ' on ' + self.service + '</div>' + str;
document.getElementById('resultsDiv').innerHTML = str;
};
We’ve also added a prompt just before the results to indicate the terms for which
the user searched, since users with screen readers can’t quickly scan the form to
find this information. This is particularly useful for users who have performed a
number of searches, and begin to page back and forth through their search history.
Alerting Users to Page Changes
The biggest problem that screen reader users experience with AJAX is that if the
whole web page doesn’t refresh, users will remain unaware that the page content
has changed. In this application, we’re using the same strategy we used in
Chapter 4 to let screen reader users know that a partial page refresh has occurred:
we provide the user with a checkbox that gives them the option to receive an
alert dialog box when the page content changes. This checkbox is hidden from
users of regular browsers.
226
Chapter 7: More Web Services and a Back Button
Licensed to
The main difference in this particular case is that rather than placing the changed
content into the alert box, we let the users know the search has completed, and
tell them where on the page they can find the search results. To do this, we add
to the handleResp method some extra code that parses the results from the
server and inserts the content into the page:
File: webservices2.js (excerpt)
document.getElementById('resultsDiv').innerHTML = str;
if (self.form.ChangeAlert.checked) {
alert('Search completed. Results are on the page ' +
'below the search form.');
}
};
This is fairly straightforward. The alert box tells our screen reader users that
the search is done, and where they can go to find the updated content. Users of
screen reader software will easily be able to find the search results, thanks to the
Skip to search results link.
The Back Button Problem
Users who aren’t used to AJAX-style web applications may not be aware that it
is possible for part of a page to update, so when they see a piece of a web page
change, they may think they have navigated to a new page. They may then try
to click the browser’s Back button to get back to the previous state of the page.
Needless to say, it confuses and frustrates users when they click on the Back
button and end up in a completely unexpected place.
The Two Options
In this section, I’m going to demonstrate two different approaches to fixing the
Back button problem. One method encourages users to avoid the Back button in
favor of Back and Forward buttons we’ll build right into the app, while the other
attempts to coerce the browser’s built-in Back and Forward buttons to work as
the user would expect.
Both options have their pros and cons:
Option 1: building your own Back button
Pros:
works in all browsers, including Safari
❑
227
The Back Button Problem
Licensed to