build your own wicked wordpress themes phần 8 docx
Bạn đang xem bản rút gọn của tài liệu. Xem và tải ngay bản đầy đủ của tài liệu tại đây (985.53 KB, 23 trang )
Adding Custom Widgets
There are tons of plugins and widgets in the WordPress plugin directory; however, at some point
you’ll need to come up with your own custom widget that solves a particular problem. It’s a really
great selling point to have themes that come with built-in widgets, especially when they take ad-
vantage of a particular feature only available to your theme.
Traditionally, there were two ways to add your own custom widgets. The first was to simply add
a function to your functions.php file, which is what we’ve been doing so far for the custom function-
ality of our theme. This will become quite cumbersome quickly, though with good commenting
and file separation it can stay manageable. The second way of going about it is to create a WordPress
plugin for each new widget. This tends to be problematic as well, because the plugin will exist
separately from your theme, thereby adding a few extra administrative steps to the installation
process. You want your theme to be as easy as possible to use, so this is probably best avoided.
Luckily, Thematic comes with a rather innovative built-in widget solution that makes widget creation
and management extremely simple. There’s a core Thematic function that looks for a folder called
widgets in your child theme folder, and adds any widgets in there without any additional work on
your part. This feature also means that your widgets will travel with your child theme, so if you’re
creating theme-specific widgets for distribution, you’ll make things simpler for users by removing
any extra plugin installation/activation steps. Another great aspect of using the widgets folder is
that you can create each widget as a separate PHP file, which can help you stay organized.
In Chapter 5 we wrote a function to add author information to the end of every post. To make this
functionality a little more flexible, why not turn it into a widget that will only display on single
post pages? That way, your users can choose to display it in the sidebar, or elsewhere, or not at all.
OOP(s)
The code that follows makes use of PHP’s object oriented programming (OOP) features. If you’re
unfamiliar with object oriented programming, don’t worry: I’ll explain everything as simply as
possible. This is just a warning that some of this code may seem a little strange to you if you’ve
only ever worked with PHP in a procedural (or not object oriented) way.
Introducing the Widgets API
To create a new widget in WordPress, you extend the WP_Widget class. If this seems a bit beyond
your grasp, don’t worry: when developing WordPress widgets, it’s unnecessary to think about objects
and classes very much. Every widget class has the same four functions inside it, so you only need
to write those four functions for every widget—and you can just copy and paste the basic layout of
the class every time you want to make a new widget. The four functions you need are a constructor
function (which always has the same name as the class itself), widget, update, and form.
Build Your Own Wicked WordPress Themes140
Licensed to Wow! eBook <www.wowebook.com>
Let’s first have a look at the empty shell of a new widget:
class My_Widget extends WP_Widget {
function My_Widget() {
// this is a constructor, where each new instance of your widget gets built
}
function form($instance) {
// this generates the widget options form which you see
// in the widgets section in the admin
}
function update($new_instance, $old_instance) {
// this handles the submission of the options form to
// update the widget options
}
function widget($args, $instance) {
// the most important function: this one handles actually outputting
// the widget's content to the theme
}
}
Assuming you’ve filled out each of these functions with your desired functionality, there’s only
one step left. Much like widget-ready areas, new widgets need to be registered with WordPress:
register_widget('My_Widget');
At the most basic level, the form and update functions only need to give your users the option to
input the title to be displayed with the widget. This means that unless you require more detailed
options here, you can reuse the same code for those two functions for each widget you develop.
Creating the Widget
To create our first custom widget, we’ll first create a widgets folder inside our child theme folder,
and add a new PHP file to it. We’ll call it author-data.php. Let’s start by putting in the declaration
of the Author_Data_Widget class, along with the four required functions and the register_widget
call:
chapter_06/v4/wicked/widgets/author-data.php (excerpt)
<?php
class Author_Data_Widget extends WP_Widget {
function Author_Data_Widget() {
}
141Widgets
Licensed to Wow! eBook <www.wowebook.com>
function form($instance) {
}
function update($new_instance, $old_instance) {
}
function widget($args, $instance) {
}
}
register_widget('Author_Data_Widget');
?>
Our first task is to write the constructor function. In its most basic form, it consists of:
function My_Widget() {
$this->WP_Widget($id, $name, $widget_ops, $control_ops);
}
That one function ($this->WP_Widget) is what WordPress uses to create each instance of your
widget, so that’s all that’s necessary here. The $id parameter is used internally to refer to your
widget, and $name is the name that’s shown in the widget admin interface. The $widget_ops para-
meter is an array that includes the widget’s description to be shown in the admin section.
$control_ops is optional and not required for most widgets, so you can forget about it for now.
Let’s have a go at writing this function for our author data widget:
chapter_06/v4/wicked/widgets/author-data.php (excerpt)
function Author_Data_Widget() {
$widget_ops = array(
'description' => 'A widget that displays author info on single posts.'
);
$this->WP_Widget('author_data', 'Author Data', $widget_ops);
}
Even with only this one function in place, we can already see our widget in the back-end interface,
as shown in Figure 6.1.
Build Your Own Wicked WordPress Themes142
Licensed to Wow! eBook <www.wowebook.com>
Figure 6.1. Our custom widget, as it appears in WordPress’s admin section
However, if you drag the widget onto one of your widget-ready areas, you’ll see that it lacks any
customizable options, as shown in Figure 6.2.
Figure 6.2. Our newly defined widget has no options
We’d like our users to at least be able to set a custom title for the widget, so we should fill out the
form and update functions to give us an options form. Let’s start with the form method.
Fortunately, WordPress handles the creation of the form element; all you need to do is write the
label and input elements specific to your option. These must be assigned specific id and name
attributes in order to work correctly, but again WordPress has your back: your widget has functions
called get_field_id and get_field_name that serve this purpose. Here’s what our simple form
looks like:
chapter_06/v4/wicked/widgets/author-data.php (excerpt)
function form($instance) {
$title = esc_attr($instance['title']);
?>
<p>
<label for="<?php echo $this->get_field_id('title'); ?>">Title:
143Widgets
Licensed to Wow! eBook <www.wowebook.com>
<input class="widefat"
id="<?php echo $this->get_field_id('title'); ?>"
name="<?php echo $this->get_field_name('title'); ?>"
type="text"
value="<?php echo attribute_escape($title); ?>" />
</label>
</p>
<?php
}
The function receives an $instance variable that represents the current widget, which will include
the options that are currently set. So, to make sure the form displays the current value of the title,
we first extract the $title variable from $instance.
Then we construct the form field, using $this->get_field_id and $this->get_field_name to set
the field’s id and name attributes. Other than that, this is fairly straightforward HTML. If you want
your form to have more than one field, all you have to do is add them here, setting their attributes
appropriately.
When the form is submitted, WordPress will use your update function to save the options the user
has entered. Let’s have a look at that next:
chapter_06/v4/wicked/widgets/author-data.php (excerpt)
function update($new_instance, $old_instance) {
$instance = $old_instance;
$instance['title'] = strip_tags($new_instance['title']);
return $instance;
}
The update function works a little differently: it receives two parameters, which hold a brand new
widget containing the new options submitted in the form, and the old widget with the previous
options, respectively. So we need to grab the title from $new_instance—being careful to strip out
any HTML and PHP tags—and use that to set the title on our instance. To avoid confusion, we’ve
dumped $old_instance into a new variable simply called $instance, and that’s where we set the
new title. Then we return $instance, and WordPress handles the rest, updating the widget with
the options we’ve set.
If your form has more than one field, just repeat this process for each option that requires setting.
You can include as much logic as you want in update. If ever you’d like to discard the new options
(based on some condition), all you have to do is return false and the widget won’t be updated.
Build Your Own Wicked WordPress Themes144
Licensed to Wow! eBook <www.wowebook.com>
Now that we have our options form, test it out: go back to your widgets admin page, and drag the
Author Data widget onto one of the widget areas. You should see your new title form, as shown in
Figure 6.3.
Figure 6.3. A simple widget options form
That’s three out of four functions defined: we have our constructor, as well as the form and update
methods for handling our widget options form. Now all that’s to be done is tell WordPress how to
display the widget!
Here’s what that function will look like:
chapter_06/v4/wicked/widgets/author-data.php (excerpt)
function widget($args, $instance) {
extract($args, EXTR_SKIP);
if (is_single()) {
echo $before_widget;
$title = apply_filters('widget_title', $instance['title']);
if ( !empty( $title ) ) { echo $before_title . $title . $after_title; };
echo '<div class="author-data">';
echo get_avatar(get_the_author_meta('user_email'), 150);
echo '<h4>' . the_author_meta('display_name') . '</h4>';
// Is there an author description?
if (get_the_author_meta('description')) {
echo '<div class="description"><p>'
. get_the_author_meta('description')
. '</p></div>';
}
echo '</div>';
echo $after_widget;
}
}
145Widgets
Licensed to Wow! eBook <www.wowebook.com>
Your function receives two parameters: the first one is $args, which is an array of the arguments
provided to all widgets in your theme. They will be familiar to you: before_title, after_title,
before_widget, and after_widget. The second parameter is our old friend $instance, which
contains all the options set on your widget. In our case that’s only the title.
Here’s a breakdown of what’s going on in there:
First, we’re using PHP’s handy extract
2
function to break up the $args array into individual
variables. So, from now on, instead of typing $args['before_title'], we can just use
$before_title. Feel free to copy and paste this line into all your own widgets, or remove it
if you prefer the more explicit $args['before_title'] style.
We only want to display our widget on single post pages: that’s really the only place where it
makes sense!
We echo out the standard before_widget string: if you’ve been following along with the rest
of this chapter, you’ll have guessed this should be Thematic’s standard opening <div> tag.
We pass the title provided by the user ($instance['title']) through any filters applied to
widget_title by our theme or any plugins.
As long as the title has content in it, we’ll output it as well as the $before_title and
$after_title values.
We use the get_the_author_meta
3
function a few times to grab the information we want to
display about the author. In this case, we’re retrieving the author’s email to pass into
get_avatar.
Finally, we output the after_widget value.
Now that you’ve written all the functions required for your widget, it should correctly display the
author info on single-post pages. Give it a try!
Here’s the full author-data.php file:
chapter_06/v4/wicked/widgets/author-data.php (excerpt)
<?php
class Author_Data_Widget extends WP_Widget {
function Author_Data_Widget() {
$widget_ops = array(
'description' => 'A widget that displays author info on single posts.'
2
/>3
/>Build Your Own Wicked WordPress Themes146
Licensed to Wow! eBook <www.wowebook.com>
);
$this->WP_Widget('author_data', 'Author Data', $widget_ops);
}
function form($instance) {
$title = esc_attr($instance['title']);
?>
<p>
<label for="<?php echo $this->get_field_id('title'); ?>">Title:
<input class="widefat"
id="<?php echo $this->get_field_id('title'); ?>"
name="<?php echo $this->get_field_name('title'); ?>"
type="text"
value="<?php echo attribute_escape($title); ?>" />
</label>
</p>
<?php
}
function update($new_instance, $old_instance) {
$instance = $old_instance;
$instance['title'] = strip_tags($new_instance['title']);
return $instance;
}
function widget($args, $instance) {
extract($args, EXTR_SKIP);
if (is_single()) {
echo $before_widget;
$title = apply_filters('widget_title', $instance['title']);
if (!empty($title)) { echo $before_title . $title . $after_title; };
echo '<div class="author-data">';
echo get_avatar(get_the_author_meta('user_email'), 150);
echo '<h4>' . the_author_meta('display_name') . '</h4>';
// Is there an author description?
if (get_the_author_meta('description')) {
echo '<div class="description"><p>'
. get_the_author_meta('description')
. '</p></div>';
}
echo '</div>';
echo $after_widget;
}
}
}
147Widgets
Licensed to Wow! eBook <www.wowebook.com>
register_widget('Author_Data_Widget');
?>
Summary
A theme that is well-prepared with carefully placed widget-ready areas, and which takes advantage
of custom widgets where appropriate to highlight its features, will often be able to outshine its
competitors. We’ve seen fairly simple examples of the kinds of widgets you can create, but there’s
really no limit to what you can do: let your imagination go wild.
Here are a few final tips:
■
Try not limit the functionality of your theme designs by only thinking of widget-ready areas as
sidebars. Widgetized areas can be used anywhere in your site design where you think your users
might want to display custom bits of content.
■
Take advantage of the helpers that Thematic and WordPress provide. There’s no need to reinvent
the wheel when it comes to markup or hooks and filters when building widget-ready areas or
custom widgets.
■
Keep the back end simple for yourself, your users, or your clients by removing unnecessary
clutter that’s extraneous to your theme: if you haven’t used or adequately styled a certain wid-
getized area, unregister it.
Stick to the ideas outlined here and you’ll be a widget master before you know it!
Build Your Own Wicked WordPress Themes148
Licensed to Wow! eBook <www.wowebook.com>
Chapter
7
Theme Options
by Allan Cole
When you start distributing your theme, within a week of release it’s likely you’ll receive an email
like this: “Hi, I absolutely love your theme! The attention to detail and color is simply astonishing.
I have one question though: how do I change X?” Initially, you might be a little annoyed. You’ll be
tempted to ask yourself: if this user thinks my theme is so great, why do they want to change it?
The answer is simple—individuality.
Every person, and every business, is different. It’s entirely natural then that a website should reflect
the owner’s personality and style. In this chapter, we’ll look at a number of ways of making your
theme as customizable as possible, so that those users won’t have to resort to editing your preciously
crafted template files—and you can dodge this potential support nightmare.
As Jeffrey will tell you in Chapter 8, options may be the single most important selling point for a
theme. After all, if you had the choice between two themes for your business, but one of them
promised the ability to customize the colors, fonts, and layout, which would you choose?
Creating an Options Panel
Before we create an options panel, we should establish what parts of our theme we’d like our users
to have control over. For the purposes of illustration, I’ve picked the following three:
Link color
a simple text field that allows users to define the color of links in the theme’s body text, using
the standard hexadecimal format (for example, #FF3366)
Licensed to Wow! eBook <www.wowebook.com>
Custom header image
a checkbox that will add or remove a custom header background to our theme
Featured category
a drop-down select menu that lets users choose one of their site’s categories; the most recent
posts from that category will be used to fill out the featured post spots on the front page
As well as being the most common types of custom options you might want to add in your theme,
these illustrate three different kinds of form element. Looking over these three examples in depth
should give you all the knowledge you’ll need to develop any type of custom option you can think
of.
The good news is that there’s no need to worry about reading from or writing to the WordPress
database. The WordPress developers have already considered that theme and plugin developers
might want to allow their users to have access to specific settings, so they’ve provided a trio of
methods to help you out: update_option, get_option, and delete_option. The first adds a custom
setting to the database, the second retrieves it, and the third—unsurprisingly—deletes it.
Combined with a bit of code for generating and handling the settings form itself, these three methods
will allow us to develop a full-featured settings form for our theme.
Laying the Groundwork
To start off, we’ll first create a new file in our library directory called options.php. This is where our
custom options form and related functions will live. Before doing anything else, let’s include it in
functions.php:
chapter_07/v1/wicked/functions.php (excerpt)
// include theme options
include('library/options.php');
We’ll begin by setting a few theme-specific variables that we’ll refer to later on. This is primarily
to make it easier for you to adapt the code to your own theme:
chapter_07/v1/wicked/library/options.php (excerpt)
<?php
// Set some theme specific variables for the options panel
$childthemename = "Wicked Theme";
$childshortname = "wt";
$childoptions = array();
Build Your Own Wicked WordPress Themes150
Licensed to Wow! eBook <www.wowebook.com>
$childthemename is, of course, your theme’s name. We’ll use this variable any time we want to
display the theme’s name in a link or on a page in the admin panel. Because it’s a name, and will
be the same in every language, no localization function is required.
$childshortname is an abbreviated version of your theme’s name. We’ll use this so that none of
the settings or data we store conflicts with any other similarly named options created by WordPress,
or any plugins that may be in use. We’ll append it to variables like $shortname . "_text_color".
$childoptions is where the options themselves will be stored. For the moment it’s an empty array,
but we’ll be filling it up shortly.
Next we’re going to create a function called childtheme_options, which will define our options
and how they’ll be displayed in the back-end administration interface. Inside that function we have
two tasks to accomplish: we’ll pull in our variables using the global keyword, and then we’ll fill
up the $childoptions array with all the information required for our options.
Let’s start with the easier task:
chapter_07/v1/wicked/library/options.php (excerpt)
function childtheme_options() {
global $childthemename, $childshortname, $childoptions;
Good! Now we have access to our variables.
Out of Range
The concept of variable scope in PHP is beyond the, uh, scope of this book. Since this is the only
place we’ll be using it, just include that line in your function and you’ll be fine.
Next we need to define all our options. $childoptions is an array that contains a bunch of other
arrays: one for each option you want your theme to have. Each of those arrays, in turn, should have
the following values in it:
name
the name of the option
desc
holds the description of the option along with any instructions for using it; the name and de-
scription will both be displayed on your options panel
id
used to save and update the option in the database; we’ll use the $childshortname variable
here so that our field will be unique
151Theme Options
Licensed to Wow! eBook <www.wowebook.com>
std
holds the default setting of the option; our form will also have a reset button, which will allow
users to restore all options to the value we declare here
type
defines the type of form element you intend to use; you can choose between text, select, textarea,
radio, and checkbox
options (only for select and radio types)
an array of the options that users will be able to choose from in select and radio button lists
Let’s start with the link color option:
chapter_07/v1/wicked/library/options.php (excerpt)
function childtheme_options() {
⋮
$childoptions = array (
array("name" => __('Link Color','thematic'),
"desc" => __('Change the color of links by entering a HEX
➥color number. (e.g.: 003333)','thematic'),
"id" => "wicked_link_color",
"std" => "999999",
"type" => "text"),
⋮
);
}
This is fairly straightforward, right? We’re using the __() localization function around the name
and description, and setting a unique id. Because we need the user to enter a value, we’re setting
type to text: this will output a text box.
The array for the header image checkbox will be very similar, but the featured category select box
is trickier: we need to provide an options value that will contain all the different categories on the
site. Obviously these will vary from one site to another, so we need to retrieve them from WordPress.
Fortunately there’s a get_categories
1
method to do just that:
1
/>Build Your Own Wicked WordPress Themes152
Licensed to Wow! eBook <www.wowebook.com>
chapter_07/v1/wicked/library/options.php (excerpt)
function childtheme_options() {
⋮
// Create array to store the Categories to be used in the drop-down select box
$categories_obj = get_categories('hide_empty=0');
$categories = array();
foreach ($categories_obj as $cat) {
$categories[$cat->cat_ID] = $cat->cat_name;
}
$childoptions = array (
⋮
}
get_categories returns the categories as an array with several different values describing each
category. In order to populate our select box we’re going to want an array of category IDs and
names, so we use a quick foreach loop to grab them.
Now that we have an array of categories, we can use it in our $childoptions array; we’ll also add
the checkbox while we’re at it:
chapter_07/v1/wicked/library/options.php (excerpt)
function childtheme_options() {
global $childthemename, $childshortname, $childoptions;
// Create array to store the Categories to be used in the drop-down select box
$categories_obj = get_categories('hide_empty=0');
$categories = array();
foreach ($categories_obj as $cat) {
$categories[$cat->cat_ID] = $cat->cat_name;
}
$childoptions = array (
array("name" => __('Link Color','thematic'),
"desc" => __('Change the color of links by entering a HEX
➥color number. (e.g.: 003333)','thematic'),
"id" => "wicked_link_color",
"std" => "999999",
"type" => "text"
),
array( "name" => __('Show Header Image','thematic'),
"desc" => __('Show an image in the header. Replace the header.png file
153Theme Options
Licensed to Wow! eBook <www.wowebook.com>
➥found in the /wicked/images/ folder with your own image.','thematic'),
"id" => "wicked_show_logo",
"std" => "false",
"type" => "checkbox"
),
array( "name" => __('Featured Category','thematic'),
"desc" => __('A category of posts to be featured on the front page.',
➥'thematic'),
"id" => "wicked_feature_cat",
"std" => $default_cat,
"type" => "select",
"options" => $categories
)
);
}
After you’ve defined all your options, you’ll need to hook this function into the WordPress init
action. By doing this, we make sure our settings are defined after WordPress loads, but before any
headers or other processes that rely on our settings are loaded. This one should be familiar to you
by now:
chapter_07/v1/wicked/library/options.php (excerpt)
add_action('init', 'childtheme_options');
Adding an Admin Panel
Now that our options are defined, there are still two more steps to work through before we’ll have
a working options page. First, we need to add a page to the WordPress admin menu to contain our
settings form. After that, we’ll create a function to output the form itself.
First, the new menu item. This part of the process is the same for any options page you create, so
I will avoid going into too much detail; you can simply reuse it with a few slight modifications,
assuming you’re using the same $childthemename, $childshortname, and $childoptions variables
we’ve been using so far:
chapter_07/v1/wicked/library/options.php (excerpt)
// Make a theme options page
function childtheme_add_admin() {
global $childthemename, $childshortname, $childoptions;
if ( $_GET['page'] == basename(__FILE__) ) {
if ( 'save' == $_REQUEST['action'] ) {
// protect against request forgery
check_admin_referer('childtheme-save');
Build Your Own Wicked WordPress Themes154
Licensed to Wow! eBook <www.wowebook.com>
// save the options
foreach ($childoptions as $value) {
if( isset( $_REQUEST[ $value['id'] ] ) ) {
update_option( $value['id'], $_REQUEST[ $value['id'] ] );
} else {
delete_option( $value['id'] );
}
}
header("Location: themes.php?page=options.php&saved=true");
die;
} else if ( 'reset' == $_REQUEST['action'] ) {
// protect against request forgery
check_admin_referer('childtheme-reset');
// delete the options
foreach ($childoptions as $value) {
delete_option( $value['id'] ); }
header("Location: themes.php?page=options.php&reset=true");
die;
}
}
add_theme_page($childthemename." Options", "$childthemename Options",
➥'edit_themes', basename(__FILE__), 'childtheme_admin');
}
add_action('admin_menu' , 'childtheme_add_admin');
This code handles the submission of the options form, saving the options to the database if the form
was submitted with the Save changes button, or resetting them if it was submitted with the Reset
button.
As I said, most of this can just be used as is without modification. The numbered lines may need
to be adjusted as follows, depending on your setup:
This line is redirecting back to the options page after the options have been saved. In order to
function correctly, it will need to contain a reference to the PHP file where your custom options
are being created: in our case, that’s options.php. Should your custom option functionality be
contained in some other file, you’ll need to change the highlighted part of this line.
The same as above: replace options.php with the name of the file where your custom options
are defined.
This line is where the menu item is added to the WordPress dashboard, allowing users to access
your theme settings form. The highlighted parameter is the name of the function that outputs
the form itself. We’ll be writing that shortly; just remember that if you give it a different name,
you’ll need to change this.
155Theme Options
Licensed to Wow! eBook <www.wowebook.com>
The last line is a call to our old friend add_action, which will ensure that our new function is
called when WordPress is building its admin menu.
If you load your site’s dashboard at this point, you should see a link to your Wicked Theme Options
page in the Appearance menu, just above the Thematic Options link, as depicted in Figure 7.1.
Figure 7.1. A link to our options page in the Appearance menu
Clicking the link will result in an error. That’s normal: we’ve told WordPress that our options page
will contain the output of the wicked_admin function, but we’ve yet to write it! Let’s do that now.
The Options Form
The last piece of the theme options puzzle is a form that will allow your users to select or enter the
options they want. The code below is a general-purpose form builder, which I’ll call the options
form toolkit. It will loop over your $childoptions array and construct an appropriate form element
for each one, pre-filling it with either the saved value if it exists, or the default value provided in
$childoptions if it doesn’t.
It’s a big function, but there’s nothing terribly complicated going on here. Because it can be used
essentially without modification, I’ll skip going over what every line does:
chapter_07/v1/wicked/library/options.php (excerpt)
function childtheme_admin() {
global $childthemename, $childshortname, $childoptions;
// Saved or Updated message
Build Your Own Wicked WordPress Themes156
Licensed to Wow! eBook <www.wowebook.com>
if ( $_REQUEST['saved'] ) echo '<div id="message" class="updated fade">
➥<p><strong>'.$childthemename.' settings saved.</strong></p></div>';
if ( $_REQUEST['reset'] ) echo '<div id="message" class="updated fade">
➥<p><strong>'.$childthemename.' settings reset.</strong></p></div>';
// The form
?>
<div class="wrap">
<h2><?php echo $childthemename; ?> Options</h2>
<form method="post">
<?php wp_nonce_field('childtheme-save'); ?>
<table class="form-table">
<?php foreach ($childoptions as $value) {
// Output the appropriate form element
switch ( $value['type'] ) {
case 'text':
?>
<tr valign="top">
<th scope="row"><?php echo $value['name']; ?>:</th>
<td>
<input name="<?php echo $value['id']; ?>"
id="<?php echo $value['id']; ?>"
type="text"
value="<?php echo stripslashes(get_option( $value['id'],
➥$value['std'] )); ?>"
/>
<?php echo $value['desc']; ?>
</td>
</tr>
<?php
break;
case 'select':
?>
<tr valign="top">
<th scope="row"><?php echo $value['name']; ?></th>
<td>
<select name="<?php echo $value['id']; ?>"
id="<?php echo $value['id']; ?>">
<option value=""> </option>
<?php foreach ($value['options'] as $key=>$option) {
if ($key == get_option($value['id'], $value['std']) ) {
$selected = "selected=\"selected\"";
} else {
157Theme Options
Licensed to Wow! eBook <www.wowebook.com>
$selected = "";
}
?>
<option value="<?php echo $key ?>" <?php echo $selected ?>>
➥<?php echo $option; ?></option>
<?php } ?>
</select>
<?php echo $value['desc']; ?>
</td>
</tr>
<?php
break;
case 'textarea':
$ta_options = $value['options'];
?>
<tr valign="top">
<th scope="row"><?php echo $value['name']; ?>:</th>
<td>
<?php echo $value['desc']; ?>
<textarea name="<?php echo $value['id']; ?>"
id="<?php echo $value['id']; ?>"
cols="<?php echo $ta_options['cols']; ?>"
rows="<?php echo $ta_options['rows']; ?>"><?php
echo stripslashes(get_option($value['id'], $value['std']));
?></textarea>
</td>
</tr>
<?php
break;
case "radio":
?>
<tr valign="top">
<th scope="row"><?php echo $value['name']; ?>:</th>
<td>
<?php foreach ($value['options'] as $key=>$option) {
if ($key == get_option($value['id'], $value['std']) ) {
$checked = "checked=\"checked\"";
} else {
$checked = "";
}
?>
<input type="radio"
name="<?php echo $value['id']; ?>"
value="<?php echo $key; ?>"
<?php echo $checked; ?>
/><?php echo $option; ?>
<br />
<?php } ?>
Build Your Own Wicked WordPress Themes158
Licensed to Wow! eBook <www.wowebook.com>
<?php echo $value['desc']; ?>
</td>
</tr>
<?php
break;
case "checkbox":
?>
<tr valign="top">
<th scope="row"><?php echo $value['name']; ?></th>
<td>
<?php
if(get_option($value['id'])){
$checked = "checked=\"checked\"";
} else {
$checked = "";
}
?>
<input type="checkbox"
name="<?php echo $value['id']; ?>"
id="<?php echo $value['id']; ?>"
value="true"
<?php echo $checked; ?>
/>
<?php echo $value['desc']; ?>
</td>
</tr>
<?php
break;
default:
break;
}
}
?>
</table>
<p class="submit">
<input name="save" type="submit" value="Save changes"
➥class="button-primary" />
<input type="hidden" name="action" value="save" />
</p>
</form>
<form method="post">
<?php wp_nonce_field('childtheme-reset'); ?>
<p class="submit">
<input name="reset" type="submit" value="Reset" />
159Theme Options
Licensed to Wow! eBook <www.wowebook.com>
<input type="hidden" name="action" value="reset" />
</p>
</form>
<p><?php _e('For more information … ', 'thematic'); ?></p>
<?php
} // end function
Near the bottom of the snippet, there’s a paragraph that you can edit to add some information about
your theme, including links to your documentation pages.
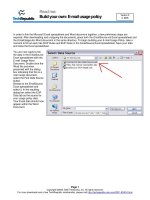
With this code in place, our theme options page will now load without error; we’ll see a form with
all the options specified in our $childoptions array, as shown in Figure 7.2.
Figure 7.2. The final theme options page
Thanks to the toolkit, the only step required to add a new option to your theme is to add it to the
$childoptions array. The construction of the form and all the communication with the WordPress
database will be handled transparently. Go ahead: give it a try. Add a new option to your
$childoptions array and watch it appear in the form, complete with save and reset functionality.
This options form toolkit also plugs into the default WordPress styling, so our options page blends
in nicely with the rest of the WordPress dashboard.
Using Options in Your Theme
That was a lot of work, but it’s paid off: we now have a flexible baseline of options page code that
can be readily adapted to allow for any kind of options on any theme we develop. But how do we
use those settings to modify the behavior of our theme? Fortunately for us, that part turns out to be
much easier.
Build Your Own Wicked WordPress Themes160
Licensed to Wow! eBook <www.wowebook.com>
Altering CSS
In the options panel we created previously, we defined three options: one for link color, one to add
a custom header image, and a third for selecting a featured category.
Of those three, the first two only require simple CSS changes, so we’ll start with them. Our options.php
file has grown quite large, and so far still serves a single purpose: defining our custom options form.
To keep our theme code organized, let’s put the options-dependent CSS code into a separate file,
which we’ll call style-options.php and include in functions.php as follows:
chapter_07/v1/wicked/functions.php (excerpt)
// include style options
include('library/style-options.php');
The first task in this file is to load in the saved options, or the defaults if none have been saved.
We’ll start a new function, and do just that:
chapter_07/v1/wicked/library/style-options.php (excerpt)
function wicked_load_custom_styles() {
// load the custom options
global $childoptions;
foreach ($childoptions as $value) {
$$value['id'] = get_option($value['id'], $value['std']);
}
This is more boilerplate code: you can reuse it any time you want to load your theme options from
the database. It dumps each option into a variable named after the option’s id, so our
wicked_link_color setting will now live in a $wicked_link_color variable.
The rest of this function simply needs to output the relevant CSS:
chapter_07/v1/wicked/library/style-options.php (excerpt)
// output a style sheet with the options
?>
<style type="text/css">
/* <![CDATA[ */
/* Color Options */
a, a:link, a:visited,
#content a,
#content a:link,
#content a:visited {color:#<?php echo $wicked_link_color; ?>;}
<?php if ($wicked_show_logo == 'true') { ?>
161Theme Options
Licensed to Wow! eBook <www.wowebook.com>
#blog-title {
background: transparent url('<?php echo
➥get_bloginfo('stylesheet_directory') ?>/images/header.png') left top no-repeat;
padding-left: 120px;
height: 100px;
}
<?php } ?>
/* ]]> */
</style>
<?php
} // end function
This part of the function spits out a <style> tag with our options handily included: we’re echoing
out the value of $wicked_link_color inside a rule, and testing for $wicked_show_logo to determine
whether or not the header.jpg image should be shown.
To insert this <style> tag into our theme, we just have to hook the function into the wp_head action:
chapter_07/v1/wicked/library/style-options.php (excerpt)
add_action('wp_head', 'wicked_load_custom_styles');
With this in place, the output of our function will be injected into the document’s head, dropping
the styles right where they need to be. At this point, you should already be able to change your
theme’s link color and header image (assuming you have a header.jpg file in the images directory).
Sweet, eh?
Altering Markup
That example only used options to modify CSS. The same thinking can be applied to changing
markup. Thanks to Thematic’s great hooks and filters, it’s extremely simple to change your theme’s
output based on settings defined in the options form. For example, let’s say when we turn our show
header option on, we want to add a class attribute to the blog title div.
Here’s how you could accomplish this:
chapter_07/v2/wicked/functions.php (excerpt)
function remove_thematic_blogtitle() {
remove_action('thematic_header','thematic_blogtitle',3);
}
add_action('init','remove_thematic_blogtitle');
Build Your Own Wicked WordPress Themes162
Licensed to Wow! eBook <www.wowebook.com>