Building Secure ASP.NET Applications phần 5 ppt
Bạn đang xem bản rút gọn của tài liệu. Xem và tải ngay bản đầy đủ của tài liệu tại đây (385.49 KB, 60 trang )
Building Secure ASP.NET Applications202
Important: Failure to set this attribute results in no access checks being performed.
●
Configure the application’s security level at the process and component level.
For meaningful role-based security, enable access checking at the process and
component levels by using the following .NET attribute.
[assembly: ApplicationAccessControl(AccessChecksLevel=
AccessChecksLevelOption. ApplicationComponent)]
This is equivalent to selecting the Perform access checks at the process and
component levels check box on the Security page of the application’s Properties
dialog box within Component Services.
Note: Always enable access checking at the process and component level for library
applications.
●
Enable component level access checks.
To enable component-level access checks, use the ComponentAccessControl
class-level attribute as shown below.
[ComponentAccessControl(true)]
public class MyServicedComponent : ServicedComponent
{
}
This is equivalent to selecting the Enforce Component Level Access Checks
check box on the Security page of the component Properties dialog box within
Component Services.
Note: This setting is effective only if you have enabled application-level access checking
and have configured process and component level access checks, as described previously.
Create and Assign Roles
Roles can be created and assigned at the application, component (class), interface,
and method levels.
Adding Roles to an Application
To add roles to an application, use the SecurityRole assembly level attribute as
shown below.
[assembly:SecurityRole("Employee")]
[assembly:SecurityRole("Manager")]
This is equivalent to adding roles to an application by using the Component Ser-
vices tool.
Chapter 9: Enterprise Services Security 203
Note: Using the SecurityRole attribute at the assembly level is equivalent to adding roles to
the application, but not assigning them to individual components, interfaces, or methods. The
result is that the members of these roles determine the composition of the security descriptor
attached to the application. This is used solely to determine who is allowed to access (and
launch) the application.
For more effective role-based authorization, always apply roles to components, interfaces, and
methods as described below.
Adding Roles to a Component (Class)
To add roles to a component apply the SecurityRole attribute above the class
definition, as shown below.
[SecurityRole("Manager")]
public class Transfer : ServicedComponent
{
}
Adding Roles to an Interface
To apply roles at the interface level, you must create an interface definition and then
implement it within your serviced component class. You can then associate roles
with the interface by using the SecurityRole attribute.
Important: At development time, you must also annotate the class with the SecureMethod
attribute. This informs Enterprise Services that method level security services may be used.
At deployment time, administrators must also add users to the system defined Marshaler role,
which is automatically created within the COM+ catalog, when a class that is marked with
SecureMethod is registered with Component Services.
Use of the Marshaler role is discussed further in the next section.
The following example shows how to add the Manager role to a particular
interface.
[SecurityRole("Manager")]
public interface ISomeInterface
{
void Method1( string message );
void Method2( int parm1, int parm2 );
}
[ComponentAccessControl]
[SecureMethod]
public class MyServicedComponent : ServicedComponent, ISomeInterface
{
public void Method1( string message )
{
Building Secure ASP.NET Applications204
// Implementation
}
public void Method2( int parm1, int parm2 )
{
// Implementation
}
}
Adding Roles to a Method
To ensure that the public methods of a class appear in the COM+ catalog, you must
explicitly implement an interface that defines the methods. Then, to secure the
methods, you must use the SecureMethod attribute on the class, or the
SecureMethod or SecurityRole attribute at the method level.
Note: The SecureMethod and SecurityRole attributes must appear above the method imple-
mentation and not within the interface definition.
To enable method level security, perform the following steps:
1. Define an interface that contains the methods you want to secure. For example:
public interface ISomeInterface
{
void Method1( string message );
void Method2( int parm1, int parm2 );
}
2. Implement the interface on the serviced component class:
[ComponentAccessControl]
public class MyServicedComponent : ServicedComponent, ISomeInterface
{
public void Method1( string message )
{
// Implementation
}
public void Method2( int parm1, int parm2 )
{
// Implementation
}
}
3. If you want to configure roles administratively by using the Component Services
tool, you must annotate the class with the SecureMethod attribute, as shown
below.
[ComponentAccessControl]
[SecureMethod]
Chapter 9: Enterprise Services Security 205
public class MyServicedComponent : ServicedComponent, ISomeInterface
{
}
4. Alternatively, if you want to add roles to methods at development time by using
.NET attributes, apply the SecurityRole attribute at the method level. In this
event, you do not need to apply the SecureMethod attribute at the class level
(although the ComponentAccessControl attribute must still be present to config-
ure component level access checks).
In the following example only members of the Manager role can call Method1,
while members of the Manager and Employee roles can call Method2.
[ComponentAccessControl]
public class MyServicedComponent : ServicedComponent, ISomeInterface
{
[SecurityRole("Manager")]
public void Method1( string message )
{
// Implementation
}
[SecurityRole("Manager")]
[SecurityRole("Employee")]
public void Method2( int parm1, int parm2 )
{
// Implementation
}
}
5. At deployment time, administrators must add any user that requires access to
methods or interfaces of the class to the predefined Marshaler role.
Note: The Enterprise Services infrastructure uses a number of system-level interfaces that
are exposed by all serviced components. These include IManagedObject, IDisposable, and
IServiceComponentInfo. If access checks are enabled at the interface or method levels,
the Enterprise Services infrastructure is denied access to these interfaces.
As a result, Enterprise Services creates a special role called Marshaler and associates the
role with these interfaces. You can view this role (and the aforementioned interfaces) with
the Component Services tool.
At deployment time, application administrators need to add all users to the Marshaler role
who needs to access any methods or interface of the class. You can automate this in two
different ways:
●
Write a script that uses the Component Services object model to copy all users from
other roles to the Marshaler role.
●
Write a script which assigns all other roles to these three special interfaces and delete
the Marshaler role.
Building Secure ASP.NET Applications206
Register Serviced Components
Register serviced components in:
●
The Global Assembly Cache. Serviced components hosted in COM+ server
applications require installation in the global assembly cache, while library
applications do not.
To register a serviced component in the global assembly cache, run the
Gacutil.exe command line utility. To register an assembly called
MyServicedComponent.dll in the global assembly cache, run the following
command.
gacutil –i MyServicedComponent.dll
Note: You can also use the Microsoft .NET Framework Configuration Tool from the Adminis-
trative Tools program group to view and manipulate the contents of the global assembly
cache.
●
The COM+ Catalog. To register an assembly called MyServicedComponent.dll
in the COM+ catalog, run the following command.
regsvcs.exe MyServicedComponent.dll
This command results in the creation of a COM+ application. The .NET at-
tributes present within the assembly are used to populate the COM+ catalog.
Populate Roles
Populate roles by using the Component Services tool, or by using script to program
the COM+ catalog using the COM+ administration objects.
Use Windows Groups
Add Windows 2000 group accounts to Enterprise Services roles for maximum
flexibility. By using Windows groups, you can effectively use one administration
tool (the Users and Computers Administration tool) to administer both Windows
and Enterprise Services security.
●
Create a Windows group for each role in the Enterprise Services application.
●
Assign each group to its respective role.
For example, if you have a role called Manager, create a Windows group called
Managers. Assign the Managers group to the Manager role.
●
After you assign groups to roles, use the Users and Computers Administration
tool to add and remove users in each group.
Chapter 9: Enterprise Services Security 207
For example, adding a Windows 2000 user account named David to the
Windows 2000 group Managers effectively maps David to the Manager role.
To assign Windows groups to Enterprise Services roles by using Component Services
1. Using the Component Services tool, expand the application that contains the
roles to which you want to add Windows 2000 groups.
2. Expand the Roles folder and the specific role to which you want to assign
Windows groups.
3. Select the Users folder under the specific role.
4. Right-click the folder, point to New, and then click User.
5. In the Select Users or Groups dialog box, add groups (or users) to the role.
More Information
For more information about programming the COM+ catalog by using the COM+
administration objects, see “Automating COM+ Administration” within the Com-
ponent Development section of the MSDN Library.
Configure Identity
Use the Component Services tool (or script) to configure the identity of the Enter-
prise Services application. The identity property determines the account used to run
the instance of Dllhost.exe that hosts the application.
To configure identity
1. Using the Component Services tool, select the relevant application.
2. Right-click the name of the application, and then click Properties.
3. Click the Identity tab.
4. Click This user and specify the configured service account used to run the
application.
More Information
For more information about choosing an appropriate identity to run an Enterprise
Services application, see “Choosing a Process Identity” later in this chapter.
Configuring an ASP.NET Client Application
You must configure the DCOM authentication level and impersonation levels used
by client applications when communicating with serviced components using
DCOM.
Building Secure ASP.NET Applications208
Configure Authentication
To configure the default authentication level used by an ASP.NET Web application
when it communicates with a serviced component, edit the
comAuthenticationLevel attribute on the <processModel> element in
Machine.config.
Machine.config is located in the following folder.
%windir%\Microsoft.NET\Framework\v1.0.3705\CONFIG
Set the comAuthenticationLevel attribute to one of the following values.
comAuthenticationLevel=
"[Default|None|Connect|Call|Pkt|PktIntegrity|PktPrivacy]"
More Information
For more information about DCOM authentication levels, see “Authentication”
within the “Security Concepts” section later in this chapter.
Configure Impersonation
The impersonation level set by the client determines the impersonation level
capabilities of the server. To configure the default impersonation level used by
a Web-based application when it communicates with a serviced component,
edit the comImpersonationLevel attribute on the <processModel> element in
Machine.config. Set it to one of the following values.
comImpersonationLevel="[Default|Anonymous|Identify|Impersonate|Delegate]"
More Information
For more information about DCOM impersonation levels, see “Impersonation”
within the “Security Concepts” section later in this chapter.
Configuring Impersonation Levels for an Enterprise Services
Application
If a serviced component in one application needs to call a serviced component
within a second (server) application, you may need to configure the impersonation
level for the client application.
Chapter 9: Enterprise Services Security 209
Important: The impersonation level configured for an Enterprise Services application (on the
Security page of the application’s Properties dialog box) is the impersonation level used by
outgoing calls made by components within the application. It does not affect whether or not
serviced components within the application perform impersonation. To impersonate clients
within a serviced component, you must use programmatic impersonation techniques, as
described in “Flowing the Original Caller,” later in this chapter.
To set the application impersonation level declaratively, use the
ApplicationAccessControl assembly level attribute as shown below.
[assembly: ApplicationAccessControl(
ImpersonationLevel=ImpersonationLevelOption.Identify)]
This is equivalent to setting the Impersonation Level value on the Security page of
the application’s Properties dialog within Component Services.
Programming Security
The Enterprise Services security features are available to .NET components using
the ContextUtil, SecurityCallContext, and SecurityIdentity classes.
Programmatic Role-Based Security
For fine grained authorization decisions, you can programmatically test role mem-
bership using the IsCallerInRole method of the ContextUtil class. Prior to calling
this method, always check that component-level access checks are enabled, as
shown in the following code fragment. If security is disabled, IsCallerInRole
always returns true.
public void Transfer(string fromAccount, string toAccount, double amount)
{
// Check that security is enabled
if (ContextUtil.IsSecurityEnabled)
{
// Only Managers are allowed to transfer sums of money in excess of $1000
if (amount > 1000)
{
if (ContextUtil.IsCallerInRole("Manager"))
{
// Caller is authorized
}
else
{
// Caller is unauthorized
}
}
}
Building Secure ASP.NET Applications210
Identifying Callers
The following example shows how to identify all upstream callers from within a
serviced component.
[ComponentAccessControl]
public class MyServicedComponent : ServicedComponent
{
public void ShowCallers()
{
SecurityCallContext context = SecurityCallContext.CurrentCall;
SecurityCallers callers = context.Callers;
foreach(SecurityIdentity id in callers)
{
Console.WriteLine(id.AccountName);
}
}
}
Note: The original caller identity is available via the SecurityCallContext.OriginalCaller
property.
Choosing a Process Identity
Server activated Enterprise Services applications run within an instance of the
Dllhost.exe process. You must configure the account used to run the process in the
COM+ catalog by using the Component Services tool.
Note: You cannot specify the run as identity by using a .NET attribute.
Never Run as the Interactive User
Do not run server applications using the identity of the interactively logged on user
(this is the default setting). There are two main reasons to avoid this:
●
The privileges and access rights of the application will vary and will be depen-
dent upon who is currently logged on interactively at the server. If an adminis-
trator happens to be logged on, the application will have administrator
privileges.
●
If the application is launched while a user is interactively logged on and then the
user logs off, the server application will be shut down. It will not be able to
restart until another user logs on interactively.
Chapter 9: Enterprise Services Security 211
The interactive user setting is designed for developers to use at development time,
and should not be considered a deployment setting.
Use a Least-Privileged Custom Account
Create a least privileged account to mitigate the threat associated with a process
compromise. If a determined attacker manages to compromise the server process,
he or she will easily be able to inherit the privileges and access rights granted to the
process account. An account configured with minimum privileges restricts the
potential damage that can be done.
If you need to access network resources with the process account, the remote com-
puter must be able to authenticate the process account. In this scenario, you have
two options:
●
You can use a domain account if the two computers are in the same or trusting
domains.
●
You can use a local account and then create a duplicate account (with the same
user name and password) on the remote computer. With this option, you must
ensure that the passwords of the two accounts remain synchronized.
You may be forced to use the duplicated local account approach if the remote
computer is located in a separate domain (with no trust relationship), or if
the remote computer is behind a firewall (where closed ports do not permit
Windows authentication).
Accessing Network Resources
Your serviced components may need to access remote resources. It is important to
be able to identify the following:
●
The resources the components need to access. For example, files on file shares,
databases, other DCOM servers, Active Directory® directory service objects, and
so on.
●
The identity used to perform the resource access. If your serviced component
accesses remote resources, the identity used (which by default is the process
identity) must be capable of being authenticated by the remote computer.
Note: For information specific to accessing remote SQL Server databases, see Chapter 12,
“Data Access Security.”
Building Secure ASP.NET Applications212
You can access remote resources from a component within an Enterprise Services
application by using any of the following identities:
●
The original caller (if you are explicitly impersonating by using
CoImpersonateClient)
●
The current process identity (configured in the COM+ catalog for server applica-
tions)
●
A specific service account
Using the Original Caller
To use the original caller’s identity for remote resource access, you must:
●
Programmatically impersonate the original caller by calling
CoImpersonateClient.
●
Be able to delegate the caller’s security context from the application server
hosting the Enterprise Services application to the remote computer. This assumes
that you are using Kerberos authentication between your Enterprise Services
application and client application.
Scalability Warning: If you access the data services tier of your application using the original
caller’s impersonated identity, you severely impact the application’s ability to scale, because
you prevent database connection pooling from working efficiently; it doesn’t work efficiently
because the security context of each database connection is tied to many individual callers.
More Information
For more information about impersonating callers, see “Flowing the Original
Caller,” later in this chapter.
Using the Current Process Identity
If your application is configured to run as a server application, you can use the
configured process identity for remote resource access (this is the default case).
If you want to use the server process account for remote resource access, you must
either:
●
Run the server application using a least-privileged domain account. This as-
sumes that client and server computers are in the same or trusting domains.
●
Duplicate the process account using the same username and password on the
remote computer.
If ease of administration is your primary concern, you should use a least-privileged
domain account.
Chapter 9: Enterprise Services Security 213
If your application is configured to run as a library application, the process identity
is inherited from the host process (which will often be a Web-based application). For
more information about using the ASP.NET process identity for remote resource
access, see Chapter 8, “ASP.NET Security.”
Using a Specific Service Account
Your Enterprise Services application could access remote resources by using a
specifically configured service account (that is, a non-user Windows account).
However, this approach is not recommended on Windows 2000 because it relies on
you calling the LogonUser API.
The use of LogonUser on Windows 2000, forces you to grant the “Act as part of the
operating system” privilege to the Enterprise Services process account. This signifi-
cantly reduces the security of your application.
Note: Microsoft Windows .NET Server 2003 will lift this restriction.
Flowing the Original Caller
By default, outgoing calls issued by serviced components (for example, to access
local or remote resources) are made using the security context obtained from the
host process. For server applications, this is the configured run-as identity. For
library applications, this is the identity of the (host) client process (for example,
Aspnet_wp.exe when an ASP.NET Web application is the client).
To flow the original caller’s context through an Enterprise Services application
1. Call CoImpersonateClient.
This creates and attaches a thread impersonation token to the current thread.
2. Perform operation (access local or remote resource).
As impersonation is enabled, the outgoing call is made using the client’s security
context (as defined by the impersonation token).
If local resources are accessed, the caller (client process) must have specified at
least Impersonate level impersonation. If remote resources are accessed, the
caller must have specified Delegate level impersonation.
If the caller is an ASP.NET Web application, the default impersonation level for
the ASP.NET worker process is Impersonate. Therefore, to flow the original caller
to a downstream remote computer, you must change this default to Delegate (on
the <processModel> element of Machine.config on the client computer).
Building Secure ASP.NET Applications214
Note: To use the original caller’s security context to access remote resources you must use
Kerberos authentication, with accounts configured for delegation. The account used to run
the Enterprise Services server application must also be marked in Active Directory as
“Trusted for delegation.”
3. Cease impersonation by calling CoRevertToSelf.
This removes the impersonation token. Any subsequent call from the current
method uses the process security context. If you fail to call CoRevertToSelf, it
is called implicitly by the runtime when the method ends.
Note: The identity of the original caller automatically flows to an Enterprise Services applica-
tion and is available using SecurityCallContext.OriginalCaller. This can be useful for auditing
purposes.
Calling CoImpersonateClient
CoImpersonateClient (and CoRevertToSelf) are located within OLE32.dll. You
must import their definitions by using the DllImport attribute in order to be able to
call them through P/Invoke. This is illustrated in the following code fragment.
class COMSec
{
[DllImport("OLE32.DLL", CharSet=CharSet.Auto)]
public static extern uint CoImpersonateClient();
[DllImport("OLE32.DLL", CharSet=CharSet.Auto)]
public static extern uint CoRevertToSelf();
}
. . .
void SomeMethod()
{
// To flow the original caller's security context and use it to access local
// or remote resources, start impersonation
COMSec.CoImpersonateClient();
// Perform operations as the caller
// Code here uses the context of the caller – not the context of the process
. . .
COMSec.CoRevertToSelf();
// Code here reverts to using the process context
}
More Information
For more information about how to configure a complete Kerberos delegation
scenario that shows how to flow the original caller’s security context through an
ASP.NET Web application, an Enterprise Services application, and onto a database,
see the “Flowing the Original Caller” section of Chapter 5, “Intranet Security.”
Chapter 9: Enterprise Services Security 215
RPC Encryption
To secure the data sent from a client application to a remote serviced component
over DCOM, use the RPC Packet Privacy authentication level between client and
server. This provides message confidentiality and integrity.
You must configure the authentication level at the client and server.
To configure ASP.NET (where an ASP.NET Web application is the client), set the
comAuthenticationLevel attribute on the <processModel> element in
machine.config to PktPrivacy.
To configure an Enterprise Services server application, set the application-level
authentication level either by using the Component Services tool or the following
.NET attribute within the serviced component assembly.
[assembly: ApplicationAccessControl(
Authentication = AuthenticationOption.Privacy)]
More Information
●
For more information about configuring security (including authentication
levels), see “Configuring Security” earlier in this chapter.
●
For more information about RPC/DCOM authentication levels, see “Authentica-
tion” later in this chapter.
●
For more information about authentication-level negotiation, see “Authentica-
tion Level Negotiation” later in this chapter.
Building Serviced Components
For a step-by-step walkthrough that shows you how to build a serviced component,
see “ How To: Use Role-based Security with Enterprise Services” in the Reference
section of this guide.
DLL Locking Problems
When you rebuild a serviced component, if the DLL is locked:
●
Use Component Services to shut down the COM+ server application.
●
If you are developing a library application, the application may still be loaded
into the Aspnet_wp.exe process. Run IISReset from a command prompt or use
Task Manager to stop the Aspnet_wp.exe process.
●
Use the FileMon.exe tool from www.sysinternals.com to help troubleshoot file
locking problems.
Building Secure ASP.NET Applications216
Versioning
The default AssemblyVersion attribute that is generated by Microsoft Visual
Studio® .NET development system when you create a new project is shown below.
[assembly: AssemblyVersion("1.0.*")]
Each time you rebuild the project, a new assembly version is generated. This also
results in the generation of a new class identifier (CLSID) to identify the serviced
component classes. If you repeatedly register the assembly with component services
using Regsvcs.exe, you will see duplicated components (strictly classes) with
different CLSIDs listed beneath the Components folder.
While this complies with strict COM versioning semantics and will prevent existing
managed and unmanaged clients from breaking, it can be an annoyance during
development.
During test and development, consider setting an explicit version by using the
assembly level AssemblyVersion attribute shown below.
[assembly: AssemblyVersion("1.0.0.1")]
This setting will prevent a new CLSID being generated with each successive project
build. You may also want to fix the interface identifiers (IIDs). If your class imple-
ments explicit interfaces, you can fix the IID for a given interface by using the GUID
attribute as shown below.
[Guid("E1FBF27E-9F11-474d-8DF6-58916F798E9D")]
public interface IMyInterface
{
}
To generate new GUIDs
1. On the Tools menu of Visual Studio .NET, click Create GUID.
2. Click Registry Format
3. Click New GUID.
4. Click Copy.
5. Paste the GUID from the clipboard into your source code.
Important: Prior to deploying your serviced component assembly for test and production,
remove any fixed GUIDs and revert to an automated assembly versioning mechanism (for
example, by using “1.0.*”). Failure to do so increases the likelihood that a new release of your
component will break existing clients.
Chapter 9: Enterprise Services Security 217
More Information
For more information about versioning for deployment, see Understanding Enter-
prise Services (COM+) in .NET on MSDN.
QueryInterface Exceptions
If you see a QueryInterface call for the IRoleSecurity interface failing, this indi-
cates that you have updated an interface definition within your assembly, but have
not re-registered the assembly with Component Services using Regsvcs.exe.
Important: Each time you run Regsvcs.exe you will need to reconfigure a server application’s
run-as identity and will also need to add users to groups again. You can create a simple script
to automate this task.
DCOM and Firewalls
Windows 2000 (SP3 or QFE 18.1) or Windows .NET Server 2003 allow you to config-
ure Enterprise Services applications to use a static endpoint. If a firewall separates
the client from the server, you only need to open two ports in the firewall. Specifi-
cally, you must open port 135 for RPC and a port for your Enterprise Services
application.
As an alternative to this approach consider exposing your Enterprise Services
application as a Web service. This allows you to activate and call serviced compo-
nents by using SOAP over port 80. The main issue with this approach is that it
doesn’t allow you to flow transaction context from client to server. You would need
to initiate your transaction at the remote serviced component.
More Information
For more information, see the following Knowledge Base articles:
●
Article Q312960, “Cannot Set Fixed Endpoint for a COM+ Application”
●
Article Q259011, “SAMPLE: A Simple DCOM Client Server Test Application”
●
Article Q248809, “PRB: DCOM Does Not Work over NAT-Based Firewall”
●
Article Q250367, “INFO: Configuring Microsoft Distributed Transaction Coordi-
nator (DTC) to Work Through a Firewall”
●
Article Q154596, “HOWTO: Configure RPC Dynamic Port Allocation to Work w/
Firewall”
Building Secure ASP.NET Applications218
Calling Serviced Components from ASP.NET
This section highlights the main issues you will encounter when an ASP.NET
application calls a serviced component.
Caller’s Identity
When you call a serviced component from an ASP.NET application, the security
identity for the call is obtained from the application’s Win32® thread identity. If the
Web application is configured to impersonate the caller, this is the caller’s identity.
Otherwise, this is the ASP.NET process identity (by default, ASPNET).
From an ASP.NET application, you can retrieve the current Win32 thread identity
by calling WindowsIdentity.GetCurrent().
From a serviced component, you can retrieve the original caller identity by using
SecurityCallContext.OriginalCaller.
Use Windows Authentication and Impersonation Within the Web-based
Application
To enable meaningful role-based security within your Enterprise Services applica-
tion, you must use Windows authentication and enable impersonation. This ensures
that the serviced components are able to authenticate the original callers and make
authorization decisions based on the original caller’s identity.
Configure Authentication and Impersonation within Machine.config
DCOM authentication levels are negotiated between client (for example, the Web-
based application) and server (the Enterprise Services application). The higher of
the two security settings is used.
Configure ASP.NET authentication levels by using the comAuthenitcation attribute
on the <processModel> element of Machine.config.
Impersonation levels are controlled by the client (for example, a Web-based applica-
tion). The client can determine the degree of impersonation that it is willing to
allow the server to use.
Configure ASP.NET impersonation levels (for all outgoing DCOM calls), by using
the comImpersonationLevel attribute on the <processModel> element of
Machine.config.
Configuring Interface Proxies
The security settings that apply to individual interface proxies are usually obtained
from the default process level security settings. In the case of ASP.NET, default
security settings such as the impersonation level and authentication level are
configured in Machine.config, as described earlier.
Chapter 9: Enterprise Services Security 219
If necessary, you can alter the security settings used by an individual interface
proxy. For example, if your ASP.NET application communicates with a serviced
component that exposes two interfaces and sensitive data is passed through only
one interface, you may choose to use the encryption support provided by the packet
privacy authentication level only on the sensitive interface and to use, for example,
packet authentication on the other interface. This means that you do not experience
the performance hit associated with encryption on both interfaces.
Collectively, the set of security settings that apply to an interface proxy are referred
to as the security blanket. COM provides the following functions to allow you to
query and manipulate security blanket settings on an individual interface proxy:
●
CoQueryProxyBlanket
●
CoSetProxyBlanket
●
CoCopyProxy
You must use P/Invoke to call these functions from an ASP.NET Web application
(the DCOM client), The following code shows how to configure a specific interface
to use the Packet Privacy authentication level (which provides encryption). This
code can be used from an ASP.NET Web application that communicates with a
remote serviced component.
// Define a wrapper class for the P/Invoke call to CoSetProxyBlanket
class COMSec
{
// Constants required for the call to CoSetProxyBlanket
public const uint RPC_C_AUTHN_DEFAULT = 0xFFFFFFFF;
public const uint RPC_C_AUTHZ_DEFAULT = 0xFFFFFFFF;
public const uint RPC_C_AUTHN_LEVEL_PKT_PRIVACY = 6;
public const uint RPC_C_IMP_LEVEL_DEFAULT = 0;
public const uint COLE_DEFAULT_AUTHINFO = 0xFFFFFFFF;
public const uint COLE_DEFAULT_PRINCIPAL = 0;
public const uint EOAC_DEFAULT = 0x800;
// HRESULT CoSetProxyBlanket( IUnknown * pProxy,
// DWORD dwAuthnSvc,
// DWORD dwAuthzSvc,
// WCHAR * pServerPrincName,
// DWORD dwAuthnLevel,
// DWORD dwImpLevel,
// RPC_AUTH_IDENTITY_HANDLE pAuthInfo,
// DWORD dwCapabilities );
[DllImport("OLE32.DLL", CharSet=CharSet.Auto)]
public unsafe static extern uint CoSetProxyBlanket(
IntPtr pProxy,
uint dwAuthnSvc,
uint dwAuthzSvc,
IntPtr pServerPrincName,
uint dwAuthnLevel,
uint dwImpLevel,
IntPtr pAuthInfo,
uint dwCapababilities);
} // end class COMSec
Building Secure ASP.NET Applications220
// Code to call CoSetProxyBlanket
void CallComponent()
{
// This is the interface to configure
Guid IID_ISecureInterface = new Guid("c720ff19-bec1-352c-bb4b-e2de10b858ba");
IntPtr pISecureInterface;
// Instantiate the serviced component
CreditCardComponent comp = new CreditCardComponent();
// Get its IUnknown pointer
IntPtr pIUnk = Marshal.GetIUnknownForObject(comp);
// Get the interface to configure
Marshal.QueryInterface(pIUnk, ref IID_ISecureInterface,
out pISecureInterface);
try
{
// Configure the interface proxy and set packet privacy authentication
uint hr = COMSec.CoSetProxyBlanket( pISecureInterface,
COMSec.RPC_C_AUTHN_DEFAULT,
COMSec.RPC_C_AUTHZ_DEFAULT,
IntPtr.Zero,
COMSec.RPC_C_AUTHN_LEVEL_PKT_PRIVACY,
COMSec.RPC_C_IMP_LEVEL_DEFAULT,
IntPtr.Zero,
COMSec.EOAC_DEFAULT );
ISecureInterface secure = (ISecureInterface)comp;
// The following call will be encrypted as ISecureInterface is configured
// for packet privacy authentication. Other interfaces use the process
// level defaults (normally packet authentication).
secure.ValidateCreditCard("123456789");
}
catch (Exception ex)
{
}
}
More Information
●
For more information about configuring an ASP.NET client application to call
serviced components, see “Configuring an ASP.NET Client Application,” earlier
in this chapter.
●
For more information about DCOM authentication levels, see “Authentication,”
later in this chapter.
●
For more information about DCOM impersonation levels, see “Impersonation,”
later in this chapter.
●
For more information about using Windows authentication and enabling imper-
sonation within a Web-based application, see Chapter 8, “ASP.NET Security.”
Chapter 9: Enterprise Services Security 221
Security Concepts
This section provides a brief overview of Enterprise Services security concepts. If
you are already experienced with COM+, many of the concepts will be familiar.
For background information on Enterprise Services, see the MSDN article “Under-
standing Enterprise Services (COM+) in .NET.”
The following are summaries of key security concepts that you should understand:
●
Security settings for serviced components and Enterprise Services applications
are maintained within the COM+ catalog. Most settings can be configured using
.NET attributes. All settings can be configured by using the Component Services
administration tool or Microsoft Visual Basic® Scripting Edition development
system scripts.
●
Authorization is provided by Enterprise Services (COM+) roles, which can
contain Windows group or user accounts. These are not the same as .NET roles.
●
Role-based security can be applied at the application, interface, class, and
method levels.
●
Imperative role checks can be performed programmatically within methods
by using the IsCallerInRole method of the ContextUtil class.
●
Effective role-based authorization within an Enterprise Services application
relies on a Windows identity being used to call serviced components.
●
This may require you to use Windows authentication coupled with imperson-
ation within an ASP.NET Web application — if the Web application calls
serviced components that rely on Enterprise Services (COM+) roles.
●
When you call a serviced component from an ASP.NET Web application or
Web service, the identity used for the outgoing DCOM call is determined by
the Win32 thread identity as defined by WindowsIdentity.GetCurrent().
●
Serviced components can run in server or library applications.
●
Server applications run in separate instances of Dllhost.exe.
●
Library applications run in the client’s process address space.
●
Role-based authorization works in a similar fashion for server and library
applications, although there are some subtle differences between library and
server applications from a security perspective. For details, see “Security for
Server and Library Applications” earlier in this chapter.
●
Authentication is provided by the underlying services of DCOM and RPC. The
client and server’s authentication level combined to determine the resulting
authentication level used for communication with the serviced component.
●
Impersonation is configured within the client application. It determines the
impersonation capabilities of the server.
Building Secure ASP.NET Applications222
Enterprise Services (COM+) Roles and .NET Roles
Enterprise Services (COM+) roles are used to represent common categories of users
who share the same security privileges within an application. While conceptually
similar to .NET roles, they are completely independent.
Enterprise Services (COM+) roles contain Windows user and group accounts (un-
like .NET roles which can contain arbitrary non-Windows user identities). Because
of this, Enterprise Services (COM+) roles are only an effective authorization mecha-
nism for applications that use Windows authentication and impersonation (in order
to flow the caller’s security context to the Enterprise Services application).
Table 9.1: Comparing Enterprise Services (COM+) roles with .NET roles
Feature Enterprise Services .NET Roles
(COM+) Roles
Administration Component Services Custom
Administration Tool
Data Store COM+ Catalog Custom data store (for example, SQL
Server or Active Directory)
Declarative Yes Yes
[SecurityRole(“Manager”)] [PrincipalPermission(
SecurityAction.Demand,
Role=”Manager”)]
Imperative Yes Yes
ContextUtil.IsCallerInRole() IPrincipal.IsInRole
Class, Interface, Yes Yes
and Method Level
Granularity
Extensible No Yes
(using custom IPrincipal implementation)
Available to all Only for components that Yes
.NET derive from ServicedComponent
components base class
Role Roles contain Windows group When using WindowsPrincipals,
Membership or user accounts roles ARE Windows groups — no extra
level of abstraction
Requires Yes No
explicit To obtain method level
Interface authorization, an interface
implementation must be explicitly defined and
implemented
Chapter 9: Enterprise Services Security 223
Authentication
Because Enterprise Services rely on the underlying infrastructure provided by
COM+ and DCOM/RPC, the authentication level settings available to Enterprise
Services applications are those defined by RPC (and used by DCOM).
Table 9.2: Enterprise Services applications authentication settings
Authentication Level Description
Default Choose authentication level using normal negotiation rules
None No authentication
Connect Only authenticate credentials when the client initially connects to the
server
Call Authenticate at the start of each remote procedure call
Packet Authenticate all data received from the client
Packet Integrity Authenticate all data and verify that none of the transferred data has
been modified
Packet Privacy Authenticate all data and encrypt parameter state for each remote
procedure call
Authentication Level Promotion
You should be aware that certain authentication levels are silently promoted. For
example:
●
If the User Data Protocol (UDP) datagram transport is used, Connect and Call
levels are promoted to Packet, because the aforementioned authentication levels
only make sense over a connection oriented transport such as TCP.
Note: Windows 2000 defaults to RPC over TCP for DCOM communications.
●
For inter-process calls on a single computer, all authentication levels are always
promoted to Packet Privacy. However, in a single computer scenario, data is not
encrypted for confidentiality (because the data doesn’t cross the network).
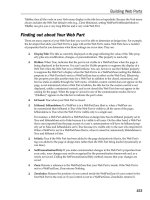
Authentication Level Negotiation
The authentication level used by Enterprise Services to authenticate a client is
determined by two settings:
●
The process level authentication level. For a server-activated application
(running within Dllhost.exe), the authentication level is configured within the
COM+ catalog.
Building Secure ASP.NET Applications224
●
The client authentication level. The configured authentication level of the client
process that communicates with the serviced component also affects the authen-
tication level that is used.
The default authentication level for an ASP.NET Web application is defined by
the comAuthenticationLevel attribute on the <processModel> element in
Machine.config.
The higher of the two (client and server) authentication level is always chosen. This
is illustrated in the Figure 9.4.
Client Process 1 (Privacy)
Privacy
Server Process 2 (None)
None
Client Process 2 (None)
Packet
None
Server Process 1 (Packet)
Privacy
Packet
Figure 9.4
Authentication level negotiation
More Information
For information about how to configure authentication levels for an Enterprise
Service application, see “Configuring Security” earlier in this chapter.
Impersonation
The impersonation level defined for an Enterprise Services application determines
the impersonation level to be used for all outgoing DCOM calls made by serviced
components within the application.
Important: It does NOT determine whether or the not serviced components within the applica-
tion impersonate their callers. By default, serviced components do not impersonate callers. To
do so, the service component must call CoImpersonateClient, as described in “Flowing the
Original Caller” earlier in this chapter.
Chapter 9: Enterprise Services Security 225
Impersonation is a client-side setting. It offers a degree of protection to the client as
it allows the client to restrict the impersonation capabilities of the server.
Table 9.3: Available impersonation levels
Impersonation Level Description
Identify Allows the server to identify the client and perform access checks
using the client’s access token
Impersonate Allows the server to access local resources using the client’s
credentials
Delegate Allows the server to access remote resources using the client’s
credentials (this requires Kerberos and specific account configuration)
The default impersonation level used by a Web-based application when it commu-
nicates with serviced components (or any component using DCOM) is determined
by the comImpersonationLevel attribute on the <processModel> element in
Machine.config.
Cloaking
Cloaking determines precisely how client identity is projected through a COM
object proxy to a server during impersonation. There are two forms of cloaking:
●
Dynamic Cloaking. Enterprise Services server applications use dynamic cloak-
ing (this is not configurable). Cloaking for library applications is determined by
the host process, for example the ASP.NET worker process (Aspnet_wp.exe).
Web-based applications also use dynamic cloaking — again this is not
configurable.
Dynamic cloaking causes the thread impersonation token to be used to represent
the client’s identity during impersonation. This means that if you call
CoImpersonateClient within a serviced component, the client’s identity is
assumed for subsequent outgoing calls made by the same method, until either
CoRevertToSelf is called or the method ends (where CoRevertToSelf is implic-
itly called).
●
Static Cloaking. With static cloaking, the server sees the credentials that are used
on the first call from client to server (irrespective of whether or not a thread is
impersonating during an outgoing call).
More Information
●
For information about how to configure impersonation levels for Enterprise
Service applications, see “Configuring Security”, earlier in this chapter.
●
For more information about cloaking, see the Platform SDK information on
“Cloaking” on MSDN.
Building Secure ASP.NET Applications226
Summary
This chapter has described how to build secure serviced components within an
Enterprise Services application. You have also seen how to configure an ASP.NET
Web-based client application that calls serviced components. To summarize:
●
Use server activated Enterprise Services applications for increased security.
Additional process hops raise security.
●
Use least-privileged, local accounts to run server applications.
●
Use Packet Privacy level authentication (which must be configured at the server
and client) if you need to secure the data sent to and from a serviced component
across a network from a client application.
●
Enable component-level access checks for a meaningful role-based security
implementation.
●
Use Windows authentication and enable impersonation in an ASP.NET Web
application prior to calling a component within an Enterprise Services applica-
tion that relies on role-based security.
●
Use secured gateway classes as entry points into Enterprise Service applications.
By reducing the number of gateway classes that provide entry points for clients
into your Enterprise Service applications, you reduce the number of classes that
need to have roles assigned. Other internal helper classes should have role-based
checks enabled but should have no roles assigned to them. This means that
external clients will not be able to call them directly, while gateway classes in the
same application will have direct access.
●
Call IsSecurityEnabled immediately prior to checking role membership pro-
grammatically.
●
Avoid impersonation in the middle tier because this prevents the effective use of
database connection pooling and dramatically reduces the scalability of your
application.
●
Add Windows groups to Enterprise Services (COM+) roles for increased flexibil-
ity and easier administration