C++ For Dummies 5th Edition phần 8 ppt
Bạn đang xem bản rút gọn của tài liệu. Xem và tải ngay bản đầy đủ của tài liệu tại đây (1.02 MB, 44 trang )
28 568523 Ch22.qxd 4/5/04 2:03 PM Page 292
292
Part IV: Inheritance
The programmer can divide a single program into separate files known as
modules. These individual source files are compiled separately and then com-
bined during the build process to generate a single program. Modules can then
be allocated to separate groups known as namespaces.
The process of combining separately compiled modules into a single exe-
cutable is called linking.
There are a number of reasons to divide programs into more manageable
pieces. First, dividing a program into modules results in a higher level of
encapsulation. Classes wall off their internal members in order to provide a
certain degree of safety. Programs can wall off functions to do the same thing.
Encapsulation is one of the advantages of object-oriented programming.
Second, it is easier to comprehend and, therefore, easier to write and debug a
program that consists of a number of well-thought-out modules than a single
source file full of all of the classes and functions that the program uses.
Next comes reuse. I used the reuse argument to help sell object-based pro-
gramming. It is extremely difficult to keep track of a single class reused
among multiple programs when a separate copy of the class is kept in each
program. It is much better if a single class module is automatically shared
among programs.
Finally, there is the argument of time. A compiler such as Visual C++ or Dev-
C++ doesn’t need very long to build the examples contained in this book using
a high-speed computer like yours. Commercial programs sometimes consist of
millions of source lines of code. Rebuilding a program of that size can take more
than 24 hours. A programmer would not tolerate rebuilding a program like that
for every single change. However, the majority of the time is spent compiling
source files that haven’t changed. It is much faster to recompile just those
modules that have changed and then quickly link all modules together.
Separate namespaces allow a further level of encapsulation. A namespace
should consist of a set of modules that perform a single capability. For example,
all of the mathematical functions might be combined into a
Math namespace.
This lesson builds a simplistic program, called
SeparateModules, that con-
sists of a
Student class, a GraduateStudent subclass, and a main() module
to test both.
Dividing the program — Student
You begin by deciding what the logical divisions of SeparateModules should
be. First, you notice that
Student is an entity of its own. It does not depend
28 568523 Ch22.qxd 4/5/04 2:03 PM Page 293
Chapter 22: Factoring Classes
293
on any other functions (besides C++ functions). Thus, it would make sense to
put
Student in a module by itself. Because the class will be used in several
places, you break the declaration into a
student.h file and a separate imple-
mentation file,
Student.cpp. By convention, the include file carries the
name of the primary class it defines, but in lowercase letters. Ideally, the
include file defines only one class. This allows the user program to include
just the files that it needs.
Historically, all include files carried the extension
.h. This was changed in the
current C++ standard. System include files such as
iostream now have no
extension at all. However, many programmers stick with the
.h convention
for include files they write. This allows such include files to be easily differen-
tiated by the reader of the program.
The resulting
student.h file appears as follows:
// Student - basic student
#ifndef _STUDENT_
#define _STUDENT_
namespace Schools
{
class Student
{
public:
Student(char* pszName, int nID);
virtual char* display();
protected:
// student’s name
char* pszName;
int nID;
};
}
#endif
The #ifndef is a preprocessor control much like #include. #ifndef _
STUDENT_
says to include only the following lines if the argument _STUDENT_
is defined. The first time that student.h is included, _STUDENT_ is not
defined. However, the
#define immediately following the #ifndef then
defines it. This has the effect that
student.h is processed only once, no
matter how many times it is included in a given file.
Defining a namespace
The second feature of the Student class is the creation of the Schools
namespace.
28 568523 Ch22.qxd 4/5/04 2:03 PM Page 294
294
Part IV: Inheritance
A namespace is a collection of loosely coupled classes that are somehow logi-
cally similar. In this case, I intend to throw all classes that I create concerning
students, graduate students, classes, course schedules, and so forth into the
Schools namespace.
The classes that make up the
Schools namespace are like members of a
family. One class within a namespace may refer to other members of the
same namespace directly. However, external classes must specify the name-
space. You will see the ways of specifying a class’s namespace in the follow-
ing SeparatedMain application.
Another reason for dividing modules into namespaces is to avoid “name colli-
sion.” For example, the class
Grade within the namespace Schools does not
interfere with the class
Grade in the namespace FoodProduction.
Implementing Student
I put the implementation of the Student class in the file Student.cpp:
// Student - implement the methods of the Student class
#include <cstdio>
#include <cstdlib>
#include <iostream>
#include <string>
#include “student.h”
namespace Schools
{
Student::Student(char* pszNameArg, int nIDArg)
: nID(nIDArg)
{
pszName = new char[strlen(pszNameArg) + 1];
strcpy(pszName, pszNameArg);
}
// display - return a description of student
char* Student::display()
{
// copy the student’s name into a block of heap
// memory that we can return to the caller
char* pReturn = new char[strlen(pszName) + 1];
strcpy(pReturn, pszName);
return pReturn;
}
}
The constructor for Student copies off the name and id provided it. The vir-
tual
display() method returns a string that describes the Student object.
28 568523 Ch22.qxd 4/5/04 2:03 PM Page 295
Chapter 22: Factoring Classes
295
Compiling the Student.cpp file generates an intermediate file. This interme-
diate file can be combined quickly with other intermediate files to form a
completed executable program.
For historical reasons, this intermediate file carries the extension
.o (for
“object file”) in most C++ environments.
Dividing the program — GraduateStudent
The next module that seems quasi-independent is GraduateStudent.
Logically, one could fold the
GraduateStudent class into Student.cpp;
however, some programs may want to deal with
Student as an abstraction
and not worry about students versus graduate students.
I made the
GraduateStudent class as simple as possible. The include file
appears as follows:
// GraduateStudent - a special type of Student
#ifndef _GRADUATE_STUDENT_
#define _GRADUATE_STUDENT_
#include “student.h”
namespace Schools
{
class GraduateStudent : public Student
{
public:
// trivial constructors
GraduateStudent(char* pszName, int nID)
: Student(pszName, nID){}
// demonstration virtual function
virtual char* display();
};
}
#endif
Notice that the graduateStudent.h file includes student.h. This is because
the
GraduateStudent class is dependent upon the definition of Student.
The resulting source file implements the
display() method, the only
member function that is yet to be implemented:
// GraduateStudent - a special type of Student
#include <cstdio>
#include <cstdlib>
#include <iostream>
#include “graduateStudent.h”
28 568523 Ch22.qxd 4/5/04 2:03 PM Page 296
296
Part IV: Inheritance
namespace Schools
{
char* GraduateStudent::display()
{
// get description of basic student
char* pFirst = Student::display();
// we’ll add this text
char* pSecond = “-G”;
// get a new string and tack second onto first
char* pName = new char[strlen(pFirst) +
strlen(pSecond) + 1];
strcpy(pName, pFirst);
strcat(pName, pSecond);
// don’t forget to return the string returned by
// Student::display() to the heap before passing
// our new string to the caller
delete pFirst;
return pName;
}
}
The GraduateStudent version of display() concatenates a “-G” onto the
end of whatever
Student returns. It begins by allocating a new character
array that’s large enough to handle the extra information.
Never assume that there’s enough room in the original buffer for any extra
characters to be tacked onto the end.
The program copies the contents of the original string into the newly allo-
cated array. It then appends the
“- G”. The display() function must return
the buffer allocated by
Student::display() to the heap before continuing.
Forgetting to return buffers to the heap is known as a memory leak. A pro-
gram with memory leaks executes properly at first; however, the program
slows more and more as the available memory is lost to the leaks. The pro-
gram eventually grinds to a halt. Memory leaks are very difficult to find.
Implementing an application
The two classes, Student and GraduateStudent, have been separated into
independent source files and included in the
Schools namespace. I wrote the
following very simple application to invoke the two classes:
28 568523 Ch22.qxd 4/5/04 2:03 PM Page 297
Chapter 22: Factoring Classes
297
// SeparatedMain - demonstrated an application separated
// into two parts - the main() part
#include <cstdio>
#include <cstdlib>
#include <iostream>
#include “graduateStudent.h”
#include “student.h”
using namespace std;
//using namespace Schools;
using Schools::GraduateStudent;
int main(int nArgc, char* pszArgs[])
{
Schools::Student s(“Sophie Moore”, 1234);
cout << “Student = “ << s.display() << endl;
GraduateStudent gs(“Greg U. Waite”, 5678);
cout << “Student = “ << gs.display() << endl;
// wait until user is ready before terminating program
// to allow the user to see the program results
system(“PAUSE”);
return 0;
}
The application includes both the student.h and graduateStudent.h
include files. This gives the application access to the definition of the two
classes.
You might notice that including
graduatestudent.h automatically includes
student.h. However, you shouldn’t take it for granted; include student.h if
you access the
Student class directly, whether or not you include
graduateStudent.h. The #ifndef, which you installed in student.h, will
make sure that the contents of
student.h are not processed twice by the
C++ compiler.
SeparatedMain is not a member of the Schools namespace. When main()
refers to the Student class, C++ does not know whether the programmer
intends to use the
Student found in the Schools namespace or a similarly
named class in some other namespace.
main() can completely specify a class without any possibility of ambiguity
because
Schools::Student refers specifically to the namespace and class.
Alternatively, the programmer can specify her intentions at the beginning of
the module: The phrase
using Schools::GraduateStudent; tells C++ that
any mention to
GraduateStudent refers to the Schools namespace.
28 568523 Ch22.qxd 4/5/04 2:03 PM Page 298
298
Part IV: Inheritance
The programmer can gain access to all members of the Schools namespace
by adding the command
using namespace Schools. The following version of
main() builds successfully:
using namespace Schools;
int main(int nArgc, char* pszArgs[])
{
Student s(“Sophie Moore”, 1234);
cout << “Student = “ << s.display() << endl;
GraduateStudent gs(“Greg U. Waite”, 5678);
cout << “Student = “ << gs.display() << endl;
// wait until user is ready before terminating program
// to allow the user to see the program results
system(“PAUSE”);
return 0;
}
statement at the beginning of the
the
std namespace.
You began using the using namespace std
book. The modules that make up the Standard C++ Library are members of
Project file
Full of expectation, I open the SeparatedMain.cpp file in the compiler and
click Build. The module compiles properly, but an error occurs during the
linking process. C++ does not know what a
Student is. Somehow you have to
tell C++ that the
Student.cpp and GraduateStudent.cpp files need to be
linked together with
SeparatedMain.cpp to create the program. Most C++
environments, including both Dev-C++ and Visual C++.NET, combine multiple
modules together via a project file.
Dev-C++ and Visual C++ use their own project file formats. The directions for
creating a C++ console application project within Visual Studio.NET is pro-
vided on the enclosed CD-ROM in Bonus Chapter 2.
Creating a project file under Dev-C++
Execute the following steps to create a Dev-C++ project:
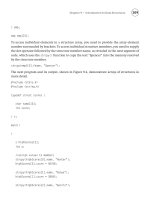
1. Choose File➪New➪Project. Select Console Application and type the
name SeparateModules.
You should see the window in Figure 22-6.
28 568523 Ch22.qxd 4/5/04 2:03 PM Page 299
Chapter 22: Factoring Classes
299
Figure 22-6:
The New
Project
window
allows the
user to
enter the
name and
type of
project.
2. Click OK.
Dev-C++ opens a file window.
3. Select the directory into which to store the project.
I selected
\CPP_Programs\Chap22. Dev-C++ creates a project with a
default initial module
main.cpp.
4. Remove
main.cpp from the project because you already have a
main() module.
5. Choose Project➪Remove From Project.
6. Select
main.cpp and click OK.
7. Copy the files
main.cpp, Student.cpp, GraduateStudent.cpp,
student.h, and graduateStudent.h to the Chap22 folder if they
aren’t there already.
8. Choose Project➪Add to Project.
9. Select the entire list of source modules and click OK.
10. Choose Execute➪Rebuild All to compile the modules in the project
and create an executable program.
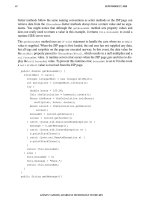
11. Click the Classes tab in the left window to see a detailed description
of each class in the program, as shown in Figure 22-7.
Make sure that the class browser is enabled and configured properly.
28 568523 Ch22.qxd 4/5/04 2:03 PM Page 300
300
Part IV: Inheritance
Figure 22-7:
The classes
tab displays
the
members of
each class.
12. Choose Tools➪Editor options and click the Class browsing tab.
13. Click the Enable Class Browser browser and the options shown in
Figure 22-8.
Notice how the class browser displays each member. Functions display
with their argument types as well as the type of object returned. Notice
also that the class browser shows two
display() member functions
under the
GraduateStudent class.
Figure 22-8:
The class
browser
options tab
determines
the type of
information
available in
the class
browser.
28 568523 Ch22.qxd 4/5/04 2:03 PM Page 301
Chapter 22: Factoring Classes
301
14. Select the first display() entry in the list, the one with the small dia-
mond in front of it.
This opens the
Student.cpp file and places the cursor on the display()
member function. Selecting the second display() entry in the class
browser takes the editor to the
GraduateStudent::display() member
function.
The properties of the project are initially set to the default. You can
change the settings as follows.
15. Select Project➪Project Options.
For example, select the Linker options under the Compiler tab. Now
make sure that Generate Debugging Information is set to Yes if you
intend to use the Dev-C++ debugger.
I encourage you to break your programs into multiple source files. It simpli-
fies the editing, modifying, and debugging process.
28 568523 Ch22.qxd 4/5/04 2:03 PM Page 302
302
Part IV: Inheritance
29 568523 PP05.qxd 4/5/04 2:02 PM Page 303
Optional Features
Part V
29 568523 PP05.qxd 4/5/04 2:02 PM Page 304
In this part . . .
T
he goal of this book is not to turn you into a C++ lan-
guage lawyer; it’s to give you a solid understanding of
the fundamentals of C++ and object-oriented programming.
The earlier parts in this book cover the essential features
you need to know to produce a well-written, object-oriented
C++ program. C++, however, is a big language (it has a seri-
ous case of feature-itis, if you ask me), and I have yet to
discuss many features such as file input/output and the
Standard Template Library. Part V rights this wrong.
C++ programmers have increasingly come to exploit the
features of this library in the past few years. The BUDGET4
and BUDGET5 programs on the enclosed CD-ROM demon-
strate how.
30 568523 Ch23.qxd 4/5/04 2:02 PM Page 305
Chapter 23
A New Assignment Operator,
Should You Decide to Accept It
In This Chapter
ᮣ Introduction to the assignment operator
ᮣ Why and when the assignment operator is necessary
ᮣ Similarities between the assignment operator and the copy constructor
T
he intrinsic data types are those that are built in the language, such as
int, float, double, and so on, plus the various pointer types. Chapter 3
and Chapter 4 describe the operators that C++ defines for the intrinsic data
types. C++ enables the programmer to define the operators for classes that
the programmer has created in addition to these intrinsic operators. This is
called operator overloading.
Normally, operator overloading is optional and not attempted by beginning
C++ programmers. A lot of experienced C++ programmers (including me)
don’t think operator overloading is such a great idea either. However, you
must figure out how to overload one operator: the assignment operator.
Comparing Operators with Functions
An operator is nothing more than a built-in function with a peculiar syntax.
The following addition
a + b
could be understood as though it were written
operator+(a, b)
30 568523 Ch23.qxd 4/5/04 2:02 PM Page 306
306
Part V: Optional Features
C++ gives each operator a function-style name. The functional name of an
operator is the operator symbol preceded by the keyword
operator and fol-
lowed by the appropriate argument types. For example, the
+ operator that
adds an
int to an int generating an int is called int operator+(int, int).
Any operator can be defined for a user-defined class. Thus, I could create a
Complex operator*(Complex&, Complex&) that would allow me to multi-
ply two objects of type
Complex. The new operator may have the same
semantics as the operator it overloads, but it doesn’t have to. The following
rules apply when overloading operators:
ߜ The programmer cannot overload the
., ::, * (dereference), and &
operators.
ߜ The programmer cannot invent new operators. You cannot invent the
operation
x$y.
ߜ The format of the operators cannot be changed. Thus, you cannot define
an operation
%i because % is a binary operator.
ߜ The operator precedence cannot change. A program cannot force
operator+ to be evaluated before operator*.
ߜ The operators cannot be redefined when applied to intrinsic types —
you can’t change the meaning of 1 + 2. Existing operators can be over-
loaded only for newly defined types.
Overloading operators is one of those things that seems like a much better
idea than it really is. In my experience, operator overloading introduces more
problems than it solves, with two notable exceptions that are the subject of
this chapter.
Inserting a New Operator
The insertion and extraction operators << and >> are nothing more than the
left and right shift operators overloaded for a set of input/output classes.
These definitions are found in the include file
iostream (which is why
every program includes that file). Thus,
cout << “some string” becomes
operator<<(cout, “some string”). Our old friends cout and cin are
predefined objects that are tied to the console and keyboard, respectively.
I discuss this relationship in Chapter 24.
30 568523 Ch23.qxd 4/5/04 2:02 PM Page 307
Chapter 23: A New Assignment Operator, Should You Decide to Accept It
307
Creating Shallow Copies
Is a Deep Problem
No matter what anyone may think of operator overloading, you will need to
overload the assignment operator for many classes that you generate. C++
provides a default definition for
operator=() for all classes. This default def-
inition performs a member-by-member copy. This works great for an intrinsic
type like an
int.
int i;
i = 10; // “member by member” copy
This same default definition is applied to user-defined classes. In the follow-
ing example, each member of
source is copied over the corresponding
member in
destination.
void fn()
{
MyStruct source, destination;
destination = source;
}
The default assignment operator works for most classes; however, it is not
correct for classes that allocate resources, such as heap memory. The pro-
grammer must overload
operator=() to handle the transfer of resources.
The assignment operator is much like the copy constructor. In use, the two
look almost identical:
void fn(MyClass &mc)
{
MyClass newMC(mc); // of course, this uses the
// copy constructor
MyClass newerMC = mc;// less obvious, this also invokes
// the copy constructor
MyClass newestMC; // this creates a default object
newestMC = mc; // and then overwrites it with
// the argument passed
}
The creation of newMC follows the standard pattern of creating a new object as
a mirror image of the original using the copy constructor
MyClass(MyClass&).
Not so obvious is that
newerMC is also created using the copy constructor.
30 568523 Ch23.qxd 4/5/04 2:02 PM Page 308
308
Part V: Optional Features
MyClass a = b is just another way of writing MyClass a(b) — in particular,
this declaration does not involve the assignment operator despite its appear-
ance. However,
newestMC is created using the default (void) constructor and
then overwritten by
mc using the assignment operator.
Like the copy constructor, an assignment operator should be provided when-
ever a shallow copy is not appropriate. (Chapter 18 discusses shallow versus
deep constructors.) A simple rule is to provide an assignment operator for
classes that have a user-defined copy constructor.
The rule is this: The copy constructor is used when a new object is being cre-
ated. The assignment operator is used if the left-hand object already exists.
Overloading the Assignment Operator
The DemoAssignmentOperator program demonstrates how to provide an
assignment operator. The program also includes a copy constructor to pro-
vide a comparison.
//DemoAssignmentOperator - demonstrate the assignment
// operator on a user defined class
#include <cstdio>
#include <cstdlib>
#include <iostream>
#include <string>
using namespace std;
// Name - a generic class used to demonstrate
// the assignment and copy constructor
// operators
class Name
{
public:
Name(char *pszN = 0)
{
copyName(pszN, “”);
}
Name(Name& s)
{
copyName(s.pszName, “ (copy)”);
}
~Name()
{
deleteName();
}
//assignment operator
Name& operator=(Name& s)
{
30 568523 Ch23.qxd 4/5/04 2:02 PM Page 309
Chapter 23: A New Assignment Operator, Should You Decide to Accept It
309
//delete existing stuff
deleteName();
// before replacing with new stuff
copyName(s.pszName, “ (replaced)”);
//return reference to existing object
return *this;
}
// very simple access function
char* out() { return pszName; }
protected:
void copyName(char* pszN, char* pszAdd);
void deleteName();
char *pszName;
};
//copyName() - allocate heap memory to store name
void Name::copyName(char* pszN, char* pszAdd)
{
pszName = 0;
if (pszN)
{
pszName = new char[strlen(pszN) +
strlen(pszAdd) + 1];
strcpy(pszName, pszN);
strcat(pszName, pszAdd);
}
}
//deleteName() - return heap memory
void Name::deleteName()
{
if (pszName)
{
delete pszName;
pszName = 0;
}
}
int main(int nNumberofArgs, char* pszArgs[])
{
// create two objects
Name n1(“Claudette”);
Name n2(“Greg”);
cout << n1.out() << “ and “
<< n2.out() << “ are newly created objects”
<< endl;
// now make a copy of an object
Name n3(n1);
cout << n3.out() << “ is a copy of “
<< n1.out() << endl;
30 568523 Ch23.qxd 4/5/04 2:02 PM Page 310
310
Part V: Optional Features
// create a new object using the “=” format
// for accessing the copy constructor
Name n4 = n1;
cout << n4.out() << “ is also a copy of “
<< n1.out() << endl;
// overwrite n2 with n1
n2 = n1;
cout << n1.out() << “ was assigned to “
<< n2.out() << endl;
// wait until user is ready before terminating program
// to allow the user to see the program results
system(“PAUSE”);
return 0;
}
The class Name contains a pointer to a person’s name, which it allocates from
the heap in the constructor. The constructors and destructor for class
Name
are similar to those presented in Chapters 17 and 18. The constructor
Name(char*) copies the name given it to the pszName data member. This
constructor also serves as the default constructor. The copy constructor
Name(&Name) copies the name of the object passed to the name stored in the
current object by calling
copyName(). The destructor returns the pszName
character string to the heap by calling deleteName().
The assignment
operator=() is a method of the class. It looks to all the world
like a destructor immediately followed by a copy constructor. This is typical.
Consider the assignment in the example
n2 = n1. The object n2 already has a
name associated with it (
“Greg”). In the assignment, the memory that the orig-
inal name occupies must be returned to the heap by calling
deleteName(),
just like a destructor. The assignment operator then invokes
copyName() to
copy the new information into the object, much like a copy constructor.
The copy constructor did not need to call
deleteName() because the object
didn’t already exist. Therefore, memory had not already been assigned to the
object when the constructor was invoked. The destructor didn’t perform the
copy function.
There are two more details about the assignment operator. First, the return
type of
operator=() is Name&. Expressions involving the assignment opera-
tor have a value and a type, both of which are taken from the final value of
the left-hand argument. In the following example, the value of
operator=() is
2.0, and the type is double.
double d1, d2;
void fn(double );
d1 = 2.0; // the value of this expression is 2.0
30 568523 Ch23.qxd 4/5/04 2:02 PM Page 311
Chapter 23: A New Assignment Operator, Should You Decide to Accept It
311
This is what enables the programmer to write the following:
d2 = d1 = 2.0
fn(d2 = 3.0); // performs the assignment and passes the
// resulting value to fn()
The value of the assignment d1 = 2.0 (2.0) and the type (double) are
passed to the assignment to
d2. In the second example, the value of the
assignment
d2 = 3.0 is passed to the function fn().
The second detail is that
operator=() was written as a member function.
The left-hand argument is taken to be the current object (
this). Unlike other
operators, the assignment operator cannot be overloaded with a nonmember
function.
Protecting the Escape Hatch
Providing your class with an assignment operator can add considerable flexi-
bility to the application code. However, if this is too much work or if you don’t
want C++ to make copies of your object, overloading the assignment operator
with a protected function will keep anyone from accidentally making an unau-
thorized member-by-member shallow copy, as illustrated here:
class Name
{
// just like before
protected:
// copy constructor
Name(Name&) {}
//assignment operator
Name& operator=(Name& s) { return *this; }
};
With this definition, assignments such as the following are precluded:
void fn(Name &n)
{
Name newN;
newN = n; //generates a compiler error -
//function has no access to op=()
}
This copy protection for classes saves you the trouble of overloading the
assignment operator but reduces the flexibility of your class.
If your class allocates resources such as memory off the heap, you must either
write a satisfactory assignment operator and copy constructor or make both
protected to preclude the default provided by C++ from being used.
30 568523 Ch23.qxd 4/5/04 2:02 PM Page 312
312
Part V: Optional Features
31 568523 Ch24.qxd 4/5/04 2:02 PM Page 313
Chapter 24
Using Stream I/O
In This Chapter
ᮣ Performing input/output
ᮣ Rediscovering stream I/O as an overloaded operator
ᮣ Using stream file I/O
ᮣ Using stream buffer I/O
ᮣ Going behind the scenes with manipulators
P
rograms appearing before this chapter read from the cin input object
and output through the
cout output object. Perhaps you haven’t really
thought about it much, but this input/output technique is a subset of what is
known as stream I/O.
In this chapter, I describe stream I/O in more detail. I must warn you that
stream I/O is too large a topic to be covered completely in a single chapter —
entire books are devoted to this one topic. Fortunately for both of us, there
isn’t all that much that you need to know about stream I/O in order to write
the vast majority of programs.
How Stream I/O Works
Stream I/O is based on overloaded versions of operator>>() and
operator<<(). The declaration of these overloaded operators is found in the
include file iostream, which are included in all the programs beginning in
Chapter 1. The code for these functions is included in the standard library,
which your C++ program links with.
The following code shows just a few of the prototypes appearing in
iostream:
//for input we have:
istream& operator>>(istream& source, char *pDest);
istream& operator>>(istream& source, int &dest);
istream& operator>>(istream& source, char &dest);
31 568523 Ch24.qxd 4/5/04 2:02 PM Page 314
314
Part V: Optional Features
// and so forth
//for output we have:
ostream& operator<<(ostream& dest, char *pSource);
ostream& operator<<(ostream& dest, int source);
ostream& operator<<(ostream& dest, char source);
// and so it goes
When overloaded to perform I/O, operator>>() is called the extractor, and
operator<<() is called the inserter. The class istream is the basic class for
input from a file or a device like the keyboard. C++ opens the
istream object
cin when the program starts. Similarly, ostream is the basis for file output.
cout is a default ostream object.
// DefaultStreamOutput
#include <iostream>
using namespace std;
void fn(ostream& out)
{
out << “My name is Stephen\n”;
}
int main(int nNumberofArgs, char* pszArgs[])
{
fn(cout);
system(“PAUSE”);
return 0;
}
Take a detailed look at what happens when you write the following code,
which is named DefaultStreamOutput and found on this book’s CD-ROM:
The program passes cout to the function fn(). fn() applies the << operator,
otherwise known as
operator<<(). Thus, C++ determines that the best match
is the
operator<<(ostream&, char*) function. C++ generates a call to this
function, the so-called
char* inserter, passing the function the ostream object
cout and the string “My name is Randy\n” as arguments. That is, it makes
the call
operator<<(cout, “My name is Randy\n”). The char* inserter func-
tion, which is part of the standard C++ library, performs the requested output.
The
ostream and istream classes form the base of a set of classes that con-
nects the application code with the outside world, including input from and
output to the file system. How did the compiler know that
cout is of class
ostream? This and a few other global objects are also declared in iostream.
h
. A list is shown in Table 24-1. These objects are constructed automatically
at program startup, before
main() gets control. Subclasses of ostream and
istream are used for input and output to files and internal buffers.
31 568523 Ch24.qxd 4/5/04 2:02 PM Page 315
Chapter 24: Using Stream I/O
315
Table 24-1 Standard Stream I/O Objects
Object Class Purpose
cin istream Standard input
cout ostream Standard output
cerr ostream Standard error output
clog ostream Standard printer output
The fstream Subclasses
The subclasses ofstream, ifstream, and fstream are defined in the include
file
fstream.h to perform stream input and output to a disk file. These three
classes offer a large number of member functions. A complete list is provided
with your compiler documentation, but let me get you started.
Class
ofstream, which is used to perform file output, has several construc-
tors, the most useful of which is the following:
ofstream::ofstream(char *pszFileName,
int mode = ios::out,
int prot = filebuff::openprot);
The first argument is a pointer to the name of the file to open. The second
and third arguments specify how the file will be opened. The legal values for
mode are listed in Table 24-2, and those for prot are in Table 24-3. These
values are bit fields that are ORed together (the classes
ios and filebuff
are both parent classes of ostream). (See Chapter 4 for an explanation of the
ORing of bit fields.)
The expression
ios::out refers to a static data member of the class ios.
Table 24-2 Constants Defined in ios to Control
How Files Are Opened
Flag Meaning
ios::app Append to the end of the line. Generate an error if
the file doesn’t already exist.
ios::ate Append to the end of the file, if it exists.
ios::in Open file for input (implied for istream).
(continued)
31 568523 Ch24.qxd 4/5/04 2:02 PM Page 316
316
Part V: Optional Features
Table 24-2 (continued)
Flag Meaning
ios::out Open file for output (implied for ostream).
ios::trunc Truncate file if it exists (default).
ios::noreplace If file does exist, return error.
ios::binary Open file in binary mode (alternative is text mode).
Table 24-3 Values for prot in the ofstream Constructor
Flag Meaning
filebuf::openprot Compatibility sharing mode
filebuf::sh_none Exclusive; no sharing
filebuf::sh_read Read sharing allowed
filebuf::sh_write Write sharing allowed
For example, the following StreamOutput program opens the file
MyName.txt
and then writes some important and absolutely true information to that file:
// StreamOutput - simple output to a file
#include <fstream>
using namespace std;
int main(int nNumberofArgs, char* pszArgs[])
{
ofstream my(“MyName.txt”);
my << “Stephen Davis is suave and handsome\n”
<< “and definitely not balding prematurely”
<< endl;
system(“PAUSE”);
return 0;
}
The constructor ofstream::ofstream(char*) expects only a filename and
provides defaults for the other file modes. If the file
MyName.txt already
exists, it is truncated; otherwise,
MyName.txt is created. In addition, the file
is opened in compatibility sharing mode.
Referring to Table 24-2, if I wanted to open the file in binary mode and
append to the end of the file if the file already exists, I would create the