Writing Enterprise Applications with Java™ 2 SDK, Enterprise Edition phần 8 ppt
Bạn đang xem bản rút gọn của tài liệu. Xem và tải ngay bản đầy đủ của tài liệu tại đây (39.47 KB, 12 trang )
LESSON 5 ADDING JAVABEANS TECHNOLOGY TO THE MIX
83 SEPTEMBER 27, 2000
Getter methods follow the same naming conventions as setter methods so the JSP page can
retrieve data from the
JBonusBean.Getter methods always have a return value and no argu-
ments. You might notice that although the
getBonusAmt method sets property values and
does not really need to return a value in this example, it returns
this.bonusAmt to avoid a
runtime J2EE server error.
The
getBonusAmt method uses an if-else statement to handle the case where no strMult
value is supplied. When the JSP page is first loaded, the end user has not supplied any data,
but all tags and scriptlets on the page are executed anyway. In this event, the data value for
the
strMult property passed to JBonusBean is null, which results in a null multiplier and a
null bonusAmt value. A runtime server error occurs when the JSP page gets and tries to dis-
play the
null bonusAmt value. To prevent this runtime error, bonusAmt is set to 0 in the event
a
null strMult value is received from the JSP page.
public double getBonusAmt() {
if(strMult != null){
Integer integerMult = new Integer(strMult);
int multiplier = integerMult.intValue();
try {
double bonus = 100.00;
Calc theCalculation = homecalc.create();
Bonus theBonus = theCalculation.calcBonus(
multiplier, bonus, socsec);
Bonus record = theCalculation.getRecord(
socsec);
bonusAmt = record.getBonus();
socsec = record.getSocSec();
} catch (javax.ejb.DuplicateKeyException e) {
message = e.getMessage();
} catch (javax.ejb.CreateException e) {
e.printStackTrace();
} catch (java.rmi.RemoteException e) {
e.printStackTrace();
}
return this.bonusAmt;
} else {
this.bonusAmt = 0;
this.message = "None.";
return this.bonusAmt;
}
}
public String getMessage(){
LESSON 5 ADDING JAVABEANS TECHNOLOGY TO THE MIX
84 SEPTEMBER 27, 2000
return this.message;
}
public String getSocsec(){
return this.socsec;
}
public String getStrMult(){
return this.strMult;
}
public void setSocsec(String socsec) {
this.socsec = socsec;
}
public void setStrMult(String strMult) {
this.strMult = strMult;
}
Start the Platform and Tools
To run this example, you need to start the J2EE server, the Deploy tool, and Cloudscape
database. In different windows, type the following commands:
j2ee -verbose
deploytool
cloudscape -start
If that does not work, type this from the J2EE directory:
Unix
j2sdkee1.2.1/bin/j2ee -verbose
j2sdkee1.2.1/bin/deploytool
j2sdkee1.2.1/bin/cloudscape -start
Windows
j2sdkee1.2.1\bin\j2ee -verbose
j2sdkee1.2.1\bin\deploytool
j2sdkee1.2.1\bin\cloudscape -start
LESSON 5 ADDING JAVABEANS TECHNOLOGY TO THE MIX
SEPTEMBER 27, 2000 85
Remove the WAR File
Because you are adding a completely new class to the application, you have to delete the
War file from the previous lesson and create a new one.
Local Applications:
• Click the
2BeansApp icon so you can see its application components.
• Select
BonusWar so it is outlined and highlighted.
• Select
Delete from the Edit menu.
Create New WAR FIle
File menu:
• Select
New Web Component.
Introduction:
• Read and Click
Next.
War File General Properties:
• Specify BonusWar for the display name.
• Click Add.
• In the next window, go to the
ClientCode directory, and add bonus.jsp.
• Click
Next, go to the ClientCode directory, add JBonusBean.class
• Click Finish.
Note: Make sure you add
bonus.jsp before you add JBonusBean.class.
War File General Properties:
• Click
Next.
Choose Component Type:.
• Make
Bonus.jsp the JSP filename
• Make sure
Describe a JSP is selected.
• Click Next.
Component General Properties:
• Make the display name
BonusJSP.
• Click
Finish.
Inspecting window:
• Select Web Context
LESSON 5 ADDING JAVABEANS TECHNOLOGY TO THE MIX
86 SEPTEMBER 27, 2000
• Specify JSPRoot.
Verify and Deploy the J2EE Application
Before you deploy the application, it is a good idea to run the verifier. The verifier will pick
up errors in the application components such as missing enterprise bean methods that the
compiler does not catch.
Verify:
• With
2BeansApp selected, choose Verifier from the Tools menu.
• In the dialog that pops up, click
OK. The window should tell you there were no failed
tests. That is, if you used the session bean code provided for this lesson.
• Close the verifier window because you are now ready to deploy the application.
Note: In the Version 1.2.1 software you might get a
tests app.WebURI error. This
means the deploy tool did not put a
.war extension on the WAR file during WAR file cre-
ation. This is a minor bug and the J2EE application deploys just fine in spite of it.
Deploy:
• From the
Tools menu, choose Deploy Application.ADeploy BonusApp dialogbox
pops up.
• Verify that the Target Server selection is either localhost or the name of the host run-
ning the J2EE server.
Note: Do not check the Return Client Jar box. The only time you need to check this
box is when you deploy a stand-alone application for the client program. This example
uses an HTML and JSP page so this book should not be checked. Checking this box
creates a JAR file with deployment information needed by a stand-alone application.
• Click
Next. Make sure the JNDI names show calcs for CalcBean and bonus for
BonusBean. If they do not show these names, type them in yourself, and press the
Return key.
• Click
Next. Make sure the Context Root name shows JSPRoot. If it does not, type it in
yourself and press the
Return key.
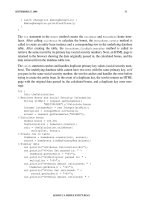
• Click
Next.
• Click
Finish to start the deployment. A dialog box pops up that displays the status of
the deployment operation.
• When it is complete, the three bars on the left will be completely shaded as shown in
Figure 20. When that happens, click
OK.
LESSON 5 ADDING JAVABEANS TECHNOLOGY TO THE MIX
SEPTEMBER 27, 2000 87
Figure 20 Deploy Application
Run the J2EE Application
The web server runs on port 8000 by default. To open the bonus.jsp page point your
browser to
http://localhost:8000/JSPRoot/bonus.jsp, which is where the Deploy tool
put the JSP page.
• Fill in a social security number and multiplier
• Click the
Submit button. Bonus.jsp processes your data and returns an HTML page
with the bonus calculation on it.
See About the Example (page 74) for screen captures showing the application in action.
More Information
Visit the JavaBeans home page at for further
information on JavaBeans technology.
LESSON 5 ADDING JAVABEANS TECHNOLOGY TO THE MIX
88 SEPTEMBER 27, 2000
LESSON 6 EXTENSIBLE MARKUP LANGUAGE (XML)
SEPTEMBER 27, 2000 89
Lesson 6
Extensible Markup Language
(XML)
eXtensible Markup Language (XML) is a language for representing and describing text-
based data so the data can be read and handled by any program or tool that uses XML APIs.
Programs and tools can generate XML files that other programs and tools can read and han-
dle.
For example, a company might use XML to produce reports so different parties who receive
the reports can handle the data in a way that best suits their needs. One party might put the
XML data through a program to translate the XML to HTML so it can post the reports to the
web, another party might put the XML data through a tool to produce a stockholder booklet,
and yet another party might put the XML data through a tool to create a marketing presenta-
tion. Same data, different needs, and an array of platform-independent programs and tools to
use the same data in any number of different ways. These highly flexible and cost-effective
capabilities are available through XML tags, Document Type Definitions (DTDs) also
known as XML schemas, and XML APIs.
This lesson adapts the example from Lesson 5 Adding JavaBeans Technology to the Mix
(page 73) so the JavaBean class uses XML APIs to print a simple report where the data is
marked with XML tags.
• Marking and Handling Text (page 90)
• Change the JavaBean Class (page 90)
• The APIs (page 95)
• Update and Run the Application (page 96)
• More Information (page 96)
LESSON 6 EXTENSIBLE MARKUP LANGUAGE (XML)
90 SEPTEMBER 27, 2000
Marking and Handling Text
With XML you define markup tags to represent the different elements of data in a text file.
For example, if you have a text file that consists of a short article, you define XML tags to
represent the title, author, first level heads, second level heads, bullet lists, article text, and so
on. Once the data is represented by XML tags, you can create a Document Type Definition
(DTD) and/or eXtensible Style sheet Language (XSL) file to describe how you want the data
handled.
• XSL styles let you do things like map XML to HTML. For example, you can define an
XML title tag to represent the title of an article, and create an XSL file that maps the
XML title tag to the HTML H1 heading tag for display to the end user.
• A DTD (also known as an XML schema) contains specifications that allow other pro-
grams to validate the structure of an XML file to ensure the tagged data is in the correct
format. For example, a DTD for an article might allow one title tag, but zero or more
first and second level heads.
Any program capable of parsing XML can check for well-formed XML tags, and any pro-
gram capable of applying XSL styles or DTD specifications to XML data can handle the
tagged data intelligently. For example, if an article has two title tags, but the DTD allows
only one, the program returns an error. Checking an XML document against a DTD is what
is known as verification.
The nice thing about XML is the tagging is separate from the style sheet and DTD. This
means you can have one XML document and one to many style sheets or DTDs. Different
style sheets let you have a different presentation depending on how the document is used.
For example, an article on XML can have a style sheet for the different web sites where it is
to be published so it will blend with the look and feel of each site.
The current J2EE release does not have an eXtensible Style sheet Language Transformation
(XSLT) engine so it is not currently possible to use a style sheet to do things such as trans-
form an XML document into HTML for display.
Change the JavaBean Class
In this lesson, a genXML method is added to the JBonusBean class to generate the XML doc-
ument shown below. A description of the code to generate this file comes after the discussion
here of the XML document tags and structure.
<?xml version="1.0"?>
<report>
<bonusCalc ssnum="777777777" bonusAmt="300.0" />
</report>
LESSON 6 EXTENSIBLE MARKUP LANGUAGE (XML)
SEPTEMBER 27, 2000 91
XML Prolog
The <?xml version=”1.0”?> line is the XML prolog. An XML file should always start with
a prolog that identifies the document as an XML file. The prolog is not required and is read
only by humans, but it is good form to include it. Besides version information, the prolog
can also contain encoding and standalone information.
• Encoding information: indicates the character set used to encode the document data.
Uncompressed Unicode is shown as
<?xml version=”1.0” encoding=”UTF-8”?>.
The Western European and English language character set is indicated by:
<?xml version=”1.0” encoding=”ISO-8859-1”?>.
• Standalone information: indicates if this document uses information in other files.
For example, an XML document might rely on a style sheet for information on how to
create the user interface in HTML, or a DTD for valid tag specifications.
Document Root
The <report> tag is the first XML tag in this file. It is the top-level XML tag and marks the
beginning of the document data. Another name for this level tag is root. XML tags have a
matching end tag, so the end of this document has the corresponding
</report> tag to close
the pair.
You can give XML tags any name you want. This example uses
report because the XML
file is a bonus report. It could just as well be named
<root> or <begin> or whatever. The
name takes on meaning in the style sheet and DTD because that is where you assign specifi-
cations to tags by their names.
Child Nodes
The <bonusCalc> tag represents the bonus report. This tag is a child node that is added to
the root. It uses attributes to specify the social security number and bonus amount values
(
ssnum and bonusAmt). You can define a DTD to check that the bonusCalc tag has the ssnum
attribute and bonusAmt attributes, and have your program raise an error if an attribute is
missing or if attributes are present that should not be there.
<bonusCalc ssnum="777777777" bonusAmt="300.0" />
Other XML Tags
There are a number of ways to tag data. This example uses empty tags, which are tags that
do not enclose data, use attributes to specify data, and are closed with a slash. The following
empty tag from this example, could be created so the data is enclosed by XML tags instead.
The XML parser checks that all data enclosed by data has what are called well-formed tags.
Well-formed tags consist of an opening tag and a closing tag as shown in the well-formed tag
example below.
LESSON 6 EXTENSIBLE MARKUP LANGUAGE (XML)
92 SEPTEMBER 27, 2000
Empty tag:
<bonusCalc ssnum="777777777" bonusAmt="300.0" />
Well-formed tags:
<bonusCalc>
<ssnum>"777777777"</ssnum>
<bonusAmt>300.0</bonusAmt>
</bonusCalc>
XML comment tags look just like HTML comment tags.
<! Bonus Report >
<bonusCalc ssnum="777777777" bonusAmt="300.0" />
Processing Instructions give commands or information to an application that is processing
the XML data. Processing instructions have the format
<? target instructions?> where
target is the name of the application doing the processing, and instructions embodies the
information or commands for the application to process. The prolog is an example of a pro-
cessing instruction, where
xml is the target and version=”1.0” embodies the instructions.
Note that the target name
xml is reserved for XML standards.
<?xml version=”1.0”?>
You can also use processing instructions to do things like distinguish between different ver-
sions of a presentation such as the high-level executive version and the technical version.
JavaBean Code
The JBonusBean class for this lesson has import statements for creating the XML docu-
ment, handling errors, and writing the document out to the terminal. This lesson writes the
XML output to the terminal to keep things simple. The XML output could just as well be
written to a file, but you would need to configure your browser to use Java Plug-In and
include a security policy file granting the JavaBean code permission to write to the file.
To generate the XML file for this lesson, you need to import the
ElementNode and XmlDocu-
ment
classes. You also need the StringWriter and IOException classes to write the XML
data to the terminal.
import javax.naming.*;
import javax.rmi.PortableRemoteObject;
import Beans.*;
import java.io.StringWriter;
import java.io.IOException;
import com.sun.xml.tree.ElementNode;
import com.sun.xml.tree.XmlDocument;
This version of the JBonusBean class has one more instance variables. The session bean’s
remote interface,
theCalculation, needs to be accessed from the getBonusAmt and genXML
methods. This is because genXML reads the database to generate XML for all records stored
in the database and has to be able to access the session bean’s
getRecord method.
LESSON 6 EXTENSIBLE MARKUP LANGUAGE (XML)
SEPTEMBER 27, 2000 93
Calc theCalculation;
The JBonusBean.genXML method is called from the getBonusAmt method after the process-
ing completes in the event
strMult is not null. The first thing this method does is create an
XMLDocument object and the root node, and adds the root to the document. The root node
represents the top-level point in the document hierarchy (or tree) and is the point at which
processing begins.
private void genXML(){
Bonus records = null;
//Create XML document
XmlDocument doc = new XmlDocument();
//Create node
ElementNode root = (ElementNode)
doc.createElement("report");
//Add node to XML document
doc.appendChild(root);
The try and catch block that comes next, gets the record out of the database, retrieves the
bonus amount and social security number from the record, converts the bonus amount to a
string, creates a child node (
bonusCalc), and adds the social security number and bonus
amount to the
bonusCalc child node as attributes. The child node represents the second
level in the document hierarchy or tree, and the attributes represent the third level.
try{
//Get database record
records = theCalculation.getRecord(socsec);
//Retrieve the social security number from record
String ssRetrieved = records.getSocSec();
//Retrieve bonus amount from record
double bRetrieved = records.getBonus();
//Convert double to string
Double bonusObj = new Double(bRetrieved);
String bString = bonusObj.toString();
//Create child node
ElementNode bonusCalc = (ElementNode)
doc.createElement("bonusCalc");
//Add attributes to child node
bonusCalc.setAttribute("ssnum", ssRetrieved);
bonusCalc.setAttribute("bonusAmt", bString);
//Add child node to root
root.appendChild(bonusCalc);
} catch (java.rmi.RemoteException e) {
e.printStackTrace();
}
The last part of the genXML method creates a StringWriter object, writes the document
hierarchy or tree to the
StringWriter object, and writes the StringWriter object to the ter-
minal.
LESSON 6 EXTENSIBLE MARKUP LANGUAGE (XML)
94 SEPTEMBER 27, 2000
try{
StringWriter out = new StringWriter();
doc.write(out);
System.out.println(out);
} catch (java.io.FileNotFoundException fe) {
System.out.println("Cannot write XML");
} catch (IOException ioe) {
System.out.println("cannot write XML");
}
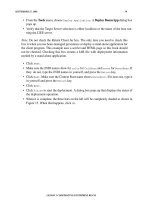
The hierarchy or tree structure for the XML document is called the Document Object Model
(DOM). Figure 21 shows a simplified representation of the DOM for this lesson’s example.
The API calls in the
genXML method create the DOM and you can make API calls to access
the DOM to do such things as add, delete, and edit child nodes, or validate the DOM against
a DTD. You can also create a DOM from an XML file.
Figure 21 Document Object Model (DOM)
Document Root
report
Child Node
bonusCalcs
Bonus Amount Attribute
bonusAmt
Social Security Number Attribute
ssnum