Professional PHP Programming phần 6 docx
Bạn đang xem bản rút gọn của tài liệu. Xem và tải ngay bản đầy đủ của tài liệu tại đây (954.38 KB, 86 trang )
$data .= fread($fp, 1000);
}
fclose($fp);
}
return $data;
}
?>
<FORM>
<INPUT TYPE=HIDDEN NAME=action VALUE=query>
<INPUT TYPE=TEXT NAME=query VALUE="<?echo $query?>">
<INPUT TYPE=SUBMIT VALUE=" OK ">
</FORM>
<?php
$server = "whois.ripe.net";
if($action == "query") {
$data = whois request($server, $query);
echo "Sent $query to $server.<p>";
echo "Output: <p><pre>$data</pre><p>";
}
?>
Extending the Frontend
We can present visitors now a way to query a whois database. But what, if we want to enable visitors to
query multiply databases? For example, if we would like to make queries to the RIPE database and the
InterNIC database.
In the previous example you saw that we had hard-wired the hostname of the whois server. In this step,
we want to make this configurable. We use the same whois_request() function again.
Our HTML form changes a little bit to reflect our new choice:
<FORM>
<INPUT TYPE=HIDDEN NAME=action VALUE=query>
<SELECT NAME=server>
<OPTION value="whois.ripe.net">RIPE</OPTION>
<OPTION value="rs.internic.net">InterNIC</OPTION>
</SELECT>
<INPUT TYPE=TEXT NAME=query VALUE="<?echo $query?>">
<INPUT TYPE=SUBMIT VALUE=" OK ">
</FORM>
We use the <SELECT> tag to build up a select box which shows several whois servers. We store the
hostname as an option value in the HTML part. This helps us to keep the effort minimal to add new
servers.
Once the user hits the submit button, the hostname of the server of his or her choice will be send to the
server. PHP makes the data available as $server variable. Thus we change our code to reflect this:
<?php
# $server is already set by web server
if($action == "query") {
$data = whois request($server, $query);
echo "Sent $query to $server.<p>";
echo "Output: <p><pre>$data</pre><p>";
}
?>
You see, this part became even simpler! In the next step we will enhance the frontend more and build new
functionality into it.
Is my domain still available?
Today, a popular way to utilize whois is to offer potential customers the ability to quickly lookup whether
specific domains are still available.
We will build such a script now. We reuse our whois_request() function from the previous sections.
Recall that this function queries a specific whois server for specific information and returns the raw
information from the server. It does not perform any analyzing, so we need some additional logic to
produce useful output.
Up to now, we built a simple query interface for a whois server. Now we add more logic to it.
Our design goal is simple. The user enters a domain name and we find out whether the domain is still
available or not.
If you have examined the previous examples, you will notice that on some queries you get useful replies
with real data and that some fail, returning a message like "No entries found for the selected source(s)."
We will use this to make the decision whether a specific domain is available.
To increase the value of our script, we enable the user to query for different TLDs (top level domains,
like COM, NET, GB). To do that, we have to determine the chosen top-level domain.
function domain tld($domain) {
$ret = "";
if(ereg("\.([^\.]+)$", $domain, $answer))
$ret = strtolower($answer[1]);
return $ret;
}
The function domain_tld() returns the TLD of the domain name passed to it. It uses a regular
expression to determine the last part of the domain, which can be found after the last ".".
Note that we do not validate the TLD. You can use the validator class to validate all top-level domains
(including all Top 7 and ISO domains).
We use the TLD to determine which whois server we have to query for a specific domain. In order to do
this quickly, we use an associative array with the TLD as index. For each TLD we save the hostname of
the whois server and the answer we expect, if the record does not exist.
<?php
$whois server = array(
"com" => array("whois.internic.net", "No match for"),
"de" => array("whois.ripe.net", "No entries found for")
);
?>
You can easily support more TLDs by including the necessary information into the array. The IANA (The
Internet Assigned Numbers Authority) maintains a database of contact information for all countries. If a
domain registry runs a whois server, it is often mentioned on the homepage of the respective organization
( Note that running a whois server is not a requirement, but
a voluntary service.
This section finishes with our working horse, a function to determine whether a specific domain is still
available. The function uses only well-known elements, which we discussed earlier, so it should be easy
to understand. The function returns false or true, depending on whether the specified function is used or
available.
<?php
function is domain available($domain){
global $whois server;
# set default return value
$ret = false;
# determine TLD
$tld = domain tld($domain);
# if the TLD is not empty and we know about a whois server for the TLD
if(!empty($tld) && is array($whois server[$tld])){
# we send a whois request
$data = whois request($whois server[$tld][0], $domain);
# and check whether the whois server's response contains
# a string which says that the domain is not used
if(strstr($data, $whois server[$tld][1]) != ""){
$ret = true;
}
}
return $ret;
}
?>
A web client
The break-through of the Internet was based upon one network protocol: HTTP (the Hypertext Transfer
Protocol, the last version is HTTP/1.1). HTTP is the protocol your web browser users when you access
web sites.
We will present a simple class now, which makes it possible to access HTTP resources transparently,
even if you need to use a HTTP proxy. A HTTP proxy is a service most ISPs (Internet Service Providers)
and companies deploy to accelerate web access and to reduce network traffic. Proxies cache data to
achieve these goals. Proxies are protocol dependent and exist for a number of services, including HTTP.
Network-wise, proxies sit between the client (web browser) and the server. The client sends a request to
the proxy, which either returns a cached copy, or forwards the request to the web server.
In PHP, you can use web resources like local files. The so-called fopen-wrappers allow you to use PHP's
standard I/O functions (i.e. fopen(), fread(), fclose()) as if the files were stored on the local file
system.
<php
# open the site
$fd = fopen(" "r");
# if the above requests succeeded, send output to the current client
if($fd){
fpassthru($fd);
}
?>
The lack of HTTP proxy support renders fopen-wrappers unusable for many purposes. For example, an
Intranet web server might not be able to access an external web site by using fopen-wrappers, because it
has no direct Internet direction and must send HTTP requests through a proxy. Hopefully, HTTP proxy
support will be added in the final version of PHP 4.0.
Since we want the class to be as simple as possible, we define it to be a HTTP/1.0 client performing only
GET requests. It should return a file pointer, so that you could easily replace PHP's fopen() function
for URLs with our self-developed class.
We use a class here, since we want to be able to store certain preferences within the class without using
global variables. Our framework looks like this:
<?php
class http {
var $proxy host = "";
var $proxy_port = 0;
function http fopen($host, $url, $port = 80) {
}
}
Our "http" named class contains two variables, called $proxy_host and $proxy_port which you can set to
the respective values which are valid in your environment. The class will make use of the proxy, if these
variables are set. Otherwise, it accesses the HTTP server directly. The key difference here is that we
simply change the fsockopen() parameter.
To request a resource, our PHP scripts opens a TCP connection to the web server or the HTTP proxy,
sends the HTTP request, reads the reply, and closes the connection. (Note that we only implement
HTTP/1.0. HTTP/1.1 can be much more complex in this regard.)
Below is the full code for the http class:
<?php
class http {
var $proxy host = "";
var $proxy port = 0;
function http fopen($host, $path, $port = 80) {
# has the user set $proxy host?
if(empty($this->proxy host)) {
# we access the server directly
$conn host = $host;
$conn port = $port;
} else {
# we use the proxy
$conn host = $this->proxy host;
$conn port = $this->proxy port;
}
# build the absolute URL
$abs url = "http://$host:$port$path";
# now we build our query
$query = "GET $abs url HTTP/1.0\r\n".
"Host: $host:$port\r\n".
"User-agent: PHP/class http 0.1\r\n".
"\r\n";
# open a connection to the server
$fp = fsockopen($conn host, $conn port);
# if the connection failed, return false
if(!$fp)
return false;
# send our query
fputs($fp, $query);
# discard the HTTP header
while(trim(fgets($fp, 1024)) != "");
# return the active file pointer
return $fp;
}
}
?>
Our http_fopen() function takes two parameters and an optional third one. The first parameter is the
hostname or IP address of the server the data shall be retrieved from (e.g. "www.wrox.com" or
"204.148.170.3"). The second one is the URI of the resource on that server (for example,
"/icons/directory.gif"). The optional third parameter is the TCP port number (e.g. port 8080). The well-
known port number for HTTP is 80, which is also our default port number.
The next step is to determine whether the user has set the proxy variables. We test whether the
$proxy_host variable is empty and based on that test we set two variables. The first identifier
($conn_host) is the hostname of the server we connect to, $conn_port is its port number. If $proxy_host is
empty, we assign these variables the hostname and port number of the web server, otherwise we assign
the configured proxy hostname and proxy port.
$conn_url is set to include the name of the protocol (http), the host name or IP number of the web server,
its port number, and the path of the resource. Note that there is no delimiter between the port number and
the path, because the path should start with "/". We construct the HTTP request by specifying GET as the
method (it retrieves whatever information is stored on the server), concatenating $conn_url and attaching
the HTTP version that we are using.
We add a "Host" header, which tells the server the hostname we want to access. Today, many HTTP
servers do not have their own IP addresses anymore, they rely on HTTP clients sending them the server
name so that the server software must distinguish between the virtual hosts it serves. These virtual hosts
are virtual, because they appear to be a real host, but in fact the web server only simulates them. The web
server maintains a list of available virtual hosts, and delivers different data to clients, depending on the
virtual hosts they specify.
Finally, we give ourselves a name by specifying it in the "User-agent" message-header. The end of the
HTTP request is marked by an empty line. The line ending is CRLF (hexadecimal 0x13 and 0x10, can
also be written as "\r\n" in PHP).
After our request is constructed now, we open the TCP connection to the server (either to the web server
or to the HTTP proxy, depending on our previous test). If the connection attempt does not succeed, we
return false, so that the caller can easily test for a failed connection attempt.
The next few lines read the HTTP response header, which is thrown away (we do this, because our design
target was simplicity). When we see an empty line, the body of the HTTP response begins. This body
contains the data the caller wants. Therefore, we stop the loop here, and return the file pointer. If the
caller reads from this file pointer, the requested resource is directly accessible.
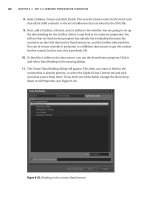
The next example demonstrates the use of the http class. It fetches the specified web site, and passes it
through to the client requesting our example script.
Using the http class
<?php
include "http.class";
$http = new http;
$fp = $http->http fopen("www.wroxconferences.com", "/");
if(!$fp) {
print "Sorry, the server is not currently available";
exit;
}
print "<BASE HREF=\"
fpassthru($fp);
?>
The first action is to include the file that contains the http class. Then we create a new instance of the http
class. We use the member function http_fopen() of that class to access the Wrox Conferences web
server. If the result of http_fopen() is false, the connection attempt to the web server failed.
Otherwise, we can manipulate the file pointer. In our example, we choose to pass through all available
data on the file pointer to the current client. That means the client sees the Wrox Conferences homepage,
as if www.wroxconferences.com would have been accessed directly. Note the <BASE> tag. It is
used to tell the client that all relative links in the page shall be relative to the specified URL. The
following screenshot shows how the output of the script looks like.
Summary
In this chapter we have shown how to build clients for TCP-based Internet protocols in PHP. We have
provided examples for accessing Whois database servers as well as HTTP servers and proxies. This
knowledge helps you to understand information flow on the Internet and implement protocols that use
TCP as their transport layer.
17
Sending and Receiving E-mail
E-mail is the most used Internet service today. Billions of e-mails are delivered each day. PHP
integrates techniques to handle e-mail. There are many different ways in which they can be applied:
Sending invoices to a customer; informing your customers about the latest news from your business;
encouraging people to join your interest group. In this chapter, we focus on how to generate and send
e-mails in PHP.
Sending E-mail
The mail() command
You use the built-in mail() command to send simple text messages. mail() relies on the local mail
system to deliver e-mails. So, if your program cannot rely on the local mail system, you shouldn't use
mail(). We present an alternative later in this chapter.
The prototype of the function:
bool mail(string to, string subject, string message[, string
additional_headers]);
The function returns true, if the e-mail was correctly submitted to the local mail system. It does not
imply that the e-mail was delivered. The fourth parameter is optional. An explanation of the parameters
follows.
Parameter Meaning Example
to
Recipient addresses,
"" or
must be separated by
comma
","
subject
The subject of the e-
"user registration"
message
The body of the
message
"Hi,\r\nthis is the second line
of text\r\nthis is the third
line of text"
additional_headers
(optional)
This string is
appended to the end
of the e-mail header.
Multiple header lines
can be specified by
separating them with
"\r\n"
"From:
\r\nReply-to:
"
The next example sends an e-mail to a single recipient:
<?php
mail("", "This is the subject", "body of the message");
?>
The third parameter contains the body of the message. If you want to embed the e-mail text in the PHP
code, the text can span over multiple lines:
<?php
mail("", "This is the subject",
"Hello,
welcome to our service. To access our site, you need
the following data:
username: $username
password: $password
If you should have problems with our service,
please contact <mailto:>.
To visit our site now, click here:
- Webmaster
");
?>
To address multiple recipients, you separate each e-mail address by a comma.
<?php
mail(",",
"This is the subject",
"body of the message");
?>
To construct the recipient string out of an array, you use the implode()
function.
<?php
$recipients = array("", "");
$recipient_list = implode(",", $recipients);
?>
class mime_mail
The mail() command can be used to send a simple, self-contained e-mail. This is enough for most
applications. But sometimes you need something more complex. Your web site might offer to send a
Wordprocessor document to a e-mail address. This requires the use of MIME, the Multipurpose
Internet Mail Extensions.
We have developed a PHP class which provides an easy interface to MIME. The class hides all the
difficult aspects of MIME, and builds the foundation for the SMTP class which we will present later.
The class follows:
<?
// store as "mime mail.inc"
class mime mail
{
var $parts;
var $to;
var $from;
var $headers;
var $subject;
var $body;
/*
* void mime mail()
* class constructor
*/
function mime mail() {
$this->parts = array();
$this->to = "";
$this->from = "";
$this->subject = "";
$this->body = "";
$this->headers = "";
}
/*
* void add attachment(string message, [string name], [string ctype])
* Add an attachment to the mail object
*/
function add attachment($message, $name = "", $ctype = "application/octet-
stream") {
$this->parts[] = array (
"ctype" => $ctype,
"message" => $message,
"encode" => $encode,
"name" => $name
);
}
/*
* void build message(array part=
* Build message parts of an multipart mail
*/
function build message($part) {
$message = $part[ "message"];
$message = chunk split(base64 encode($message));
$encoding = "base64";
return "Content-Type: ".$part[ "ctype"].
($part[ "name"]? "; name = \"".$part[ "name"].
"\"" : "").
"\nContent-Transfer-Encoding: $encoding\n\n$message\n";
}
/*
* void build multipart()
* Build a multipart mail
*/
function build multipart() {
$boundary = "b".md5(uniqid(time()));
$multipart =
"Content-Type: multipart/mixed; boundary = $boundary\n\nThis is a MIME
encoded message.\n\n $boundary";
for($i = sizeof($this->parts)-1; $i >= 0; $i )
{
$multipart .= "\n".$this->build message($this->parts[$i]).
" $boundary";
}
return $multipart.= " \n";
}
/*
* string get mail()
* returns the constructed mail
*/
function get mail($complete = true) {
$mime = "";
if (!empty($this->from))
$mime .= "From: ".$this->from. "\n";
if (!empty($this->headers))
$mime .= $this->headers. "\n";
if ($complete) {
if (!empty($this->to)) {
$mime .= "To: $this->to\n";
}
if (!empty($this->subject)) {
$mime .= "Subject: $this->subject\n";
}
}
if (!empty($this->body))
$this->add attachment($this->body, "", "text/plain");
$mime .= "MIME-Version: 1.0\n".$this->build multipart();
return $mime;
}
/*
* void send()
* Send the mail (last class-function to be called)
*/
function send() {
$mime = $this->get mail(false);
mail($this->to, $this->subject, "", $mime);
}
}; // end of class
?>
The next example demonstrates how to send a simple e-mail using class mime_mail.
<?php
include "mime_mail.inc";
# create object instance
$mail = new mime mail;
# set all data slots
$mail->from = "";
$mail->to = "";
$mail->subject = "welcome!";
$mail->body = "Here goes the real
text of the e-mail. You can write over
multiple lines, of course.";
# send e-mail
$mail->send();
?>
That was easy. The following script shows how to read a file from the local file system and how to
attach it to an e-mail. Note that you can attach multiple files to an e-mail.
<?php
include "mime mail.inc";
$filename = "testfile.jpg";
$content type = "image/jpeg";
# read a JPEG picture from the disk
$fd = fopen($filename, "r");
$data = fread($fd, filesize($filename));
fclose($fd);
# create object instance
$mail = new mime mail;
# set all data slots
$mail->from = "";
$mail->to = "";
$mail->subject = "welcome!";
$mail->body = "Here goes the real
text of the e-mail. You can write over
multiple lines, of course.";
# append the attachment
$mail->add attachment($data, $filename, $content type);
# send e-mail
$mail->send();
?>
The last example for class mime_mail displays an input form for an e-mail address. The next step is to
read multiple files from the local file system, and send these files to the specified e-mail address.
<?php
include "mime mail.inc";
# check whether the user has already submitted an address
if (empty($recipient)) {
?>
Please enter your e-mail address to receive the files:
<FORM>
<INPUT TYPE="text" NAME="recipient">
<INPUT TYPE="submit" VALUE=" OK ">
</FORM>
<?php
exit;
}
print "Sending files to $recipient.<p>";
# set up $mail object
$mail = new mime mail;
$mail->from = "";
$mail->to = $recipient;
$mail->subject = "Your files";
$mail->body = "Hello, here are your files.";
# we send only JPEGs, thus the content type is constant
$content type = "image/jpeg";
# open current directory and search for files ending with .jpg
$dir = opendir("."); # "." is the name of the current directory
while (($filename = readdir($dir))) {
if (ereg("\.jpg$", $filename)) {
$fd = fopen($filename, "r");
$data = fread($fd, filesize($filename));
fclose($fd);
$mail->add attachment($data, $filename, $content type);
print "I've added $filename.<br>";
}
}
closedir($dir);
# send e-mail
$mail->send();
print "I've sent off the e-mail.";
?>
Using SMTP
SMTP (Simple Mail Transfer Protocol) is the protocol used for exchanging e-mails on the Internet.
Your e-mail client uses the protocol to communicate with an SMTP server (sometimes simply referred
to as "e-mail server"). If you use the built-in mail() function of PHP, your application then depends
on a local mail delivery system. Since this dependency might not always be satisfied, you can
alternatively access an SMTP server directly. The following class demonstrates the use of a relaying
SMTP server to deliver e-mails.
What is a relaying SMTP server? The term relaying means that the SMTP server accepts e-mail for
every recipient and goes through the trouble of delivering the e-mail. Imagine that in real-life you
throw mail into a postbox (the relaying SMTP server), so that the postal service will deliver it to the
address specified on the envelope of the mail (the recipient of the e-mail). Internet Service Providers
often allow their customers to use the ISP's SMTP servers as relays. So-called "open relays," which do
not restrict who uses them hardly exist anymore, because some people abused this service by sending
large quantities of e-mail (spam). This led to the deprecation of open relays.
Let us have a look at the class smtp_mail.
<?php
/*
* save as "smtp mail.inc"
*/
class smtp mail {
var $fp = false;
var $lastmsg = "";
/*
* read line() reads a line from the socket
* and returns the numeric code and the rest of the line
*/
function read line()
{
$ret = false;
$line = fgets($this->fp, 1024);
if(ereg("^([0-9]+).(.*)$", $line, &$data)) {
$recv code = $data[1];
$recv msg = $data[2];
$ret = array($recv code, $recv msg);
}
return $ret;
}
/*
* dialogue() sends a command $cmd to the remote server
* and checks whether the numeric return code is the one
* we expect ($code).
*/
function dialogue($code, $cmd)
{
$ret = true;
fwrite($this->fp, $cmd."\r\n");
$line = $this->read line($this->fp);
if($line == false) {
$ret = false;
$this->lastmsg = "";
} else {
$this->lastmsg = "$line[0] $line[1]";
if($line[0] != $code) {
$ret = false;
}
}
return $ret;
}
/*
* error message() prints out an error message,
* including the last message received from the SMTP server.
*/
function error message()
{
echo "SMTP protocol failure (".$this->lastmsg.").<br>";
}
/*
* crlf encode() fixes line endings
* RFC 788 specifies CRLF (hex 0x13 0x10) as line endings
*/
function crlf encode($data)
{
# make sure that the data ends with a newline character
$data .= "\n";
# remove all CRs and replace single LFs with CRLFs
$data = str replace("\n", "\r\n", str replace("\r", "", $data));
# in the SMTP protocol a line consisting of a single "." has
# a special meaning. We therefore escape it by appending one space.
$data = str replace("\n.\r\n", "\n. \r\n", $data);
return $data;
}
/*
* handle e-mail() talks to the SMTP server
*/
function handle e-mail($from, $to, $data)
{
# split recipient list
$rcpts = explode(",", $to);
$err = false;
if(!$this->dialogue(250, "HELO phpclient") ||
!$this->dialogue(250, "MAIL FROM:$from")) {
$err = true;
}
for($i = 0; !$err && $i < count($rcpts); $i++) {
if(!$this->dialogue(250, "RCPT TO:$rcpts[$i]")) {
$err = true;
}
}
if($err || !$this->dialogue(354, "DATA") ||
!fwrite($this->fp, $data) ||
!$this->dialogue(250, ".") ||
!$this->dialogue(221, "QUIT")) {
$err = true;
}
if($err) {
$this->error message();
}
return !$err;
}
/*
* connect() connects to an SMTP server on the well-known port 25
*/
function connect($hostname)
{
$ret = false;
$this->fp = fsockopen($hostname, 25);
if($this->fp) {
$ret = true;
}
return $ret;
}
/*
* send_e-mail() connects to an SMTP server, encodes the message
* optionally, and sends $data. The envelope sender address
* is $from. A comma-separated list of recipients is expected in $to.
*/
function send e-mail($hostname, $from, $to, $data, $crlf encode = 0)
{
if(!$this->connect($hostname)) {
echo "cannot open socket<br>\n";
return false;
}
$line = $this->read line();
$ret = false;
if($line && $line[0] == "220") {
if($crlf encode) {
$data = $this->crlf encode($data);
}
$ret = $this->handle e-mail($from, $to, $data);
} else {
$this->error message();
}
fclose($this->fp);
return $ret;
}
}
?>
To understand all the details, you should read Chapter 16 (PHP Connectivity), which provides insight
into the world of developing networking applications. However, you have not been told how the class
works, if you just want to use it to send e-mails. We will show now how you can combine class
mime_mail and class smtp_mail to deliver complex e-mails using direct SMTP access.
<?php
include "mime mail.inc";
include "smtp mail.inc";
# our relaying SMTP server
$smtp server = "mail.isp.com";
# the sender address
$from = "";
# the recipient(s)
$to = ", ";
# the subject of the e-mail
$subject = "welcome!";
# and its body
$body = "Here goes the real text of the e-mail.
Multiple lines
are allowed, of course.";
# create mime mail instance
$mail = new mime mail;
$mail->from = $from;
$mail->to = $to;
$mail->subject = $subject;
$mail->body = $body;
# get the constructed e-mail data
$data = $mail->get mail();
# create smtp mail instance
$smtp = new smtp mail;
# send e-mail
$smtp->send e-mail($smtp server, $from, $to, $data);
?>
In the example, we used class mime_mail to construct a complete e-mail and used class smtp_mail to
send it to the specified relaying SMTP server. This allows us to combine the flexibility of the MIME
mail class with our networking SMTP class.
Receiving E-mail
IMAP, Internet Message Access Protocol, has made a strong introduction to the commercial market
after years of existence as only freeware. IMAP makes some general improvements over POP by first
providing a reliable transport of mail, regardless of connection and timeout conditions. With POP’s
singular mission to dump all email messages to a requesting authenticated client, IMAP brings the
control of email, in storing as well as fetching, to the server. The extra features, like manipulation of
status flags (read, unread, etc) make IMAP a very attractive solution. IMAP’s system has also proven
to be very effective over low-speed connections where downloading an entire mailbox might take
hours. IMAP also supports multiple, simultaneous access to a single mailbox, which can prove useful
in some circumstances. In return for these added benefits, IMAP requires more attention by
administrators and needs precise scaling. Beefier hardware, improved processors, and storage space
will also be a requirement since messages will now remain on the server. A benefit of this setup is that
the system can be backed up on an enterprise scale instead of on a personal scale. Since email can be
considered mission critical, or at least contain mission essential information, this type of backup can
prove to be beneficial over time.
The standard IMAP protocol is well supported by PHP, and when the two are combined produce a very
suitable programming environment for creating e-mail facilities Powerful and versatile results can be
accomplished quickly, by the combination of multiple PHP IMAP functions. Some of these are listed
below.
imap_open
The PHP function, imap_open(), opens an IMAP stream to a mailbox.
int imap_open(string mailbox, string username, string password, int
flags);
The code above returns an IMAP stream on success and false on error. This function can also be used
to open streams to POP3 and NNTP servers. If you want to connect to an IMAP server running on port
143 on the local machine, see the following code:
$mbox = imap_open("{localhost:143}INBOX","user_id","password");
To connect to a POP3 server on port 110 on the local server, use:
$mbox = imap_open("{localhost/pop3:110}INBOX","user_id","password");
To connect to an NNTP server on port 119 on the local server, use:
$nntp = imap_open("{localhost/nntp:119}comp.test","","");
To connect to a remote server replace "localhost" with the name or the IP address of the server. For
example, "{mail.domain.com:###}INBOX" is a valid remote IMAP mailbox specification. The result
of imap_open() produces an IMAP stream, which can be used by the other IMAP PHP functions to
retrieve various information. The IMAP stream is an important feature because it allows multiple
IMAP connections to different IMAP servers within the same script.
The flags are a bitmask with one or more of the following:
❑ OP_READONLY - Open mailbox read-only
❑ OP_ANONYMOUS - Dont use or update a .newsrc for news
❑ OP_HALFOPEN - For IMAP and NNTP names, open a connection but dont open a mailbox
❑ CL_EXPUNGE - Expunge mailbox automatically upon mailbox close
imap_headers
Once an IMAP connection is established, we can use a function called imap_headers() to return a
list of all the mail messages in our mailbox. The resulting list of mail messages can be output to the
screen. The function imap_headers() can be used in the form below:
array imap_headers(int imap_stream);
The result that imap_headers returns, is an array of strings formatted with header info, one element per
mail message. The format it returns becomes very important in that we are able to not only displaying a
list of messages but also to provide a link to the actual mail message. To do this, we take the resultant
array, loop through each array element printing out the header information. While this occurs each
message header is assigned a URL link to view the contents of the actual message before the cycle
continues.
The strings format is:
❑ R, N or ' ' for read, new or old
❑ U for old, but not read
❑ F for flagged
❑ A for answered
❑ D for deleted
❑ msgno, four characters and a trailing )
❑ date, 11 chars and a blank
❑ from, 20 chars and a blank
❑ optional user flags, embedded in { and }
❑ subject, 25 chars + blank
❑ size in bytes, embedded in ( and )
imap_header
This function returns an object with the entire header but is broken down into the various header
elements.
We use the function, imap_header(), to take in a message number and return an associative array
with each of the mail headers as elements. The syntax for imap_header() is,
string imap_header(int imap_stream, int msgno, int flags);
This function causes a fetch of the complete header of the specified message as a text string and
returns that text string.
imap_fetchheader
The function of imap_fetchheader() is similar to imap_header() in its action. But, it causes
the fetch of the complete, unfiltered RFC 822 format header of the specified message as a text string
and returns that text string.
stringimap_fetchheader(int imap_stream, int msgno, int flags);
The flag options are:
❑ FT_UID The msgno argument is a UID.
❑ FT_INTERNAL The return string is in "internal" format, without any attempt to
canonicalize to CRLF newlines.
❑ FT_PREFETCHTEXT The RFC822.TEXT should be pre-fetched at the same time. This
avoids an extra RTT onan IMAP connection if a full message text is desired (e.g. in a "save to
local file" operation).
imap_delete
The imap_delete() function marks the messages pointed at by msg_number for deletion. Actual
deletion of the messages is done by imap_expunge().Though it may look otherwise, this can
actually lower the server load. For instance, multiple messages can be flagged for deletion before
imap_expunge() is run; for example, when the flag count reaches a certain level or the user leaves
the site. So, even though imap_delete() will not decrease, the imap_expunge() can be reduced
in most cases to a single time.
The syntax for the use of imap_delete() is below:
int imap_delete(int imap_stream, int msg_number);
imap_expunge
imap_expunge() deletes all the messages marked for deletion by imap_delete().
int imap_expunge(int imap_stream);
imap_close
Closes the imap stream. It takes an optional flag CL_EXPUNGE, which will silently expunge the
mailbox before closing.
int imap_close(int imap_stream, int flags);
For the mailbox manipulation we can use the imap_mail_copy() and imap_mail_move()
functions.
imap_mail_copy
This function copies mail messages specified by msglist to a specified mailbox. msglist is a
range not just specific message numbers.
int imap_mail_copy(int imap_stream, string msglist, string mbox, int
flags);
Returns true on success and false on error.
flags is a bitmask of one or more of:
❑ CP_UID - the sequence numbers contain UIDS
❑ CP_MOVE - Delete the messages from the current mailbox after copying
imap_mail_move
Moves mail messages specified by msglist to a specified mailbox.
int imap_mail_move(int imap_stream, string msglist, string mbox);
Returns true on success and false on error.
That was just a list of the basic functions available for the creation of a IMAP stream and some of the
manipulation. For a working example of an e-mail application, see Chapter 25 (E-mail Application).
Summary
In the chapter, we have shown you how to deliver e-mail. Depending on the context, you can use:
❑ The built-in mail() function (relies on local mail system; handles only simple e-mails).
❑ class mime_mail (handles attachments).
❑ class smtp_mail (accesses an SMTP server to deliver e-mails).
❑ Additional IMAP functions to give remote access.
These techniques enable you to choose the appropiate technique for every e-mail task that you can
implement in PHP. The following table shows the advantages of each method:
Technique Suitable for Examples
built-in mail() Plain-text e-mails Registration texts, short informal messages
class mime_mail E-mails containing
attachments
Sending a file
class smtp_mail Systems with no local mail
system
Windows systems often do not have a local e-mail
system
IMAP functions Low power client systems
with frequent mail use
Receiving mail from remote servers
PHP is fine for sending single e-mails to individual recipients or small groups. It can be used to deliver
plain-text messages as well as multiple files. For other jobs, especially for large mailing lists, you
should consider using specialized tools such as mailing list managers.
18
Cookies
As static web pages have developed into dynamic web applications, the need for these applications to
maintain state – that is, the ability to retain the values of variables and to keep track of the users who are
currently logged on to the system. With previous technologies such as CGI, the problem has always been
that, when a client submits a request, the server just produces a response and returns it. When another
request is received from that user, the server has no idea if there was a previous request. This is because the
HTTP protocol is stateless.
What are Cookies?
Cookies were developed to solve this problem of maintaining state between subsequent visits to a web page,
or between visits to different pages within a web site. Cookies enable web servers to store and retrieve data
on the client's hard drive. This creates a new domain of applications which can track a client's path through
a web site: e-commerce applications, for example, might store items selected by a customer, a membership
site might remember an ID for every user, and a web server might generate visitor profiles. In all of these
cases, cookies can be used to store the data on the client.
Cookies are simple text strings of the form name=value which are stored persistently on the client side. A
URL is associated with each cookie; this URL is used by the client to determine whether it should send the
cookie to the requested server.
There are specific restrictions to avoid the abuse of cookies. Firstly, a browser is restricted to 300 cookies,
and 20 cookies per server. If an application needs to maintain more data, it should keep data on the server
side (this can be done with PHP 4.0 session support, or stored on a database). Secondly, cookies are only
sent to servers which are permitted to receive them. When a server sets a cookie, it can limit the spectrum
of servers the cookie is sent to. Because cookies may contain sensitive data, leaking this data could lead to
a security breach.
It is a common, but erroneous, belief that cookies can be dangerous. While they can be used
in all kinds of ways by server-based applications, they pose no risk to you as a user.
Cookies, as they are documented, will not format your disk, send back information about
your system, or put you on a mailing list.