Adobe Illustrator CS4 digital classroom phần 6 potx
Bạn đang xem bản rút gọn của tài liệu. Xem và tải ngay bản đầy đủ của tài liệu tại đây (1.6 MB, 33 trang )
148
Formatting type
Adobe Illustrator CS4 Digital Classroom
6
Formatting type
Adobe Illustrator CS4 provides several options for formatting type in your document.
Depending on your desired result, you may want to set some of these options that change the
overall appearance of the type. Let’s explore the di erent options that are available to you.
1 Launch Adobe Illustrator CS4.
2 Press the Go to Bridge button (
) in the upper-right corner of the Control panel.
3 Navigate to the ai06lessons folder within Bridge, and double-click the le named
ai0601.ai.
The le opens in Adobe Illustrator.
4 In Illustrator, choose File > Save As. In the Save As dialog box, navigate to the
ai06lessons folder and type ai0601_w
ork.ai in the Name text eld. Press Save. If a
dialog box appears stating that changing a used spot color to a process color can generate
unexpected results, press Continue. In the Illustrator Options dialog box, leave the
settings at their defaults and press OK.
5 To be sure that all the panels and tools are easy to nd,
choose Window > Workspace >
Essentials. This resets your tools and panels to their default locations.
6 This document was created using layers, so before you begin working, open the Layers
panel,
either by pressing the Layers button (
) in the dock on the right side of the
workspace, or by choosing Window > Layers. Click on the Artwork layer, the second
layer listed in the Layers panel, to make it active.
A word on legacy text
Type objects that were created in Illustrator 10 and earlier cannot be edited in Illustrator
CS4 until those type objects are updated. You will encounter legacy text only if you open an
Illustrator document or copy and paste text from an Illustrator document that was created in
version 10 and earlier. Upon opening the le from a previous version of Illustrator, you see a
dialog box asking you if you would like to convert the type. Choose No. The reason for this
dialog box is that type can shift during the updating of legacy text to a new version of Illustrator,
causing re ow and other physical changes. Once the document opens, select the text that needs
to be converted and choose Type > Legacy Text > Update Selected Legacy Text. This allows you
to see any adjustments as the text is updated. Once updated, the text can be edited and adjusted
as needed.
It isn’t mandatory that legacy text be updated at all. If you need to open a document that
contains legacy text, you can simply choose not to update the text. You can still view the text
on-screen and print your artwork as needed; you just can’t edit text that hasn’t been updated.
AICS4.indb 148AICS4.indb 148 11/25/2008 3:20:45 PM11/25/2008 3:20:45 PM
Simpo PDF Merge and Split Unregistered Version -
Formatting type
149Lesson 6, Working with and Formatting Text
6
7 Activate the Type tool ( ) in the Tools panel, then click once in the upper-left corner of
the box’s left panel, which has an image of a biker on it.
Clicking once anywhere on the artboard with the Type tool creates point type. Point
type simply allows you to type text wherever you click with the cursor. Point type is
generally used when setting a single line of copy or a headline. Later in this lesson, you’ll
learn about another method of setting text, called area type.
A blinking cursor appears where you clicked. To more closely see the cursor and the
text you will type, zoom in on the document by pressing Ctrl+(plus sign) (Windows) or
Command+(plus sign) (Mac OS) a few times. If you need to reposition the artboard after
increasing the page magni cation, use the Hand tool (
).
8 Type Nutz pr
ovides energy to get you through the day!
9 With the Type tool still selected, triple-click anywhere within the type you just created
to select the whole line of type
.
10 Click on the Character link in the Control panel at the top of the workspace to open
the Character panel.
Change the font to Myriad Pro Bold Italic and set the font size to
18 pt.
The Character panel allows you to change the attributes of the selected type.
Some character formatting options are available directly within the Control panel. Character
formatting can also be accomplished by choosing Window > Type > Character.
11 To make the type more readable, change the color of the selected type to white by
clicking on the Fill color s
watch in the Control panel and choosing the white swatch
from the Swatches panel that appears.
The word Nutz is the name of the ctional company that sells the box of mixed nuts
you are creating. Because it is a company name, it should have an ® symbol next to it,
indicating that the name is a registered trademark.
AICS4.indb 149AICS4.indb 149 11/25/2008 3:20:47 PM11/25/2008 3:20:47 PM
Simpo PDF Merge and Split Unregistered Version -
150
Formatting type
Adobe Illustrator CS4 Digital Classroom
6
12 Click once to the immediate right of the word Nutz and choose Type > Glyphs to open
the Glyphs panel. The Glyphs panel displays every symbol available in the currently
chosen font. Scroll through the Glyphs panel, locate the ® symbol, and double-click it to
insert that symbol at the location of your cursor. Close the Glyphs panel.
13 Press Shift+Ctrl+A (Windows) or Shift+Command+A (Mac OS) to deselect everything
in y
our document. Choose File > Save to save your work.
OpenType fonts
OpenType is a relatively new font format that has a number of advantages over other formats.
OpenType fonts are cross-platform, which means they can be used on the Windows and
Mac OS platforms alike. In addition, OpenType fonts are composed of a single le, unlike
older Postscript fonts, which require a separate screen and printer font le in order to work
properly. OpenType fonts support expanded character sets and layout features that provide
richer linguistic support and advanced typographic control. Most of the large font foundries are
now releasing fonts in the OpenType format, and many OpenType fonts are now based upon
PostScript, allowing them to be used for high-resolution imaging and printing.
Adobe Illustrator takes full advantage of the features available with OpenType fonts. In fact,
Illustrator has dedicated an entire panel within the application to controlling the features of
OpenType. You can open this panel by choosing Window > Type > OpenType.
Paragraph formatting
Unlike character formatting, paragraph formatting can only be applied to one or more
paragraphs at a time. You can’t apply a paragraph formatting attribute to a word, for instance; it’s
the whole paragraph or nothing. The key factor with paragraph formatting is a hidden character
within a body of text that de nes the end of one paragraph and the beginning of another —the
paragraph return, which is created when you press Enter (Windows) or Return (Mac OS) on
your keyboard. Let’s apply some paragraph formatting to the text in your artwork.
1 Press Ctrl+0 (Windows) or Command+0 (Mac OS) to see the entire project, then
select the Zoom tool (
) from the Tools panel and zoom in on the area below the
nutrition facts.
The Zoom tool can also be accessed by pressing and holding Ctrl+spacebar (Windows) or
Command+spacebar (Mac OS), then clicking on the area you want to magnify while still
holding down the key combination.
AICS4.indb 150AICS4.indb 150 11/25/2008 3:20:54 PM11/25/2008 3:20:54 PM
Simpo PDF Merge and Split Unregistered Version -
Formatting type
151Lesson 6, Working with and Formatting Text
6
2 Using the Type tool ( ), click and drag to create a type area beneath the nutrition facts.
To be certain that you create a new area for text, con rm that the cursor icon displays
the I-beam with a dotted frame around the edges (
) before clicking and dragging. A
blinking cursor appears in the upper-left corner of the frame that you just drew.
Using the Type tool, drag to
create a type area.
By clicking and dragging with the Type tool, you create area type. Area type di ers from point
type in that it acts as a text container and allows you to resize the frame while the text re ows
within it. Point type doesn’t work this way; if you resize a point type frame, you scale the text
within it.
3 Choose File > Place. In the Place dialog box, navigate to the Text folder inside the
ai06lessons folder
. Select the ingredients.txt le and press Place. In the Text Import
Options dialog box that appears, leave the settings at their defaults and press OK. The
contents of the ingredients.txt le are placed inside the text area.
4 Press Ctrl+A (Windows) or Command+A (Mac OS) to select all the text you just
placed.
In the Control panel, set the font to Myriad Pro Bold Condensed, and the size to
8 pt.
5 Click on the Fill color swatch in the Control panel and choose the White swatch from
the s
watch options to turn the text white. Choose Type > Change Case > UPPERCASE
to make all the text uppercase.
AICS4.indb 151AICS4.indb 151 11/25/2008 3:20:57 PM11/25/2008 3:20:57 PM
Simpo PDF Merge and Split Unregistered Version -
152
Formatting type
Adobe Illustrator CS4 Digital Classroom
6
6 Click once within the ingredients text, then click the Paragraph text in the Control
panel at the top of your screen to reveal the Paragraph panel. Press the Justify with Last
Line Aligned Left button at the top of the Paragraph panel to change the alignment of
the text.
The Paragraph panel allows you to change the alignment of text for the entire
paragraph as well as other paragraph-level attributes.
7 After formatting, the type may not ll the frame. To tidy things up, switch to the
Selection tool (
) and drag the center frame handle at the bottom of the frame upward to
reduce the frame’s size.
You can alter the size of the text frame by
dragging one of the frame handles.
8 Choose File > Save to save your work. Keep the le open.
AICS4.indb 152AICS4.indb 152 11/25/2008 3:21:04 PM11/25/2008 3:21:04 PM
Simpo PDF Merge and Split Unregistered Version -
Formatting type
153Lesson 6, Working with and Formatting Text
6
Formatting imported type
Next, you’ll import some additional text that will appear on the back of the box, and apply
additional paragraph formatting to the text.
1 Choose View > Fit in Window, or press Ctrl+0 (Windows)/Command+0 (Mac OS) to
see the entire spread. Choose the Type tool (
) from the Tools panel, then click and drag
to create a large type area on the back of the box (the box panel on the right side of your
screen) package. As you did in the previous exercise, be certain that you create a new
area for text by con rming that the cursor icon displays the I-beam with a dotted frame
around the edges (
) before clicking and dragging.
2 To precisely position the text area, open the Transform panel by clicking on the
T
ransform text on the far right side of the Control panel. Click in the center of the
reference point locator (
) to determine that all transformations are made relative to the
center of the text area. Type 1148 pt into the X text eld, 425 pt into the Y text eld,
450 pt into the W text eld, and 550 pt into the H text eld.
The Transform panel allows you to precisely
position and size objects in your document.
3 Choose Type > Area Type Options. In Columns area of the Area Type Options dialog
box, type 2 for the number of columns, 3 in the Span text eld, and .25 for the gutter.
Press OK.
The Area Type Options dialog box allows you to customize attributes
of the selected area type.
AICS4.indb 153AICS4.indb 153 11/25/2008 3:21:09 PM11/25/2008 3:21:09 PM
Simpo PDF Merge and Split Unregistered Version -
154
Formatting type
Adobe Illustrator CS4 Digital Classroom
6
4 Click in the top-left corner of the text area with your Type tool to place the cursor
within the frame. Choose File > Place. In the Place dialog box, navigate to the Text
folder within the ai06lessons folder and select the nuts.txt le. Press Place. In the Text
Import Options dialog box, leave the settings at their defaults and press OK. The text
from the le appears within the text area, displayed in two columns.
5 Place the cursor anywhere within the text and press Ctrl+A (Windows) or
Command+A (Mac OS) to select all the text.
Click on the Fill color swatch in the
Control panel and choose White from the Swatches panel. This is just a temporary x so
that you can see the selected text against the dark background.
6 Press Ctrl+(plus sign) (Windows)/Command+(plus sign) (Mac OS) twice to better
see the text.
Highlight the rst line of type in the text area (which reads, The Bene ts of
Nuts), and in the Control panel, change the font to Myriad Pro Bold and the size to 18
pt. Now the heading, The Bene ts of Nuts, stands out from the accompanying body text.
In a later exercise, you will take these attributes and turn them into a general style for
headings.
7 Click within the r
st full paragraph of text (which begins with, Most people that you talk
to ), click on the Paragraph link in the Control panel, and set the alignment to Justify
with last line aligned left. Set the spacing after the paragraph to 8 pt.
Adding space after a paragraph adds space without using an empty hard return in the copy.
8 Choose File > Save to save your work. Keep it open for the next part of the lesson.
You have now formatted some of the text. In the next section, you’ll create styles to
str
eamline the formatting of additional text in your project.
AICS4.indb 154AICS4.indb 154 11/25/2008 3:21:14 PM11/25/2008 3:21:14 PM
Simpo PDF Merge and Split Unregistered Version -
Formatting type
155Lesson 6, Working with and Formatting Text
6
Space before and after
In the days of the typewriter, the method used to create additional space between paragraphs
of text was to press the Enter or Return key twice; this was called a double-return. With a
typewriter, a double-return is really the only way to accomplish this e ect and may seem
antiquated, but this practice is, interestingly, still in use to this day, even though there is a much
better way.
You may be wondering why (and if) it matters how you add space between paragraphs. The
problem with using a double-return is that doing so completely limits the control that you have
over the space between paragraphs. And if you need to adjust the spacing between paragraphs for
any reason, the only option you have is to manually adjust that return by changing the leading
and or point size of the return. This can be very time-consuming. The solution: space before
and after. Using the space before and after options allows you to add space before and/or after
a paragraph without adding empty returns between paragraphs. What’s more, by including that
spacing in a paragraph style, you can control the space between all paragraphs in your document
with just a few clicks! It’s the di erence between a 30-second type change and a 30-minute
type change.
Paragraph and character styles
Illustrator CS4 allows you to save the formatting applied to text as a style. A style is simply a
way to apply consistent formatting to text without having to do it manually. There are two
types of styles that can be created in Illustrator: paragraph styles and character styles. As their
names imply, paragraph styles can only be applied to an entire paragraph, while character styles
can be applied to a single character or a range of characters in your text. Let’s see how you can
use these styles in your project.
1 With your ai0601_work.ai le still open, click once within the rst line of text in
the text area on the back of the box (The Bene ts of Nuts). Choose Window > Type >
Paragraph Styles to open the Paragraph Styles panel.
AICS4.indb 155AICS4.indb 155 11/25/2008 3:21:17 PM11/25/2008 3:21:17 PM
Simpo PDF Merge and Split Unregistered Version -
156
Formatting type
Adobe Illustrator CS4 Digital Classroom
6
2 Press the panel menu button ( ) in the upper-right corner of the Paragraph Styles panel.
Choose New Paragraph Style. In the New Paragraph Style dialog box, type Subhead in
the Style Name text eld. Press OK. The new style you created appears in the Paragraph
Styles panel.
Choose New Paragraph Style from the Paragraph Styles panel menu;
all the attributes of the text are automatically added to the style.
3 Highlight that rst line (The Bene ts of Nuts) with your Type tool ( ), and click on
Subhead in your Paragraph Styles panel to apply this style to the selected text.
4 Repeat steps 2 and 3, this time clicking inside the r
st full paragraph of text (beginning
with Most people ) and naming the style Body. Don’t forget to apply the Body style to
the paragraph after you create it.
When you apply styles to text, if you see a plus sign (+) to the right of the style name, you may
need to click on the name of the style once more to clear that plus sign, or Alt+click (Windows)/
Option+click (Mac OS) as you apply the style to cause your text to appear properly. A plus sign
next to a style name indicates that the text contains overrides or doesn’t match the de nition of
the style.
5 Finish styling the rest of the copy on the back of the box, applying the Body style to all
the parag
raphs and the Subhead style to the Nuts Nuts Nuts and Only the Best! headers.
6 Click the Character Styles tab next to the Paragraph Styles panel to reveal the Character
Styles panel.
Find the line in the second full paragraph (which starts with In 2002 ) and
highlight the phrase Physician’s Health Study. In the Control panel, change the font to
Myriad Pro Italic.
AICS4.indb 156AICS4.indb 156 11/25/2008 3:21:17 PM11/25/2008 3:21:17 PM
Simpo PDF Merge and Split Unregistered Version -
Formatting type
157Lesson 6, Working with and Formatting Text
6
7 With the text still selected, press the panel menu button in the Character Styles panel,
then choose New Character Style. In the New Character Styles dialog box, type Body
Italic in the Style Name text eld. Press OK.
Create a new character style named Body Italic.
8 Apply the Body Italic character style to the selected text by clicking on the Body Italic
entry in the Character Styles panel.
9 Now navigate to the bottom of the r
st column of text, highlight the word FDA, and
apply the Body Italic character style to it as well. Repeat this process for the following
sentence (which begins with Scienti c evidence ).
Apply the Body Italic character style.
10 Choose File > Save to save your work. Keep the le open for the next part of the lesson.
Now that your copy has been styled, maybe the subheads would look better in a di er
ent
color. You could manually select each subhead and change its color, but it is much more
e cient to simply edit the style, now that all the subheads have been styled using a
paragraph style.
AICS4.indb 157AICS4.indb 157 11/25/2008 3:21:23 PM11/25/2008 3:21:23 PM
Simpo PDF Merge and Split Unregistered Version -
158
Formatting type
Adobe Illustrator CS4 Digital Classroom
6
Editing styles
Styles can be edited directly from the Paragraph Styles or Character Styles panels.
1 Choose Select > Deselect, or press Shift+Ctrl+A (Windows) or Shift+Command+A
(Mac OS), to deselect all the items in your document.
2 Click the Paragraph Styles tab next to the Character Styles panel to bring the Paragraph
Styles panel forw
ard. Double-click on the Subhead style in the Paragraph Styles panel.
3 In the resulting Paragraph Styles Options dialog box, make sure the Preview check bo
x
in the lower-left corner is checked so that you can see the changes before you press
OK. Click the Character Color entry on the left side of the dialog box and select the
red swatch, named Die Tracing, from the list of swatches. You may need to reposition
the Paragraph Style Options dialog box so that you can see the change in your artwork.
Press OK.
4 Choose Select > Deselect, or press Shift+Ctrl+A (Windows) or Shift+Command+A
(Mac OS),
to deselect all the items in your document.
5 Double-click on the Body style in the Paragraph Styles panel.
6 Click on the Basic Character Formats entry on the left side of the dialog box. Choose
Minion Pr
o from the Font Family drop-down menu and Regular from the Font Style
drop-down menu. Press OK. This adjusts the style settings and all the fonts throughout
the document to which the style is applied.
The nished styles for body and headers.
7 Press Ctrl+S (Windows) or Command+S (Mac OS) to save your work. Keep the le
open.
AICS4.indb 158AICS4.indb 158 11/25/2008 3:21:26 PM11/25/2008 3:21:26 PM
Simpo PDF Merge and Split Unregistered Version -
Formatting type
159Lesson 6, Working with and Formatting Text
6
Loading styles
Styles can also be imported from other Illustrator documents. This not only allows you to
maintain consistency across multiple related documents, but also saves you the time and hassle of
recreating styles manually. In the following steps, you will import a style from another Illustrator
le to reuse in your project.
1 From the Paragraph Styles panel menu ( ), choose Load Paragraph Styles. The Select
a File to Import dialog box appears. Navigate to the ai06lessons folder and select the
styles.ai le. Press Open and notice that a new style, called Vitamins, has been added to
the Paragraph Styles panel.
By creating a character style, you can e ciently
apply character-based formatting to your text.
2 Choose View > Fit All in Window, then zoom in on the lower-left corner of the front
of the Nutz box, where there are vitamins and minerals listed in white text. Apply
the Subhead paragraph style to the words Vitamins and Minerals. Apply the Vitamins
paragraph style to the remainder of the text. If you see a plus sign next to the style after
applying the style, simply Alt+click (Windows) or Option+click (Mac OS) on the style
to remove the plus sign.
3 Choose File > Save to save your work.
AICS4.indb 159AICS4.indb 159 11/25/2008 3:21:28 PM11/25/2008 3:21:28 PM
Simpo PDF Merge and Split Unregistered Version -
160
Formatting type
Adobe Illustrator CS4 Digital Classroom
6
Text wrap
Illustrator CS4 allows your text, images, and objects to interact with each other by applying
text wrap to objects, which causes the text to wrap around other objects in your Illustrator
document. In the following steps, you’ll apply text wrap to an image that is already in
your document.
1 Press Ctrl+0 (Windows) or Command+0 (Mac OS) to t the entire spread in the
window, then press Ctrl+(minus sign) (Windows) or Command+(minus sign) (Mac OS)
twice, at which point you’ll see a single almond below and to the right of the spread.
When you place an image in Illustrator, it is typically a square. The almond image is being
clipped using a clipping mask, which gives it the proper shape of an almond.
2 Activate the Selection tool (
) from the Tools panel. Drag the image of the almond so
that it is on top of the two-column text on the back of the box (on your right). Resize
the almond to approximately 50% by dragging a corner handle while holding down the
Shift key to keep its proportions intact.
3 Once the image is in the desired position and size, right-click (Windows) or Ctrl+click
(Mac OS) on the almond image and choose
Arrange > Bring to Front. Leave the
image selected and choose Object > Text Wrap > Make. This applies text wrap to the
selected image.
4 Press Ctrl+(plus sign) (Windows) or Command+(plus sign) (Mac OS) to zoom in on the
almond image
.
5 To adjust how closely the text wraps around the image, make sure that the image is
still selected and choose Object >
Text Wrap > Text Wrap Options. In the Text Wrap
Options dialog box, check the Preview checkbox and increase the o set amount to 10 pt.
Press OK.
The Text Wrap Options dialog box allows you to adjust the distance that the text is o set from the edge of the image.
6 Choose File > Save. Keep the document open for the next part of the lesson.
AICS4.indb 160AICS4.indb 160 11/25/2008 3:21:30 PM11/25/2008 3:21:30 PM
Simpo PDF Merge and Split Unregistered Version -
Advanced techniques with text
161Lesson 6, Working with and Formatting Text
6
Advanced techniques with text
Adobe Illustrator CS4 o ers a variety of advanced tools for working with text. Let’s explore
some of those techniques now!
Text on a path
In Illustrator CS4, type can be applied to a path of just about any shape. You can use the Pen
tool (
), the Pencil tool ( ), or any of the shape tools to draw a path on which type can be
applied. In the following steps, you’ll add some text to a path that already exists on the box for
creative e ect.
1 With your ai0601_work.ai le still open, zoom in on the curved path in the lower-right
corner of the back of the box.
2 Click and hold the Type tool (
) in the Tools panel and choose the Type on a Path tool
( ). Click on the far-left side of the path; this converts the existing path to a type path
and allows you to enter and edit text on the path.
Place your Type on a Path cursor at the
end of the curved line to type along it.
3 In the Control panel, click on the Fill color swatch and select the white color from the
Swatches panel. Change the font to Myriad Pro Bold Condensed, then type 17 in the
Size text eld.
4 Type Contains 14 Essential
Vitamins and Minerals. If the text does not t
completely on the path, choose Edit > Undo to remove the text and Edit > Undo again
to remove the insertion point on the path. Repeat steps 2, 3, and 4.
The text you entered.
5 Press Ctrl+S (Windows) or Command+S (Mac OS) to save your work.
AICS4.indb 161AICS4.indb 161 11/25/2008 3:21:36 PM11/25/2008 3:21:36 PM
Simpo PDF Merge and Split Unregistered Version -
162
Advanced techniques with text
Adobe Illustrator CS4 Digital Classroom
6
Warping text
One of the great features of Adobe Illustrator CS4 is its ability to apply e ects that distort and
transform type in many ways, while keeping the text editable. This is advantageous in that it
makes the process of editing or modifying text very e cient. Let’s apply an e ect to the NUTZ
logo to enhance its appearance.
1 Press Shift+Ctrl+A (Windows) or Shift+Command+A (Mac OS) to deselect all objects
in your document. Choose View > Fit in Window to see the entire box. Activate the
Selection tool (
) and click on the word NUTZ on the front cover of the box.
2 Choose E ect >
Warp > Bulge.
3 In the Warp Options dialog box, turn on the Preview checkbox so that you can see
the changes to y
our artwork as you adjust the values in the dialog box. Make sure the
Horizontal radio button is selected and set the Bend to 75 percent. Press OK.
The Warp Options dialog box allows you to adjust the e ect until
you obtain the desired result.
Now that you’ve applied the e ect to the logo, you will add dimension by applying an
image to the text of the logo.
4 Choose File > Place. In the Place dialog box, navigate to the Links folder inside the
ai06lessons folder
. Select the sky.jpg image and choose Place. A small image of a sky at
dusk appears on the spread.
5 Back in Illustrator, position the photo on top of the NUTZ logo and scale the photo so
that it completely co
vers the logo. Do this by dragging one of the corner handles of the
image using the Selection tool (
) and holding down the Shift key on your keyboard. The
Shift key constrains the proportions of the image so that it doesn’t become stretched.
6 With the photo still selected, press Ctrl+[ (Windows) or Command+[ (Mac OS) several
times until the image appear
s beneath the NUTZ logo. Ctrl+[ (Windows)/Command+[
(Mac OS) is the Send Backward command that can also be applied by choosing Object
> Arrange > Send Backward.
AICS4.indb 162AICS4.indb 162 11/25/2008 3:21:43 PM11/25/2008 3:21:43 PM
Simpo PDF Merge and Split Unregistered Version -
Advanced techniques with text
163Lesson 6, Working with and Formatting Text
6
7 Hold down the Shift key and click on the NUTZ text so that both elements are selected
at the same time.
8 Press the Transparency icon (
) in the dock on the right side of the workspace to open
the Transparency panel. There is a preview of the selected items in the Transparency
panel. If you do not see a preview, press the Transparency panel menu button (
) and
choose Show Options.
9 Press the Transparency panel menu button and choose Make Opacity Mask. The
text of the lo
go now masks out the photo everywhere except where the type of the
logo appears.
Choose Make Opacity Mask from the Transparency panel menu to make
a mask out of the topmost element of your selection.
10 Select both the NUTZ and Mixed text using the Selection tool ( ) and holding down the
Shift key on your keyboard. Choose Object > Group to group the elements.
11 While holding down the Alt (Windows)/Option (Mac OS) key on your keyboard,
drag the g
rouped logo up to the top ap of the box. Holding down the Alt/Option
key makes a copy of the object that you are dragging. If necessary, increase the page
magni cation to more clearly see the work you are performing.
12 Scale down the copied logo by holding the Shift key on your keyboard while dragging
one of the lo
go’s corner handles so that it ts on the left side of the box ap.
Scale down the copied image.
13 Choose File > Save to save your work. Keep the le open.
For more information on how to use e ects in Illustrator CS4,
see Lesson 9, “Using
E ects and Transparency.”
AICS4.indb 163AICS4.indb 163 11/25/2008 3:21:46 PM11/25/2008 3:21:46 PM
Simpo PDF Merge and Split Unregistered Version -
164
Advanced techniques with text
Adobe Illustrator CS4 Digital Classroom
6
Text in a shape
In addition to the type features that you applied earlier in the lesson, Illustrator gives you the
ability to t type inside various shapes. In the following steps, you will place some text inside a
circle on the side of the Nutz box.
1 Select the Ellipse tool by clicking and holding the Rectangle tool ( ) in the Tools panel
and choosing the Ellipse tool (
) from the list of options. You can also access the Ellipse
tool by pressing the L key on your keyboard.
2 Navigate to the lower portion of the side panel, below the ingredients. Click and drag to
dra
w a circle on the side panel of the box. Hold down the Shift key while you drag to
keep the shape proportionate.
3 With the circle still selected, click and hold the Type tool (
) and choose the Area Type
tool (
) from the list of options that appears. Click on the path at the top of the circle to
convert the circle to a shape that will accommodate area type.
Create a circular text area
using the Ellipse tool.
4 Your cursor is now inside the circle.
5 Choose File > Place and navigate to the Text folder inside the ai06lessons folder. Select
the bene ts.txt le and pr
ess Place. In the resulting Text Import Options dialog box, leave
the settings at their defaults and press OK.
6 Press Ctrl+A (Windows) or Command+A (Mac OS) to select all the text within the
cir
cle. Change the color of the text to white and the paragraph alignment to justi ed.
AICS4.indb 164AICS4.indb 164 11/25/2008 3:21:53 PM11/25/2008 3:21:53 PM
Simpo PDF Merge and Split Unregistered Version -
Advanced techniques with text
165Lesson 6, Working with and Formatting Text
6
7 At this point, you can adjust the text to t the circle by changing the tracking values ( )
in the Character panel, as well as by adjusting the leading (
) and font size ( ) of the
type. Sample some of these options, experimenting with di erent values.
Once you have text in a shape, it can be edited
at any time using the standard Type tool.
8 Once you’ve found a look that you like, choose File > Save to save your work. Keep the
le open.
Creating outlines
You might want to modify the character shapes of type itself—you can even do this to type
that you have already applied to your artwork. In these instances, you can’t alter the shape of
characters in live text, so you need to convert the characters to outlines. Converting type to
outlines converts live text to editable paths in the shape of the original type. This is also useful
when you are sending les to someone else and you don’t want to include the fonts. Once type
is converted to outlines, you no longer need the original font that was used to create the text.
Converting text to outlines is generally not recommended with small body text, as it tends to
cause the text to look slightly bolder than the original text. In the following steps, you’ll see
how text can be converted to outlines to create a headline on the front of the box.
1 Press Shift+Ctrl+A (Windows) or Shift+Command+A (Mac OS) to deselect all objects
in your document. Activate the Type tool (
) from the Tools panel, then click in an area
on the front of the box to create a point type area. If necessary, increase the magni cation
using the Zoom tool (
) so you can more clearly see your work.
2 Type A Hear
t Healthy Snack!, then press Ctrl+A (Windows) or Command+A (Mac
OS) to select all the text. In the Control panel, change the font to Minion Pro Bold
Italic, then type 36 into the Size text eld. Click on the Fill color swatch and choose a
red color from the Swatches panel.
AICS4.indb 165AICS4.indb 165 11/25/2008 3:21:58 PM11/25/2008 3:21:58 PM
Simpo PDF Merge and Split Unregistered Version -
166
Advanced techniques with text
Adobe Illustrator CS4 Digital Classroom
6
3 Select the type using the Selection tool ( ) and choose Type > Create Outlines. This
converts all the selected type to outlines (paths).
After converting the text to outlines, the text changes appearance
and reveals the paths that make up the character shapes.
4 When type is converted to outlines, all the text is grouped so that it moves and adjusts as
a collective unit. Ungroup the text by choosing Object > Ungroup.
5 Using the Selection tool, drag a marquee around the word Hear
t to select only that word.
Press the Delete key on your keyboard to remove the word.
In the next steps, you will replace the word Hear
t with a vector drawing of a heart.
6 Choose Select > Heart from the menu at the top of your screen. In the Control panel,
pr
ess the Fill color swatch and choose a red color from the swatches panel to ll the
heart image.
7 Drag the drawing of the heart to the empty area of the text outlines where the word
Hear
t used to be. Scale and adjust the drawing as you see t by dragging the corner
handle of the object and holding down the Shift key. You may need to zoom in on
the remaining text to the right of the heart to close the space and make it look more
balanced. Once you nish adjusting the headline, select the heart and the text, then
group them by pressing Ctrl+G (Windows) or Command+G (Mac OS).
AICS4.indb 166AICS4.indb 166 11/25/2008 3:22:14 PM11/25/2008 3:22:14 PM
Simpo PDF Merge and Split Unregistered Version -
Advanced techniques with text
167Lesson 6, Working with and Formatting Text
6
8 To add a nishing touch to the headline, select it and choose E ect > Stylize > Drop
Shadow. In the Drop Shadow dialog box, type 5 pt for both the X and Y o sets and 4 pt
for blur. Press OK.
Apply a drop shadow to the headline.
Check spelling
Before you send your project to the client for approval, you should always perform a spell
check to verify that there aren’t any misspelled words in your document. The Check Spelling
command in Adobe Illustrator CS4 compares the words in your document to a built-in
dictionary and alerts you to any misspelled words. Spell check your project now.
1 Press Shift+Ctrl+A (Windows) or Shift+Command+A (Mac OS) to deselect all objects
on your page. Choose Edit > Check Spelling to open the Check Spelling dialog box.
AICS4.indb 167AICS4.indb 167 11/25/2008 3:22:17 PM11/25/2008 3:22:17 PM
Simpo PDF Merge and Split Unregistered Version -
168
Advanced techniques with text
Adobe Illustrator CS4 Digital Classroom
6
2 Click on the arrow icon in the lower-left corner of the dialog box to display additional
options. Leave both checkboxes in the Find section checked, and check the boxes in
the Ignore section to ignore words that are all uppercase and words with numbers. This
speeds up the process, as the nutrition label contains several of these instances. Press the
Start button to begin the spell checking process.
The Check Spelling dialog box allows you to de ne the parameters
that determine what Illustrator ags as problems.
After pressing the Start button, the Check Spelling dialog box displays the errors that it
nds in your document. Not all errors are necessarily spelling errors; some are repeated
words and other miscellaneous errors. Some of these errors can be corrected by choosing
an option o ered in the Suggestions window in the middle of the dialog box. Illustrator
displays the error at the top of the dialog box and also displays suggestions below it for
correcting the error. You have the option of choosing Change, which changes the current
error to the suggestion shown in the Suggestions window, or Ignore, which skips the
currently agged error.
AICS4.indb 168AICS4.indb 168 11/25/2008 3:22:19 PM11/25/2008 3:22:19 PM
Simpo PDF Merge and Split Unregistered Version -
Self study
169Lesson 6, Working with and Formatting Text
6
3 Continue through the spell check by choosing either Change or Ignore, depending on
the error. There are some misspelled words in the document, so as the spell checker ags
them, change them to the correct spelling; other errors can be ignored. Make sure that
when Illustrator ags the word NUTZ, you ignore it.
Just because a word is not found in the dictionary that Illustrator uses to spell check
the document,
it doesn’t necessarily mean that the word is incorrect. For instance, Spell
Check nds the word Folate. Illustrator doesn’t recognize this word even though it is
correct. One way to handle this situation is to click the Add button on the right side
of the Check Spelling dialog box. This adds the current word to the dictionary so that
Illustrator will recognize the word from now on, and will no longer ag it as an error.
The Add button is useful when dealing with proper nouns and people’s names, especially
when they appear more than once in a document or range of documents. By adding a
word to the dictionary, Illustrator no longer considers it misspelled.
4 When you have completed checking the entire document, press Done.
5 Choose File > Save to save your work.
Find and Replace
Imagine that this project is due to the client and at the last minute you realize that you
omitted the ® symbol next to the NUTZ brand name, identifying it as a registered trademark.
Fortunately, Illustrator provides the tool needed to x this problem quickly. Let’s see how easily
this can be done.
1 Press Shift+Ctrl+A (Windows) or Shift+Command+A (Mac OS) to deselect all objects
on your page. Choose Edit > Find and Replace to display the Find and Replace
dialog box.
2 In the Find text eld,
type NUTZ (all caps). In the Replace With text eld, type
NUTZ (all caps) and then click on the arrow to the right of the Replace With text eld.
From the list of options, choose Registered Trademark Symbol. This inserts an ® next
to the word NUTZ in the Replace With text eld. This is the character equivalent that
Illustrator uses for the registered trademark symbol.
3 Press the Find button once to nd the r
st location where NUTZ appears within your
project, then press the Replace All button to replace all occurrences of NUTZ with the
new text, including the necessary symbol. Adobe Illustrator noti es you that it made
three replacements within your document. Press OK, then press Done.
4 Choose File > Save to save your document.
Congratulations! You’ve nished Lesson 6,
“Working with and Formatting Text.”
AICS4.indb 169AICS4.indb 169 11/25/2008 3:22:20 PM11/25/2008 3:22:20 PM
Simpo PDF Merge and Split Unregistered Version -
170
Self study
Adobe Illustrator CS4 Digital Classroom
6
Self study
To add a nishing touch to your document, draw a white rectangle encompassing all the text
on the back of the box. Send the rectangle backward until it is behind the text. Now apply
a Gaussian Blur with a radius of about 8 pixels and drop the transparency of the rectangle to
about 40 percent. This is a great e ect that you can use to subdue the background and allow the
type to stand out a little bit.
Practice applying text to various shapes that you draw in Illustrator. Use the Pen tool (
) or the
Pencil tool (
) to draw a path, and then use your Type on a Path tool ( ) to add type to the
shape. You can adjust how type is positioned on a path by dragging the center bracket using
your Selection tool and moving it left or right along the path. You can even drag the center
bracket down and ip the text to the other side of the path. In addition, draw some closed
shapes and practice placing text inside them to see the di erent e ects that you can achieve.
Add di erent e ects to the NUTZ logo to make it stand out a little more. See Lesson 9, “Using
E ects and Transparency,” for more on applying e ects to objects. Try adding an outer glow to
the logo, or even a drop shadow with various intensities. You could also experiment with other
e ects options in the E ects panel. You may want to remove the existing e ect rst by deleting
it from the Appearance panel.
Review
Questions
1 True or false: E ects can only be applied to type that has been converted to paths.
2 If you wanted to put text that wrapped inside a given area of your artwork, would you
use point type or ar
ea type?
3 Which of Illustrator’s features gives you the control needed to maintain consistency and
contr
ol throughout a range of text in your document?
4 If a word that Illustrator’s dictionary doesn’t recognize appears several times in your
document,
how can you stop Illustrator from agging each instance of the word?
5 Which panel in Illustrator shows you all the characters available within a given font?
Answers
1 False. E ects can be applied to live type and remain editable even after the e ect has
been applied.
2 You would use area type. Point type doesn’t wrap within a given area. Point type only
wraps if y
ou apply a hard or soft return to the type.
3 Character and paragraph styles.
4 Add the word to the dictionary by pressing the Add button in the Check Spelling dialog
bo
x. This makes the word a recognized word and prevents Illustrator from earmarking it.
5 The Glyphs panel.
AICS4.indb 170AICS4.indb 170 11/25/2008 3:22:20 PM11/25/2008 3:22:20 PM
Simpo PDF Merge and Split Unregistered Version -
171Lesson 7, Organizing your Illustrations with Layers
What you’ll learn
in this lesson:
Selecting items •
on a layer
Locking and •
hiding layers
Creating new layers•
Moving items between •
layers
Organizing layers•
Organizing your
Illustrations with Layers
Complex illustrations with many components can make it more
di cult to work with and select individual components. In this
lesson, you will discover how to use Illustrator CS4’s Layers panel
to organize and manage your illustrations.
Starting up
Before starting, make sure that your tools and panels are consistent by resetting your workspace.
See “Resetting Adobe Illustrator CS4 Preferences” on page 3.
You will work with several les from the ai07lessons folder in this lesson. Make sure that you
have loaded the ailessons folder onto your hard drive from the supplied DVD. See “Loading
lesson les” on page 4.
Lesson 7
AICS4.indb 171AICS4.indb 171 11/25/2008 3:22:23 PM11/25/2008 3:22:23 PM
Simpo PDF Merge and Split Unregistered Version -
172
Starting up
Adobe Illustrator CS4 Digital Classroom
7
See Lesson 7 in action!
Use the accompanying video to gain a better understanding of how to use some of the features
shown in this lesson. The video tutorial for this lesson can be found on the included DVD.
Getting to know the Layers panel
Whether you deliberately work with layers or not, every time you create, import, or paste items
in an Illustrator document, you are placing those items on a layer. The default layer that is in
every new Illustrator document is called Layer 1. The order in which you add new elements
to the document determines their arrangement on Layer 1. The latest additions appear on top
of the earlier ones; this is called the stacking order. Just like stacking sheets of paper on your
desk, the rst one placed appears on the bottom of the stack and the most recent one placed
is positioned on the top of the stack. The Layers panel allows you select an item or items in
an illustration, change their stacking order, show or hide them, and lock them. The following
exercise familiarizes you with the Layers panel.
1 Launch Adobe Illustrator CS4 if it is not already open. Choose File > Open. In the
Open dialog box, navigate to the ai07lessons folder and select the ai07.ai le. Press Open.
2 Choose File > Save As. In the Save As dialog box, navigate to the ai07lessons folder
and type ai07_w
ork.ai in the Name text eld. Press Save, then press OK when the
Illustrator Options dialog box appears.
3 Press the Layers button (
) in the dock on the right side of the workspace to open the
Layers panel.
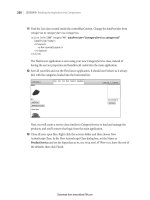
A B C D E F
J
I
H
G
A. Visibility column. B. Edit column. C. Selection color column. D. Disclosure triangle. E. Target column.
F. Panel menu. G. Make/Release Clipping Mask. H. Create New Sublayer. I. Create New Layer. J. Delete Selection.
7
AICS4.indb 172AICS4.indb 172 11/25/2008 3:22:33 PM11/25/2008 3:22:33 PM
Simpo PDF Merge and Split Unregistered Version -