Adobe Photoshop CS4 Digital Classroom phần 2 pot
Bạn đang xem bản rút gọn của tài liệu. Xem và tải ngay bản đầy đủ của tài liệu tại đây (3.53 MB, 39 trang )
20
Adding a text layer
Adobe Photoshop CS4 Digital Classroom
1
7 Click on the This Adjustment A ects All Layers Below button ( ) at the bottom of the
Adjustments panel. The only layer being a ected by the Black & White adjustment layer
is the boy layer.
Click on the This Adjustment A ects The grayscale applies only to the layer directly underneath it.
All Layers Below button.
8 Choose File > Save to save this le, and keep it open for the next part of this lesson.
Adding a text layer
Adding text is the nal step before converting this image into a 3D object. In this part of the
lesson, you will create text that will be positioned o to the right of the postcard. For this lesson
you will simply set the text as instructed, but if you want to discover more possibilities with
text, read Lesson 4, “The Basics of Working in Photoshop.”
1 Make sure that the topmost (Black & White) layer is selected; then select the Type tool
(
) and click o to the right of the boy in the image area. The cursor appears.
2 Type Bik
e, and then press the Enter (Windows) or Return (Mac OS) key and type On!
3 Press Ctrl+A (Windows) or Command+A (Mac OS) or choose Select > Select All to
acti
vate both words. You will now take advantage of some keyboard shortcuts to help
speed up the font size and typeface selection.
PSCS4.indb 20PSCS4.indb 20 9/17/2008 2:41:46 PM9/17/2008 2:41:46 PM
Making a 3D postcard
21Lesson 1, Exploring Photoshop
1
4 Hold down Ctrl+Shift (Windows) or Command+Shift (Mac OS) and then repeatedly
press the > (Greater Than) key to make the text incrementally larger. Continue
pressing the > key until your text is approximately 36 points. If you are not in favor of
using keyboard shortcuts, you may simply type 36 into the Font size text box in the
Application bar.
To make text incrementally smaller, you use the < (Less Than) key instead of the > key.
5 Change the leading, or space between the lines of text, by pressing Alt+up arrow
(W
indows) or Option+up arrow (Mac OS). If you decrease the space too much, you
can press Alt+down arrow (Windows) or Option+down arrow (Mac OS) to increase
the leading, the vertical space between the lines of type. You do not need any speci c
settings for this step; simply set the leading to the amount you feel works well.
6 Click and drag to highlight the font name in the Application bar at the top of the image
ar
ea, and then press the up or down arrow key to change your font selection to the font
that is on the list before or after the current font selection. This is an easy visual method
to use when selecting a font. No speci c font is required; in the example, the Poor
Richard font is selected.
7 To change the color of the text to white, click once on the Set the Text Color box in the
Application bar
. When the Color Picker appears, click on a white (or light) color in the
upper-left corner of the color pane. Press OK. The text is now white.
Change the text to 36 points, and then select the font and text color.
8 If necessary, switch to the Move tool ( ) and reposition the text to be centered in the sky
area o to the right in the image.
9 Press Ctrl+S (Windows) or Command+S (Mac OS) to save this le
. Keep it open for the
next part of this lesson.
PSCS4.indb 21PSCS4.indb 21 9/17/2008 2:41:47 PM9/17/2008 2:41:47 PM
22
Making a 3D postcard
Adobe Photoshop CS4 Digital Classroom
1
Making a 3D postcard
You will now convert your at image into a 3D postcard. You will do this by using the new 3D
features and tools that have been added to Photoshop CS4. You will experiment more with the
new and improved 3D features in Lesson 13, “Introducing 3D.”
Converting multiple layers into one smart object layer
Because the 3D features work with an individual layer, you will rst convert the multiple
layers in this image into one smart object layer. A smart object layer can embed multiple layers
into one layer. You can re-open the separate layers by double-clicking on the smart object
layer in the Layers panel. Find out more about smart objects in Lesson 10, “Getting Smart
in Photoshop.”
1 Click once on the bottom (Background) layer, and then hold down the Shift key and
click on the topmost layer (Bike On!). All layers are now selected.
2 Click and hold on the panel menu (arrow in the upper-right corner of the Layers panel)
and select Con
vert to Smart Object from the panel drop-down menu. The layers are
consolidated into one layer. As a default, the smart object layer takes on the name of the
topmost layer.
Select all layers. Convert them to one smart object layer.
Turning your image into a 3D texture
You will now take the smart object layer that you have created and apply it as a texture to a
3D object. In this example you will create a simple 3D postcard.
To avoid clipping o some of the layer, you will expand the canvas. This makes your work area a
little larger, and creates some needed space for 3D rotation.
1 Choose Image > Canvas Size; the Canvas Size dialog box appears.
PSCS4.indb 22PSCS4.indb 22 9/17/2008 2:41:49 PM9/17/2008 2:41:49 PM
Turning your image into a 3D texture
23Lesson 1, Exploring Photoshop
1
2 Type 125 in the Width text box and then choose percent from the measurement units
drop-down menu. Then type 125 in the Height text box, and press OK. An additional
25 percent of transparency appears around the image.
Increase the canvas size. The result.
3 With the smart object Bike On! still selected, choose 3D > New 3D Postcard from
Layer. You may not see any change occur at this time.
4 Choose the 3D Rotate tool (
) from the Tools panel, and then click and drag the image.
The image rotates in space, much like an actual postcard might. Experiment with the
rotation until you nd a satisfactory position; no speci c coordinates are required for this.
The completed le.
Congratulations! You have completed the tour of Adobe Photoshop CS4. Read to
discover more details about the features you were introduced to in this lesson.
PSCS4.indb 23PSCS4.indb 23 9/17/2008 2:41:49 PM9/17/2008 2:41:49 PM
PSCS4.indb 24PSCS4.indb 24 9/17/2008 2:41:50 PM9/17/2008 2:41:50 PM
25Lesson 2, Getting to Know the Workspace
What you’ll learn
in this lesson:
Opening a file using •
Adobe Bridge
Using Photoshop tools•
Navigating in your •
image area
Using panels•
Getting to Know
the Workspace
In this lesson, you’ll learn how to best use the Adobe Photoshop
CS4 work area. You will also discover how to open a document
using Adobe Bridge, how to use the Tools panel, and how to easily
navigate images.
Starting up
Adobe Photoshop is an image-editing program that can open an image captured by a scanner
or digital camera, or downloaded from the web. It can also open captured video images and
vector illustrations. In addition, you can create new documents in Photoshop, including vector
graphics, which are scalable image les (for example, the images can be enlarged or reduced in
size with no loss of clarity).
Before starting, make sure that your tools and panels are consistent by resetting your preferences.
See “Resetting Adobe Photoshop CS4 preferences” on page 3.
You will work with several les from the ps02lessons folder in this lesson. Make sure that you
have loaded the pslessons folder onto your hard drive from the supplied DVD. See “Loading
lesson les” on page 5.
Lesson 2
PSCS4.indb 25PSCS4.indb 25 9/17/2008 2:41:50 PM9/17/2008 2:41:50 PM
26
Starting up
Adobe Photoshop CS4 Digital Classroom
2
See Lesson 2 in action!
Use the accompanying video to gain a better understanding of how to use some of the features
shown in this lesson. The video tutorial for this lesson can be found on the included DVD.
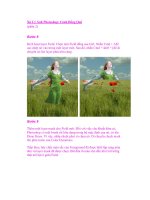
Opening an existing document in Adobe Bridge
As mentioned previously, Adobe Bridge is a standalone application that can be accessed using
the File menu in any of the Creative Suite 4 applications, or by using the Launch Bridge
button (
) that is found on the Application bar or control panels of most of the Creative
Suite 4 applications.
1 Launch Adobe Photoshop CS4. If the Welcome menu appears, choose Close.
2 Choose File > Browse in Bridge. If the Folders panel is not in the foreground, click on it
no
w to bring it forward, then click on Desktop, the rst list item in the Folders panel.
3 Open the pslessons folder that you have already copied onto your desktop, and then
open the ps02lessons folder
.
4 Locate and then double-click on the image named ps0201.psd to open it in Photoshop.
An image of a g
irl with a dandelion appears.
2
PSCS4.indb 26PSCS4.indb 26 9/17/2008 2:41:55 PM9/17/2008 2:41:55 PM
Discovering the Tools panel
27Lesson 2, Getting to Know the Workspace
2
As you practice with the les throughout this book, you will nd that you are instructed
to save a work le immediately after opening the original le.
5 Choose File > Save As to save a copy of this document to your ps02lessons folder.
6 Navigate to the ps02lessons folder. In the File name text eld,
type ps0201_work, and
choose Photoshop from the Format drop-down menu. Click Save.
Discovering the Tools panel
When you start Photoshop, the Tools panel appears docked on the left side of the screen—it is
not a oating Tools panel, as it was in earlier versions of Photoshop. There are four main groups
of tools, separated by functionality on the Tools panel: selection, cropping, and measuring;
retouching and painting; drawing and type; and 3D and navigation.
A B C D
A. Selection, cropping, and measuring tools.
B. Retouching and painting tools.
C. Drawing and type tools.
D. 3D and navigation tools.
Selection, Cropping, and Measuring Tools
ICON TOOL NAME USE WHERE IT’S
COVERED
Move (V) Moves selections or layers. Lesson 5
Marquee (M) Makes rectangular, elliptical, single row,
and single column selections.
Lesson 5
Lasso (L) Makes freehand, polygonal (straight-
edged), and magnetic selections.
Lesson 5
Quick Selection (W) Paints selections. Lesson 5
Crop (C) Crops an image. Lesson 3
Eyedropper (I) Samples pixels. Lesson 6
PSCS4.indb 27PSCS4.indb 27 9/17/2008 2:41:57 PM9/17/2008 2:41:57 PM
28
Discovering the Tools panel
Adobe Photoshop CS4 Digital Classroom
2
Retouching and Painting Tools
ICON TOOL NAME USE WHERE IT’S
COVERED
Spot Healing (J) Removes imperfections. Lesson 6
Brush (B) Paints the foreground color. Lesson 6
Clone Stamp (S) Paints with a sample of the image. Lesson 6
History Brush (Y) Paints a duplicate of the selected state
or snapshot.
Lesson 6
Eraser (E) Erases pixels—or reverts to a saved
history state.
Lesson 6
Gradient (G) Creates a gradient. Lesson 6
Blur (R) Blurs pixels. Lesson 12
Dodge (O) Lightens pixels in an image. Lesson 5
Drawing and Type Tools
ICON TOOL NAME USE WHERE IT’S
COVERED
Pen (P) Draws a vector path. Lesson 5
Horizontal Type (T) Creates a type layer. Lesson 4
Path Selection (A) Allows you to manipulate a path. Lesson 7
Rectangle (U) Draws vector shapes. Lesson 2, 10
3D and Navigation Tools
ICON TOOL NAME USE WHERE IT’S
COVERED
3D Rotate (K) Rotates 3D objects. Lesson 13
3D Orbit (N) Changes the view of 3D objects. Lesson 13
Hand (H) Navigates the page. Lesson 2
Zoom (Z) Increases and decreases the relative size
of the view.
Lesson 2
PSCS4.indb 28PSCS4.indb 28 9/17/2008 2:42:00 PM9/17/2008 2:42:00 PM
Discovering the Tools panel
29Lesson 2, Getting to Know the Workspace
2
Can’t tell the tools apart? You can view tooltips that reveal a tool’s name and keyboard shortcut by
positioning your cursor over the tool
.
The Tools panel is in a space-saving, one-column format. Click on the gray title bar area above
the Tools panel to bring the Tools panel into the two-column view. Click on the title bar again
to bring the Tools panel back to the default, single-column view. Keep the Tools panel set to
whichever format works best for you
Hidden tools
Some of the tools in the Tools panel display a small triangle at the bottom-right corner; this
means that there are additional tools hidden under the tool.
1 Click and hold the Blur tool to see the hidden Sharpen and Smudge tools.
Selecting a hidden tool.
2 Drag to the Smudge tool ( ) and release. The Smudge tool is now the visible tool.
Most tools have options that you can adjust, using the Options bar that runs across the
top of y
our document window. In this case, you will change an option for the Smudge
tool before using it on your image.
3 Click on the arrow to the right of Brush in the Options bar to open up the Brush Preset
pick
er. Using the Master Diameter slider, slide to the right until you reach approximately
the 100 mark, or type 100 into the Master Diameter text eld.
Now you can try painting with the tool you just customized.
PSCS4.indb 29PSCS4.indb 29 9/17/2008 2:42:07 PM9/17/2008 2:42:07 PM
30
Navigating the image area
Adobe Photoshop CS4 Digital Classroom
2
4 Click and drag over the seeds ying away in the image. Use freeform brush strokes, as
you want the smudging to look like part of the image is being stirred up by the wind.
Have fun with this part of the lesson and smudge any part of the image you like. Don’t
worry; your next step is to revert the le back to its last saved version.
Smudging the seeds.
5 Choose File > Revert. The image is returned to its last saved version.
Navigating the image area
To work most e ciently in Photoshop, you’ll want to know how to zoom (magnify) in and
out of your image. Changing the zoom level allows you to select and paint accurately and helps
you see details that you might otherwise have overlooked. The zoom function has a range from
a single pixel up to a 3200 percent enlargement, which gives you a lot of exibility in terms of
viewing your images.
You’ll start by using the View menu to reduce and enlarge the document view, and end by
tting the entire document on your screen.
PSCS4.indb 30PSCS4.indb 30 9/17/2008 2:42:09 PM9/17/2008 2:42:09 PM
Navigating the image area
31Lesson 2, Getting to Know the Workspace
2
1 Choose View > Zoom In to enlarge the display of ps0201_work.psd.
2 Press Ctrl+plus sign (Windows) or Command+plus sign (Mac OS) to zoom in again.
This is the k
eyboard shortcut for the Zoom In command that you accessed previously
from the View menu.
3 Press Ctrl+minus sign (Windows) or Command+minus sign (Mac OS) to zoom out.
This is the k
eyboard shortcut for View > Zoom Out.
Now you will t the entire image on the screen.
4 Choose View > Fit on Screen, or use the keyboard shortcut Ctrl+0 (zero) (Windows) or
Command+0 (zer
o) (Mac OS), to t the document to the screen.
5 You can also display artwork at the size it will print by choosing View > Print Size.
Using the Zoom tool
When you use the Zoom tool ( ), each click increases the view size to the next preset
percentage, and centers the display of the image around the location in the image that you
clicked on. By holding the Alt (Windows) or Option (Mac OS) key down (with the Zoom tool
selected), you can zoom out of an image, decreasing the percentage and making the image view
smaller. The magnifying glass cursor is empty when the image has reached either its maximum
magni cation level of 3200 percent or the minimum size of one pixel.
1 Choose View > Fit on Screen.
Fitting the image on the screen.
2 Select the Zoom tool, and click four times on the dandelion to zoom in. You can also use
key modi ers to change the behavior of the Zoom tool.
3 Press Alt (Windows) or Option (Mac OS) while clicking with the Zoom tool to
zoom out.
You can accurately zoom into the exact region of an image by clicking and
dragging a marquee around that area in your image.
PSCS4.indb 31PSCS4.indb 31 9/17/2008 2:42:10 PM9/17/2008 2:42:10 PM
32
Navigating the image area
Adobe Photoshop CS4 Digital Classroom
2
4 With the Zoom tool still selected, hold down the mouse and click and drag from the top
left of the dandelion to the bottom right of the dandelion. You are creating a rectangular
marquee selection over the dandelion. Once you release the mouse, the area that was
included in the marquee is now enlarged to ll the document window.
Dragging a marquee over the dandelion.
5 Double-click the Zoom tool in the Tools panel to return to a 100 percent view.
Because the Zoom tool is used so often, it would be tiresome to continually have to
change from the Zoom tool back to the tool you were using. Read on to see how you
can activate the Zoom tool at any time without deselecting your current tool.
6 Select the Move tool (
) at the very top of the Tools panel.
7 Hold down Ctrl+spacebar (Windows) or Command+spacebar (Mac OS) Note that on
the Mac OS y
ou must hold down spacebar before the Command key, otherwise you
trigger Spotlight; the Move tool is temporarily converted into the Zoom In tool. While
still holding down Ctrl/Command+spacebar, click and drag over the dandelion again,
then release. Note that although you have changed the zoom level, the Move tool is
still active.
You can zoom out by holding down Alt+spacebar (Windows) or Option+spacebar (Mac OS).
8 Choose View > Fit on Screen.
PSCS4.indb 32PSCS4.indb 32 9/17/2008 2:42:11 PM9/17/2008 2:42:11 PM
Navigating the image area
33Lesson 2, Getting to Know the Workspace
2
Using the Hand tool
The Hand tool allows you to move or pan the document. It is a lot like pushing a piece of
paper around on your desk.
1 Select the Zoom tool ( ), and click and drag on an area surrounding the dandelion.
2 Select the Hand tool (
), then click and drag to the right to push the picture to
the right. Notice that
when the Hand tool is active, four view buttons appear in the
Options bar (at the top of the work area) that allow you to change your current view to
Actual Pixels, Fit Screen, Fill Screen, and Print Size. You can also select the Hand tool
from the Application bar. Mac Users must choose Window > Application Bar to see the
Application bar.
View options are available in the Options panel.
3 Select the Zoom tool and hold the spacebar. Notice that the cursor turns into the Hand
tool. Click and drag left to view the dandelion again. By holding down the spacebar, you
can access the Hand tool without deselecting the current tool.
4 Double-click the Hand tool in the Tools panel to t the entir
e image on your screen.
This is the same as using Ctrl+0 (zero) (Windows) or Command+0 (zero) (Mac OS).
Using the Rotate View tool
The Rotate View tool allows you to rotate the image view of a document to match the way
you would typically draw or paint on paper or canvas. This does not change the orientation of
a document, only the view. Note that this feature only works with OpenGL enabled document
windows (see note on page 34.)
1 Click and hold on the Hand tool to display the hidden Rotate View tool.
2 Drag to the Rotate View tool and release. The Rotate View tool is now the active tool.
3 Click on the gray area just outside the boundary of the open image and drag to the
left.
As you are dragging, you see an image of a compass displayed in the center of the
image, indicating the orientation of the image. The image is now rotated in a counter-
clockwise direction.
4 Click and drag again, but this time hold down the Shift key while dragging. The image
is no
w rotated in 15-degree increments, giving you precise control of the image rotation
The image view can also be adjusted in the Options bar by typing in a numeric value or
by dragging the line in the Rotation icon.
PSCS4.indb 33PSCS4.indb 33 9/17/2008 2:42:13 PM9/17/2008 2:42:13 PM
34
Navigating the image area
Adobe Photoshop CS4 Digital Classroom
2
5 Double-click on the Rotate View tool or click the Reset View button in the Options bar
to return the view to normal.
Dragging to rotate the view of the image.
The ability to use the Rotate View tool is dependent upon the capabilities of your computer. The
Rotate View tool relies on technology called OpenGL, which is used in high-performance graphics
cards. When you install Photoshop, it looks to see if your computer’s graphics card supports
OpenGL and turns on the preference in Photoshop that enables OpenGL performance. If your
computer’s graphics card doesn’t support OpenGL, then you will not be able to use the Rotation
tool. In addition, you must be running Windows Vista or Mac OS X 10.4.11 or later to use the
OpenGL features.
PSCS4.indb 34PSCS4.indb 34 9/17/2008 2:42:14 PM9/17/2008 2:42:14 PM
Navigating the image area
35Lesson 2, Getting to Know the Workspace
2
NAVIGATION SHORTCUTS WINDOWS MAC OS
Zoom In Ctrl+plus sign
Ctrl+spacebar
Command+plus sign
Command+spacebar
Zoom Out Ctrl+minus sign
Alt+spacebar
Command+minus sign
Option+spacebar
Turn Zoom tool into
Zoom Out tool
Alt Option
Fit on Screen Ctrl+0 (zero) or double-click
the Hand tool
Command+0 (zero) or
double-click the Hand tool
Hand tool (except when Type tool
is selected)
Press spacebar Press spacebar
Tabbed windows
In Photoshop CS4 you now have control over how your windows appear in the workspace.
You can work with oating image windows, or choose to tab your windows across the top of
the workspace. If you are working on the Windows OS tabbed windows are the default. In this
section you nd out how to use the new tabbed workspace.
1. If you are a Macintosh user and want to experiment with tabbed windows choose
Window > Application Frame.
2 Click the Launch Bridge button (
) to switch to Adobe Bridge.
3 Double-click the ps0202.psd le to open the image in Photoshop
. The image is displayed
as a separate tab within Photoshop, allowing you to click on the tab to switch between
active images.
Multiple open images appear as tabs at the top of the screen.
4 Click on the ps0202.psd tab to make it active; then click and drag the tab away from its
tabbed position and release the mouse button. The image window is now oating.
PSCS4.indb 35PSCS4.indb 35 9/17/2008 2:42:16 PM9/17/2008 2:42:16 PM
36
Navigating the image area
Adobe Photoshop CS4 Digital Classroom
2
5 Click the title bar of the oating window and drag upwards until your cursor is next to
the tab of the other image. When you see a blue bar appear, release the mouse button.
The image is now back to a tabbed window. Keep in mind that you can stop a window
from tabbing accidently by holding down the Ctrl (Windows) or Command (Mac OS)
key while dragging the oating window.
If you are a Windows user would prefer not to take advantage of the tabbed window
feature, you can choose Edit > Preferences > Interface. In the Panels & Documents
section uncheck Open Documents as Tabs and press OK.
To quickly move all oating windows back to tabbed windows, choose Window > Arrange >
Consolidate All to Tabs.
Maximizing productivity with screen modes
Now that you can zoom in and out of your document, as well as reposition it in your image
window, it’s time to learn how to take advantage of screen modes. You have a choice of three
screen modes in which to work. Most users start and stay in the default—standard screen
mode—until they accidentally end up in another. Screen modes control how much space your
current image occupies on your screen, and whether you can see other Photoshop documents
as well. The Standard Screen mode is the default screen mode when you open Photoshop for
the rst time. It displays an image on a neutral gray background for easy and accurate viewing
of color without distractions, and also provides a exible work area for dealing with panels.
1 Click on the tab of the ps0201_work.psd image to make that image active.
2 Position your cursor on the vertical line that runs down the left side of the panel
docking ar
ea. Click on the line and drag to the left. Notice that this not only expands the
panel docking area, but it also dynamically changes the image window when you release
the mouse. The document window is resized when dock widths change.
The image area dynamically changes as
the panel docking area is resized.
3 Press the Tab key; the Tools panel and other panels disappear, creating much more
workspace. Press the Tab key again to bring the Tools panel and other panels back.
PSCS4.indb 36PSCS4.indb 36 9/17/2008 2:42:17 PM9/17/2008 2:42:17 PM
Navigating the image area
37Lesson 2, Getting to Know the Workspace
2
4 Press Shift+Tab to hide the panel docking area while keeping the rest of the panels
visible. Press Shift+Tab to bring the hidden panels back. Both the Tools panel and the
panel docking area should now be visible.
As you position your cursor over various tools, you see a letter to the right of the tool name in the
tooltip. This letter is the keyboard shortcut that you can use to access that tool. You could, in fact,
work with the Tools panel closed and still have access to all the tools.
You will hide the panels once more so that you can take advantage of a hidden feature in
Photoshop CS4.
Press the Tab key to hide the panels. Then position your cursor over the thin gray strip
where the Tools panel had been, and pause. The Tools panel reappears. Note that the
Tools panel appears only while your cursor is in the Tools panel area, and it disappears if
you move your cursor out of that area. Try this with the panel docking area to the right
of the screen, and watch as that also appears and disappears as your cursor moves over it.
By changing the screen modes, you can locate over-extended anchor points and select
more accurately up to the edge of your image. Changing modes can also help you to
present your image to clients in a clean workspace.
5 Press the Tab key again to display all the panels.
6 Press F to cycle to the next scr
een mode, which is Full Screen Mode With Menu Bar.
This view surrounds the image out to the edge of the work area with a neutral gray
(even behind the docking area) and displays only one image at a time, without tabs and
centered within the work area. You can access additional open images by choosing the
image name from the bottom of the Window menu.
You can also change your screen mode by clicking and holding on the Change Screen
Mode button in the Application bar and selecting Full Screen Mode With Menu Bar.
The Change Screen Mode button
accessed in the Application bar.
PSCS4.indb 37PSCS4.indb 37 9/17/2008 2:42:18 PM9/17/2008 2:42:18 PM
38
Navigating the image area
Adobe Photoshop CS4 Digital Classroom
2
7 Notice that the gray background area (pasteboard) now extends to ll your entire screen,
and your image is centered within that area. One of the bene ts of working in this mode
is that it provides more area when working on images.
The Full Screen mode with Menu bar.
PSCS4.indb 38PSCS4.indb 38 9/17/2008 2:42:19 PM9/17/2008 2:42:19 PM
Using panels
39Lesson 2, Getting to Know the Workspace
2
8 Press F on the keyboard again to see the last screen mode, Full Screen Mode. You may
receive a warning dialog box in this screen mode, indicating that you can exit the screen
mode by pressing the F or Esc key because all the interface elements are hidden.
Full Screen mode.
This is Full Screen mode. A favorite with multimedia folks, it allows you to show others
your document full-screen with no distracting screen elements. All menus and panels
are hidden automatically in this mode; however, they are still accessible by hovering the
cursor over the area where the panels normally reside. The panels temporarily reappear
for easy access. If you’d like to see the panels while in this mode, simply press the Tab key
to display and hide them.
9 Press the F k
ey once to cycle back into Standard Screen mode, or click and hold on the
Screen Mode button in the Application bar at the top of your screen and select Standard
Screen Mode. Stay in this mode throughout this lesson.
PSCS4.indb 39PSCS4.indb 39 9/17/2008 2:42:20 PM9/17/2008 2:42:20 PM
40
Using panels
Adobe Photoshop CS4 Digital Classroom
2
Using panels
Much of the functionality in Photoshop resides in the panels, so you will want to know how
to navigate them and nd the ones you need quickly and easily. In Photoshop CS4, the panel
docking area has become streamlined with added functionality. In this lesson, you will learn
how to resize, expand, and convert panels to icons and then back to panels again. You will then
nd out how to save your favorite workspaces so that you don’t have to set them up every time
you work on a new project.
The default panel locations.
PSCS4.indb 40PSCS4.indb 40 9/17/2008 2:42:21 PM9/17/2008 2:42:21 PM
Using panels
41Lesson 2, Getting to Know the Workspace
2
Putting the new panel system to use
To maximize your workspace, convert your panels to icons. You can get an idea of what the
complete icon view for panels looks like by switching to the Basic workspace.
1 Click and hold down on the Workspace button on the right side of the Application bar
and select Basic. A warning message appears, verifying that you want to change your
menu and keyboard shortcut sets. Select Yes. Notice that all the panels are now converted
to small icons. Move your cursor over the icons to see tooltips indicating the names of
the panels associated with each icon.
Select the Basic workspace.
2 Click on the Navigator panel icon ( ); the Navigator panel opens.
The Navigator panel shows the entire image. A red box (called the proxy view) in the
image ar
ea of the Navigator panel identi es the area currently being viewed in the active
window. You can change the proxy view by clicking and dragging the red box to other
locations in the Navigator panel. The view percentage—how much of the whole image
you’re currently able to see—is shown in the lower-left corner of the Navigator panel. To
zoom in or out, you can either type in a new percentage or use the slider at the bottom
of the panel.
Move the proxy view (red box) to
navigate your image.
PSCS4.indb 41PSCS4.indb 41 9/17/2008 2:42:22 PM9/17/2008 2:42:22 PM
42
Using panels
Adobe Photoshop CS4 Digital Classroom
2
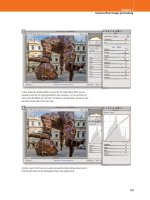
3 In the Navigator panel, drag the bottom slider to the right to approximately 200 percent
to zoom into the image. The image on-screen updates once you release the mouse.
Use the slider to adjust the zoom level.
The box to the left of the slider automatically updates the percentage of zoom.
4 Move your cursor over the image in the Navigator panel. The cursor becomes a
pointer (
). Click anywhere over the preview image in the Navigator panel to move the
area that is being previewed.
5 Now, move the cursor over the proxy view (red rectangle). Your pointer turns into the
Hand tool (
). Drag the proxy view to the top left. This allows you to quickly scroll to
that part of the image. Next, you will control your zoom with a key modi er.
Reposition the proxy view.
6 Hold Ctrl (Windows) or Command (Mac OS) while hovering with your cursor over
the Navigator panel; your cursor becomes the Zoom tool (
). Click and drag over the
part of the image that contains the dandelion. When you release, the exact location of the
region you created is enlarged to the maximum level.
Use Ctrl/Command to zoom.
7 Press Ctrl+0 (Windows) or Command+0 (Mac OS) to t the image to the screen.
PSCS4.indb 42PSCS4.indb 42 9/17/2008 2:42:23 PM9/17/2008 2:42:23 PM
Using panels
43Lesson 2, Getting to Know the Workspace
2
Choosing other panels
Now you will focus on a di erent panel, the Actions panel. To move from the Navigator panel
to the Actions panel, select the Actions panel icon (
). The Navigator panel changes back to an
icon as the Actions panel appears. Actions are very useful tools; Photoshop comes with many
prede ned actions installed that can help you perform common tasks. You can use these actions
as is, customize them to meet your needs, or create new actions. Actions are stored in sets to
help you stay organized.
1 Select the arrow to the left of Default Actions to expand the folder, then use the scroll
bar to locate the action named Sepia Toning (layer).
2 Select the Sepia Toning (layer) action by clicking on it, and then press the Play Selection
b
utton (
) at the bottom of the Actions panel. The image is immediately converted to a
sepia-toned image.
3 Now, select the History panel icon (
). The Actions panel disappears and the History
panel appears. Select the rst state in the History panel that has the lename to its right;
this is the state of the image when it was initially opened. The image le is reverted
back to the original image data. You can read more about the History panel in Lesson 6,
“Painting and Retouching.”
Expanding your panels
If you do not like deciphering what the panel icons represent, you can expand your panels. You
can do this automatically with a precon gured workspace, or you can choose to expand only
the panels you want to see.
1 Click and hold on the Workspace button on the Application bar and select Essentials. The
Essentials workspace is the default workspace in Photoshop and provides a workspace
with all the panels expanded.
2 Collapse panels to button view by clicking on the dark gray bar (title bar) at the top of
the panel docking ar
ea. Click on the dark gray bar again to expand them.
Collapse the panel by clicking on the title bar.
In addition, you can collapse speci c panel groups by clicking on the gray bar above each
panel group to collapse and expand them.
PSCS4.indb 43PSCS4.indb 43 9/17/2008 2:42:28 PM9/17/2008 2:42:28 PM
44
Using panels
Adobe Photoshop CS4 Digital Classroom
2
Customizing your panels
A panel group is made up of two or more panels that are stacked on top of each other. To view
the other panels in a group, select the name on the tab of the panel. You will now learn how to
organize your panels the way that you want.
1 Select the tab that reads Swatches; the Swatches tab is brought forward.
2 Now, select the Color tab to return the Color panel to the front of the panel group.
3 Click on the tab of the Color panel, and drag it away
from the panel group and into
the image area. The panel looks slightly transparent as you drag it away from the group.
Release it—you have just removed a panel from a panel group and the docking area.
Rearranging panels can help you keep frequently used panels together in one area.
The Color panel as it is dragged away
from a panel group.
4 Click the title bar area at the top of the Swatches panel and drag it over the Color panel.
It appears slightly transparent as you drag. As soon as you see an outline around the Color
panel, release the mouse. You have now made a panel group.
The Actions panel dragged over the History panel.
You’ll now save a custom workspace. Saving a workspace is a good idea if you have
production processes that often use the same panels. Saving workspaces is also helpful if
you are in a situation where multiple users are sharing Photoshop on one computer.
5 Click on the workspace button at the far-right side of the Application bar and choose
Sa
ve Workspace.
PSCS4.indb 44PSCS4.indb 44 9/17/2008 2:42:30 PM9/17/2008 2:42:30 PM