Dot Net Nuke for Dummies phần 7 pdf
Bạn đang xem bản rút gọn của tài liệu. Xem và tải ngay bản đầy đủ của tài liệu tại đây (932.12 KB, 41 trang )
Here’s how to change the page layout:
1. Select Settings from the module menu.
This takes you to the Module Settings page of this module.
2. Click the Maximize button to open the Repository Settings section.
3. Select an option from the Default Sort drop-down box.
Choose the field that you want listings to be sorted by when displayed
in the Repository. Choose from Date, Downloads, User Rating, Title, or
Author Name.
4. Change the number in the Enter the Number Of Items Per Page text
box.
This setting controls the number of items displayed on each page. Next
and Back links are displayed above and below listings to enable people
to access other listings. You might like to change the number of items
per page according to the Skin selected. For example, if you are using
the FileList skin, each listing is only one line; therefore, it would be rea-
sonable to display up to 20 items per page.
5. Select an option from the Image Set To Use for Ratings drop-down box.
Choose Default to display a five-star rating scale or Dashes to display a
ten-bar rating scale.
6. Click the Update
link.
You are now returned to the Repository and your changes are applied.
Working with Repository Files
After you have set up the Repository, you can begin adding files. File upload
is available to members of any security roles selected as Upload Roles under
Repository Settings. See “Setting the unique Repository security roles” to find
out how to set File Upload roles. Note that the fields to be completed vary,
depending on the skin.
Here is how to upload a file and add a new listing for the Default skin:
1. Click the Upload button.
This takes you to the Upload a File page, as shown in Figure 8-5.
2. Enter a title into the Title text box.
The title will be the name of the listing.
223
Chapter 8: Collaborating and Selling with DNN
14_798439 ch08.qxp 3/22/07 9:17 PM Page 223
3. Click the Browse button beside File and select the file from your
computer.
This is the download file associated with this item.
4. Click the Browse button beside Image and select an image.
This is the image is displayed for this listing. If you don’t choose an
image, the default image is displayed instead; see “The fastest setup this
side of Texas” for more information.
5. Select one or more Categories.
Select each category this listing should be listed under. You must select
the All category if you want it to be listed under All.
6. Deselect the Show My Email Address check box beside the E-Mail
Address fields to hide your e-mail address.
Figure 8-5:
The
Repository
file upload
page for
the Default
skin. The
fields vary,
depending
on the skin
used.
224
Part III: Jumping to Light Speed with DotNetNuke
14_798439 ch08.qxp 3/22/07 9:17 PM Page 224
This option allows the uploader to request that his or her e-mail address
not be displayed. The Your Name and Your EMail Address fields are
prefilled with your details. When All Users can upload files and the user
isn’t logged in to the Web Site, these fields are blank and will need to be
completed.
7. Enter a description into the RTE Description field.
The description is displayed on the listing for this skin.
8. Click the Upload button.
As an Administrator, you are automatically a member of the Moderation
role, so the listing is added to the Repository.
If the uploader isn’t a member of the Moderation role, the item is added to
moderation queue. See “Setting the unique Repository security roles” to find
out how to set Moderation roles. After the upload is approved the uploader is
e-mailed a message confirming that the item is approved. See “Moderating
new items” to find out how to moderate unapproved items.
If you are having problems uploading a file, check the maximum size of file
uploads and verify with your host which file types can be uploaded.
Editing and deleting items
Administrators can edit any item uploaded to the Repository. Other users
who are authorized to upload items can edit only the items that they
uploaded and can’t edit other people’s uploads.
Here’s how to edit or delete an item:
To access the page where you can edit or delete a listing, click on the Edit
button located in the top left corner of any listing.
1. Locate the item to be edited or deleted.
Use Categories or search if required.
2. Click the Edit button beside the item.
This displays the Edit Item page for this item.
3. Edit the item if required and click the Upload button; alternatively,
click the Delete button and then OK to delete the item.
225
Chapter 8: Collaborating and Selling with DNN
14_798439 ch08.qxp 3/22/07 9:17 PM Page 225
Downloading a file
Files can be downloaded by members of any security roles selected in the
Download Roles setting. See “Setting the unique Repository security roles” to
find out how to set File Download roles.
To download a file, click the Download button or link for that item.
Searching the Repository
No setup is required for the search tool, which is available to all users with
View Module permissions.
To search for a listing, enter all or part of the title of the listing, a word in the
description, the author’s name or the author’s e-mail address. For example,
searching on the word Richard also returns results for the words Richards and
Richardson.
Moderating new items
Moderation is an approval process for new items. Moderation is available to
any security roles selected in the Moderation Roles setting. See “Setting the
unique Repository security roles” to find out how to set Moderation roles.
Here’s how to moderate an upload:
1. Click the Moderate button.
The number of uploads awaiting moderation is displayed on the
Moderate button.
2. Click the V
iew File link to view a file to be moderated.
Open the file to view it. If the file is an image, you can either skip this
step or click on the thumbnail of the image to view a larger image.
3. Click either the Appr
ove or the Reject Link.
If you choose to approve the item, it is added to the Repository and a
confirmation notice is sent to the author. If you choose to reject the
item, a text box is displayed that enables you to compose and send a
rejection note to the author.
226
Part III: Jumping to Light Speed with DotNetNuke
14_798439 ch08.qxp 3/22/07 9:17 PM Page 226
Adding a comment to an item
Many Repository skins enable people to add comments to items and read
other people’s comments. See “Setting the unique Repository security roles”
to find out how to set the comment roles.
Here’s how to add a comment to an item:
1. Click the Comments (0)
link.
In the default skin, this is located in the bottom-right corner of each list-
ing. This displays any existing comments and provides a text box to add
your comments.
2. Enter a comment into the Your Comment text box and click the Post
Your Comments button.
Your comment is added to the item and can be viewed by clicking on the
Comments
link again. Note that the number of comments for that item
increases accordingly. For example, the link now reads Comments (1)
.
Viewing, editing, and deleting comments
Administrators can edit or delete any comment; however, other users can
only edit or delete their own comments.
Here’s how to view, edit, or delete a comment:
1. Click the Comments (1)
link.
You can now view any existing comments.
2. Click the Edit button beside a comment to edit or delete it.
This displays the comment for editing or deleting.
3. Edit the comment and click Update to save your changes or Delete to
delete the comment.
You are now returned to the Repository.
Rating files
Most Repository skins enable people to add ratings to items and see the aver-
age rating. See “Setting the unique Repository security roles” to find out how
to set the rating roles.
227
Chapter 8: Collaborating and Selling with DNN
14_798439 ch08.qxp 3/22/07 9:17 PM Page 227
Here’s how to add a rating to an item:
1. Click on the stars or dashes located between Rating and Comments.
This displays the number of votes cast for this item and the average
rating. You are also provided with a series of radio buttons to add your
rating.
2. Select a radio button to rate the item and click the Post Your Rating
button.
Your rating is added to the running total and the rating image changes to
display the new total. Ratings cannot be edited; however, you can add
more than one rating per item to change the results.
See “Changing the page layout” earlier in this chapter to find out how to
change the five-star rating scale to a ten-bar rating scale.
Displaying quick links by
using the dashboard
The Repository module has a companion module called the Repository
Dashboard module. This module can display different information relating to
the Repository module such as a list of categories, the latest uploads, the top
downloads, and the top rated item.
Here’s how to set up the Repository Dashboard module:
1. Add the Repository Dashboard module to a page.
You can add the dashboard to any page on your Web site.
2. Select Settings from the module menu.
This displays the Module Settings page of this module.
3. Select the page/title of a Repository module from the Select
Repository drop-down box.
This setting lets you select which Repository module on your Web site
you want this dashboard to be associated with.
4. Choose a radio button to set the information to be displayed from the
Dashboard Module field. Your options are
• Categories (single-column): Display the categories in a single
column of links
• Categories (multi-column): Display the categories in multiple
columns of links
228
Part III: Jumping to Light Speed with DotNetNuke
14_798439 ch08.qxp 3/22/07 9:17 PM Page 228
• Latest Uploads: Displays links to the latest uploads
• Top Downloads: Displays links to the most frequently downloaded
items
• Top Rated: Display links to items with the highest ratings
5. Enter a number to set the maximum number of links for non-category
modes into the Indicate the Number of Items to Be Displayed text box.
For example, enter 10 to display ten links. Category modes will ignore
any value entered here.
6. Click the Update
link.
This returns you to the page, and the dashboard now displays your
selection. You can add multiple dashboards for each repository.
Selling Stuff with a Store
One of the greatest benefits of having a Web site is the ability to create an
online marketplace where people can browse and buy your wares 24 hours a
day. Online stores are cheap to set up, cheap to run, and they give you a
global presence that would be difficult to achieve with a physical shop at
your local mall.
The DNN Store consists of five modules that work together to create a full
online shopping experience. Your Web site visitors can browse your prod-
ucts, add them to a virtual shopping cart, and purchase them by using a
secure online payment gateway. Administrators can manage products,
manage product reviews, and manage customer orders as well as provide
authorized roles with the ability to also manage products. In the upcoming
section, we describe each of the five Store modules.
The Store Menu (Categories) module
The Store Menu module (which is titled Categories after you add it to a page,
so that’s what we call it in this chapter) enables customers to browse prod-
ucts by selecting a category. This module works with the Catalog module,
which displays the description of the selected category and its products.
Categories can be managed by using either this module or the Store Admin
module. Administrators, and other authorized roles, can add, edit, archive,
and delete categories by using the Categories module menu. See Figure 8-6 to
check out the Categories module in action.
229
Chapter 8: Collaborating and Selling with DNN
14_798439 ch08.qxp 3/22/07 9:17 PM Page 229
The Store Catalog module
The Store Catalog module (which is titled Catalog after you add it to a page,
so that’s what we call it in this chapter) displays results from the Categories
module. When a category is selected, the Catalog module displays the cate-
gory description and a summary listing of all products within the selected
category. Each listing includes a linked product title that goes to a detailed
product description, and an Add to Car
t link. Look at Figure 8-6 to see the
Catalog module in action.
The Store Mini Cart module
The Store Mini Cart module displays a brief listing of any products in a cus-
tomer’s cart. This module provides customers with quick way of seeing how
many products they have added to their cart and the total cost. Customers
can adjust product quantities or delete items from their cart. A View Cart
Details link takes customers to the Store Account module, which provides a
detailed view of their shopping cart. See Figure 8-6 to see the Store Mini Cart
module in action.
Figure 8-6:
The Store
Menu,
Catalog, and
Mini Cart
work
together to
create a
shopping
page.
230
Part III: Jumping to Light Speed with DotNetNuke
14_798439 ch08.qxp 3/22/07 9:17 PM Page 230
The Store Account module
The Store Account module, shown in Figure 8-7, provides each customer
with a place to manage their shopping account. The module consists of three
screens: Customer Cart, Profile, and Order History. Customer Cart is the
default screen, which enables customers to manage any products in their
shopping cart. This screen includes a Checkout
link, enabling the customer
to proceed to the Checkout to complete their order. The Profile screen lets
customers add and manage their shipping and billing addresses. The Order
History screen enables customers to view details of their previous orders.
The Store Admin module
The Store Admin module enables Administrators to configure and manage
all store settings. The module has five administrative sections: Store Info,
Categories, Product, Customers, and Reviews. The Store Info section is
required to configure the store and includes setup of your preferred payment
gateway. The Store Info section is shown in Figure 8-8. The Categories and
Products sections manages adding, editing, archiving, and deletion of cate-
gories and products. The Customer section displays a list of existing store
customers and a summary of their previous orders. The Reviews section
manages the approval, editing, and deletion of customer reviews.
Figure 8-7:
The Store
Account
module
shows
customers
what’s in
their cart. It
also enables
customers
to manage
their
addresses
and view
previous
orders.
231
Chapter 8: Collaborating and Selling with DNN
14_798439 ch08.qxp 3/22/07 9:17 PM Page 231
Laying Out Your Store
The Store modules must be arranged on different pages and have different
security roles set to create a shopping experience. As is typical with DNN,
you have full control over which security roles can view pages and modules.
The following example shows how to set up a store that lets all visitors
browse and select products before registering or logging in to their account.
Creating the Store page
Here’s how to set up the page where customers come to browse and buy:
1. Add a page titled Store.
At Permissions for View Page, select All Users.
2. Add the Store Menu (Categories) module to the Store page.
Use all the default options when adding the module. This module looks
good in either the left or right pane.
3. Add the Store Catalog (Catalog) module to the Store page.
Use all the default options when adding the module.
Figure 8-8:
The Store
Admin
page lets
Administrat-
ors set up
the store
and manage
categories,
products,
orders, and
reviews.
232
Part III: Jumping to Light Speed with DotNetNuke
14_798439 ch08.qxp 3/22/07 9:17 PM Page 232
4. Add the Store Mini Cart module to the Store page.
Use all the default options when adding the module. This module looks
good in either the left or right pane or below the Catalog.
The setup of the Store page is now complete. Refer to Figure 8-8 for an
example of the Store page with categories and products.
Creating the Store Account page
Here’s how to set up a page where customers can review their current order,
manage their profile, and view their order history:
1. Add a page titled Store Account.
At Permissions for View Page, select All Users. This enables visitors who
have been browsing and adding items to their Mini Cart to view more
details about what’s in their cart before they need to create an account.
2. Add the Store Account module to the Store Account page.
Use all the default options when adding the module. The setup of your
Store Account page is now complete.
Creating the Store Admin page
Here’s how to set up the Store Administration module:
1. Add a page titled Store Admin.
This is an administration-only page, so use the default page Permissions
settings.
2. Add the Store Admin module to the Store Admin page.
Use all the default options when adding the module. Your Store Admin
page is now ready to be configured. See “Configuring the Store Admin
Module” later in this chapter for details.
Choosing a Payment Provider
Before you can begin selling your products online, you need a method of
receiving payment for your goods. DNN Store has been integrated with two
well-known payment processing companies: PayPal and AuthorizeNet. Both
companies can provide you with an account that enables your store to
accept credit card payments and have these funds paid into an account.
233
Chapter 8: Collaborating and Selling with DNN
14_798439 ch08.qxp 3/22/07 9:17 PM Page 233
Both of these companies provide an immediate and low-cost solution to
processing online transactions. Visit the Web sites for both companies
(at www.paypay.com and www.authorizenet.com) to see which company
best suits your requirements. After you have made your choice, sign up for
an account with your preferred company. Your account details are required
before you can complete your Store Admin configuration.
AuthorizeNet provides a free test account service, which enables you to test
out the full customer experience of buying from your store. I suggest you
create a test account and use these details for the Gateway Provider setting
until you are ready to go live with your Store.
Configuring the Store Admin Module
To configure the Store Admin module, you first have to complete the Store
Info page:
1. Go to the Store Admin page.
The Store Info page of the Store Admin module is displayed.
2. Complete the Store Name, Description, and Keywords fields.
These fields are used to identify your store in search engines.
3. Enter an e-mail address for the store into the Store Email text box.
This field is used as the e-mail address used by the store.
4. Select Store Account as the Shopping Cart Page.
This field must be set to go to the page where the Store Account module
is added.
5. Select the Update
link.
The Store setup is almost complete. The final step is to select and set
your payment gateway.
Setting the payment gateway as PayPal
You must have a current PayPal account to complete this step. Make sure
your account details are handy.
234
Part III: Jumping to Light Speed with DotNetNuke
14_798439 ch08.qxp 3/22/07 9:17 PM Page 234
Here is how to complete the payment gateway settings for PayPal:
1. Go to the Store Admin page.
The Store Info page is displayed.
2. Select PayPal Provider from the Gateway drop-down box.
This displays the required PayPal fields.
3. Enter the e-mail address in the PayPal ID field.
This is the e-mail address you used when you created your PayPal
account.
4. Enter your store name into the Cart Name text box.
This is the store name you entered in the first field on this page.
5. Leave the Button URL field as it is.
This field contains the URL to the PayPal Buy Now button. You can
check out the button by pasting the address into a new browser. If you
want to use your own button, enter the URL in this field.
6. Leave the Currency Type as USD.
This sets the currency of your store as U.S. dollars (USD). Although
PayPal accepts money of different currencies, your Store will receive
and process its funds as U.S. dollars.
7. Click the Update
link.
Your store is now ready to receive online payments.
Setting the payment gateway
as AuthorizeNet
You must have a current AuthorizeNet account to complete this step. Make
sure your account details are handy.
Here is how to complete the payment gateway settings for AuthorizeNet:
1. Go to the Store Admin page.
The Store Info page is displayed.
2. Select AuthorizeNetProvider from the Gateway drop-down box.
This displays the required AuthorizeNet fields.
235
Chapter 8: Collaborating and Selling with DNN
14_798439 ch08.qxp 3/22/07 9:17 PM Page 235
3. Enter the Transaction POST URL into the Gateway URL text box.
This URL is supplied by AuthorizeNet when you sign up.
4. Enter 3.1 in the Version text box.
This is the latest version of AuthorizeNet.
5. Enter your Login ID in the Username text box.
AuthorizeNet supplies the Login ID when you sign up.
6. Enter your password in the Password text box.
AuthorizeNet supplies a password when you sign up.
7. Select Auth and Capture in the Capture Type drop-down box.
This sets the transaction type for the Store. Authorize and Capture
(Auth and Capture) sends a request to authorize and receive the funds
for a purchase.
The second option, Authorization Only (Auth Only), sends a request
to authorize funds, but doesn’t put the money into your account.
AuthorizeNet provides this as an alternative method so that you can
upload and process a large batch of mail order/telephone order (MOTO)
sales. See Virtual Terminal/Batch Upload on the AuthorizeNet Web site
(www.authorizenet.com) if you are interested in finding out more
about this.
8. Select the Test Mode check box if you want to test receiving payments
before launching the store to the pubic.
AuthorizeNet enables you to test your Store before you begin to accept
real transactions. You will need to deselect this option when you are
ready to go live.
9. Click the Update
link.
Your store is now configured to receive online payments.
You must go back and deselect the Test Mode check box that you selected in
Step 8 and then update the page before you can start accepting real transac-
tions from customers.
Adding tax rates for each state
The store enables you to add a different taxation rate for each U.S. state. The
tax rate is added to the Item Price of each product and is displayed to the
customer when they go to their cart. The amount of taxation paid is also
displayed on the confirmation e-mail sent to the customer when they
complete an order.
236
Part III: Jumping to Light Speed with DotNetNuke
14_798439 ch08.qxp 3/22/07 9:17 PM Page 236
Here’s how to set your taxation rates:
1. Go to the Store Admin page.
The Store Info page is displayed.
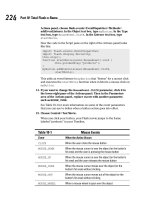
2. Click the Maximize button beside the Tax Administration section.
This displays an abbreviation of each tax code and the rate applied for
that state. For example, the first box is AL for Alabama. The box below it
displays the current tax rate for Alabama. The default value for each
state is zero (0.00).
3. Edit the tax rate for each state as required.
Tax rates are displayed as a percentage of 1.00, where 1.00 equals 100%
tax. For example, to set the tax rate for Alabama to 10%, change the
value in the text box below the AL text box to 0.10. Values of 1 or more
are not accepted.
4. Click the Update T
ax Rates link.
The tax rates are now updated.
Adding a shipping fee
The Store provides you with an option to charge a shipping fee that is a per-
centage of the total order. Here is how to add your shipping fee:
237
Chapter 8: Collaborating and Selling with DNN
Squishing bugs
At the time of writing, the Store Admin module
contained a minor bug. It won’t cause any real
problems, but it is a bit frustrating. The bug
causes the Shipping Fee value to incorrectly be
saved as 0, rather than in the required format
of 0.00.
This bug means that you have to readd the zeros
to the end of the shipping fee each time you
click the Categories
, Products, Customers, or
Review
links on the Store Info page, or update
the tax rates. To reduce the need to do this, you
may prefer to use the Category and Catalog
module menus to manage these items.
Here’s how to work around this bug:
1. Whenever you see a warning box that says
“The shipping fee must be in the format
#.##”, click OK on the warning box.
2. Click the Maximize button beside the
Shipping Administration section.
This displays the shipping fee for an order.
3. Enter 0.00 into the Shipping Fee text box.
You can now continue with the task.
14_798439 ch08.qxp 3/22/07 9:17 PM Page 237
1. Go to the Store Admin page.
The Store Info page is displayed.
2. Click the Maximize button beside the Shipping Administration section.
This displays the current shipping fee. The default setting is zero (0.00).
3. Enter the shipping fee.
Shipping fees are displayed as a percentage of 1.00, where 1.00 equals a
100% shipping fee. For example, to add a shipping fee of 10%, change the
value to 0.10. Values greater than 1 are not accepted.
4. Click the Update Shipping Fee
link.
The shipping fee is now updated.
Adding Products to the Store
Administrators handle product management by using the Store Admin
module.
You can enable roles other than Administrators to add products by giving
them Edit Module permissions to the Catalog module. This lets them manage
products without being able to change store settings, or manage reviews and
customer accounts. Similarly, you can provide Edit Module permissions on
the Categories module to enable roles to manage product categories.
Creating and managing categories
Here’s how to add a category:
1. Go to the Store Admin page.
This displays the Store Info page of the Store Admin module.
2. Click the Categories
link.
It takes you to the Categories management screen, as shown in Fig-
ure 8-9. Any existing categories are listed here.
3. Click the Add Categor
y link.
This takes you to the Add Category screen.
4. Enter a category name into the Category Name text box.
The category name is displayed in the category module to customers to
help them browse through your products.
238
Part III: Jumping to Light Speed with DotNetNuke
14_798439 ch08.qxp 3/22/07 9:17 PM Page 238
5. Enter a short description into the Description text box.
The category description is not displayed to customers and is for your
records only.
6. Leave the Archived check box deselected.
7. Enter category details of the category into the Message text box.
When a customer clicks on a category to view its products, this message
is displayed above the products in the Catalog module.
8. Click the Update
link.
The new category is now listed on the Categories page of the Store
Admin module, as well as in the Categories module. Repeat Steps 3
through 8 to add more categories.
Here’s how to edit a category:
1. Go to the Store Admin page.
This page has the Store Admin module on it.
2. Click the Categories
link.
This link is one of five located in the top-right corner of the module. It
takes you to the Categories management screen. Any existing categories
are listed here.
3. Click the Edit
link beside the category to be edited.
This takes you to the Edit Category screen.
4. Edit the category fields as required.
5. Click the Update
link.
Archiving a category hides that category from customers in the Categories
module. This stops customers from being able to browse any products asso-
ciated with that category.
Figure 8-9:
The
Categories
page of the
Store Admin
module.
239
Chapter 8: Collaborating and Selling with DNN
14_798439 ch08.qxp 3/22/07 9:17 PM Page 239
Here’s how to archive a category:
1. Go to the Store Admin page.
2. Click the Categories
link.
This takes you to the Categories management screen. Any existing cate-
gories are listed here.
3. Click the Edit
link beside the category to be archived.
This takes you to the Edit Category screen.
4. Select the Archived check box.
This hides the category and its products from customers, but doesn’t
delete any of the information. You can remove archiving at any time by
deselecting this option.
5. Click the Update
link.
The category is no longer displayed to customers on the Categories
module.
Deleting a category is permanent. You cannot delete a category that has any
products listed in it. If the category to be deleted does have products listed
for it, you must first either delete the products or move them to a different
category.
Here’s how to delete a category:
1. Go to the Store Admin page.
2. Click the Categories
link.
This takes you to the Categories management screen. All existing cate-
gories are listed here.
3. Click the Edit
link beside the category to be deleted.
This takes you to the Edit Category screen.
4. Click the Delete
link.
A message box appears asking if you are sure you want to delete the
item.
5. Click the OK button to confirm.
The category is now deleted.
Creating and managing products
You must add at least one category before you can add products. Each prod-
uct listing displays an image.
240
Part III: Jumping to Light Speed with DotNetNuke
14_798439 ch08.qxp 3/22/07 9:17 PM Page 240
Create a separate folder in your File Manager to keep your store images. If
you are enabling roles other than Administrators to add products, remember
to give those roles access to view and/or edit the folder. Uploading your
product images before you begin adding products saves you time.
Here’s how to add a product:
1. Go to the Store Admin module.
2. Click the Pr
oducts link.
This takes you to the Products screen, as shown in Figure 8-10. Any
products belonging to the Category displayed in the drop-down box will
be listed.
3. Click the Add Pr
oduct link.
4. Complete the first four fields, which relate to product details.
The Manufacturer, Model Name, and Model Number fields are displayed
as the summary listing of the product in the Catalog module. This infor-
mation along with the Summary is displayed on the detailed product
page.
5. Enter the cost of the product into the Unit Price text box.
Unit price must be either a whole or a decimal number. The unit price
appears both in the summary listing and full listing pages for this
product.
6. Select the product category from the Category drop-down box.
7. Don’t select the Archived check box.
8. Choose if you want to select the Featured check box.
Featured products are displayed first in the Featured category, as well as
being listed below with all other products. You can change this setting at
any time.
9. Upload and/or select the product image by using the Link Type tool
displayed at the Image field.
The image is displayed on the detailed listing of the product. The
summary listing creates and displays a thumbnail of this image.
10. Enter a description of the product into the RTE below the Description
field.
The description is only displayed on the full listing page of this product
and not in the summary listing displayed in the Catalog module.
11. Click the Update
link.
This returns you to the Products screen of the Store Admin module. The
new product is displayed below.
241
Chapter 8: Collaborating and Selling with DNN
14_798439 ch08.qxp 3/22/07 9:17 PM Page 241
Here’s how to view a detailed description of a product:
1. Click on a category in the Categories module.
This displays a summary listing of the products related to this category
in the Catalog module.
2. Click on the product link in the Catalog module.
The product link is a combination of the manufacturer, module name,
and model name. This link displays the full product details and enables
reviews to be added to the product.
Here’s how to edit a product:
1. Go to the Store Admin page.
2. Click the Pr
oducts link.
This takes you to the Products screen. Any products belonging to the
Category displayed in the drop-down box will be listed.
3. Select the Category of the product to be edited.
This displays the products associated with this category.
4. Click the Edit
link beside the product to be edited.
5. Edit the product details as required.
6. Click the Update
link.
You are now returned to the Products screen where a summary of the edited
product is displayed.
Products can also be edited by using the Catalog module. To delete a product
by using the Catalog module, you must first select the relevant category from
the Category module.
Figure 8-10:
The
Products
page of the
Store Admin
module.
242
Part III: Jumping to Light Speed with DotNetNuke
14_798439 ch08.qxp 3/22/07 9:17 PM Page 242
Deleting a product permanently removes all details of that product from your
store.
Here’s how to delete a product:
1. Go to the Store Admin page.
The Store Admin page has the Store Admin module on it.
2. Click the Pr
oducts link.
This takes you to the Products management screen. Any products
belonging to the Category displayed in the drop-down box will be listed.
3. Select the Category of the product to be deleted.
This displays the resulting products below.
4. Click the Edit
link beside the product to be deleted.
This takes you to the Products screen.
5. Click the Delete
link.
A message box appears, asking if you are sure you want to delete this
item.
6. Click OK to delete the product.
The product is now deleted.
Approving and Editing Product Reviews
Anyone who can view the Store can add a product review by clicking the Add
Review link located in the bottom-right corner of each detailed product page.
Reviews consist of a rating of between one and five stars and an optional
comment. An Administrator must approve reviews before they appear on the
Web site.
Here’s how to approve and edit reviews:
1. Go to the Store Admin page.
2. Click the Reviews
link.
This takes you to the Reviews screen, as shown in Figure 8-11. All
reviews, including both authorized and nonauthorized reviews, will be
displayed.
3. Select Not Approved from the Status drop-down box.
This displays the reviews that are awaiting approval.
243
Chapter 8: Collaborating and Selling with DNN
14_798439 ch08.qxp 3/22/07 9:17 PM Page 243
4. Click the Edit link beside a review.
This takes you to an editing screen for this review. If required, you can
edit the comments but not the rating or the username.
5. Select the Authorized check box to approve the review.
6. Click the Update
link.
This takes you back to the Reviews page. The approved review is now
displayed on the full listing of that product page. Repeat Steps 4 through
6 to approve more reviews.
Deleting a Product Review
Reviews must be deleted by using the Store Admin module. They can’t be
deleted via the Catalog module. Note: Deleting a review is permanent, so you
may prefer to change it to Not Authorized for later consideration. Making a
review Not Authorized removes the review from the product page but not
from your records.
1. Go to the Store Admin page.
2. Click the Reviews link.
This takes you to the Reviews screen. All reviews are displayed.
3. Click the Edit
link beside the review to be deleted.
This takes you to an editing screen for this review.
4. Click the Delete
link.
A message box appears, asking you if you’re sure you want to delete this
item.
Figure 8-11:
The
Reviews
page of the
Store Admin
module lets
Administrat-
ors edit,
approve,
and delete
product
reviews.
244
Part III: Jumping to Light Speed with DotNetNuke
14_798439 ch08.qxp 3/22/07 9:17 PM Page 244
5. Click OK to confirm deletions.
The review is now permanently deleted and you are returned to the
Reviews page. Repeat Steps 3 through 5 to delete additional reviews.
Shopping ’til You Drop
After you have configured the store modules and added categories and
products, you can launch your Store on the Web.
You must go back and deselect the Test Mode check box and then click
Update before you can start accepting real transactions from customers.
Adding a product to the cart
Here’s how to add a product to the store shopping cart:
1. Click on a category in the Categories module.
This displays a summary listing of the products related to this category
in the Catalog module.
2. Click the Add T
o Cart link.
This link is also displayed on the detailed product page.
Going to the checkout
Here’s how to proceed to the checkout, create a customer account, and place
the order.
1. Log in to the Web site.
The user can either log in now or after Step 3.
2. Click on the View Cart Details link in the Mini Cart module, or go to
the Store Account module.
This displays a summary listing of the products added to the cart.
3. (Optional.) Modify the quantities of any product.
Use the + and x buttons beside any product to increase or decrease the
quantity.
245
Chapter 8: Collaborating and Selling with DNN
14_798439 ch08.qxp 3/22/07 9:17 PM Page 245
4. Click the Checkout link.
You are taken to the Checkout page. Details of the products being pur-
chased are listed at the top of this page, along with the tax, shipping,
and total amount payable.
5. Complete the billing details in the Billing Address section.
This is where you enter the name, address, and contact details related to
the billing of this order.
6. Complete the shipping details in the Shipping Address section.
This is where you enter the name, address, and contact details related to
the shipping of this order. If these details are the same as the billing
details above, simply select the Ship the Order to the Billing Address
radio button.
7. Enter your payment details into the Payment Information fields.
8. Click the Pr
ocess Order link.
This takes you to the Checkout page. Details of the products being pur-
chased are listed at the top of this page, along with the tax, shipping,
and total amount payable.
Viewing previous customer orders
Here’s how the Administrator can view a summary of previous orders:
1. Go to the Store Admin page.
2. Click the Customers
link.
This takes you to the Order History screen of the Store Admin module.
3. Select a customer name from the Customers drop-down box.
This displays a summary of orders placed by this customer.
4. Click the Back
link to return to the Order History page.
Collaborating with Wiki
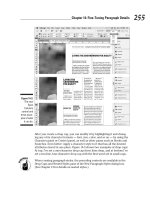
A Wiki, shown in Figure 8-12, is a type of Web site where all visitors can add,
edit, and remove HTML content from HTML pages. Popular Wikis include
www.wikipedia.org, which is a Wiki encyclopedia, and www.wikitravel.
org, which is an online travel guide.
246
Part III: Jumping to Light Speed with DotNetNuke
14_798439 ch08.qxp 3/22/07 9:17 PM Page 246
The DNN Wiki module lets Administrators create and manage multiple Wiki
Web sites within the one DNN Web site. The DNN Wiki has a number of tools
that enable users to quickly view the latest changes to a page and view the
differences between each version. This makes it easy to revert to a previous
version of that page. This can be important for a Wiki because they carry the
risk of containing false information.
The ease of reinstating previous copy combined with a simple method of
adding content without registration makes a Wiki ideally suited to collabora-
tive writing.
While the traditional setup of a Wiki enables everyone to contribute to its
content, at the time of writing, the DNN Wiki permitted contributions from
logged-in users only.
The Wiki module isn’t included with your DNN installation, but is available for
free download from the DotNetNuke Web site by going to the Wiki Project page
(www.dotnetnuke.com/DotNetNukeProjects/ModuleWiki/tabid/
848/Default.aspx) and clicking the Pr
oject Downloads link. See Chapter 3
to find out how to install modules.
Creating a Wiki Site
The Wiki module lets Administrators build one or more Wiki Web sites;
however, you can only display one Wiki Web site per module at a time. For
example, if you create a Canine Breeds Wiki site and a Canine Terminology
Wiki site, you need to use two Wiki modules and select which module dis-
plays which Wiki Web site.
Figure 8-12:
A DNN Wiki
Web site.
247
Chapter 8: Collaborating and Selling with DNN
14_798439 ch08.qxp 3/22/07 9:17 PM Page 247