Expert Service-Oriented Architecture in C# 2005 phần 7 potx
Bạn đang xem bản rút gọn của tài liệu. Xem và tải ngay bản đầy đủ của tài liệu tại đây (785.68 KB, 27 trang )
Figure 7-3. The properties of the WSE2QuickStartClient certificate
Now choose the Local Computer certificate location and the Personal store to find the
WSE2QuickStartServer certificate. If both certificates are there it means that you either
installed them automatically through a setup file, or manually, following the instructions in
Chapter 5. The certificates must be installed correctly in order to run this sample. If you get
any exceptions during the execution of this sample, you should go back to Chapter 5 and
review the installation instructions to make sure you didn’t miss any important steps. Another
option is to run the setup.bat file that is located under the Sample directory of the %Program
Files%\Microsoft WSE\v3.0 directory.
CHAPTER 7 ■ EXTENDED WEB SERVICES SECURITY WITH WS-SECURITY AND WS-SECURE CONVERSATION 139
701xCH07.qxd 7/17/06 1:23 PM Page 139
Message Flow
Before the communication takes place, the client must have access to its own certificate, plus
the public portion of the server’s certificate. The server only needs to have access to its own
certificate, because the client will attach the public portion of the client certificate to the
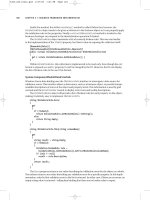
request. The diagram in Figure 7-4 shows a simplified representation of the steps.
Figure 7-4. Mutual certificate assertion message flow
The following steps occur when the client makes a call to the service using the mutual
certificates pattern:
1. Attach X.509 certificate: The client assumes that the server does not have access to
its certificate in a local store. It attaches the certificate information to the outgoing
message.
2. Sign the message: The client uses its private key to sign the message. This signature will
allow the server to validate the message origin and its integrity.
3. Encrypt the message: The client uses the server public key to encrypt the message. This
will prevent nonauthorized users from accessing the content of the message while it is
in transit.
CHAPTER 7 ■ EXTENDED WEB SERVICES SECURITY WITH WS-SECURITY AND WS-SECURE CONVERSATION140
701xCH07.qxd 7/17/06 1:23 PM Page 140
4. Validate client certificate: The server checks that the certificate has not expired, that
it has not been tampered with, and that it is issued by a certificate authority that is
trusted by the server. It also checks the certificate revocation list (CRL) to see if the cer-
tificate is included in the list. The check can be performed online or against a local
CRL. The default mode is to check online and this can be modified in the Security tab
of the WSE 3.0 Settings Tool.
5. Decrypt the message: After the certificate is validated, the server proceeds to decrypt
the message using its private key.
6. Validate the signature: The last step is to validate the client signature using the client
public key. This helps the service validate whether the message is coming from the
right client and has not been altered while in transit.
Secure the Web Service
The following steps show you how to secure a Web service using X.509 certificates:
1. In the StockTraderSecure project, open the WSE 3.0 Settings Tool.
2. In the Policy tab, click the Add button. You should see the UsernamePolicy in the list of
existing Application Policies.
3. Name this policy MutualCertificatePolicy and click OK.
4. Click Next in the welcome screen and choose to secure a service in the Authentication
Settings step. Select Certificate as the authentication method and click Next.
5. The Authorized Clients step allows you to choose one or many certificates that are
allowed to access the service. In this example we are going to uncheck this box, and we
will configure Authorization later, making changes directly to the configuration files.
6. This step prompts you to select the message protection level, just as you have already
seen in Chapter 6. Leave the WS-Security 1.1 Extensions box checked. You would
uncheck this box if you need to interact with clients that do not support WS-Security
1.1. Choose Sign and Encrypt, uncheck the Secure Session box, and click Next.
7. Click the Select Certificate button and choose the WSE2QuickStartServer from the list.
Click Next to continue.
■Note The client will also have access to the WSE2QuickStartServer certificate and it will use its public
key to encrypt the message. When the service receives the message, it will use this certificate’s private key
to decrypt it. If the service sends a response to the client, it will use the certificate’s private key to sign the
message.
CHAPTER 7 ■ EXTENDED WEB SERVICES SECURITY WITH WS-SECURITY AND WS-SECURE CONVERSATION 141
701xCH07.qxd 7/17/06 1:23 PM Page 141
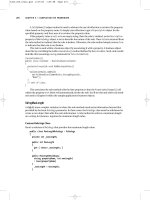
8. Review the settings of the MutalCertificatePolicy to make sure that you selected the
right options during this process. The summary should look like the screen shown in
Figure 7-5.
Figure 7-5. A summary of the mutual certificate server policy
9. Click Finish to complete the process and open the wse3policyCache.config policy file
to see the new settings.
The wizard adds the following elements to the existing policy file. You can see that the
definition UsernamePolicy is still in there, which means that you can select to use it or the
MutualCertificatePolicy in your project. Listing 7-1 shows the changes to the policy file after
adding the MutualCertificatePolicy.
Listing 7-1. The Policy File After Adding the MutualCertificatePolicy
<policy name="MutualCertificatePolicy">
<mutualCertificate11Security
establishSecurityContext="false"
renewExpiredSecurityContext="true" requireSignatureConfirmation="true"
messageProtectionOrder="SignBeforeEncrypt" requireDerivedKeys="true"
ttlInSeconds="300">
<serviceToken>
<x509 storeLocation="LocalMachine" storeName="My"
findValue="CN=WSE2QuickStartServer"
findType="FindBySubjectDistinguishedName" />
</serviceToken>
CHAPTER 7 ■ EXTENDED WEB SERVICES SECURITY WITH WS-SECURITY AND WS-SECURE CONVERSATION142
701xCH07.qxd 7/17/06 1:23 PM Page 142
<protection>
<request signatureOptions="IncludeAddressing, IncludeTimestamp,
IncludeSoapBody" encryptBody="true" />
<response signatureOptions="IncludeAddressing, IncludeTimestamp,
IncludeSoapBody" encryptBody="true" />
<fault
signatureOptions="IncludeAddressing,
IncludeTimestamp, IncludeSoapBody"
encryptBody="false" />
</protection>
</mutualCertificate11Security>
<requireActionHeader />
</policy>
In this policy file you can see that the WSE 3.0 security wizard identifies our scenario as
falling within the MutualCertificate11Security assertion. If you look closer at these elements
you will see that each one of your decisions is reflected here and you can make changes man-
ually if required.
To demonstrate how easy it is to make changes, we are going to add an authorization
section to this policy. The authorization rules will only grant access to those clients that are
authenticated using the WSE2QuickStartClient certificate. Copy these lines of code under the
start of the Policy tag in the policy file:
<authorization>
<allow user="CN=WSE2QuickStartClient"/>
<deny user="*"/>
</authorization>
The last step before we move to the client project is to apply this policy to the service.
You can do this by finding the place in the StockTrader class where you applied the Username-
Policy and modify the policy name to say MutualCertificatePolicy. After this change, the class
definition should look like the following:
[Policy("MutualCertificatePolicy")]
public class StockTrader : StockTraderStub
Secure the Client Application
In order to secure the StockTraderClient application you will follow similar steps to the ones
you executed in Chapter 6. The fact that these steps are similar is one of the main benefits of
using WSE 3.0. It gives you the ability to concentrate more on decisions to secure your applica-
tion than on putting the security implementation in place.
We are going to abbreviate some of the instructions, given that you have been through
this wizard a couple of times already:
1. Open the WSE 3.0 Settings Tool, go to the Policy tab, and click the Add button.
2. Name this policy MutualCertificatePolicy and click OK.
CHAPTER 7 ■ EXTENDED WEB SERVICES SECURITY WITH WS-SECURITY AND WS-SECURE CONVERSATION 143
701xCH07.qxd 7/17/06 1:23 PM Page 143
3. In the Authentication Settings step, choose Secure a Client Application and choose
Certificate and click Next.
4. In the Client Certificate step, choose the X.509 certificate named WSE2QuickStart-
Client from the CurrentUser store and click Next. This is the certificate that will be used
to sign the message using the certificate private key. The service will use this certificate
public key to validate the integrity of the message.
5. The Message Protection screen gives you the options that you are already familiar with.
Since you selected to use WS-Security 1.1 in the service, you will need to do the same
in the client. The protection order for the message should also match the service pro-
tection order requisites, which are Sign and Encrypt. Remember to uncheck the Secure
Session box. We will talk about the benefits provided by this feature in the section
“Establish Trusted Communication with WS-Secure Conversation” later in this chapter.
Click Next once you have provided all the answers required in this step.
6. In this screen you are asked to select one more certificate. Select the LocalMachine
store, click Select Certificate, and choose the WSE2QuickStartServer certificate from
the list. This is the server certificate that will be used to encrypt the message. The client
application must have access to this certificate before you make this first call. In a pro-
duction scenario, you can achieve this by including the public portion of the certificate
as part of the installation package. Click Next and review the policy summary. It should
look like the one shown in Figure 7-6. Click Finish to complete the process.
Figure 7-6. A summary of the mutual certificate client policy
CHAPTER 7 ■ EXTENDED WEB SERVICES SECURITY WITH WS-SECURITY AND WS-SECURE CONVERSATION144
701xCH07.qxd 7/17/06 1:23 PM Page 144
Let’s take a look at Listing 7-2 to review the changes made to the wse3policyCache.config
file. The MutualCertificatePolicy has been added and you can see that it references both the
client token and the server token.
Listing 7-2. Changes to the Client Policy File After Adding the MutualCertificatePolicy
<policy name="MutualCertificatePolicy">
<mutualCertificate11Security establishSecurityContext="false"
renewExpiredSecurityContext="true" requireSignatureConfirmation="true"
messageProtectionOrder="SignBeforeEncrypt" requireDerivedKeys="true"
ttlInSeconds="300">
<clientToken>
<x509 storeLocation="CurrentUser" storeName="My"
findValue="CN=WSE2QuickStartClient"
findType="FindBySubjectDistinguishedName" />
</clientToken>
<serviceToken>
<x509 storeLocation="LocalMachine" storeName="My"
findValue="CN=WSE2QuickStartServer"
findType="FindBySubjectDistinguishedName" />
</serviceToken>
<protection>
<request signatureOptions="IncludeAddressing, IncludeTimestamp,
IncludeSoapBody" encryptBody="true" />
<response signatureOptions="IncludeAddressing, IncludeTimestamp,
IncludeSoapBody" encryptBody="true" />
<fault signatureOptions="IncludeAddressing, IncludeTimestamp,
IncludeSoapBody" encryptBody="false" />
</protection>
</mutualCertificate11Security>
<requireActionHeader />
</policy>
The final change to the sample solution is to modify the code in the StockTraderConsole.cs
class. You need to remove the lines that create the Username Token and append it to the proxy
class. You also need to change the name of the policy from UsernamePolicy to MutualCertifi-
catePolicy.
Running the Sample Solution
Now you can run the sample solution to test the implementation of the mutual certificate pat-
tern. Try to access the client certificate at the service by using the following property:
RequestSoapContext.Current.Credentials.UltimateReceiver.
➥
GetClientToken<X509SecurityToken>().Certificate
You can use this property to obtain the identity of the caller and log every incoming call
for audit purposes.
CHAPTER 7 ■ EXTENDED WEB SERVICES SECURITY WITH WS-SECURITY AND WS-SECURE CONVERSATION 145
701xCH07.qxd 7/17/06 1:23 PM Page 145
Brokered Authentication Using Kerberos
Now we are going to take a look at another form of brokered authentication. Kerberos is the
security protocol that Microsoft chose to implement distributed security in its Windows 2000
and 2003 domains. Prior to Windows 2000, Microsoft relied on NTLM, which stands for Win-
dows NT LAN Manager. NTLM is a proprietary security protocol, as opposed to Kerberos,
which is an open standard created by the Massachusetts Institute of Technology (MIT) and
published by the Internet Engineering Task Force (IETF) as RFC 1510 and later deprecated by
RFC 4120. NTLM is still supported in order to provide backward compatibility, and it is also
used to authenticate a user that logs into a computer using a local account.
Let’s review a few basic concepts of the Kerberos protocol. This is an extensive topic and
we are only going to cover the areas that will help you understand how WSE 3.0 and Kerberos
can help you secure your Web services.
The Kerberos Protocol
The fact that Kerberos is based on open standards and that Microsoft has chosen it to be its
default network authentication protocol makes it an essential topic of discussion in this book.
The benefits provided by this protocol make it an ideal candidate for Web service security in
scenarios where you want to take full advantage of the features provided by Windows imple-
mentation of the Kerberos protocol.
These are some of the terms that will help you understand the description of the Kerberos
protocol:
Security principal: This is an entity in a Windows domain that can be uniquely identified.
It can be a user, services, or a machine.
Active Directory: This is an LDAP implementation that is used to store information about
the security principals and their relationships.
Long-term keys: These are cryptographic keys that are persisted in the identity store.
Each key is associated with a security principal.
Authenticator: This contains information about the client, such as IP address, username,
message time stamp, and Kerberos protocol version.
Session keys: These are keys associated to security principals and they only last a few
minutes or hours. They are used to encrypt the authenticators.
Service principal names: These are unique identifiers that can be used to obtain a security
token without having to use the name of the account that is running the service.
KDC: This is the Kerberos Key Distribution Center. It is composed of the Authentication
Service and the Ticket Granting Service.
■Note Some of these terms are specific to the Microsoft implementation of the Kerberos protocol.
CHAPTER 7 ■ EXTENDED WEB SERVICES SECURITY WITH WS-SECURITY AND WS-SECURE CONVERSATION146
701xCH07.qxd 7/17/06 1:23 PM Page 146
How Kerberos Works
Kerberos uses shared secrets as an authentication mechanism. A user defines a password
when his account is created in the identity store, which in this case is Active Directory. These
passwords can’t be stored or transmitted in clear text, because this would make them vulnera-
ble to attacks. For this reason, a symmetric key is used to encrypt these passwords. After they
have been encrypted they can be referred to as a long-term key. Not only users have associated
long-term keys; these are also created for services and computers that join a Windows
domain.
When a user logs in, the client encrypts the password using a symmetric key and sends
a request to the KDC for a Ticket Granting Ticket (TGT). If the key matches the value stored
in Active Directory the KDC returns the TGT and a session key. This session key is encrypted
by the KDC using the user’s long-term key; we will refer to it as session key #1. The TGT is
encrypted using the KDC secret key. The client computer stores this information in memory
and it is used to request service tickets. Figure 7-7 shows the process that takes place when
the user logs into the domain.
Figure 7-7. The TGT request process
The next step takes place when the client attempts to access a service. The client will send
a request to the KDC. The request is composed by the TGT and an authenticator. The authen-
ticator includes client information such as the username, a machine IP address, and a time
stamp. The authenticator is encrypted with session key #1.
The KDC receives this request, decrypts the TGT with its long-term key, and decrypts the
authenticator using the session key that it sent to the client at login. If all the information is
valid, the KDC creates another session key (session key #2) and a service ticket. The KDC will
encrypt the service ticket using the server’s long-term key. It will also encrypt the session key
using session key #1.
CHAPTER 7 ■ EXTENDED WEB SERVICES SECURITY WITH WS-SECURITY AND WS-SECURE CONVERSATION 147
701xCH07.qxd 7/17/06 1:23 PM Page 147
■Note The KDC doesn’t send the service ticket to the server because it is not guaranteed that the service
ticket will get to the server faster than the client request. There are also other implications, such as the need
to maintain a state for each service ticket in order to allow the server to be ready for the time when the
client request arrives.
When the client receives the service ticket and session key #2 from the KDC, it decrypts
session key #2 using session key #1. The client then creates a new authenticator with a time
stamp and information about the client, such as the IP address and username. This authenti-
cator is encrypted using session key #2 and it is sent to the server along with the service ticket.
The server receives the request that has the Kerberos security token attached to it. This
token contains the authenticator and the service ticket. The service uses its long-term key to
decrypt the service ticket. The service ticket has session key #2 in it. The server will use this
session key to decrypt the authenticator.
After the client is successfully validated, the service can provide mutual authentication by
encrypting the time stamp found in the authenticator and sending it back to the client. This
time stamp is encrypted using session key #2. Figure 7-8 shows the steps executed after the
client obtains the TGT from the KDC.
Figure 7-8. Steps for obtaining the TGT from the KDC
CHAPTER 7 ■ EXTENDED WEB SERVICES SECURITY WITH WS-SECURITY AND WS-SECURE CONVERSATION148
701xCH07.qxd 7/17/06 1:23 PM Page 148
Advantages and Disadvantages of Using Kerberos
Using the Kerberos protocol offers several advantages and disadvantages. The advantages
include the following:
Mutual authentication: Kerberos provides a simple mechanism for mutual authentica-
tion. As you saw in the previous pages, the server just needs to encrypt the time stamp
included in the client authenticator and send it back as a proof of its identity. When the
client receives the message and decrypts it with the session key, it can easily validate
whether the service is who it claims to be.
Improved performance: The identity of the client only needs to be verified once during the
duration of the session. After the TGT is generated, the client no longer needs to access
the authentication service.
Integration with Windows: If your organization already relies on Active Directory you can
benefit from this existing infrastructure and implement a protocol that benefits from the
impersonation, delegation, authorization, and audit capabilities provided by Windows.
Interoperability: Kerberos is a protocol that has been adopted by other important players
in the IT industry, so you don’t have to worry about being limited using it within a
Windows domain.
SSO: The fact that Kerberos is based on security tokens makes it an ideal candidate for
SSO scenarios. The user only needs to provide its credentials once at the beginning of a
session, and a TGT can be used to provide multiple session tickets to access different
network resources.
The main disadvantages of using the Kerberos protocol include the following:
Requires additional infrastructure: If your organization does not use Active Directory, you
will need to incur the additional expense of setting it up. You will also need to consider the
investment for maintaining an Active Directory implementation.
Requires online access: The client needs to have online access to the KDC; otherwise it
won’t be able to retrieve the service ticket and make a call to the server.
Limited to a domain or trusted domains: This authentication mechanism does not work
outside the boundaries of the domain or the trusted domains.
Now let’s modify our sample application to use Kerberos authentication. You can con-
tinue the same solution that you used to implement mutual certificates and the Username
Token assertions. You will see how easy it is to switch between one security model and another
when using WSE 3.0.
CHAPTER 7 ■ EXTENDED WEB SERVICES SECURITY WITH WS-SECURITY AND WS-SECURE CONVERSATION 149
701xCH07.qxd 7/17/06 1:23 PM Page 149
Set Up the Environment
Follow these steps to make sure that your computer is configured correctly in order to secure
the sample application using the Kerberos security turnkey assertion:
1. Log on to a Windows domain. You will need to log in to your computer using a domain
account.
2. Use IIS instead of the ASP.NET Development Server. If you are using Windows XP and
have been running your samples using the ASP.NET Development Server you will need
to create a virtual directory in IIS that points to the StockTraderSecure folder. You don’t
need to make any changes in Visual Studio 2005. You can continue to work using the
ASP.NET development server. You will access the Web service via IIS at runtime only.
3. Map a domain account. If you are using Windows XP, you will need to use a domain
account to run the ASP.NET process. In order to do this, you need to open the
machine.config file and modify the following line:
<processModel autoConfig="true" userName="domain\username"
password="userpassword" />
You will need to make sure that the username and password attributes match with
those of a domain account. By default, the ASP.NET process runs under the local
ASPNET account. A local computer account cannot be validated against Active Direc-
tory and this would not allow you to implement brokered authentication.
If you are using Windows 2003 you don’t need to make any changes to the
machine.config file. This is because the ASP.NET process runs under a service
account that can be validated against Active Directory.
4. Configure the SPN. SPNs can be used to uniquely identify a service. Each SPN is linked
to an Active Directory account. When a client requests a Kerberos token using an SPN,
Active Directory obtains the information about the associated Windows account,
which allows the authentication process to be executed.
SPNs can be managed using a utility named setspn.exe. This utility is available on
Windows 2003 servers and it can be downloaded from the Microsoft site if you are
using Windows 2000 or Windows XP.
In the following sample, we are going to create new SPNs and link them to the domain
account that you are using to run the ASP.NET process. The syntax to create the new
SPNs is the following:
Setspn.exe –a stocktrader/host1 domain\username
Setspn.exe –a stocktrader/host1.domain.com domain\username
Verify whether the SPNs were added successfully by running the following line:
Setspn.exe –l domain\username
The utility will return the names of the two SPNs that you just added. The result should
look like the following:
stocktrader/host1.domain.com
stocktrader/host1
CHAPTER 7 ■ EXTENDED WEB SERVICES SECURITY WITH WS-SECURITY AND WS-SECURE CONVERSATION150
701xCH07.qxd 7/17/06 1:23 PM Page 150
Secure the Web Service
Now that you have configured your environment, you are ready to modify the StockTrader
application. You are going to begin by securing the service, just like we did in the previous
samples.
1. In the StockTraderSecure project, open the WSE 3.0 Settings Tool.
2. In the Policy tab, click the Add button. Name this policy KerberosPolicy and click OK.
3. Click Next in the welcome screen.
4. In the Authentication Settings step, choose to secure a service application using
Windows as the authentication method. Click Next to continue.
5. Add the user or users that will be authorized to access this service. Make sure that you
add the domain account you used to log on to your computer. Click Next when you
finish adding the authorized accounts.
6. In the Message Protection step, choose to Sign and Encrypt the message and uncheck
the Establish Secure Session box. Click Next to continue.
7. Review the summary information of the new security policy, shown in Figure 7-9, and
click Finish.
Figure 7-9. A summary of the Kerberos server policy
CHAPTER 7 ■ EXTENDED WEB SERVICES SECURITY WITH WS-SECURITY AND WS-SECURE CONVERSATION 151
701xCH07.qxd 7/17/06 1:23 PM Page 151
The new policy is added to the configuration file. As you can see in Listing 7-3, this
policy does not make any particular reference to the KDC or the Active Directory that will
be involved in the brokered authentication process. This information is obtained directly
from the machine environment. This simplifies the deployment of Kerberos-based policies,
because there aren’t parameters to specify in the policy and you don’t need to install a certifi-
cate as in the case of the MutualCertificatePolicy.
Listing 7-3. Changes to the Service Policy File
<policy name="KerberosPolicy">
<authorization>
<allow user="sieena\mauricio" />
<deny user="*" />
</authorization>
<kerberosSecurity
establishSecurityContext="false"
renewExpiredSecurityContext="true"
requireSignatureConfirmation="false"
messageProtectionOrder="SignBeforeEncrypt"
requireDerivedKeys="true" ttlInSeconds="300">
<protection>
<request signatureOptions="IncludeAddressing, IncludeTimestamp,
IncludeSoapBody" encryptBody="true" />
<response signatureOptions="IncludeAddressing, IncludeTimestamp,
IncludeSoapBody" encryptBody="true" />
<fault signatureOptions="IncludeAddressing, IncludeTimestamp,
IncludeSoapBody" encryptBody="false" />
</protection>
</kerberosSecurity>
<requireActionHeader />
</policy>
The next step is to apply this policy to the service. You can do this by finding the place in
the StockTrader class where you applied the MutualCertificate Policy and modify the policy
name to KerberosPolicy. After this change, the class definition should look like the following:
[Policy("KerberosPolicy")]
public class StockTrader : StockTraderStub
Finally, before moving to the client project, you will need to add the following line in the
web.config file, right under the <system.web> tag. This line will allow you to use Integrated
Windows Authentication.
<authentication mode="Windows" />
CHAPTER 7 ■ EXTENDED WEB SERVICES SECURITY WITH WS-SECURITY AND WS-SECURE CONVERSATION152
701xCH07.qxd 7/17/06 1:23 PM Page 152
Secure the Client Application
The followings steps show you how to secure a client application using the Kerberos security
assertion:
1. Open the WSE 3.0 Settings Tool, go to the Policy tab, and click the Add button.
2. Name this policy KerberosPolicy and click OK.
3. Click Next in the welcome screen.
4. In the Authentication Settings step, choose to secure a client application using
Windows as the authentication method. Click Next to continue.
5. The Kerberos Token step prompts you to enter the Service Principal Name. Type in
wse/host1, where host1 is the name of your computer. Choose Impersonation in the
drop-down box and click Next.
6. In the Message Protection step, choose to Sign and Encrypt the message, and uncheck
the Establish Secure Session box. Click Next to continue.
7. Review the policy summary, shown in Figure 7-10, and click Finish.
Figure 7-10. A summary of the Kerberos client policy
CHAPTER 7 ■ EXTENDED WEB SERVICES SECURITY WITH WS-SECURITY AND WS-SECURE CONVERSATION 153
701xCH07.qxd 7/17/06 1:23 PM Page 153
Listing 7-4 shows the configuration of the new policy. Pay special attention to the <token>
element, where the target principal and the impersonation level are defined.
Listing 7-4. Configuration of the KerberosPolicy
<policy name="KerberosPolicy">
<kerberosSecurity
establishSecurityContext="false"
renewExpiredSecurityContext="true"
requireSignatureConfirmation="false"
messageProtectionOrder="SignBeforeEncrypt"
requireDerivedKeys="true" ttlInSeconds="300">
<token>
<kerberos targetPrincipal="stocktrader/host1"
impersonationLevel="Impersonation" />
</token>
<protection>
<request
signatureOptions="IncludeAddressing,
IncludeTimestamp, IncludeSoapBody"
encryptBody="true" />
<response
signatureOptions="IncludeAddressing,
IncludeTimestamp, IncludeSoapBody"
encryptBody="true" />
<fault
signatureOptions="IncludeAddressing,
IncludeTimestamp, IncludeSoapBody"
encryptBody="false" />
</protection>
</kerberosSecurity>
<requireActionHeader />
</policy>
The last step is to modify the StockTraderConsole.cs class. The Run() method should look
like the following:
public void Run()
{
// Create an instance of the Web service proxy
StockTraderProxy.StockTraderWse serviceProxy =
➥
new StockTraderProxy.StockTraderWse();
// Use the logged in user identity as the identity of the current thread.
// You will need to add a using clause for the ➥
System.Security.Principal namespace
AppDomain.CurrentDomain.SetPrincipalPolicy(PrincipalPolicy.WindowsPrincipal);
CHAPTER 7 ■ EXTENDED WEB SERVICES SECURITY WITH WS-SECURITY AND WS-SECURE CONVERSATION154
701xCH07.qxd 7/17/06 1:23 PM Page 154
// Access the IIS based service
serviceProxy.Url = "http://host1/StockTraderSecure/StockTrader.asmx" ;
// Use the credentials of the current security context
serviceProxy.UseDefaultCredentials = true;
// Set the client policy
serviceProxy.SetPolicy("KerberosPolicy");
// Call the service
Console.WriteLine("Calling {0}", serviceProxy.Url);
string Symbol = "MSFT";
StockTraderProxy.Quote q = serviceProxy.RequestQuote(Symbol);
// Show the results
Console.WriteLine("Web Service Response:");
Console.WriteLine("");
Console.WriteLine( "\tSymbol:\t\t" + q.Symbol );
Console.WriteLine( "\tCompany:\t" + q.Company );
Console.WriteLine( "\tLast Price:\t" + q.Last );
Console.WriteLine( "\tPrevious Close:\t" + q.Previous_Close );
}
protected static void Error(Exception ex)
{
Console.WriteLine("EXCEPTION!" + ex.Message + "\n" + ex.StackTrace);
}
The SetPrincipalPolicy method will assign the identity of the logged-on user to the cur-
rent thread and the UseDefaultCredentials property will indicate the proxy to attach those
credentials to the outgoing message.
Replace the host1 name of the server for the name of your local computer and run the
application. If you get any security exceptions, review the instructions to set up the environ-
ment. It is important that you use a domain account and that you use the SPN name correctly.
Kerberos authentication is an effective mechanism but you need to carefully configure the
deployment environment in order to have a successful communication between the service
and the client.
Impersonation
Let’s take a look at how to impersonate the client user at the server by obtaining his identity
from the Kerberos token. We are going to create a file in the server hard drive that only the
client logged-in user has permission to access:
1. Create a new file under the C:\temp folder named Impersonation.txt.
2. Right-click the Impersonation.txt file and choose Properties.
3. Select the Security tab and click the Advanced button.
CHAPTER 7 ■ EXTENDED WEB SERVICES SECURITY WITH WS-SECURITY AND WS-SECURE CONVERSATION 155
701xCH07.qxd 7/17/06 1:23 PM Page 155
4. In the Advanced Security Settings dialog, uncheck the Inherit from Parent the Permis-
sion Entries box.
5. In the Security pop-up window, click the Remove button, shown in Figure 7-11.
Figure 7-11. The Advanced Security Settings dialog
6. Click OK on the Advanced Security Settings dialog. You will get a prompt asking you if
you want to remove all the users from the list. Click Yes. You are going to add a new
user with read permissions in the next step.
7. In the Security tab, click the Add button and enter the name of the client user that you
are going to authenticate at the server. Use the domain\username format.
8. Make sure the user has read access to the file and click OK.
This file will help you validate whether the impersonation is taking place. Remember that
this service is running under a domain account different from the one that you used to log on
to the client computer. So if impersonation doesn’t take place, the following code will not be
successful:
CHAPTER 7 ■ EXTENDED WEB SERVICES SECURITY WITH WS-SECURITY AND WS-SECURE CONVERSATION156
701xCH07.qxd 7/17/06 1:23 PM Page 156
private void impersonate(KerberosToken token)
{
if (token.Principal!=null && token.Principal.Identity is WindowsIdentity)
{
// Obtain user identity
WindowsIdentity callerIdentity =
➥
token.Principal.Identity as WindowsIdentity;
// Initialize context object
WindowsImpersonationContext context = null;
try {
// Impersonate the user
context = callerIdentity.Impersonate();
// Access a file that only this user has permissions to read
FileStream x = File.OpenRead("c:\\temp\\Impersonation.txt");
x.Close();
}
catch (Exception ex)
{
// rethrow the exception
throw ex;
}
finally
{
context.Undo();
}
}
}
Add a line at the beginning of the RequestQuote method that passes the Kerberos token
to the Impersonate method.
impersonate(RequestSoapContext.Current.Credentials.UltimateReceiver.
➥
GetClientToken<KerberosToken>());
This method starts by obtaining the user’s identity from the Kerberos token, and then it
impersonates the user by setting its identity in the current security context. After the user has
been impersonated, the code opens the Impersonate.txt file and it immediately closes it. If
the user is not impersonated successfully, this line will cause a SystemUnauthorizedAccess
exception.
CHAPTER 7 ■ EXTENDED WEB SERVICES SECURITY WITH WS-SECURITY AND WS-SECURE CONVERSATION 157
701xCH07.qxd 7/17/06 1:23 PM Page 157
The impersonation code has to be implemented within a try, catch, finally block. The goal
is to restore the original security context after the file has been read or after an unexpected
error.
Impersonation can also be achieved by adding the following line at the web.config file.
However, this applies to all the methods in the Web service and it doesn’t allow you to imper-
sonate a user only for a particular task:
<identity impersonate="true" />
Constrained Delegation
There is another feature provided by Kerberos that is named Constrained Delegation. This
feature allows the impersonated client user to access a resource on a different machine. The
service user that will be performing the delegation needs to be configured in Active Directory.
This configuration consists of choosing a list of services that the user is authorized to delegate
on. In Figure 7-12, the WSE user is authorized to delegate credentials to the HTTP server of the
MTYSVR01 computer.
Figure 7-12. Delegation properties tab in Active Directory
You have the option to trust the user for delegation to any service. This is known as
Unconstrained Delegation but it is not recommended because if the security of the service
is compromised it means that all the services in the network are also compromised.
CHAPTER 7 ■ EXTENDED WEB SERVICES SECURITY WITH WS-SECURITY AND WS-SECURE CONVERSATION158
701xCH07.qxd 7/17/06 1:23 PM Page 158
Prevent Replay Attacks Using Time Stamps,
Digital Signatures, and Message Correlation
We will continue this chapter with a look at a different kind of security issue called replay
attacks. A replay attack occurs when a client makes multiple Web service calls to the same
service without waiting for a response from one or more previous requests. If enough of these
calls are made, it is possible to overwhelm the Web service’s hosting server, and to then cause
the service to become unresponsive or to go offline. Replay attacks are at best a nuisance and,
at worst, can cause critical system breakdowns.
The WS-Security specification mentions replay attacks and briefly describes a strategy for
dealing with them. The key to preventing a replay attack is for a Web service to monitor the
status of incoming messages and to verify their uniqueness. The Web service needs to verify
that an incoming SOAP request message is unique and has not already been sent before the
service starts processing the message.
■Note You can eliminate replay attacks by unauthorized clients by using an encrypted communication
channel such as Secure Sockets Layer (SSL). However, SSL provides no protection if the authorized client
decides to conduct a replay attack. Other protective measures are required. The strategies that are outlined
in this section assume that you want to prevent replay attacks by verifying request messages for uniqueness
and verifying that they have not been tampered with.
Standard Web service calls are stateless, and SOAP messages are inherently stateless one-
way communications. SOAP messages must therefore include extra information that tracks
their uniqueness and thereby helps the service to verify whether a request message has
already been received. There are three main ways to track this information and to enable
message verification and protection against replay attacks:
• Message time stamps (including Created and Expires)
• Username Token nonce values
• Message correlation (including sequence numbers)
In the next sections we will consider each of these and how they can be used to secure
SOAP messages, and Web services, against replay attacks.
Use Time Stamps for Message Verification
Message time stamps are added to an outgoing SOAP request message by the sender. They
help in detecting unauthorized SOAP message requests. The client may choose to set an
expiration date and time on the request message, which means that the message is only valid
for a specific number of seconds after it is issued. This ensures that if the SOAP message is
intercepted and re-sent by an unauthorized sender, it will only be useful to them for a limited
amount of time. And, of course, if the message expiration is set short enough, there will not be
time for an unauthorized party to intercept and reroute the message. Message time stamps
CHAPTER 7 ■ EXTENDED WEB SERVICES SECURITY WITH WS-SECURITY AND WS-SECURE CONVERSATION 159
701xCH07.qxd 7/17/06 1:23 PM Page 159
and expiration are a useful first defense for preventing the unauthorized use of legitimate
SOAP messages. As added protection, the client may digitally sign both the message body and
the time stamp directly. This allows the receiving service to detect a scenario wherein the time
stamp itself was tampered with and altered by an unauthorized user.
■Note SOAP message interception and tampering is a serious security issue that will become more widely
understood (and worried about) once Web services become more commonly deployed and used by compa-
nies. If a thief steals your credit card or a document that contains your personal information, he has access
to a legitimate source of credit, even though he is not an unauthorized user. SOAP message interception
potentially creates the same security compromise scenario.
Once the service receives the request message, it can cache the SoapContext while it
processes the message. Subsequent incoming request messages can then be compared
against the cached SoapContext objects and rejected if the service detects that the request
has already been received. Recall that the SoapContext is a WSE-specific class representation
of a SOAP message and is a member of the Microsoft.Web.Services3 namespace. You can use
the SoapContext class to programmatically access the properties of a SOAP message, includ-
ing its headers and body.
There are no specific rules as to what kind of information you should use to correlate
SoapContext information between messages. Basically, any unique identifying information
makes for a good candidate, as long as it cannot be spoofed by an unauthorized third party.
So you will want to choose a piece of information that can be digitally signed in the request
message. Good candidates include addressing headers and security token IDs. In addition to
addressing headers, you can correlate messages using specific contents of the SOAP message
body, or any other header information that is uniquely set by the client. If the message uses a
security token, the token itself can be used to uniquely identify a message.
Use Username Token Nonce Values for Message Verification
If you find yourself struggling to extract a unique piece of information from a message (using
the SoapContext class), and the message includes a Username Token security token, you can
use a nonce-based token ID as a unique identifier. A nonce is simply a random cryptographic
string that can be assigned as the ID value for the Username Token security token. When the
service receives a request message, it can extract the nonce value from the security token and
cache the value for the duration of the request message. These ID values are part of the mes-
sage signature and cannot be spoofed. And because they are nonce values, it is highly unlikely
that two request messages will coincidentally share the same ID values. However, this could
happen if you choose to rely on the autogenerated ID value for the security token.
Again, the burden remains on the service to cache information on incoming request mes-
sages. But if you need to take this approach, a nonce value is the simplest way to do so.
Listing 7-5 shows how the client can assign a nonce value to a Username Token security
token.
CHAPTER 7 ■ EXTENDED WEB SERVICES SECURITY WITH WS-SECURITY AND WS-SECURE CONVERSATION160
701xCH07.qxd 7/17/06 1:23 PM Page 160
Listing 7-5. Assigning a Nonce Value to a Username Token Security Token
using Microsoft.Web.Services3.Security;
using Microsoft.Web.Services3.Security.Tokens;
SecurityToken token = new UsernameToken(username, passwordEquivalent,
➥
PasswordOption.SendPlainText);
// Assign a random nonce value to the security token
Nonce objNonce = new Nonce(34);
token.Id = objNonce.Value;
You may be wondering why nonce values apply specifically to the Username Token secu-
rity token. This is because other security tokens are more sophisticated and do not require the
additional guarantee of uniqueness that a nonce value provides. A Username Token security
token is, after all, simply a hashed username-password combination, and there is nothing
inherently unique about this combination. Usernames and passwords can be duplicated
between users much more easily than cryptographic values can, especially if a malicious
client is intentionally using another client’s credentials.
If you use an alternate security token such as an X.509 certificate, you are automatically
afforded some protection because the client and the service are using credentials that are not
easily discovered. However, as we pointed out with SSL, this does not provide protection
against replay attacks. You cannot assume that authorized clients will by their nature avoid
carrying out a replay attack. For example, consider a client that autogenerates Web service
calls in batch mode. If this client were to experience a system error or breakdown in business
logic, it is conceivable that the client might generate duplicate request messages to the serv-
ice. This is why you must tackle replay attacks at the message and service level. You cannot
protect against replay attacks under the umbrella of a trusted relationship between client and
service.
Use Message Correlation and Sequence Numbers for
MessageVerification
The key to preventing replay attacks is for the Web service to verify the uniqueness of incom-
ing request messages. The WS-Addressing specification describes a GUID-based message ID
that is one of several addressing headers that can be assigned to a SOAP message. WSE pro-
vides support for the WS-Addressing specification in general, and for addressing headers
specifically. Once again, the burden is on the Web service to store message correlation infor-
mation and to determine whether an incoming message has already been received. As with
other kinds of identifiers, the message ID does not in and of itself prevent replay attacks, but
it provides another simple, unique identifier for an incoming SOAP message.
Another type of message identifier is the sequence number, which stamps a message with
the sequential role that it plays in a business process. Sequence numbers are part of the WS-
Reliable Messaging specification and are designed to enable business orchestration, which
refers to a business process or workflow that spans multiple components. In SOAs, sequenced
messages are exchanged between multiple Web services, and the collective outcome repre-
sents the completion of the business workflow.
CHAPTER 7 ■ EXTENDED WEB SERVICES SECURITY WITH WS-SECURITY AND WS-SECURE CONVERSATION 161
701xCH07.qxd 7/17/06 1:23 PM Page 161
Sequence numbers provide an additional advantage for preventing replay attacks
because a message that contains a duplicate sequence number is automatically suspect.
Sequence numbers alone do not ensure uniqueness, but they will in conjunction with a
message ID.
Establish Trusted Communication with WS-Secure
Conversation
The WS-Secure Conversation specification allows Web services and clients to establish a
token-based secure conversation for the duration of a session. It is analogous to the SSL pro-
tocol that provides on-demand secure communications over the HTTP transport channel.
Secure conversations are essentially an efficiency mechanism to optimize the secure commu-
nication between a service and a client after the initial exchange of security credentials is over;
this is known as the handshake. Secure conversations reduce the need for frequent authenti-
cation between client and service.
In previous chapters, you saw how the WS-Security and WS-Policy family of specifications
combine to provide a comprehensive approach to securing Web services. Together these spec-
ifications provide an assortment of security options, including digital signatures, encryption
algorithms, and custom authorization schemes. We discussed these technologies in the con-
text of protective security, meaning that they protect messages in transit and keep unwanted
eyes from discovering sensitive information. This is certainly an important application of
these technologies and it needs no further explanation. But for the purpose of this chapter,
we need to expand the context within which to view these technologies. They are no longer
needed just for protective security; in a broader context, they are needed for establishing
trusted communications.
In the discussions so far, we have made the big assumption that the client and the Web
service automatically trust each other. By this, we mean the assumption that they both have
an equivalent confidence in the integrity of the security tokens they are using to sign, encrypt,
and otherwise secure their communications. For example, if a client and a Web service agree
to encrypt their messages using a digital X.509 certificate, they must both trust the source of
the certificate, and must be comfortable using the private and public keys that are generated
from the certificate. In a sense, both the client and the Web service have come to a mutual
agreement that they will offload the burden of proving trust to a (trusted!) third-party source,
which issues a digital certificate to act as the tangible record of that trust.
Of course, the issue is more complex than this. When it comes to certificates, for many of
us they are a necessary requirement for trusted communication. As clients, we may have all
the trust in the world in a service provider, but we still need to use a digital certificate for the
mechanics of signing and encrypting shared messages. We happen to be comfortable with
digital certificates for most communication requirements because they represent certified
trust. However, other client-service communications may be just as well off using a simpler
Username Token security token, which is based on a simple username-password combination
that gets hashed during transit. Luckily, the WSE implementation of the WS-Security specifica-
tion is flexible, and you have a choice of security token types to use for conducting trusted
communication.
CHAPTER 7 ■ EXTENDED WEB SERVICES SECURITY WITH WS-SECURITY AND WS-SECURE CONVERSATION162
701xCH07.qxd 7/17/06 1:23 PM Page 162
The point is that your preferred security tokens and your preferred hashing and encryp-
tion algorithms are simply a means to a bigger goal of establishing trusted communication,
otherwise known in the Web services world as secure conversation. There is no single correct
choice of technologies that you should always use. Instead, you need to be using those
technologies that are appropriate for establishing a trusted, secure conversation between
a given client and a Web service. The rules can change depending on who is doing the
communicating.
This chapter focuses on how you establish session-oriented, trusted communications
using the WS-Secure Conversation specification. The great thing about the WS- specifications
is that many of the concepts complement each other and build on each other. The under-
standing that you now have about WS-Security and WS-Policy will translate directly into the
concepts behind WS-Secure Conversation. By the end of this chapter, you will have a good
understanding of what constitutes secure conversation, and a broader appreciation for the
usefulness of the WS-Security family of specifications.
Overview of Secure Conversation
The WS-Secure Conversation (and WS-Trust) specification provides the means for a client and
a service to establish an optimized secure communication channel for a session, that is, an
established duration of time. Secure conversation uses a security token that is procured by a
service token provider following the initial handshake, or exchange of original security tokens,
by the service and client. The security token is used to encrypt and sign all subsequent SOAP
messages that are exchanged between the service and client. This process involves an initial
amount of overhead, but once the channel is established, the client and service exchange a
lightweight, signed security context token, which optimizes message delivery times compared
with using regular security tokens. The security context token enables the same signing and
encryption features that you are used to with regular security tokens.
Secure conversation is analogous to communications over the HTTPS protocol. HTTPS
establishes a secure channel for the duration of a session and ceases to be in effect once that
session is over. The classic example is an e-commerce transaction, in which you browse a cat-
alog over an unsecured channel, but then you establish a secure channel for the purpose of
completing a sales transaction with the vendor. The communication needs to be secure
because sensitive payment and order information is being exchanged, so the client and the
vendor need to establish a secured channel for as long as it takes to complete the transaction.
For performance reasons, the client does not need or even want to establish a continuous
secure session for every interaction with the vendor. HTTPS is useful for providing on-
demand secure communication for exactly as long as it is needed.
■Note HTTPS and WS-Secure Conversation differ in one important way: HTTPS is not typically used for
client authentication, whereas secure conversation is.
CHAPTER 7 ■ EXTENDED WEB SERVICES SECURITY WITH WS-SECURITY AND WS-SECURE CONVERSATION 163
701xCH07.qxd 7/17/06 1:23 PM Page 163