Apress Expert C sharp 2005 (Phần 11) potx
Bạn đang xem bản rút gọn của tài liệu. Xem và tải ngay bản đầy đủ của tài liệu tại đây (1.21 MB, 50 trang )
protected internal virtual void OnCurrentPrincipalChanged(
object sender, EventArgs e)
{
if (CurrentPrincipalChanged != null)
CurrentPrincipalChanged(sender, e);
}
I
t is both
v
irtual
a
nd raises a
C
urrentPrincipalChanged
e
vent, declared as follows:
public event EventHandler CurrentPrincipalChanged;
If the developer of a user control needs to respond to a login/logout event, they can either
override
OnCurrentPrincipalChanged() or handle the CurrentPrincipalChanged event. Either way,
they’ll be notified that the
CurrentPrincipal property of the Thread object has changed.
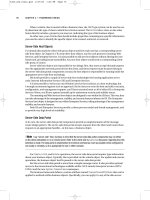
MainForm
The MainForm form is the core of the application in that it provides the menu and status bar, and
hosts the user controls for display to the user. It coordinates the flow of the entire application.
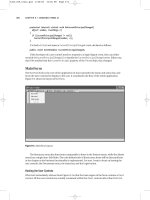
Figure 9-4 shows the layout of
MainForm.
The
R
esources menu has three items comparable to those in the Projects menu, while the Admin
menu has a single item: Edit Roles. The code behind each of these menu items will be discussed later
in the chapter as the business functionality is implemented. F
or no
w
, I want to focus on hosting the
user controls, the Documents menu, the status bar, and the Login button.
Hosting the User Controls
What isn
’
t immediately
obvious from Figure 9-4 is that the main region of the form contains a
Panel
control. All the user controls are actually contained within this Panel control rather than MainForm
CHAPTER 9 ■ WINDOWS FORMS UI474
Figure 9-4. M
ainForm layout
6323_c09_final.qxd 2/26/06 10:06 PM Page 474
itself. This is done so that resizing events can be handled more easily, and the overall hosting process
can be simplified.
The
Panel control’s Dock property is set to Fill, so it automatically fills the available space in the
form, even if the form is resized.
Loading/Adding User Controls
When a new user control is dynamically loaded (because the user chooses to view/edit a project,
resource, or role), it needs to be created, added to the host’s
Controls collection, positioned, and
sized to fit the client area of
MainForm. The same thing happens when MainForm is resized, since all
the user controls it contains need to be resized accordingly.
This process is split into two parts: adding a user control and showing a user control. The rea-
son for the split is that when a new user control is added, it must be displayed. But already-loaded
user controls also must be displayed through the Documents menu.
The
AddWinPart() method adds a user control to the Panel control:
private void AddWinPart(WinPart part)
{
part.CloseWinPart += new EventHandler(CloseWinPart);
part.BackColor = toolStrip1.BackColor;
Panel1.Controls.Add(part);
this.DocumentsToolStripDropDownButton.Enabled = true;
ShowWinPart(part);
}
Remember that all user controls will inherit from the WinPart base contr
ol—hence the naming
of the
AddWinPart() method and the type of the parameter.
The
CloseWinPart() method is hooked to handle the user control’s CloseWinPart event. I’ll dis-
cuss this method shortly—but for now, you should know that its purpose is to properly remove the
user control from
MainForm.
The user control’s
BackColor property is set to match the color scheme of MainForm. Then, the
user control is added to the
Controls collection of the panel. This effectively adds the user control
to the form. Then
ShowWinPart() is called to display the user control.
Finally, the Documents menu option is enabled. At this point, it’s known that there’s at least one
user control hosted by
MainForm, so the Documents menu should be available to the user.
The
ShowWinPart() method makes sure that the user control is properly positioned and sized;
then it makes it visible:
private void ShowWinPart(WinPart part)
{
part.Dock = DockStyle.Fill;
part.Visible = true;
part.BringToFront();
this.Text = "Project Tracker - " + part.ToString();
}
Remember that the Panel control’s Dock property is set to Fill, so the Panel control automati-
cally fills the available space—even when
MainForm is resized. The user control is contained within
the
Panel control and its Dock property is also set to Fill. This means that the user control is auto-
matically resized along with the
Panel control, so it always fills the client area of MainForm.
N
ext, the user contr
ol is made visible and is br
ought to the fr
ont: its z-or
der is set so that the user
control is on top of all other controls in the
Panel control. These two steps ensure that the user control
is visible and active.
Finally, the caption text of
MainForm itself is changed to r
eflect the
ToString() v
alue of the newly
active user contr
ol. I
f y
ou look back at F
igur
es 9-2 and 9-3, y
ou’ll notice that
MainForm displays the
CHAPTER 9 ■ WINDOWS FORMS UI 475
6323_c09_final.qxd 2/26/06 10:06 PM Page 475
name of the Project object being edited. You’ll see how this flows from the ToString() value of the
user control later in the chapter.
Removing User Controls
R
ecall how the
A
ddWinPart()
m
ethod sets up the
C
loseWinPart()
m
ethod to handle the user control’s
CloseWinPart event. That event is raised by the user control when it is closed, and MainForm uses the
event to properly remove the user control from the
Panel control’s Controls collection:
p
rivate void CloseWinPart(object sender, EventArgs e)
{
WinPart part = (WinPart)sender;
part.CloseWinPart -= new EventHandler(CloseWinPart);
part.Visible = false;
Panel1.Controls.Remove(part);
part.Dispose();
if (DocumentCount == 0)
{
this.DocumentsToolStripDropDownButton.Enabled = false;
this.Text = "Project Tracker";
}
else
{
// Find the first WinPart control and set
// the main form's Text property accordingly.
// This works because the first WinPart
// is the active one.
foreach (Control ctl in Panel1.Controls)
{
if (ctl is WinPart)
{
this.Text = "Project Tracker - " + ((WinPart)ctl).ToString();
break;
}
}
}
}
When a user control is removed, other work is required as well. The user control’s Dispose()
method is called and the caption text on MainForm is reset (because there’s almost certainly a new
activ
e user contr
ol no
w). I
f there’s no longer an active user control, then the caption text is set
accordingly.
Also notice that the
CloseWinPart event is unhooked. This is an important step, because
handling an event sets up an object reference behind the scenes, and failing to unhook events
can cause memor
y leaks (b
y keeping objects in memor
y when they ar
e no longer needed).
Resizing User Controls
When MainForm is resized, the Panel control’s Resize event is automatically raised. The following
code handles that event to resize all the hosted user controls:
private void Panel1_Resize(object sender, EventArgs e)
{
foreach (Control ctl in Panel1.Controls)
if (ctl is WinPart)
ctl.Size = Panel1.ClientSize;
}
CHAPTER 9 ■ WINDOWS FORMS UI476
6323_c09_final.qxd 2/26/06 10:06 PM Page 476
With the ability to add, remove, and resize user controls, the code in MainForm covers most of
the capabilities required. Of course, there’s the implementation of the Documents menu itself to
consider.
Documents Menu
The Documents menu is a drop-down menu listing all the active documents (user controls) currently
hosted by the main form. If there are no active user controls, then the menu is disabled. When the
u
ser selects an item from the list, that particular user control becomes the active user control.
The
DropDownOpening event is raised when the user clicks the Documents menu option to open
the list. Handling this event allows the code to populate the list
before it is displayed to the user:
private void DocumentsToolStripDropDownButton_DropDownOpening(
object sender, EventArgs e)
{
ToolStripItemCollection items =
DocumentsToolStripDropDownButton.DropDownItems;
foreach (ToolStripItem item in items)
item.Click -= new EventHandler(DocumentClick);
items.Clear();
foreach (Control ctl in Panel1.Controls)
if (ctl is WinPart)
{
ToolStripItem item = new ToolStripMenuItem();
item.Text = ((WinPart)ctl).ToString();
item.Tag = ctl;
item.Click += new EventHandler(DocumentClick);
items.Add(item);
}
}
Remember that the menu item is only enabled if there are one or more items in the Controls
collection of the Panel control. Notice that a reference to each user control is put into the Tag prop-
erty of the corresponding
ToolStripMenuItem object.
If the user clicks an item in the list, a
Click event is raised and handled to make the selected user
control the active control:
private void DocumentClick(object sender, EventArgs e)
{
WinPart ctl = (WinPart)((ToolStripItem)sender).Tag;
ShowWinPart(ctl);
}
The Tag pr
operty of the menu item references the user control associated with that item, so this
code needs only to cast the
Tag value and make the control visible by calling the ShowWinPart() method
discussed earlier.
This wraps up the code in
MainForm that deals with the user controls and the Documents menu.
N
ow let’s see how the status bar display and mouse cursor changes are handled.
Status Bar
MainForm has a StatusStrip control at the bottom, so the user can be informed about any long-
running activity that is occurring. Also, when a long-running activity is going on, the mouse cursor
should be changed to indicate that the application is busy.
CHAPTER 9 ■ WINDOWS FORMS UI 477
6323_c09_final.qxd 2/26/06 10:06 PM Page 477
An easy way to handle this is to create an object that implements IDisposable. This object
would update both the status display and mouse cursor, and then reset them when it is disposed.
The result is that anywhere in the UI, code can be written like this:
using (StatusBusy busy = new StatusBusy("Working…"))
{
// do long-running task here
}
When the object is created, it sets the status display on MainForm, and it resets the text when it is
disposed. Similarly, when the object is created, it sets the mouse cursor to a busy cursor, and resets
it when disposed.
To do this, it needs to be able to access the
MainForm object. Exposing the MainForm instance is
accomplished by adding a
static property named Instance to the MainForm class:
private static MainForm _main;
internal static MainForm Instance
{
get { return _main; }
}
The form’s constructor sets the _main field to a reference of the form:
_main = this;
This way, the MainForm object can be used by any code in the UI, including the StatusBusy
class:
public class StatusBusy : IDisposable
{
private string _oldStatus;
private Cursor _oldCursor;
public StatusBusy(string statusText)
{
_oldStatus = MainForm.Instance.StatusLabel.Text;
MainForm.Instance.StatusLabel.Text = statusText;
_oldCursor = MainForm.Instance.Cursor;
MainForm.Instance.Cursor = Cursors.WaitCursor;
}
// IDisposable
private bool _disposedValue = false; // To detect redundant calls
protected void Dispose(bool disposing)
{
if (!_disposedValue)
if (disposing)
{
MainForm.Instance.StatusLabel.Text = _oldStatus;
MainForm.Instance.Cursor = _oldCursor;
}
_disposedValue = true;
}
CHAPTER 9 ■ WINDOWS FORMS UI478
6323_c09_final.qxd 2/26/06 10:06 PM Page 478
public void Dispose()
{
// Do not change this code.
// Put cleanup code in Dispose(bool disposing) above
Dispose(true);
GC.SuppressFinalize(this);
}
}
When a StatusBusy object is created, it sets the status text and mouse cursor, storing the old
values for later use:
_oldStatus = MainForm.Instance.StatusLabel.Text;
MainForm.Instance.StatusLabel.Text = statusText;
_oldCursor = MainForm.Instance.Cursor;
MainForm.Instance.Cursor = Cursors.WaitCursor;
Then, when the object is disposed, the status text and cursor are reset to their previous values:
MainForm.Instance.StatusLabel.Text = _oldStatus;
MainForm.Instance.Cursor = _oldCursor;
This is one of the
simplest ways to implement powerful status notification and cursor handling
for the user in a Windows Forms UI.
Login Button
The final bit of common functionality implemented in MainForm allows the user to log into or out of
the application. It is important to realize that the
ProjectTracker application allows unauthorized
or guest users to view certain data, and so the user can interact with the application even if they
haven’t logged in.
The login process is triggered when the application first loads, and when the user clicks the
Login button on the menu. In both cases, a
DoLogin() method is called to handle the actual login/
logout behavior:
private void DoLogin()
{
ProjectTracker.Library.Security.PTPrincipal.Logout();
if (this.LoginToolStripButton.Text == "Login")
{
LoginForm loginForm = new LoginForm();
loginForm.ShowDialog(this);
}
System.Security.Principal.IPrincipal user =
Csla.ApplicationContext.User;
if (user.Identity.IsAuthenticated)
{
this.LoginToolStripLabel.Text = "Logged in as " +
user.Identity.Name;
this.LoginToolStripButton.Text = "Logout";
}
else
{
this.LoginToolStripLabel.Text = "Not logged in";
this.LoginToolStripButton.Text = "Login";
}
CHAPTER 9 ■ WINDOWS FORMS UI 479
6323_c09_final.qxd 2/26/06 10:06 PM Page 479
// reset menus, etc.
ApplyAuthorizationRules();
// notify all documents
foreach (Control ctl in Panel1.Controls)
if (ctl is WinPart)
((WinPart)ctl).OnCurrentPrincipalChanged(this, EventArgs.Empty);
}
Before doing anything else, this method ensures that the CurrentPrincipal property of the
Thread is set to an unauthenticated PTPrincipal object:
ProjectTracker.Library.Security.PTPrincipal.Logout();
This way, if the user’s credentials are invalid, she can at least use the application as an unauthen-
ticated user. Recall that the data portal requires that the principal object inherit from
Csla.Security.
BusinessPrincipalBase
. PTPrincipal meets this requirement, and so the current principal is set to an
unauthenticated
PTPrincipal object by calling the Logout() method.
Next, the text of the button on the menu is checked. If the text is
Login, then a login process is
initiated. The login process is actually handled by a
Login dialog form, which is shown to the user
as a modal dialog. That dialog prompts the user for their credentials and calls
PTPrincipal.Login()
(as implemented in Chapter 8) to validate them.
The result is that the
CurrentPrincipal property on the Thread object will either be an authen-
ticated
PTPrincipal or an unauthenticated PTPrincipal. The status of the principal object is used
to determine whether the user is logged in or not:
if (user.Identity.IsAuthenticated)
{
this.LoginToolStripLabel.Text = "Logged in as " +
user.Identity.Name;
this.LoginToolStripButton.Text = "Logout";
}
else
{
this.LoginToolStripLabel.Text = "Not logged in";
this.LoginToolStripButton.Text = "Login";
}
If the user was authenticated, then the button text is changed to Logout and the user’s name is
displayed in the menu. Otherwise, the button text is changed to
Login, and text indicating that the
user isn’t logged in is displayed.
I
n any case
, an
ApplyAuthorizationRules() method is called so that MainForm can update its
display based on the user’s identity (or lack thereof). Then all the active user controls are notified
that the principal has changed:
// reset menus, etc.
ApplyAuthorizationRules();
// notify all documents
foreach (Control ctl in Panel1.Controls)
if (ctl is WinPart)
((WinPart)ctl).OnCurrentPrincipalChanged(this, EventArgs.Empty);
Each user control is responsible for handling this event and responding appropriately. Recall that
the
WinPart base control implements the OnCurrentPrincipalChanged() method and subsequently
raises a
protected ev
ent to the code in the user control.
CHAPTER 9 ■ WINDOWS FORMS UI480
6323_c09_final.qxd 2/26/06 10:06 PM Page 480
The ApplyAuthorizationRules() method in MainForm is responsible for enabling and disabling
menu items. This method is somewhat long and repetitive, so I won’t show the whole thing, but here’s
the code to enable/disable one menu item:
this.NewProjectToolStripMenuItem.Enabled =
Project.CanAddObject();
Notice how the actual authorization check is delegated to the static method of the Project
business class. These methods were discussed in Chapter 8, and were implemented specifically to
enable scenarios like this. The idea is that
MainForm has no idea whether particular users or roles are
authorized to add
Project objects. Instead, the Project class itself has that knowledge, and MainForm
simply asks Project whether the current user is authorized.
The end result is good separation of concerns:
Project is concerned with whether users can and
can’t add objects, while
MainForm is concerned with the UI details of enabling and disabling controls.
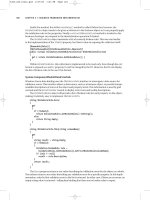
Login Form
The DoLogin() method in MainForm calls a Login dialog form to collect and authenticate the user’s
credentials. After gathering credentials from the user, this dialog form will call
PTPrincipal.Login()
to do the authentication itself.
Figure 9-5 shows the
Login form layout.
All the wor
k occurs when OK is clicked. At that point, the credentials entered by the user are
v
erified:
private void OK_Click(object sender, EventArgs e)
{
using (StatusBusy busy =
new StatusBusy("Verifying credentials "))
{
ProjectTracker.Library.Security.PTPrincipal.Login(
this.UsernameTextBox.Text, this.PasswordTextBox.Text);
}
this.Close();
}
Notice the use of the StatusBusy object to update the status text and mouse cursor. Also
notice the simplicity of this code. Since
PTPrincipal.Login() does all the work of authenticating
the user, there’s just not much work to do in the UI. This is a theme you’ll see throughout the rest
of the chapter
.
CHAPTER 9 ■ WINDOWS FORMS UI 481
Figure 9-5. Layout of the Login form
6323_c09_final.qxd 2/26/06 10:06 PM Page 481
Using Windows Integrated Security
If you wanted to use Windows integrated security, you wouldn’t need a login form because the
client workstation already knows the user’s identity. Instead, you would need to add a bit of code
to
MainForm so that as it loads, the CurrentPrincipal is configured with a WindowsPrincipal object.
The following code shows how to detect the authentication mode and adapt to use either
Windows or custom authentication appropriately:
private void MainForm_Load(object sender, EventArgs e)
{
if (Csla.ApplicationContext.AuthenticationType == "Windows")
AppDomain.CurrentDomain.SetPrincipalPolicy(
System.Security.Principal.PrincipalPolicy.WindowsPrincipal);
else
DoLogin();
if (DocumentCount == 0)
this.DocumentsToolStripDropDownButton.Enabled = false;
ApplyAuthorizationRules();
}
Calling SetPrincipalPolicy() to set the WindowsPrincipal option tells the .NET runtime to return
the current
WindowsPrincipal object for the CurrentPrincipal property of the Thread.
■Note If you use Windows integrated security, and you are using a remote data portal, you must make sure to
change the server configuration file to also use Windows security. If the data portal is hosted in IIS, the virtual root
must be set to disallow anonymous access, thereby forcing the client to provide IIS with the Windows identity from
the client workstation via integrated security.
Business Functionality
With the common functionality in MainForm, WinPart, StatusBusy, and Login covered, we can move
on to the business functionality itself. As I mentioned earlier, I’
ll walk through the
RolesEdit user
control, the
ProjectSelect dialog, and the ProjectEdit user control in some detail. ResourceSelect
and ResourcEdit are available in the download and follow the same implementation approach.
All of these forms and user controls will be created using the new data binding capabilities built
into
V
isual S
tudio 2005.
These capabilities allo
w the UI developer to literally drag-and-drop business
classes or properties onto the form to create the controls and set up data binding. The developer pro-
ductivity gained through this approach is simply amazing.
The detail edit forms (
ProjectEdit and ResourceEdit) will also make use of the
ReadWriteAuthorization and BindingSourceRefresh contr
ols cr
eated in Chapter 5, as w
ell as the
standar
d
Windows Forms ErrorProvider contr
ol. All thr
ee controls are
e
xtender contr
ols
, adding
important extra capabilities to the other controls on each form or user control.
Let’s start by looking at the business code in
MainForm that displays the other forms and user
controls.
MainForm
You’ve already seen the code in MainForm that exists to provide common functionality around the
user controls, authentication, and authorization. But the form also implements the menu options
to add, edit, and delete project and resource data, and to edit the list of roles.
CHAPTER 9 ■ WINDOWS FORMS UI482
6323_c09_final.qxd 2/26/06 10:06 PM Page 482
Displaying User Controls
Thanks to the common code discussed earlier, none of these menu options are difficult to imple-
ment. For instance, when the user chooses the menu option to edit the list of roles, the code simply
checks to see if the
RolesEdit user control is already loaded. If it is, the existing user control is made
active; otherwise, a new one is created and displayed:
private void EditRolesToolStripMenuItem_Click(
object sender, EventArgs e)
{
// see if this form is already loaded
foreach (Control ctl in Panel1.Controls)
{
if (ctl is RolesEdit)
{
ShowWinPart((WinPart)ctl);
return;
}
}
// it wasn't already loaded, so show it.
AddWinPart(new RolesEdit());
}
A slightly more complex variation occurs when the user clicks the menu to add a project or
resource. In both cases, a new instance of the appropriate business object is created and is passed
to a new instance of the appropriate user control. For example, when the user opts to add a new
project, this code is run:
private void NewProjectToolStripMenuItem_Click(
object sender, EventArgs e)
{
using (StatusBusy busy =
new StatusBusy("Creating project "))
{
AddWinPart(new ProjectEdit(Project.NewProject()));
}
}
Project.NewProject() is called to create the new Project object, and it is then passed to the con-
structor of a
ProjectEdit user control. That user control, now populated with data from the Project
object, is then
added to the list of activ
e user controls and is displayed.
Editing an Existing Object
Even more complex is the process of editing an existing project or resource. This is because in
both
cases
, the user must be pr
ompted to select the specific item to edit.
The
ProjectSelect and
ResourceSelect dialog forms are used to prompt the user for the particular object they wish to edit.
Here’s the code behind the menu option to edit a resource:
private void EditResourceToolStripMenuItem_Click(
object sender, EventArgs e)
{
ResourceSelect dlg = new ResourceSelect();
dlg.Text = "Edit Resource";
if (dlg.ShowDialog() == DialogResult.OK)
CHAPTER 9 ■ WINDOWS FORMS UI 483
6323_c09_final.qxd 2/26/06 10:06 PM Page 483
{
// get the resource id
ShowEditResource(dlg.ResourceId);
}
}
The code for editing a project is virtually identical, but obviously uses ProjectSelect instead.
This code displays the dialog using the
ShowDialog() method and checks its result value. If the
user clicks the OK button in the dialog, then the selected
ResourceId value is retrieved from the dia-
l
og form and is passed to a
S
howEditResource()
m
ethod.
ShowEditResource() checks to see if this resource is already visible in a user control, and if so, it
makes that the active user control. Otherwise, the method takes care of retrieving the business object
from the database and adding a new
ResourceEdit user control to MainForm:
public void ShowEditResource(int resourceId)
{
// see if this resource is already loaded
foreach (Control ctl in Panel1.Controls)
{
if (ctl is ResourceEdit)
{
ResourceEdit part = (ResourceEdit)ctl;
if (part.Resource.Id.Equals(resourceId))
{
// resource already loaded so just
// display the existing winpart
ShowWinPart(part);
return;
}
}
}
// the resource wasn't already loaded
// so load it and display the new winpart
using (StatusBusy busy = new StatusBusy("Loading resource "))
{
try
{
AddWinPart(new ResourceEdit(Resource.GetResource(resourceId)));
}
catch (Csla.DataPortalException ex)
{
MessageBox.Show(ex.BusinessException.ToString(),
"Error loading", MessageBoxButtons.OK,
MessageBoxIcon.Exclamation);
}
catch (Exception ex)
{
MessageBox.Show(ex.ToString(),
"Error loading", MessageBoxButtons.OK,
MessageBoxIcon.Exclamation);
}
}
}
CHAPTER 9 ■ WINDOWS FORMS UI484
6323_c09_final.qxd 2/26/06 10:06 PM Page 484
The code to find an existing ResourceEdit user control for this resource loops through all the
controls hosted in the
Panel control. Those items that are of type ResourceEdit are checked to see
if the
Resource object they are editing has the same Id value as the one just selected by the user.
Assuming no matching
ResourceEdit user control is found, the requested Resource object is
loaded from the database. This object is passed to a new
ResourceEdit user control, which is dis-
played in
MainForm:
AddWinPart(new ResourceEdit(Resource.GetResource(resourceId)));
Any exceptions are handled so that the user is notified about the problem; otherwise, the user
is free to move ahead and view or edit the
Resource object’s data.
Deleting an Object
Deleting a project or resource is a similar process. The user is prompted to select the item to delete.
Then they are asked if they are sure they want to delete the item, and finally the item is deleted. The
code to delete projects and resources is quite comparable; here’s the code to delete a
Resource object:
private void DeleteResourceToolStripMenuItem_Click(
object sender, EventArgs e)
{
ResourceSelect dlg = new ResourceSelect();
dlg.Text = "Delete Resource";
if (dlg.ShowDialog() == DialogResult.OK)
{
// get the resource id
int resourceId = dlg.ResourceId;
if (MessageBox.Show("Are you sure?", "Delete resource",
MessageBoxButtons.YesNo, MessageBoxIcon.Question,
MessageBoxDefaultButton.Button2) == DialogResult.Yes)
{
using (StatusBusy busy =
new StatusBusy("Deleting resource "))
{
try
{
Resource.DeleteResource(resourceId);
}
catch (Csla.DataPortalException ex)
{
MessageBox.Show(ex.BusinessException.ToString(),
"Error deleting", MessageBoxButtons.OK,
MessageBoxIcon.Exclamation);
}
catch (Exception ex)
{
MessageBox.Show(ex.ToString(),
"Error deleting", MessageBoxButtons.OK,
MessageBoxIcon.Exclamation);
}
}
}
}
}
CHAPTER 9 ■ WINDOWS FORMS UI 485
6323_c09_final.qxd 2/26/06 10:06 PM Page 485
Though this looks like a lot of code, there are really only a couple lines of importance—the rest
provide the user with feedback during the process or implement exception handling. To start with,
the user is prompted for the
Resource to delete:
ResourceSelect dlg = new ResourceSelect();
dlg.Text = "Delete Resource";
if (dlg.ShowDialog() == DialogResult.OK)
If the user clicks the OK button, the ResourceId value is retrieved from the ResourceSelect dialog
f
orm, and the user is asked if they are sure they want to delete the object. Assuming they confirm the
deletion, the
Resource class is used to delete the object:
Resource.DeleteResource(resourceId);
Because the business classes implement all the data access, the code in the UI is entirely focused
on the user experience—not on adding, retrieving, or deleting data.
RolesEdit
The RolesEdit user control allows an authorized user to edit the roles a resource can hold when
assigned to a project. The simplest way to create such data maintenance forms is with the
DataGridView control, because it can be directly bound to an editable root collection object such
as
ProjectTracker.Library.Roles.
Using a Business Class as a Data Source
To bind controls to an object, choose the Data ➤ Add New Data Source menu option in Visual Studio
to br
ing up the Data Source Configuration Wizard. Choose the Object option in the first step, as shown
in Figure 9-6.
CHAPTER 9 ■ WINDOWS FORMS UI486
Figure 9-6. Choosing an object data sour
ce
6323_c09_final.qxd 2/26/06 10:06 PM Page 486
The next step in the wizard is to select the business class that will be the data source. All types in
the current project and any referenced projects are listed. As shown in Figure 9-7, they are grouped
by namespace.
■Tip This wizard uses reflection to get this list, so the assemblies must be compiled before the classes will show
up in this list. Make sure to build your solution before running the Data Source Configuration Wizard.
At this point, y
ou can finish the wizard to add the class as a data source. The data sources appear
in the Data Sources window. If this window isn’t available, you can open it by using the Data
➤ Show
Data Sources menu item in Visual Studio. Figure 9-8 shows the Data Sources window after all the root
classes from Chapter 8 have been added as data sources.
N
otice ho
w the classes ar
e gr
ouped b
y namespace to help y
ou find them more easily. The illustra-
tion in F
igure 9-8 shows the
Roles class expanded to sho
w its properties. When doing drag-and-drop
data binding, you can drag entire classes or individual properties onto the form.
I
n the case of the
RolesEdit user contr
ol, the entir
e class was dragged onto the form, causing
Visual Studio to create a
DataGridView control. This control is bound to a rolesBindingSource object,
which was also automatically added b
y
V
isual Studio. The resulting display is shown in Figure 9-9.
■Tip The BindingSource controls appear in the component tray at the bottom of the designer in Visual Studio.
The new data binding in Windows Forms uses BindingSource controls. These controls sit
between all the data bound controls in the UI and the actual data source object—in this case,
Roles.
CHAPTER 9 ■ WINDOWS FORMS UI 487
Figure 9-7. Selecting the data source business class
6323_c09_final.qxd 2/26/06 10:06 PM Page 487
CHAPTER 9 ■ WINDOWS FORMS UI488
Figure 9-8. ProjectTracker.Library classes
in the Data Sources window
Figure 9-9. RolesEdit user control with data bound
DataGridView
The first thing you might notice about Figure 9-9 is the ToolStrip control across the top. This
BindingNavigator control is added by Visual Studio when you drag your first data source onto the
form, and it provides VCR-like behaviors for the associated
BindingSource control.
I don’t use any
BindingNavigator controls in the ProjectTracker application. To get rid of them,
you can select them in the designer or in the component tray at the bottom of the designer and press
the Delete key. Of course, there’s still the need for Save and Close buttons, so I add them as normal
Button controls. Figure 9-10 shows the resulting form layout.
Figure 9-10. Final layout of the RolesEdit user control
6323_c09_final.qxd 2/26/06 10:06 PM Page 488
Looking at Figure 9-10, you’ll see that data binding automatically picked up the properties from
the child object,
Role, contained within the Roles collection. Thanks to the [Browsable(false)] attrib-
utes applied to the CSLA .NET base class properties in Chapter 3, they are automatically ignored by
data binding, so only the actual business properties appear.
WinPart Code
One drawback with using a custom base control rather than UserControl is that Visual Studio
has no direct support for adding subclasses of a custom control. So what you need to do to add
a
WinPart-derived user control is choose the Project ➤ Add User Control menu option to add a
standard user control to the project. Then change the control to inherit from
WinPart instead of
UserControl. This means the declaration of RolesEdit looks like this:
public partial class RolesEdit : WinPart
The one bit of code that every subclass of WinPart needs to implement is the GetIdValue()
method. Since there can really only be one instance of EditRoles, it simply returns human-readable
text for display in the Documents menu:
protected internal override object GetIdValue()
{
return "Edit Roles";
}
This allows the WinPart base control to automatically handle the System.Object overrides for
the user control. For instance, this text is returned through the user control’s
ToString() method,
which is used by
MainForm to populate the display of the Documents menu.
Authorization
The RolesEdit authorization code is perhaps the simplest in the application. This user control doesn’t
support a read-only mode, so if the user isn’t authorized to edit the list of roles, then the form can’t be
available.
MainForm already disables the menu to prevent the user from getting to the user control if they
aren’t authorized, but there’s still the possibility that the user could log out while the user control is
loaded. In that case, the user control needs to close itself to prevent the now unauthorized user from
editing the roles. To implement this, the
CurrentPrincipalChanged event is handled:
private void RolesEdit_CurrentPrincipalChanged(
object sender, EventArgs e)
{
if (!Roles.CanEditObject())
this.Close();
}
The Roles class is asked whether the current user is authorized to edit the object, and if the user
isn’t authorized, then the user control is immediately closed.
Loading the Form
When the RolesEdit user control is loaded, it retrieves a new Roles object and makes it the current
data source for the
rolesBindingSource object; which in turn means it becomes the current data
source for the
DataGridView contr
ol:
CHAPTER 9 ■ WINDOWS FORMS UI 489
6323_c09_final.qxd 2/26/06 10:06 PM Page 489
private Roles _roles;
private void RolesEdit_Load(object sender, EventArgs e)
{
try
{
_roles = Roles.GetRoles();
}
catch (Csla.DataPortalException ex)
{
MessageBox.Show(ex.BusinessException.ToString(),
"Data load error", MessageBoxButtons.OK,
MessageBoxIcon.Exclamation);
}
catch (Exception ex)
{
MessageBox.Show(ex.ToString(),
"Data load error", MessageBoxButtons.OK,
MessageBoxIcon.Exclamation);
}
if (_roles != null)
this.rolesBindingSource.DataSource = _roles;
}
Most of this code exists to gracefully handle exceptions. Only two lines really matter:
_roles = Roles.GetRoles();
and
this.rolesBindingSource.DataSource = _roles;
The first retrieves the Roles object, and the second sets the data source using that object. Setting
the
DataSource property of the BindingSource control automatically connects all the data bound con-
trols on the form to the underlying data source object. The result is that data in the object is displayed
in the controls and is available for editing by the user.
Of course, the exception-handling code is important too.
If an exception occurs during the normal data portal processing, including within the
DataPortal_Fetch() method of the Roles object, a Csla.DataPortalException will be thrown. To get
at the original exception thrown by the business code, use the
BusinessException property. Remem-
ber that you can also use the
BusinessObject property to get a reference to the business object as it
was when the ex
ception was thrown—a fact that can be very useful for debugging.
I
t is far less likely that any other exception will be thrown, but I’ve included code showing how
to catch those exceptions as well. If you look at the client-side
DataPortal code from Chapter 4,
you’ll see that very little code executes that can throw exceptions other than a
DataPortalException,
so other types of exceptions typically only occur during development and debugging.
Sa
ving the Data
When the user clicks the Save button, the data needs to be saved. This is the most complex bit of
processing the UI developer should have to write. The complexity comes because the object may
be updated dur
ing the update process, and it is possible for the update process to fail part of the
way through—possibly leaving the object in an invalid or indeterminate state.
For instance, suppose Jeff edits a number of roles in the
Roles object. And suppose Marie has
edited the
last role in the list and saved her change. When Jeff saves his changes, all the data will be
saved (updating the
timestamp v
alues in each
Role object) until the update pr
ocess hits that last
CHAPTER 9 ■ WINDOWS FORMS UI490
6323_c09_final.qxd 2/26/06 10:06 PM Page 490
role. At that point, a concurrency issue is detected and an exception is thrown. The database trans-
action handles rolling back the
database to a valid state, but all those Role objects now have invalid
timestamp values in memory. Somehow the Roles object needs to be reset to the state it was in before
Save() was called.
Another issue occurs if the data portal is configured to run locally in the client process. In that
case, the object is
not serialized to a server, but rather is updated in place on the client. It is possible
that the business object could raise
PropertyChanged or ListChanged events while it is being updated,
c
ausing the UI to refresh during the data update process. Not only does that incur performance costs,
but sometimes code in the UI might respond to those events in ways that cause bugs.
To avoid these issues, the following process is followed:
1. Turn off events from the BindingSource controls.
2. Clone the business object.
3. Save the clone of the business object.
4. Rebind the BindingSource controls to the new object returned from Save(), if necessary.
5. Turn on events from the BindingSource controls.
Turning off and on the events from the
BindingSource controls ensures that any events from
the data source won’t be cascaded up to the UI during the update process. This is important, because
otherwise an exception will occur when rebinding the
BindingSource controls to the new object
returned from
Save(). As you’ll see, this rebinding requires that the DataSource property first be
set to
null, which of course isn’t a valid data source for the UI.
The reason for cloning the business object is so
an exact copy of the object can be saved to the
database. It is this exact copy of the object that has its fields changed during the update process. If
the update fails, then the
original object remains intact and unchanged, but if the update succeeds,
then the
Save() method returns the successfully updated version of the object, including any new
field values.
Here’s the code for the Save button on the
RolesEdit user control:
private void SaveButton_Click(object sender, EventArgs e)
{
this.rolesBindingSource.RaiseListChangedEvents = false;
Roles temp = _roles.Clone();
try
{
_roles = temp.Save();
this.Close();
}
catch (Csla.DataPortalException ex)
{
MessageBox.Show(ex.BusinessException.ToString(),
"Error saving", MessageBoxButtons.OK,
MessageBoxIcon.Exclamation);
}
catch (Exception ex)
{
MessageBox.Show(ex.ToString(), "Error saving",
MessageBoxButtons.OK, MessageBoxIcon.Exclamation);
}
finally
{
this.rolesBindingSource.RaiseListChangedEvents = true;
}
}
CHAPTER 9 ■ WINDOWS FORMS UI 491
6323_c09_final.qxd 2/26/06 10:06 PM Page 491
The first line of code turns off event processing for the BindingSource control:
t
his.rolesBindingSource.RaiseListChangedEvents = false;
You would do this for every BindingSource control on the form if there were more than one.
In
ProjectEdit, for instance, there are two such controls bound to editable data.
The next line of code creates a clone of the business object:
Roles temp = _roles.Clone();
This is easily done, since all CSLA .NET business objects automatically support the Clone()
method. Remember that this method copies the object and all child objects it contains. In this
case, it copies the
Roles object and all the Role objects in the collection.
Then the
copy of the object is saved:
_roles = temp.Save();
Notice that the result of the Save() method is stored in the original _roles field, which overwrites
the original value. If no exception occurs during the
Save() call, the original object is replaced by the
resulting updated object. Remember that most insert and update operations do change the object’s
data, at least updating the
timestamp values for concurrency.
If the user control was not immediately closed, you would rebind the
BindingSource object to
the new business object returned from the
Save() method by adding these lines of code immediately
after the
Save() method call:
this.rolesBindingSource.DataSource = null;
this.rolesBindingSource.DataSource = _roles;
You can’t simply set the DataSource property to a new object. You must first set the property
to
null, and then to the new object. If you don’t do this, the BindingSource will not bind to the
new object and will silently remain bound to the old object, resulting in hard-to-debug problems
in your application.
In this case, the form is closed immediately upon successfully saving the data, so the UI is not
rebound. Instead, the user control’s
Close() method is called:
this.Close();
The Save() call and closing of the user control (or rebinding of the BindingSource control)
occurs in a
try block. If an ex
ception occurs during the
Save() call, the _roles field will not be set
to a new value, meaning it will retain the original value it had to start with.
Additionally, in the case of an exception, the user control isn’t closed (or if the UI is being
rebinded, that rebinding won’t occur). This means that the
BindingSource control will still be
bound to the original, unchanged, object. This is exactly the desired behavior, since it means
that the UI contr
ols ar
e still bound to an object in a v
alid state (ev
en though it apparently can’t
be sav
ed for some reason). The
catch blocks contain code to display the ex
ception details to the
user as discussed earlier.
Finally, whether an exception occurs or not, event handling is reenabled for the
BindingSource
control:
this.rolesBindingSource.RaiseListChangedEvents = true;
This must occur for data binding to behave properly, either against the newly updated object,
or the or
iginal object in the case of an ex
ception.
CHAPTER 9 ■ WINDOWS FORMS UI492
6323_c09_final.qxd 2/26/06 10:06 PM Page 492
Simplified Saving with a Remote Data Portal
If you know that you’ll be using a remote data portal rather than running the data portal locally in
the client process, you can avoid some of the work I just discussed. This is because when you use
a remote data portal, the object is automatically copied from the client to the application server:
effectively doing the cloning for you.
In that case, the Save button code would look like this:
private void SaveButton_Click(object sender, EventArgs e)
{
this.rolesBindingSource.RaiseListChangedEvents = false;
try
{
_roles = _roles.Save();
this.Close();
}
catch (Csla.DataPortalException ex)
{
MessageBox.Show(ex.BusinessException.ToString(),
"Error saving", MessageBoxButtons.OK,
MessageBoxIcon.Exclamation);
}
catch (Exception ex)
{
MessageBox.Show(ex.ToString(), "Error saving",
MessageBoxButtons.OK, MessageBoxIcon.Exclamation);
}
finally
{
this.rolesBindingSource.RaiseListChangedEvents = true;
}
}
Notice that the Clone() method call is gone, and the original object in _roles is saved directly.
If this succeeds without an exception, a newly updated copy of the object is returned from
Save(),
and the
BindingSource controls are rebound to that new object.
But if an exception
does occur, then no new object is returned and the _roles field will continue
to point to the or
iginal object; as it was before
Save() was called! S
imilarly, an exception will prevent
the rebinding of the
BindingSource controls, so they continue to point to the original object as well.
Again, this alter
nate approach is valid if you
only use a r
emote data portal configuration. But in
that case, it is a good change to make since it avoids making an extra clone of the object before call-
ing
Save(), and so is better for performance.
If you are (or might be) using a local data portal configuration, you should manually clone the
object to ensure that the UI ends up bound to a valid object in the case of an exception during data
pr
ocessing.
Closing the Form
Since the _roles field is local to the RolesEdit user control, closing the user control is as simple as
calling the
protected Close() method:
private void CancelButton_Click(object sender, EventArgs e)
{
this.Close();
}
As you’ll see, more complex user controls like ProjectEdit require a bit more work before closing.
CHAPTER 9 ■ WINDOWS FORMS UI 493
6323_c09_final.qxd 2/26/06 10:06 PM Page 493
This completes the code in RolesEdit. The important thing to note about this form is the com-
parative simplicity of the code. It implements
GetIdValue(), loads the business object and makes it
a data source, and implements code to save the object. All the authorization, validation, and other
business logic is entirely in the business object, leaving the code in the UI to focus purely on user
interaction.
Project List
W
hen the user wants to edit or remove a project from the system, she’ll need to be presented with a
list of projects. The
ProjectList business object was created for this purpose, so the infrastructure
already exists to retrieve the project data. All the UI needs to do is provide a dialog box to display the
information.
The user may be prompted to select a project from the list in various places in the application,
so the dialog form will be very focused: it will simply display the list of projects and allow the user to
select one. This way, the form can be reused anywhere the user must choose a project. Figure 9-11
shows the layout of the
ProjectSelect form.
Displaying the Data
When the form is loaded, it populates its display with a list of projects:
private void ProjectSelect_Load(object sender, EventArgs e)
{
DisplayList(ProjectList.GetProjectList());
}
private void DisplayList(ProjectList list)
{
Csla.SortedBindingList<ProjectList.ProjectInfo> sortedList =
new Csla.SortedBindingList<ProjectList.ProjectInfo>(list);
sortedList.ApplySort("Name", ListSortDirection.Ascending);
this.projectListBindingSource.DataSource = sortedList;
}
CHAPTER 9 ■ WINDOWS FORMS UI494
Figure 9-11. Layout of the ProjectSelect form
6323_c09_final.qxd 2/26/06 10:06 PM Page 494
Notice how the DisplayList() helper method uses SortedBindingList to sort the results before
they are displayed:
Csla.SortedBindingList<ProjectList.ProjectInfo> sortedList =
new Csla.SortedBindingList<ProjectList.ProjectInfo>(list);
sortedList.ApplySort("Name", ListSortDirection.Ascending);
The user can also get a filtered list of projects. The NameTextBox control allows for optional
f
iltering of the displayed list. This value will be provided to the
G
etProjectList()
f
actory method
of
ProjectList when the associated button is clicked:
private void GetListButton_Click(
object sender, EventArgs e)
{
DisplayList(ProjectList.GetProjectList(NameTextBox.Text));
}
In this case, DisplayList() is passed a filtered ProjectList object, and its data is sorted and
displayed to the user.
Data Binding the ListBox
The primary control on the form is a simple ListBox that is data bound to the ProjectList object.
This binding was set up using drag-and-drop binding from the Data Sources window.
Recall that dragging the
Roles collection onto the designer resulted in a DataGridView control.
That is the default control, but you can change that in the Data Sources window before dragging the
data source onto the designer. Doing that requires customizing the list of controls available from
the Data Sources window. Figure 9-12 shows the Customize menu option you would use.
This option brings up a dialog in which you can specify which controls should be available in
the menu for y
our data sour
ce. You would then select that option from the list and drag the object
onto the form.
B
ut I think it is easier to use connect-the-dots data binding instead.
T
o do this, just drag a
ListBox control from the normal toolbox onto the designer. Size and position it as you desire, then
drag the
ProjectList object from the Data Sources window onto the already existing ListBox control.
Visual Studio adds a
projectListBindingSource control to the designer, and the data binding
pr
oper
ties of the
ListBox contr
ol ar
e automatically linked to that
BindingSource contr
ol.
Either approach is fine, and the end result is the same: your form has a
ListBox control that
is data bound to the
ProjectList business object. Figure 9-13 shows the Data properties for the
ListBox contr
ol.
CHAPTER 9 ■ WINDOWS FORMS UI 495
Figure 9-12. Customization option in the Data Sources window
6323_c09_final.qxd 2/26/06 10:06 PM Page 495
The DataSource pr
oper
ty points to the
projectListBindingSource contr
ol. Again, this follo
ws
the new data binding approach, with which UI controls are bound to
BindingSource controls, which
in tur
n are bound to the underlying data source itself.
Also notice the
DisplayMember and ValueMember properties. DisplayMember indicates the prop-
erty value from the data source that will be displayed to the user.
ValueMember indicates the property
from the data source that will be invisibly maintained for each item in the
ListBox control.
The
ListBox control has a SelectedValue property that you can use to get the ValueMember value
for the currently selected item in the
ListBox. This makes it very easy to retrieve the Id value for the
project that the user selected from the list.
Selecting a Project
When ProjectSelect is displayed, it presents the user with a list of projects. At this point, the user
can either select one and click OK, or click Cancel. Either way, the
DialogResult property is set and
the form is closed. For instance, here’s the code for the Cancel button:
private void Cancel_Button_Click(object sender, EventArgs e)
{
this.Close();
}
The DialogResult property is set to Cancel (because the DialogResult property of the Cancel
button is set to
Cancel) and the form is closed. The code that displayed this dialog in the first place
can r
etr
iev
e the
DialogResult v
alue like this:
if (dlg.ShowDialog() == DialogResult.OK)
The DialogResult value from the dialog form’s code flows through as the result of the
ShowDialog() method call in this calling code.
CHAPTER 9 ■ WINDOWS FORMS UI496
Figure 9-13. Data properties for the ListBox control
6323_c09_final.qxd 2/26/06 10:06 PM Page 496
If the user clicks the OK button, things are a bit more interesting. The code behind the OK but-
ton stores the
SelectedValue property from the ListBox control, sets the DialogResult value, and
closes the form:
private Guid _projectId;
private void OK_Button_Click(object sender, EventArgs e)
{
_
projectId = (Guid)this.ProjectListListBox.SelectedValue;
this.Close();
}
The value of SelectedValue needs to be stored so it can be retrieved by the calling code. After
all, the reason this
ProjectSelect dialog was called in the first place was to allow the user to select
that value! The OK button’s
DialogResult property is set to OK, indicating that the user clicked the
OK button, and then the form is closed to return control to the code that called the dialog.
The final bit of code is a read-only
ProjectId property:
public Guid ProjectId
{
get { return _projectId; }
}
It is important to realize that closing a form doesn’t destroy the object; it merely causes the form
to no longer be displayed. This means that the code that created and displayed the
ProjectSelect
dialog still has a valid reference to the ProjectSelect dialog object, even after it has been closed. The
calling code can then retrieve the selected
ProjectId value, somewhat like this:
Guid projectId;
using (ProjectSelect dlg = new ProjectSelect())
{
if (dlg.ShowDialog() == DialogResult.OK)
{
projectId = dlg.ProjectId;
}
}
With this small bit of effort, the ProjectSelect dialog is complete and can be used any time the
user needs to select a project. The form is highly reusable, because
ProjectSelect doesn’t care what’s
done with the selected value; it simply allows the user to select a project.
Project Edit
The final item I’ll cover in detail is the ProjectEdit user control. In some ways, this is like RolesEdit,
because it inherits from
WinPart and is hosted in MainForm. But the goal here is to show how a detail
form can be created, along with using a
DataGridView for editing child objects.
Figure 9-14 shows the layout of the
ProjectEdit user control.
As y
ou can see
, this for
m has a set of
Label and TextBox contr
ols so the user can view and edit
information in the
Project object itself. It also uses a DataGridView control to display the
ProjectResource objects. That DataGridView will also allow the user to change the role a resource
plays on a pr
oject. Additionally, the values in the
FullName column will be display
ed as hyperlinks to
make it easy for the user to bring up the associated
ResourceEdit user control for that resource.
Implementing the functionality behind this form is more complex than
RolesEdit or
ResourceSelect. But still, the focus is entirely on user interaction and the flow of the UI, not on
author
ization,
v
alidation, or other business behaviors already implemented in the business objects.
CHAPTER 9 ■ WINDOWS FORMS UI 497
6323_c09_final.qxd 2/26/06 10:06 PM Page 497
Creating the Controls
The controls shown in Figure 9-14 were all added using drag-and-drop data binding. The Label and
TextBox controls were added by dragging the Project object from the Data Sources window onto the
designer, after setting some options in the Data Sources window.
Binding to the Project Class
Figure 9-15 shows the Data Sources window with the Projects node expanded and being changed to
create a details form.
CHAPTER 9 ■ WINDOWS FORMS UI498
Figure 9-14. Layout of the ProjectEdit user control
Figure 9-15. Project node ready to create a details form
6323_c09_final.qxd 2/26/06 10:06 PM Page 498